Harbor Freight Tools 91006 User manual

Digital Floor SafeDigital Floor Safe
Digital Floor Safe
1.5 cu. ft.1.5 cu. ft.
1.5 cu. ft.
ASSEMBLY AND OPERATING INSTRUCTIONS
3491 Mission Oaks Blvd., Camarillo, CA 93011
Visit ourWeb site at http://www.harborfreight.com
Copyright©2004 byHarborFreightTools®. Allrightsreserved.Noportion of
thismanualor anyartwork contained hereinmaybe reproduced inanyshape
or form without the express written consent of Harbor FreightTools.
For technical questions and replacement parts, please call 1-800-444-3353
91006

SKU 91006 Page 2
SaveThis Manual
Youwill need the manual forthe safetywarningsandprecautions,assembly
instructions, operating and maintenance procedures, parts list and diagram. Keep
your invoice with this manual. Write the invoice number on the inside of the front
cover. Keep the manual and invoice in a safe and dry place for future reference.
Safety Warnings and Precautions
WARNING: When using safe, basic safety precautions should always be
followed to reduce the risk of personal injury and damage to equipment.
Read all instructions before using this safe!
1. Keep work area clean. Cluttered areas invite injuries.
METINOITPIRCSED
snoisnemiDllarevOD"31xW"71.41xH"28.22
snoisnemiDedisnID"52.11xW"57.21xH"52.81
yticapaCtoofcibuc5.1
noitcurtsnoC gnisuohetalpleets.ag9 emarfroodetalpleets.ag6 roodleets.ag5
serutaeFdapyeK
tesedocyekB&A,9-0 "NEPO"edocDELneerG "egnahCyrettaB"edocDELdeR "detpeccAegnahC"edocDELwolleY
syeKycnegremEsyekedirrevoycnegreme2
roiretnI roolfdeddaP flehselbatsujdA
,tnemecalP gnitnuoM ;sleehwelbavomeR4 detnuomllawebnaC)dedulcnitonerawdrah(
hsiniFtaocredwopyargkraD
thgieW.sbl5.67
NOTE: Harbor FreightTools is not responsible for the loss
of any property stored within this safe due to theft,
fire, or any other circumstance.
Specifications
REV 05/04

SKU 91006 Page 3
2. Observe work area conditions. Do not use safe in damp or wet locations.
Don’t expose to rain. Keep work area well lit. Do not use electrically powered
safes in the presence of flammable gases or liquids.
3. Keep children away. Children must never be allowedin the workarea. Do not
let them handle safe without supervision.
4. Safe must be mounted in a dry location to inhibit rust. Always keep safe
locked and keep override keys out of reach of children.
5. Use the right safe for the job. Do not attempt to use a small safe to do the
work of a larger safe. There are certain applications for which this safe was
designed. Do not modify this safe and do not use this safe for a purpose for
which it was not intended.NOTE: This is not a fire-resistant safe.
6. Do not overreach. Keep proper footing and balance at all times during
installation.
7. Maintain safe with care. Keep safe dry and clean for better and more reliable
performance.The handle and keypad must be kept clean, dry, and free from oil
and grease at all times.
8. Stay alert. Watch what youare doing, use common sense.Do notoperateany
safe when you are tired or impaired.
9. Check for damaged parts. Before using any safe, any part that appears
damaged should be carefully checked to determine that it will operate properly
and perform its intended function. Check for alignment and binding of moving
parts; any broken parts or mounting fixtures;and any other condition that may
affect proper operation. Any part that is damaged should be properly repaired
or replaced by a qualified technician.Do not use the safe if any switch does not
operate properly.
10. Replacement parts and accessories. When servicing, use only identical
replacement parts. Use of any other parts will void the warranty. Only use
accessoriesintendedforusewiththissafe.Approvedaccessories are available
from Harbor Freight Tools.
11. Do not install safe if under the influence of alcohol or drugs. Readwarning
labels on prescriptions to determine if your judgment or reflexes are impaired
while taking drugs.If there is any doubt, do not attempt to install the safe.
12. Maintenance. For your safety, service and maintenance should be performed
regularly by a qualified technician.
Warning:The warnings,cautions,and instructions discussed in this instruction
manual cannot cover all possible conditions and situations that may occur. It
mustbeunderstoodby the operator thatcommon senseand caution are factors
which cannot be built into this product, but must be supplied by the operator.

SKU 91006 Page 4
Features include:
Large1.5cu.ft.capacity,Solidsteel heavy
duty construction, Concealed, tamper-
proof hinges, Double lock with key and combination, Easy to use electronic keypad,
Removable wheels, Adjustable shelf, Padded floor
When unpacking, check to make sure
the following parts are included.
1.5 cu.ft.capacity floor safe
2 Override keys
Adjustable shelf
4 removable wheels/bolts, cotter pins (in
bag), 4‘C’batteries
Override keyhole cover
If any parts are missing or broken,
please call Harbor Freight Tools at the
number on the cover of this manual.
Unpacking
Operation
This safe is ideal for home and business use.It may be used as a roll-about with the
included casters, or may be bolted to the wall for more permanent installation.
1. To electronically open the safe: Input the numbers “159” on the electronic
keypad, then press the “A” key. Once the green light comes on, turn the knob.
Then, turn the handle and pull the door open.NOTE:The knob must be turned
within 5 seconds of the green light coming on. If the knob is not turned, the
green light will go out, and the code must be reentered.
2. To mechanically open the safe: In case the batteries have not been installed
or are worn out, you may open the safe using one of the Override Keys.Gently
detachthefrontpanel.Thiswillexpose a key-operatedlock.Insert the Override
Key into the lock and turn. Turn the knob, then the handle, and pull the door
open.Important reminder: Never lock your Override Keys into the safe.Store
them separately in a safe place.
Knob
Override Key
Override Cover
Key Pad
Green LED Red LED Yellow LED
Wheel Assembly
Note: Wheels can be easily installed.
Place the Safe on its side for easy access
to the bottom of the Safe. Assemble each
wheel using the included wheel axles.
Secure each wheel in place using Cotter
Pin. (See photo).
REV 09/04
Wheel
Cotter Pin
Wheel Axle

SKU 91006 Page 5
4. To change the code: Your safe comes
preset with the default code of “159-A”.
To change the code, first open the safe.
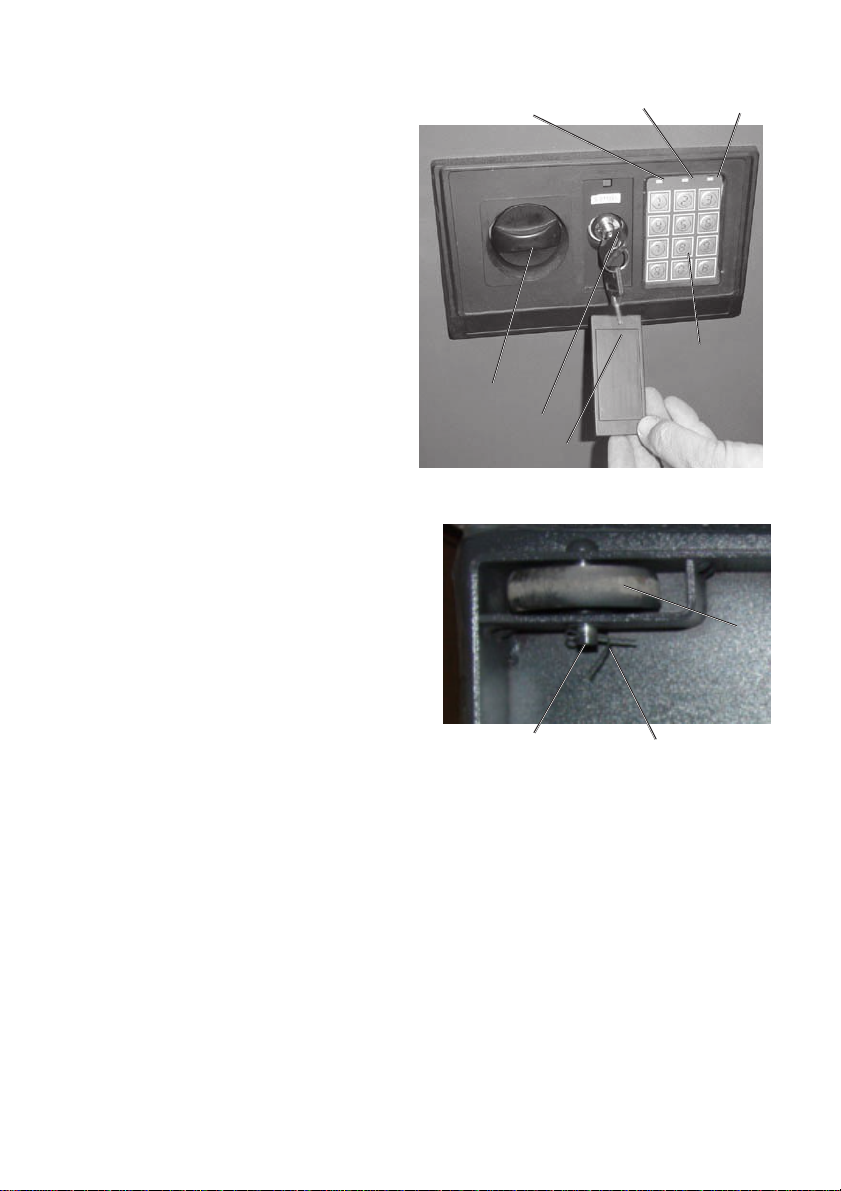
Onthe inside of the doornearthehinge,
thereisasmallred“reset”button.Press
this button until the Yellow LED on the
frontpanellightsup.Now,inputyournew
code up to 8 characters, followed by
either“A”or“B”.TheYellowLEDwillflash
toindicatethatyournewcode has been
accepted. Warning: If the Yellow LED
does not flash, the code has not been
accepted, and you must start over.
NOTE: Be sure to test your new
combination before closing the door.
NOTE:Be sureto havetheOverride Key
available when setting a new
combination or changing batteries, in
case the door doesn’t open.
5. For more secure installation, you may bolt the safe to a wall or other
vertical surface.Positionthe safewhereyouwantit, and notethetwo mounting
holes in the back wall of the safe. Mark the location of the mounting holes on
the wall using a pencil or other marker. Move the safe aside, and drill suitable
pilot holes in the wall.These should be just smaller than the diameter of the
bolts to be used (hardware not included).Reposition the safe, and secure the
bolts through the safe back into the wall. WARNING: Do not try to hang or
suspend the safe using these bolts. For best results the weight of the safe
should be supported on its wheels on the floor or other suitable strong surface.
6. To adjust the shelf: First, remove all items from the shelf.Lift the sides of the
shelfup.Thiswilldisengagethemountingtabson each corner of the shelf from
thesupports.Repositiontheshelf in the desired location, making sure itislevel.
Engage the tabs on all for corners of the shelf with the supports.Gently press
the shelf downward, engaging the tabs into the supports.You may now replace
your property on the shelf.
3. To close and lock the safe: Closethedoorand turnthehandle. Then, turnthe
knob in the opposite direction. Pull the door gently to be sure it is properly
locked.The safe is now closed and locked.
Reset Button
REV 05/04 REV 09/04

SKU 91006 Page 6
Maintenance
1. To install the batteries: Open the safe door.The
battery compartmentis located on the inside of the
safe door. Slide the battery cover off the
compartment.Removetheoldbatteries,and install
4 new ‘C’ batteries in their place. Be sure to align
thepolarityofthebatteriesasindicatedin thebattery
compartment. Replace the battery compartment
cover. Reset the code - see instructionson page 5.
2. Low battery power warning: TheredLEDlighton
thekeypadwill light when the batteriesweardown.
Whenyouobservethered LEDlighton,immediately
replace the batteries. To do this, follow the
instructions above.
3. Protect the safe from moist or wet conditions.
This may cause electronic fault in the keypad, or
corrosion of the steel construction.
4. Occasionally wipe the safe and keypad with a soft dry cloth or brush to
removedust.
5. Occasionally apply a small
amount of light oil or lock
lubricant to the mechanical lock
mechanism. Be careful not to get
any oil or other liquids on or near
the electronic mechanism.
6. Occasionally apply a small
amount of oil to the wheel axles.
7. Occasionally vacuum or brush
dust from the carpet lining of the
safe.
BatteryCompartment
REV 05/04

SKU 91006 Page 7
PLEASE READTHE FOLLOWING CAREFULLY
THE MANUFACTURER AND/OR DISTRIBUTOR HAS PROVIDED THE PARTS DIAGRAM
IN THIS MANUAL AS A REFERENCE TOOL ONLY. NEITHER THE MANUFACTURER
NOR DISTRIBUTOR MAKES ANY REPRESENTATION OR WARRANTY OF ANY KIND TO
THE BUYER THAT HE OR SHE IS QUALIFIED TO MAKE ANY REPAIRS TO THE
PRODUCT OR THAT HE OR SHE IS QUALIFIED TO REPLACE ANY PARTS OF THE
PRODUCT. IN FACT, THE MANUFACTURER AND/OR DISTRIBUTOR EXPRESSLY
STATES THAT ALL REPAIRS AND PARTS REPLACEMENTS SHOULD BE UNDERTAKEN
BY CERTIFIED AND LICENSED TECHNICIANS AND NOT BY THE BUYER.THE BUYER
ASSUMES ALL RISK AND LIABILITY ARISING OUT OF HIS OR HER REPAIRS TO THE
ORIGINAL PRODUCT OR REPLACEMENT PARTS THERETO, OR ARISING OUT OF HIS
OR HER INSTALLATION OF REPLACEMENT PARTS THERETO.
NOTE: Some parts are listed and shown for illustration purposes only
and are not available individually as replacement parts.
Parts List
1. Emergency Key 4. Shelf
2. Front Panel 5. Wheels/Axles/Cotter Pins
3. Knob 6. Handle
Assembly Drawing
REV 05/04 REV 09/04
Table of contents
Other Harbor Freight Tools Safe manuals
Popular Safe manuals by other brands

Phoenix
Phoenix Neptune HS1050 Base Fixing Instructions & Guarantee Registration

Yale
Yale YSS-250-EB1 installation instructions

Barska
Barska AX13500 user manual

Vaultek
Vaultek LifePod instruction manual

Phoenix
Phoenix SS0800K Instructions & Guarantee Registration

TENAMIC
TENAMIC HB Series instruction manual