Induro PHQ Series User manual
PHQ–SERIES PANHEAD
OPER AtINg INStRuctIONS
INDURO Camera Support Gear | 8 Westchester Plaza, Elmsford, NY 10523 | T 914-347-3300 | F 914-347-3309 | info@indurogear.com | indurogear.com
Thank you for making Induro your choice for
professional photographic gear. Your Induro gear
is manufactured to provide years of dependable
service. In order to obtain optimum satisfaction
and performance we suggest that you carefully
read these instructions and provide them to
anyone who may also use your Induro gear.
USER NOTICE
Do not exceed the maximum specied load c
capacity (see specications on the package
label or visit www.indurogear.com).
Always ensure that all Panhead locks are c
tightly engaged before mounting any gear.
Do not use any Panhead below c
temperatures of −4°F or above +158°F
(−20°C / +70°C).
Always clean and dry any Panhead after c
it has been exposed to wet, dusty, sandy
or salty conditions. Your Panhead is not
recommended for use in salt water. If
required, clean Panhead using a mild soap
solution applied with a soft cloth, rinse
with fresh water and dry with soft towel.
Remove any dust, dirt or sand from all
locks and all moving parts.
Do not leave any Panhead in the sun c
for prolonged periods and avoid high
temperature exposure.
Avoid leaving any Tripod or Monopod c
unattended in areas where people could
trip over the gear and get hurt.
Remove camera, lens, and all gear from c
any Tripod or Monopod when transporting.
For your safety, don’t let your Induro c
gear come in contact with any electrical
power source.
Specifications and design are subject to change without notice.
All tradenames, logos, and brand references are the respective trademarks of their owners.
SETUP
Head Mounting
Install by screwing the head clockwise onto
the 3/8" mounting thread of the top plate of
the Tripod. Once it is hand tight, if available on
the tripod, secure by fully tightening the Head
Locking Screw(s) from below.
OPERATION
Five-way positioning of camera and lens
movement is directly controllable on the PHQ
Series Panheads. Two comfortable, foldable
Handles provide both movement and locking of
front to rear Tilt, and side to side Tilt. A separate
Locking Knob permits the entire Head assembly to
move freely within a 360° rotational adjustment on
the Pan Base and another Locking Knob permits
the Top Platform assembly to move freely within
a 360° rotational adjustment on the tilted axis of
the head. Additionally, the Quick Release plate can
slide perpendicular to the rotational axis.
Universal Quick Release Plate System
The PHQ-Series Panheads feature an indexed
Universal Arca-Swiss style Quick Release Plate
system. It offers a quick method of mounting or
releasing a Camera or Equipment from the Head.
It’s important that the correct Quick Release
Plate be used along with the proper mounting
screw (1/4–20 is included as the standard size but
spare 1/4–20 and 3/8 plates of various lengths
are available as accessories).
The Mounting Screw requires an Allen Key which
is included (some screws also have a coin slot).
Extra Plates are recommended as you can screw
one to each Camera or Lens for even greater
convenience when rapidly mounting and
dismounting gear. And because of compatibility
with the Universal Arca-Swiss style system,
most plates and special brackets from other
manufacturers can be used as well.
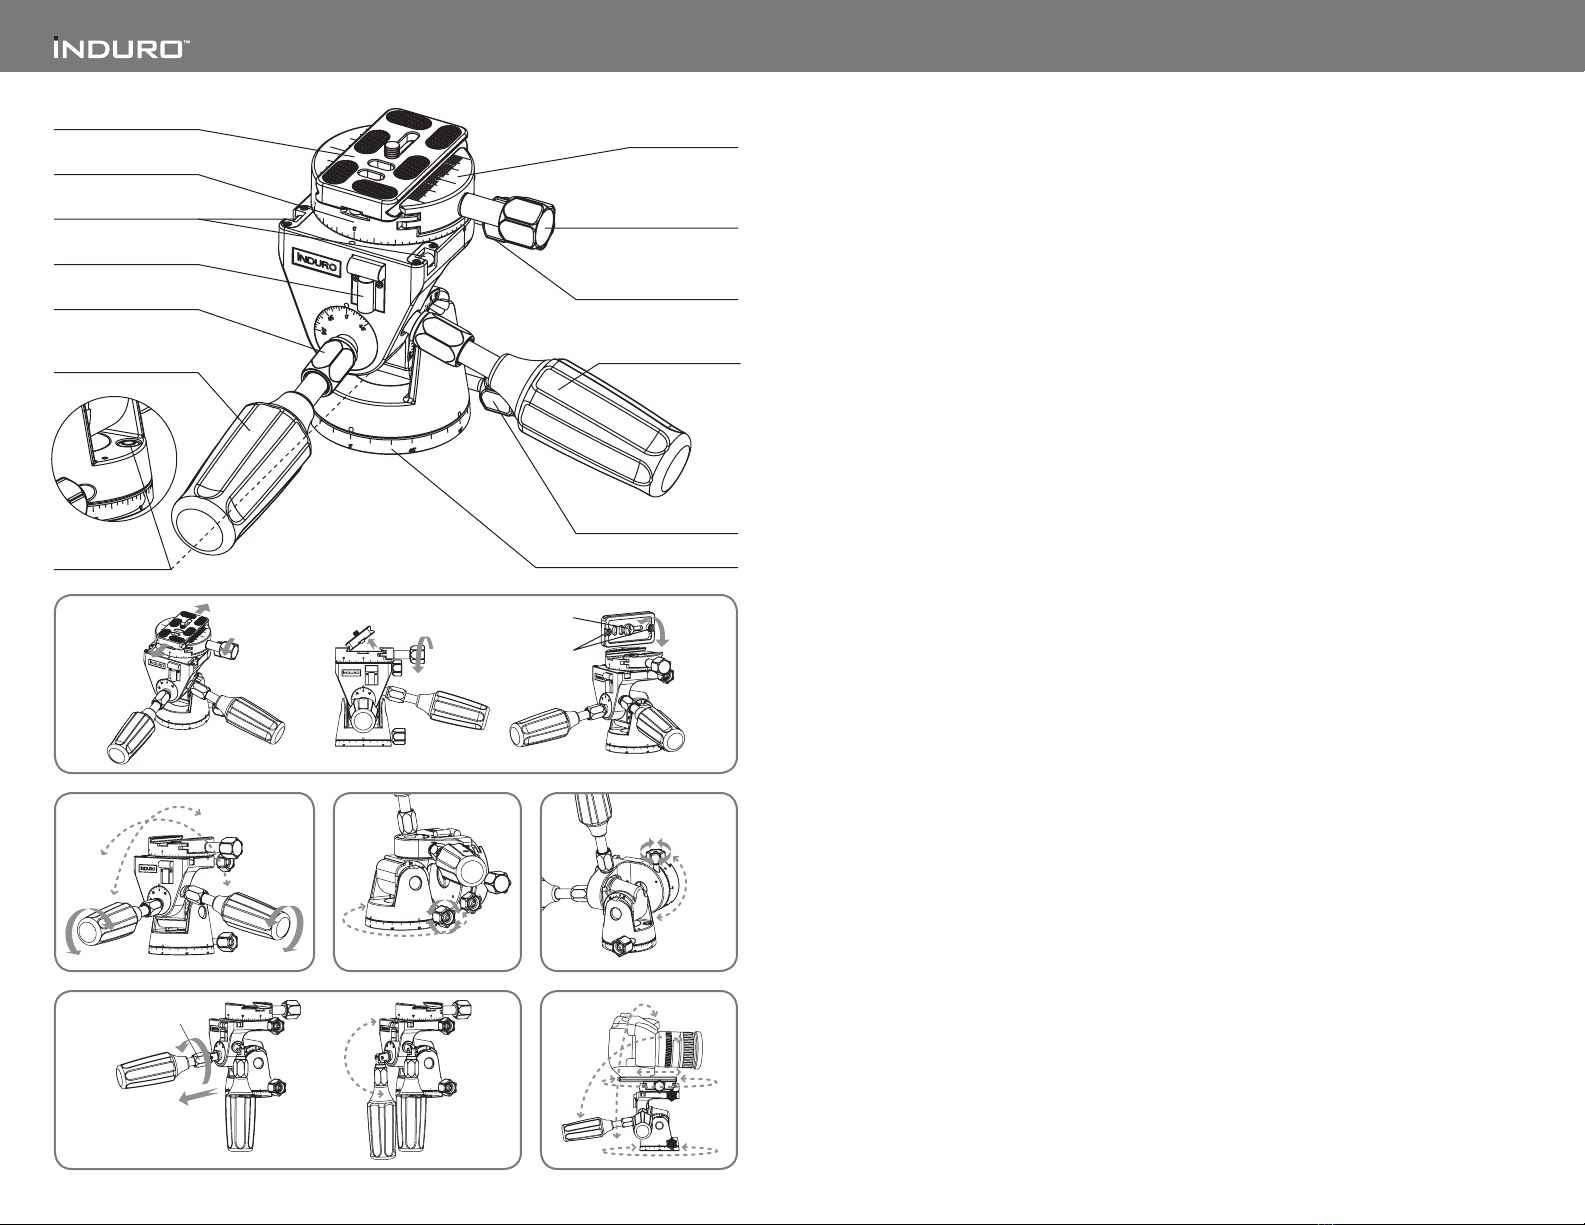
Quick Release Lock (FIGURE 1)
When used properly, and with a featured Quick
Release Plate or Accessory, the Quick Release
Lock offers two levels of security for your gear.
To remove the Quick Release Plate, turn the
Quick Release Locking Knob counter-clockwise.
A partial opening of the clamping mechanism
allows the Quick Release Plate to slide on the
Mounting Platform for proper balance and
positioning. Two removable Stop Screws on the
bottom of a featured Quick Release Plate provide
this rst level of security. An additional counter-
clockwise turn of the Quick Release Locking Knob
opens the clamp fully so that the Quick Release
Plate can be tilted out to be removed. Reverse the
process and tighten the Quick Release Locking
Knob to secure the Quick Release Plate.
Stop Screws (2)
Mounting Screw
1
135°
105°
2
360°
3
360°
4
Locking Collar Nut
5
135°
105°360°
360°
6
Locking Collar Nut
Front to Rear Tilt
Control/Lock Handle
Quick Release Plate
Rotating Top Platform
Quick Release
Plate Index
Quick Release
Locking Knob
Top Platform Pan
Control/Lock Knob
Rotating Pan Base
Base Pan
Control/Lock Knob
Side to Side Tilt
Control/Lock Handle
Dual Bubble Level
Single Bubble Levels (2)
Base Single
Bubble Level
NOTE: Always hold on rmly to balance
the weight of the camera when making any
movement adjustments.
Tilt Controls (FIGURE 2)
Front to Rear Angle or Tilt adjustments can be
easily accomplished by rst loosening the Front to
Rear Tilt Control Handle (be sure to hold on rmly
to balance weight of the camera). Position as
required and then tighten Handle securely. The same
Control and Lock are available on the other axis for
Side to Side Angle or Tilt adjustments by using the
Side to Side Tilt Control Handle. Bubble Levels can
be viewed on all sides while making adjustments.
NOTE: Do not over tighten the Tilt Control Locks
as this could damage the locking mechanism.
Base Pan Control (FIGURE 3)
Horizontal rotation or Panning can be easily
accomplished by rst loosening the Base Pan Lock
Knob and then rotating the Head on the Pan Base.
Once in position tighten the Base Pan Lock securely.
NOTE: Do not over tighten the Base Pan Lock as
this could damage the locking mechanism.
Top Platform Pan Control (FIGURE 4)
Similar to the Base Pan Control the Top Platform
Pan Control Knob allows rotation or Panning of
the Top Platform at any axis of Panhead Tilt. To
accomplish this rst loosen the Top Platform Pan
Lock Knob and then rotate the Top Platform. Once in
position tighten the Top Platform Pan Lock securely.
NOTE: Do not over tighten the Top Platform Pan
Lock as this could damage the locking mechanism.
Folding Tilt Control Handles (FIGURE 5)
Both Tilt Control Handles can easily fold down
along the sides of the PHQ Head to make packing
and transport much more convenient. To prepare
for transport (without a camera mounted), rmly
hold the Handle and rotate the Locking Collar Nut
counter-clockwise until you can slide it back on
the shaft exposing the joint and allowing it to bend.
Reverse the procedure to secure the Handle for
normal operation.
Quintaxial Camera Control (FIGURE 6)
A unique feature of the PHQ head is the
exceptional level of calibrated adjustments,
and control of camera and lens positioning on
ve axis of movement. This offers exceptional
convenience for studio, architectural and nature
photographers. And, when used in combination
with longer plates and other specialized Arca-
Swiss compatible Quick Release components
(which allow for nodal point positioning), the
capability extends to panoramic, QTVR and
Spherical photography as well.


