Made in Czech Republic
Programming /
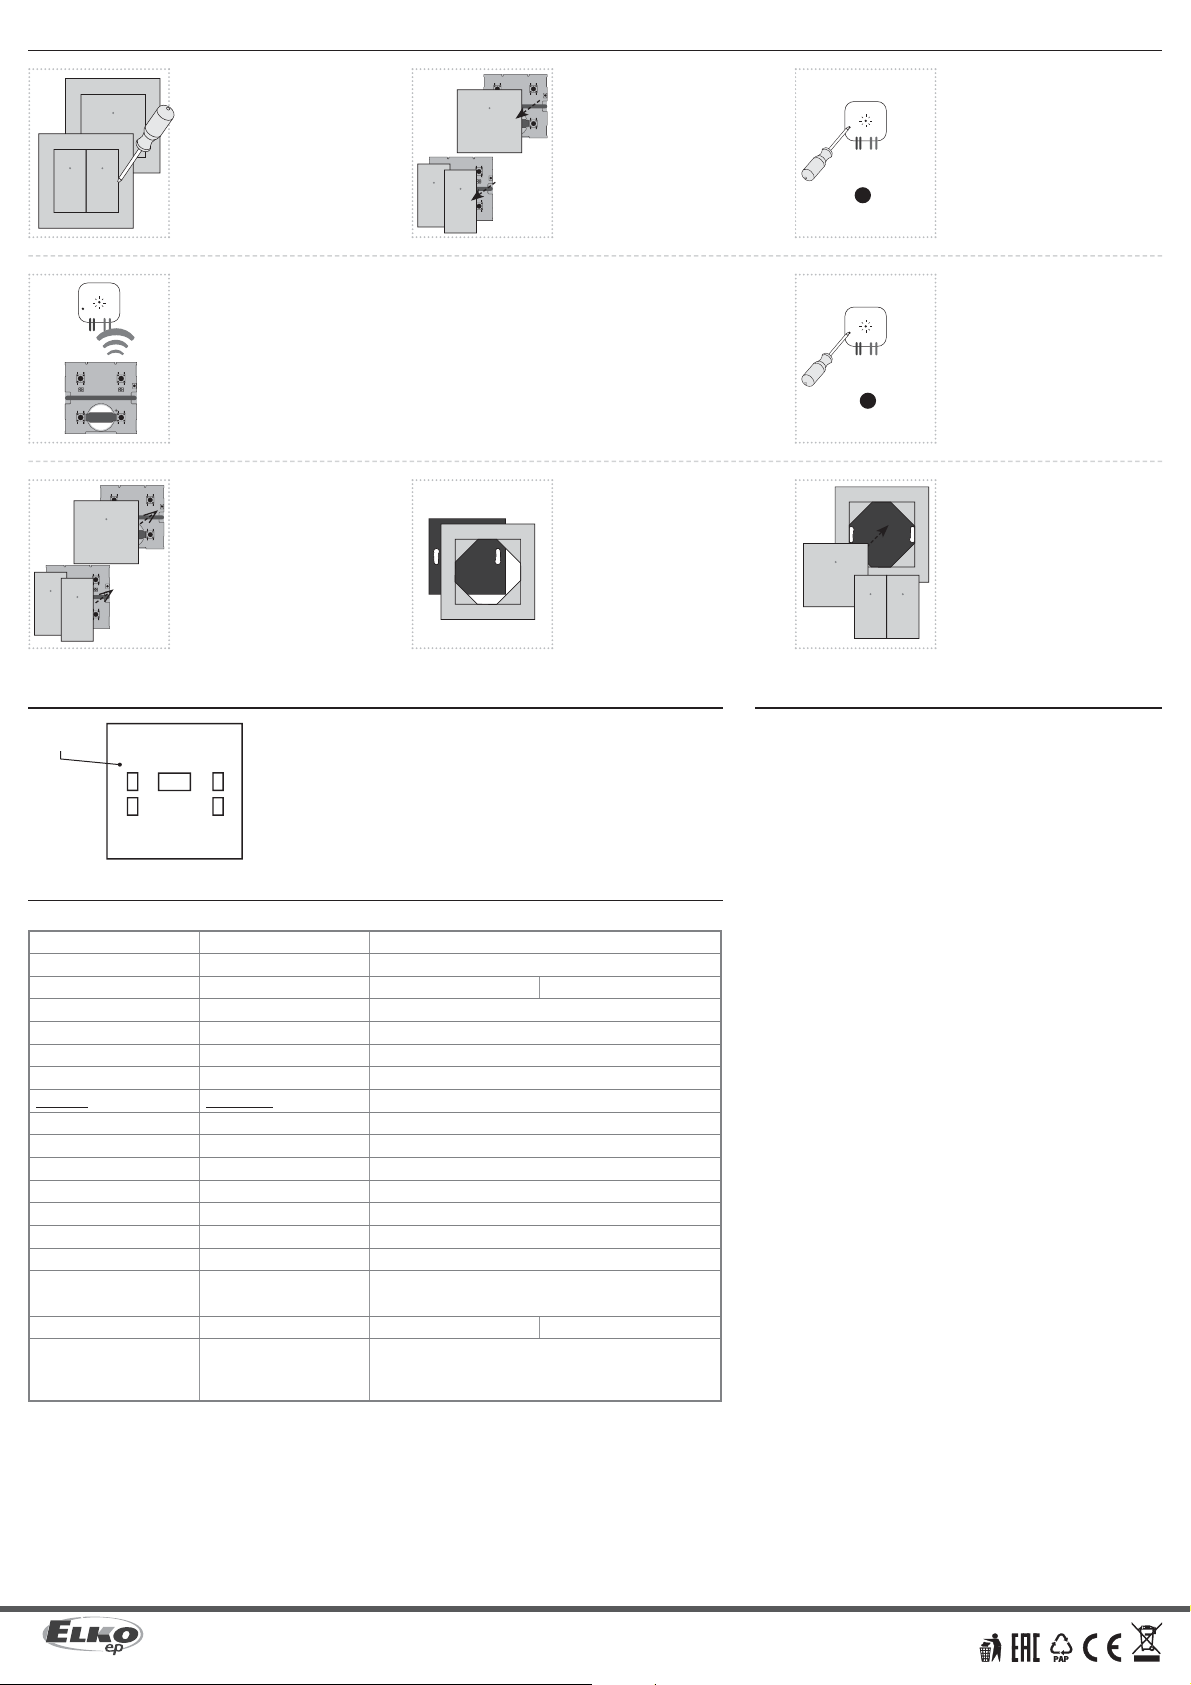
Snap the device with the cover into
the prepared frame.
2 3
PROG > 1s
1 x
4
5
PROG < 1s
1 x
1RFWB-20/G
RFWB-40/G
6 7 8
xxxxxx
Assignment of system components /
address / The address on the back of the controller is used for assignment to the system
components.
Press of programming button on ac-
tuator for 1 second will activate actua-
tor RF into programming mode. LED
is flashing in 1s interval.
Gently pull to remove the cover.Using a screwdriver, carefully pry off
the device from the frame.
Press of programming button on
actuator shorter then 1 second will
finish programming mode.
Snap on the cover. The LED opening
must be located in the upper part (for
the RFWB-40, observe the positioning
of the left and right cover).
Hold the programming button on the RFWB. Press the selected control button on the RFWB according
to the desired function (for more information on individual functions and programming, see the manual
of the specific component). There must be a lapse of 1 second between individual presses. Then release
the programming button.
Place the frame on the rear part.
RFWB-20/G RFWB-40/G
Supply voltage:
Transmission indication:
Number of control buttons:
Programming button:
Transmitter frequency:
Signal transmission method:
Range in free space:
Other data
Operating temperature:
Operating position:
Mounting:
Protection:
Contamination degree:
Dimensions:
LOGUS90 frame - plastic:
LOGUS90 frame
- metal, glass, wood, granite:
Weight:
Related standards:
Technical parameters /
* Comes with plastic frame, without battery.
Attention:
No installation into multi-frames.
When you instal iNELS RF Control system, you have to keep
minimal distance 1 cm between each units.
Between the individual commands must be an interval of
at least 1s.
Instruction manual is designated for mounting and also for user of the device. It is
always a part of its packing. Installation and connection can be carried out only by a
person with adequate professional qualification upon understanding this instruction
manual and functions of the device, and while observing all valid regulations. Trouble-
free function of the device also depends on transportation, storing and handling. In
case you notice any sign of damage, deformation, malfunction or missing part, do
not install this device and return it to its seller. It is necessary to treat this product and
its parts as electronic waste after its lifetime is terminated. Before starting installa-
tion, make sure that all wires, connected parts or terminals are de-energized. While
mounting and servicing observe safety regulations, norms, directives and professional,
and export regulations for working with electrical devices. Do not touch parts of the
device that are energized – life threat. Due to transmissivity of RF signal, observe cor-
rect location of RF components in a building where the installation is taking place.
RF Control is designated only for mounting in interiors. Devices are not designated
for installation into exteriors and humid spaces. The must not be installed into metal
switchboards and into plastic switchboards with metal door – transmissivity of RF
signal is then impossible. RF Control is not recommended for pulleys etc. – radiofre-
quency signal can be shielded by an obstruction, interfered, battery of the transceiver
can get flat etc. and thus disable remote control.
The company ELKO EP, as the manufacturer, is entitled to make technical modificati-
ons to the product, in the technical specification and product manual, without prior
notification.
Warning /
ELKO
EP
,
s.r
.o.
|
Palackého
493
|
769
01
Holešov
,
Všetuly
|
Czech
Republic
|
e-mail:
[email protected] |
Support:
+420
778
427
36
6ELKO
EP
Germany
GmbH
|
Minoritenstr
.
7
|
50667
Köln
|
Deutschland
|
E-mail:
[email protected] |
T
el:
+49
(0)
221
222
837
80
ELKO EP Austria GmbH | Laurenzgasse 10/7 | 1050 Wien | Österreich | E-mail: elko@elkoep.at | Tel: +43 (0) 676 942 9314
www.elkoep.com / www.elkoep.de / www.elkoep.at
Spannungsversorgung:
Übertragungsanzeige:
Anzahl der ovládacíchTasten:
Programovací tlačítko:
Übertragungsfrequenz:
Signalübertragungsmethode:
Reichweite im Freien:
Andere Daten
Arbeitstemperatur:
Arbeitsposition:
Montage:
Schutzart:
Verschmutzungsgrad:
Abmessungen:
LOGUS90 Rahmen - Kunststo:
LOGUS90 Rahmen
- Metall, Glas, Holz, Stein:
Gewicht:
Standards:
3Vbattery / Batterie CR 2032
red / rote LED
2 4
1
866 MHz, 868 MHz, 916 MHz
unidirectionally addressed message / eindirektional adressierte Nachricht
up to / bis zu 200 m
-10 ... +50 °C
any / beliebig
glue, screws / Kleben, Schrauben
IP20
2
85 x 85 x 16 mm
94 x 94 x 16 mm
55 g* 55 g*
EN 60669, EN 300220, EN 301489 R&TTE Directive, Order. No 426/2000 Coll.
(Directive 1999/EC) / EN 60669, EN 300220, EN 301489 Richtlinie RTTE,
RG Nr.426/2000 Sgl. (Richtlinie 1999/EG)
Technische Parameter
* Lieferung mit Kunststoffrahmen, ohne Batterie.
Achtung:
Eine Installation in Mehrfachrahmen ist nicht möglich.
Bei der Installation Aktoren iNELS RF Control muss es
der Mindestabstand 1 cm geachtet sein. Zwischen
aufeinanderfolgenden Befehlseingaben sollte mindesten 1 s
Abstand liegen.
Die Betriebsanleitung dient der Montage, sowie dem Benutzer des Geräts. Sie ist
immer im Lieferumfang enthalten. Die Montage und der Anschluss darf nur durch eine
Person mit einer angemessenen Berufsqualifikation, nach dieser Bedienungsanleitung
und Funktionen des Gerätes und unter Beachtung aller gültigen Vorschriften
ausgeführt werden. Die störungsfreie Funktion des Gerätes hängt auch von Transport,
Lagerung und Handhabung ab. Falls Sie irgendwelche Anzeichen von Beschädigung,
Verformung, Fehlfunktionen oder Fehlteilen feststellen, ie das Gerät nicht und
wenden sich an den Verkäufer. Es ist notwendig, dieses Produkt und Teile davon als
Elektronikschrott zu behandeln, nachdem seine Lebensdauer beendet ist. Vor Beginn
der Montage ist sicherzustellen, dass alle Leitungen, miteinander verbundenen
Teilen oder Anschlüsse spannungsfrei sind. Während der Montage und der Wartung
sind die Sicherheitsvorschriften, Normen, Richtlinien für die Arbeit mit elektrischen
Geräten zu beachten. Berühren Sie keine Teile des Gerätes, die mit Energie versorgt
werden - Lebensgefahr. Aufgrund der Sendeleistung des RF-Signals, beachten Sie
den geeigneten Montageort der RF-Komponenten in einem Gebäude, in dem die
Installation stattfindet. RF Control ist nur für die Montage im Innenbereich geeignet.
Geräte sind nicht für die Montage in Außenbereichen und Feuchträumen geeignet.
RF Control Komponenten dürfen nicht in Metallschalttafeln und in Kunststoff
-Schalttafeln mit Metalltür installiert werden - Die Durchlässigkeit des RF-Signals ist
dann nicht gegeben. RF Control ist nicht für Aufzüge geeignet - das RF Signal kann
gestört und abgeschirmt werden, die Batterie des Emfängers verliert schnell die
Leistung etc. - dieses verhindert die Steuerung durch eine Steuerungseinheit.
Als Hersteller behält die Firma ELKO EP das Recht vor, technische Änderungen am
Produkt, Änderungen der technischen Spezifi kation und der Produktanleitung
ohne vorherige Ankündigung vorzunehmen.
WarnungPřiřazení k systémovým prvkům
Pro přiřazení k systémovým prvkům slouží adresa, uvedená na zadní straně
ovladače.
Adresse
Přidržte programovací tlačítko na ovladači. Zvolené ovládací tlačítko na RFWB stiskněte dle požadované
funkce (podrobnější informace k jednotlivým funkcím a programování naleznete v návodu konkrétního
prvku). Es muss ein Pause von 1s zwischen den einzelnen Tastenbetätigungnen eingehalten werden).
Poté uvolněte programovací tlačítko na RFWB.
Mit einem Schraubendreher hebeln
Sie vorsichtig das Gerät aus dem Rah-
men.
Ziehen Sie vorsichtig, um die Abde-
ckung zu entfernen.
Setzen Sie die Abdeckung wieder ein.
Die LED Öffnung muß sich im oberen
Teil (bei dem RFWB-40, beobachten
Sie die Positionierung der linken und
rechten Seite der Abdeckung) befin-
den.
Legen Sie den Rahmen auf den hin-
teren Teil. Lassen Sie das Gerät mit der Abde-
ckung in den Rahmen einrasten.
Drücken der Programmiertaste am
Aktor RF na dobu delší než 1 Sekun-
de, der Aktor wird in den Program-
miermodus versetzt. LED blinkt im
1s-Intervall.
Drücken der Programmiertaste am
Aktor RF kürzer als 1 Sekunde Pro-
grammiermodus wird beendet.
Programmierung


