INFRARED CAMERAS DuraCam XT User manual

DuraCam XT
Therm al I m age Cam era
User Manual
INFRARED CAMERAS INC.

2
! W a rnings, Ca ut ions a nd N ot e s
D efin it ions
!W ARN I N G Could cause bodily inj ury or deat h.
!CAUTI ON Could cause dam age t o equipm ent or perm anent loss of data.
!N OTE prov ides useful inform at ion t o the operat or.
I m por t a nt I n form a t ion – Rea d befor e using t he I nstr u m e n t
!W ARN I N G – Laser Radiat ion is em it ted from this device. D o N ot st ar e
int o Laser Beam . Cla ss 2 La se r , 6 3 5 n m , 0 . 9 m W
!CAUTI ON - Never point t he lens dir ect ly t oward a strong radiat ion source
( ie. Sun, direct or r eflect ed laser beam , et c ) , wit h power on or power off, as
dam age m ay result t o t he t herm al det ect or used inside. Perm a nent
dam age m a y r e sult !
!CAUTI ON - The original shipping cart on should be kept for use for fut ur e
transport ation. Do not drop, shake or im pact t he therm al im ager
excessively, in use or during t ransportation.
!CAUTI ON - St or e t he unit in it s or igin al case in a cool, dr y, w ell-vent ilat ed
ar ea aw ay from st r ong elect r om agnet ic fields.
!CAUTI ON - Prot ect t he surface of the lens from being st ained or dam aged
by foreign obj ect s such as sludge or chem icals. Please replace t he lens cap
aft er use.
!CAUTI ON - Please rem em ber t o backup im age dat a r egular ly t o avoid
losing im port ant dat a.
!N OTE - For m axim um m easur em en t accuracy, allow 3 t o 5 m inut es for
cam era t o st abilize aft er init ial pow er up.
!N OTE - Each cam era is fact ory calibrat ed. I t is recom m ended that
calibrat ion be per form ed ever y 12 m ont hs.

3
!CAUTI ON - Do not open case. Unit does not contain any user serviceable
part s. Repair should be perform ed by fact ory authorized t echnicians only.

4
Cont ent s
! W a rn ing s, Cau t ion s a nd N ot es......................................................... 2
1I nt r od uct ion ................................................................................ 6
1.1 St andard accessories ................................................................................................8
1.2 Optional accessories..................................................................................................8
2Cam e r a over vie w ......................................................................... 9
2.1 Funct ion keys ...............................................................................................................9
2.2 I nt erface.......................................................................................................................12
3Basic operation .......................................................................... 1 4
3.1 Bat tery I nst allat ion and Replacem ent ..............................................................14
3.1.1 I nsert ing or r em oving bat tery .....................................................................14
3.1.2 Replacing bat t ery..............................................................................................15
3.2 Bat tery safet y and usage ......................................................................................16
3.3 Quick access ...............................................................................................................16
3.3.1 Capt ur e an im age .............................................................................................16
3.3.2 Tem perat ur e m easur em ent .......................... Error! Bookmark not defined.
3.3.3 save im age .......................................................... Error! Bookmark not defined.
3.3.4 Playbak c I m age ................................................. Error! Bookmark not defined.
3.3.5 Download the saved files...............................................................................19
3.3.6Screen Sett ing ...................................................................................................19
3.3.7Manu operation int roduct ion ........................................................................20
4Op er a t ion g uid e ......................................................................... 2 1
4.1 Graphic int erface descript ion ...............................................................................21
4.1.1 Screen graphic int erface ................................................................................21
4.1.2 Float ing Bar int erface...................................... Error! Bookmark not defined.
4.1.3 Main m anu........................................................... Error! Bookmark not defined.
4.1.4 sub-m anu int erface.......................................... Error! Bookmark not defined.
4.2 Measurem ent obj ect adding ................................. Error! Bookmark not defined.
4.3 Recording ..................................................................... Error! Bookmark not defined.
4.4 Phot o ............................................................................. Error! Bookmark not defined.
4.5Preview ......................................................................... Error! Bookmark not defined.
4.6Set ting and Nor m al set t ing................................... Error! Bookmark not defined.
4.6.1 Measurering Set ting ........................................ Error! Bookmark not defined.
4.6.2 Adj ust m ent ..........................................................................................................30
4.6.3 I m age set t ing .....................................................................................................31
4.6.4 Net w or d setup ...................................................................................................34
4.6.5 TF card m anagem ent ...................................... Error! Bookmark not defined.
4.6.6 photo setting ...................................................... Error! Bookmark not defined.

5
4.6.7 syst em sett ing ................................................... Error! Bookmark not defined.
4.7File Managem ent .......................................................................................................40
4.7.1 Playback ...............................................................................................................40
4.7.2 Bluet oot h t ransm ission ...................................................................................42
4.7.3 Delet e ....................................................................................................................43
5. Webpage operate 44
5.1 webpage loin 44
5.2 surveillacne image 44
5.3 function operation 45
5.3.1 system parameter set 45
5.3.2 Photo settint 46
5.3.3 Graphic setting 47
5.3.4 Measurement Setting 47
5.3.5 Network 48
5.3.6 Local setting 49
5.3.7 System Maintenace 49
6Configura tions .......................................Error! Bookm ark not defined.
7Tr ou ble sh oot in g ......................................Error! Bookm ark not defined.
Appe ndix A...................................................................................... 5 5
Com m on m at er ial em issiv it y(FYI ).............................................................................55
Appe ndix B...................................................................................... 5 6
Fact or y default param et er sett ing t able ......................................................................56

6
1 I nt r oduct ion
Thank you for choosing I CI I nst rum ent s “ DURACAM XT” hand-held infrared
t herm al im ager.
M ode l I de nt ifica t ion
DURACAM XT im agers use the detect or with 25um 384* 288, and
m easur em ent range from -20° C~+ 650° C
Fe at ur e s
DURACAM XT include the following feat ur es:
11 user select able color palet t es
11 user select able langu ages
2X ,4X digit al zoom
5 rem ovable spot m easurem ents
5 Areas m easurem ent s
2 lines m easurem ents
Cust om shortcut s
Blue toot h
Pow er saving m ode
LCD Br igh tn ess adj ust m ent
Video Output – NTSC or PAL
I nternet set tings
Tim e and Dat e set tings
Factory set t ings rest ore
TF car d uninst all, for m at t ing
TF card im age st orage, video st orage
Text and Audio annot at ion v ia im age st orage
Consecut ive im age shot st orage
Alarm im age capture
Alarm video r ecord
I sot her m m easur em ent funct ion
Tem perat ur e m easur em ent set t ings

7
Built in Em issivit y Table list of com m on m at erials
CMOS visible im age and st orage
I nfrared and visible im age fusion
Merge set
Upgr ade s a nd Options
DURACAM XT m odel is fact ory upgradeable for Wide Angle or Telephot o
Lenses.
DURACAM XT m odel is fact ory upgradeable for high t em perat ure
expansion lens t o a wide tem perat ure m easurem ent range.
App lica t ions:
Pr e ve nt ive m a int en an ce
Pow er indust ry: Power line and power facilit y t herm al st at e checking;
problem and defect diagnosis.
Elect rical system : I dent ify pot ent ial circuit overloads.
Mechanical syst em : Reduce downt im e and avoid catast rophic failure.
Const r uct ion scie nce
Roof: Quick ident ification of wat er penet rat ion problem s.
St ruct ur e: Com m ercial and residential energy audit s.
Moist ur e det ect ion: Det er m in e r oot cause of m oist ur e and m ildew.
Evaluation:Evaluat e t he r esolut ion t o ensur e t h e ar ea com plet ely dr y.
Ot h er s
I ron and st eel industry: I nspect st eel refining and rolling pr ocesses;
diagnose hot-blast st ove defect s; det ect t he em br yo t em per at ur e of arm or
plat e, et c.
Fir e fight ing: For est fir e pr event ion and det ect ion of lat ent ignit ion
sour ce. Pr event ive det ect ion on specific m at er ials of aut o-ignit ion. Det ect ion
of pot ent ial spark ignit ion sources.
Medical: Hum an body surface t em perature det ect ion and screening.

8
Pet r o/ chem ical: Oil pipeline st at us inspect ion ; m at er ial sur face
t em perat ure det ect ion; insulat ion inspect ion; power equipm ent st at us, et c.
1 .1 St a nda rd a ccessories
Infrared t herm al im age cam era ( wit h wrist st rap)
Carrying case
Video out cable
Lit hium ion bat t er ies(2)
User m anual, I nfrared r eport and analysis soft ware syst em CD
Lit hium batt ery charger
Lens cap
TF card
TF card reader
USB cable
1 .2 Opt ion a l a cce ssor ie s
Ext ernal 0.5x wide-angle lens
Ext ernal 2x t elescopic lens
Eye patch
Pow er adapt er (wit h power cable and plug)
European standard plug
Brit ish st andard plug
Aust ralian standard plug

9
2 Cam era overview
2 .1 Fun ct ion k eys
2
3
1
4
5
6
7

10
[1] Pow er k e y
Pr ess and hold t h e Power Key for > 3 secon ds t o pow er on/ off t he cam er a.
! N ot e : After powering off, please wait ten seconds before powering the
cam era on again.
[2] Se le ct / Au t o k e y ( M a rk e d “ A”)
Th e “ A” or at t ribut e but ton per form s 2 funct ions.
a) The first funct ion is m odificat ion of select ed param eters. I t is obtained
by a quick press and release ( less than 2 seconds), wit h t his funct ions to
m odify t heir param eters. Subsequent presses will “scroll” through the
available param et er s. The select ed funct ion w ill be highlight ed in yellow. Th e
funct ions include:
•Me a sure m en t point s, ar ea s, a nd line s
Point s, ar eas, lines – swit ching the added point s, areas and lines in the
int er face fr om Up t o Dow n, pr ess Men u t o set pr opert ies, pr ess C t o delet e the
selected m easuring object s.
Color Pa le t t e
Pr essing t h e left or r ight ar row s w ill scr oll t hr ough t he available color
palet t es, display ing t heir n am e above t he palet t e. The select ed palet t e w ill
becom e act ive after about 3 seconds of selecting it and will be set as the
defau lt pow er on palet t e.
•Le v e l/ Span values
Pressing t he left or right arrow will reduce or increase the Span and
pr essing t he up or down arrow will reduce or increase t he Level. I f t he unit is
in Aut om at ic m ode, m odify ing any of t hese param et er s w ill select Man ual
m ode.
b)The second funct ion perform ed is t o force an internal calibrat ion cycle.
This is perform ed by pressing and holding t he A key for 5 seconds or m or e.
The cam era w ill m ak e aut om at ic cor rect ion t o get t he m ost accu rat e t herm al
m easurem ent.
c) I m age t ransm ission via blue t ooth. Open blue-t oot h , select obj ect im age,

11
short press A, it will display sending dialog.
[3] Cancel/ Cam er a key ( Mark ed “C”)
•Pressing and releasing t he C k ey cancels t he pr esent operat ion w hen in
Menu m ode.
•Pressing and releasing the C key when an im age is frozen or being viewed
from m em ory, will ret urn t o real-t im e m easur em ent st at us.
•When not in m enu m ode or param et er edit ing, pressing and releasing t he C
key w ill t oggle bet ween t he t her m al im age and t he v isible CCD cam era
im age.
•When a param et er is select ed, such as a m easurem ent cursor, pressing the
Ckey will delet e t he highlighted m easurem ent .
[4] Fr ee z e/ Sa ve k e y ( M ar ked “S”)
Used for fr eezing or saving t herm al im age. Pr ess t he key once t o fr eeze t he
im age. Pr ess Confirm t o save t he im age or Press C t o r et urn to real-t im e
m easurem ent. I f Audio recording is enabled, Audio com m ent dialog box will
display. I n docum ent m anagem en t, pr ess S t o delet e video or im age.
[5] Menu/ Confir m k ey ( bar)
I ncludes Up , D ow n , Le ft , Rig h t and M enu / Con firm ( cent er ) k eys.
Funct ion varies wit h operat ion m ode.
I n M e nu m od e, it is used for m enu select ion. Up and D ow n keys ar e for
sam e level of m enu operat ion. Left and Righ t keys ar e for different levels
m enu operat ion . Confirm key ( cent er) is t o act ivat e the m enu and confirm t he
choice.
I n I m age m ode, press Up or D ow n k ey t o act ivat e X2 digit al zoom . The
screen will display “ X2” in the upper left corner. Press Up or D ow n key t o
r et ur n t o t he or igin al im age.
I n Spot Mea sure m ent edit ing m ode ( act ivat ed im m ediat ely aft er adding
a spot or by select ing via the Akey) , pr ess t he Menu k ey t o pop up t he

12
at tribut e box. Press four navigat ion keys to m ove the spot locat ion.
I n line t em per at ur e m easur em ent edit in g m ode ( act ivat ed im m ediat ely
aft er adding a line or by selecting via t he Ak ey ) , p ress t he M e nu key t o pop up
t he at t ribut e box. I f m easur em ent line is hor izont al, pr ess Up and Dow n key s
t o m ove t he line locat ion ; pr ess Le ft and Right key s t o m ov e t he r efer ence line.
I f m easurem ent line is ver t ical, pr ess Le ft and Right keys t o m ove t he line;
press Up and D ow n keys to m ove the reference line.
I n area m easurem ent edit ing m ode ( act ivat ed im m ediat ely aft er adding an
area or by select ing via t he Akey) , pr ess t he Con firm key t o pop up t he
at tribut e box. Select in t he at tribute box the param et er t o be edit ed, eit her size
or posit ion . Pr ess t he fou r n avigat ion k ey s t o m ove t he ar ea locat ion or change
t he size of t he ar ea.
[6] Tr igger / Sh ortcut key
The trigger key serves as a short cut to access the following funct ions:
Laser – Pulling t rigger activat es laser sight and releasing deactivat es it .
Spot , Area– Pulling and releasing trigger adds a spot or area. Pulling and
releasing trigger again rem oves t he spot or area.
Video and I m age Save –pr essing t o init iat e a Save cycle.
Zoom -pressing t o zoom t he infrared im age
LCD brightness adj ust m ent-pressing t o act ivat e
[7] Microphone
Used for recording a voice m essage wit h t he Saved im age

13
2.2 Interface
[ 1 ] USB to RJ45 ou t p ut
Used f or in t er net connect ing.
[ 2 ] TF Ca r d slot
Accept ing st an dar d size TF card such as supplied 8GB capacit y card, for
device upgrade or im age st orage.
[ 3 ] Vide o por t
I t is a video output int er face.
[ 4 ] Pow er inter face
Ext ernal power input interface. Power source should be + 12VDC. Cent er
pin is posit ive t erm inal.
1
4
2
3
14
3 Basic operation
3 .1 Ba t t e ry I nst a lla t ion a nd Re pla ce m ent
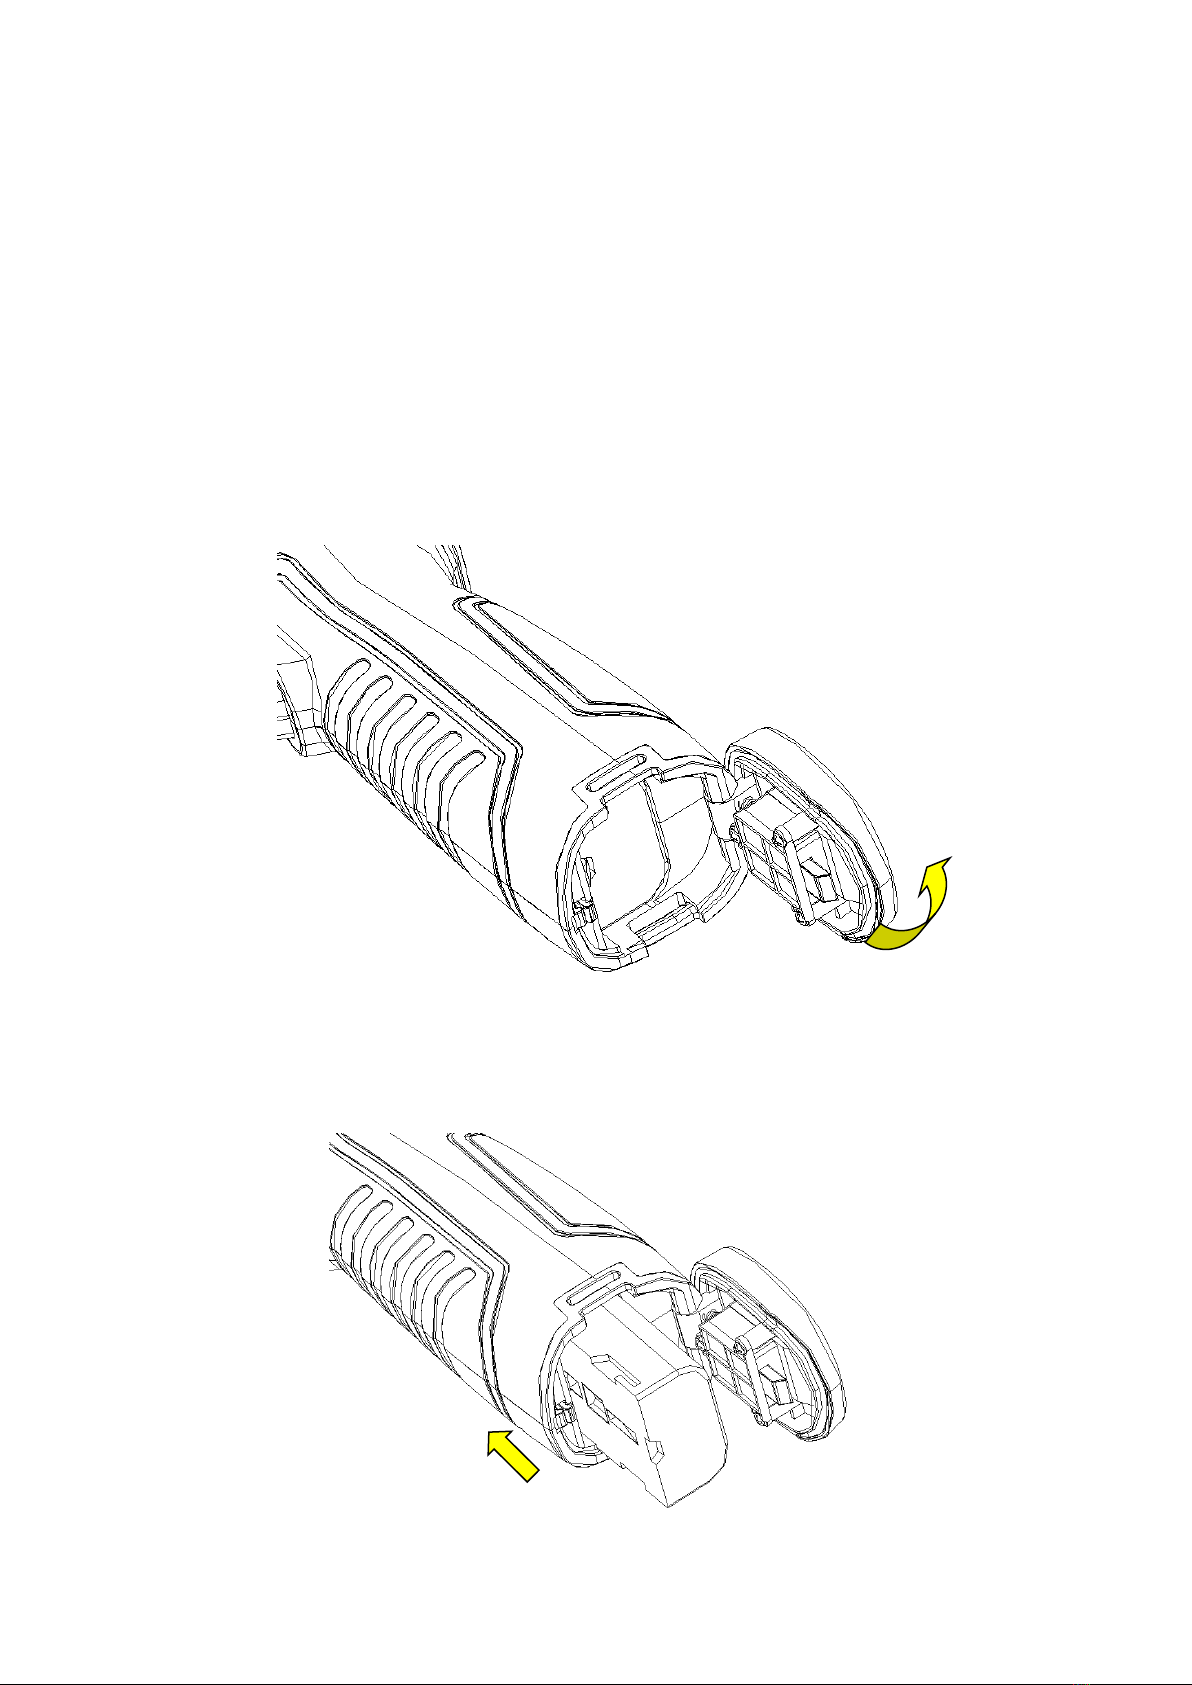
3.1.1 I n se rt ing or r em ovin g b at t e r y
Bat tery com partm ent is locat ed inside the handle. Turn the cover
coun t er-clock wise t o r em ov e. Rem ov e bat t er y for r eplacem ent .
I nser t t he bat tery (the batt ery contacts m ust face int o the bat tery
com part m ent ) .
15
Replace t he cover and screw down.
! CAU TI ON : Use only or iginal m anufact ur er r eplacem en t bat t er y. Use of
incorrect bat tery m ay result in physical or electrical dam age t o t he inst r um ent
due to incorrect volt age or physical size difference.
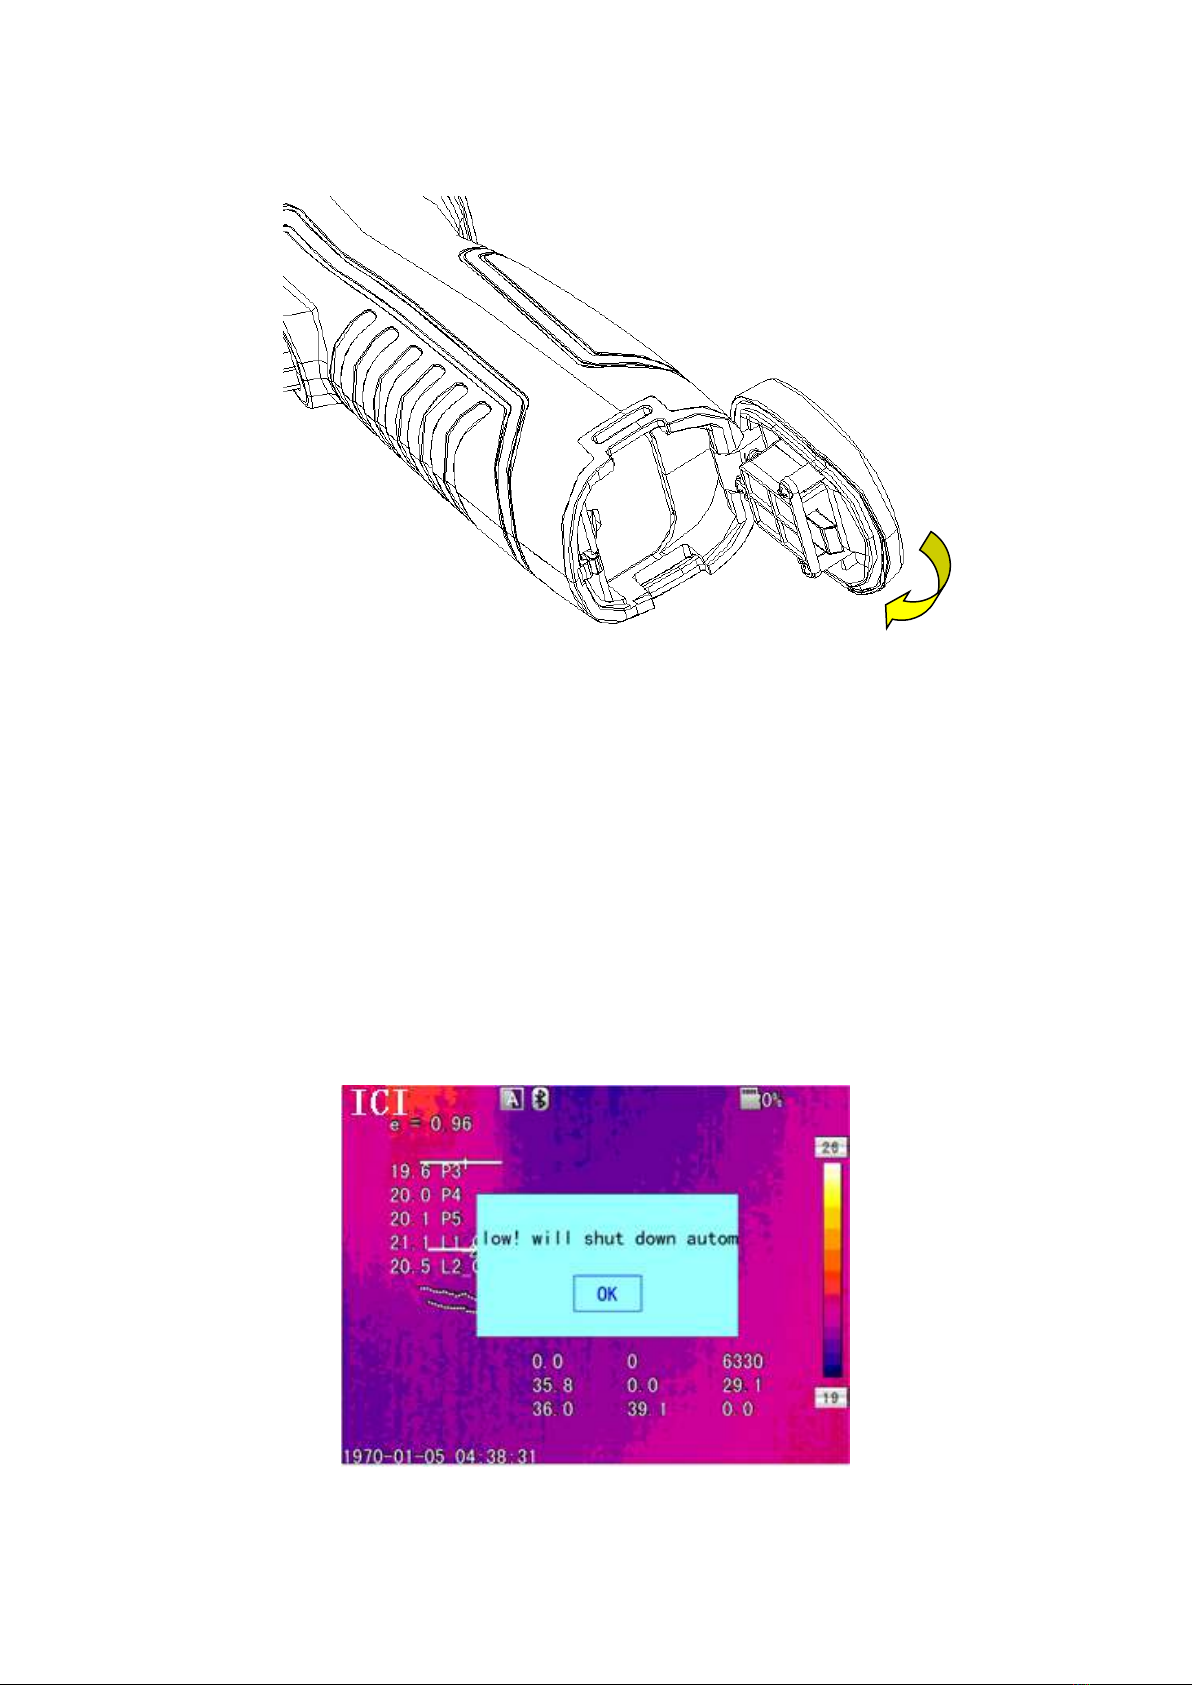
3.1.2 Re pla cing ba t t er y
When battery displays em pt y and flashes for about 1 m inut e and 50
seconds, t he inst rum ent displays a low bat t ery dialog and shut down
aut om at ically aft er about 10 seconds.
Pow ering off display

16
I t ’s bett er t o replace bat t eries now.
3 .2 Ba t t e ry sa fe t y a nd usa ge
Bat t er ies should be st or ed in an am bient t em perat ur e of -4° F ( –20° C) t o
67.9° F ( + 20° C). Lithium bat teries will self-discharge during st orage, so
they should be fully char ged befor e st orage. Self-discharge m ay affect long
t er m bat t er y per for m ance. Fur t herm or e, it is r ecom m ended t hat t he bat t ery
should be charged in a set t im e, as below;
Am bient t em perat ure of:
- 4° F ( –20° C) t o 67. 9° F ( + 2 0° C) , on ce every 6 m ont hs
67.9° F ( + 20° C) t o 1 13° F ( + 45° C) , once every 3 m ont hs
113° F ( + 45° C) t o 149° F ( + 60° C) , once every m onth
Batt ery should have great er than 50% charge prior to recharge.
The am bient tem perature for charging should be 32° F ( 0° C) to 104°F
( + 40° C) . I f un der 32° F ( 0° C) , t he batt ery capacit y will be dim inished; if
over 104° F ( + 40° C), t he bat t ery m ay overheat , r esult ing in perm anent
dam age.
!W ARN I N G:
!Never disassem ble, incinerat e or punct ur e bat t er y
!Never short circuit t he bat t ery
!Keep bat t er y dr y
!Keep out of reach of children
!Always dispose of bat t ery in accordance with local, stat e and federal
r egulat ions
3 .3 Quick a cce ss
3.3.1 Ca pt ur e a n im a ge
After installing the battery, press and hold the power key (≥3 seconds)
unt il the display com es on. Aft er approxim at ely 50 seconds, t he power
on routine will finish and t he cam era will start it s m easurem ent s.
Rem ove t he lens cap and aim at t he t ar get . Adj ust t he f ocus for t he

17
clearest t arget t herm al im age.
! Note:Focus is not clear, and will lead to measurement error.
3.3.2 Temperature Measurement
To move the target object to the screen on the point of crossing temperature, the
upper-right corner of the screen shows "XX" is the temperature measurement point at the
target temperature. If you want to measure more accurately, keep press the "A" button for
3 seconds。
If wish to detailed analysis the thermal image of the current screen, you can press the "S"
key to frozen the image, then analysis. Sustainable pressing the "S" key for 3 seconds, the
thermal image stored, and then analyzed.
When the target temperature is greater than or less than the relevant thermal image' Max
or Min temperature, the temperature of the screen display> XXX °C or <XXX °C.
If you need to modify the properties of the temperature measurement object, you should
first check the temperature of the object, and then press the Enter key, the temperature of
the object's Properties dialog box pops up on the screen. The following figure is the
temperature measurement points, the temperature line, the temperature measurement area
of the Properties dialog box:
Point Measurement Properties Dialog Box
The attributes of the measurement points can be modified amplitude coefficient ratio,
the distance and the reference object, the left and right arrow keys to the left and right
selection, press the A key to switch up and down. Temperature value is displayed when
the "reference object" option changes to "open", and other measuring object with the
temperature difference of the temperature measurement points.

18
Line Measurement Properties Dialog Box
Line temperature measurement properties can be modified amplitude coefficient
ratio, distance, maximum temperature, minimum temperature, average temperature,
maximum temperature difference, the crossing point temperature and the reference
object, the left and right arrow keys to the left and right selection, press the A key to
switch up and down. Temperature value is displayed when the "reference object" option
changes to "open", and other measuring object with the temperature difference of the
temperature measurement points.
Area Measurement Properties Dialog Box
Area temperature measurement properties can be modified amplitude coefficient
ratio, distance, maximum temperature, minimum temperature, average temperature, the
maximum temperature and the reference temperature properties can be modified, and the

19
left and right arrow keys to the left and right selection, press the A key to switch up and
down. Temperature value is displayed when the "reference object" option changes to
"open", and other measuring object with the result of the temperature difference between
the temperature measurement of the temperature measurement area
! Note:It can only set one reference target.
3.3.3 Save Image
Obtain the current image to store, you can choose one of the following four ways:
Press Ok button and will show panel menu, select the "photo" option in the menu, the
system will automatically save images
Press S key, the image will froze, and press the same key again and the image will be
saved.
Keep press S key for 3 second, the image will be automatically saved.
To set a shortcut key as Take Photo, then just need press this key to save image.
3.3.4 Playback Image
Two way to open the image file:
1、Press the Ok key to activate the main menu, select "File Manager" menu , then select the
submenu (via the arrow keys to select)
2、Click the "Preview" option in the floating panel to open the selected file (via the left and
right keys to switch selection)
After you open the image, you could use upper and lower sections of the playback control
panel keys to playback the current store images.
Press Cancel key to exit and return to the current state.
3.3.5 Download the Save Files
Can use card reader to download, delete, format the TF files.
! Note:Use the recommended form to format the TF card。
3.3.6 Screen Setting
There’s two ways to set up: 1) Via general setup menu of “LCD brightness adjustment” to
do screen brightness settings, so as to achieve the best effect. 2) by setting shortcut keys
for the “LCD brightness adjustment”, then use the shortcut key to adjust the LCD screen
brightness.

20
3.3.7 Manu Operation Introduction
Keyboard operation: press the "OK" button to pop up the floating panel, use left and right
arrow keys on the floating panels to select the icon, click "OK" key to enter the relevant
interface.
Main menu interface: via "up and down" key to select the menu icon, click "OK" key to enter
the submenu.
Sub-menu interface: via "up and down" key to select, if there’s the ">" mark, using
right-click to enter the lower menu
Parameter interface: The "up and down" key is to modify, the “left and right” key is to choose
< > means modify the setting of the current manu.
Press the "OK" button to confirm the changes, save and return to the previous menu, press the
"C" key to cancel the changes and return to the previous menu.
Cancel and return to the previous menu button;Save and return to the
previous menu button. (For touch screen)
Switch button, by the left and right keys to modify the switch settings
Table of contents
Other INFRARED CAMERAS Thermal Camera manuals


