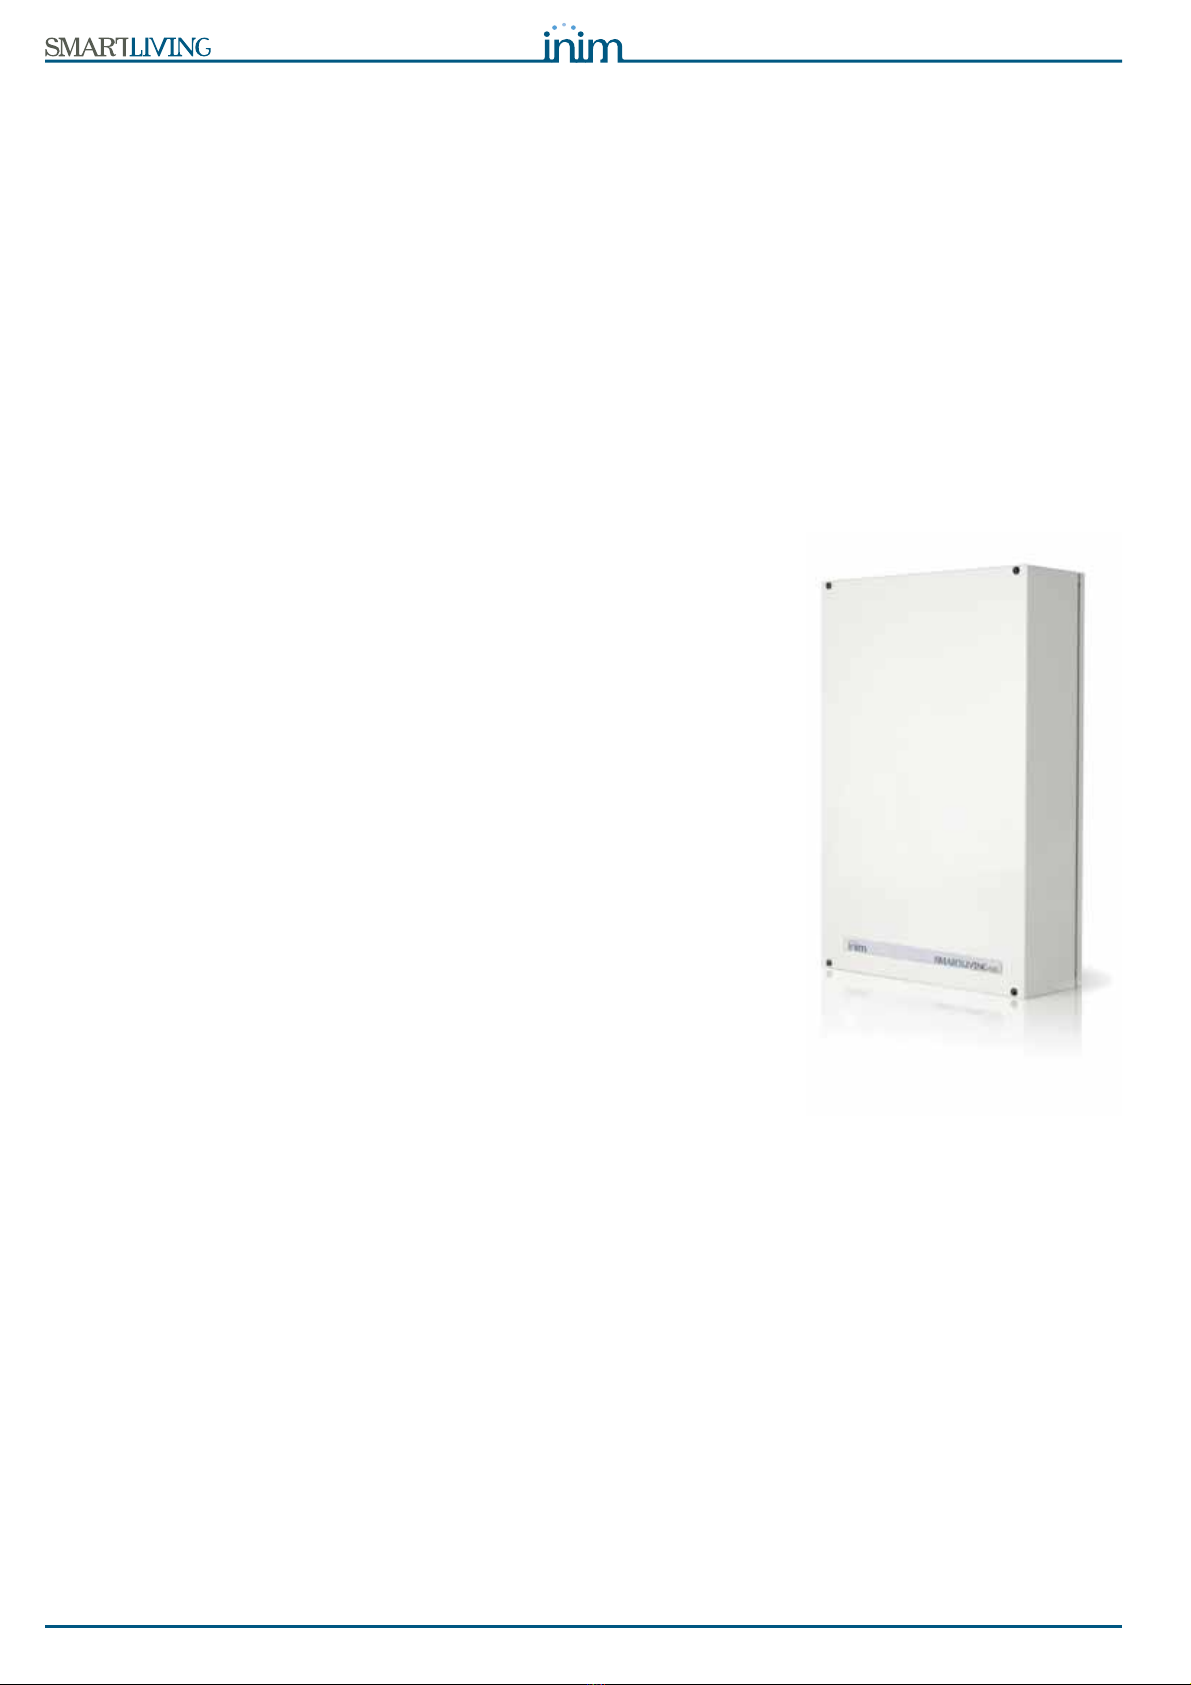
INIM Electronics SmartLiving 505 User manual

User’s Manual
1
SISTEMI DI SICUREZZA
GameOver
MANUALE
DI
INSTALLAZIONE
E
PROGRAMMAZIONE
USER’S
MANUAL
SECURITY SYSTEMS
Certified by
IMQ - Security systems
CEI 79-2
EN 50131-3
EN 50131-6
T014

2
User’s Manual
Warranty
INIM Electronics s.r.l. (Seller, Our, Us, ) warrants the original purchaser that this
product shall be free from defects in materials and workmanship under normal
use for a period of 24 months. As INIM Electronics s.r.l. does not install this
product directly, and due to the possibility that it may be used with other
equipment not approved by Us; INIM Electronics s.r.l. does not warrant against
loss of quality, degradation of performance of this product or actual damage that
results from the use of products, parts or other replaceable items (such as
consumables) that are neither made nor recommended by INIM Electronics.
Seller obligation and liability under this warranty is expressly limited to repairing
or replacing, at Seller's option, any product not meeting the specifications. In no
event shall INIM Electronics s.r.l. be liable to the purchaser or any other person
for any loss or damage whether direct ot indirect or consequential or incidental,
including without limitation, any damages for lost profits, stolen goods, or claims
by any other party caused by defective products or otherwise arising from the
incorrect or otherwise improper installation or use of this product.
This warranty applies only to defects in parts and workmanship relating to normal
use. It does not cover:
• damage arising from improper maintenance or negligence
• damage caused by fire, flood, wind or lightning
• vandalism
• fair wear and tear
INIM Electronics s.r.l. shall, at its option, repair or replace any defective products.
Improper use, that is, use for purposes other than those mentioned in this
manual will void the warranty. Contact Our authorized dealer, or visit our website
for further information regarding this warranty.
Limited
Warranty
INIM Electronics s.r.l. shall not be liable to the purchaser or any other person for
damage arising from improper storage, handling or use of this product.
Installation of this Product must be carried out by qualified persons appointed by
INIM Electronics. Installation of this Product must be carried out in accordance
with Our instructions in the product manual.
Copyright
The information contained in this document is the sole property of INIM
Electronics s.r.l. No part may be copied without written authorization from INIM
Electronics s.r.l.
All rights reserved.
European
Directive
compliance
Hereby INIM Electronics s.r.l. declares that the SmartLiving series of intrusion-
control panels, the Air2 series of devices and the SmartLink product are in
compliance with the essential requirements and other relevant provisions of
Directive 1999/5/CE.
Moreover, INIM Electronics s.r.l. also declares that all other devices mentioned in
this manual are in compliance with the essential requirements and other relevant
provisions of Directive 2004/108/CE.
The full declarations of conformity can be found at URL: www.inim.biz/dc.html.
State-of-the-art
Installations
(DM 37/08)
The devices described in this manual, in accordance with the settings selected
during the installation phase and the following illustrated guidelines are,
alternatively, in compliance with the the Italian Normative CEI 79-2:1998+Ab:2000
performance level 2 or European Normative CEI EN 50131-3:2009 (in reference to
Control and indicating equipment - intrusion control panels) and CEI EN 50131-
6:2008 (in reference to Power supplies) security grade 3.
In support of research, development, installation, testing, commissioning and
maintenance of intrusion alarm systems installed in buildings please refer to the
following normative documents:
CEI 79-3 e CEI CLC/TS 50131-7.
When installing INIM systems, it is up to the installer company to install systems
equipped with Normative CEI 79-2 compliant devices rather than devices
compliant with European Normatives series EN50131 within and not over the
DOWs summarized in amendment CEI 79-2;V1:2010.

User’s Manual
3
Table of
contents
Warranty . . . . . . . . . . . . . . . . . . . . . . . . . . . . . . . . . . . . . . . 2
Limited Warranty . . . . . . . . . . . . . . . . . . . . . . . . . . . . . . . . . 2
Copyright . . . . . . . . . . . . . . . . . . . . . . . . . . . . . . . . . . . . . . 2
European Directive compliance. . . . . . . . . . . . . . . . . . . . . . . . 2
State-of-the-art Installations (DM 37/08) . . . . . . . . . . . . . . . . 2
Table of contents . . . . . . . . . . . . . . . . . . . . . . . . . . . . . . . . . 3
Chapter 1 General information . . . . . . . . . . . . . . . . . . . . . . . . . 5
1-1 Manufacturer's details . . . . . . . . . . . . . . . . . . . . . . . . . . . . . . . . . . 5
1-2 Description of the product and various models . . . . . . . . . . . . . . . . . 5
1-3 Environmental Conditions . . . . . . . . . . . . . . . . . . . . . . . . . . . . . . . . 6
1-4 Products certified and conforming to directives . . . . . . . . . . . . . . . . . 6
1-5 Manuals . . . . . . . . . . . . . . . . . . . . . . . . . . . . . . . . . . . . . . . . . . . . 7
1-6 Operator Qualifications . . . . . . . . . . . . . . . . . . . . . . . . . . . . . . . . . . 7
1-7 Access Levels . . . . . . . . . . . . . . . . . . . . . . . . . . . . . . . . . . . . . . . . 7
1-8 Conventions – Glossary . . . . . . . . . . . . . . . . . . . . . . . . . . . . . . . . . 7
Chapter 2 The SmartLiving System . . . . . . . . . . . . . . . . . . . . . . 8
2-1 Introduction . . . . . . . . . . . . . . . . . . . . . . . . . . . . . . . . . . . . . . . . . 8
2-2 The technologies . . . . . . . . . . . . . . . . . . . . . . . . . . . . . . . . . . . . . . 9
2-3 Keypads . . . . . . . . . . . . . . . . . . . . . . . . . . . . . . . . . . . . . . . . . . . . 9
2-4 Reader - nBy. . . . . . . . . . . . . . . . . . . . . . . . . . . . . . . . . . . . . . . . . 14
2-5 User Codes . . . . . . . . . . . . . . . . . . . . . . . . . . . . . . . . . . . . . . . . . . 15
2-6 Keys . . . . . . . . . . . . . . . . . . . . . . . . . . . . . . . . . . . . . . . . . . . . . . 16
2-7 Multi-system access . . . . . . . . . . . . . . . . . . . . . . . . . . . . . . . . . . . . 17
2-8 Telephone functions . . . . . . . . . . . . . . . . . . . . . . . . . . . . . . . . . . . . 18
2-9 WEB / e-mail functions . . . . . . . . . . . . . . . . . . . . . . . . . . . . . . . . . . 18
2-10 Arming scenarios . . . . . . . . . . . . . . . . . . . . . . . . . . . . . . . . . . . . . . 18
Chapter 3 Shortcuts . . . . . . . . . . . . . . . . . . . . . . . . . . . . . . . . 19
3-1 Keypad shortcuts. . . . . . . . . . . . . . . . . . . . . . . . . . . . . . . . . . . . . . 19
3-2 Shortcut with code. . . . . . . . . . . . . . . . . . . . . . . . . . . . . . . . . . . . . 20
3-3 Key and Reader shortcuts . . . . . . . . . . . . . . . . . . . . . . . . . . . . . . . . 20
3-4 Shortcut list . . . . . . . . . . . . . . . . . . . . . . . . . . . . . . . . . . . . . . . . . 21
Chapter 4 Voice functions. . . . . . . . . . . . . . . . . . . . . . . . . . . . . 22
Chapter 5 Using the system . . . . . . . . . . . . . . . . . . . . . . . . . . . 23
5-1 Managing alarms . . . . . . . . . . . . . . . . . . . . . . . . . . . . . . . . . . . . . . 23
5-2 Arming and disarming partitions . . . . . . . . . . . . . . . . . . . . . . . . . . . 24
5-3 Voice functions and Intercom (JOY/MAX only) . . . . . . . . . . . . . . . . . . 26
5-4 Activations . . . . . . . . . . . . . . . . . . . . . . . . . . . . . . . . . . . . . . . . . . 26
5-5 View. . . . . . . . . . . . . . . . . . . . . . . . . . . . . . . . . . . . . . . . . . . . . . . 28
5-6 Activating/Deactivating outputs. . . . . . . . . . . . . . . . . . . . . . . . . . . . 30
5-7 Change date and time . . . . . . . . . . . . . . . . . . . . . . . . . . . . . . . . . . 31
5-8 Keypad settings. . . . . . . . . . . . . . . . . . . . . . . . . . . . . . . . . . . . . . . 31
5-9 Change PIN. . . . . . . . . . . . . . . . . . . . . . . . . . . . . . . . . . . . . . . . . . 32

4
User’s Manual
5-10 Change telephone numbers . . . . . . . . . . . . . . . . . . . . . . . . . . . . . . 32
5-11 Teleservice request . . . . . . . . . . . . . . . . . . . . . . . . . . . . . . . . . . . . 33
5-12 Overtime request . . . . . . . . . . . . . . . . . . . . . . . . . . . . . . . . . . . . . 33
5-13 Thermostat (JOY/MAX keypads only) . . . . . . . . . . . . . . . . . . . . . . . . 34
5-14 Listen-in. . . . . . . . . . . . . . . . . . . . . . . . . . . . . . . . . . . . . . . . . . . . 35
5-15 Partition status enquiry . . . . . . . . . . . . . . . . . . . . . . . . . . . . . . . . . 35
5-16 Commands over-the-phone . . . . . . . . . . . . . . . . . . . . . . . . . . . . . . 35
5-17 Using the SmartLAN/G . . . . . . . . . . . . . . . . . . . . . . . . . . . . . . . . . . 37
Appendix A Technical terminology and Glossary . . . . . . . . . . . . . . 39
Appendix B Shortcuts at default . . . . . . . . . . . . . . . . . . . . . . . . . 43
Appendix C Fault signals . . . . . . . . . . . . . . . . . . . . . . . . . . . . . . 44
Notes . . . . . . . . . . . . . . . . . . . . . . . . . . . . . . . . . . . . . . . . . 45

User’s Manual
General information 5
Chapter 1
GENERAL
INFORMATION
1-1Manufacturer's details
Manufacturer: INIM Electronics s.r.l.
Production plant: Via Fosso Antico - Centobuchi
63076 Monteprandone (AP) - Italy
Tel: +39 0735 705007
Fax: +39 0735 704912
e-mail: [email protected]
Web: www.inim.biz
Any persons authorized by the manufacturer to repair or replace the parts of this
system, hold authorization to work on INIM Electronics brand devices only.
1-2Description of the product and
various models
Description: Intrusion control panel
Models: SmartLiving 505
SmartLiving 515
SmartLiving 1050
SmartLiving 1050L
SmartLiving 10100L
Applied Normative: CEI 79-2:1998+Ab:2000, CEI EN 50131-3:2009 and
CEI EN 50131-6:2008
Certification agency: IMQ Security Systems
Security rating: 3
The following table describes the main features of the various models of the
SmartLiving series:
Table 1: Control panel - Main Features
SmartLiving intrusion control panels 505 515 1050 1050L 10100L
Total terminals
515 50 100
Terminals on panel
510
Terminals on panel configurable as inputs
510
Terminals on panel configurable as Rollerblind/Shock
2
Terminals on panel configurable as outputs
05
Total zones
10 30 100 200
Relay outputs on panel motherboard
1
Open-collector outputs on panel motherboard
2 (150mA) 2 (500mA)
Partitions
51015
Keypads (JOY, nCode/G, Concept/G)
51015
nBy Readers
10 20 30
Digital keys and keyfobs
50 100 150
Possible key-code combinations
4294967296
Codes
30 50 100
Scenarios
30
Timer
10 20
Recordable Events
500 1000

6General information
User’s Manual
1-3Environmental Conditions
The JOY/GR, JOY/MAX, nCode/G, Concept/G, IB100, FLEX5, Nexus and nBy/X
peripheral devices are for indoor installation only and operate best under the
following environmental conditions:
•Temperature:from-10°to+40°C
•Maximum humidity: 75% (without condensation)
•Environmental class:II
The nBy/S reader is suitable for indoor or outdoor installation, and operates best
under the following conditions:
•Temperature:from-25°to+70°C
•Maximum humidity: 93% (without condensation)
•Protection grade:IP34
•Environmental class:IV
1-4Products certified and
conforming to directives
When duly programmed, the SmartLiving intrusion control panel and the devices
described in this manual have been certified by the IMQ - Security Systems
agency as compliant with CEI 79-2:1998+Ab:2000, CEI EN 50131-3:2009 and
CEI EN 50131-6:2008.
The Control panel enclosure houses the following certified devices:
• INIM Electronics switching-power supply
• Mother board (IN082 or IN088)
• SmartLogos30M voice board (accessory item)
• FLEX5/U input/output expansion board (accessory item)
• AUXREL32 relay board (accessory item)
• SmartLAN/SI and SmartLAN/G LAN interface boards (accessory items)
• IB100/RU BUS isolator board (accessory item)
• ProbeTH thermal-probe kit for battery-charge optimization (accessory item)
• TamperNO tamper-protection kit (accessory item)
• Backup battery, 12 V @ 17 Ah
• Motherboard (IN082 and IN088) integrated Type B notification apparatus
The control panel compliancy is also guaranteed when connected to the following
certified devices:
• FLEX5/P input/output expansion boards
• Joy/MAX, Joy/GR, Concept/G, nCode/G keypads
• nBy/S outdoor-mount proximity readers
• nBy/X universal-mount proximity readers
• IB100/RP BUS isolator
• Self-powered IB100/A BUS isolator
• nCard access-control card for proximity readers
• nTag access-control tag for proximity readers
Compliancy is not guaranteed when the control panel is connected to the
following uncertified devices:
• SmartLink/GWB GSM interface with 12V @ 1.2 Ah battery
• BUS-connected Nexus interface
• BUS connectable Ivy-B, Ivy-BF, Ivy-BM, and Ivy-BFM self-powered
sounderflashers for outdoor installation
• Wireless devices such as: AIR2, AIR2-BS100 (transceivers), Air2-IR100 (PIR
detectors), Air2-MC100 (magnetic contacts), Air2-KF100 (access-control
keyfobs)
• SmartModem100 Teleservice modem
TYPE B NOTIFICATION
APPARATUS
ATS2 notification apparatus (refer to EN50131-1:2008-02, paragraph 8.6
Notification, Table 10, page 46, Grade 3and EN50136) characterized by:
• Transmission time - classification D2 (60 seconds)
• Transmission time - max. values M2 (120 seconds)
• Classification time - classification T2 (25 hours)
• S0 Substitution security (no detection of device substitution)
• I0 Information security (no detection of message substitution)

User’s Manual
General information 7
1-5Manuals
1-5-1
Installation Manual
The installer should read carefully through the Installation Manual and should be
familiar with all the components and the operating procedures of the SmartLiving
system. In order to provide adequate protection, the installer must adhere to all
the manufacturer's guidelines relating to the active and passive security devices of
this system. It is the installer's responsibility to inform the system users that,
regardless of its capabilities, an intrusion alarm system is not a substitute for the
necessary precautions building occupants must take to prevent intrusion.
1-5-2
User's Manual
(this manual)
MANUAL CODE
DCMUINE0SLIVINGE
VERSION4.00
The installer should read carefully through the User's Manual (supplied with each
control panel). Once the system has been installed, the installer must ensure that
the User's Manual is available to the users for consultation, and that they fully
understand how the system works and are aware of all the functions, settings and
procedures.
1-6Operator Qualifications
1-6-1
Installer
The installer is the person (or group of persons) who sets up and programs the
entire security system in accordance with the purchaser's requirements and in
respect of the safety laws in force. As the only individual in contact with system
users, it is the installer's responsibility to instruct them on how to use the
security system properly.
Under normal circumstances, the installer is not allowed to arm/disarm the system
without previous authorization from the user. All the system partitions must be
disarmed before accessing the parameter programming phase.
1-6-2
User
The users are the occupants of the building where this intrusion control panel is
installed. Only authorized users can operate the system.
The most common operations can be carried out without code/key verification.
This method must be expressly requested by the main user, as it considerably
lowers the security level of the system and may cause false alarms, accidental
arm/disarm operations, etc.
1-7Access Levels
The normative defines the following system-access levels, regardless of system-
access limitations:
•Level 1 - access by any person (e.g. passer-by)
•Level 2 - user access
•
Level 3
- installer or maintenance operator access (authorized by user - level 2)
•Level 4 - manufacturer access
1-8Conventions – Glossary
In order to help users understand the terminology utilized in this manual and
improve your knowledge of this system and its operating procedures, read
carefully through the Technical Terminology – Glossary (refer to Appendix A,
Technical terminology and Glossary).
The appendix contains the definitions of technical terms commonly used in the
field of security, therefore, relevant to the SmartLiving system.
8The SmartLiving System
User’s Manual
Chapter 2
THE SMARTLIVING
SYSTEM
2-1Introduction
INIM Electronics wishes to thank you for choosing this SmartLiving intrusion
control system. Its advanced technology and user-friendly operations provide an
extremely high level of protection combined with ease-of use.
INIM Electronics recommends that all parts of this manual be read thoroughly
before starting up SmartLiving system. Once you have become accustomed to
the day-to-day operations, your installer will explain and if required, program the
advanced functions provided by the system.
A typical system comprises:
• SmartLiving control panel
• intrusion detection devices (PIR or microwave detectors, magnetic contacts,
linear beam detectors, etc.)
• system control peripherals: proximity readers, keypads
• alarm signaling devices which generally signal the events detected by the
system (sounders, flashers, etc.)
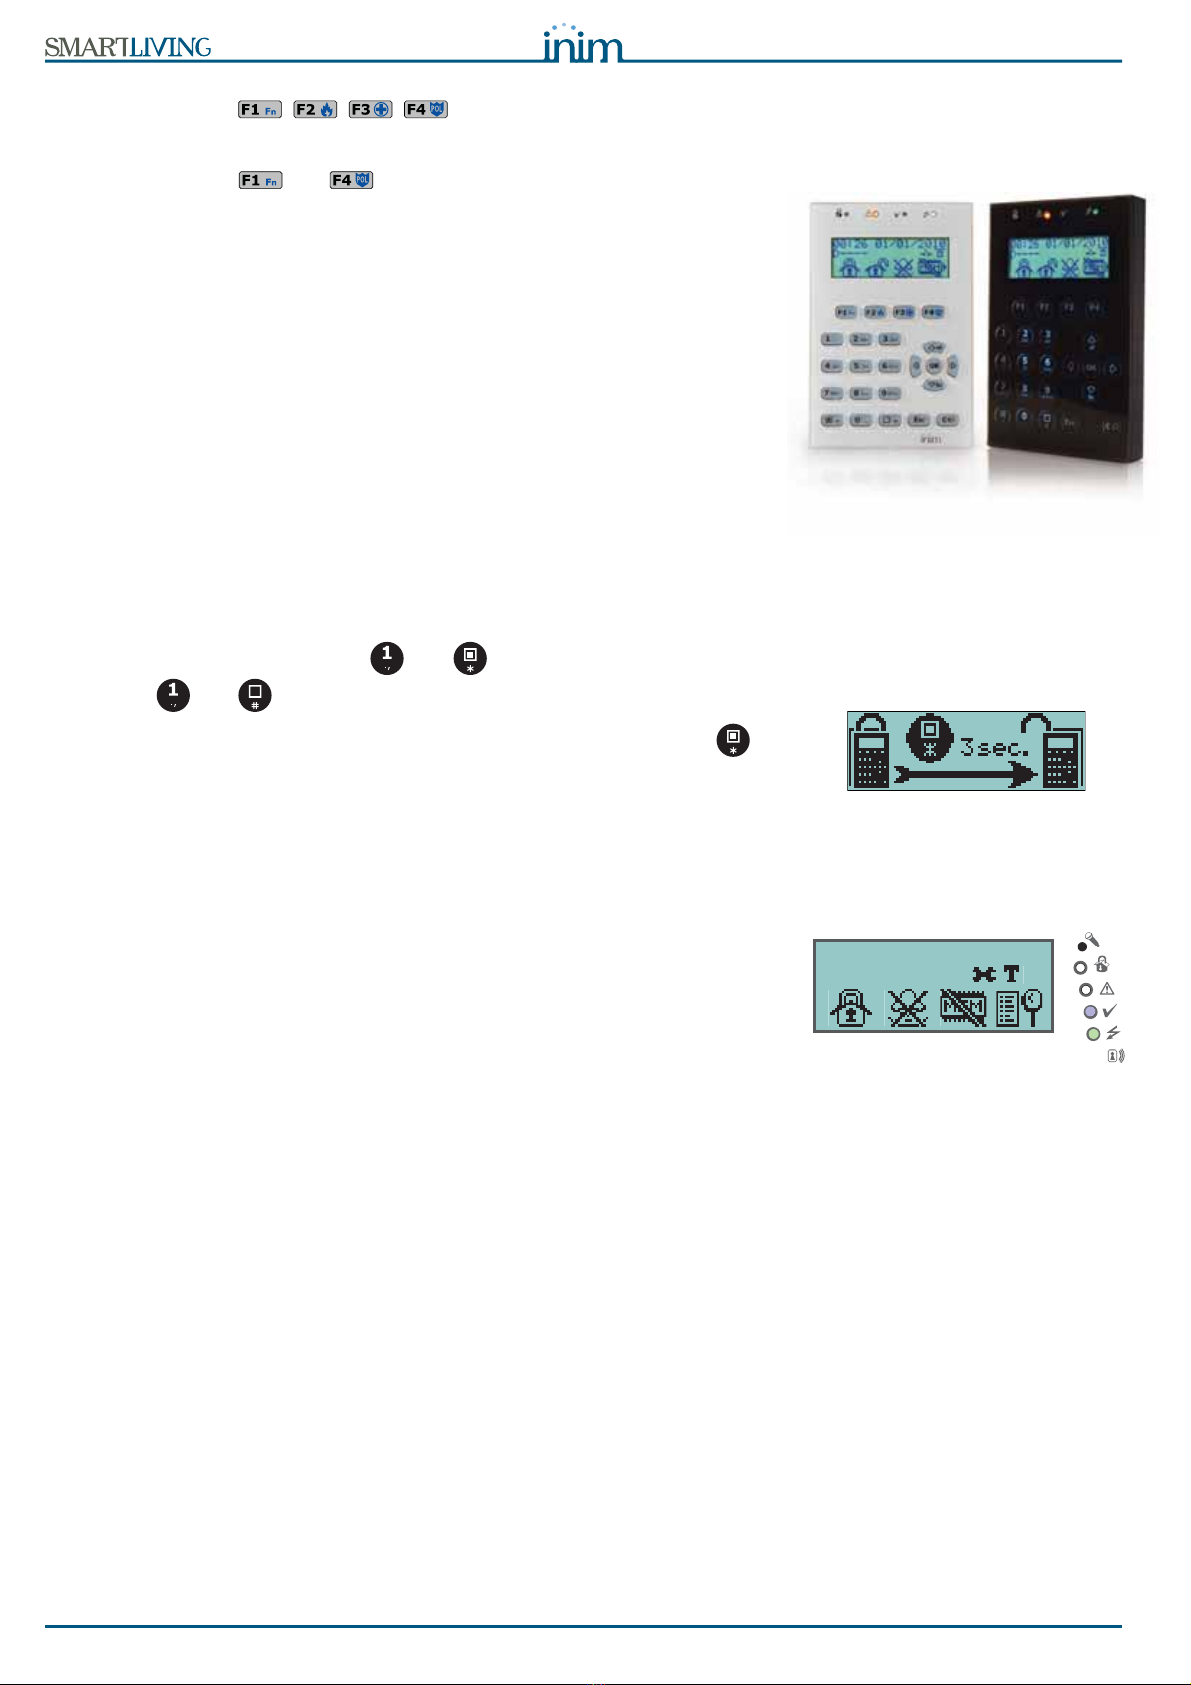
The keypad (Joy/GR, Joy/MAX, nCode/G or Concept/G) is an extremely flexible
peripheral device which allows you to manage the system with ease. The graphic
display provides all the information necessary for fast understanding of the
system status, and the steps necessary to take in the event of an alarm. All users
have PINs which allow them to access and control the system in accordance with
their permitted access level.
Advanced voice technology guides you through the operations by means of clear
voice prompts which explain the operations you must undertake.
nBy readers (2 versions available: nBy/S wall-mount and By/X flush-mount)
allow you to access and control the system. Although these devices are not as
flexible as keypads, they provide a quick and easy way of carrying out day-to-
day operations such as arming and disarming the system. Authorized digital-key
users can operate the system in accordance with their programmed access level
(enabled functions, etc.) by holding the key in front of the proximity key reader.
All SmartLiving control panels are capable of managing INIM's “Air2” two-way
wireless system. This system integrates wireless devices (detectors, keyfobs,
etc.) into the hardwired environment.
SmartLiving control panels are capable of managing various event types (alarms,
faults, tamper, code/key identification, arm/disarm operations, etc.) and event-
response actions (audible/visual signaling, telephone calls, SMS text messages
over the GSM network and, with the addition of the optional SmartLan/G board,
e-mails with attachments). The calls can be:
1. report calls to alarm receiving centres - via the most widely used reporting
protocols.
2. voice calls to contact numbers - using advanced voice technology to inform
contact persons of the active alarm condition.
Events can also be announced on JOY/MAX keypads.
The SmartLiving intrusion control panel also provides automatic features, such
as:
• arm and disarm operations set up on a weekly basis
• simple yet useful access-control functions which allow the system to deny
access to specific keys/codes at certain times
• pre-set activation/deactivation of household devices (building automation)
such as courtesy lights
• other similar automatic facilities.

User’s Manual
The SmartLiving System 9
2-2The technologies
Expertise in the arena of total security and a commitment to precision and high
quality allow INIM's R & D professionals to deliver excellence in design technology
and dependability through time.
2-2-1
EASY4U
This user-friendly tool provides an interesting array of graphic features and
functions. All SmartLiving intrusion control panels are controlled by keypads
equipped with 96x32 pixel graphic displays. The four-line alphanumeric display
screen (16 characters per line) can be edited or used to view the icons associated
with various customized user-operations. The keypad shortcuts allow time-
consuming sequences to be transformed into simple keystroke actions. In this
way, frequently-used or repetitive sequences of keystrokes can be eliminated.
The shortcuts can be used for a variety of tasks and make operations less tedious
and less error-prone. The use of customizable graphic-objects, which indicate
the system status, helps users to understand what is happening on the system..
Besides accepting various commands (Away Arm, Stay Arm, Disarm, etc.), the
nBy reader also allows users to manage the "shortcuts" programmed on the
keypad.
The JOY/MAX keypad provides a built-in nBy key reader.
2-2-2
VOIB
This is an acronym for Voice Over Inim-Bus. VOIB technology allows the system
to manage end-to-end digitized voice transmissions at extremely high-speed over
the IBUS. Voice transmissions can be carried to all points of the IBUS. The JOY/
MAX keypad provides a built-in microphone and speaker for message recording
and playback. The 30 minute capacity voice board allows each event to be
associated with a message. Voice digitizing and compression allow the signal to
be transmitted in data packets over the bus to recipient keypads where it is
announced. Voice digitizing and the characteristics of the I-BUS allow end-to-end
“noise-immune” voice transmissions without the need of any additional wiring.
2-3Keypads
The keypad allow users to manage all aspects of the security system.
SmartLiving control panels support JOY/GR, JOY/MAX, nCode/G and Concept/G
keypads. The features of these keypads are described in the following table:
The various keypad models provide diverse functions, casings and key access.
Joy keypads have a flip which protects the keys, whereas, the keys of the nCode/
G and Concept/G keypads are on view. The Concept/G is a touch keypad.
The keypad is the device that allows authorized code users to control the entire
system or specific partitions. However, system control can be extended to other
building occupants who do not hold a valid code.
The SmartLiving intrusion control panel offers an array of innovative features. In
addition to the traditional User menu (accessed by means of user-code entry),
Table 2: Keypads - functions
JOY/MAX JOY/GR nCode/G Concept/G
Graphic display
Yes
Keys
23
(in soft rubber)
23
(touch)
Signaling LEDs
4
Buzzer
Yes
Terminals
21
Microphone
Yes No
Loudspeaker
Yes No
Built-in proximity reader
Yes No
Temperature sensor
Yes No
Backlight activated by proximity
sensor
No Yes
Block keypad
No Yes
10 The SmartLiving System
User’s Manual
this system provides a series of shortcuts" (refer to "Shortcuts" in Appendix)
associated with keys .
Generally, intrusion control panels do not allow access to the system via keypad
without code entry. However, by means of the customized (personal) shortcuts
associated with keys , ..., it is possible to enable building occupants to
access and operate the system without code entry.
The installer must program the shortcuts to suit user requirements and explain
how they are used. For example, it may be useful to allow all the building
occupants to arm the system without code entry, as this operation increases the
level of system security. However, operations which lower the level of system
security should be reserved for code users only. Under normal circumstances,
operations which increase system security can be allowed without valid-code
entry whereas, operations which lower system security (Disarm, Delete Alarm/
Tamper memory, Deactivate Alarm/Tamper outputs) should be allowed only after
valid-code entry.
Each keypad is assigned (by the installer) to the partitions it controls.
JOY/MAX keypads also provide a programmable chronothermostat function. This
function allows you to set up zone management (one zone per keypad) of the
heating/air-conditioning system.
The temperature is gauged by a built-in temperature sensor. The hysteresis is
fixed at 0.4°C.
The Concept/G keypad provides a further two options relating to direct user
access.
A special feature allows activation of the backlight of the display and keys when
users approach the keypad. This is achieved through a proximity sensor which
can be activated by pressing keys and simultaneously and deactivated
by pressing and .
The other option, block/unblock keypad, can be achieved by pressing key for
3 seconds. If the block keypad option is enabled, the display will show the icon
opposite.
2-3-1
Display - description
The brightness and contrast of the backlit-graphic LCD (96 x 32 pixel) can be
adjusted by way of the respective options on the User Menu (refer to paragraph
5-8 Keypad settings).
The first line of the display shows the date and time. If you are using a JOY/MAX
keypad, the date and room temperature will alternate on the screen every 3
seconds.
The left side of the second line shows the characters that indicate the current
status of the partitions the keypad is assigned to:
•
D
= partition disarmed
•
A
= partition armed in Away mode (interior and perimeter zones armed)
•
S
= partition armed in Stay mode (perimeter zones armed)
•
I
= partition armed in Instant mode (perimeter zones armed with no delay)
•
-
= partition does not belong to the keypad
The displays of the SmartLiving 505 and 515 models show 5 characters indicating
the status of partitions 1 to 5 (both models have 5 partitions).
The displays of the SmartLiving 1050 and 1050L models show 10 characters
indicating the status of partitions 1 to10 (both models have 10 partitions).
The display of the SmartLiving 10100L model, alternates at 3 second intervals,
between 10 characters indicating the status of partitions 1 to 10 and 5 characters
indicating the status of partitions 11 to 15 (the 10100L model has 15 partitions).
If a partition has memory of an alarm or tamper condition, the character that
represents the partition concerned will blink.
The right side of the second line shows several icons which provide visual
information regarding the system.
18:23 30/10/2011
DASIDASI--

User’s Manual
The SmartLiving System 11
Note
If duly programmed by the installer, the icon will not be shown when Teleservice is
enabled.
The remaining section of the display (that is, the third and fourth line) is occupied
by the icons which correspond to the Shortcuts associated with keys , ...,
. If the function keys have not been associated with shortcuts, the third and
fourth line will be empty.
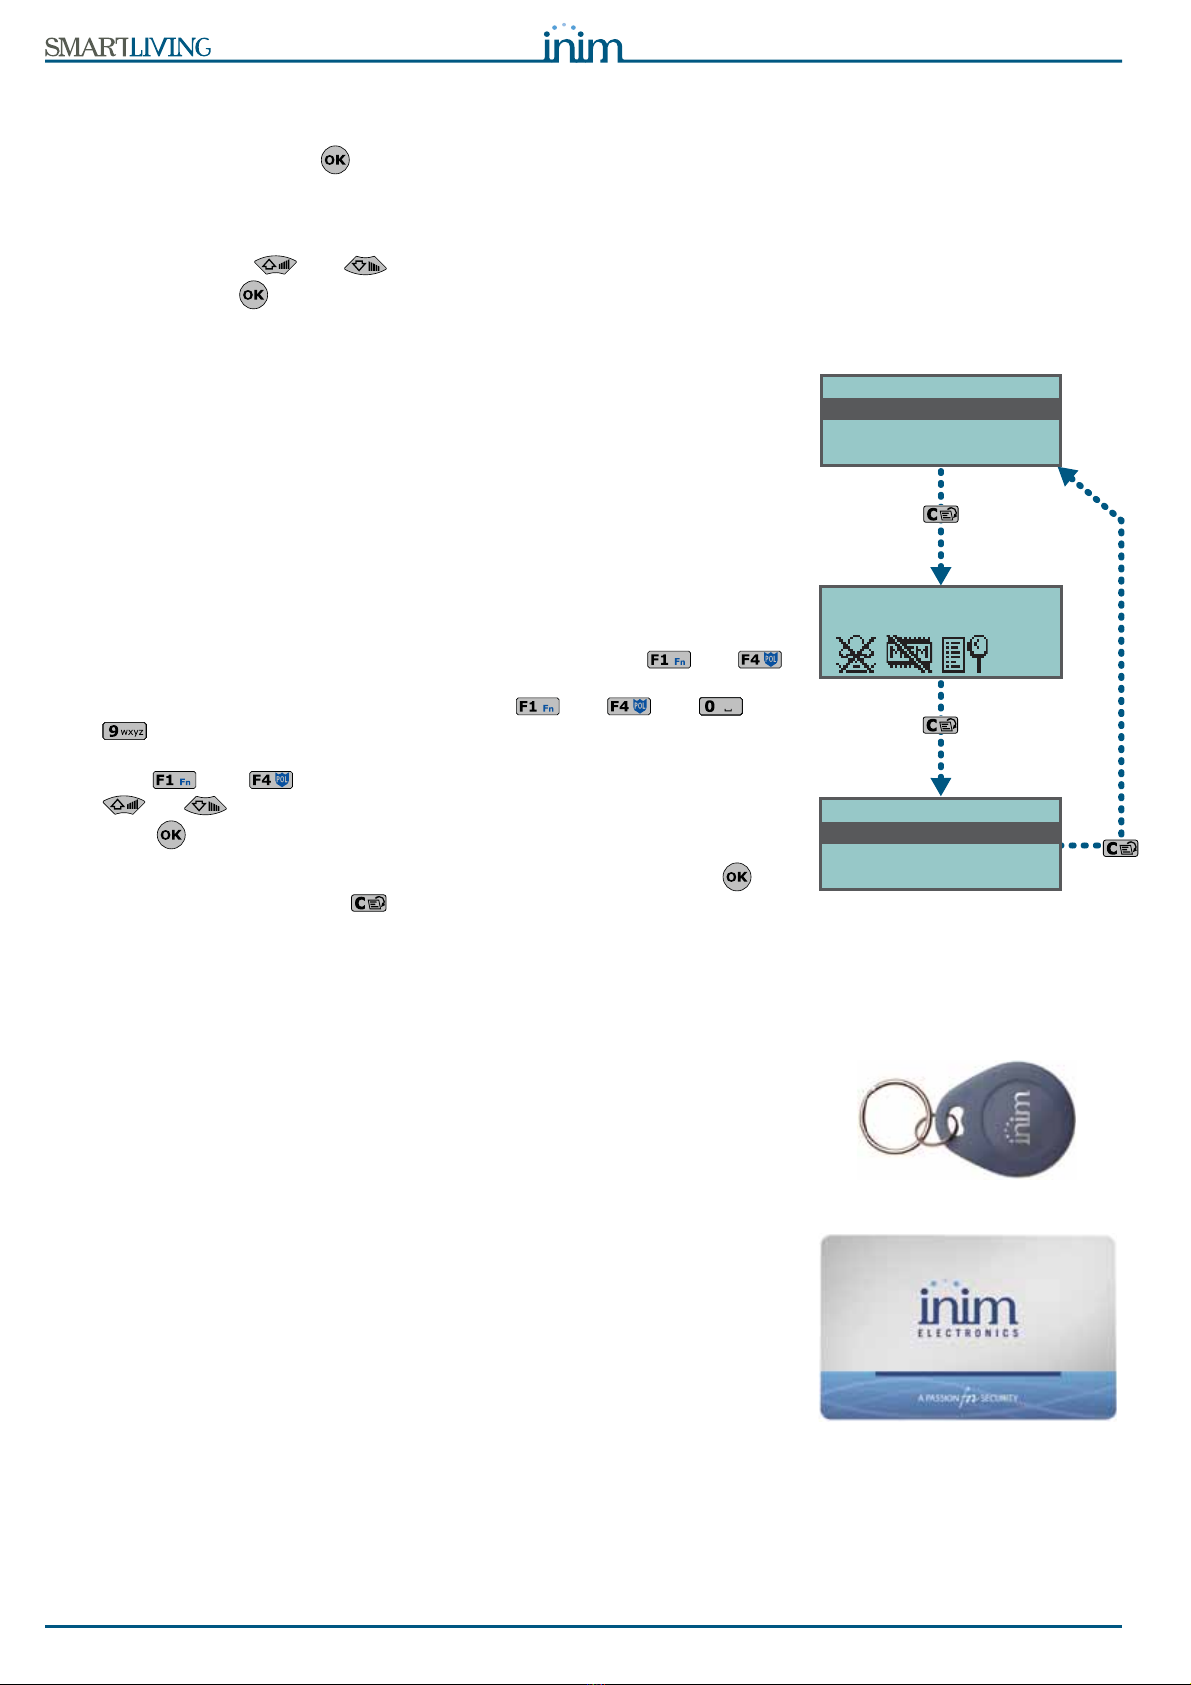
2-3-2
Display - standby status
A) If the control panel is in Maintenance status, the first line on the screen will
show the string indicated in the figure. The characters “K03” indicate the
address assigned to the keypad (in the example, the keypad is at address
3). If you are using a Joy/MAX keypad, the string will also show “P05”,
which is the address assigned to the built-in proximity reader (in the exam-
ple, the reader is at address 5).
B) If any of the keypad partitions has Alarm or Tamper memory, the first line
of the screen will flash the descriptions of the zones concerned every 3 sec-
onds. In the event of Alarm or Tamper memory, the red LED on the key-
pad and the characters corresponding to the partitions concerned will blink.
C) If the control panel is in Maintenance status and any of the keypad parti-
tions has memory of an Alarm or Tamper condition, the first line on the
screen will show the strings described in points A) and B).
D) If the "View open zones of disarmed partitions" option is enabled, the first
line on the screen will flash (approximately every 3 seconds) the descrip-
tions of any zones which are not-in-standby status when the keypad parti-
tions disarm. Any auto-bypassable zones will be shown in white on black
background.
Note
Case D is discernible from case B in the fact that in case B, the red LED on the keypad
blinks.
Case D is viewable only when the conditions of cases A, B and C are not present.
Table 3: The icons (shown on the second line of the display)
Icon Name Not present On solid Blinking or interchanging icons
Telephone line
Telephone line busy (Icon blinking)
Telephone line down
Peripheral tamper
All peripherals are properly
placed and all enclosures
covers are closed.
At least one peripheral (keypad,
reader, expansion) is in tamper
status (enclosure open or device
dislodged).
(Interchanging icon)
All peripherals are properly placed and all
enclosure covers are closed, however,
tamper has been detected and cleared
(Tamper memory).
Peripheral Loss
All the peripherals in the
system configuration are
responding properly
(Present).
At least one peripheral (keypad,
reader, expansion) is not
responding properly.
(Interchanging icon)
All the peripherals in the system
configuration are responding properly,
however, loss of a peripheral has been
detected and cleared (Peripheral Loss
memory).
Answerphone
Answerphone function
disabled Answerphone function enabled
Teleservice
Teleservice disabled Teleservice enabled
Key
(Icon blinking)
False key
Control panel Tamper
The Control panel is
properly placed and the
enclosure is closed.
The Control panel is in tamper
status (enclosure open or device
dislodged).
(Interchanging icon)
The Control panel is properly placed and
the enclosure is closed, however, panel
tamper has been detected and cleared
(Panel tamper memory).
Thermostat:
Winter mode
The thermostat option is
disabled.
The keypad thermostat option is
enabled in Winter mode
(Heating).
Thermostat:
Summer mode
The keypad thermostat option is
enabled in Summer mode (Air-
conditioning).
Thermostat:
Heating/Air-
conditioning
Heating/Air-conditioning
Off. Heating/Air-conditioning On.
MaintenanK03 P05
DASIDASI--
Panel T03
DASIDASI--
Panel T03
DASIDASI--

12 The SmartLiving System
User’s Manual
2-3-3
Using the keypad
The following section describes how the keys are normally used. Some of the
keys may have specific functions which will be indicated when necessary.
2-3-4
Emergency keys
This control panel provides 3 "key-duos" for Emergency Calls which can be
activated by pressing the respective keys on any of the system keypads:
1. + = Fire Emergency
2. + = Ambulance Emergency
3. + = Police Emergency
Utilization of any of the "key-duos" will generate the respective events and
actions (e.g. activation of outputs and calls).
To activate an emergency call, press simultaneously and hold keys + ,
or + , or + for at least 3 seconds until the selected
emergency call is confirmed by a beep.
Note
If any two function keys are pressed at the same time, the functions relating to the icons
associated with the keys will not be activated.
2-3-5
Visual signals on the keypad LEDs
The following table describes the visual signals on the keypad LEDs.
Table 4: The keys
Keys Name Typical application
Number keys
Used to type in User PINs
OK
Confirms the selected item (parameter, etc.)
UP, DOWN
Navigate through the menu lists or adjust keypad volume
LEFT, RIGHT
Scroll along the data rows (for example, partitions in the events log, etc.).
C
Steps back on the open menu without changing the selected item (parameter, etc.) or,
after entering a User PIN and pressing
, runs through the 3 User-menu templates
(refer to paragraph 2-5 User Codes) each time it is pressed.
ESC
Exits the User menu without changing the selected item (parameter, etc.).
ENABLE
Enables options (refer to paragraph 5-4 Activations)
DISABLE
Disables options
F1, F2, F3, F4
or function keys
Activate the shortcuts which correspond to the associated icons.
Can be used also as Emergency keys (refer to paragraph 2-3-4 Emergency keys).
Panel T03
DASIDASI--
Press simultaneously
Table 5: Keypad LEDs
LED Red Yellow Blue Green
OFF
(no light)
All the keypad partitions are
disarmed. No faults present. Open zones on the keypad
partitions.
Primary power failure (230V
a.c.)
ON
(Solid)
At least one of the keypad
partitions is armed.
At least one fault has been
detected.
All the zones on the keypad
partitions are in standby
status: Ready to arm.
Primary power OK (230V a.c.)
Slow blinking
(ON: 0.5sec
OFF: 0.5sec)
All the keypad partitions are
disarmed. Memory of alarm/
tamper on at least one of the
keypad partitions or memory
of a system alarm.
No faults present. At least one
of the zones belonging to the
keypad partitions is either
disabled (inhibited) or is in
Tes t st atu s
All the zones belonging to the
keypad partitions are in
standby status. (For JOY/MAX
only: an unplayed voice
message is present in the
memo box).
Fast blinking
(ON: 0.15sec
OFF: 0.15sec)
At least one keypad-partition
is armed. Memory of alarm/
tamper on at least one of the
keypad partitions or memory
of a system alarm.
At least one fault is active and
at least one zone belonging to
the keypad partitions is either
disabled (inhibited) or is in
Test status.
Open zones on the keypad
partitions. (For JOY/MAX only:
an unplayed voice message is
present in the memo box).
User’s Manual
The SmartLiving System 13
The list of faults signaled on the yellow fault LED can be found in the table in
Appendix C, Fault signals.
Following is the list of events which cause the Red System Alarm LED
to
blink:
• Open panel tamper
• Dislodged panel tamper
•Expansiontamper
•KeypadTamper
• Reader Tamper
• Expansion Loss
•KeypadLoss
•ReaderLoss
•Falsekey
“FALSE KEY”If the “False key” event is configured as a “Silent event”, the red LED will not
blink.
“50131STATHIDDEN”If this option is enabled, the status of the partitions will be hidden. If a valid code
is entered at a keypad, the real-time status will be indicated on the keypad
concerned for 30 seconds. Additionally:
• If the partitions are armed, the status of the system will be hidden from non-
authorized users.
•• Red keypad LED Off
•• Yellow keypad LED Off
•• Green keypad LED On solid
•• Status icons not present
•• Alarm and Tamper memory hidden
•• If a particular event occurs more than 5 times when the partitions are
armed, it will not be signaled as having occurred more than 5 times. This is
due to the limitation placed on the counter of each event. The counters will
reset to zero each time all the partitions are disarmed.
• If the partitions are DISARMED:
•• LEDs operating normally.
•• Status icons present
•• Alarm and Tamper memory visible
2-3-6
Signaling on the Buzzer
The buzzer signals the running Entry, Exit and Pre-arm times (refer to Appendix
A, Technical terminology and Glossary) of enabled partitions.
2-3-7
Emergency status
In the event of a keypad configuration or communication error between the
system peripherals, the display will show one of the templates opposite.
If this occurs, you must contact your installer immediately and get the fault
cleared.
Buzzer signal Description
8 pulses with 5 second pause Entry time
3 pulses with 5 second pause;
4 short pulses with 5 second pause during the
final 20 seconds of the Exit Time
Exit time
1 pulse with 5 second pause Pre-arm time
- JOY/MAX -
FW RELEASE 3.00
NO COMMUNICATION
K01 P14
- JOY/MAX -
FW RELEASE 3.00
NOT ENROLLED
K01 P14
14 The SmartLiving System
User’s Manual
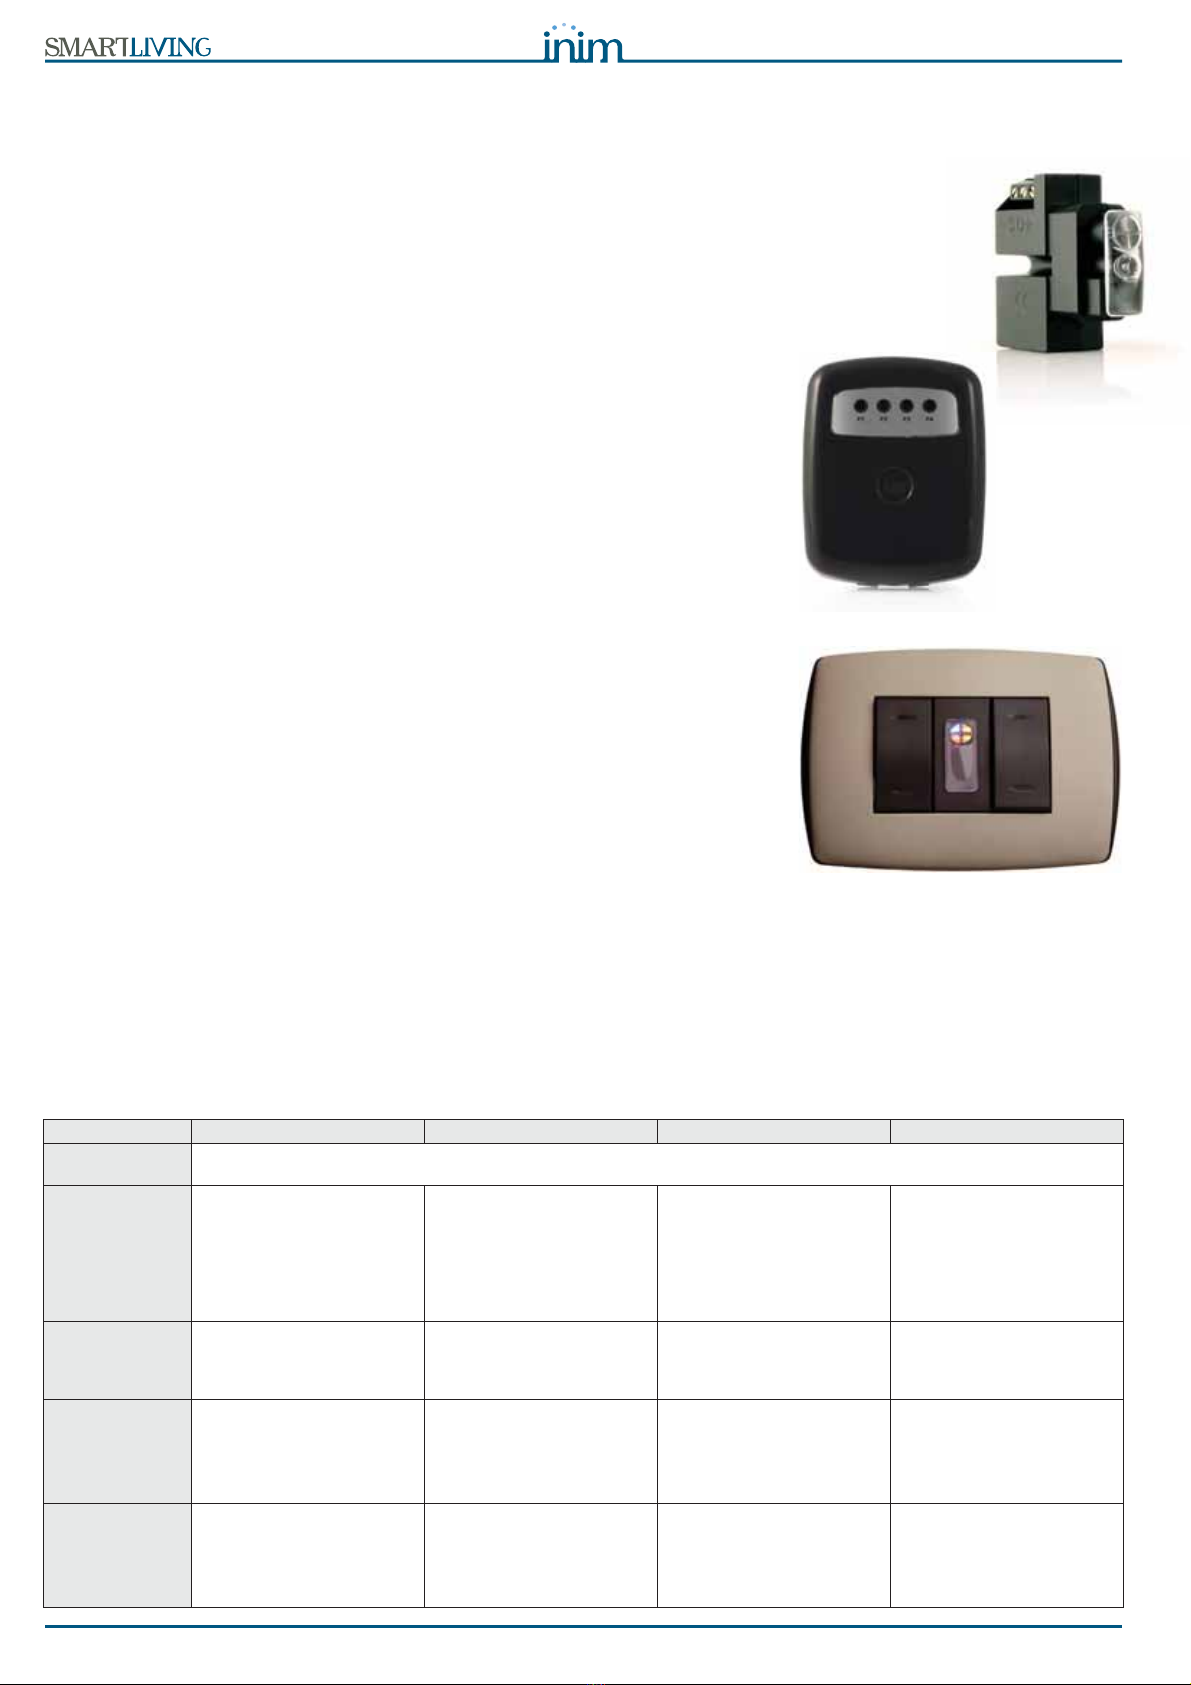
2-4Reader - nBy
The SmartLiving intrusion control panel manages nBy/S and nBy/X readers and
also JOY/MAX-keypad readers.
The proximity reader is the easiest way for users to interact with the SmartLiving
intrusion control system.
The wall-mount nBy/S model (anchored by means of two screws) is IP34 rated
and therefore suitable for outdoor use.
It is equipped with a buzzer and 4 LEDs:
•F1- Red
•F2 - Blue
•F3 - Green
•F4 - Yellow
The Universal flush-mount nBy/X (Patent Pending) has been especially
designed to integrate with all brands of cover plates.
It is equipped with 4 LEDs (red, blue, green and yellow).
Readers do not provide the same extent of system control as keypads, however,
these devices are quick and easy-to-use and are extremely useful when carrying
out day-to-day operations (arm/disarm partitions, etc.).
Readers are usually located near the main entry/exit points of the protected
building. These devices allow system access to valid keys only. The system
readers are capable of recognizing a large number of keys, each characterized by
customized parameters.. Each reader is enabled to operate on specific partitions,
whereas each key is enabled to operate only on the partitions the user is allowed
to control. Therefore, if a key is held in the vicinity of a reader, it will be possible
to control only the partitions which the two devices have in common.
Each reader can be programmed with up to 4 shortcuts (one per LED).
Each key can be programmed with up to 4 shortcuts.
Unlike most traditional readers (which generally carry out arm/disarm operations
only), nBy readers also manage a series of useful shortcut commands. For
example, it is possible to associate two shortcuts to the red and blue LEDs for
arm and disarm operations, and a shortcut to the green LED for gate control, and
yet another to the yellow LED for "Clear call queue" operations.
The buzzer signals the running Entry, Exit and Pre-arm time of the reader partitions
(refer to paragraph 2-3-6 Signaling on the Buzzer).
2-4-1
Signaling on the Reader LEDs
The LEDs have two distinct operating in modes:
1. When no key is present at the reader (refer to Table 6: Reader LEDs with no key
at reader), the LEDs will indicate the current status of the associated shortcut.
2. When a key is present at the reader (refer to Table 7: Reader LEDs with key at
reader), the LEDs will indicate (in rapid succession) the available shortcuts.
Table 6: Reader LEDs with no key at reader
LED Red Blue Green Yellow
OFF
(All LEDs Off)
All the reader partitions are disarmed.
No alarm/tamper memory on the reader partitions or system tamper memory.
ON / OFF
(in accordance
with the
associated
shortcut)
The scenario associated with
the arming-shortcut of the red
LED is active/inactive.
The output associated with the
output-activation shortcut of
the red LED is active/inactive.
Faults are present/not present.
The scenario associated with
the arming-shortcut of the
blue LED is active/inactive.
The output associated with the
output-activation shortcut of
the blue LED is active/inactive.
Faults are present/not present.
The scenario associated with
the arming-shortcut of the
green LED is active/inactive.
The output associated with the
output-activation shortcut of
the green LED is active/
inactive.
Faults are present/not present.
The scenario associated with
the arming-shortcut of the
yellow LED is active/inactive.
The output associated with the
output-activation shortcut of
the yellow LED is active/
inactive.
Faults are present/not present.
Intermittent
blinking
(ON: 2.3sec
OFF: 0.1sec)
At least one Reader-partition is
armed.
Slow blinking
(ON: 0.5sec
OFF: 0.5sec)
The reader partitions are
disarmed.
Alarm/tamper memory on at
least one of the reader
partitions, or system tamper
memory.
The scenario associated with
the last key used is active.
Fast blinking
(ON: 0.15sec
OFF: 0.15sec)
At least one Reader-partition is
armed.
Alarm/tamper memory on at
least one of the reader
partitions, or system tamper
memory.

User’s Manual
The SmartLiving System 15
Note
If a key is present, all operations (arm, disarm, etc.) will apply only to the partitions
common to both the key and reader.
“50131READERLEDOFF”If this option is enabled and there are no keys present at the reader, the reader
LEDs will be Off.
2-5User Codes
Each User Code comprises a PIN for identification purposes and a group of
parameters which determine its rank in the system code hierarchy and the
operations the user is entitled to perform.
The PIN is made up of 4, 5 or 6 digits that the user must enter in order to allow
identification.
The PIN of the only user code enabled at default is 0001. The PINs of the
successive codes are 0002, 0003, etc.
Note
The installer is allowed to change User code PINs. The installer provides the system users
with default user PINs which they must change immediately to PIN codes of their choice.
Each user code is characterized by the following parameters, programmed by the
installer in accordance with specific user rank.
•
Partitions
- User codes can control only the partitions they are assigned to. If a
user code is entered at a keypad, the user can control only the partitions which
are common to both the code and keypad concerned. For example, if a code
enabled on partitions 1, 2, 3, 4 and 5 is entered at a keypad which enabled on
partitions 4, 5, 6 and 7, it will be able to operate on partitions 4 and 5 only.
• User Code Type - Rank There are two user code types (ranks), "Main User"
and "User". "Main User" codes can disable ordinary "User" codes and change
their PINs. However, a "Main User" code cannot be used to disable another
"Main User" code or change its PIN. "User" codes can change their own PINs
only.
•
User Menu Access mode
Each User code can access its customized menu in 3
different ways (refer to paragraph 2-5-1 Accessing the User Menu).
• Commands over-the-phone This option enables access to the system via
remote telephone. If this option is enabled, the User can send commands to
the control panel over-the-phone. Commands can be sent during calls to/from
the control panel. After a valid PIN entry on the telephone keypad the user can
activate specific shortcuts (refer to Chapter 3 - Shortcuts). This method of
entering commands will affect the code partitions only.
• Timer Restriction If a code is associated with one of the timers, it will be
able to operate the system only when the Timer is On.
• Group of outputs which can be activated/deactivated manually After
accessing the Outputs ON/OFF section (User Menu) the user can activate/
deactivate the duly programmed outputs.
•TheMenu Sections are the authorized User menu sections (refer to
paragraph 2-5-1 Accessing the User Menu, point 1.)
•Customized Shortcuts. Each code can be programmed to manage:
•• up to 12 customized (personal) shortcuts assigned to keys , ...,
•• up to 10 customized (personal) shortcuts assigned to keys , ...,
These shortcuts are available only after accessing the User Menu.
Table 7: Reader LEDs with key at reader
LED Red Blue Green Yellow
OFF
(no light)
Request to arm ALL the partitions common to both the key and reader.
ON
(only one LED
On)
Request to activate the
shortcut associated with the
red LED on the reader or the
first shortcut of the key
Request to activate the
shortcut associated with the
blue LED on the reader or the
second shortcut of the key
Request to activate the
shortcut associated with the
green LED on the reader or
the third shortcut of the key
Request to activate the
shortcut associated with the
yellow LED on the reader or
the fourth shortcut of the key
ON
(All the LEDs
On).
Request to activate the shortcut associated with the key.
Fast blinking
(ON: 0.15sec
OFF: 0.15sec
one LED only)
If the shortcut associated with
the red LED is an arming
operation, one of the
partitions concerned is not-
ready-to-arm due to zones
which are not in standby
status.
If the shortcut associated with
the blue LED is an arming
operation, one of the
partitions concerned is not-
ready-to-arm due to zones
which are not in standby
status.
If the shortcut associated with
the green LED is an arming
operation, one of the
partitions concerned is not-
ready-to-arm due to zones
which are not in standby
status.
If the shortcut associated with
the yellow LED is an arming
operation, one of the
partitions concerned is not-
ready-to-arm due to zones
which are not in standby
status.
Fast blinking
(ON: 0.15sec
OFF: 0.15sec
ALL LEDs)
If the shortcut associated with the key is an arming operation, one of the partitions concerned is not-ready-to-arm due to
zones which are not in standby status.
Type in code
***---
User Code
Manage alarms
Arm/Disarm op.
Voice functions
16 The SmartLiving System
User’s Manual
2-5-1
Accessing the User Menu
In order to access a customized (personal) menu, it is necessary to type the
respective PIN and press key
.
At this point, there are 3 different ways of allowing first-access to the user menu,
depending on the system setup, as follows.
1. The user can access the menu directly, as shown in the figure opposite
(1.); using keys and , the user can select the desired menu sec-
tion and press
for access.
Following is a the list of available User-Menu
sections:
• Manage alarms
•Arm/Disarmop.
• Voice functions
•Activations
•View
•OutputsON/OFF
•Setdate/time
•SetKeypad
•ChangePIN
• TelephoneNumbers
• Teleservice req.
•Overtime
•Thermostat
2. The keypad cancels the shortcut icons associated with keys , ...,
and replaces them with the customized shortcut icons associated with the
code, as illustrated opposite (2.); using keys , ..., and , ...,
select the desired shortcut.
3. You can access a descriptive menu of the customized shortcuts assigned to
keys , ..., as opposite (3.). To activate the shortcuts use key
or to scroll for the description of the required shortcut then
press
.
All methods allow first access to the menu after a valid code-entry followed by . At
this point, each time you press key , 3 different objects will appear, select the one
that applies to the operation concerned and then continue.
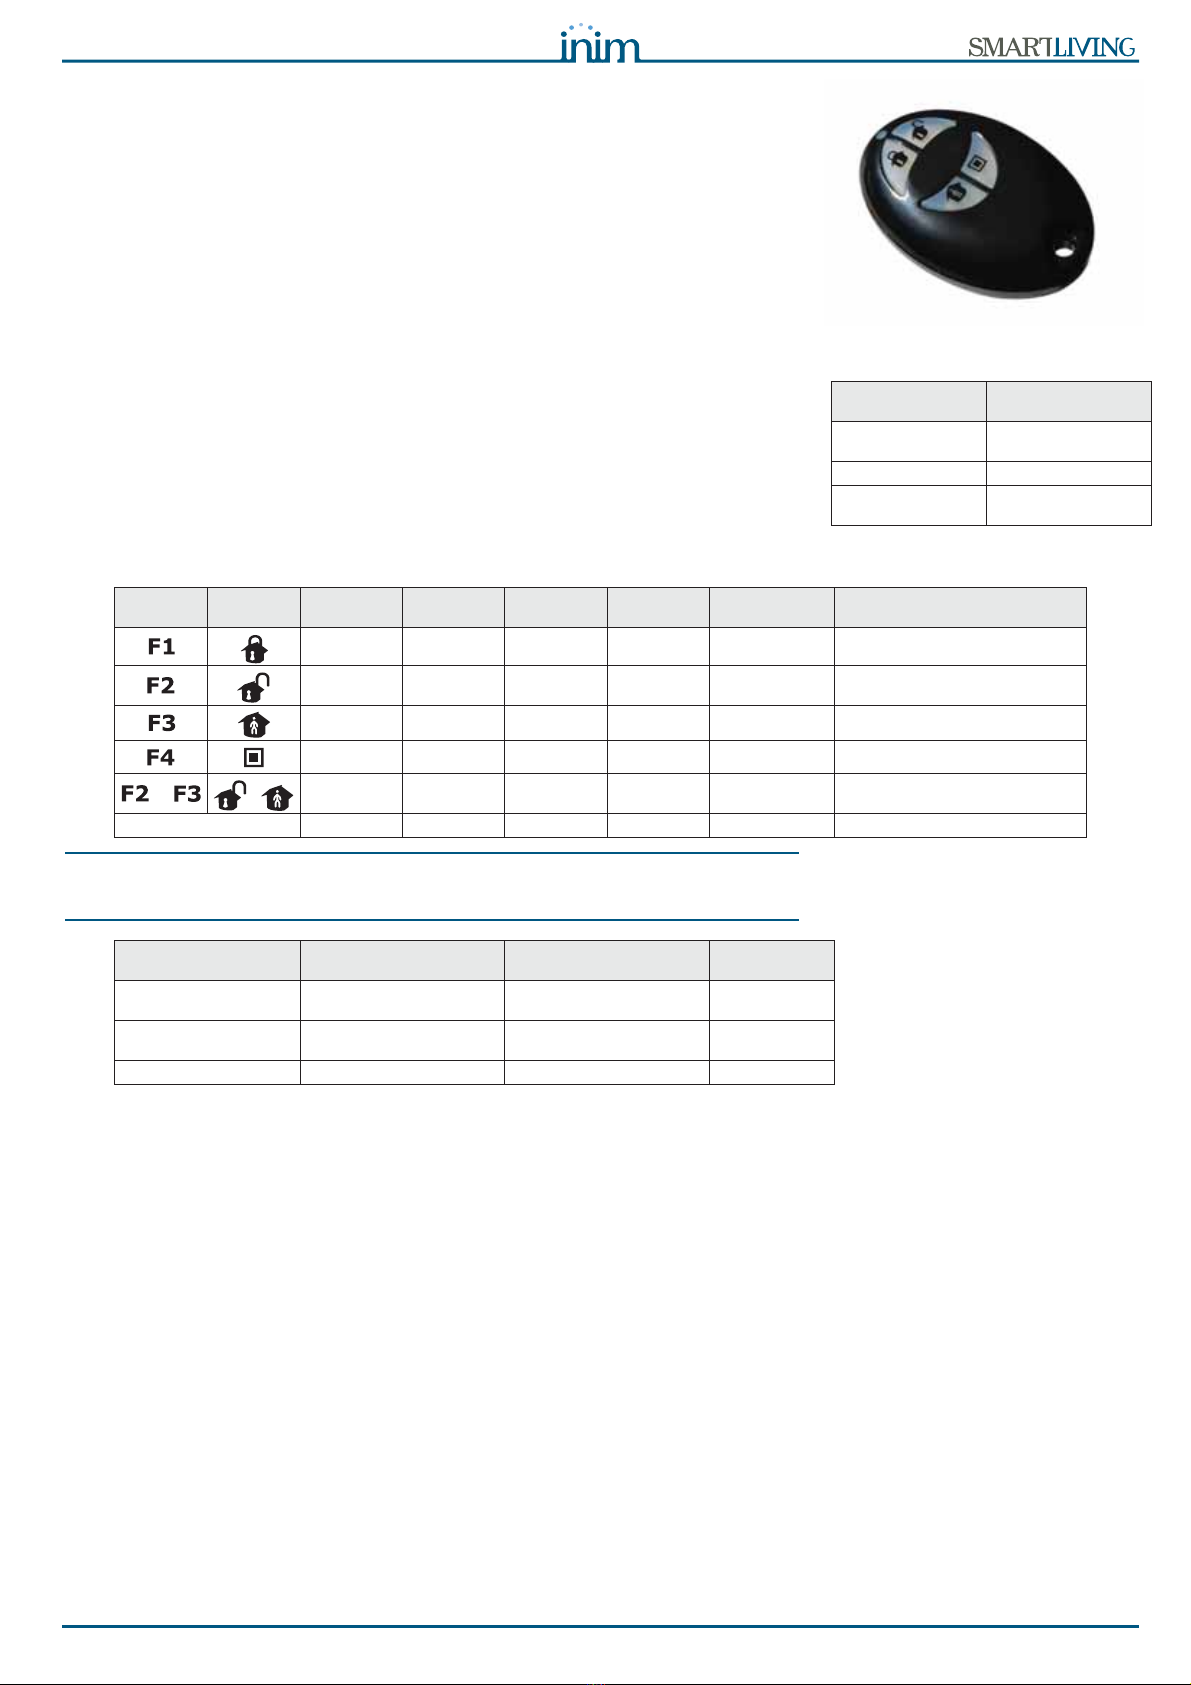
2-6Keys
The SmartLiving system is capable of managing INIM's contact-free digital-keys,
which are available in three versions:
•nKey - proximity keyfob
•nCard - proximity card
•Air2-KF100
- wireless keyfob
Each key is unique and is identified by a random code selected from over 4 billion
code combinations. During the installation phase, each key is enrolled on the
system in order to allow it to operate.
Each key is characterized by the following parameters (programmed by the
installer) in accordance with the requirements of the key user.
•Partitions - User codes can control only the partitions they are assigned to. If
a key is used at a reader, it can operate only on the partitions the two devices
have in common. For example, if the key controls partitions 1, 3, and 5 and
the reader controls partitions 1, 2 and 6, the key can operate on partition 1
only, as it is the only partition the key and reader have in common. If a keyfob
button is pressed, the user will be allowed access only to the partitions the
wireless keyfob is assigned to.
•Upto4Shortcuts.
•ATimer can be set up to restrict the use of a key. The system will allow the
key to operate the system only when the Timer is active. In this way, the user
will be unable to access the system at all other times.
•Patrol attribute - This option is usually enabled on keys used by security
personnel or night watchmen who must patrol the protected premises at
regular intervals. This type of key does not allow the user to select the “Arm
Type”. When a key with this attribute is recognized, the system will perform
the following operations:
User Code
User Code
Manage alarms
Arm/Disarm op.
Voice functions
User Code
Stop alarms
Delete memory
View menu
(1.)
(2.)
(3.)
User’s Manual
The SmartLiving System 17
1. Disarm the partitions common to the key and reader concerned.
2. Activate the respective Patrol Time for the partitions concerned.
3. Re-arm the partitions (as before) when the Patrol Time expires.
If the patrol key is held in the vicinity of the reader while the Patrol Time is still
running (for example, if the inspection ends ahead of time), the Patrol Time
will end immediately and the partitions will arm as before.
•Maintenance option - On acceptance of a key with this attribute, the system
will deactivate any outputs associated with Zone alarm/tamper and Partition
alarm/tamper events (on the Partitions the key and reader have in common).
This type of key can select the reader shortcuts and its customized (personal)
shortcuts.
2-6-1
Air2-KF100 Wireless keyfobs
The KF100 keyfob has 4 remote-control buttons which can each be programmed
with a shortcut (ask your installer for details). The graphic-choice feature allows
you to identify the buttons by numbers or icons.
The keyfob also provides 4 button-associated LEDs and a confirmation LED. As a
result of two-way communications with the BS100 transceiver, the KF100 keyfob
imparts audible and visual feedback signals (beep and LED signals) which notify
the user of the outcome of requested operations.
Note
If an operation is successful, but the corresponding LED fails to light, it is an indication that
the battery is low.
The battery must be replaced before it runs out completely.
2-7Multi-system access
Users can access several systems using the same code/key/keyfob. The user
code, key or keyfob must be enrolled separately on the control panels concerned,
and can be programmed with different attributes and functions in accordance
with the requirements of each specific system.
The keys and codes provide the systems with random codes (for keys) or PINs
(for codes) which the system associates with the respective attributes and
functions programmed by the installer. For example, a user key/code may be
enabled on partitions 1 and 2 on system A, on partitions 7, 8 and 9 on system B
and on partitions 4 and 5 on system C.
This operating method is possible for all keys and codes.
Technical
specifications Value
Battery 3V CR2032 Lithium
battery (included)
Buzzer Multitone
Rubber pushbutton
version
- with icons
- with numbers
Table 9: Feedback signals provided by KF100
Push
button Icon LED 1 LED 2 LED 3 LED 4 Buzzer signal Operation
1 flash beep Shortcut activation 1
1 flash beep Shortcut activation 2
1 flash beep Shortcut activation 3
1 flash beep Shortcut activation 4
+ +
1 flash 1 flash beep Block/Unblock keyfob
any
4 flashes 4 flashes Keyfob blocked
Feedback from panel Confirmation LED -
green Confirmation LED - red Buzzer signal
Command not
received
1 flash
Operation not done
4 flashes bop (audible
error signal)
Operation done
3 flashes long beep
18 The SmartLiving System
User’s Manual
2-8Telephone functions
The SmartLiving control panel events can be programmed to trigger report calls
to an Alarm receiving Centre (via digital dialer) and also voice calls and SMS
messages to contact numbers.
The SmartLiving control panel also accepts commands over-the-phone. Shortcut
commands can be sent during calls to/from the control panel, after valid PIN
entry on the telephone keypad.
The commands can be activated by keys “0” to “9” on the telephone keypad,
which the system associates with various shortcut actions. Each code can be
programmed with customized shortcuts, such as: arm, disarm, activate/
deactivate outputs, delete alarm memory, etc.
If the system is equipped with a SmartLogos30M voice board, the code shortcuts
assigned to keys “0” to “9” will be announced over-the-phone, in order to
facilitate operations.
Additionally, the Listen-in function allows you to eavesdrop on the protected
premises by means of the keypad microphones.
When a user requests an operation - via a correctly formatted SMS message or
voice call to the SIM card of the Nexus - the control panel will activate the
respective shortcut/event and send confirmation (feedback) of the successfully
implemented command.
2-9WEB / e-mail functions
All SmartLAN/G equipped SmartLiving control panels are capable of sending
event associated e-mails (SmartLAN/G is an optional accessory board).
The e-mail text, subject, attachments and recipients must be edited by your
installer. No changes whatsoever should be made to the e-mail structure. Each e-
mail text is capable of containing a direct link to a website or to an IP addressable
device such as an IP camera, and an attachment document/file.
For a description of a typical e-mail format, refer to paragraph 5-17-1 e-mail.
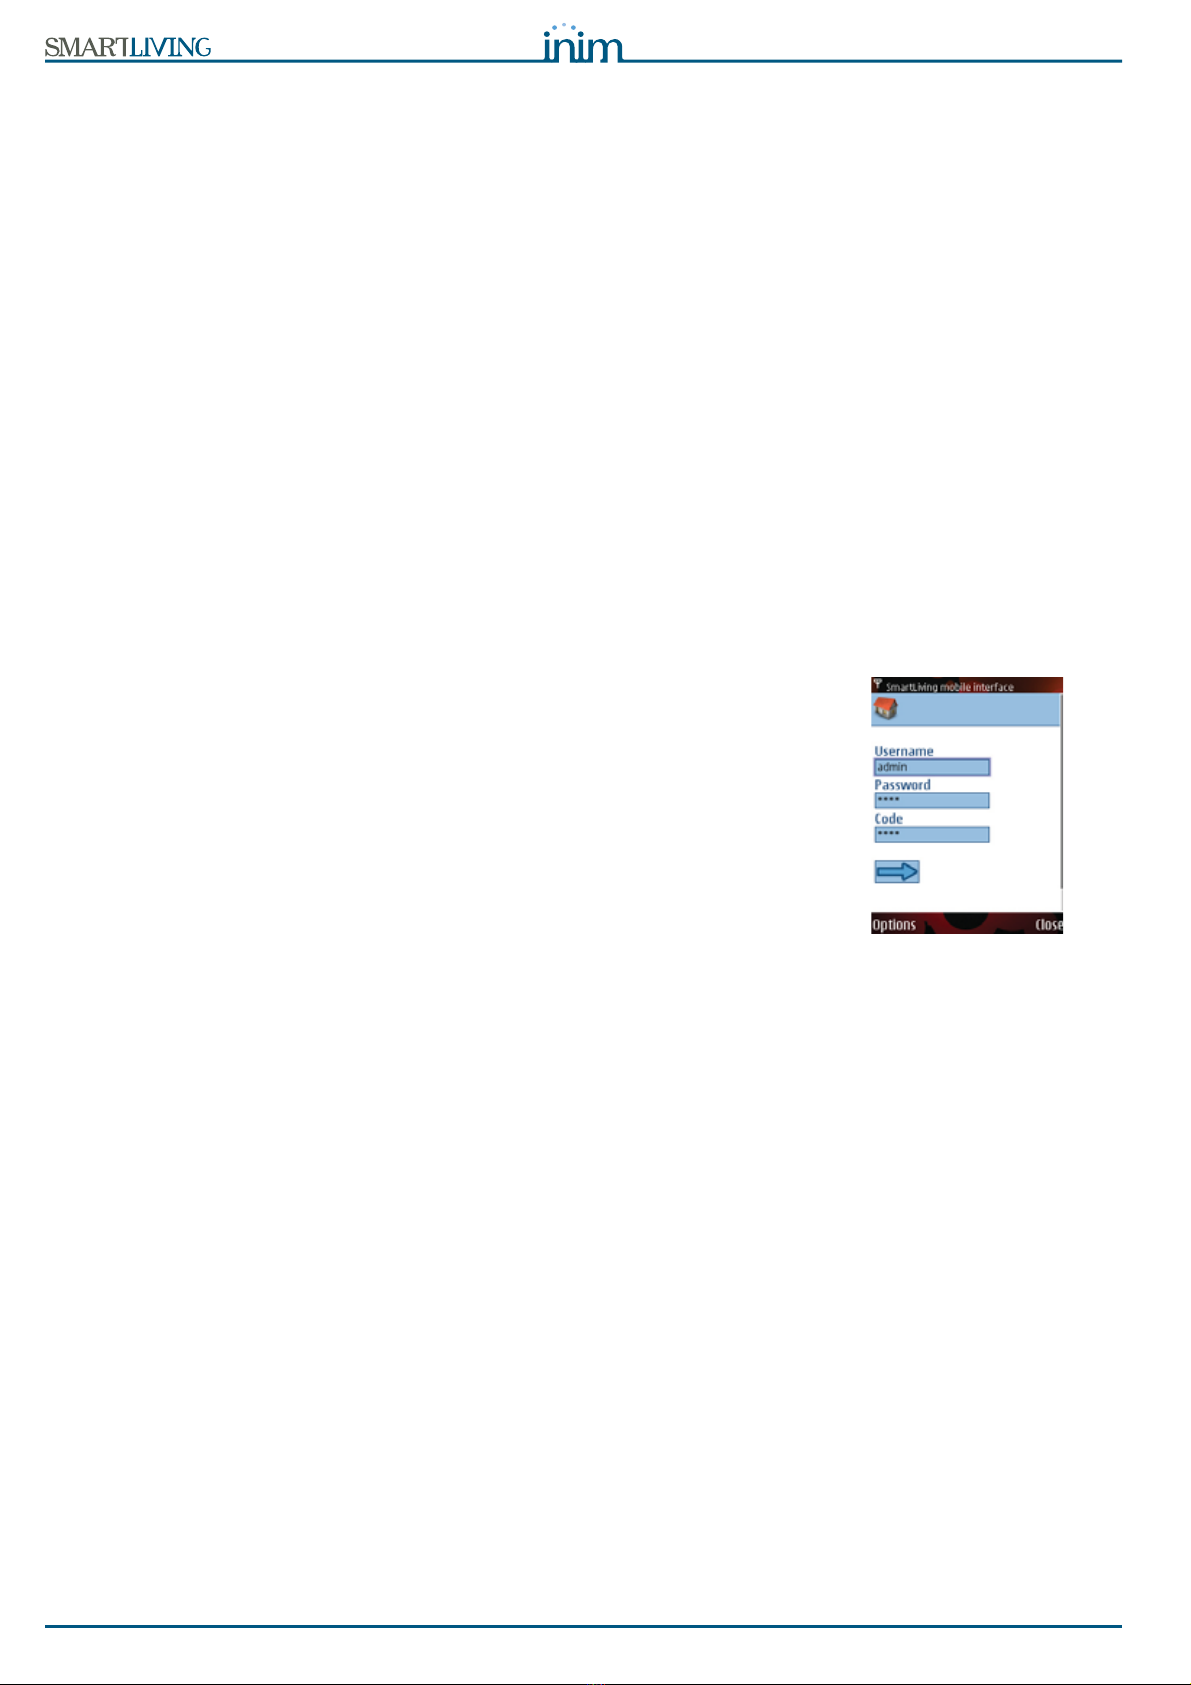
In addition to e-mails, the SmartLAN/G board allows you to interface with the
control panel from any computer or mobile phone device (PDA, mobile phone,
etc.) via any internet browser. The SmartLAN/G board integrates a web-server
which allows users to operate the control panel from remote locations without the
need of authentication.
For further details regarding the web-server, refer to paragraph 5-17-2 Access
the web-server.
2-10Arming scenarios
A scenario is a pre-set arming configuration which applies various operating
modes to the SmartLiving system partitions (the scenarios are programmed by
the installer in accordance with user requirements).
For example, if all the occupants are leaving the building, you can apply a
scenario that arms all the partitions and activates the outputs which closes the
rollerblinds and switches off the lights. On returning to the building, you can
apply a scenario that disarms some of the partitions (those required) and
activates an output which switches on the garden lights.
The installer will set up the and make available the scenarios which best suit user
requirements. The scenarios can be activated via keypad, reader, remote-control,
and over-the-phone using shortcut commands (refer to Chapter 3 - Shortcuts),
or through a web-server with a mobile-phone interface, by accessing the
“Scenario activation” section (paragraph 5-17-3 Mobile-phone web interface).

User’s Manual
Shortcuts 19
Chapter 3
SHORTCUTS
3-1Keypad shortcuts
Each keypad can be programmed with up to 12 shortcuts associated with 4
function keys . The shortcuts are identified by icons which
appear on the lower part of the display. Arrows to the right and left of the icons
indicate that keys and will allow you to view and use other shortcuts (if
programmed).
The 12 keypad shortcuts can be activated in 4 different ways, as follows.
1. By ALL. Press the respective key , ..., to activate the shortcut
instantly without code entry. The shortcut will affect all the keypad parti-
tions.
2. By ALL with confirmation request. Press the respective key , ...,
, the system will ask if you wish to continue or not. If you press
the shortcut will activate instantly, if you pre
ss
or
the operation
will be abandoned. This method protects against accidental operations. The
shortcut will affect all the keypad partitions.
3. Code users only. Press the respective key , ..., then enter a
valid code, the shortcut will activate after code recognition. The shortcut
will affect the partitions common to both the keypad and code.
4. Code users only when activation of the shortcut lowers system
security. If a shortcut involves a scenario that completely disarms a parti-
tion, or switches a partition from Away mode to Stay mode, the security of
your system will obviously be at risk, therefore, the system will request
code entry. The shortcut will affect the partitions common to both the key-
pad and code.
To activate a shortcut, press the key , ..., which corresponds to the
shortcut icon. The system will either activate the shortcut instantly (case 1.) or
will request confirmation (case 2.) or code entry (cases 3. and 4.) before carrying
out the operation.
CONTINUE?OK=YES
18:23 30/10/2011
DASIDASI--
18:23 30/10/2011
DASIDASI--
(1.)
18:23 30/10/2011
DASIDASI--
Type in code
******
(3./4.)
Shortcut
activation
(2.)
Shortcut
activation
Shortcut activation

20 Shortcuts
User’s Manual
3-2Shortcut with code
Besides the keypad shortcuts provided by keys
, each
user code can have as many as 22 customized (personal) shortcuts.
Users can access their code-shortcuts only after entering their PINs and pressing
(refer to paragraph 2-5-1 Accessing the User Menu). Each code can be
programmed to manage:
• Up to 12 shortcuts activated by keys , ..., and identified by explicit
icons.
• Up to 10 shortcuts activated by keys , ..., . If a code is enabled to
operate the system over-the-phone, these shortcuts will also be available on
the telephone number-keys.
Entry of a code associated with shortcut no.9: at a JOY/MAX keypad, prompts
the voice announcement of all the shortcuts assigned to the number keys.
To activate a shortcut at a keypad, work though the following steps.
1. Type in your code then press .
2. Access the User Menu, using the method described in paragraph 2-5-1
Accessing the User Menu at point 2.
3. Press the key , ..., which corresponds to the shortcut icon or
press the key , ..., which is assigned directly to the shortcut.
To activate a shortcut over-the-phone:
1. Establish communication with the control panel.
2. Type in your code followed by “#”.
3. Listen to the voice prompts regarding the available shortcuts.
4. Press the number key which corresponds to the required shortcut.
3-3Key and Reader shortcuts
3-3-1
nBy/S and nBy/X Reader shortcuts
Hold a valid key in the vicinity of the reader, as soon as the reader accepts the
key, a series of visual signals on the reader LEDs will indicate the various
shortcuts.
When the required shortcut is indicated, remove the key to activate the
corresponding shortcut action.
The visual signals on the Reader LEDs are as follows (refer to Table 7: Reader
LEDs with key at reader).
1. Red LED on for 3 seconds - shortcut associated with the red LED of the
reader or first shortcut of the key
2. Blue LED on for 3 seconds - shortcut associated with the blue LED of the
reader or second shortcut of the key
3. Green LED on for 3 seconds - shortcut associated with the green LED of
the reader or third shortcut of the key
4. Yellow LED on for 3 seconds - shortcut associated with the yellow LED
of the reader or fourth shortcut of the key
5.
All LEDs on for 3 seconds -
first shortcut associated with the user key
6. All LEDs off for 3 seconds - disarm all the partitions.
7. If the key is not removed, the reader will run through the entire sequence
again starting from the red LED. Selection of the desired shortcut (indi-
cated by a specific LED) will not occur until the key is removed.
If, during this phase, any of the partitions are armed, the LED sequence will start
at point 6.
If the installer has enabled option “50131ReadLedOFF”, the reader LEDs will be
off, therefore, if you wish to activate a shortcut, you must:
1. Wave the key across the sensitive area of the reader: the LEDs will signal
the respective status for 30 seconds.
2. During this 30 second period, hold a valid key in the vicinity of the reader
in order to generate the visual signals on the reader LEDs. Remove the key
when the required operation or pre-set scenario is indicated on the LEDs.
Other manuals for SmartLiving 505
2
This manual suits for next models
4
Table of contents
Other INIM Electronics Security System manuals

INIM Electronics
INIM Electronics Prime Owner's manual

INIM Electronics
INIM Electronics enea ES1050 User manual

INIM Electronics
INIM Electronics SmartLiving 505 Assembly instructions

INIM Electronics
INIM Electronics Praesidia Instruction sheet

INIM Electronics
INIM Electronics IS1030 User manual

INIM Electronics
INIM Electronics Sol-P User manual


