InMotion INDVR600RT User manual


2
Preface
Thank you for choosing inMotion DVR, for a better understanding of the product, we
recommend you to read this instruction and safety information before use.
䕺Notice˖
This user manual is an operation guide only. It has no implied or stated warranty, or
guaranty of the product described herein. The copyright and all rights reserved by the
company. Please do not reprint or redistribute without authority. Please note the
latest bulletin of the company for the updated version.
䕺Remark:
Please keep the product in temperature between 32°F and 104°F, keep away from harsh
environment like humid.
Keep out of direct sunlight and devices generating heat.
Do not install it in harsh environment including humid, dust and smoke.
Keep horizontal mounting.
Keep installing in stable location, prevent it from falling.
Do not place other devices onto it.
Install in well-ventilated locations. Do not block the vents.
Only operated in the rated input and output ranges.
Do not dismantle the product as your wish.
䕺Product Operating Environment.
To display and manage multiple audio and video like 64 channels CIF DVR spontaneously,
the basic configuration of the server should be as follows:
CPU˖Intel Core i3 550˗memory˖4G˗Graphics˖Discrete graphics:512M, HDD, client
tailed˗
This product works with Windows XP/WIN7/VISTA. For best viewing, resolution should
be 1024×768ˈDirectX should be at least ver. 8.1, or newer.

3
Contents
1 System startup ..............................................................................................................4
1.1 System startup ....................................................................................................4
2 Setup Wizard.................................................................................................................4
2.1 Wizard interface .................................................................................................4
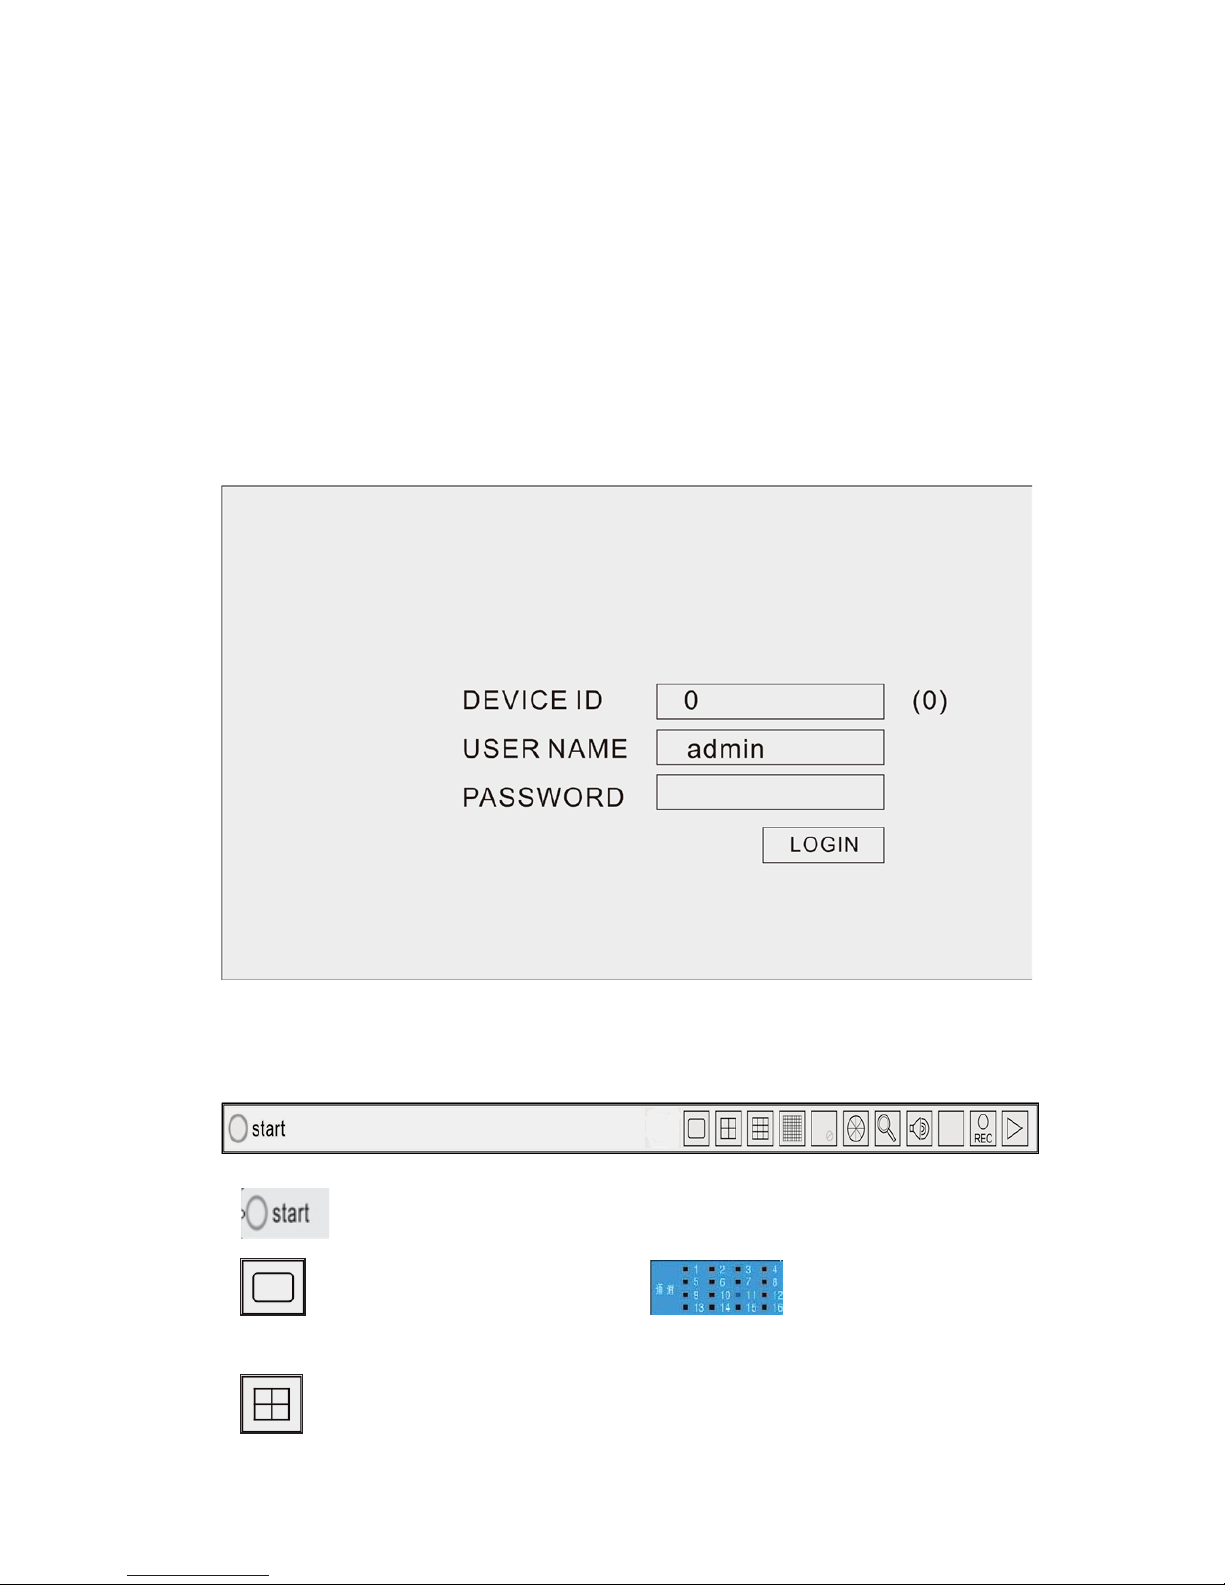
2.2 Administrator Login Interface.............................................................................5
2.3 Basic Setup..........................................................................................................6
2.4 Network setup ....................................................................................................7
2.5 Network testing ..................................................................................................7
2.6 DDNS & Port Setup .............................................................................................8
2.7 Record Mode & Record Setup ............................................................................9
2.8 HDD Setup.........................................................................................................10
2.9 Use of Taskbar .................................................................................................10
3 User login ....................................................................................................................13
3.1 BASIC................................................................................................................. 14
3.2 Advance ............................................................................................................22
3.3 Search ...............................................................................................................35
3.4 Log Search…………………………………………………………………………………………………… 36
3.5 HDD................................................................................................................... 36
3.6 SYSTEM INFORMATION.....................................................................................37
3.7 Device Maintenance .........................................................................................39
3.8 LOGOUT ............................................................................................................42
4 Remote control ...........................................................................................................42

4
1 System startup
1.1 System startup
Power on/off
Connect the power plug to the power port on the back of the DVR. The system will
automatically run a status check, and will start after few seconds. You will see a wizard
interface after the system loading.
2 Setup Wizard
Setup Wizard is a quick-set to enter the whole DVR information. You can finish the DVR
basic settings according to your requirements. This setup wizard contains all the basic
settings, like time setup, network setup, HDD format reminder, etc. The DVR will achieve
basic functions after the setup wizard has finished. If personalized settings are desired,
please login to the main menu and setup to complete this function.
2.1 Wizard interface
Wizard interface is shown below. We recommend the initial user finish the guide step by
step for the basic settings. Place a check mark ΖяΖ in the box in the lower left corner and
then click 'Next' to perform the basic settings.

5
2.2 Administrator Login Interface
Here we recommend you setup a password for administrator and then click "Next" for
more settings; if you click "Cancel”, you will enter directly into the "Main Menu"; if you
click "Prev.", the system goes to the previous page.
Note: By default, the administrator user name is: admin. There is no password, but for
better security, we strongly recommend that you setup a password here.

6
2.3 Basic Setup
Date/Time, date format, time format, time zone, camera system, language, should be
setup according to the user’s needs, as below:
Date/Time Setup: Click calendar and choose the date; Click time, a virtual keyboard will
appear, and then set to local time.
Date Format: Three format types: MM/DD/YYYY, DD/MM/YYYY, and YYYY/MM/DD.
Time Format: 24-hour/ 12-hour.
Time Zone: Click the down arrow, time zone options will be displayed, please select your
time zone.
Note: Once the DVR connects to the internet, it will automatically adjust the time to the
time zone you have chosen. Please make sure the time zone you chosen is the desired
time zone.
Camera System: PAL/NTSC optional.
Language: Choose your local language or the language you prefer.

7
2.4 Network setup
There are 2 kinds of network setup: obtain an IP automatically or static IP. Select the
type according to your network requirements, as displayed below:
2.5 Network testing
The system will test your network setup automatically. If a network connection is
abnormal, please return to the previous page to correct the settings and then click
“Next”. If no testing is required, just click “Skip” to go to the next page, as displayed
below:

8
2.6 DDNS & Port Setup
DDNS: Enable/Disable, please enable the DDNS to use a Dynamic Domain Name Server.
Server: Choose your domain name server: REELINK, 88110, 3322, DYNDNS, NO-IP,
CHANGEIP or DNSEXIT.
Host Name: Enter the host name you registered on the domain name server if required.
User Name: Enter the user name you registered on the domain name server if required.
Password: Enter the password you registered on the domain name server if required.
As displayed below:
When using “Reelink”, User name, Host name, and Password are not required.
Port Setup
Media Port: one private communication port between the DVR and the PC, default:
9000. If this port is occupied by other server port, please change to any free port.
Web Port: Http port, default: 80, if change the web port, like to: 8088, and need to
access through browser, please add the web port followed by the IP address.
E.g.: http://ip address:8088
Note: port range: 1-65535, some local ISP’s may block port “80”. We recommend you
to change the web port to something else. See display below:

9
2.7 Record Mode & Record Setup
Setup video and audio recording for each channel; please use the check mĂƌŬ ΖяΖ ƚŽ
enable video and audio recording.
There are two record modes: Always/Schedule.
For faster setup, setup one channel and then copy to the others, as shown below:

10
2.8 HDD Setup
HDD Information: You can check the HDD capacity and HDD quantity in the HDD setup.
HDD Format: check ΖяΖƵŶĚĞƌĨŽƌŵĂƚĂŶĚƚŚĞŶĐůŝĐŬ&ŽƌŵĂƚ
Note: The newly installed HDD must be formatted through our DVR before use.
Overwrite: There are three options to choose from; “by days”, “by capacity” and
“never”. Please select desired method.
After the setup of HDD, save and confirm interface will be shown on screen and click
“Save” to log out.
After the completion of the setup wizard, DVR can be worked properly. If personalized
settings are needed, you can login to the menu to setup. As shown below:
2.9 Use of Taskbar (For Mouse operation only)
1. By mouse operation, multi system options can be obtained.
2. Open task bar: right click any place on the screen, and open the task bar.
Choose an option below:
1) START: Enter into the menu interface.
2) Single channel view: click and pop-up checkthe channelto be
displayed.
3) Quad channel view: click and pop-up the channel window to choose any four

11
channels to be displayed.
There also be different view options per model.
4) 8 channel view: click to display all 8 channels.
5) Color setting: Open color setup interface (As shown below).
Choose the channel to be setup and BRI, CON, HUE, SAT can be adjusted from "1-63";
Click "Default" to recover the default settings; Click "Apply" to save the settings.
6) Zoom˖Drag the mouse to partially zoomed picture.
7) PTZ setup: Open the control interface of PTZ (As shown below).

12
ӑ
1 Choose of relevant channel, "all" refer to all channels, control of the PTZ of relevant
channel.
ӑ
2 User can control the PTZ camera up, up left, down, right down, left, left down, right,
right up or stop turning; turning speed(ranging from "1-39"), zoom, focus, and iris of the
PTZ camera can be adjusted. Select the code of preset point.
ӑ
3 Setup of preset point: choose the channel to set the preset point.
ӑ
4 Cruise line, click cruise setup to add or delete cruise.
8) Volume: open volume adjust control bar.
9) Manual record settings: on/off manual recording.
10) Video playback: open video search interface, and playback the video.
11) Right click any position on the screen to hide the task bar.

13
3 User login
Click “START” to enter the login interface, insert the Device ID, the default Device ID is
“0”. The initial user name is: admin with no password, but if you setup a password
during the setup wizard, you now need to input your password here.
Operation of the menu
Enter the menu: the icon will be highlighted when the cursor moves onto the icon, click
to enter.

14
1) BASIC: Open the basic menu, and 5 functions show in interface: system setup,
time/date setup, record setup, display setup and user configuration.
2) ADVANCE: Open the advanced menu. You can: setup the alarm, network
settings, Internet application settings, and PTZ configuration.
3) SEARCH: Search the recorded video.
4) DISK: Display the HDD state and format the HDD.
5) INFORMATION: Display of the current configuration parameter, you can check:
system information, network information, user information and video settings
information.
6) MAINTENANCE: Firmware can be upgraded; the frequency and schedule of
maintenance can be setup.
7) LOGOUT: Locks the front panel button, and user name and password need to
be input for re-login.
3.1 BASIC
After enter the menu, move the cursor to “BASIC”, and the icon will be highlighted, click
to enter.
3.1.1 System setup
Setup of device name, device ID, video format, VGA resolution, language, auto logout
time duration and startup wizard.
1) Device name: It is for the change of the device name, click the input box and virtual
keyboard will pop-up, and use the keyboard to edit the device name.
2) Device ID: It is for the change of device ID, click the input box and virtual keyboard
will pop-up, and use the keyboard to edit the device name.
3) Select “PAL” or “NTSC” from the drop-down box.
4) VGA resolution: Adjust according to the VGA monitor used. Select “1024×768” or
“1280×1024” from the drop-down menu.

15
5) Language: Select the language from the drop-down menu.
6) Logout time: Select “30 seconds”, “1 minute”, “3 minutes”, “5 minutes”, “10 minutes”
or “Never”.
7) Startup wizard: Select “Off” or “On” from the drop-down menu.
Note: After setup is completed, click “Apply” to save the changes, or click “Default” to
recover the default settings, and click “Exit” to the return.
3.1.2 Date/time
1. Date/Time setup:
1) Date/time: Click the calendar beside the date setup box, and select the date; Click the
time setup box to adjust.
2) Date format: Select “MM/DD/YYYY”, “YYYY-MM-DD”, “DD/MM/YYYY” from the
drop-down menu.
3) Time format: Select “24-Hour” or “12-Hour” from the drop-down menu.
4) Time zone: Select from the time zone from the drop-down menu.
5) Synchronization: Network time sync function. Check the box to have the network
synced time.
6) Time sever: Select the desired sever among the multi sever address from the
drop-down menu.
Note: After setting is completed, click “Apply” to finish setting, or click “Default” to
recover the default settings, and click “Exit” to the return.

16
2. DST setup
1) Enable: Check the enable box to use the DST setup.
2) Mode: Select “Week” or “Date” in the window.
3) Offset: time period gains or loses. Select “One hour” or “Two hours” in the
window.
4)“From” and “To”: It can be set according to the local DST
Note: Click “Apply” to save the new settings. Click “Default”, to cancel the new settings.
Click “Exit” to go back to the previous menu.

17
3.1.3 Display
1) CH: Order of the DVR channel
2) Name: Click to modify the CH name.
3) Mask: Click “settings” and drag the mouse to mask the area. It can have up to 4
masked areas. Double click to cancel the mask. Click “Apply” to save. Click
“Default” to cancel.
4) Color: Click “Setting” and select one CH. Brightness, Contrast, Hue, and Saturation
can be adjusted. Click “Apply” to save.

18
5) Overlay: Click “Setting” and select one CH. Select “Time overlay” and “Name
overlay”. Click “Default” to cancel.
Copy CH: Copy one CH settings to another CH.

19
3.1.4 Record
1. Basic setting
1) CH: Order of the DVR channel
2) Enable: Check the box to enable the video recording.
3) Audio: Check the box to enable audio recording.
4) Mode: Select “Always” or “Time recording” to make the DVR record when start up or
record according to the set schedule.
5) Copy CH: Copy one CH settings to another CH.
2. Bit rate

20
1) CH: Order of the DVR channel
2) Resolution: Select “CIF”, “HD1”, “D1”, “WCIF”, “WHD1” or “WD1(960H)” to set the
recording resolution.
3) Frame rate: Select the desired frame rate for “1-25”fps for PAL or “1-30” fps for NTSC.
4) Quality: Select the desired quality from “Best”, ”Better”, ”Good” or ”Normal”.
5) Copy CH: Copy one CH settings to another CH.
3. Schedule
1) CH: DVR channels.
2) Select the mode of recording from “Manual”, “Normal” or “Alarm”.
3) Select or unselect the boxes to set the schedule or
3) Double click the recording schedule; the “schedule” window will pop up. You can set
the recording schedule here.
Copy CH: Copy one CH settings to another CH.
Table of contents
Other InMotion DVR manuals