Inner Balance Wellness Jin User manual

2ibwellness.com
1Chair Manual
User Manual
Please read this user manual thoroughly prior to operating the massage chair.
Please keep this manual for future reference.
by inner balance

ibwellness.com 2
Contents
Congratulations on purchasing a Jin massage chair. Please read and follow all
safety and operating instructions listed in this user manual prior to use. Basic
precautions should always be used when operating an electrical appliance.
Safety Instructions.........................................2-3
Product Specications......................................4
Hardware Pack Contents.................................4
Product Components ...................................5-6
Chair Installation............................................7-9
Before Use........................................................ 10
Remote Controller.......................................... 11
Operation Guide....................................... 12-15
Maintenance.................................................... 16
Trouble Shooting ...................................... 17-18
Safety Instructions
Warning
The plug must be fully inserted into an appropriate outlet. Improper
connection of the equipment grounding conductor can result in the risk
of electric shock. Check with a qualied electrician or service technician if
you are in doubt as to whether the product is properly grounded. Do not
modify the plug provided with the product. If the outlet is not suitable,
ensure that a proper outlet is installed by a qualied electrician. When
using the massage chair, basis precautions should always be followed to
reduce the risk of electric shock, burns, re, or injury to person.
Avertissement
La che doit être complètement insérée dans une prise de courant
adéquate. Une mauvaise connexion du conducteur de mise à la terre peut
poser un risque d’électrocution. Consultez un électricien qualié ou un
technicien de service en cas de doute quant à la mise à la terre adéquate
du fauteuil. Ne modiez pas la che fournie avec le produit; assurez-vous
qu’une prise de courant adéquate est installée par un électricien qualié.
Lorsque vous utilisez le fauteuil masseur, observez des précautions de
base an d’éviter le risque d’électrocution, de brûlures, d’incendie ou de
blessures corporelles.
1. Make sure the power plug is securely inserted into the proper electrical outlet
to reduce the risk of short-circuit and re.
2. Always unplug the massage chair from the electrical outlet immediately after
use and before cleaning,
4. Do not use the massage chair in places where the humidity is high.
5. Do not use the massage chair outdoors or in direct sunlight.
6. If the power goes o during use, turn the power switch to the OFF position
and pull the power plug out from the socket to prevent damage from
occurring when the power is restored.
7. Never operate the massage chair if the power cord is wet or damaged.
8. Never plug/unplug the power cord from the outlet with wet hands.
9. Close and continuous supervision is necessary when the massage chair is
being used by or near children or persons with disabilities.
10. Operate the massage chair only for its intended use only as described in this
user manual.
11. Do not use any parts supplied by anyone other than the supplier of
the product.

ibwellness.com
Chair Manual 4
3
12. Do not stand, sit or jump in the legrest when massage chair is in use.
13. Do not attempt to stand on the backrest and armrest.
14. Be careful not to fall asleep during the massage session.
15. Always keep the massage chair clean.
16. Never insert any object into the gaps on and around the massage chair.
17. Ensure there are no children, pets or obstacles underneath the massage
chair prior to lowering the leg rest/backrest.
18. Do not use the massage if the backrest is ripped or torn. Contact the service
center immediately for repairs.
19. This massage chair is designed for household use only.
20. Those who are undergoing medical treatment (including the following
conditions) should consult their doctor prior to use:
- Cancer
- Heart disease
- Pregnancy, menstruation and puerperal fever
- Back problems
22. If you experience pain during usage, stop using the massage chair
immediately. If any injuries occur, seek medical treatment immediately.
23. Never massage swollen or inamed parts of the body.
24. This product is designed for recreational use. Do not use this product as
substitute for medical treatment.
25. Each massage session should not exceed 30 minutes. Massage the targeted
area only for15 minutes. Prolonged use can damage the massage chair.
26. Do not operate where aerosol (spray) products are used or where oxygen is
being administered.
27. The massage chair should not be used by anyone under 18 years of age.
NOTE: This appliance is not intended for use by persons (including children) with
reduced physical sensory or mental capabilities, unless supervised by a parent,
guardian or medical professional.
If the supply cord is damaged, it must be replaced by the manufacturer.
This appliance heats during operation. Persons sensitive to heat must take extra
caution during use.
Safety Instructions Product Specications
Description Specications
Product Name Jin Massage Chair
Model No. Jin
Rated Voltage AC 100-120V
Rated Frequency 50/60Hz
Rated Power
Consumption 230W Max.
Dimension (LxWxH) 56(L)X30(W)X49(H)in
Weight Net Weight: 212lb Gross Weight: 251lb
Hardware Pack Contents
-1 power cord
-1 M6 Allen wrench
- 6 M6*20 shoulder xed screws

ibwellness.com
Chair Manual 6
5
Product Components
MAIN BODY DIAGRAM (FRONT)
Product Components
MAIN BODY DIAGRAM (REAR)
Headrest
Arm Airbags
Remote Controller
Seat Cushion
FootrestLegrestWheels
Side Panel
Backrest
Cushion
Shoulder
Airbags
Remote Controller Port
Main Power Switch
Safety Fuse
Power Cord Socket
ibwellness.com
Chair Manual 8
7
Chair Installation
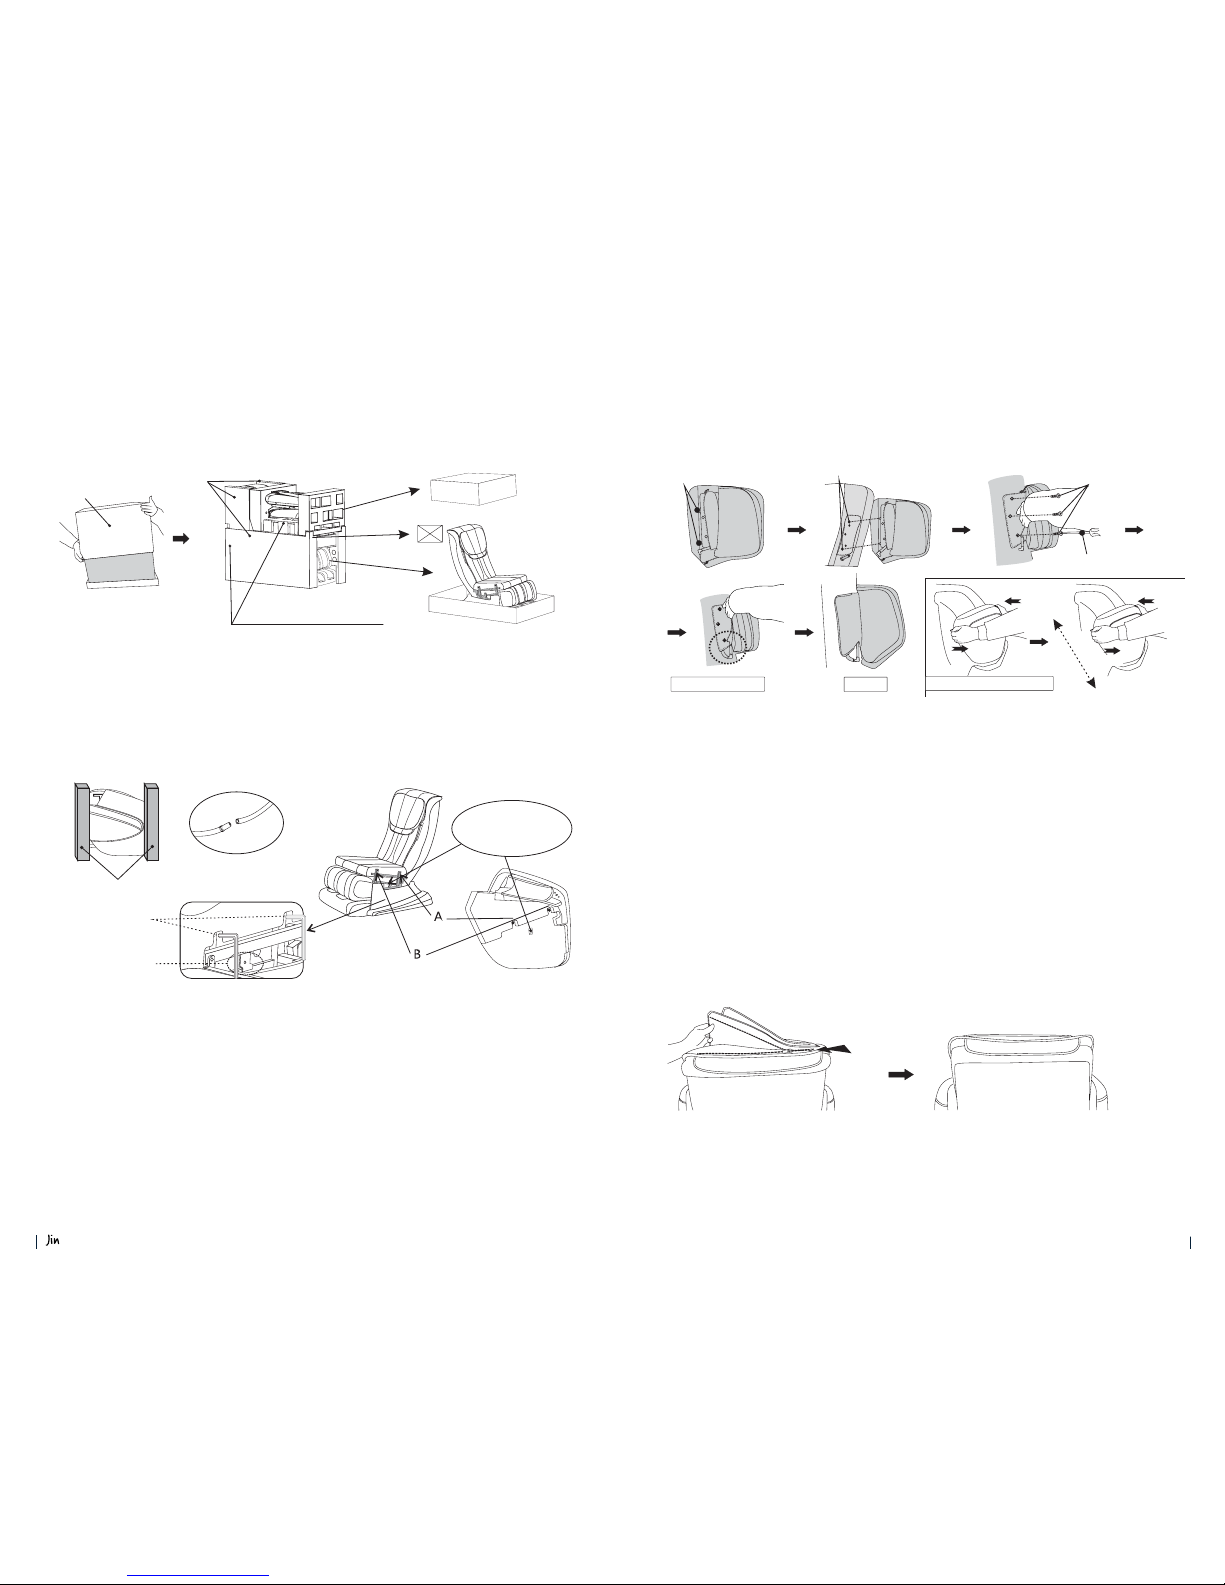
1. Removing the chair and parts from the package
Remove the carton.
Foam
Left and right shoulder are put in
these two positions separately
a. Lift and remove main outer carton.
b. Remove cardboard and foam on both sides of the massage chair.
c. Remove accessory box (includes: instructions, power cord etc.).
2. Installing the side panel
Foam
Air bag air tube
Iron plates inserted
into the seat frame at
the relevant side seat
Lock screw place
Lock screw place
Iron plates inserted
into the seat frame
a. Remove the side panels from the carton, and take them out to
begin assembly.
b. Connect the side panel airhose with the airhose coming out of the side of the
chair. Both sides of the airhose need to be inserted in order to prevent an air
leak and loss of pressure during use.
c. Unscrew bolt (B) from the side panel, insert the metal connector plates
into the metal pipe which is on the corresponding side of the seat frame
(as shown above). At the same time, put the other bolt (A) in the slot on the
corresponding seat frame. Then align the holes and screw in bolt (B). Tighten
the two screws and repeat this process on both side panels.
d. Smooth out the fabric of the chair.
Chair Installation
3. Installing the shoulder airbags
Locating pin Locating pin hole
Cross screw
Cross screwdriver
Press
Press
Lift
Lift
Shoulder position adjustment
Keep this action adjust up or down
Finished
Shoulder airbag tube
(1) (2) (3)
(4) (5) (6)
a. Unzip the cloth cover for the shoulder airbag components revealing one
locating pin and pin hole for each up and down.
b. Insert up and down two locating pins into the pin holes on the left side of
backrest (as shown). In the screw holes, lock cross screws with the
cross screwdriver.
c. Insert the air tube joints into air tubes. (Note: They must be inserted
completely to prevent air leakage and loss of pressure during use.)
d. Zip up the cloth cover.
e. Repeat steps a-d on the other side of the chair.
f. Adjust the shoulder airbags to t your shoulder position if needed taking care
not to force them into place.
4. Installing the backrest and headrest
a. Use the velcro strips to connect the backrest and cover.
b. Smooth out the backrest and seat cushion.

ibwellness.com
Chair Manual 10
9
5. Finding a location for the chair
6. Moving the massage chair
1. Place the chair in the desired
location and not in direct sunlight.
2. Make sure there is at least 3.5 in
behind and in front of the chair.
1. Press down the back of massage chair
to approximately 45° degree angle.
2. This will allow it to easily be moved to
another location.
CAUTION:
* Do not move massage chair when occupied or
in use.
* Moving the massage chair may cause damage
to oors. Floor protection is recommended.
* Do not drop or suddenly let go of the chair
while moving it.
* Using two people to move the chair is
recommended. The second person should lift up
the legrest, while one person holds the backrest
Before Use
4. Adjust the position of the headrest.
– Adjust the under-part of the
headrest and align it with the
position of the ear.
3.5 in 3.5 in
Chair Installation
1. Make sure that the product is in
good condition.
– Conrm that the headrest, backrest
and power plug are not damaged.
– Make sure the footrest is in its right
position (as shown in the diagram to
the left).
2. Check the surrounding area to make
sure it’s clear of anything obstructing
the chairs incline/recline.
– Make sure there are at least 3.5
inches in front and back of chair.
3. Connect the chair to a power source.
– Plug the chair in.
– Turn the power switch to “on.”

ibwellness.com
Chair Manual 12
11
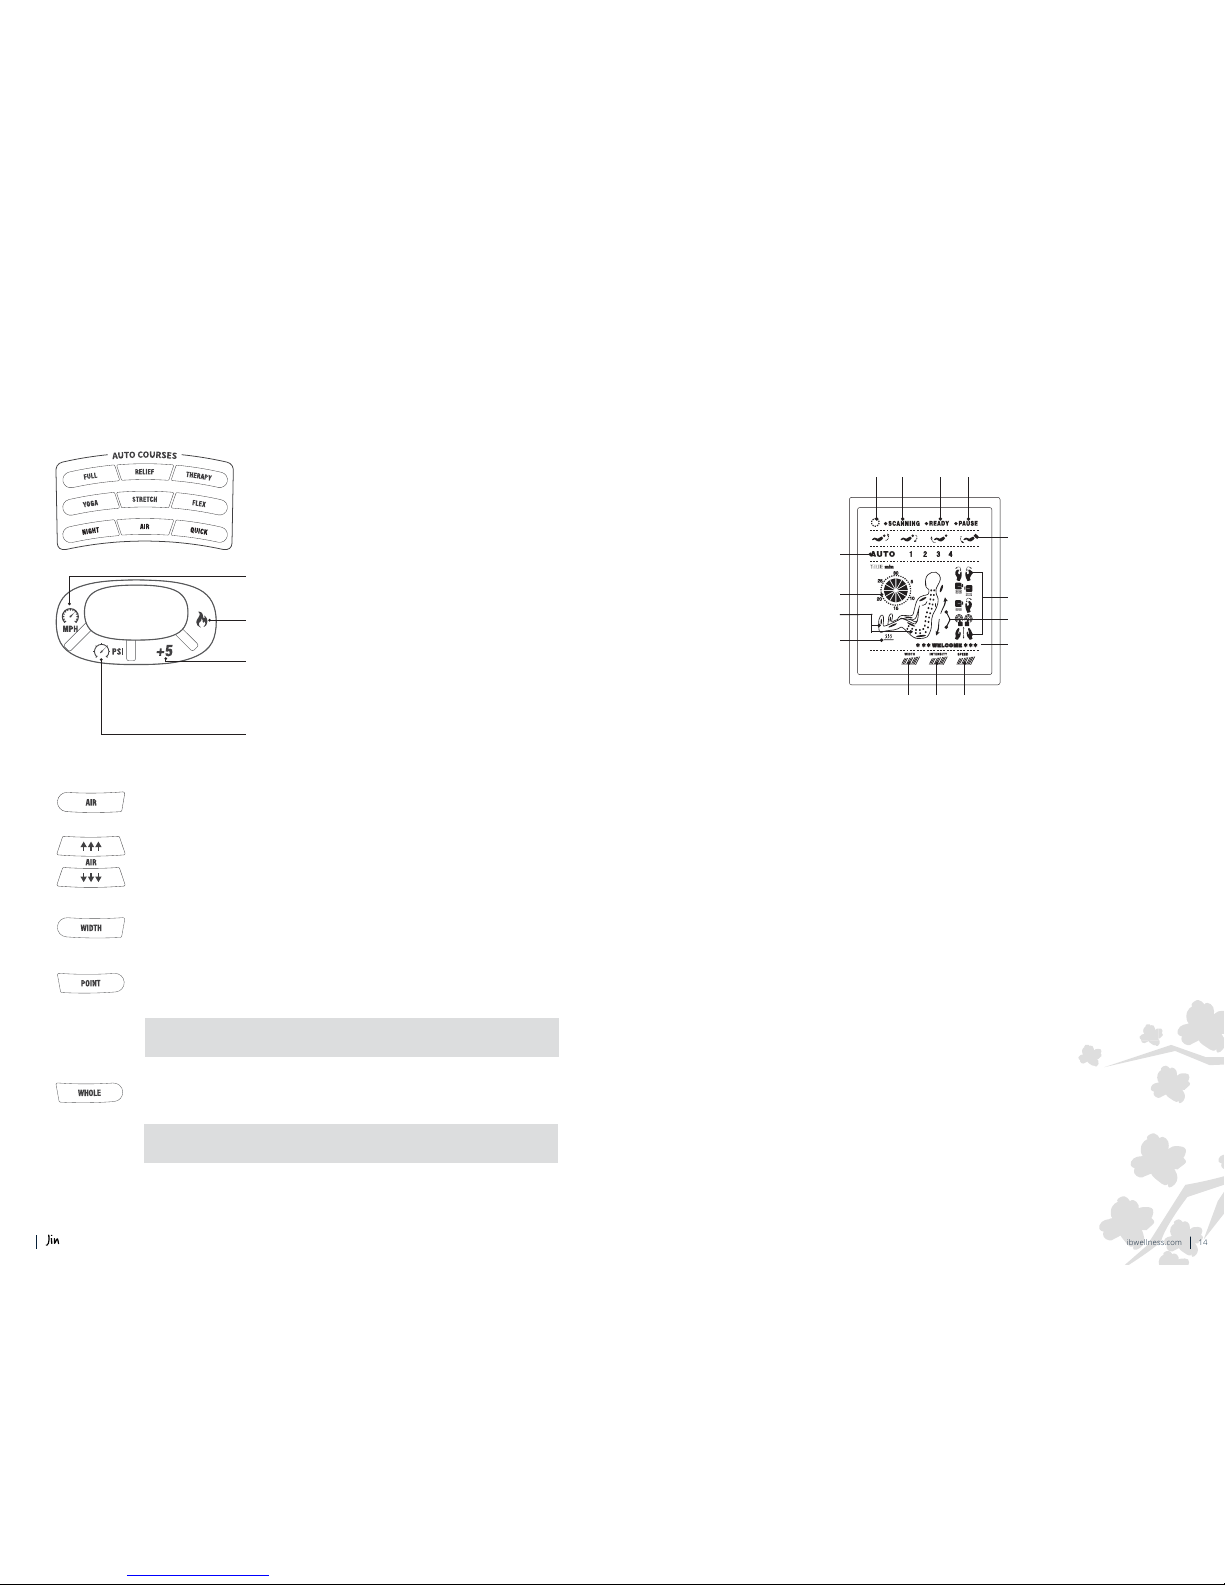
Remote Controller
Display
On/o
Heat
Time
Relief
Full
Yoga
Night
Operation Guide
FUNCTION DESCRIPTION OF CONTROLLER BUTTONS
Zero G1 "Zero G2 "Zero G3 "Original Position
Stretch
Therapy
Flex
Air
Quick
PRE-PROGRAMMED
AUTO COURSES
(Bright Green
Buttons)
PRE-PROGRAMMED
AUTO COURSES
(Bright Green
Buttons)
INCLINE
AND RECLINE
BUTTONS
Legrest
Up
Legrest
Down
Zero
Stop/
Pause
Speed
Air
Intensity
Air
Roller
Width
Point
Whole
Roller
Position
ACTION
KEYS
ACTION
KEYS
MANUAL
CONTROLS
MANUAL
CONTROLS
INCLINE
AND RECLINE
BUTTONS
Backrest
Down
Backrest
Up
Start or Stop massage chair
- Press this button to turn the massage chair ON. Now you can select
an auto course or manual massage function.
- Press this button again to turn massage chair OFF. Massage
function will stop and the massage chair will come back to the
original position. When the chair returns to the original position the
chair will completely shut o and all buttons will be inactive.
Press once to temporarily pause or stop all the massage functions.
Chair will enter idle mode. Press again to resume massage.
Press this button to move the back and leg position. Press once for
Zero G1, twice for Zero G2, three times for Zero G3 and four times
to return to the original position.
Press and hold this button to adjust the footrest.
Press and hold this button to adjust position of the
backrest or legrest.
Note: The position adjustment buttons are disabled when the chair is in
STRETCH mode.
ibwellness.com
Chair Manual 14
13
Operation Guide
This chair is designed with 9 auto massage modes.
FULL • RELIEF • THERAPY • YOGA • STRETCH
FLEX • NIGHT • AIR • QUICK
Speed – Press to cycle through three levels of
speed: Tapping & Kneading, Dual Action & Shiatsu.
Heat – Press to turn heating function on
and o.
Time – Press to increase the massage time in
increments of 5 minutes. The default working
time is 15 minutes. The maximum working time
is 30 minutes.
Intensity – Press to cycle through three levels
of intensity.
Air: Press this button for dierent combinations of massage.
Roller Location: Press and hold the up or down arrows to move
the massage rollers to the desired location.
Width: Press once to adjust the width of the rollers.
Point: Press to control the location of the massage roller, once
pressed use the up and down arrows to position the rollers.
Whole: Press to manually choose the technique massaging the
whole back.
Kneading Whole "Tapping Whole "Dual Whole "
Shiatsu Whole "Massage Whole " O
Kneading Point "Tapping Point "Dual Point "
Shiatsu Point "Massage Point " O
Operation Guide
DISPLAY DIAGRAM
1. Power is on.
2. Massage chair is scanning the users back contour to provide a massage
experience customized for the user.
3. Scanning is complete and the massage is about to begin.
4. Pause button has been pressed and the chair is temporarily stopped.
5. Reclining position adjustment buttons are pressed and the backrest and/or
legrest are moving.
6. An Auto Course is activated.
7. Which massage technique is activated.
8. Direction of the massage rollers, moving upwards or downwards.
9. Cheerful greeting from your massage chair
10. Speed level, from one to three.
11. Air intensity level, from one to three.
12. Massage roller width, from narrow to wide.
13. Heating function is on.
14. Location of massage rollers and active air bags.
15. Time remaining in current massage program.
1 2 3 4
12 11 10
5
7
8
9

ibwellness.com
Chair Manual 16
15
Operation Guide
AFTER USE
1. After the massage program is completed,
return chair to upright position by pressing
the On/O button. Before pressing:
- Make sure surrounding area is clear.
- Keep arms and legs away from gaps
between the armrest, legrest, and
footrest, to prevent possible injury.
2. Then press the power button to turn
o the massage chair and and bring it
back upright. Once done, return remote
controller to the storage pocket in the front
of the chair by the users knee.
3. Turn o the main power switch.
4. Remove plug from power outlet.
- Do not pull on the power cord to remove
the plug.
- Do not unplug with wet hands.
Maintenance
- Turn o and unplug the chair
before cleaning.
- Use a dry, neutral colored cloth or
soft bristled brush to lightly wipe
the chair.
- Do not use water or any other
liquids to clean the chair.
ibwellness.com
Chair Manual 18
17
Trouble Shooting Trouble Shooting
You may experience the following noises or feeling when in massage, as being
due to the mechanical design, they will not have any eect on the operation of
the unit and the product life.
• A “clatter” noise occurs when the knead balls go up and down.
• A “creak” noise of the gear and the motor occurs while in massage.
• A friction noise occurs when the knead balls rub the cover cloth.
• A rattling noise occurs while in the “Tap” or “Knead and Tap” massage
movements (particularly when the massage moves from the shoulders to
the back).
• In the “Knead”, “Tap”, or “Knead and Tap” massage movements, massaging
speed may vary with the knead balls’ strength changed.
• A roaring noise of the motor occurs when load is given to the chair.
• A “cuckoo” noise occurs while in the auto mode course, the knead balls are
automatically adjusted to the back-and-forth position to have the chair tting in
with the user’s body shape.
• The compressor’s noise and the air exhausting noise occur while in
air-massage.
• A noise occurs when the air bag is inated.
• A noise occurs while in massage of the shoulders.
• A grinding noise occurs when the backrest is reclined.
• There is a humming sound from the pump.
PROBLEMS CHECK POINTS TROUBLESHOOTING
The unit does not
start up.
Check whether the switch has
been turned on.
Check whether the button
on the remote controller has
been pressed.
No massage function has
been selected.
Check whether there is poor
connection between the power
plug and the receptacle.
Turn on the switch.
Press the button on the
remote controller.
Select a massage function.
Ensure good connection
between the power plug and
the receptacle.
Dierent height of
the left and right
knead balls.
A mechanism is used to
allow two knead balls
tapping alternatively.
This is normal and does not
come from the trouble of
the chair.
Sudden noise rises
during operation.
Check whether the unit has
been in operation for too long.
Turn o the power and stop
the operation. Restart the unit
after 30-min break.
Sudden cease
of operation.
The rated operating time
has elapsed.
Turn o the power and stop
the operation. Restart the unit
after 30-min break.
The reclined backrest fails to
return its stored position
when is pressed.
Excessive use of the unit. Turn o the power and stop
the operation. Restart the unit
after 30-min break.
The rated operating time
has elapsed.
The power indicator
fails to light up after
the power switch is
turned on.
Check whether there is poor
connection between the power
plug and the receptacle.
Whether the circuit breaker is
tripped o.
Ensure good connection
between the power plug and
the receptacle.
Restore the circuit breaker.
If the problem re-occurs after
the circuit breaker is restored,
please contact our
service center.
.Attention
After checking, if the problem is caused by none of the above, switch o the power, unplug the power
cord, and contact your dealer or our service center for repairs.
Prior to operating the unit when it has not been used for a long period of time, read this manual carefully
and make sure that the unit is still in good condition to avoid accident or injury.
Avis
Après la vérication, si la source du problème n’est aucune de celles ci-dessus, coupez l’alimentation,
débranchez le cordon d’alimentation et contactez votre détaillant ou notre centre de service pour faire
réparer le fauteuil.
Avant d’utiliser le fauteuil s’il n’a pas été utilisé pour une longue période, lisez ce manuel attentivement et
assurez-vous que le fauteuil est encore en bon état an d’éviter les accidents ou les blessures.
Warning
Absolutely do not modify, disassemble or repair by yourself. Negligence may cause re or mechanical
trouble of the chair which may result in hazard on the body.
Avertissement
Évitez absolument de modier, de démonter ou de réparer le fauteuil vous-même. La négligence peut
entraîner un incendie ou des troubles mécaniques du siège et poser un risque de blessures.
Other manuals for Jin
1
Table of contents
Other Inner Balance Wellness Massager manuals

Inner Balance Wellness
Inner Balance Wellness MC-660NA User manual

Inner Balance Wellness
Inner Balance Wellness Arch Refresh User manual

Inner Balance Wellness
Inner Balance Wellness Power ZG User manual

Inner Balance Wellness
Inner Balance Wellness Jin User manual

Inner Balance Wellness
Inner Balance Wellness Ji User manual


