Inngenso T 201 User manual

...step by step
Thermostat
Manual
IT 201 | EN

3
EN DIGITAL THERMOSTAT IT 201
The IT 201 thermostat is designed to control heating
systems. Unlike standard home thermostats, IT 201 has
two separate and wirelessly connected units (thermostat +
receiver).
The receiver is a switching device used to connect
heating systems, and a thermostat is a portable control
unit for handling and setting the temperature. The units
communicate with each other using a radio signal.
The advantage of the system is the variability and easier
availability of temperature control.
Important notes
• Read the user manual not only for the thermostat, but also
the the boiler.
• Turn off the power supply before installing the thermostat.
• We recommend installation by a qualified technician.
• Be aware of the required standards for installation.
• The electrical circuit should be secured with a fuse that
does not exceed 20 A.

4 5
Specifications
Thermostat
Receiver
230 V AC
2000 W (At 70 °C)
Lin, N, PE, Lout, N, PE
868 MHz
120 x 90 x 25 mm
Power supply
Maximum switching power
Output/Input
Frequency
Dimensions
Power supply
Mounting
Schedule
Manual control
Frost protection
Hysteresis setting
Temperature sensor calibration
Sensitivity
Temperature setting
Temperature measurement
Dimensions
3 V DC, 2 AA batteries
Wall or portable
7 Days
Full
Yes
0.2 °C - 5 °C
-5 °C - 5 °C
0.5 °C
7 °C – 35 °C
5 °C – 40 °C
86x86x29 mm
Safety
Risks due to poor handling
Due to poor handling of the product you can harm yourself
and cause material damage.
• Read the accompanying instructions carefully, especially
the chapter on safety and important notes.
Danger of malfunctioning
• Ensure that the air in the room can circulate freely around
the thermostat and that the thermostat is not covered by
furniture, curtains and other objects.
• Only operate the heating system if it is in technically
perfect condition.
Freezing damage due to too low room
temperature
If the room temperature is set too low in some rooms, the
heating system can be damaged due to freezing:
• Ensure that during the frost period the heating
system remains in operation and that all rooms during
your absence are sufficiently heated.
• Default frost protection temperature is 5 °C and can be
changed in the range from 0 to 17 °C.

6 7
Proper use of the device
Improper use can result in health and life hazards to the
plant operator or third parties.
This product is not intended for use by people (including
children) with limited physical, sensory or intellectual
abilities or people without experience and / or knowledge,
unless they are under the supervision of a person in charge
of their safety or have been instructed by that person to use
the product.
Children must be supervised to ensure that they do not
play with the product.
Intended use includes:
• Following the included instructions for use, installation
and maintenance of the device, as well as all other system
components.
• Compliance with all inspection and maintenance
requirements stated in the instructions.
Use that is different from the one described in this manual
or use that goes beyond the scope of the use described
here will be considered as non-intended.
It is not intended for any direct commercial or industrial
use.
Overview of command elements
Room thermostat
Receiver
1. Receiver ON/OFF/AUTO Button
2. RGB light signal indicators
• RED - Heating request is active
• GREEN - Device is turned on but there is no heating request
• BLINKING YELLOW - There is no communication between the thermostat and the receiver
• BLINKING GREEN - Receiver is in pairing mode
1. Display
2. Left button for decreasing the value
3. Middle button for confirmation of selection
4. Right button for increasing the value
1
2 43
12
8 9
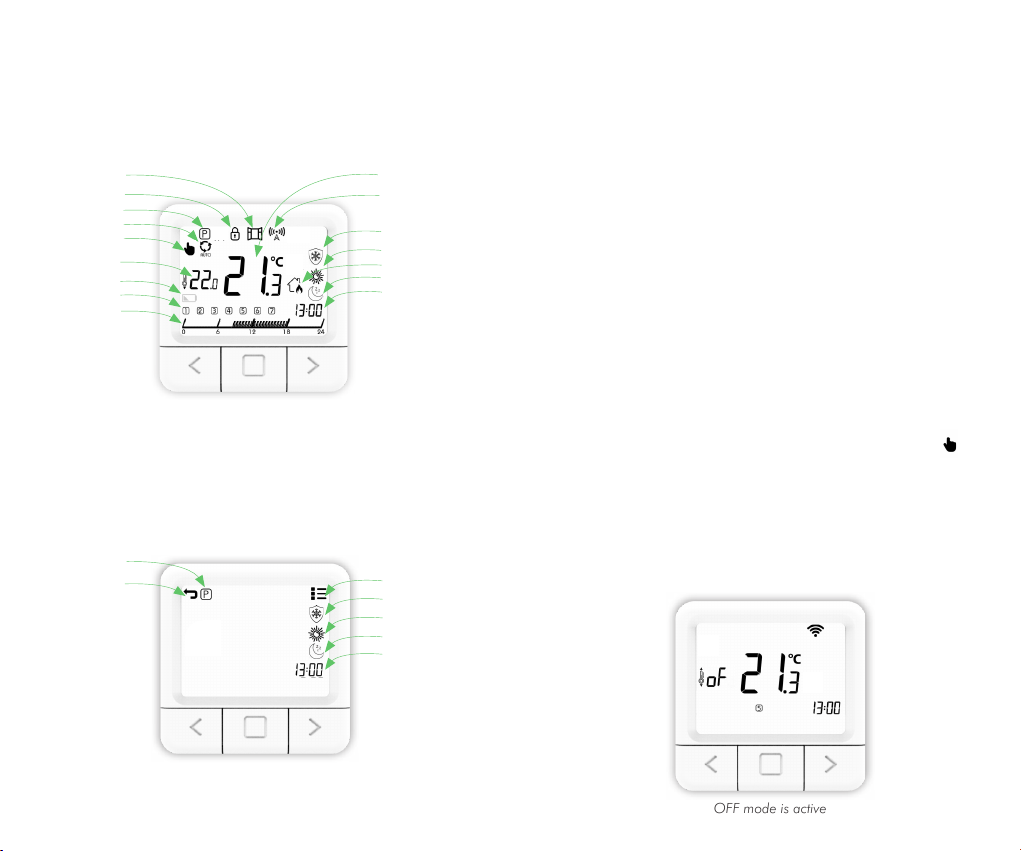
Display description
Description of the basic display
Description of the settings display
Advanced settings
Setting the time
Return to the previous screen
Setting the program
Eco mode
Comfort mode
Antifrost mode
Child lock
Open window detected
Program mode
Set temperature
Current room temperature
Days of the week
Setting the program
Manual mode
Battery low
Overview of the basic functions
Overview of the functions
on the settings display
Connection to receiver
Weekly program
Heating indicator
Time
Eco mode
Comfort mode
Antifrost mode
Temperature setting
1. Press the RIGHT button to increase the set temperature.
2. Press the LEFT button to decrease the set temperature.
Setting the working mode
There are 4 working modes of the thermostat: SYSTEM OFF
mode, MANUAL mode, PROGRAM mode and ANTIFROST
mode. To access each mode you need to press on the
middle button until the icon you wish to set the temperature
of, appeares on the top of the screen. To better understand
read appears through explanations comming in the
following pages.
SYSTEM OFF mode
1. Press the middle button to enter MANUAL mode.
2. The upper left end of the screen shows the symbol .
3. While thermostat is in MANUAL mode press and hold
LEFT button decrease temperature to minimum 7 °C.
4. Press and hold LEFT button for 5 sec. to enter SYSTEM
OFF mode.
5. To exit SYSTEM OFF mode press and hold MIDDLE button
for 5 sec.
OFF mode is active

10 11
Manual mode
1. Briefly press the middle button.
2. The upper left end of the screen shows the symbol .
3. MANUAL MODE successfully activated.
Manual mode is active
Program mode
1. Briefly press the middle button.
2. The upper left end of the screen shows the symbol .
3. PROGRAM MODE successfully activated.
Program mode is active
Antifrost mode
1. Briefly press the middle button.
2. The upper right end of the screen shows the symbol .
3. ANTIFROST MODE successfully activated.
The settings display
1. Hold down the MIDDLE button for 5 seconds until the
settings display shows.
2. Release the MIDDLE button (See the picture illustrated on page 8.).
Setting the Eco temperature
1. Open the SETTINGS display.
2. Navigate with the RIGHT and LEFT button until you
reach the Eco symbol and briefly press the CONFIRM
button (middle button) to enter the Eco setting.
3. Press the left or right button and set the desired temperature.
4. Eco temperature can be changed in the range from 10 to 30
°C.
Antifrost mode is active

12 13
Setting the Comfort temperature
1. Open the SETTINGS display.
2. Navigate with the RIGHT and LEFT button until you reach
the Comfort symbol and briefly press the CONFIRM
button (middle button) to enter the Comfort setting.
3. Press the left or right button and set the desired temperature.
4. Comfort temperature can be changed in the range from
15 to 35 °C.
The screen forsetting the Eco temperature
Overview of the screen for setting the Comfort temperature
Setting the Antifrost temperature
1. Open the SETTINGS display.
2. Navigate with the RIGHT and LEFT button until you reach
the Antifrost symbol and briefly press the CONFIRM
button (middle button) to enter the Antifrost setting.
3. Press the left or right button to set the desired temperature.
4. Antifrost temperature can be changed in the range from
0 to 17 °C.
Overview of the screen for setting the Antifrost temperature
Setting the weekly program
Program can be set for each day in a week separately.
The program bar will show the current program. Icons
ANTIFROST/ECO/COM and the set temperature will show
which one of them is active for the selected half an hour.
1. Open the SETTINGS display.
2. Press the left or right button to navigate to the symbol ,
select program symbol and press and hold the middle
button to enter the program setting.
3. Navigate to the DAY, select the DAY for which you want to
set the program and click the middle button. The days Monday

14 15
to Sunday are represented by the numbers 1 to 7, respectively.
4. Navigate through program bar with LEFT or RIGHT
button.
5. Press the MIDDLE button to change between ANTIFROST
/ECO/COM temperature for the selected half hour.
6. Repeat steps 4 and 5 for each hour in a day.
7. Repeat all steps for each day of a week.
8. Hold the MIDDLE button to confirm program settings
and enter settings main screen.
NOTE: Thermostat will then save the program for each day
(takes 1 minute) and the program will be shown setting screen.
Setting the time
Setting the time can be done following the steps written
below:
1. Open the SETTINGS display.
2. Navigate with the RIGHT and LEFT button until you
reach the time symbol and briefly press the CONFIRM
button (middle button) to enter the clock setting.
3. By pressing the RIGHT and LEFT button, set the current
Overview of weekly program setting
Overview of settings main screen
MINUTE and briefly press the CONFIRMATION button
(middle button).
4. Navigate RIGHT and LEFT button to set the clock, then
set the current CLOCK and briefly press the CONFIRM
button (middle button).
5. Navigate RIGHT and LEFT button to set the day, then
set the current DAY and briefly press the CONFIRM button
(middle button).
6. Use the RIGHT and LEFT button to navigate to the symbol
to exit the SETTINGS display, then press the CONFIRM
button (middle button).
Overview of time setting
Overview of settings main screen
Setting the All Days program
The All Days program gives you the possibility to preview
the settings for individual days or to set settings of the
desired values individualy or for the all days in the week
with the ALL option. The program bar will show the current
program. Icons ANTIFROST/ECO/COMFORT and the set
temperature will show which one of them is active for the
selection.
1. Open the settings display.

16 17
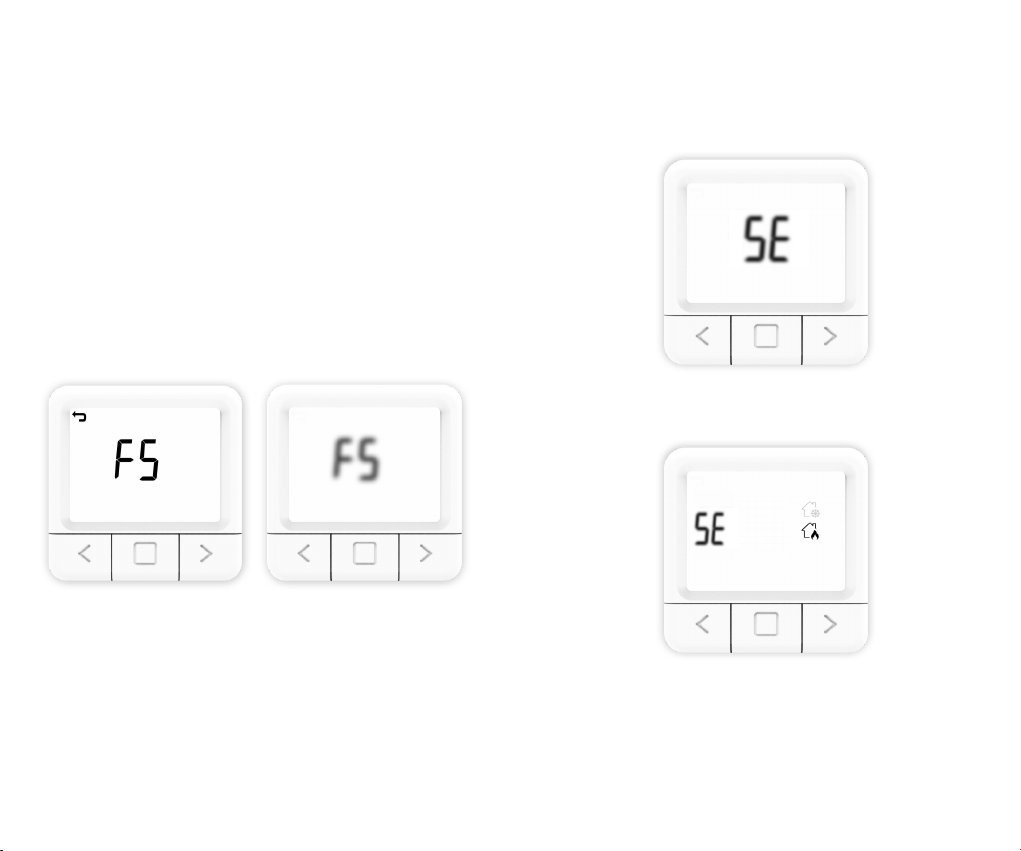
ADVANCED settings
In advanced settings, there are settings for SP SmartPairing,
FS Factory settings, SE Season settings, CA Calibration
settings and HS Hysteresis settings. In the next couple of
pages each setting will be explained in details.
SmartPairing mode
SmartPairing allows easy connection of the thermostat with
the receiver.
2. Press the left or right button to navigate to the symbol
, select program symbol and press and hold the middle
button to enter the program setting.
3. Press the LEFT or RIGHT button, select the ALL to set
temperature automatically for all days in the week.
4. Press the LEFT or RIGHT button to change for which half
an hour you want to set the temperature.
5. Press the MIDDLE button to change between ANTIFROST
/ECO/COMFORT temperature for the selected half hour.
6. Hold the MIDDLE button to go back.
Overview of All Days program setting
1. Open the ADVANCED SETTINGS display.
2. Navigate with the RIGHT and LEFT button until you
reach the “SP” option.
3. When “SP” flashes, press the MIDDLE button and hold
it for 5 seconds.
4. Now it should show the symbol SP on the side, and
00 will flash on the screen in the center, until it finds the
device. When the device is found, it shows 01.
5. Start SP mode on the receiver by pressing and holding
the button until the green light signal appears.
6. Release the button on the receiver on the green light
signal and then the green light will flash.
7. You have now entered SP mode on both devices and you
need to wait until the devices are paired with each other.
8. The connection status of the device is known when the
lights are no longer flashing but the lights are steady green
and the thermostat displays the home screen.
In case of adding another receivers that was already
added to the network, we need to reset the desired
receiver to factory settings which will be explained in the
next few pages.
Symbol SP starts to blink when entering the SmartPairing mode.
18 19
For a factory reset of individual receivers it is necessary
to go to each one of the paired receivers. Hold the on/
off button until the red light is on. The red led will indicate
that the receiver is in the factory reset proces which would
take up to 30 sec. After the reset the red led starts blinking
and indicating that the receiver is in its factory state which
would take ~5 sec until the SP mode turns on which will
be indicated by blinking green light.
Overview of Factory reset on the thermostat
Factory reset
Factory reset sets all values of the thermostat to their initial
state, as well as unpairs the thermostat with all the paired
receivers.
1. Open the ADVANCED SETTINGS display.
2. Navigate with the RIGHT and LEFT button until you
reach the FS symbol.
3. Hold down the MIDDLE button for 10 seconds.
4. Now only the FS in the center should flash on the screen.
5. Wait for the thermostat to restart.
6. Successful restore to FACTORY SETTINGS.
Season settings (heating/cooling)
1. Open the ADVANCED SETTINGS display.
2. Navigate with the RIGHT and LEFT button to the SE option.
3. Press the MIDDLE button for 5 seconds to enter the settings.
4. Use the LEFT and RIGHT buttons to select the desired
operating mode.
5. Press the MIDDLE button for 5 seconds to confirm the
selected mode.
Season setting
Season setting
20 21
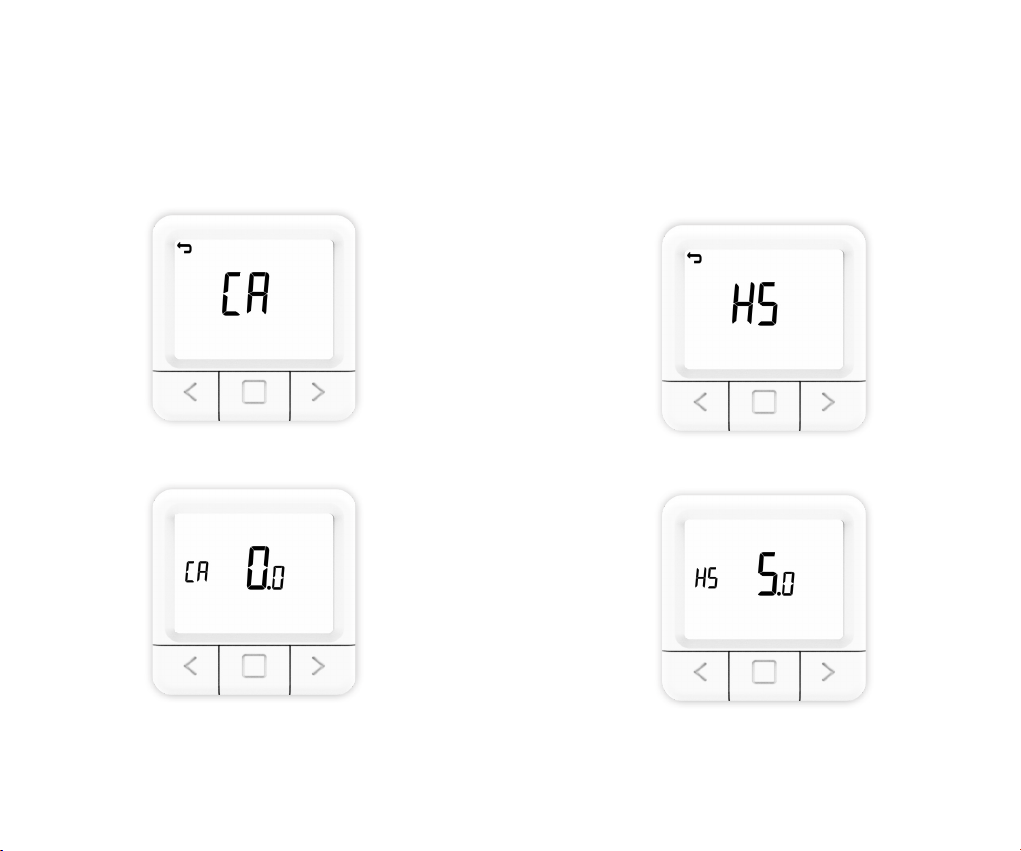
Calibration settings
Sensor calibration is an adjustment performed on a sensor
to make that thermostat as accurate as possible.
1. Open the ADVANCED SETTINGS display.
2. Navigate with the RIGHT and LEFT button until you
reach the CA symbol.
3. Hold down the MIDDLE button for 10 seconds to enter.
4. Use the LEFT and RIGHT buttons to select the desired value
and hold the MIDDLE button for confirmation.
5. Once again hold the MIDDLE button to go to main screen
(Successfully saved CALIBRATION setting).
Symbol CA starts to blink
Overview of Calibration setting
Hysteresis settings
Hysteresis is the value for which the current temperature
must be lower than the set temperature in order to switch
the heating on.
1. Open the ADVANCED SETTINGS display.
2. Navigate with the RIGHT and LEFT button until you
reach the HS symbol.
3. Hold down the MIDDLE button for 10 seconds to enter.
4. Use the LEFT and RIGHT buttons to select the desired value
and hold the MIDDLE button for confirmation.
5. Once again hold the MIDDLE button to go to main screen
(Successfully saved HYSTERESIS setting).
Symbol HS starts to blink
Overview of Hysteresis setting
22 23
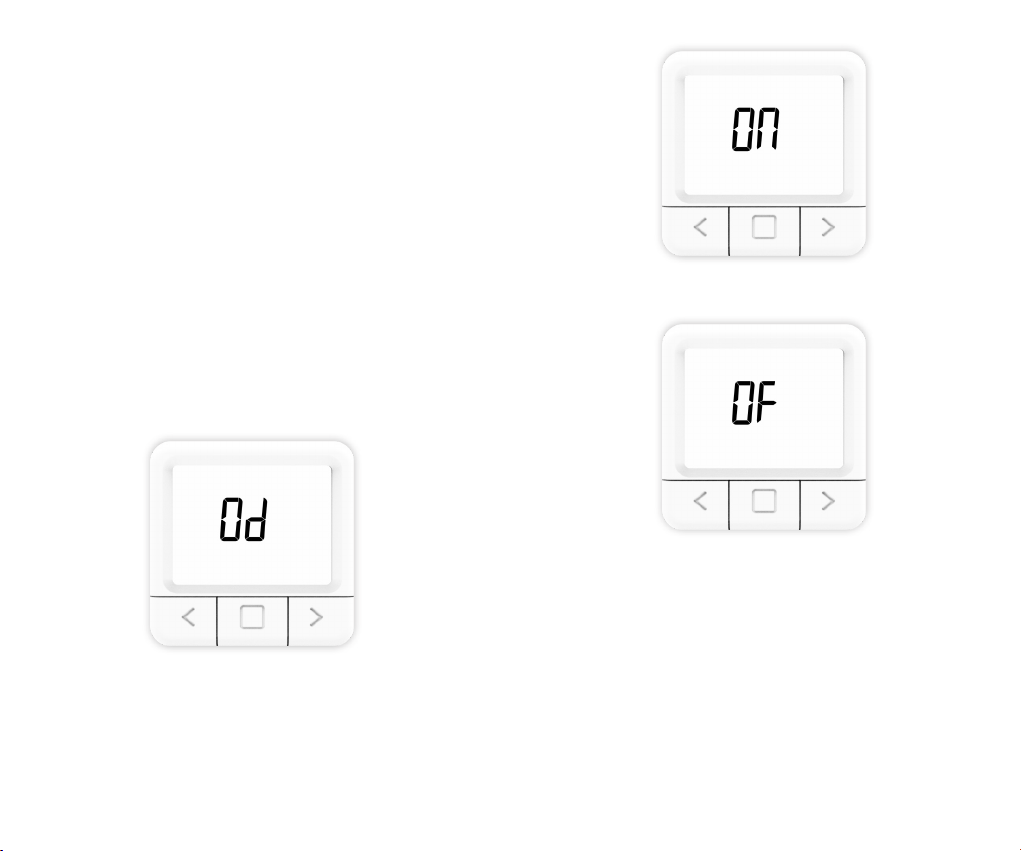
Window open detection
Window open detection is a feature that detects whether
your window is open. It can only be detected when the
heater is turned on. If opened window has been detected
the heater will automatically be turned off for next 10
minutes, unless you apply some change to any of your
general settings which will temporarily disable window
open detection for the next 30 minutes. Also after 10
minutes have passed since the opened window has been
detected, this will also temporarily disable window open
detection for the next 30 minutes. Window open detection
can be enabled or disabled via thermostat at any given
time.
1. Open the ADVANCED SETTINGS display.
2. Navigate with the RIGHT and LEFT button until you
reach the “Od” symbol.
3. Hold down the MIDDLE button for 10 seconds to enter.
4. Use the LEFT and RIGHT buttons to select the desired mode
(ON or OF) and hold the MIDDLE button for confirmation.
Symbol “Od” starts to blink
5. Once again hold the MIDDLE button to go to main screen
(Successfully saved WINDOW OPEN DETECTION setting).
Symbol “ON”
Symbol “OF”

25
Operating via receiver
• When the receiver is in normal operation mode (AUTO
MODE), by clicking on the ON/OFF button, the receiver
turns off and goes to OFF MODE.
• If we want to turn AUTO MODE on the receiver, to
change the state from OFF MODE, it is necessary to click
twice on the ON/OFF button.
• If the receiver is in ON MODE, it is necessary to press the
ON/OFF button once to change the state to OFF MODE,
and then press the ON/OFF button again to change the
state to AUTO MODE.
• When the thermostat is in SYSTEM OFF mode, by
pressing the ON/OFF button on the receiver, we exit from
OFF MODE to enter MANUAL MODE. (SYSTEM OFF mode is a
mode whose state changes apply to all receivers that are connected to that thermostat)
• If we want to start SmartPairing mode via the receiver,
we need to hold the ON/OFF button until the green color
appears on the receiver and then release the button.
• If we want to start a FACTORY RESET via the receiver,
it is necessary to hold the ON/OFF button until the red
color appears on the receiver, and after that the receiver
returns to the factory settings. After that, receiver enters
SmartPairing mode to reconnect with thermostat.
Description of receiver
working modes
ON mode
The receiver is turned on regardless of the set value on
the thermostat.
OFF mode
The receiver is turned off regardless of the set value of the
thermostat.
AUTO mode
The receiver follows the default commands on the thermostat.
SYSTEM OFF mode
This operating mode automatically switches receiver to
AUTO mode, and switches it to the off state.
26 27
Receiver ON/OFF/AUTO Button (RGB light signal indicators)
• RED - Heating request is active
• GREEN - Device is turned on but there is no heating request
• BLINKING YELLOW - There is no communication between the thermostat and the receiver
• BLINKING GREEN - Receiver is in pairing mode
Maintenance
Battery replacement
If the battery symbol appears on the screen, change the
batteries:
1. Remove the thermostat from the thermostat mount.
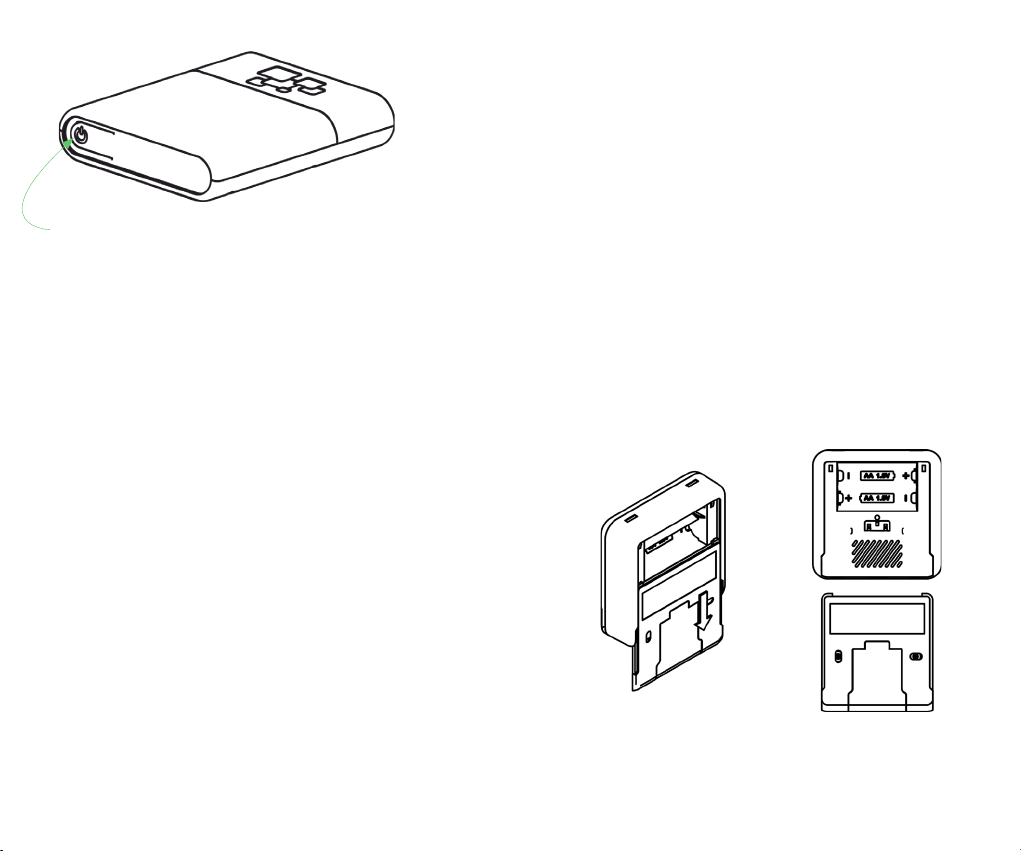
2. Replace the batteries with two Alkaline AA 1.5V batteries.
3. Place the thermostat on the thermostat mount.
4. Set TIME by following the manual: SETTING THE TIME.
The thermostat is ready to continue operating. All set
programs and advanced options have been preserved.

28 29
Interference detection and correction
Condition: The room thermostat display is off.
• Make sure the thermostat is on.
• Check that the room thermostat batteries are properly
inserted into the battery compartment.
• Check the correct polarity of the batteries.
• Make sure the batteries are not empty.
Condition: The thermostat cannot establish communication
with the receiver.
• Turn the thermostat off/on by putting batteries out/in.
• Press the MIDDLE button on the thermostat for a refresh.
Condition: The receiver activated the heating request, but
the heating system did not activate.
• Check that all other conditions for activating the heating
are fulfilled.
• Check that the receiver is properly attached to the panel.
• Make sure the receiver is properly connected to the
heating system.
Handling and maintenance
The device is designed to operate reliably for many years with
appropriate handling. Here are some tips to handle it properly:
1. Before using the product, read the manual carefully.
2. Do not expose the product to direct sunlight, extreme
cold and humidity, and sudden changes in temperature.
This lowers the measurement accuracy.
3. Do not place the product in a place subject to vibration
or shocks - it may cause damage.
4. Do not expose the product to excessive pressure,
shocks, dust, high temperature or humidity - this can
cause degradation of product functionality, reduced
energy endurance, batteries damage and deformation of
plastic parts.
5. Do not expose the product to rain or moisture, dripping
or splashing water.
6. Do not place any open flames on the device, such as a
lit candle, etc.
7. Do not place the device in places where there is
insufficient air-flow.
8. Do not place any objects in the vents of the unit.
9. Do not touch the internal power openings of the device
- they may be damaged and thus automatically void the
warranty. Only a qualified person should operate the
device.
10. Use a slightly damp cloth to clean it. Do not use
thinners or cleaners - they could scratch the plastic parts
and damage the power lines.

30
11. Do not immerse the product in water or other liquids.
12. In case of damage or malfunction of the device,
do not make any repairs yourself. Have your device
repaired at the shop where you bought it.
13. This product is not intended for use by persons
(including children) with limited physical, sensory or
intellectual abilities or persons without experience and /
or knowledge, unless they are under the supervision of a
person in charge of their safety or have been instructed
by that person to use the product. Children should be
supervised to ensure that they do not play with the device.
Do not dispose the device or batteries at the end of their
lifetime as unsorted municipal waste; use waste collection
centers. By properly disposing the waste, you will avoid a
negative impact on human health and the environment.
Recycling contributes to the protection of natural
resources. More information about recycling this product
will be provided by the municipality, your household waste
disposal organization, or the point of sale where you
purchased the product.
NOTE: The contents of this manual are subject to
change without notice - due to limited printing, the
displayed symbols may be slightly different from the on-
screen display - the contents of this manual may not be
copied without prior consent.
Innentech GmbH declares that IT 201 (thermostat +
receiver) meets the essential requirements and other
relevant provisions of Directive 2014/53/EU. The device
can be used freely in the EU.

Innentech GmbH
Gubelstrasse 19
6300 Zug
Switzerland
Table of contents
Other Inngenso Thermostat manuals


