Inngenso IT WiFi User manual

Thermostat
Manual
...step by step
IT WiFi v3.0 | EN


The IT WiFi thermostat is designed to control heating
systems. Unlike standard home thermostats, the IT WiFi has
two separate and wirelessly connected units (thermostat +
receiver) and a mobile application that allows monitoring
and controlling of the heating system.
The receiver is a switching device used to connect
heating systems, and a thermostat is a portable control
unit for handling and setting the temperature. The units
communicate with each other using a radio signal. The
receiver also communicates with the mobile app using
WiFi. The advantage of the system is the variability and
easier availability of temperature control.
Important notes
• Read the user manual not only for the thermostat but
also the boiler.
• Turn off the power supply before installing the
thermostat.
• We recommend installation by a qualified installer.
• The electrical circuit should be secured with a fuse that
does not exceed 20 A.
• Be aware of the required standards for installation.
ENG WIRELESS DIGITAL WiFi THERMOSTAT IT WiFi

Specifications
Thermostat
Receiver
Mobile app
230 V AC
2000 W
NO, NC, COM, L, N
433 MHz and 2.4GHz
86x86x29 mm
2.4 GHz
TLS (SSL)
Yes
IP20
0 °C – 70 °C
Power supply
Maximum switching power
Output/Input
Frequency
Dimensions
WiFi
Data encryption
Standalone control
Ingress protection rating
Operating temperature
Yes
Yes
Yes
0.2 °C – 5 °C
–5 °C – 5 °C
Android 5.0 / iOS 5 or higher
Free
Holiday mode
Weekly program
Multiple thermostat control
Hysteresis setting
Temperature sensor calibration
Platform
Download and update
22.5
Power supply
Mounting
RF Communication
Manual control
Frost protection
Window open detection
Sensitivity
Temperature setting
Temperature measurement
Dimensions
3 V DC, 2 AA batteries
Wall or portable
*CS, FEC
Full
Yes
Yes
0.5 °C
7 °C – 35 °C
5 °C – 40 °C
86x86x29 mm
* Checksum, Forward error correction

Safety
Risks due to poor handling
Due to poor handling, you can harm yourself and cause
material damage.
• Read the accompanying instructions carefully, especially
the chapter on safety and important notes.
Danger of malfunctioning
• Ensure that the air in the room can circulate freely around
the thermostat and that the thermostat is not covered by
furniture, curtains and other objects.
• Make sure that all heater valves in the room where the
thermostat is installed are fully open.
• Only operate the heating system if it is in technically
perfect condition.
Behaviour in case of loss of wireless communication
Low voltage in the batteries that power the thermostat may
result in interruption of wireless communication. In the
event of a loss of wireless communication between the
receiver (heating system switching unit) and the thermostat
(room control unit):
• On the receiver: orange light is off.
• On thermostat’s display: time and current temperature
are shown. The symbol “--” is shown instead of the set
temperature.

If the battery icon is shown on the thermostat that means
that the batteries have reached the voltage limit for which
the device can operate without any problem. In this case,
it is highly advised to replace the current batteries with
the new ones. The thermostat can still function with these
batteries but it is much more error-prone.
NOTE: In case when communication is lost
the thermostat immediately switches off the heating.
After that the heating can be turned on via the mobile
app by applying a set temperature higher than 7.0 °C.
When the power supply comes back after the power
outage the receiver remains in its last state. If after
10 minutes the communication with the thermostat
is not established it will turn off the the heating. In
this case the heating can be turned on and controlled
only via mobile app by setting the set temperature
higher than 7.0°C.
Freezing damage due to too low room temperature
If the room temperature is set too low in some rooms, the
heating system can be damaged due to freezing.
• Ensure that during the frost period the heating
system remains in operation and that all rooms during
your absence are sufficiently heated.
• The frost protection only activates when the thermostat
is turned off. Default frost protection temperature is 5 °C
and can be changed in the range from 0 to 17 °C. Frost
protection can be enabled or disabled via mobile app.

Proper use of the device
Improper use can result in health and life hazards to the
plant operator or third parties.
This product is not intended for use by persons (including
children) with limited physical, sensory or intellectual
abilities or persons without experience and / or knowledge,
unless they are under the supervision of a person in charge
of their safety or have been instructed by that person to use
the product.
Children must be supervised to ensure that they do not
play with the product.
This thermostat can be used to control a heating system
with a boiler.
Intended use includes:
• Following the enclosed instructions for use, installation
and maintenance of the device, as well as all other
system components.
• Compliance with all inspection and maintenance
requirements stated in the instructions.
Use that is different from the one described in this manual
or use that goes beyond the scope of the use described
here will be considered as non-intended.
It is not intended for any direct commercial or industrial
use.

Overview of command elements
Room thermostat
1 – Display
2 – Rotary push button (increase/
decrease value or confirm selection)
3 – Side button: backlight,
thermostat on/off button, step back
Receiver
1 – Receiver ON/OFF Button
2 – Green light signal
3 – Red light signal
4 – Orange light signal
• Off in case there is no communication between the thermostat and the receiver
• On in case communication is established between the thermostat and the receiver
• Blinks quickly if the device is in SmartConfig mode
• Blinks two times in case the receiver receives a message from the thermostat
• On when the receiver
is turned on
• On when heating request is active
• Blinks quickly if the device is in
SmartPairing mode
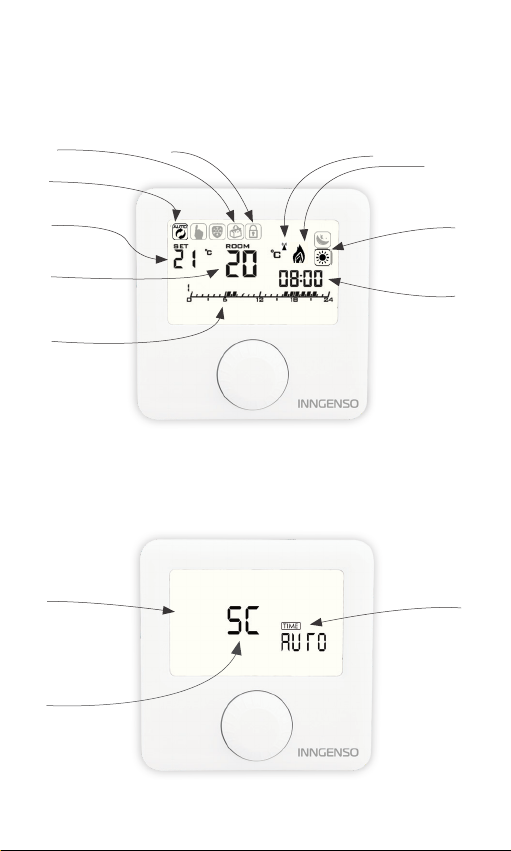
Display description
Description of the basic display
Description of the settings display
Working mode
Heating state
Time
Program
Current
temperature
Set
temperature Eco/Comfort temperature
Time settings
Overview of the basic functions
Overview of the functions
on the settings display
Internet connection
SmartPairing
mode
SP
SmartConfig
mode
Holiday mode Child lock

Thermostat ON/OFF
When the thermostat is off, it extends the battery life.
1. Press and hold the turn ON/OFF button (on
the right) for 3 seconds.
2. The thermostat is successfully turned ON or
OFF.
Please note that by turning the thermostat off, the heating
is turned off, unless anti frost protection turns it on.
Setting the working mode
Program mode
Program mode can only be entered if an internet
connection is established.
1. Press and hold the rotary push button for
one second.
2. The upper left end of the screen shows the
symbol .
3. PROGRAM MODE successfully activated.
Manual mode
1. Press and hold the rotary push button for
one second.
2. The upper left end of the screen shows the
symbol .
3. MANUAL MODE successfully activated.

Holiday mode
1. The upper end of the screen shows the
symbol .
2. Holding the rotary push button for three
seconds exits the holiday mode and enters
manual mode.
Program mode is active Manual mode is active
Holiday mode is active

Set temperature setting
Set temperature can only be set in manual mode.
1. Rotate the rotary push button to set the
desired temperature.
2. Rotating clockwise increases the set
temperature.
3. Rotating counterclockwise decreases the set
temperature.
Opening the settings display
1. Hold down the rotary push button for 3-5
seconds until the settings display opens.
2. Release the rotary push button.
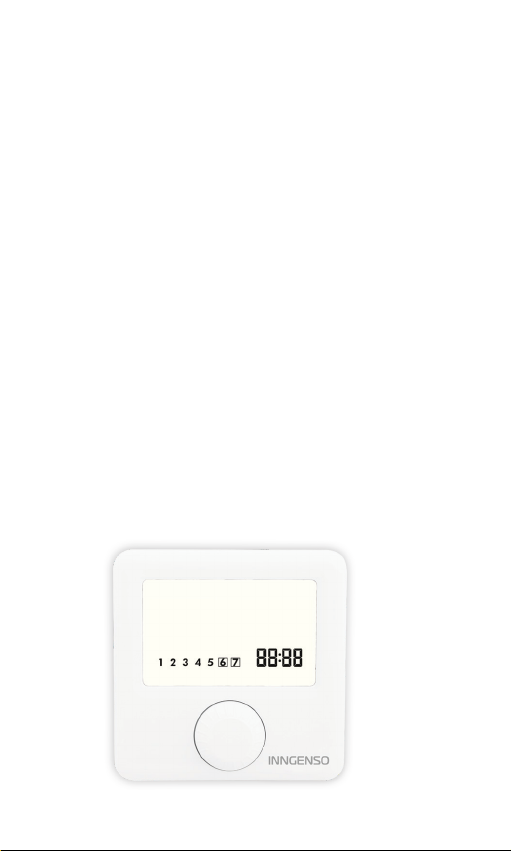
Setting the time
Setting the time is only enabled if the device does not have
internet connection. Otherwise, time is synchronized with
internet time.
1. Open the settings display.
2. Rotate the rotary push button, select the
time symbol, and briefly press the rotary push
button to enter the clock setting.
3. Rotate the rotary push button, set the current
MINUTE, and briefly press the rotary push
button.
4. Rotate the rotary push button, set the current
HOUR, and briefly press the rotary push button.
5. Rotate the rotary push button, set the current
DAY and briefly press the rotary push button.
6. Briefly press the side button to go a step
back to exit the settings display.
Overview of time
setting

SmartPairing mode
When thermostat or receiver is replaced with another
one, SmartPairing mode allows the pairing of the new
thermostat/receiver with the old one. Both thermostat and
receiver need to be in SmartPairing mode to be paired
together.
To enter SmartPairing via thermostat:
1. Open the settings display.
2. Rotate the rotary push button, select the SP
and hold the rotary push button.
3. When symbol SP starts to blink, release the
rotary push button.
To enter SmartPairing via receiver:
1. Push down ON/OFF button.
2. While green light signal is blinking pull the
ON/OFF button up.
3. Do step 1 and 2 two times.
4. Red light signal blinking will indicate that the
receivar has entered SmartPairing mode.
When the SmartPairing is completed thermostat will return
to on screen, and red light signal on receiver will stop
blinking.
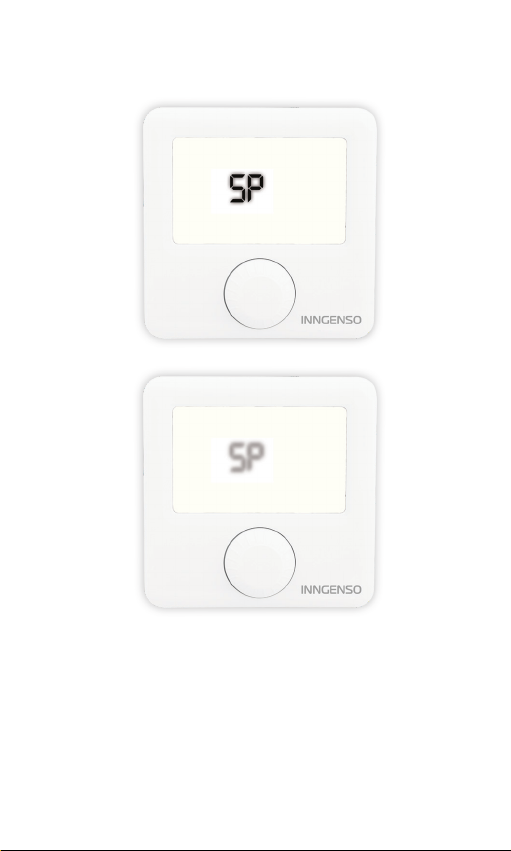
Symbol SP starts to blink when entering
the SmartPairing mode

SmartConfig Mode
SmartConfig allows easy connection of the thermostat to
the Internet via the WiFi chip, which is embedded in the
receiver. The device has an option of changing the WiFi
network in SmartConfig mode. Please make sure that your
mobile device is connected to a 2.4GHz Wlan network for
the SmartConfig process.
1. Open the settings display.
2. Rotate the rotary push button, select the
SC and hold the rotary push button.
3. When symbol SC starts to blink again and
there is no time option, release the rotary push
button.
4. Open the mobile app and click the symbol
+ in the upper right corner.
5. Click SMART CONFIG, and then START
SMART CONFIG.
6. Enter the WiFi password of the network your
mobile device is connected to.
7. Click CONNECT and wait.
8. A message on the device’s connection status
will be displayed on the mobile app screen.
To exit SmartConfig, hold the rotary push button until the
basic display on the thermostat is shown, or wait 3 minutes
when the devices will automatically exit the SmartConfig
mode.

Symbol SC starts to blink when entering
the SmartConfig mode

Mobile App INNGENSO
Creating an account
Creating an account is possible with the mobile app.
1. Open Google Play / AppStore.
2. Search for the INNGENSO.
3. Click download.
4. After installing it, open the mobile app.
5. Choose CREATE ACCOUNT.
6. Enter data in corresponding fields.
7. Click REGISTER.
8. Check the email used to create a new
account and confirm registration via the
confirmation link.
9. Go back to the main screen in the
mobile app.
10. Enter your username and password in
corresponding fields.
11. Click LOG IN.
12. The application is ready to use.
Scan QR to download the
app from Google Play
Scan QR to download the
app from App Store

Overview of the
register screen
Overview of the
log in screen

Add new device
By adding a new device the first connection of the device
with the internet is established. This is done via the mobile
app.
1. Activate SmartConfig Mode on thermostat
as explained before.
2. Turn on the location function on mobile
device.
3. Open the mobile app.
4. Log in to the account you previously created.
5. Click on ADD NEW DEVICE.
6. You can also add a new device by clicking
the symbol +in upper right corner.
7. Select SMART CONFIG.
8. Select START SMART CONFIG.
9. Enter the password of the WiFi network
you are currently connected to and then click
CONNECT.
10. Wait for the mobile app to recognize
your device.
11. A message on the device’s connection
status will be displayed on the mobile app
screen.
This manual suits for next models
1
Table of contents
Other Inngenso Thermostat manuals


