Innofit INN - 704 User manual

IMPASTATRICE
INN - 704
MANUALE D’USO
USER MANUAL

2
Grazie per aver acquistato l’impastatrice “INN - 704” uno strumento utilissimo
per la preparazione di diversi tipi di pietanze ed impasti.
Prima dell’uso:
•Leggere attentamente tutte le avvertenze e le istruzioni d’uso e conservare il
presente manuale per future consultazioni.
•Lavare i componenti ed accessori: vedere la sezione ‘cura e pulizia’
•Rimuovere tutti i materiali di imballaggio.
NORME DI SICUREZZA E AVVERTENZE
•Prima di utilizzare l’apparecchio, leggere attentamente le istruzioni per
l’uso e in particolare le avvertenze sulla sicurezza, attenendosi ad esse.
Conservare il presente manuale, per l’intera durata di vita dell’apparecchio, a
scopo di consultazione. La mancata osservanza delle istruzioni potrebbe
essere causa di incidenti e rendere nulla la garanzia, sollevando il fabbricante
da ogni responsabilità.
•ll presente apparecchio deve essere utilizzato unicamente per lo scopo per cui
è stato progettato, ovvero come IMPASTATRICE per uso domestico. Qualsiasi
altro utilizzo è considerato non conforme e pertanto pericoloso.
•Questo prodotto è stato concepito per il solo uso DOMESTICO, non è stato
concepito per uso industriale o professionale
•Gli elementi di imballaggio (sacchetti di plastica, cartone, polistirolo ecc.)
non devono essere lasciati alla portata dei bambini in quanto potenziali
fonti di pericolo e devono essere smaltiti secondo quanto previsto dalle
normative vigenti.
•Dopo aver rimosso l’apparecchio dalla confezione, controllare l’eventuale
presenza di danni da trasporto e l’integrità della fornitura in base al
disegno. In caso di danneggiamenti o dubbi sull’effettiva integrità, non
utilizzare l’apparecchio e rivolgersi al servizio di assistenza autorizzato.
•Non usare l’apparecchio se il cavo o la spina risultano danneggiati.
•Prima di collegare l’apparecchio, controllare che i dati della tensione di rete
riportati sulla etichetta dati corrispondano a quelli della rete elettrica locale.
L’etichetta dati si trova sull’apparecchio stesso.
•La spina dell’apparecchio deve entrare nella presa perfettamente. Non
alterare in alcun modo la spina. Non usare adattatori.
•Non usare il prodotto all’esterno.
IT
IMPASTATRICE

3
•Non usare il prodotto se è caduto a terra, se ci sono visibili segni di
danneggiamento o perdite.
•Non tirare il cavo di rete per sollevare, trasportare o togliere la spina dalla
presa di corrente.
•Assicurarsi che il cavo non presenti nodi o piegature.
•Verificare lo stato del cavo elettrico. Cavi danneggiati o annodati aumentano il
rischio di scossa elettrica.
•Non usare la spina o il cavo con le mani o i piedi bagnati o umidi.
•Se il cavo di alimentazione è danneggiato, esso deve essere sostituito da un
centro di assistenza tecnica autorizzato, in modo da prevenire ogni rischio.
•In caso di guasto o di cattivo funzionamento dell’apparecchio, spegnerlo e
non manometterlo. Per l’eventuale riparazione rivolgersi esclusivamente ad
un centro di assistenza tecnica autorizzato
•Questo prodotto non è stato concepito per l’uso da parte di persone (inclusi
bambini) con ridotte capacità fisiche, mentali o sensoriali, o privi di esperienza
e conoscenza, a meno che non ci sia la supervisione o formazione sull’uso
dell’apparecchio fornita dalla persona responsabile della loro sicurezza.
•Questo prodotto non è un giocattolo. Assicurarsi che i bambini non giochino
con l’apparecchio. Tenere il prodotto lontano dalla portata dei bambini.
•Non lasciare mai che il cavo penzoli da una superficie dove un bambino
potrebbe afferrarlo.
•Non capovolgere il prodotto mentre è in funzione o è collegato alla rete
•Prima di montare o smontare gli accessori, dopo l’uso o prima della pulizia,
spegnere l’apparecchio e togliere la spina dalla presa elettrica
•Non lasciare mai il prodotto incustodito quando è in funzione.
•Riporre il prodotto in un ambiente asciutto privo di polvere, lontano dalla luce
diretta del sole e da fonti di calore.
•NON immergere mai l’apparecchio in acqua e non metterlo mai sotto il getto
di acqua corrente.
•Per l’uso, posizionare il prodotto su una superficie piana e stabile, in modo che
non possa cadere a terra, nel lavandino o in altri contenitori di acqua.
• NON utilizzare in prossimità del piano cottura della cucina e o altre fonti di calore.
•Prestare attenzione affinché il cavo non venga a contatto con superfici calde,
incandescenti, fiamme libere, pentole e altri utensili bollenti.
•Non toccare le parti in movimento. ATTENZIONE: Non tentare in nessun modo
di toccare e/o estrarre gli accessori mentre l’apparecchio è in funzione.
•Tutte le parti destinate al contatto con il cibo durante l’utilizzo dell’apparecchio
IT

4
devono essere ben lavate prima dell’uso.
• Non usare mai un accessorio non autorizzato, oppure più di un accessorio alla volta.
•Durante il funzionamento non occludere le griglie di aerazione.
•Non far entrare acqua o oggetti all’interno delle griglie di aerazione.
DESCRIZIONE
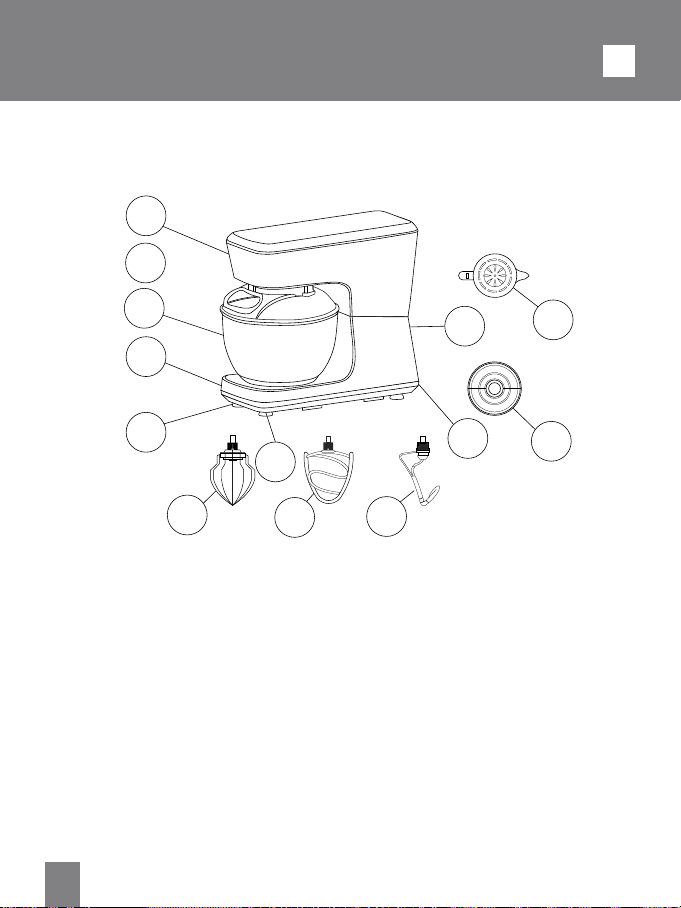
(1) parte superiore (2) coperchio ciotola (3) ciotola (4) parte inferiore (5) base
(6) piedini antiscivolo (7)interruttore acceso/spento e selettore della velocità
(8) tasto per sollevare/abbassare parte superiore (9) frusta (10) frusta piatta
(11) gancio per impastare (12) separatore uova (13) protezione anti polvere
GLI ACCESSORI PER MISCELARE E IL LORO USO
•FRUSTA (o anche detta frullino): per uova, panna, pastelle, pan di spagna
senza grassi, meringhe, cheesecake, mousse e soufflé. Non utilizzare
il frullino nel caso di miscele dense (ad esempio per montare burro e
zucchero), potrebbero danneggiarla.
•FRUSTA PIATTA: per preparare torte, biscotti, pasta frolla e simili, glassa,
IT
08 12
07 13
11
10
09
06
05
04
03
01
02

5
ripieni, bigné e purea di patate
•GANCIO PER IMPASTARE: per impasti con lievito.
FUNZIONAMENTO
1. Premere il tasto per sollevare la parte superiore dell’impastatrice fino a
bloccarla in posizione.
2. Scegliere una delle fruste o il gancio e inserire la protezione a disco come
indicato sotto in figura 1.
3. Avvitare l’accessorio all’apposito aggancio, posto sulla testa dell’impastatrice,
vedi figura 2.
4. Inserire il recipiente sulla base nell’apposito alloggiamento, ruotarlo in senso
anti-orario nella direzione indicata dalla scritta LOCK e bloccarlo in posizione,
versare quindi gli ingredienti al suo interno.
5. Installare il paraspruzzi sulla parte superiore dell’impastatrice. Durante la
miscelazione è possibile aggiungere ingredienti direttamente nella ciotola,
usando lo scivolo di introduzione
6 Premere l’apposito tasto e abbassare la testa del mixer fino a bloccarla in posizione.
7. Inserire la spina nella presa di corrente, accendere e impostare la velocità
desiderata. Per spegnere, spostare il selettore su ‘0/OFF’.
8. Togliere la spina dalla presa elettrica.
9. Per rimuovere gli accessori dall’impastatrice, sollevare la testa del mixer e
svitarli per estrarli dall’attacco. Per rimuovere la ciotola, girarla in senso orario.
ATTENZIONE:
1. Il tempo di funzionamento continuo deve essere inferiore ai 5 minuti.
2. Prima di ripetere questo ciclo lasciar raffreddare completamente l’apparecchio
IT
Fig.1 Fig.2

6
Importante
•Quando si lavorano ingredienti pesanti, come impasti per il pane, è normale
che la testa del mixer si muova.
•Se la testa del mixer viene sollevata con l’apparecchio in funzione, quest’ultimo
si ferma immediatamente. Per farlo ripartire, abbassare la testa del mixer,
impostare la velocità sulla posizione spenta, attendere qualche secondo e
poi selezionare nuovamente la velocità. Il mixer dovrebbe rimettersi subito in
funzione.
•Se per qualunque motivo dovesse mancare la corrente e il mixer smette
di funzionare, spostare il selettore sulla posizione spenta, attendere qualche
secondo e poi selezionare nuovamente la velocità. Il mixer dovrebbe rimettersi
subito in funzione.
•Il mixer non funziona se prima non si montano correttamente accessori e parti
•Se si sente che l’apparecchio funziona con fatica, spegnerlo ed estrarre parte
della miscela, o alternativamente alzare la velocità.
Suggerimenti
•Per montare le uova è meglio utilizzare uova a temperatura ambiente.
•Prima di montare albumi assicurarsi che il frullino o la ciotola non siano unti o
sporchi di tuorlo.
•Utilizzare ingredienti freddi per preparate pasta frolla e simili, a meno che la
ricetta non indichi diversamente.
•Quando si montano burro e zucchero per preparare torte utilizzare sempre
burro a temperatura ambiente o farlo prima ammorbidire.
•Se l’apparecchio viene avviato con una miscela di consistenza elevata nella
ciotola, come l’impasto per il pane, potreste notare che il mixer impiega alcuni
secondi per raggiungere la velocità selezionata.
Per impastare:
1. La proporzione farina: acqua è in genere 5:3 (questa proporzione è data
solo come riferimento, può essere aggiustata secondo ricette o a proprio
piacimento.)
2. Usare la velocità minima per almeno 1 minuto, poi passare a quella media per 3-4 minuti.
3. Assicurarsi di non aver superato la massima capacità della ciotola con l’impasto.
4. La capacità massima della ciotola è 800 g farina: 420 g acqua, si consiglia un
tempo di lavorazione di 3 minuti ad una velocità media.
5. Accessorio raccomandato: Gancio per impastare.
IT

7
IT
Per montare uova e burro:
Versare le uova nella ciotola nella quantità specificata dalla ricetta, utilizzando la
velocità massima per 2-5 minuti.
1. La quantità massima di uova raccomandata è 18.
2. Mescolate al massimo 1.5-2.0L di burro fresco a velocità media per 3-5minuti.
3. Quando lavorate latte fresco, burro o altri liquidi, assicuratevi che la quantità
totale non superi la capacità massima della ciotola (3,5L).
4. Accessorio raccomandato: frusta.
Per mescolare ingredienti freddi, insalata, cocktail o altri liquidi:
1. Mescolare gli ingredienti nelle quantità desiderate al Massimo per 5 minuti,
alternando velocità bassa e alta.
2. Non superare la capacità massima della ciotola. Nel caso in cui la quantità sia
notevole, è necessario usare una bassa velocità per evitare che fuoriesca dalla
ciotola durante la lavorazione.
3. Accessorio raccomandato: frusta piatta
CURA E PULIZIA
1. Prima di togliere l’accessorio dal robot da cucina e procedere con la pulizia,
spegnere l’apparecchio e scollegare dalla rete elettrica.
2. Dopo l’uso, attendere qualche minuto che si raffreddi prima di pulire
l’apparecchio.
3. Svitare l’accessorio e rimuovere la ciotola.
4. Per pulire l’esterno dell’unità principale, utilizzare un panno umido o asciutto
con un pochino di detergente delicato, facendo attenzione che né acqua né
detergenti penetrino all’interno dell’apparecchio. Questo potrebbe causare
danni al motore o provocare shock elettrici.
5. Non usare materiali adesivi o alcool per pulire all’interno dell’apparecchio o il
coperchio di protezione.
6. Non immergere l’apparecchio in acqua.
7. Per pulire gli accessori, usare acqua calda e detersivo.
8. Per pulire la ciotola è possibile usare il detersivo abituale, ma fare attenzione a
non utilizzare spugne di materiali abrasivi o detergenti troppo aggressivi.
9. Ciotola, frusta, frusta piatta e gancio possono essere lavati in lavastoviglie.
8
IT
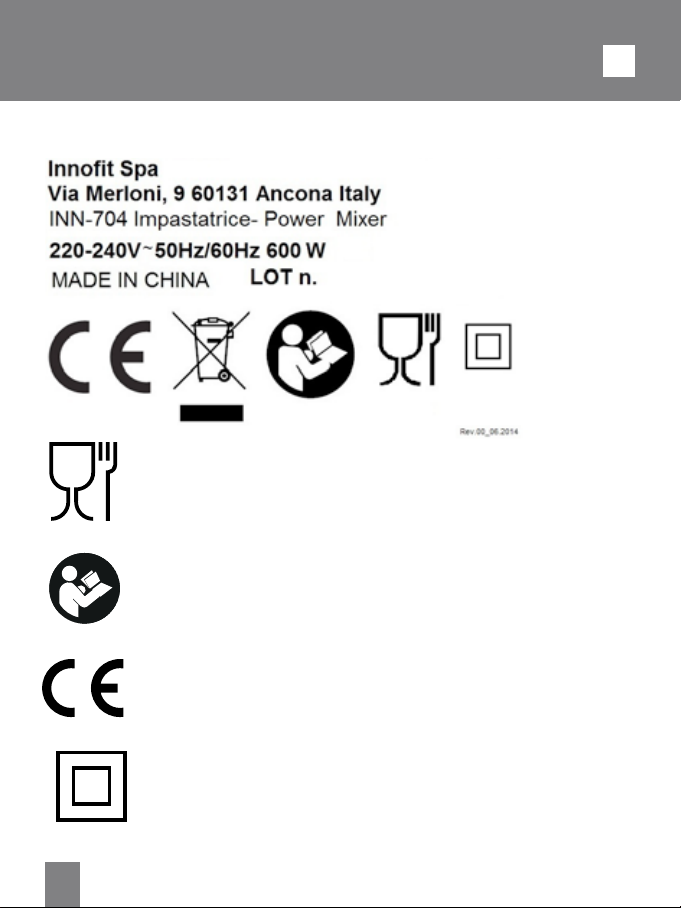
Per contatto con alimenti
leggere attentamente le istruzioni per l’uso
Questo prodotto è conforme a tutte le direttive europee applicabili.
Apparecchio con isolamento elettrico di classe II.
ETICHETTA DATI

9
INFORMAZIONI AGLI UTENTI ai sensi del Decreto Legislativo N°
49 del 14 Marzo 2014 “Attuazione della Direttiva 2012/19/UE sui rifiuti di
apparecchiature elettriche ed elettroniche (RAEE)”
Il simbolo del cassonetto barrato riportato sull’apparecchiatura indica che il
prodotto alla fine della propria vita utile deve essere raccolto separatamente
dagli altri rifiuti. L’utente dovrà, pertanto, conferire l’appa¬recchiatura integra dei
componenti essenziali giunta a fine vita agli idonei centri di raccolta differenziata dei
rifiuti elettronici ed elettrotecnici, oppure riconsegnarla al rivenditore al momento
dell’acquisto di nuova apparecchiatura di tipo equivalente, in ragione di uno a
uno, oppure 1 a zero per le apparecchiature aventi lato maggiore inferiore a 25
CM. L’adeguata raccolta differenziata per l’avvio successivo dell’apparecchiatura
dimessa al riciclaggio, al trattamento e allo smaltimento ambientale compatibile
contribuisce ad evitare possibili effetti negativi sull’ambiente e sulla salute e
favorisce il riciclo dei materiali di cui è composta l’apparecchiatura. Lo smaltimento
abusivo del prodotto da parte dell’utente comporta l’applicazione delle sanzioni
amministrative di cui al D.Lgs n. Decreto Legislativo N° 49 del 14 Marzo 2014.
IT

10
Thank you for purchasing “INN - 704” power mixer, a very useful tool for the
preparation of different types of dishes.
Before use:
•read all the instructions and warnings carefully and keep this user manual safe
for future use
•wash the parts and accessories: see “Cleaning and maintenance”
•remove all packaging materials
SAFETY NORMS AND WARNINGS
•Please read the instructions of use and safety norms before using the
appliance and follow these at all times. Keep this manual with the appliance
for future consultation for all the product life. Failure to comply with the use and
maintenance instructions provided in this user manual could lead to an accident
and will invalidate all and any rights to the manufacturer’s warranty.
•This appliance must be used only for the purpose for which it was designed
that is as a KNEADING MACHINE for home use. Any other use is improper
and potentially dangerous.
•This appliance is for household use only, not professional or industrial use.
•Keep all packing material (plastic bags, cardboard, polystyrene, etc..) out of
reach of the children, since they are potential sources of danger and must be
disposed of as provided by law.
•After having removed the appliance from its packaging, verify its integrity
based on the drawing and any presence of damage caused by transport. If in
doubt, do not use the appliance and contact an authorized service centre.
•Do not use the appliance if the cable or plug is damaged.
•Ensure that the voltage indicated on the rating label matches the mains voltage
before plugging in the appliance. The rating label is on the product.
•The appliance’s plug must fit into the mains socket properly. Do not alter the
plug. Do not use plug adaptors.
•Do not use or store the appliance outdoors.
•Do not use the appliance if it has fallen on the floor, if there are visible signs of
damage or if it has a leak.
•Do not force the electrical connection wire. Never use the electric wire to lift up,
carry or unplug the appliance.
•Ensure that the electric cable does not get trapped or tangled.
GB
PowER MIxER

11
•Check the state of the electric cable. Damaged or knotted cables increase the
risk of electric shock.
•DO NOT use the appliance with damp or wet hands or feet.
•If the power cable is damaged, it must be replaced by an authorized technical
service centre, so as to prevent all risks.
•In case of fault or malfunctioning of the appliance, switch it off and do not
tamper with it. If the device needs to be repaired, contact an authorized
technical assistance centre.
•This appliance is not intended for use by persons (including children) with
reduced physical, sensory or mental capabilities, or lack of experience and
knowledge, unless they have been given supervision or instruction concerning
use of the appliance by a person responsible for their safety.
•This product is not a TOY. Keep it out of reach of children. Children should be
supervised to ensure that they do not play with the appliance. Keep this
product out of reach of children.
•Never let the cord hang down where a child could it grab.
•Do not turn the appliance over while it is in use or connected to the mains.
•Always unplug the mixer from the power outlet before removing or changing
accessories.
•Never leave the product unattended when in use.
•Store the appliance in a dry place, free from dust and out of direct sunlight, far
from heating sources.
•Never immerse the appliance into water or other liquid and not place it under
tap water.
•When in use, place the product on a flat and stable surface, ensure it cannot
fall on the floor, in a sink or a container full of water.
•DO NOT use near the kitchen hob and or other sources of heat.
•Be careful that the cable does not touch hot, incandescent surfaces, open
flames, pans or other utensils.
•Do not touch the moving parts. CAUTION: Do not touch and/or remove
accessories while the unit is in operation.
•All parts that come into contact with food during the use of the device must be
well washed before use.
•Do not use accessories of different types at the same time.
•During operation, do not block the ventilation grids.
•Do not let in water or objects through the ventilation grilles.
GB
12
PRODUCT DESCRIPTION
(1) upper part (2) cover (3) bowl (4) lower part (5) base (6) anti-slip feet
(7) on/off swtich and speed selector (8) upper part raise/lower bottom (9) whisk
(10) flat beater (11) dough hook (12) egg separator (13) protection disc
ACCESSORIES FOR MIXING AND THEIR USE
•WHISK(oralsoknownasbeater):foreggs,cream,batters,fat-freesponge
cake, meringues, cheesecake, mousse and soufflé. Do not use the
whisk in the case of heavy mixtures (eg creaming fat and sugar), may
cause damage.
•FLATBEATER:topreparecakes,biscuits,shortcrustpastryandsoon,icing,
fillings, cupcakes and potato puree
•DOUGHHOOK:foryeastdough
08 12
07 13
11
10
09
06
05
04
03
01
02
GB

13
OPERATION
1. Press the button to lift-up the upper part of the power mixer until it’s blocked.
2. Select one of the beater or the hook and insert the protection disc, as shown in
picture 1.
3. Screw the accessory into its room on the head of the mixer, see picture 2.
4. Insert the bowl into the base and turn it anti-clockwise, as shown by the printing
LOCK, and block it in its final position, then pour the ingredients in it.
5. Insert the cover into the head of the mixer. During the food preparation, you
can add the ingredient directly from the hole of the cover.
6 Press the button to move the head down and block into its final position.
7. Insert the plug into the electric socket, turn the appliance on and set the speed
to the desired level. To turn the unit off, set the speed to ‘0/OFF’.
8. Disconnect the pug from the electric socket..
9. To remove the accessories, lift up the head of the mixer and unscrew the access
To remove the bowl, turn it clockwise.
CAUTION:
1. The continuous operating time must be less than 5 minutes.
2. Before repeating this cycle let the appliance cool down completely
GB
Picture.1 Picture.2

14
Important
•Whenprocessingheavyingredients,suchasbreaddough,itisnormalthatthe
mixer head is moving.
•Theunitsstopsworkingifyouliftuptheheadduringoperation.Inorderto
make it start working again, move down the head, wait few seconds and set the
speed. The product might start working again.
•Ifforanyreasonitshouldmissthecurrentandthemixerstopsworking,move
the switch to the off position, wait a few seconds and then re-select the speed.
The appliance should resume operating straight away.
•Themixerdoesn’tworkiftheaccessoriesandpartshavenotbeenmounted
correctly.
•Ifyoufeelthatthedeviceworkswitheffort,turnitoffandremovepartofthe
mixture, or alternatively increase the speed.
Tips
•Tomounteggsitisbettertouseeggsatroomtemperature.
•Beforemountingwhitesmakesurethewhiskorbowlisnotgreasyordirtyofyolk.
•Usecoldingredientsforprepareshortcrustpastryandthelike,unlessthe
recipe says otherwise.
•Whenmountingbutterandsugartomakecakesalwaysusebutteratroom
temperature or soften it before.
•Iftheunitisbootedwithahighconsistencymixtureinthebowl,asthedough
for the bread, you might notice that the mixer takes a few seconds to reach the
selected speed.
To dough:
1. The proportion of flour: water is typically 5:3 (this ratio is given for reference
only, may be adjusted according to recipes or to your liking.)
2. Use the lowest speed for 1 minute, then move on to the medium for 3-4 minutes.
3. Make sure you have not exceeded the maximum capacity of the bowl with the dough.
4. The maximum capacity of the bowl is 800 g flour 420 g water, it is
recommended that a processing time of 3 minutes at medium speed.
5. Accessory recommended: Dough Hook.
GB

15
To mount eggs and butter:
Pour the eggs into the bowl in the quantity specified in the recipe, using the
maximum speed for 2-5 minutes.
1. The recommended maximum amount of eggs is 18.
2. Stir maximum of 1.5-2.0L of fresh butter at medium speed for 3-5minutes.
3. When processed fresh milk, butter or other liquids, make sure that the total
amount does not exceed the maximum capacity of the bowl (3.5 L).
4. Accessory recommended: whisk
To mix cold ingredients, salads, cocktails and other liquids:
1. Stir ingredients in the quantities required to Maximum for 5 minutes, alternating
between low and high speeds.
2. Do not exceed the maximum capacity of the bowl. In case the amount is
considerable, it is necessary to use a low speed to avoid that come out from the
bowl during processing.
3. Recommended accessories: flat beater.
CLEANING AND MAINTENANCE
1. Before removing the accessory from the food processor and proceed with
cleaning, turn off the appliance and unplug.
2. After use wait a few minute until it cools down before cleaning.
3. Unscrew the accessory and remove the bowl.
4. To clean the outside of the main unit, use a dry or damp cloth with a little mild
detergent, making sure that no water or detergent fall into the unit. This could
damage the engine or cause an electric shock.
5. Do not use adhesive materials or alcohol to clean inside the appliance
or the protective cover.
6. Never immerse the appliance in water.
7. To clean the accessories, use hot water and detergent.
8. To clean the bowl use the usual detergent, take care not to use abrasive
sponges or aggressive detergents
9. Bowl, whip, flat beater and hook can be cleaned in the dishwasher.
GB

16
Food contact
Read carefully the user manual
The product is made conforming with all the applicable European
regulations
Class II insulated electrical appliance
RATING LABEL
GB

17
INFORMATION TO USERS according to Legislative Decree No. 49 of
March 14, 2014 “ 2012/19/UE Implementation of the Directive on Waste Electrical
and Electronic Equipment (WEEE) “
The crossed-out dustbin symbol indicates that the product at the end of its life must
be collected separately from other waste. The user should, therefore, take the
equipment with the essential components at the end of its useful life to the separate
collection center of electronic and electrical waste, or return it to the retailer when
purchasing new equipment of equivalent type, in ratio of one to one, or one to
zero for devices with larger side less than 25 CM. The separate collection for the
decommissioned equipment for recycling, treatment and environmentally compatible
disposal contributes to avoid possible negative effects on the environment and
human health and promotes recycling of the materials. Improper disposal of the
product by the user entails the application of administrative sanctions according to
Legislative Decree No. 49 of 14 March 2014
GB


Rev.00_06.2014
Innofit Spa
Via Merloni, 9
60131 Ancona Italy
Tel: 199.188.335
www.innofit.it
MADE IN CHINA
Table of contents
Languages:


