InnoMedia BuddyTalk BT110 Manual

Version 1.0
August, 2020
InnoMedia
BuddyTalk BT110 Setup and
Deployment Guide
INNOMEDIA PROPRIETARY
This document contains proprietary information of InnoMedia Inc., and its receipt or
possession does not convey any rights to reproduce, disclose its contents, or to
manufacture, use or sell anything it may describe. It may not be reproduced, disclosed or
used without specific written authorization of InnoMedia Inc.

BuddyTalk BT110 Setup and Deployment Guide
Page 2 of 51
Copyright © 2020 InnoMedia. All rights reserved.
TABLE OF CONTENTS
1Introduction........................................................................................................................3
2Prerequisites.......................................................................................................................4
2.1 An Amazon Alexa Account ..........................................................................................4
2.2 A VoIP Service Subscription or an IP-PBX extension...................................................4
2.3 Download the BuddyTalk Setup App ..........................................................................5
3Setup the BT110 Device Using the BuddyTalk Setup App..................................................6
3.1 Powering up and Preparing the Device.......................................................................6
3.1.1 Configuring a New BT110 Device.........................................................................6
3.1.2 Re-configuring a BT110 Device which has gone through WiFi SSID Setup, or has
completed AVS Registration previously .............................................................................6
3.2 Setting Up Basic Network Access................................................................................7
3.3 Enabling Alexa Voice Service with Your Amazon Account........................................13
3.4 Configuring Telephony Settings and Other Alexa & Device Options........................17
4Setup Mid-Point Assessment Tests ..................................................................................21
4.1 Alexa Voice Service Tests ..........................................................................................22
4.2 Conditional Alexa Communication and BuddyTalk Calling Tests..............................23
5Network and SIP Option Settings via Web Console .........................................................25
5.1 Obtaining the Device's IP Address ............................................................................26
5.2 Logging into the Device’s Web Console....................................................................26
5.3 Configuring Network Interfaces................................................................................27
5.3.1 Redundant Mode...............................................................................................27
5.4 Dual-Homed Mode....................................................................................................29
5.4.1 VPN for Enterprise Network Traversal...............................................................30
5.4.2 VLAN Mode ........................................................................................................32
5.5 SIP Account Setup via BT110 Web Console to Enable VoIP Calling ..........................34
5.6 Setting up Digitmap and Digit Replacement Rules ...................................................38
5.6.1 DIALING PLANS AND DIGIMAPS.........................................................................38
5.6.2 DIGIT REPLACEMENT RULES ..............................................................................40
5.7 Activating Alexa Voice Service Through BT110 Web Console ..................................42
6Setup BuddyTalk Tablet Controller and Mobile App........................................................45
6.1 Setting up BuddyTalk Tablet Controller ....................................................................46
6.2 Setting up Companion BuddyTalk Mobile App .........................................................48

BuddyTalk BT110 Setup and Deployment Guide
Page 3 of 51
Copyright © 2020 InnoMedia. All rights reserved.
1INTRODUCTION
The BuddyTalk BT110 is an Alexa Voice Service (AVS) and Alexa Communication (ACM)
enabled intelligent speakerphone and smartspeaker suitable for use in a home, office or
conference room environment. With AVS, the BT110 brings you a broad range of AVS
smartspeaker features such as standard Alexa questions & commands, timers, alarms,
reminders, and voice-enabled control of AVS-supported IoT devices. With ACM, the BT110
allows voice-initiated calling using InnoMedia’s internal SIP stack, as well as supporting
Alexa-to-Alexa calls, drop-ins, messaging, and announcements. A VoIP service provider’s
account can be configured for both inbound and outbound calls (“BuddyTalk Calling”)
throughout the service provider’s network coverage area.
The BT110 has a variety of convenient call control mechanisms: utilizing voice commands, a
tablet, an integrated touch panel on the device, a smartphone app, or a standard telephone.
During calls, users can communicate either using the hands-free speakerphone, or using a
smartphone or standard telephone handset for added privacy.

BuddyTalk BT110 Setup and Deployment Guide
Page 4 of 51
Copyright © 2020 InnoMedia. All rights reserved.
2PREREQUISITES
Please check the following prerequisites before proceeding to deploy BT110 devices
1. An Amazon Alexa Account
2. A VoIP Service Subscription or an IP-PBX extension
3. Download the BuddyTalk Setup App
2.1 An Amazon Alexa Account
1. Have your Amazon account ready for performing registration with Amazon Voice
Services (AVS). Visit https://alexa.amazon.com to create a new account if you do not
have an existing Amazon account.
2. If you are using an Android smartphone for the Setup App and have the Amazon
Shopping app loaded, please log off from it prior to starting the BuddyTalk Setup
App.
2.2 A VoIP Service Subscription or an IP-PBX extension
You need to have a VoIP service subscription for BT110 devices. The VoIP service can be one
of two types:
•Your enterprise is already using a VoIP service for your IP-PBX system. In this
case, the BT110 device can be configured as an IP phone extension connected to
the existing IP-PBX system.
•You would like to setup the BT110 device directly with a VoIP service provider. In
this case, you will need to configure the BT110 device with the parameters of the
VoIP service account.
You can configure the BT110 device with the VoIP service credentials either through the
BuddyTalk Setup App, or using the BT110 device web console. Please prepare the following
items:
1. User ID and password for web GUI access to the BT110 device if you choose to use
the BT110 device web console. You can find the device-dependent factory default
user id/password on the label on the base of the BuddyTalk device.
2. SIP account to be used on the BT110 device. This may include:
•SIP account ID (or IP-PBX extension number)
•SIP account password, and (optionally) authentication ID
3. SIP server (or IP-PBX) registration information
•Server IP address (or FQDN)
•SIP domain
•Other requirements for SIP registration –dependent on Server (or IP-PBX)
settings

BuddyTalk BT110 Setup and Deployment Guide
Page 5 of 51
Copyright © 2020 InnoMedia. All rights reserved.
2.3 Download the BuddyTalk Setup App
This Setup App will assist the user to setup WiFi on the BT110 device, as well as performing
other configuration steps.
•Android App. Go to the Google Play Store on your Android mobile device and search
for “BuddyTalk” or “InnoMedia”. Install the BuddyTalk Setup App on your phone or
tablet. The App is supported on phones and tablets running Android 4.4.4 and
above.
•iOS App. Go to the Apple App Store on your iPhone and search for “BuddyTalk” or
“InnoMedia”. Install the BuddyTalk Setup App on your phone or tablet. The Setup
App is supported on phones and tablets running iOS version 12 and above.

BuddyTalk BT110 Setup and Deployment Guide
Page 6 of 51
Copyright © 2020 InnoMedia. All rights reserved.
3SETUP THE BT110 DEVICE USING THE BUDDYTALK SETUP APP
The BuddyTalk Setup App sets up the BT110 device in three stages:
1. Setup your BT110 device with basic network access through Ethernet and/or WiFi.
2. Link the BT110 device with an Amazon account to enable Alexa Voice Service.
3. Allow BuddyTalk Calling by providing a SIP Telephony subscription with the required
parameters & credentials.
Before starting the steps below, first find the MAC address for your device listed on the
bottom of BuddyTalk unit. Record the last 6 characters of the MAC address, which will be
used by the BuddyTalk Setup App.
3.1 Powering up and Preparing the Device
3.1.1 Configuring a New BT110 Device
Follow the steps below if your BT110 device has not been setup before. Otherwise, go to
section 3.1.2.
1. Power up the BT110 device. After power up, wait for the device to complete the
initialization process as described below. The process may take up to 60 seconds:
•The first power-up indication is the Ring LED flashing blue. The BT110 device is
starting its boot-up process.
•Then the Ring LED will switch to rotating orange, indicating that the device is in
WiFi setup mode (Captive Portal mode) and that the device is ready for setup.
Continue to section 3.2 below.
3.1.2 Re-configuring a BT110 Device which has gone through WiFi SSID Setup, or has
completed AVS Registration previously
1. Power up the BT110 device. After power up, wait for the device to complete the
initialization process as described below. The process may take up to 60 seconds:
•The first power-up indication is the Ring LED flashing blue, then rotating green.
•Then, depending on the completeness of the Setup process previously, the
BT110 LEDs may exhibit one of the following three behaviors:

BuddyTalk BT110 Setup and Deployment Guide
Page 7 of 51
Copyright © 2020 InnoMedia. All rights reserved.
a. The BT110 device has not completed AVS registration previously, and is now
attempting AVS, ACM, and SIP/Telephony registration.
b. The BT110 device has completed AVS registration previously, but has not
completed either ACM or SIP/Telephony registration, or both.
c. The BT110 device has completed AVS, ACM, and SIP/Telephony registration
previously.
Note that:
•Ring LED flashing blue indicates that the BT110 device is in the boot up process.
•Ring LED rotating green indicates that the BT110 device is attempting AVS
registration. Upon successful AVS registration, the Ring LED will turn off.
•Red Phone LED indicates that the BT110 has not completed either the ACM
registration, or the SIP/Telephony registration, or both. The Phone LED turns green
and then off when it has successfully completed both the ACM registration and the
SIP/Telephony registration.
2. To perform the setup again, press the Setup Button for 3 seconds to enter Setup
mode, indicated by a rotating orange Ring LED.
3.2 Setting Up Basic Network Access
At this stage, the device will show a rotating orange pattern on its Ring LED, indicating that
the device is in the WiFi setup (Captive Portal) mode for the BuddyTalk Setup App to
connect to. Follow the Setup App steps described below to setup basic network access for

BuddyTalk BT110 Setup and Deployment Guide
Page 8 of 51
Copyright © 2020 InnoMedia. All rights reserved.
the device. The device’s network access can be either through its WiFi interface or its
Ethernet interface.
Screen 1
Splash screen
Screen 2
Run the BuddyTalk Setup App
from your smartphone. After the
Splash screen, it displays the
Welcome screen shown below.
Tap <SETUP BUDDYTALK
DEVICE>
Screen 2-1
This screen will show only for
certain Android smartphones.
The Setup App is asking for
access to the device’s location.
Tap <ALLOW ALL THE TIME> to
continue.
BuddyTalk BT110 Setup and Deployment Guide
Page 9 of 51
Copyright © 2020 InnoMedia. All rights reserved.
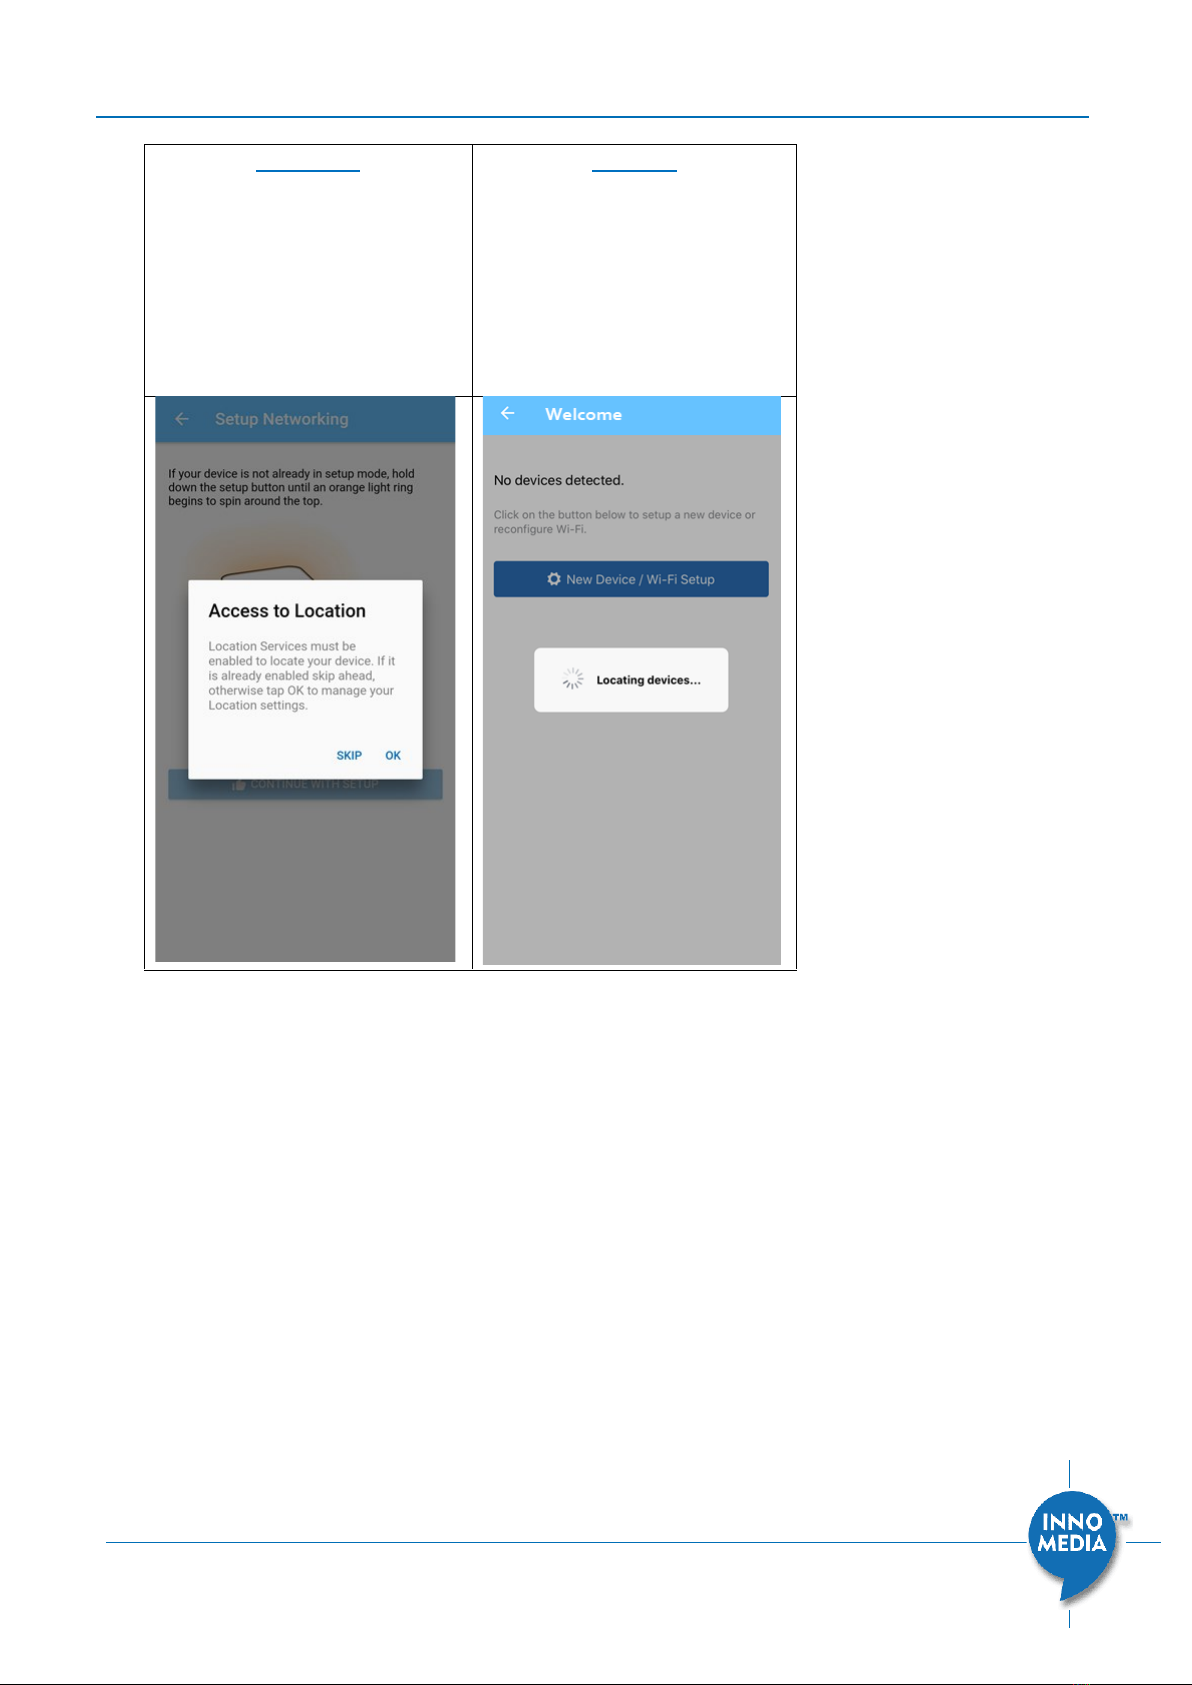
Screen 2-2
This screen will show only for
certain Android smartphones if
Location Services are not enabled
on the smartphone device.
Tap <OK> to enable Location
Services.
Screen 3
The Setup App searches through
the local network for all the
BuddyTalk devices that have
been configured previously. Once
done, it will transition to Screen 4
automatically with the
discovered devices displayed.

BuddyTalk BT110 Setup and Deployment Guide
Page 10 of 51
Copyright © 2020 InnoMedia. All rights reserved.
Screen 4
For a new BuddyTalk device, tap
<New Device / Wi-Fi Setup> to
start the setup process.
To reconfigure a device that has
been discovered by the Setup
App previously, tap the intended
device to start the setup
process.
Screen 5
For a new BuddyTalk device, the
Ring LED will be rotating orange.
Tap <Continue with setup>.
To reconfigure a BuddyTalk
device, long press the device's
Setup button until its Ring LED
displays rotating orange.
Screen 6
The Setup App is locating the
BuddyTalk device.

BuddyTalk BT110 Setup and Deployment Guide
Page 11 of 51
Copyright © 2020 InnoMedia. All rights reserved.
Screen 7
This screen will show for iOS
devices only.
The Setup App has located the
BuddyTalk device, and is asking
for confirmation to connect to
the device. Tap <Join> to
continue the setup process.
Screen 8
This screen will display if the
BuddyTalk device's Ethernet
interface is connected to the
network.
•Tap <CONTINUE> to setup
the WiFi interface. The
Setup App goes to Screen 9.
•Tap <SKIP> to skip the WiFi
setup. The Setup App goes
to Screen 11.
Screen 9
Enter the passphrase of the
selected WiFi SSID that you wish
the BuddyTalk device to connect
to.
Note: Prior to Screen 9, you may be asked to select the BuddyTalk device SSID. Please select
the SSID of the device you intend to set up if prompted.

BuddyTalk BT110 Setup and Deployment Guide
Page 12 of 51
Copyright © 2020 InnoMedia. All rights reserved.
Screen 10
WiFi setup is complete. Tap <OK>
to continue.
Note: The network to which the device and the Setup App are connected should have
access to the public Internet in order to complete the BuddyTalk device setup process.
BuddyTalk BT110 Setup and Deployment Guide
Page 13 of 51
Copyright © 2020 InnoMedia. All rights reserved.
3.3 Enabling Alexa Voice Service with Your Amazon Account
We now enter the 2nd stage of the Setup process –Linking your Amazon/Alexa account to
the BuddyTalk device to enable Alexa Voice Service (AVS).
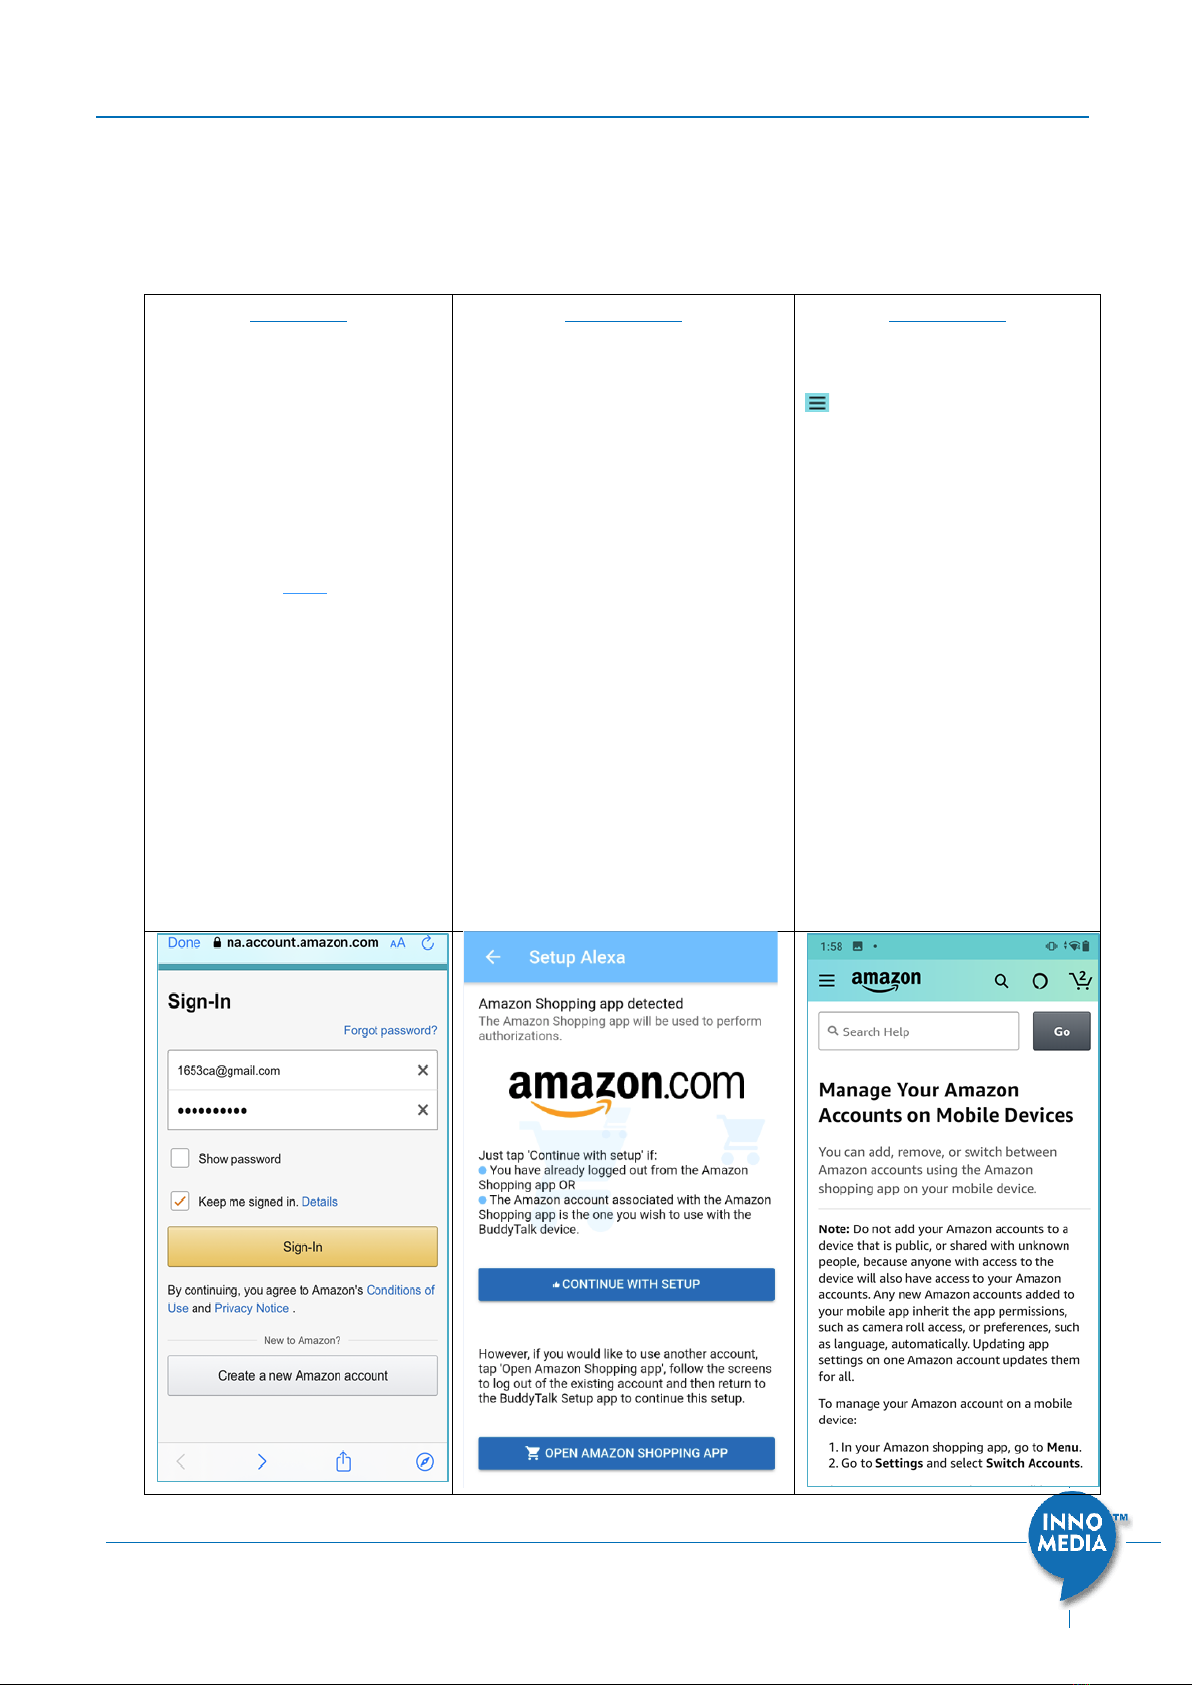
Screen 11
Sign in with your Amazon
account to access the Alexa
Voice Service.
Note: For Android phones, if
the Amazon Shopping app is
installed on the phone, the
flow will go directly from
Screen 10 to 11-1.
Screen 11-1
•Tap <CONTINUE WITH
SETUP> either if you have
already logged out from the
Amazon Shopping app, or
the Amazon account
associated with the Amazon
Shopping app is the one you
wish to use with the
BuddyTalk device.
•Tap <OPEN AMAZON
SHOPPING APP> if the
Amazon account associated
with the Amazon Shopping
app is NOT the one you wish
to use with the BuddyTalk
device. Follow the Amazon
Account Management screens
(11-2 11-3 11-4 11-5)
to sign out from the Amazon
Shopping app, close it, and
return to the Setup App (11-1).
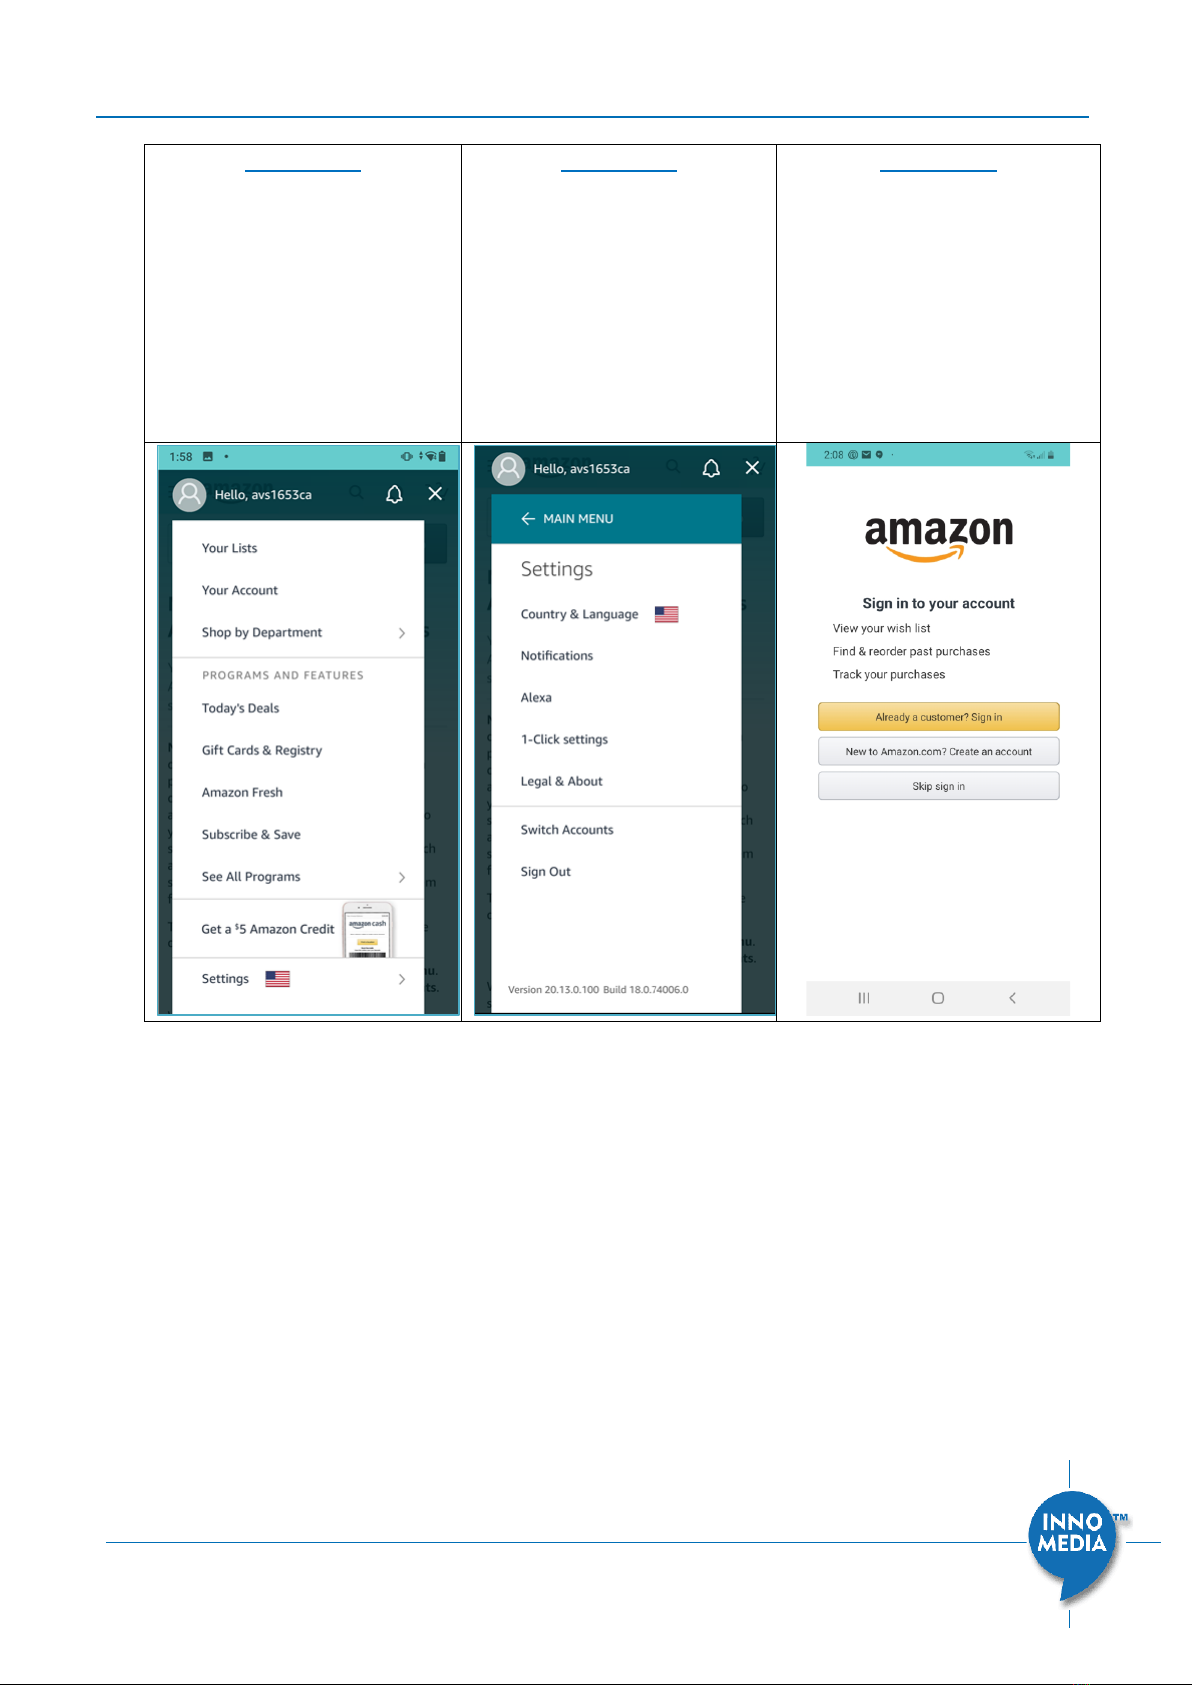
Screen 11-2
Tap the menu icon on the
upper left corner of the screen.
BuddyTalk BT110 Setup and Deployment Guide
Page 14 of 51
Copyright © 2020 InnoMedia. All rights reserved.
Screen 11-3
Tap <Settings>.
Screen 11-4
Tap <Sign Out>. The setup
process continues with
Screen 11-5.
Screen 11-5
Do not tap any button on this
screen. Simply close the
Amazon Shopping app and
return to the BuddyTalk Setup
App. The Setup App continues
with Screen 11-1.
This time, tap <CONTINUE
WITH SETUP> on Screen 11-1.
BuddyTalk BT110 Setup and Deployment Guide
Page 15 of 51
Copyright © 2020 InnoMedia. All rights reserved.
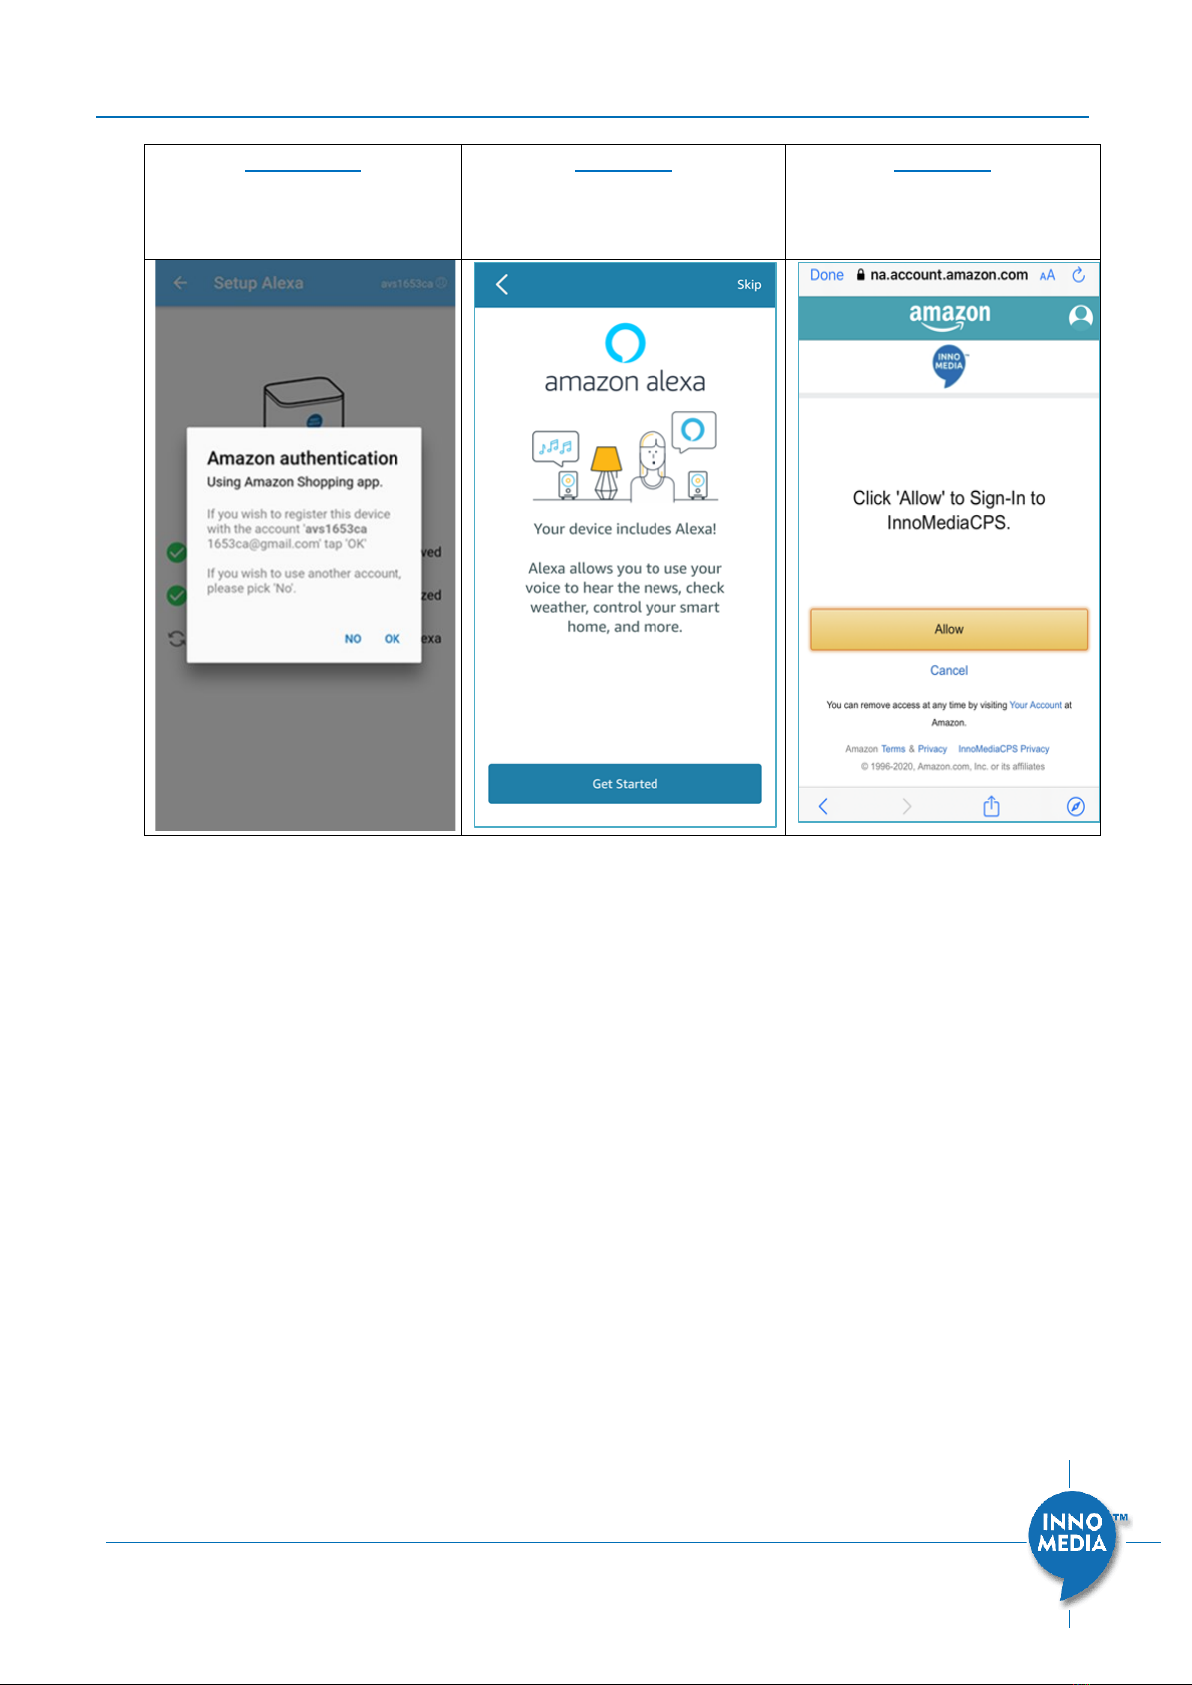
Screen 11-6
Tap <OK> to proceed to Screen
12.
Screen 12
Tap <Get Started> to proceed.
Screen 13
Tap <Allow> to give permission
for the BT device to use the
Alexa Voice Service.
Note:
1. If you are using an iPhone, then, you should see the following flow:
Screen 10 Screen 11 Screen 12
2. If you are using an Android phone and do not have the Amazon Shopping app
installed, then, you should see the following flow:
Screen 10 Screen 11 Screen 12
3. If you are using an Android phone with the Amazon Shopping app installed, and if
you have already logged out from the Amazon Shopping app prior to starting the
BuddyTalk Setup App, you should see the following flow:
Screen 10 Screen 11-1 (Please tap <CONTINUE WITH SETUP>) 11 11-6 12
4. If you are using an Android phone with the Amazon Shopping app installed, and if
the account associated with the Amazon Shopping app is the one you wish to use
with the BuddyTalk device, you should see the following flow:
Screen 10 Screen 11-1 (Please tap <CONTINUE WITH SETUP>) 11 11-6 12
5. If you are using an Android phone with the Amazon Shopping app installed, and if
the account associated with the Amazon Shopping app is NOT the one you wish to
use with the BuddyTalk device, you should see the following flow:
10 11-1 (Please tap <OPEN AMAZON SHOPPING APP>) 11-2 11-3 11-4
11-5 (Please close the Amazon Shopping app and return to the Setup App) 11-1
11 11-6 12

BuddyTalk BT110 Setup and Deployment Guide
Page 16 of 51
Copyright © 2020 InnoMedia. All rights reserved.
Screen 14
Amazon Alexa service setup is
complete.
Tap <OK> to continue.
Screen 15
Tap <DONE> to finish the
Amazon Alexa setup.
Screen 16
This is a transitional screen,
and will continue to section
3.4 - Configuring Telephony
Settings and Other Alexa &
Device Options.
Note: If you wish to use a different account for the Amazon Shopping app as shown on
Screen 14, you can change it for the Amazon Shopping app after you complete the
BuddyTalk Setup.
Note: As soon as the device successfully
completes the Alexa Voice Service authorization
and registration process, the BT110 device’s Ring
LED will stop rotating green and will turn off. The
device will continue with ACM and SIP
registration. The Phone LED stays red during the
ACM and SIP/Telephony registration period,
indicating that the BT device has not completed
ACM registration, or SIP registration, or both.
Ring LED from rotating green to off.
BuddyTalk BT110 Setup and Deployment Guide
Page 17 of 51
Copyright © 2020 InnoMedia. All rights reserved.
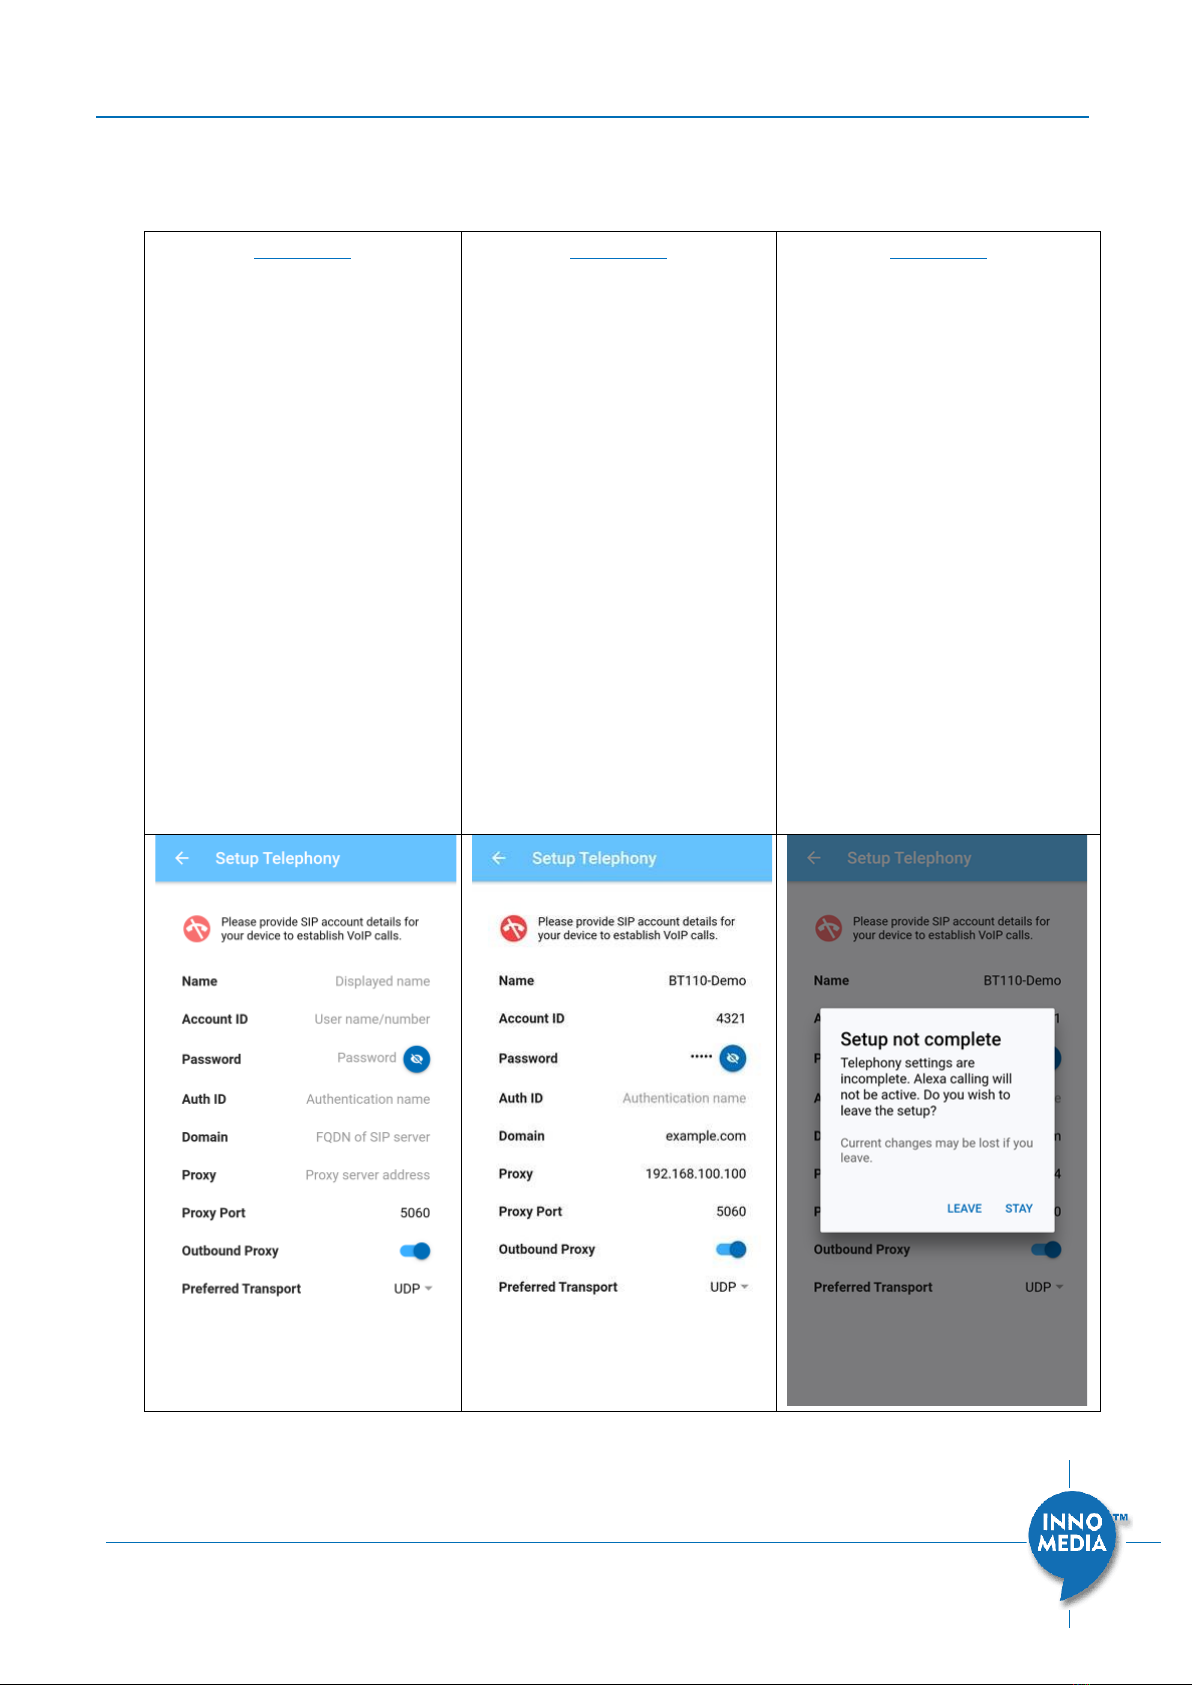
3.4 Configuring Telephony Settings and Other Alexa & Device Options
We now enter the 3rd and final stage of the Setup process.
Screen 17
Input the required Telephony
parameters:
•Name: Display name of
the SIP account
•Account ID (Typically the
phone number)
•Auth ID (Optional
authentication identifier)
•Password
•Domain (FQDN of the SIP
server)
•Proxy (FQDN or IP address
of the SIP proxy)
•SIP Port (Proxy server
port)
•Outbound Proxy
•Preferred Transport (SIP
signaling Transport
protocol)
Screen 18
Before the BuddyTalk device
successfully registers to the
SIP server, the telephone icon
at the top left corner will stay
red.
Screen 19
If the user attempts to exit this
page before the BuddyTalk
device successfully registers to
the SIP server, the Setup App
will prompt the user to
confirm. Tap <STAY> to
continue with the SIP
parameter settings.

BuddyTalk BT110 Setup and Deployment Guide
Page 18 of 51
Copyright © 2020 InnoMedia. All rights reserved.
Screen 20
As soon as the SIP parameters
are correctly entered and the
BuddyTalk device successfully
registers to the SIP server, the
Setup App displays the Setup
Complete page. Note that the
Phone icon at the upper left
corner becomes green,
indicating successful
registration to the designated
SIP/Telephony server.
Tap <OK>. The Setup App will
proceed to Screen 21.
Screen 21
On this page, the user can
choose to either enable or
disable auto firmware
updates. The default value
(and recommended setting) is
enabled.
Tap <ALL DONE>. The Setup
App will revert back to Screen
1.
Note: As soon as the device successfully completes the Alexa Communication
authorization/registration and SIP registration process, the BT110 device’s Phone LED will
change from red to green to off.

BuddyTalk BT110 Setup and Deployment Guide
Page 19 of 51
Copyright © 2020 InnoMedia. All rights reserved.
When both the Ring LED and the Phone LED have turned off, you have successfully
completed the BuddyTalk BT110 setup process.
Note:
1. If the Phone LED stays red after you complete the BuddyTalk setup process and,
when you attempt to make phone calls using Alexa voice commands such as ‘Alexa,
call 1-xxx-xxxxxxx’, Alexa responds with ‘Calling is not enabled on this device …’ or ‘I
can’t do that because communications is disabled on this device…’, please go to your
Alexa app to enable the Alexa Communication option.
2. You can use Alexa voice commands to make phone calls by name (‘Alexa, call John
Smith’) by entering the contact information into the Alexa app’s contact list. You can
also import your mobile phone’s contact list to the Alexa app’s contacts.
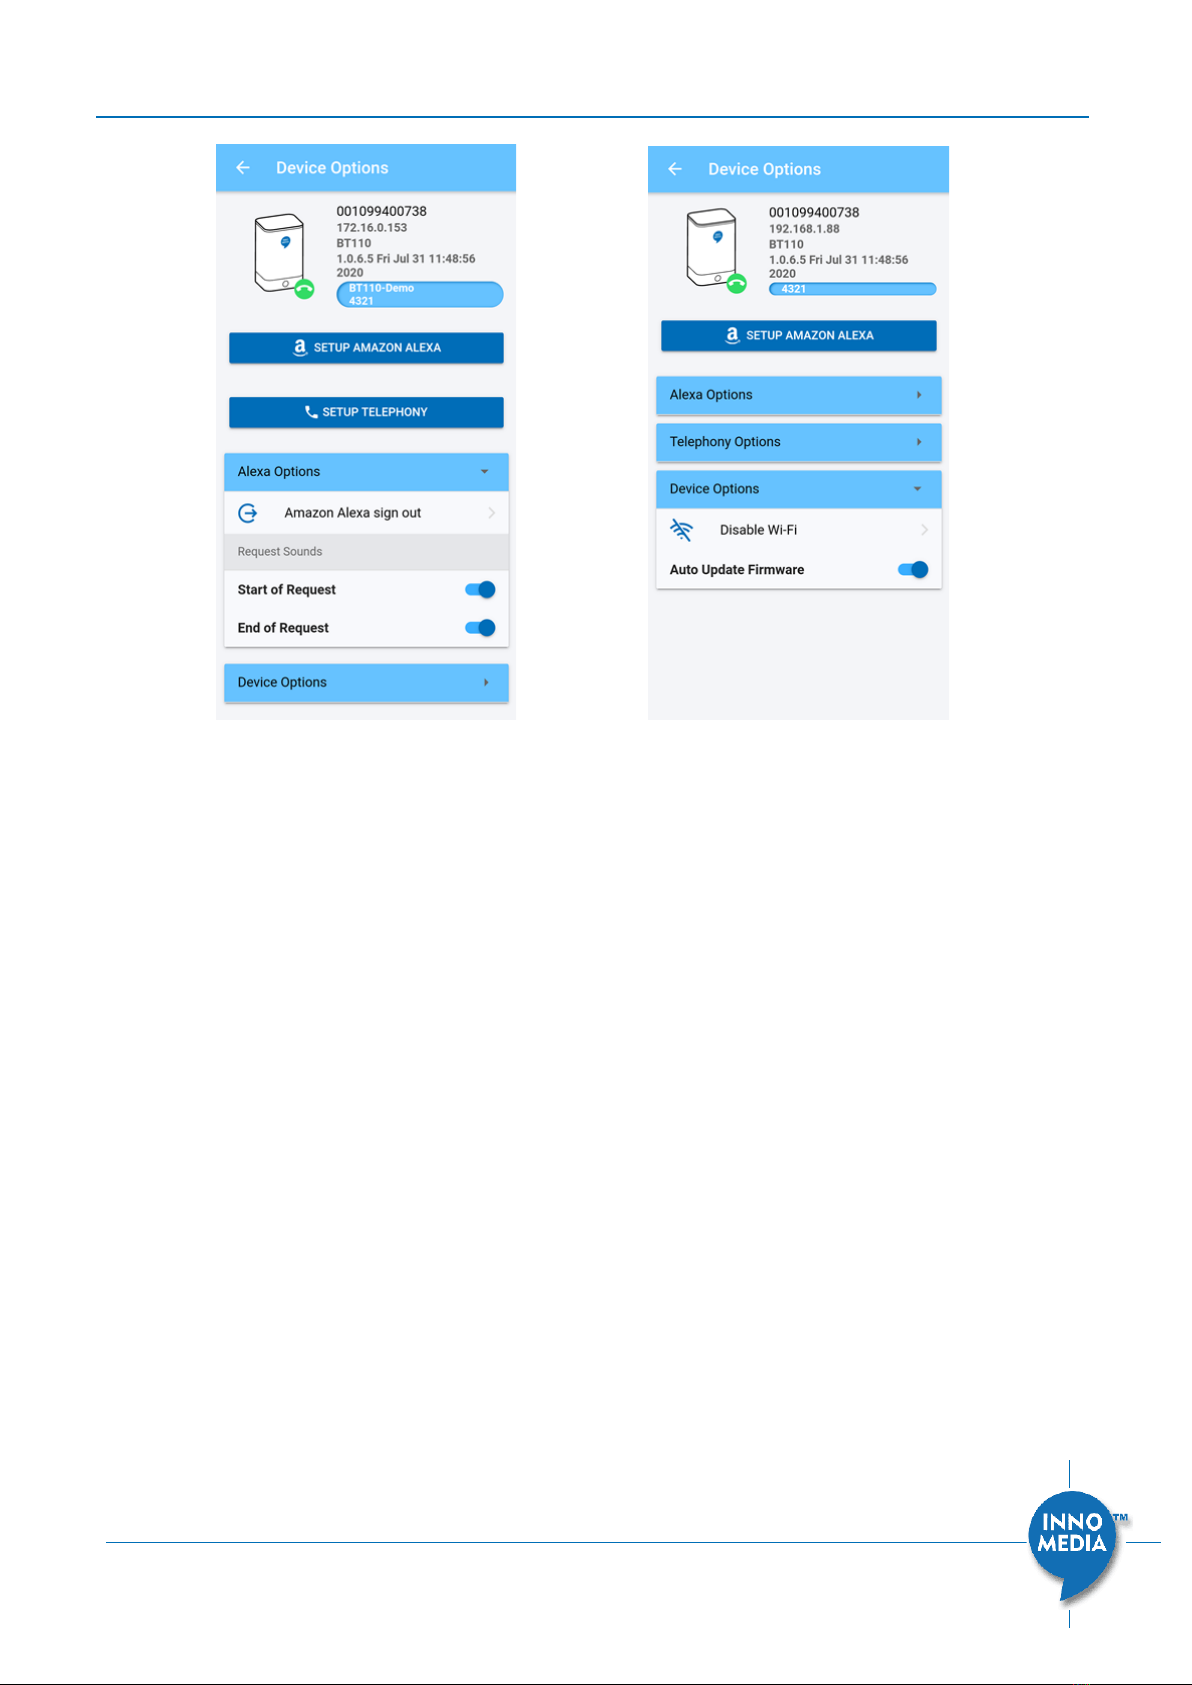
3. You can enable/disable the Alexa Request Sounds by navigating to the Alexa Options
drop-down in the Setup App. Additionally, you can disable WiFi and enable/disable
firmware auto updates by navigating to the Device Options drop-down in the Setup
App.
Phone LED from red to green to off
BuddyTalk BT110 Setup and Deployment Guide
Page 20 of 51
Copyright © 2020 InnoMedia. All rights reserved.
Other manuals for BuddyTalk BT110
1
Table of contents
Other InnoMedia Telephone manuals


