Innoquest GoTow 36520 User manual
PRODUCT MANUAL
Made In The USA
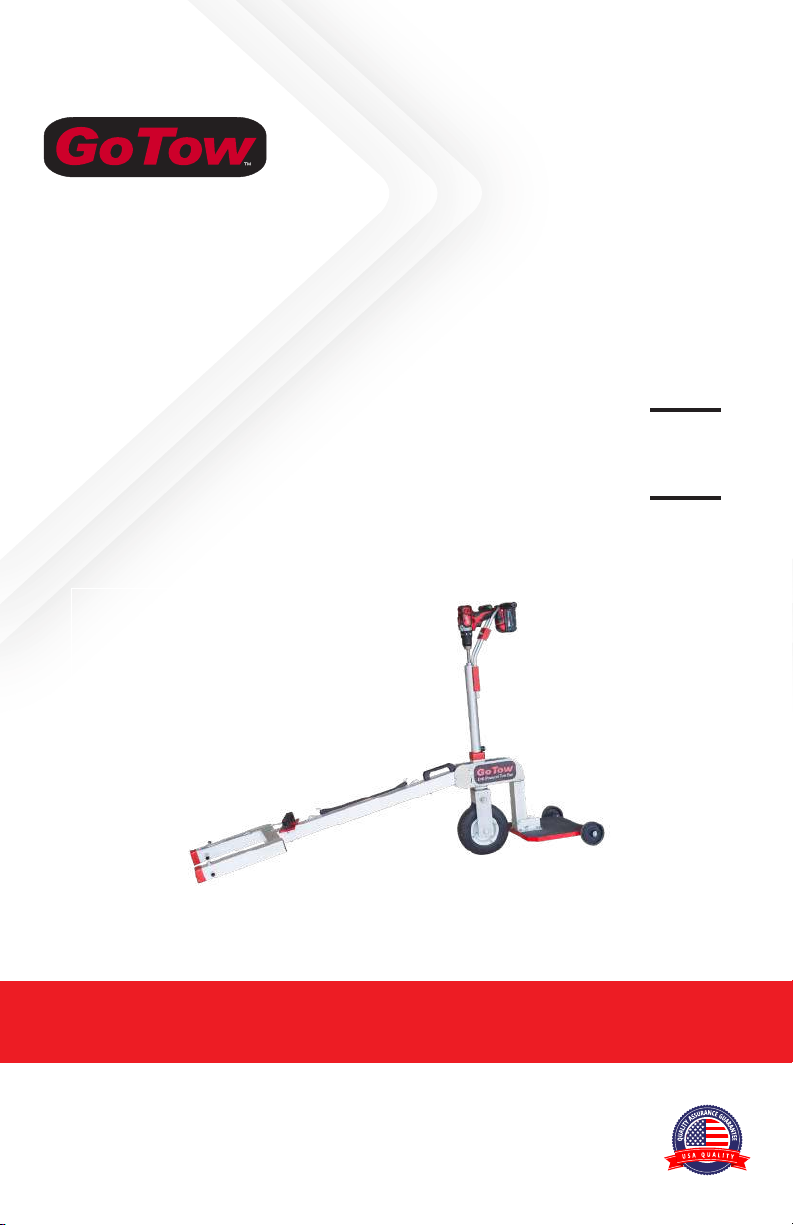
DRILL-POWERED TOW BAR
Model #36520
USE A CORDLESS DRILL TO MOVE
YOUR AIRPLANE
DRILL-POWERED
TOW BAR


INSTRUCTIONS IN ENGLISH |GOTOW DRILL-POWERED TOW BAR
SAFETY:
Warning: Keep ngers and hands away from the drive chain at all times when a drill
is attached to the GoTow to avoid possible injury.
Warning: Stepping o of the GoTow while your airplane is on a steep slope may
cause the GoTow tire to start sliding since your weight provides the traction.
Alert: Your airplane’s nose wheel will only turn so far in either direction before it
hits a stop. Before using the GoTow determine this stop angle so you can avoid
exceeding it while using the GoTow.
1 YEAR WARRANTY: This product is warranted to be free from defects in materials or
workmanship for one (1) year from the date of purchase.
1GoTow Drill-Powered Tow Bar Item #36520
FEATURES:
• Easy steering, no need to lift or slide the tow unit
• Does not cause abrasion to your airplane’s tire
• Uses body weight for down force resulting in excellent traction; no awkward arm strain
• Works with most Cessna & Cirrus airplanes without additional adapters
• Optional adapter set available as required for other airplanes (GoTow Adapter Set Item #36550)
• Adjustable height and width to accommodate dierent airplanes
• Flat-free tire won’t mark up your hanger oor and never needs air
• High-quality welded aluminum construction for strength and ease of handling
• Adjusts to t most cordless drills regardless of brand

INSTRUCTIONS IN ENGLISH |GOTOW DRILL-POWERED TOW BAR
Drill Requirements: 18v or greater cordless drill with 1/2in (13mm) chuck capacity
(drill not included with purchase)
Typical Tow Speed: 12/min(4m/min) with drill on LOW
42/min(13m/min) with drill on HIGH
Max User Weight: 270 lb (123 kg)
Max Recommended
Airplane Weight:
3600 lb (1636 kg)
Weight: 30 lb (13.6 kg)
Size: 39in H x 17in W x 69in L (99cm H x 44cm W x 176cm L)
Shipping Specs: size: 8in H x 17in W x 49in L (21cm H x 43cm W x1245cm L)
weight: 38 lb (17.3 kg)
SPECIFICATIONS:
With included Lug
Tubes:
Cirrus SR20, SR22
Cessna 150, 152, 162, 172, 175, 177, 182, 185, 205, 206, 207
Beechcra Queen Air, Musketeer, Sport, Sierra, Sundowner, Twin
Vans RV6A, RV7A, RV8A, RV9A, RV10
Piper Tomahawk
With optional Adapter
Set (GoTow Adapter Set
Item #36550):
Cessna 172RG, 177RG, 182RG, 210 Series
Beechcra Bonanza, Debonair, Duchess, Barron, Duke, Skipper
Lanceair 400, Columbia 400, Cessna TTX
General Nose Wheels with approximately 0.840in ID or 1.125in ID
(Saratoga, for example)
COMPATIBLE AIRPLANES:
GoTow Drill-Powered Tow Bar Item #365202

1
INSTRUCTIONS IN ENGLISH |GOTOW DRILL-POWERED TOW BAR
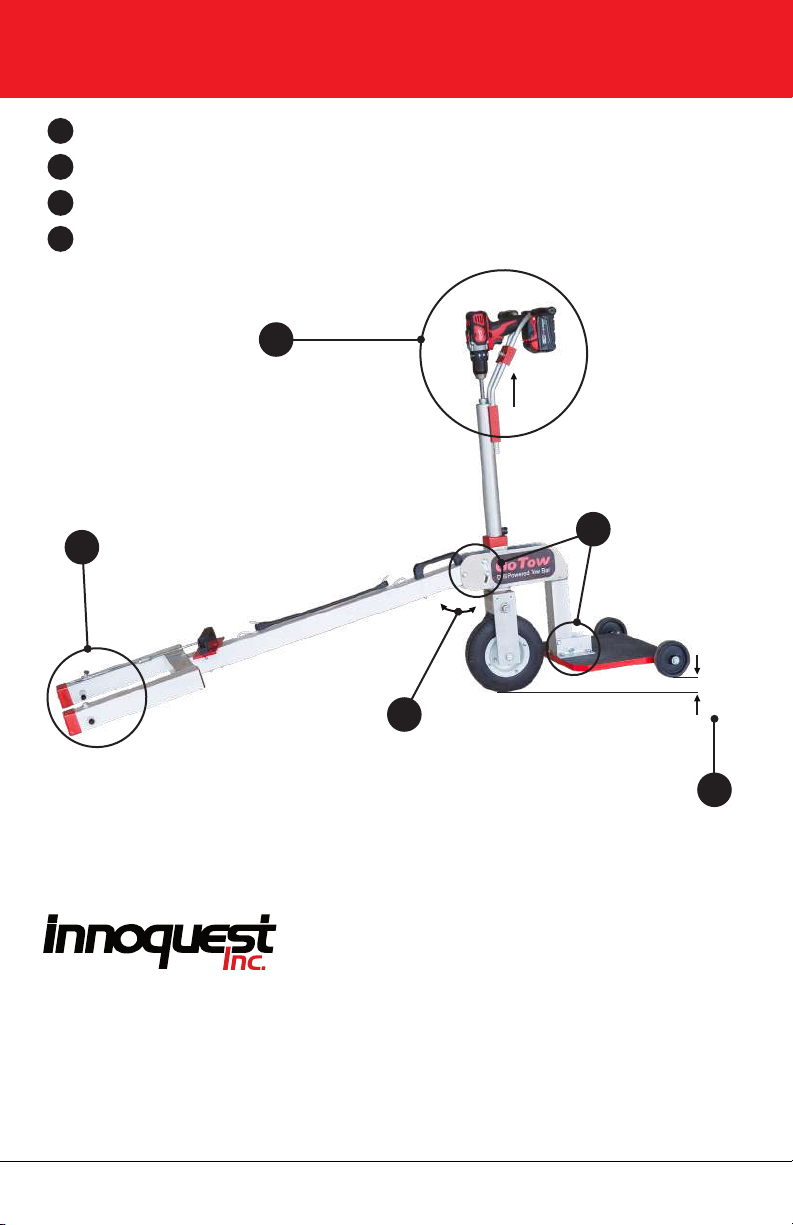
GOTOW COMPONENTS:
Handlebars for steering
Cordless Drill (Not Included)
Carry Handle
Wheel Chock Storage Strap
Attachment & Release Handle
Lug Tubes for Airplane Attachment
Tow Arm
Flat-Free Drive Tire
Transport Wheels
Operator Platform
Drive Head
1
2
3
4
5
6
7
8
9
10
11
3GoTow Drill-Powered Tow Bar Item #36520
2
3
4
5
6
7
8
9
10
11
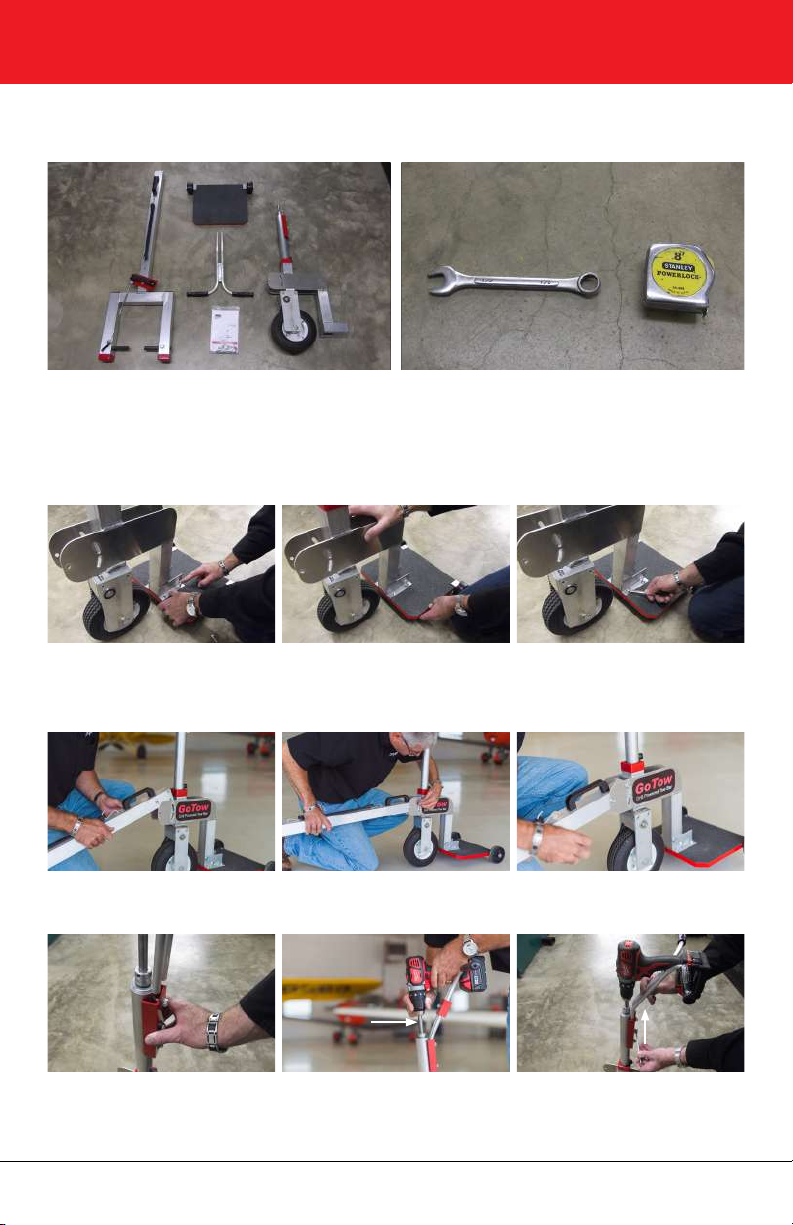
ASSEMBLY:
Before Starting
INSTRUCTIONS IN ENGLISH |GOTOW DRILL-POWERED TOW BAR
Step 1 – Attach the operator platform
Step 2 – Attach the tow arm
Step 3 – Attach drill & adjust handlebars
Attach the operator platform to the drive head with (4) included 5/16-18 x 7/8 hex bolts (fully
tighten).
Attach tow arm to drive head with (6) included 5/16-18 x 7/8 hex bolts (do NOT tighten until Step 8).
Loosen all three 5/16-18 x 7/8 hex bolts and insert handle bars to full depth. Insert drive sha to
full depth in drill chuck and tighten rmly. Finally, slide handle bars up in the channel until they
are snug against the drill handle then tighten bolts rmly.
Unpack and inspect components:
Tow Arm, Operator Platform, Handle Bars.
Drive Head, 5/16-18 x 7/8 Hex Bolts (10)
Tools needed:
½” Wrench, Tape Measure
GoTow Drill-Powered Tow Bar Item #365204
DRIVE SHAFT
INSTRUCTIONS IN ENGLISH |GOTOW DRILL-POWERED TOW BAR
5GoTow Drill-Powered Tow Bar Item #36520
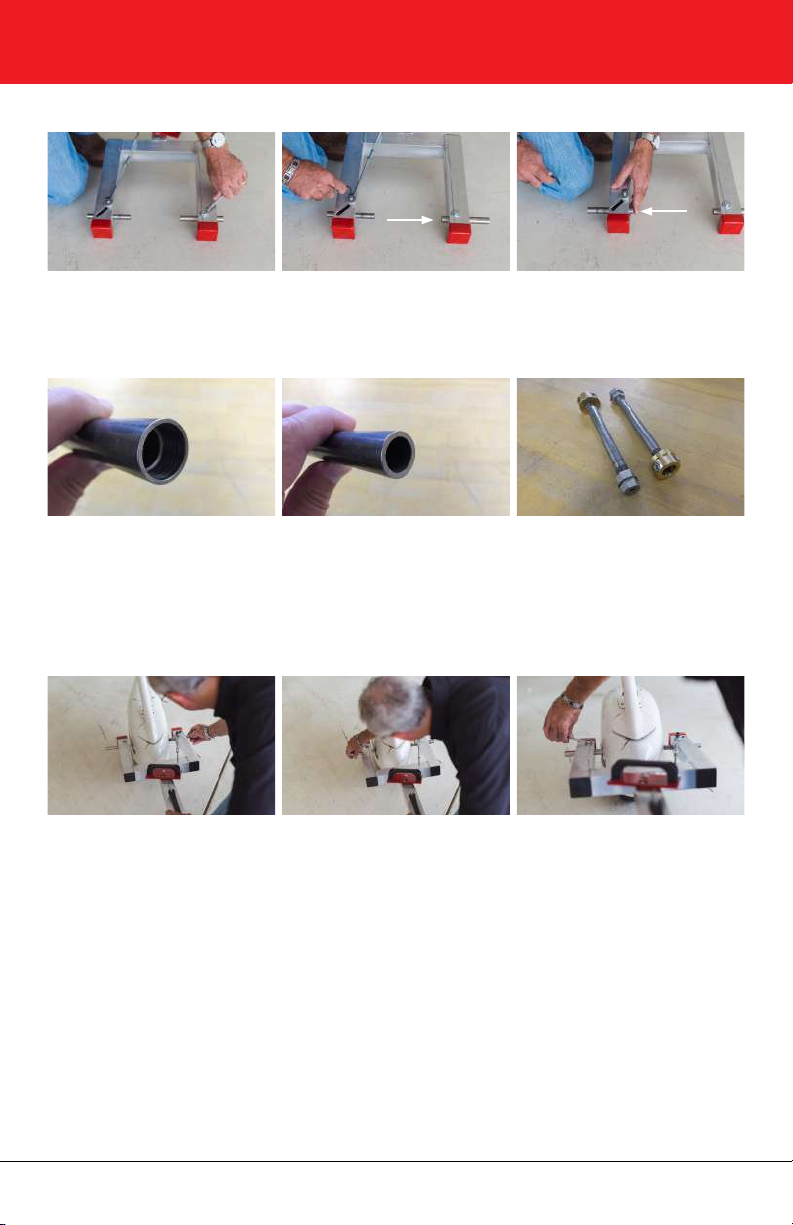
Step 4 – Prep for attachment to your airplane
Step 5 – Determine your lug tube conguration
Step 6 – Initial lug t-up
Use the ½” wrench to loosen the lug tube clamps and slide each to the full open position (leave
loose for next steps).
The lug tubes are dierent inside diameters on each end. Remove and ip these lug tubes as
needed. The larger ID is for Cessna Airplanes and the small ID is for Cirrus Airplanes. See the
specications section on exact aircra models these t. You may need an adapter set as pictured
to t your model (GoTow Adapter Set Item #36550).
While holding the tow arm up to your nose wheel, use nger pressure to slide the lug tubes over
your airplanes tow lugs on both sides. Continue adjusting the position of the lug tubes until the
“fork” of the tow arm is centered on tire, then tighten both lug tube clamps.
GOTOW ADAPTER SET
INSTRUCTIONS IN ENGLISH |GOTOW DRILL-POWERED TOW BAR
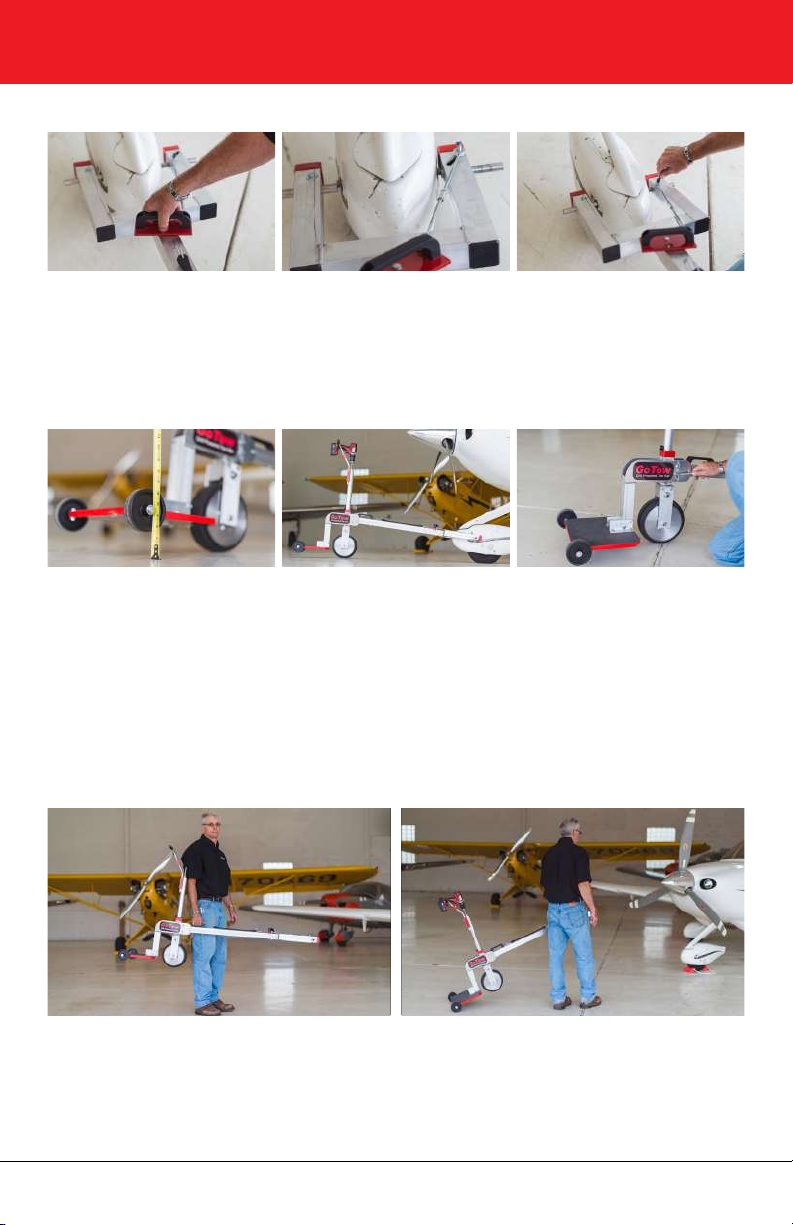
Step 7 – Test lug tube positions
Step 8 – Setting the operator platform height
Depress the thumb latch button and move the lug tubes to the open position. If you cannot
remove the GoTow from the airplane in this open position, then readjust the position of each lug
tube to provide enough clearance for removal in this open position. Adjust and test in both the
open and closed position until you are satised.
Attach the GoTow to your airplane for this nal assembly step. Adjust the angle of the operator
platform so that the transport wheels are 2-3 inches above the ground. This step should be done
on level ground and will result in a slight upward angle to the operator platform. This angle is
necessary because the tire will compress when you step onto the operator platform. Now is the
time to rmly tighten all (6) 5/16-18 x 7/8 hex bolts that hold the tow arm to the drive head as
assembled in Step 2. The assembly is now complete!
GoTow Drill-Powered Tow Bar Item #365206
USE OF PRODUCT:
Transport
Transport the GoTow to and from your airplane by either carrying it or using the transport wheels
as shown.

INSTRUCTIONS IN ENGLISH |GOTOW DRILL-POWERED TOW BAR
7GoTow Drill-Powered Tow Bar Item #36520
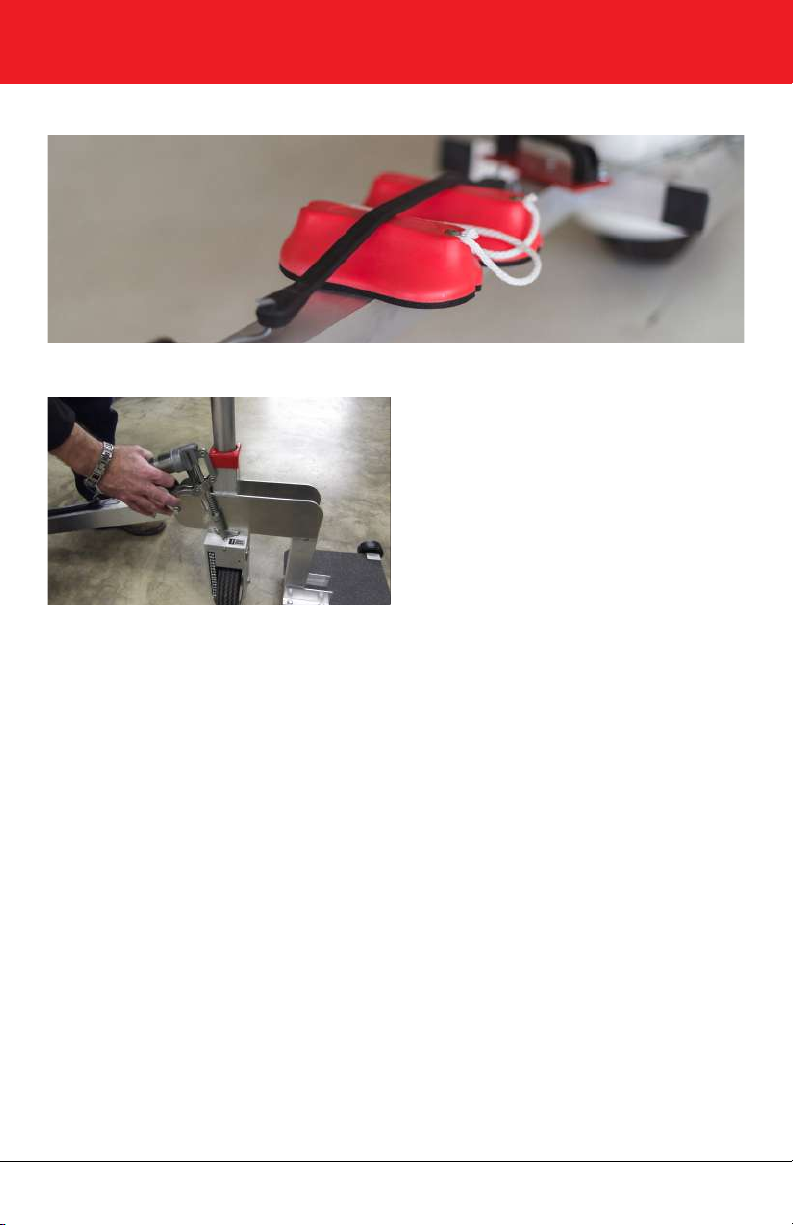
Attachment
Attach to your airplane by holding both handles for alignment and then twist the attachment
handle to lock it onto the lugs. Make sure the thumb latch has engaged so there is no chance it
will accidentally come loose during use.
THUMB LATCH
MOVE YOUR AIRPLANE:
Alert: Your airplane’s nose wheel will only turn so far in either direction before it
hits a stop. Before using the GoTow determine this stop angle so you can avoid
exceeding it while using the GoTow.
Stand on the operator platform with both feet so that all your body weight is on the drive tire.
Select forward or reverse on your drill for the proper direction of travel. Gently squeeze the drill
trigger to start movement. Steer with one hand on the handle bars while operating the drill with
your other hand. When the plane is in the desired location, release the drill trigger and the plane
will come to a stop.
INSTRUCTIONS IN ENGLISH |GOTOW DRILL-POWERED TOW BAR
Every month or as needed apply 2 pumps of grease to the grease tting on
the drive head as shown. Also from time to time apply a light coating of
grease to the outside of the lug tubes and the diagonal slot on the tow arm.
GoTow Drill-Powered Tow Bar Item #365208
Stow your chocks
Lubrication

WARRANTY, SERVICE, AND RETURNS:
One-Year Warranty
Innoquest, Inc. (“Innoquest”) warrants this product to be free from defects in materials
and workmanship under normal use for a period of one (1) year from date of purchase. This
warranty extends only to the original purchaser and shall not apply to any product which,
in Innoquest’s sole opinion, has been subject to misuse, alteration, abuse, or abnormal
conditions of operation or handling. Innoquest’s obligation under this warranty is limited
to repair or replacement of the product which is returned to Innoquest. Innoquest
accepts no liability for whatever damages may be caused by a malfunctioning product.
Repair & Service Policy
Products returned to Innoquest for repair or service must follow these guidelines: Return of the
product for warranty repair or service is the responsibility of the purchaser. Return of the product
for non-warranty repair or service, also the purchaser’s responsibility, will carry a charge of $35 for
assessing the product’s repair needs. Further work will not be completed without the purchaser’s
approval.
Return Procedure
All returns, regardless of reason, must have a Return Merchandise Authorization (“RMA”) number.
The purchaser must call Innoquest at (815) 337-8555 to obtain the RMA number prior to sending
any merchandise back. The RMA number must be displayed on the outside of the shipping
carton. All shipping charges will be paid by the purchaser. Innoquest is not responsible for
any package that is returned without a valid RMA number or for the loss of the package by any
shipping company.
Return for Refund Policy
We only accept returns of products purchased directly from Innoquest. Please return all other
products to the original place of purchase. A restocking fee (the greater of 15% of the purchase
price or $35) will apply to any returns sent back to Innoquest for a refund. For a refund, the
product must be in the original sealed packaging provided by Innoquest. If the unit was opened
but is completely functional and returned in good condition as determined by Innoquest, a
repackaging fee not to exceed $25 will be added to the restocking fee. No refund will be given for
damaged products.
INSTRUCTIONS IN ENGLISH |GOTOW DRILL-POWERED TOW BAR
9GoTow Drill-Powered Tow Bar Item #36520
QUICK START GUIDE
Assemble unit with 5/16-18 x 7/8 hex bolts
Attach drill and slide handle bars upward to cradle drill handle
Attach to airplane by adjusting lugs
Adjust pivot angle so transport wheels are always 2-3 inches above the ground
ground
Always
2-3”
1
2
3
4
2
4
4
3
1
910 Hobe Road
Woodstock, IL 60098
US 800-637-1623 | International +1-815-337-8555
sales@innoquestinc.com
www.innoquestinc.com
P/N 36640 Rev.0
© 2019 Innoquest, Inc
Table of contents
Popular Truck manuals by other brands

freightliner
freightliner BUSINESS CLASS M2 Driver manual

Scheppach
Scheppach DP3000 instruction manual

Still
Still EXU-H-18 Original instructions

logitrans
logitrans PANTHER Inox Plus 2072 instruction manual

Jungheinrich
Jungheinrich ESE 220 operating instructions

EP Equipment
EP Equipment ES16-RS Operation manual


