Innova R/FM02 User manual

Radio Digital Multibanda
Rádio Multibanda Digital
USER MANUALl / MANUAL DE USUARIO /
MANUAL DE USUÁRIO
R/FM02
Entrada auriculares
Entrada de fone de ouvido
Radio multibanda
Rádio multi-band
Alarma
Despertador
Función Sleep
Função do sono
FM/MW/SW

English User manual
Operating instructions
APPEARANCE DIAGRAM AND FUNCTION
INDICATION
1. Display screen
2. Power switch button / sleep function button
3. Volume control button
4. Up tuning / Time adjustment +
5. Earphone jack
6. Down tuning / Time adjustment -
7. Band conversion
8. Backlight
9. Locking switch
10. Time mode / alarm setting
11. Station storage / Scanning storage
12. Storage address -
13. Storage address +
14. Telescopic antenna
15. Battery slot
16. AC power jack 12
3
4
5
8 7
9
101112
6
13
14
15 16

English User manual
LCD EXPLANATION
1. Low battery indication
2. Frequency unit indication of FM
3. Frequency unit indication of AM
4. Frequency or time indication
5. Alarm power on indication
6. Sleep function indication
7. FM band indication
8. Locking indication
9. AM band indication
10. Signal strength indication
11. FM stereo indication
12. Saved band indication
13. Scanning storage indication

English User manual
INSTALL THE BATTERY
R20SSIZE D 1.5V NO.101 R20SSIZE D 1.5V NO.101 R20SSIZE D 1.5V NO.101
+
-
+
-
+
-
1. The device uses three UM1
batteries. When listening to it, install
the batteries into the battery slot
according to the polarity indicated on the
device.
2. At the time of listening, if the volume distorts or is too small,
please replace the battery in time
Note:
1. The old and new battery or the battery of different types
should not be used together.
2. Don’t try to charge, heat or break down the battery in order to
prevent the leakage of electrolyte or explosion.
3. If the radio is not used for a long time, please take out the
battery in case that the electrolyte corrodes elements inside the
product.
4. If battery leakage occurs, the new battery cannot be installed
unless the leakage inside battery slot is cleaned with soft cloth.
Note: Battery should not be exposed to sun light, roasting or
similar overheat environment.
USE OF EXTERNAL POWER SUPPLY
At power-off state, insert one end of the attached external power
supply to 220V AC power socket.
Another end is connected with the AC power jack of the radio.

English User manual
At the moment, the
battery supply in the radio is
disconnected automatically
and AC power is used as
power supply of the radio.
(1)
220V AC
power socket
AC power jack
OPERATION OF THE RADIO
1. Press “Power switch button” (2) to switch on the radio. The
display screen will display the band frequency when the radio is
switched off last time.
2. Press band conversion button (7) to switch the programs
among FM/AM.
3. Press “Down tuning button” (6) or “Up tuning button” (4) to
search radio programs from low end to high end manually.
4. Hold down “down tuning button” (6) or “Up tunning button” (4)
to search radio programs from low end to high end automatically.
5. Rotate the volume control button (3) to adjust the volume of
the radio.
6. Please use an earphone to listen in order not to affect other
people to have a test. Insert the earhone into the “earphone
jack” (5) (the loudspeaker in the radio will be cut automatically) to
listen with the earphone (at FM band, the earphone may be used
to listen to FM stereo staions).
7. When you don’t want to listen, press “Power switch button” (2)
to switch off the radio and the display screen displays clock
information.

Prompt: When the power button is pressed to switch on the
radio, it should not exceed 2 seconds. Otherwise, it enters the
sleep state.
This device adopts 24-hour time system. After the battery is
installed, the clock will run from “12:00”.
1. At power-off state, if the indicator “ ”
for power-on by alarm is on the
display screen, press alarm setting
button (10) to cancel.
2. Press “time mode button” (10) once again
and the hour number flashed. At the state when the “hour”
number flashes, press “time adjustment + button” (4) or “time
adjustment - button” (6) to set the hour.
Note:
1. when the hour is set, it must be set when the “hour” number
flashes.
2. When the minute is set, it must be set when the “minute” num-
ber flashes.
English User manual
CLOCK SETTING
flash time
adjustment
TIME SETTING FOR POWER-ON BY
ALARM
1. At power-off state, press “alarm
setting button” (10) and the indicator
for power-on by alarm “ ” and
time for power-on by alarm appear on the
flash time
adjustment

English User manual
display screen.
This indicates that the radio enters the state of power-on by alarm.
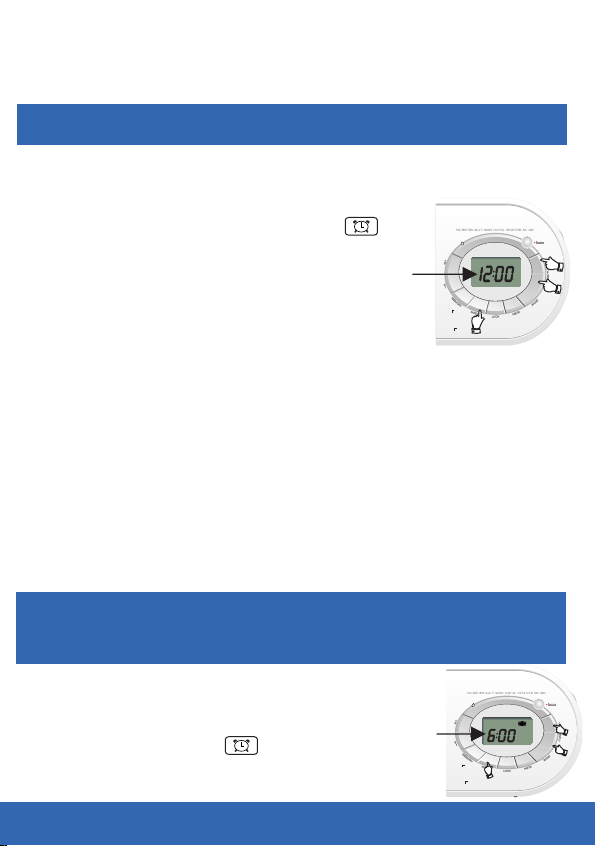
2. At power-off state, press “time mode button” (10) once and the
“hour number” on the display screen begins to flash. At flashing
state, press “time adjustment +” button (4) or “time adjustment-”
button (6) to set the hour time for power-on by alarm.
3. At power-off state, press “time mode button” (10) twice and the
“minute time” on the display screen begins to flash. The setting
method is the same as that for setting the hour time for power-on
by alarm.
4. If the alarm is due, the radio will power on automatically and
receive the band frequency before power off automatically.
5. The radio will power off automatically after listening for 60 mi-
nutes. But the indicator for power-on by alarm is not canceled, the
radio will power on at the same time repeatedly every day.
6. to power off in advance, press the “Power switch button” (2) to
power off.
7. To cancel the function of power-on by alarm, at power-off state,
hold down “alarm setting button” (10) to cancel the indication for
power-on by alarm on the display screen.
USE OF SLEEP FUNCTION
This device has sleep function and will automatically power off
at the set time prior to sleep to avoid power waste caused by
excessive energization.
1. At power-off state, keep “sleep function button” (2) pressed to
power in the device.

Flash
English User manual
The sleep indication “ ” and sleep
time “90” will be down on the display
screen in two seconds, representing
that the radio enters sleep state and will
automatically power off after listening for
90 minutes.
2. At the state when sleep time is displayed, press “sleep function
button” (2) to adjust the sleep time.
3. You can listen to your favorite stations after the sleep time is
adjusted and the radio will power off automatically at the sleep
time.
4. To power off in advance, press “sleep function button” (2) to
power off the radio.
Note: The law of sleep time change is as the following: 90-80-
70-60-50-40-30-20-10 (cancel sleep function).
LOCKING SWITCH
1. The radio is set with the function to lock the buttons to prevent
mistaken operation.
2. Hold down locking button (9) and the locking indication “ ”
is displayed on the display screen. This means that radio is at the
locking state and the buttons are disabled.
3. To cancel locking function, hold down the locking switch button
(9) to cancel locking indication.
AUTOMATIC SEARCH
At power-on state, keep the “up tuning button” (5) under pressed

English User manual
and release it after 2 seconds, the stations will be searched
towards high end automatically. Keep the “down tuning button”
(6) under pressed and release is after 2 seconds, the stations will
be searched towards high end manually.
Search will stop automatically when radio station is found.
Press “up tuning button” (5) to search stations towards high end
at power-on state. Press “down tuning button” (6) to search
stations towards low end.
Prompt:
1. In FM band, the frequency increases/decreases by 0.1 MHz
by pressing up / down tuning button once.
2. In AM band, the frequency increases/decreases by 9 KHz by
pressing up / down tuning button once.
3. Press up tuning button to search frequency in ascending
sequence and press down tuning button to search frequency in
descending sequence
MANUAL SEARCH

STORE STATIONS
English User manual
1. Use automatic and manual search to receive stations.
2. Hold down “station storage button” (11) and the indication for
station storage “PRESET” is displayed on the display screen and
the storage address flashes.
3. At the state when station storage address flashes, press
“storage address + button” (13) or “storage address - button” (12)
to select storage address.
4. Select the saving address, press the band save button (11) to
confirm the saving address, then the band frequency will be
saved in the set address
Note:
1. Every band of the device may store 20 station and “0” is the
first station storage address.
If station frequency exists in the number from 0 to 19, new
frequency stored according to above method will overwrite the
old frequency. Prior to operation, the user should check whether
the selected station address has stations.
2. When the statio is stored, it must be stored under the condition
when the storage address flashes. Otherwise, it is invalid.
1. At power-on state, press band conversion button (4) to select
band.
2. Press storage address + button (13) or storage address-button
(12) to select the stored station address. The radio will receive
TUNE OUT STORED STATIONS

English User manual
the station stored in this address.
1. At FM, AM band: hold down the scanning button (11)
for 5 seconds and the radio will scan the stations once from the
low end to high end of the band automatically and store the
scanned stations according to sequence from the current storage
address.
2. The scanning may stop if any button is pressed during the
process of scanning storage.
3. It will automatically enter the first scanned station after
scanning storage
Prompt:
1. The last station for every scanning may be different.
2. Prior to scanning storage, please adjust the radio in accordan-
ce with the content of use of antenna so as to scan more stations
Note:
1. When listening to the scanning-stored stations, if it is not clear
or has noise, please conduct fine tuning with manual search.
2. When the function of scanning storage is used, the original
stored stations will be overwritten when stations are received.
3. Scanning-storage is only used in the set band. If you want to
scan other bands, please press the band conversion button to
switch to this band.
SCAN AND STORE STATIONS

TECHNICAL INDEX
English User manual
1. Frequency range
FM 87.5 - 108 MHz
AM 522 - 1710 KHz
2. Sensitivity
FM better than 6 V
AM better than 3mV/m
3. Single signal selectivity: Better than 20dB
4. FM S/N better than 50dB
AM S/N better thatn 40dB
5. Power: AC 220V
Battery three UM1 batteries
6. Maximum consumption current: less than 350 mA
7. Speaker 102 mm (diam.) / 8Ω / 3W
8. Unit size: 256X136X78 mm
9. Weight: 703g (without battery)
Through this INNOVA CELLULAR, it declares that the DIGITAL
MULTI-BAND RADIO R/FM02 (KK-4501) complies with the
essential requirements and any other applicable or enforceable
provisions of Directives 2014/30/UE and RoHS 2011/65/EU, of
the European Parliament and of the Council, transposed to
Spanish legislation through Royal Decree 188/2016, of May 6,
2016. To see the complete declaration of conformity,
DECLARATION OF CONFORMITY

GUARANTEE LETTER
DEVICE
ITEM: ___________________________________
Serial number: ________________________________
ESTABLISHMENT
Purchase date: ___________________________
91 499 06 24
INNOVA CELULAR SL
C/ Severo Ochoa Nº 9 nave 8B
28521 Rivas-Vaciamadrid
Madrid
Establishment signature
Note: Do not expose the digital multi-band radio at extreme
temperatures, the batteries could exploit.
English User manual
You can access it through the following link:
http://www.innovacelular.com/images/web/descargas/descargas/
declaracion/declaracion_r-fm02.pdf
GUARANTEE LETTER

Español Manual de usuario
Instrucciones de operación
DIAGRAMA DE APARIENCIA E INDICA-
CIÓN DE FUNCIONES
1. Pantalla de visualización
2. Botón del interruptor de encendido / botón de función Sleep
3. Botón de control de volumen
4. Sintonización hacia arriba / ajuste de hora +
5. Toma de auriculares
6. Sintonización hacia abajo / ajuste de hora -
7. Cambio de banda
8. Iluminación
9. Interruptor de bloqueo
10. Modo hora / ajuste de alarma
11. Almacenamiento de la emisora /
almacenamiento de la búsqueda
12. Cambio de emisora almacenada -
13. Cambio de emisora almacenada +
14. Antena telescópica
15.Compartimento para batería
16. Toma de corriente alterna
12
3
4
5
8 7
9
101112
6
13
14
15 16

Español Manual de usuario
EXPLICACIÓN LCD
1. Indicación de batería baja
2. Indicación de la unidad de frecuencia de FM
3. Indicación de unidad de frecuencia de AM
4. Indicación de frecuencia
5. Indicación de encendido de alarma
6. Indicación de la función Sleep.
7. Indicación de banda FM
8. Indicación de bloqueo
9. Indicación de banda AM
10. Indicación de intensidad de señal
11. indicación estéreo FM
12. Indicación de banda/emisora guardada
13. Indicación de escaneo de emisoras
1
4
2
3
6
5
87
9
10
12 13
11

Español Manual de usuario
INSTALAR LA BATERÍA
R20SSIZE D 1.5V NO.101 R20SSIZE D 1.5V NO.101 R20SSIZE D 1.5V NO.101
+
-
+
-
+
-
1. El dispositivo usa tres baterías
UM1. Para hacer uso de la radio,
instale las baterías en la ranura de la
batería de acuerdo con la polaridad
indicada en el dispositivo.
2. Cuando lo ponga en funcionamiento, si el volumen se
distorsiona o es demasiado pequeño, reemplace las batería.
Nota:
1. Las baterías viejas y nuevas o la batería de diferentes tipos
no deben usarse juntas.
2. Para evitar fugas de electrolitos o explosiones, no intente
cargar, calentar o descomponer la batería.
3. Si la radio no se usa durante mucho tiempo, quite las baterías
para evitar que el electrolito corroa los elementos dentro
del producto.
4. Si se produce una fuga de la batería, las baterías nuevas no
se puede instalar a menos que la fuga dentro de la ranura de la
batería se limpie con un paño suave.
Nota: No exponer las pilas a altas temepraturas, éstas podrian
explotar
FUENTE DE ALIMENTACIÓN EXTERNA
En modo Apagado, conecte el cable de aliemntación en el
conector proporcionado para ello.
El otro extremo del cable debe conectarlo a un enchufe.

Español Manual de usuario
Por el momento, el suministro de
batería en la radio se desco-
necta automáticamente y la
alimentación de CA se utiliza
como fuente de alimentación de la radio.
(1)
220V AC
power socket
AC power jack
OPERACIÓN DE LA RADIO
1. Presione el “botón del interruptor de encendido” (2) para en-
cender la radio. La pantalla mostrará la frecuencia de la última
banda de radio escuchada antes de apagarla.
2. Presione el botón de conversión de banda (7) para cambiar
los programas entre FM/MW/SW.
3. Presione “Botón de sintonización - ” (6) o “Botón de sintoniza-
ción + ” (4) para buscar emisoras de radio desde el extremo más
bajo hasta el extremo superior manualmente.
4. Mantenga presionado el “botón de sintonización - ” (6) o el
“botón de sintonización + ” (4) para buscar emisoras de radio
desde el extremo inferior hasta el superior automáticamente.
5. Gire el botón de control de volumen (3) para ajustar el volumen
de la radio.
6. Inserte el auricular en el "conector para auriculares" (5) (el al-
tavoz de la radio se cortará automáticamente) para escuchar con
el auricular.
7. Cuando no quiera seguir escuchando la radio, presione el
"botón de encendido" (2) para apagar la radio y la pantalla mos-
trará información del reloj.

Aviso: cuando se presiona el botón de encendido para encen-
der la radio, no debe exceder los 2 segundos. De lo contrario,
entra en el estado de suspensión.
Este dispositivo adopta un sistema de hora de 24 horas. Después
de instalar la batería, el reloj funcionará
desde "12:00".
1. Si en estado de apagado, se muestra “ ”
presione el botón de configuración
de alarma (10) para cancelar.
2. Presione el "botón de modo de hora" (10)
una vez más y la hora parpadeará. En el estado en que parpa-
dea la "hora", presione "botón de ajuste de hora +" (4) o "botón
de ajuste - " (6) para configurar la hora.
Nota:
1. Cuando se configura la hora, debe configurarse cuando la
"hora" parpadea.
2. Cuando se configura el minuto, debe configurarse cuando el
número de "minuto" parpadea.
Español Manual de usuario
CONFIGURACIÓN DEL RELOJ
flash time
adjustment
CONFIGURACIÓN DE LA HORA PARA
LA ALARMA
1. En el estado de apagado, presione el "botón
de configuración de la alarma" (10)
y el indicador de “ ” alarma y
la hora de configuración de hora aparecerá
flash time
adjustment

Español Manual de usuario
en la pantalla
Esto indica que la radio entra en estado de encendido por alarma.
2. Cuando está apagado, presione una vez el "botón de hora"
(10) y la "hora" en la pantalla comenzará a parpadear. En este
estado, presione el botón “ajuste de hora +” (4) o el botón “ajuste
de hora-” (6) para configurar la hora para el encendido por alarma.
3. Cuadno esté apagado, presione dos veces el "botón de modo
de hora" (10) y los "minutos" en la pantalla comenzará a parpa-
dear. El método de configuración es el mismo que para configurar
la hora de encendido por alarma.
4. Si la alarma llega, la radio se encenderá automáticamente y
recibirá la última emisora escuchada.
5. La radio se apagará automáticamente después de escuchar
durante 60 minutos. Pero el indicador de encendido por alarma
no se cancela, la radio se encenderá a la misma hora repetida-
mente todos los días.
6. Para apagarlo antes, presione el “botón de encendido” (2).
7. Para cancelar la función de encendido por alarma, en apagado,
mantenga presionado el “botón de configuración de alarma” (10)
para configurarlo.
USO DE LA FUNCIÓN SLEEP
Este dispositivo tiene la función de suspensión y se apagará au-
tomáticamente a la hora establecida para evitar el desperdicio
de energía causado por la activación excesiva.
1. En el estado de apagado, mantenga presionado el "botón de
función de reposo" (2) para encender el dispositivo.

Flash
Español Manual de usuario
El indicador SLEEP “ ” y el tiempo de
reposo "90" se apagarán en la pantalla en dos
segundos, lo que representa que la radio
entra en estado de reposo y se apagará automá-
ticamente después de escuchar durante 90 minutos.
2. En el estado en que se muestra la hora, presione el “botón
de la función Sleep” (2) para ajustar el tiempo.
3. Puede escuchar sus emisoras favoritas después de ajustar el
tiempo de suspensión y la radio se apagará automáticamente a
la hora de suspensión programada.
4. Para apagar antes de la suspensión la radio, presione el
"botón de función Sleep" (2) para apagar la radio.
Nota: La secuencia de apagado puede programarse:
90-80-70-60-50-40-30-20-10 (cancelar la función de sueño).
INTERRUPTOR DE BLOQUEO
1. La radio está configurada con la función de bloquear los
botones para evitar operaciones erróneas.
2. Mantenga presionado el botón de bloqueo (9) y aparecerá el
simbolo “ ” en la pantalla. Esto significa que la radio está
en estado de bloqueo y los botones están desactivados.
3. Para cancelar la función de bloqueo, mantenga presionado el
botón de bloqueo (9).
BÚSQUEDA AUTOMÁTICA
Mantenga presionado el “botón de sintonización +” (5) o el
Table of contents
Languages: