MOTU UltraLite-mk5 User manual

SAFETY PRECAUTIONS AND ELECTRICAL REQUIREMENTS FOR THE UltraLite-mk5 (“PRODUCT”)
CAUTION! READ THIS SAFETY GUIDE BEFORE YOU BEGIN INSTALLATION OR OPERATION. FAILURE TO COMPLY WITH SAFETY
INSTRUCTIONS COULD RESULT IN BODILY INJURY OR EQUIPMENT DAMAGE.
HAZARDOUS VOLAGES: CONTACT MAY CAUSE ELECTRIC SHOCK OR BURN. TURN OFF UNIT BEFORE SERVICING.
WARNING: TO REDUCE THE RISK OF FIRE OR ELECTRICAL SHOCK, DO NOT EXPOSE THIS APPLIANCE TO RAIN OR OTHER MOISTURE.
CAUTION: TO REDUCE THE RISK OF ELECTRICAL SHOCK, DO NOT REMOVE COVER. NO USER-SERVICEABLE PARTS INSIDE. REFER SERVICING
TO QUALIFIED SERVICE PERSONNEL.
IMPORTANT SAFEGUARDS
1. Read these instructions. All the safety and operating instructions should be read before operating the product.
2. Keep these instructions.These safety instructions and the product owner’s manual should be retained for future reference.
3. Heed all warnings. All warnings on the product and in the owner’s manual should be adhered to.
4. Follow all Instructions. All operating and use instructions should be followed.
5. Do not use the product near water.
6. Cleaning - Unplug the product from the computer and clean only with a dry cloth. Do not use liquid or aerosol cleaners.
7. Ventilation - Do not block any ventilation openings. Install in accordance with the manufacturer’s instructions.
8. Heat - Do not install the product near any heat sources such as radiators, heat registers, stoves, or another apparatus (including an amplifier) that produces heat.
9. Overloading - Do not overload wall outlets and extension cords as this can result in a risk of fire or electrical shock.
10. Power supply cord - Protect the product power supply cord from being walked on or pinched by items placed upon or against them.
11. Power switch - Install the product so that the power switch can be accessed and operated at all times.
12. Disconnect - The main power supply plug is considered to be the disconnect device for the product and shall remain readily operable.
13. Accessories - Only use attachments/accessories specified by the manufacturer.
14. Surge protection - Unplug the product during lightning storms or when unused for long periods of time.
15. Servicing- Referall servicingtoqualified servicepersonnel.Servicing is requiredwhen theproduct has beendamaged in anyway, such aswhen a power-supplycordorplug is damaged,liquid hasbeen
spilled or objects have fallen into the product, the product has been exposed to rain or moisture, does not operate normally, or has been dropped.
16. Power Sources - Refer to the manufacturer’s operating instructions for power requirements.
17. Installation - Do not install the product in an unventilated rack, or directly above heat-producing equipment such as power amplifiers. Observe the maximum ambient operating temperature listed
below.
18. Power amplifiers- Never attach audio power amplifier outputs directly to any of the unit’s connectors.
19. Replacement Parts -When replacement parts are required, be sure the service technician has used replacement parts specified by the manufacturer or have the same characteristics as the original part.
Unauthorized substitutions may result in fire, electric shock or other hazards.
20. Safety Check - Upon completion of any service or repairs to this MOTU product, ask the service technician to perform safety checks to determine that the product is in safe operating conditions.
ENVIRONMENT, HEAT AND VENTILATION
OperatingTemperature: 10°C to 40°C (50°F to 104°).The product should be situated away from heat sources or other equipment that produces heat. When installing the product in a rack or any other
location, be sure there is adequate space around the product to ensure proper ventilation. Improper ventilation will cause overheating and can damage the unit.
TO REDUCE THE RISK OF ELECTRICAL SHOCK OR FIRE
Do not handle the power cord with wet hands. Do not pull on the cord of the power supply when disconnecting it from an AC wall outlet.
Grasp it by the power supply unit. Do not expose this apparatus to rain or moisture. Do not place objects containing liquids on it.
DC INPUT
10 - 24V DC • 1.0A max
Version 1.1

iii
Contents
Part 1: Getting Started
7Quick Start Guide
8A Typical UltraLite-mk5 Setup
9UltraLite-mk5 Front Panel
10 UltraLite-mk5 Rear Panel
11 About the UltraLite-mk5
15 Packing List and System Requirements
17 Software Installation
21 Hardware Installation
Part 2: Using the UltraLite-mk5
29 Front Panel Operation
31 CueMix 5
45 Working with Host Audio Software
Part 3: Appendices
53 Troubleshooting
55 Audio Specifications
57 Half-rack Mounting Kit
59 Half-rack Coupler Kit
61 Index

iv

Part 1
GettingStarted


7
Quick Start Guide
Thank you for purchasing an UltraLite-mk5!
Follow these easy steps to get started quickly.
MAC USERS START HERE
1Visit motu.com/UltraLite-mk5-start to
download and run the MOTU Gen 5 Installer.
2Connect the included power supply to your
UltraLite-mk5 unit.
3Connect the UltraLite-mk5 to your Mac using
one of the included USB cables.
4Choose Apple menu > System Preferences and
click Sound to choose the UltraLite-mk5 as the
input and output device.
5Proceed to “For all users” below.
WINDOWS USERS START HERE
1BEFORE you connect the UltraLite-mk5 to
your computer, visit motu.com/UltraLite-mk5-
start to download and run MOTU Gen 5 Setup.
2Connect the included power supply to your
UltraLite-mk5 unit.
3Connect the UltraLite-mk5 to your PC using
one of the included USB cables.
4Go to the Windows Sound Control Panel and
choose UltraLite-mk5 as the default recording and
playback device.
5Proceed to “For all users” below.
FOR ALL USERS
6As shown on the next page, connect speakers to
the UltraLite-mk5 Main Outs 1-2, or connect a
pair of headphones to the headphone jack on the
front panel, so you can hear your computer’s audio
output.
7You are now ready to start using your
UltraLite-mk5 interface.
8Visit motu.com/UltraLite-mk5-start to register
your UltraLite-mk5, download the included
software and watch brief how-to videos, including:
■How to connect a mic, guitar, keyboard or other
audio source.
■How to use the UltraLite-mk5 with your
recording software.
■How to get the most out of the UltraLite-mk5.
☛Register your UltraLite-mk5 to gain access to
all the software, virtual instruments, loops and
sounds that are included with your UltraLite-mk5
purchase. Registered users also qualify for
technical support and information about software
updates, so please register today!

MAIN
VOL
(HOLD)
BACK SELECT
MIC LINE/INST MIC
GAIN
PHONES
PAD 48V PAD 48V
2
12
1
LINE OUT LINE IN
MAIN OUT
S/PDIF
OPTICAL
USB C15V DC
MIDI
OUT IN IN
OUT OUT
IN
53
8
7
10
9
6
753
864
(L)
(R)
4
1
2
A Typical UltraLite-mk5 Setup
Mic or guitar Mic or guitar
Headphones
MIDI modules MIDI controller Aux speakers
Main speakers Keyboards and synths
Mac, PC or iOS device I/O expansion Home theater Stage monitors Outboard gear

UltraLite-mk5 Front Panel
1. These Mic/Line/Inst inputs are XLR/TRS combo jacks
that accept either a mic cable or a quarter-inch cable,
balanced or unbalanced, from a guitar or line input. Use
the controls to the right (3) to adjust individual preamp
gain, instrument input gain, 48V phantom power, and
an optional -20 dB pad for each mic input. Each input
includes a Phase Invert switch, accessed in the CueMix 5
app. See “Input tab”on page 34.
2. The Phones jack accepts a quarter-inch headphone
plug. Use the knob above for volume control. The
display provides feedback as you turn the knob.
3. Individual preamp gain, switchable 48V phantom
power, and optional -20 dB pad switches for each
combo input.The Precision Digital Gain™ knob provides
+74 dB of preamp gain or instrument input gain. Both
gain settings are retained independently. Turn the knob
to see the gain adjustments in the screen.
4. This portion of the screen displays level meters for all
analog inputs and outputs. It can also show device
settings, using the knobs to the left.
5. This portion of the screen shows digital I/O activity
(optical and S/PDIF) and MIDI activity (in and out).
6. This portion of the screen displays the current sample
rate and clock source, such as INT (Internal clock mode).
7. Push Select to enter the menu. Turn Select to scroll
through menu options. Push again to descend into the
sub-menus, if applicable.To choose the current setting,
push Select a third time. Push Back to return to the
previous menu level, and do so repeatedly to exit the
menu altogether.
8. Power and Volume control for phones and main outs.
Push this knob to toggle between Phones volume and
Main Out volume.The screen provides visual feedback.
This setting, along with all front panel settings, can also
be adjusted from the CueMix 5 app.The CueMix 5 app
also allows you to add additional Line Outs to the Main
Volume group, so you can control them all with this
knob. See item #2 (Main Volume Group) on page 35.
Push this knob to power on the unit; push and hold for
three seconds to power it off.
78
2 3 5
6
1 4

UltraLite-mk5 Rear Panel
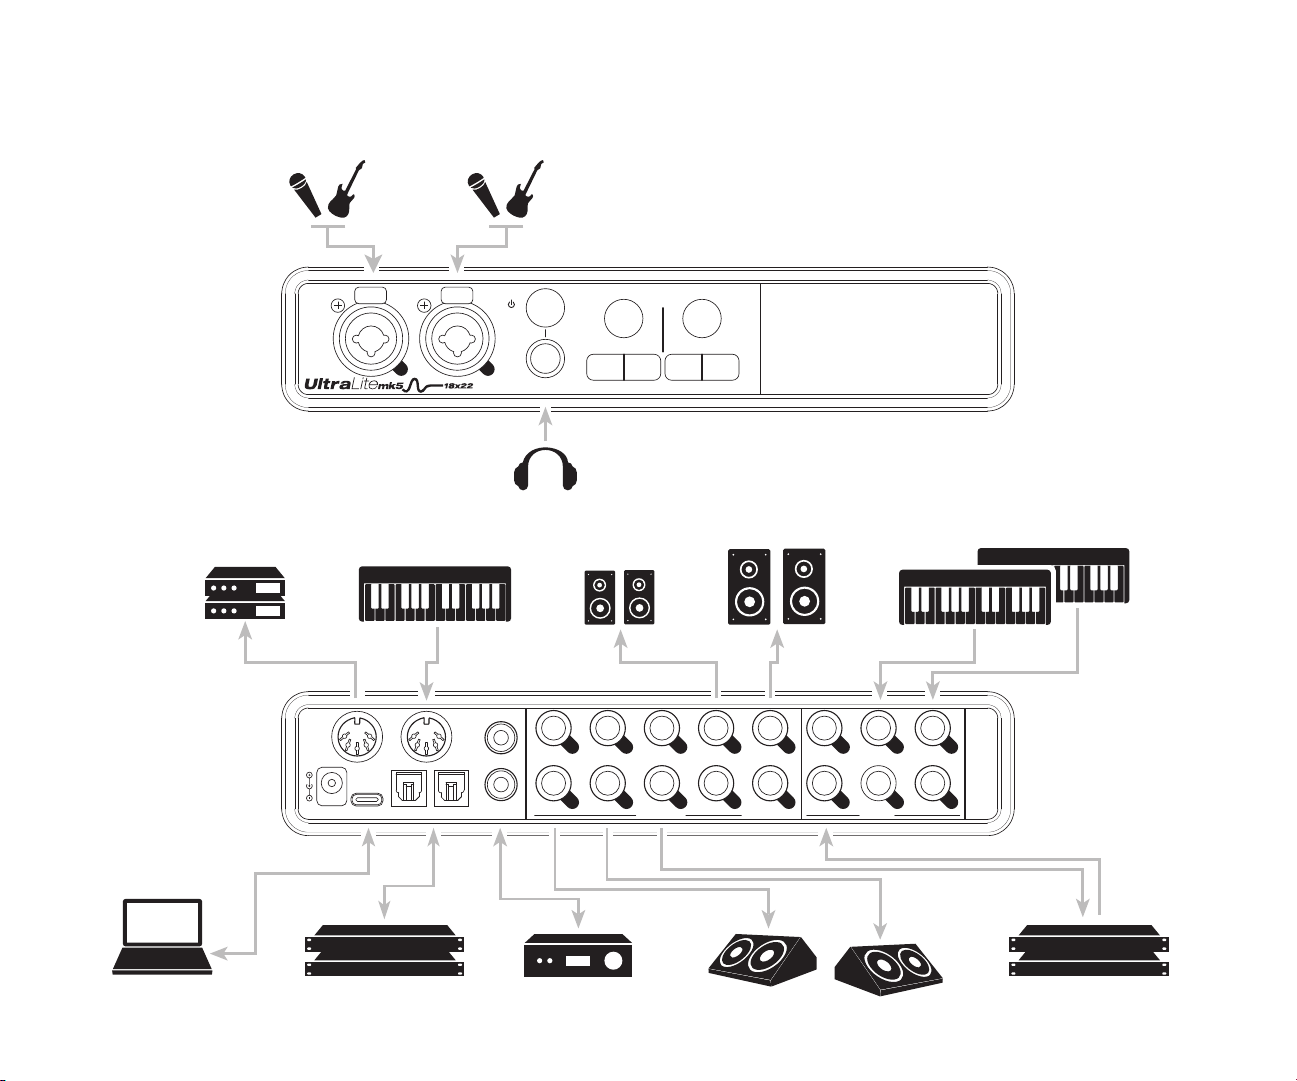
1. The UltraLite-mk5 operates as a USB MIDI interface, allow-
ing MIDI software to communicate with connected MIDI
devices through the USB connection to the computer.
Connect a MIDI device here using standard MIDI cables.
Connect the UltraLite-mk5’s MIDI OUT port to the MIDI IN
port on the other device. Conversely, connect the
UltraLite-mk5’s MIDI IN port to the MIDI OUT port on the
other device. For further details, see “MIDI connections”on
page 25.
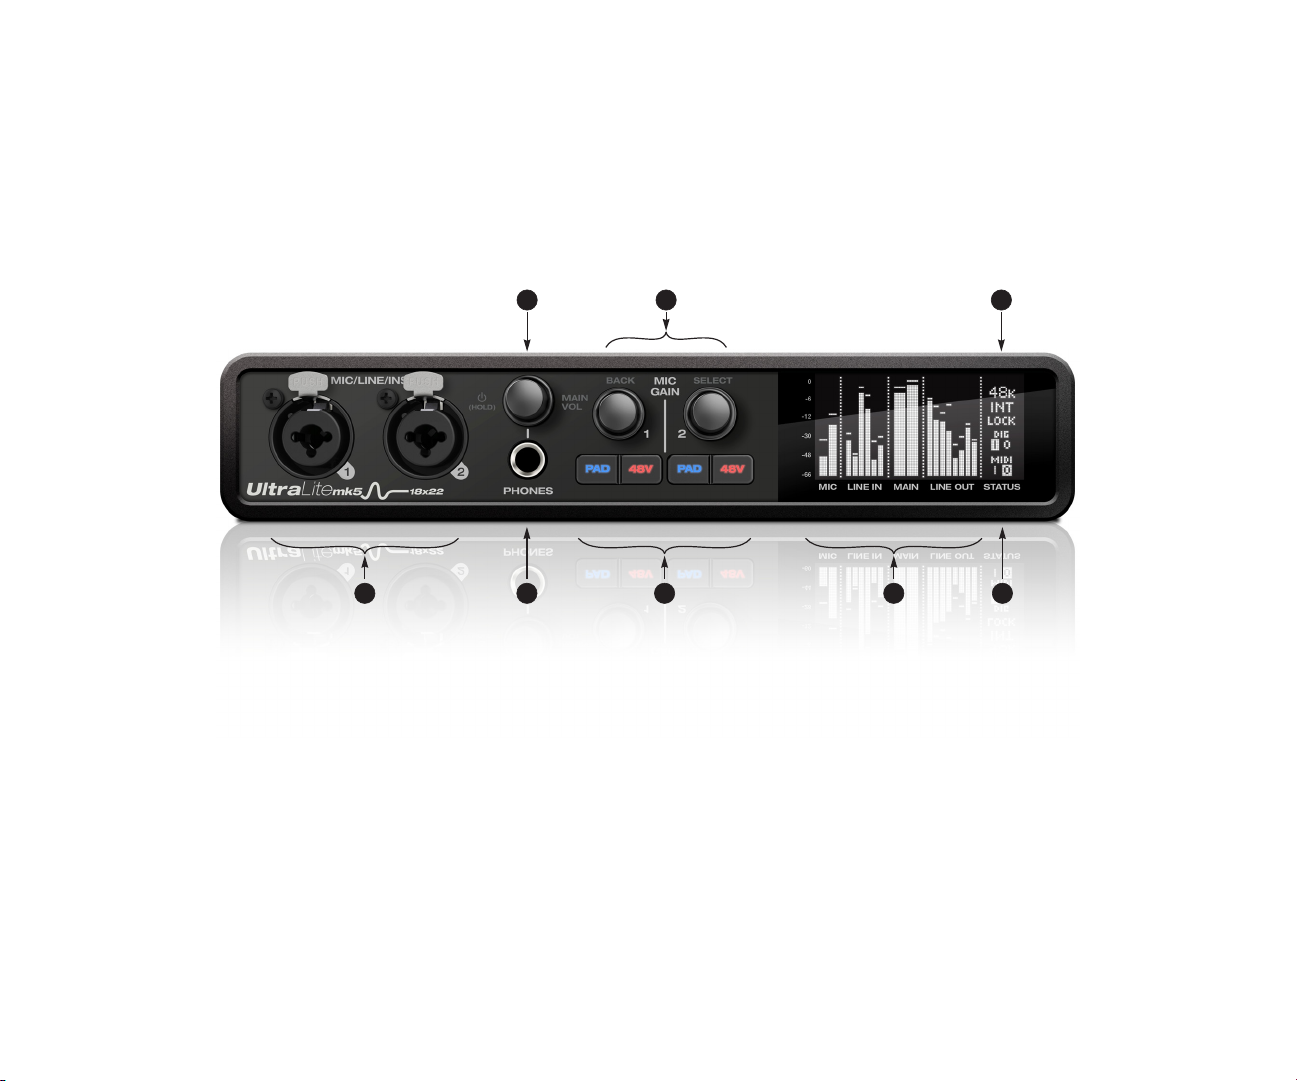
2. The analog (‘Line’) outputs provide additional analog
output for secondary studio monitors, surround monitor-
ing, sub-mixes or any other desired destination. These
connectors are balanced (tip/ring/sleeve), but they also
accept an unbalanced plug. They are DC-coupled. Control
volume from the CueMix 5 app or your host audio software.
For further details, see “Audio connections”on page 22.
3. The Main Out pair provides stereo analog output for
primary (powered) studio monitors or PA speakers, or any
other desired destination. Control volume from the
CueMix 5 app or from the front panel volume control.
To hear audio playback from your host audio software on
the MAIN OUT pair, assign audio tracks (and master fader)
to these main outs.You can also use the CueMix 5 app to
route live UltraLite-mk5 inputs here as well.
4. Equipped with very high quality 24-bit 192 kHz converters,
these six line inputs are balancedTRS (tip/ring/sleeve)
quarter-inch connectors that can also accept an unbal-
anced plug (with the ring disconnected). Use them for
keyboards or other line level analog sources.These inputs
are equipped with the UltraLite-mk5’s Precision Digital
Gain™ feature: digital gain that boosts the input level up to
+20 dB in 1 dB increments, adjusted from the CueMix 5
app. Each input includes a Phase Invert switch, accessed in
the CueMix 5 app. See “Input tab”on page 34.
5. These RCA S/PDIF jacks provide stereo, 24-bit digital input
and output at all supported sample rates (up to 96 kHz).
When connecting a source to the input, be sure to set the
clock source correctly. See “S/PDIF”on page 24.
6. These ADAT optical “lightpipe”jacks provide 8 channels of
24-bit ADAT optical digital I/O at 1x sample rates (44.1 or 48
kHz) and 4 channels at 2x sample rates (88.2 or 96 kHz).
They are disabled at higher sample rates. Alternately, they
can operate as stereo TOSLink (optical S/PDIF) connectors.
See “Optical I/O”on page 24.
7. Connect the UltraLite-mk5 to the computer here using the
included USB-C-to-C or USB-C-to-A cable. If you are
connecting to an iOS device, see “iOS setup (USB-C)”on
page 21.
8. This DC power jack accepts any standard 15V DC, 1A
tip-positive power supply.
4
8
1 2 3
7 6 5

CHAPTER
11
1About the UltraLite-mk5
The UltraLite-mk5 is an 18 x 22 USB audio
interface with mixing, DSP effects, and very high
quality A/D/A conversion at sample rates up to
192 kHz for on-the-go mobile audio recording.
Hardware-driven DSP delivers monitor mixes on
all analog output pairs, with seven stereo buses
and 32-bit effects processing, including EQ,
compression and reverb.
The UltraLite-mk5 can operate as an audio
interface for a studio workstation (DAW), as a
standalone mixer, or as an auxiliary monitor
mixing system in the studio or on stage. This
chapter provides a brief overview of its main
features and characteristics.
Comprehensive I/O
The UltraLite-mk5 provides a variety of analog
and digital interconnects, all active simultane-
ously, designed to provide everything you need for
a well-equipped mobile recording studio.
† The UltraLite-mk5 optical connectors support
the industry-standard ADAT and TOSLink optical
I/O formats, which provide varying channel
counts. See “Optical I/O” on page 24 for details
about optical bank operation.
All inputs and outputs are discrete. For example,
using a mic input does not “steal” an input from
the TRS analog I/O bank.
Universal connectivity
The UltraLite-mk5 can connect to a computer
with high-speed USB 2.0, which is compatible
with USB 3.0. It is USB audio class-compliant,
which means that it is iOS compatible and does
not require driver installation for USB connection
to a computer.
Mic/guitar inputs with preamps
The two front-panel mic/line/instrument inputs
are equipped with preamps and “combo” XLR/
TRS jacks, which accept XLR microphone inputs
or quarter-inch line/instruments inputs.
Individual 48 volt phantom power and a -20 dB
pad can be supplied independently to each mic
input. The Precision Digital Gain™ knobs on the
front panel for each mic/instrument input provide
up to 74 dB of boost in precise 1 dB increments.
Flexible analog I/O
All quarter-inch analog inputs can accept either a
balanced or unbalanced plug. The six line inputs
are equipped with digital gain, adjustable in 1 dB
increments.
Equipped with renowned ESS Sabre32™ DAC
technology, all analog outputs offer trim, also
adjustable in 1 dB increments. You can save your
trim configurations as a preset for instant recall.
All quarter-inch outputs are DC-coupled, so they
can be used for CV control output.
Connection Input Output
Quarter-inch analog on bal/unbal TRS 6 10
Mic/guitar inputs on combo XLR/TRS 2 -
Headphone output - 1 x stereo
S/PDIF digital I/O on RCA 2 2
ADAT optical digital (at 44.1 or 48 kHz)† 8 8
Total 18 22

ABOUT THE ULTRALITE-MK5
12
On-board DSP with mixing and processing
The UltraLite-mk5 is equipped with a DSP engine
that drives a 24 x 14 monitor mixer, which supplies
each analog output pair with a unique monitor
mix. Each mix can include any chosen inputs, plus
computer output and the separate reverb bus.
Effects include 4-band parametric EQ,
compression and reverb. The included CueMix 5
app provides easy and intuitive on-screen control
of everything.
32-bit processing
The DSP engine has a 32-bit data path with 64-bit
(double-precision) data processing, which
provides 48 dB of headroom (above full scale)
inside the mixer for the utmost in sound quality.
Software control
Control the UltraLite-mk5 on-board mixing and
device settings from the CueMix 5 app software
running on a laptop or iOS device.
Stand-alone mixing
Connect a tablet to the UltraLite mk5 for complete
control of all settings on the road at rehearsals or
gigs — great for live sound mixing.
ADAT digital I/O
The UltraLite-mk5 provides 8-channel optical
digital I/O. Connect outboard digital processors,
digital mixers or other gear: 8 channels at 44.1/48
kHz or 4 channels at 88.2/96 kHz. Alternately, the
optical ports can be independently configured to
support stereo TOSLink (optical S/PDIF).
The input and output operate independently,
allowing you to mix and match optical formats.
For example, you could receive four channels of
96 kHz S/MUX input while at the same time
sending 96 kHz stereo optical S/PDIF
(“TOSLink”) to the output.
S/PDIF
The UltraLite-mk5 rear panel provides S/PDIF
input and output in two different formats: RCA
“coax” and optical “TOSLink”. The RCA jacks are
dedicated to the S/PDIF format. The optical jacks
can be used for either TOSLink or ADAT optical,
as discussed earlier.
MIDI I/O
The UltraLite-mk5’s standard MIDI IN and MIDI
OUT jacks supply 16 channels of MIDI I/O to and
from the computer through its USB connection.
High-contrast OLED display
The high-contrast OLED display shows all signal
activity at a glance with precise, detailed metering
for all I/O. You can access many hardware settings
directly from the front panel.
Headphone output
The UltraLite-mk5 front panel provides an
independent headphone jack with separate
volume control. You can program the phones to
mirror the main outs or act as its own independent
output.
Rack mount or desktop operation
The UltraLite-mk5 is housed in a sturdy, metal-
alloy half-rack enclosure. Rack mounting brackets
are available (sold separately) for mounting the
unit in a standard 19-inch equipment rack. A
separate half-rack coupler kit is also available (sold
separately) to join two UltraLite-mk5 units (or
similar units) together and mount them side by
side in an equipment rack.
Performer Lite
Performer Lite is a full-featured audio workstation
software package for Mac and Windows that is
available as a free download for you as an
UltraLite-mk5 owner. Visit motu.com/download
to obtain your copy. Performer Lite provides
multi-track MIDI and audio production, over 100
included virtual instruments, automated virtual

ABOUT THE ULTRALITE-MK5
13
mixing, graphic editing, music notation editing,
real-time effects plug-ins with crossfades, support
for many third-party audio plug-ins, sample-
accurate editing and placement of audio, and
more.

ABOUT THE ULTRALITE-MK5
14

CHAPTER
15
2Packing List and
System Requirements
PACKING LIST
The UltraLite-mk5 ships with the items listed
below. If any of these items are not present in the
box when you first open it, please immediately
contact your dealer or MOTU.
■UltraLite-mk5 audio interface
■USB-C-to-C cable
■USB-C-to-A cable
■DC power adapter
■User guide
SYSTEM REQUIREMENTS
■Intel Core i3 Mac or PC (or AMD equivalent).
Faster CPUs are recommended for best
performance.
■4GB RAM; 8 GB or more recommended.
■macOS 10.11 or later; Windows 10 or later. For
macOS the optional driver requires 10.13 or later.
■Available high-speed USB 2.0 (or 3.0) port.
■A large hard drive (preferably at least 512 GB).
PLEASE REGISTER TODAY!
Please register the UltraLite-mk5 today: visit
www.motu.com/register.
As a registered user, you will be eligible to receive
free bundled software, technical support and
announcements about product enhancements as
soon as they become available. Only registered
users receive these special update notices, so
please register today.
Thank you for taking the time to register your new
MOTU products!

PACKING LIST AND SYSTEM REQUIREMENTS
16

CHAPTER
17
3Software Installation
USB audio class-compliant operation . . . . . . . . . . . . . . . . . . .17
Software installation . . . . . . . . . . . . . . . . . . . . . . . . . . . . . . . . . . .17
Audio drivers . . . . . . . . . . . . . . . . . . . . . . . . . . . . . . . . . . . . . . . . . . .17
CueMix 5 app. . . . . . . . . . . . . . . . . . . . . . . . . . . . . . . . . . . . . . . . . . .18
Performer Lite workstation software. . . . . . . . . . . . . . . . . . . .18
Working with host audio software . . . . . . . . . . . . . . . . . . . . . .19
MIDI I/O on Windows . . . . . . . . . . . . . . . . . . . . . . . . . . . . . . . . . . .19
MIDI I/O setup on the Mac . . . . . . . . . . . . . . . . . . . . . . . . . . . . . .19
USB AUDIO CLASS-COMPLIANT OPERATION
The UltraLite-mk5 is a USB audio class-compliant
device. This means that you can connect it to your
Mac (running Mac OS 10.11 or higher) with a
USB cable and use it without installing any
software drivers. The computer recognizes the
UltraLite-mk5 as a USB audio device and makes
its inputs and outputs available to your host audio
software. Basic settings, such as the hardware’s
sample rate, are made in either your host software
or the front-panel menu.
☛In this scenario, the UltraLite-mk5 provides
basic audio input and output, and no software
driver installation is necessary. Use the Mac’s
Audio MIDI Setup utility to manage the
UltraLite-mk5 audio inputs and outputs for your
Mac.
Connection to iOS devices (iPad and iPhone)
Audio-class compliant operation allows you to
connect the UltraLite-mk5 to any iOS device with
a standard camera connection kit adapter. The
UltraLite-mk5 then provides multi-channel audio
I/O to your audio apps. Use your audio app to
configure the number of available audio channels.
SOFTWARE INSTALLATION
If you don’t want to operate the UltraLite-mk5 as a
USB audio class compliant device, or if you are
using Windows on a PC, install the software as
follows.
1Visit www.motu.com/ultralite-mk5-start to
download the latest Mac or Windows Gen 5
installer.
2Run the installer and follow the directions it
gives you.
☛We recommend that you run the software
installer before you connect the UltraLite-mk5 to
your computer and power it on. This ensures that
all driver components are properly installed in
your system.
☛To allow support for a wide variety of
platforms, the Ultralite-mk5 appears as a USB
Class Compliant Ethernet device (USB-CDC-
ECM) in the Network settings for macOS and
Windows. This network port is currently used by
CueMix 5 to communicate with the UltraLite-mk5
on Windows and iOS, and may support other
platforms in the future.
AUDIO DRIVERS
The installer provides a USB audio driver for Mac
(CoreAudio) and Windows (ASIO and Wave).
Industry-leading I/O latency performance
On macOS and Windows, the UltraLite-mk5
driver provides exceptionally low I/O latency
performance. For example, with a 32-sample
buffer size, an UltraLite-mk5 interface operating
at 96 kHz produces round trip latency (RTL)
performance of 2.4 milliseconds (ms) on macOS.
RTL is the measurement of the time it takes audio

SOFTWARE INSTALLATION
18
to pass from an analog input, through a high-
performance DAW host such as Digital Performer,
to an analog output.
ASIO Driver support
On Windows, to enable the UltraLite-mk5 in your
ASIO host software, choose the MOTU
UltraLite-mk5 ASIO driver, as shown in Figure 7-1
on page 46.
WDM / Wave driver support
On Windows, the MOTU Gen5 driver includes
support for WDM (Wave) compatible audio
software. See item #8 on page 33.
Host Buffer Size
When connected to a Windows computer, the
Host Buffer Size menu is available in the Device tab
(item #6 on page 33). This setting determines the
amount of latency (delay) you may hear when live
audio is patched through your Windows audio
software. Smaller buffer sizes produce lower
latency, with sizes of 256 samples or less producing
virtually imperceptible delay. Many host
applications report audio hardware I/O latency, so
you can see what happens to the reported latency
when making adjustments to this setting.
Be careful with very small buffer sizes, as they can
cause performance issues from your host software
or PC.
☛At sea level, audio travels approximately one
foot (30 cm) per millisecond. A latency of ten
milliseconds is about the same as being ten feet
(three meters) from an audio source.
Host Safety Offset
When connected to a Windows host, the Host
Safety Offset menu (item #7 on page 33) also
becomes available. This setting allows you to fine
tune host latency. Larger offsets allow the driver
more time to process audio as it transfers to and
from the hardware. Lower settings produce lower
latency, but if you go too low, your host software
may experience performance issues. Generally
speaking, 64 samples should serve as a good
baseline setting. You can then experiment with
lower settings from there. Be mindful, however,
when reducing the safety offset, as this parameter
can have a significant impact on your computer
system’s performance.
CUEMIX 5 APP
CueMix 5 is an easy-to-use app for macOS,
Windows and iOS that gives you complete control
over all the settings in your UltraLite-mk5
interface. For details, see chapter 6, “CueMix 5”
(page 31).
PERFORMER LITE WORKSTATION SOFTWARE
Performer Lite is an easy to use audio workstation
software package for macOS and Windows that
lets you record, edit, mix, process, bounce and
master multi-track recording projects. Advanced
features include over 100 included virtual
instruments, real-time effects processing,
recording, and much more.
To obtain Performer Lite, visit motu.com to
register your MOTU audio interface, download
Performer Lite and activate it on your computer.
Figure 3-1: Performer Lite.

SOFTWARE INSTALLATION
19
WORKING WITH HOST AUDIO SOFTWARE
For further information about using the
UltraLite-mk5 with host audio software, see
chapter 7, “Working with Host Audio Software”
(page 45).
MIDI I/O ON WINDOWS
On Windows, the MOTU Gen 5 Setup installer
provides a USB MIDI driver for the
UltraLite-mk5. This driver allows you to access
the UltraLite-mk5’s MIDI input and output ports
through its USB connection to the computer. The
ports are published in Windows and are available
to all MIDI software.
MIDI I/O SETUP ON THE MAC
Core MIDI is the “under-the-hood” component of
macOS that handles MIDI services for MIDI
hardware and software. Core MIDI provides many
universal MIDI system management features,
including MIDI communication between your
UltraLite-mk5 interface and all Core MIDI
compatible software.
Audio MIDI Setup is a utility included with macOS
that allows you to configure your UltraLite-mk5
interface for use with all Core MIDI compatible
applications. Audio MIDI Setup provides:
■A “virtual” studio on your Mac that graphically
represents your MIDI hardware setup and that is
shared by all Core MIDI-compatible programs
■A simple, intuitive list of your MIDI devices
whenever you need it in any Core MIDI-
compatible program
Launching Audio MIDI Setup
1Make sure your UltraLite-mk5 interface is
connected (a USB connection is required) and
turned on.
2Launch the Audio MIDI Setup utility.
This can usually be found in /Applications/
Utilities. If it has been moved, just search for
Audio MIDI Setup.
3Confirm that the MIDI interface is present in
the MIDI Devices tab (or window) in Audio MIDI
Setup. If the interface does not appear, or if it is
grayed out, check your cable connections and click
Rescan MIDI.
Connecting MIDI devices to the UltraLite-mk5
Once your UltraLite-mk5 interface appears in
Audio MIDI Setup, you are ready to add devices,
indicate how they are connected, and identify
properties they may have for particular purposes.
This information is shared with all Core MIDI
compatible applications.
To add a device in Audio MIDI Setup:
1Click Add Device.
2Drag on its input and output arrows to draw
connections to the UltraLite-mk5 that match its
physical connection.
Figure 3-2: Connecting devices to the UltraLite-mk5. In this example, a
controller keyboard is connected to the UltraLite-mk5’s MIDI IN, and a
sound module is connected to the UltraLite-mk5 MIDI OUT.
3Double-click the device to make settings, such
as input and output channels, that further describe
the device.

SOFTWARE INSTALLATION
20
Figure 3-3: Device settings.
4Repeat the above steps for each MIDI device
connected to the interface.
5When you are finished, quit Audio MIDI Setup.
Your configuration is automatically saved as the
default configuration, and it is shared with all
Core MIDI-compatible software.
Table of contents
Other MOTU Recording Equipment manuals

MOTU
MOTU UltraLite- mk3 Hybrid User manual

MOTU
MOTU Stage- B16 User manual

MOTU
MOTU Traveler-mk3 User manual

MOTU
MOTU MicroBook IIc User manual

MOTU
MOTU HD Express User manual

MOTU
MOTU UltraLite-mk3 Hybrid User manual

MOTU
MOTU micro express User manual

MOTU
MOTU FastLane User manual

MOTU
MOTU MicroBook User manual

MOTU
MOTU 828mk3 User manual

MOTU
MOTU UltraLite AVB User manual

MOTU
MOTU HDX-SDI User manual

MOTU
MOTU 828mkII User manual

MOTU
MOTU Traveler User manual

MOTU
MOTU 828 Mk III Hybrid User manual

MOTU
MOTU HDX-SDI User manual

MOTU
MOTU UltraLite- mk3 Hybrid User manual

MOTU
MOTU 1248 User manual

MOTU
MOTU V4HD User manual

MOTU
MOTU USB-MIDI User manual