Innovation ELITE User manual

Voicemail Installation guide
1841 Bourbon Road
Cross Plains, Wisconsin
1-800-424-6757
www.innovationtw.com

ELITE Installation guide Introduction
ii
©2008 Innovation Technologies Worldwide, Inc. All rights reserved.
Elite, PrivateLine, InnConnect, InnCommand are trademarks of Innovation Technologies Worldwide,
Inc.
Windows XP Professional and Outlook Express are registered trademarks of Microsoft Corporation.
Other product and company names mentioned herein may be the trademarks of their respective
owners.
Innovation Technologies Worldwide, Inc., 1841 Bourbon Road, P.O. Box 183, Cross Plains, WI 53528.
For technical support, call 608-798-3555, then press 1at the menu prompt.
You can also visit our Web site: www.innovationtw.com
This manual is based on software release 3.0, is for informational use only, and is subject to change
without notice. No part of this publication may be reproduced, stored in a retrieval system, or
transmitted in any form or by any means, electronic, mechanical, photocopying, recording, or
otherwise, without the express written permission of Innovation Technologies Worldwide, Inc.
Innovation Technologies Worldwide, Inc. makes no warranty of any kind with regard to the
material in this manual, and shall not be held liable for errors contained herein or for incidental or
consequential damages in connection with the furnishings or use of this manual.

ELITE Installation guide Introduction
iii
Contents
Introduction.................................................................................................................................vii
Chapter 1 Installation................................................................................................................. 1
Preinstallation information ......................................................................................................... 2
Opening and verifying system components............................................................................. 2
Inspecting and installing hardware ........................................................................................... 3
Final connections .......................................................................................................................... 6
Programming Elite ....................................................................................................................... 8
Adding general system information...................................................................................... 8
Adding a system administrator............................................................................................ 10
Checking the voice ports ....................................................................................................... 12
Setting the Call ID format (in-band port types only) ........................................................ 13
Setting the MWI dial-strings (certain port types only)...................................................... 15
Device interface serial ports...................................................................................................... 16
Chapter 2 Mailboxes and other features ................................................................................. 18
Mailboxes: an introduction ....................................................................................................... 19
Mailbox IDs ............................................................................................................................. 21
Adding guest mailboxes........................................................................................................ 22
Adding mailboxes one at a time....................................................................................... 22
Adding multiple mailboxes .............................................................................................. 24
Deleting mailboxes............................................................................................................. 25
Adding staff mailboxes.......................................................................................................... 25
Adding front desk mailboxes................................................................................................ 27
Adding administration mailboxes ....................................................................................... 28
Checking your maximum mailbox number size................................................................ 30
Defining the guest services class .............................................................................................. 31
Prompt administration .............................................................................................................. 34
Using Elite’s user interface to record prompts................................................................... 34
Creating a “Record Prompt” mailbox for prompts ........................................................... 36
Translations ................................................................................................................................. 39
Adding translations individually......................................................................................... 39
Adding multiple translations................................................................................................ 40
Deleting translations .............................................................................................................. 41
Guest services menus................................................................................................................. 41
Automated attendants ............................................................................................................... 45
Automated attendant example............................................................................................. 46
InnConnect .................................................................................................................................. 52
Step 1: Review and adjust the Call Forward settings for guests and staff ..................... 53
Step 2: Add a Guest Service Menu option for InnConnect............................................... 54
Step 3 (optional): Make InnConnect part of the guest tutorial......................................... 55
Step 4: Enable InnConnect for selected staff members...................................................... 55
Step 5: Configure ports to perform outdial function for this feature.............................. 56
Step 6: Add and configure the SMDR Filter interface ....................................................... 57
Reports ......................................................................................................................................... 58

ELITE Installation guide Introduction
iv
Programming the fax number for reports........................................................................... 59
Programming reports to generate automatically............................................................... 60
Report examples ..................................................................................................................... 60
Active Guest report ............................................................................................................ 61
Wake-up Call report........................................................................................................... 62
Guest Mailbox report ......................................................................................................... 63
Mailbox Activity report ..................................................................................................... 64
Maid Status report.............................................................................................................. 65
Staff Mailbox report ........................................................................................................... 66
Port Usage report................................................................................................................ 67
System Activity report....................................................................................................... 71
Call Identification report ................................................................................................... 72
DAPI Message report......................................................................................................... 74
Staff Email Address report................................................................................................ 75
Did you remember to? ............................................................................................................... 76
Chapter 3 Reference ................................................................................................................ 77
System housekeeping................................................................................................................. 78
System backup ............................................................................................................................ 79
System languages ....................................................................................................................... 80
System atomic clock ................................................................................................................... 81
System service log ...................................................................................................................... 82
System prompts .......................................................................................................................... 82
Alerts ............................................................................................................................................ 82
SNMP alerts................................................................................................................................. 83
System alerts................................................................................................................................ 83
COM port assignments.............................................................................................................. 83
Voice ports................................................................................................................................... 83
Voice port types .......................................................................................................................... 86
Device interfaces......................................................................................................................... 89
Associated Tenant .................................................................................................................. 91
Parameters ............................................................................................................................... 91
Echo Messages?....................................................................................................................... 91
Administrators............................................................................................................................ 91
Tenants......................................................................................................................................... 92
Tenant information................................................................................................................. 92
General tenant information................................................................................................... 93
Staff tutorial........................................................................................................................... 100
Property management ......................................................................................................... 101
Wake-up calls........................................................................................................................ 102
Dialing directory................................................................................................................... 105
Reports ................................................................................................................................... 106
Guest messaging................................................................................................................... 107
Guest transfers ...................................................................................................................... 109
Dialing security..................................................................................................................... 110
Staff mailbox reset ................................................................................................................ 111
Announce............................................................................................................................... 112
Maid status entry.................................................................................................................. 114

ELITE Installation guide Introduction
v
Automated attendants ............................................................................................................. 115
Guest services menus............................................................................................................... 118
Guest tutorials........................................................................................................................... 120
Distribution lists ....................................................................................................................... 123
Notifications – Special Message Notification ....................................................................... 124
Special Message Notification programming example:........................................................ 127
Special Message Notification report .................................................................................. 128
Mailboxes................................................................................................................................... 129
Guest mailboxes.................................................................................................................... 130
Service classes for guest mailboxes.................................................................................... 133
Guest holding mailboxes ..................................................................................................... 137
Staff mailboxes ...................................................................................................................... 137
Configuring Outlook Express for email forwarding ......Error! Bookmark not defined.6
Front desk mailboxes ........................................................................................................... 147
Administration mailboxes................................................................................................... 149
Other mailboxes.................................................................................................................... 150
Question & Answer mailbox............................................................................................... 151
Chapter 4 Add-on features...................................................................................................... 155
PrivateLine ................................................................................................................................ 156
Step 1: Configure PrivateLine settings .............................................................................. 156
Step 2: Add a DID phone number for a guest .................................................................. 158
Step 3: Test the DID phone number routing..................................................................... 159
Step 4: Add the remaining DID phone numbers that guests will use .......................... 159
Step 5: Add DID phone numbers that staff members will use ...................................... 160
Guest/Other Phone Number function buttons............................................................ 160
Step 6: Adjust the Guest Service Class............................................................................... 161
Step 7: Adjust the phone # card printing information .................................................... 162
Step 8: Connect the DID card printer................................................................................. 164
Step 9 (optional): Adjust the guest tutorial....................................................................... 164
Step 10 (optional): Adding PrivateLine options to the Guest Services Menu (AGS).. 165
Step 11: Configure PrivateLine reports ............................................................................. 166
Reports ............................................................................................................................... 166
Front Desk administrative functions ............................................................................. 166
InnCommand ............................................................................................................................ 167
Wake-up off-loading ................................................................................................................ 171
911 notifications ........................................................................................................................ 173
Index........................................................................................................................................... 177

ELITE Installation guide Introduction
vi

ELITE Installation guide Introduction
vii
Introduction
IN THIS GUIDE
Installing and configuring
the Elite system
Setting up mailboxes and
other features
Reference material, for
more detailed information
This guide explains how to install and configure the
Elite voice messaging system. The manual consists of
the three chapters shown at left.
Turn to Chapter 1 to begin installing the hardware
and configuring the software. This guide contains all
you need to know to complete a typical installation.
After installing the hardware, you configure the
software for the installation site. Elite is easy to
modify for your own needs. Chapter 2 explains what
you can do:
•Add mailboxes, either one at a time or in groups
•Add and configure Automated Attendants
•Customize certain system prompts
•Configure automated guest services (AGS) menus
Note: Changes to an Elite system should only be
attempted by qualified personnel.
Innovation believes in quality systems and
installations. We offer several certification options
to dealers and end users, which help them benefit
from the features of Elite and make each installation
as robust as possible. Please contact
your Regional Sales representative or visit
www.innovationtw.com for information on this training.

ELITE Installation guide Introduction
viii

ELITE Installation guide Chapter 1: Installation
1
1Installation
IN THIS CHAPTER
Preinstallation
Inspecting and installing
hardware
Adding system information
and an administrator
Checking voice ports
Setting the call ID format,
if necessary
Setting MWI dial-strings,
if necessary
Device interfaces
If you’re a certified dealer or telephone technician,
you can use the instructions in this chapter to install
the hardware of the Elite voice messaging system.
You’ll also set some hardware-related parameters in
the system software.
The installation procedures consist of the topics
summarized at left.
Note: Installation of the Elite system should only be
performed by qualified personnel.

ELITE Installation guide Chapter 1: Installation
2
Preinstallation information
The Elite voice mail system requires an operating environment that meets the
following conditions:
•The temperature is between 55°and 75°F, humidity non-condensing.
•The UPS is connected to a 20-amp, two-outlet AC power source.
•The modem line connecting to the Elite system is terminated to an RJ-11 phone
jack.
•Each phone jack is labeled with its extension numbers.
•In most cases, each telephone line cord connected to Elite will have one extension
per line cord. Some PBX integrations require special wiring and terminations.
Check with the PBX installation guide that came with your system for further
information.
Opening and verifying system components
Before installing the system, verify that all of the components are present.
With all systems you should find:
•Elite computer
•UPS (uninterruptible power system)
•AC Power cords
•Software key (HASP)
•PS/2 Keyboard
•PS/2 mouse
•Mouse and Keyboard Y adapter cable
•VGA monitor
•Multi-COM port cable
•RJ14 telephone line cords or telephone interface cable(s) part # CAB0033
•System documentation
Some systems may come with additional items. If you feel that anything is missing,
contact Innovation at the number shown on the front of this manual.
ELITE Installation guide Chapter 1: Installation
3
Inspecting and installing hardware
Before connecting Elite to the phone system and electrical power, check its
components. If all the components are present, you can install the system.
1. Open the Elite computer.
2. Inspect the interior of the Elite voice mail system.
Note: You must ground yourself to the outside of the case using a static wrist strap.
Failure to do so may damage Elite. Connecting the AC power cords to the computer
and plugging them in will provide a path to ground.
Verify that all cables and boards are seated properly. In particular, check:
•All power connections from the power supply to the motherboard or passive
back plane, hard drive, floppy drive, and CD-RW drive.
•That all circuit boards are properly seated. Reseat any boards that appear loose.
•That all memory modules are properly seated.
•That all ribbon cable connections between the motherboard, RAID 1 controller
card, hard drives, floppy drive, and CD-RW drive are secure.

ELITE Installation guide Chapter 1: Installation
4
3. Connect the peripherals to the Elite voice mail system.
Below are two illustrations of what the back of the system may look like, based on
the port size and/or voice cards installed, depending on the integration type.
Example #1 shows 2
four port (D/41) voice
cards.
Example #1 shows 2
four port (D/41) voice
cards.
Example #2 shows 1
eight port (D/82U)
voice card. (Typically
used in Mitel DNIC and
Nortel integration’s).

ELITE Installation guide Chapter 1: Installation
5
•Connect the UPS data cable to an available USB port on the back of the system.
Connect the other end of the data cable to the UPS.
•Connect the UPS to AC power. Turn on the UPS
•Connect the Multi-COM port cable to the connector labeled Comm Cable on the
back of the system.
•Connect the system’s AC power cord to the row of UPS power outlets labeled
Battery, Surge and Noise Protected Outlets 300W Max.
•Connect the VGA monitor to the Video connector on the back of the system.
•Connect the keyboard cable to the Keyboard connector on the back of the system.
•Connect the PS/2 mouse to the Mouse connector on the back of the system.
•Connect the AC power cord of the monitor to the UPS and turn on the VGA
monitor.
4. Verify system operation.
Flip both power supply toggle
switches (located on the back of the
system) to the “on” position. Open
the door to the system and flip the
power toggle switch to the “on”
position.
Verify that the following components
are working:
•The software begins to load on the
monitor.
•The CPU fan on the motherboard
is turning.
•The power supply fan is turning.
•The fan(s) in the front section of
the computer are turning.
Verify that the following components are working:
•The Elite software begins to load on the monitor. The system is configured to log
on automatically as an administrator.
•The CPU fan on the motherboard is turning.
•The power supply fans are turning.
•The fans in the front section of the computer are turning.
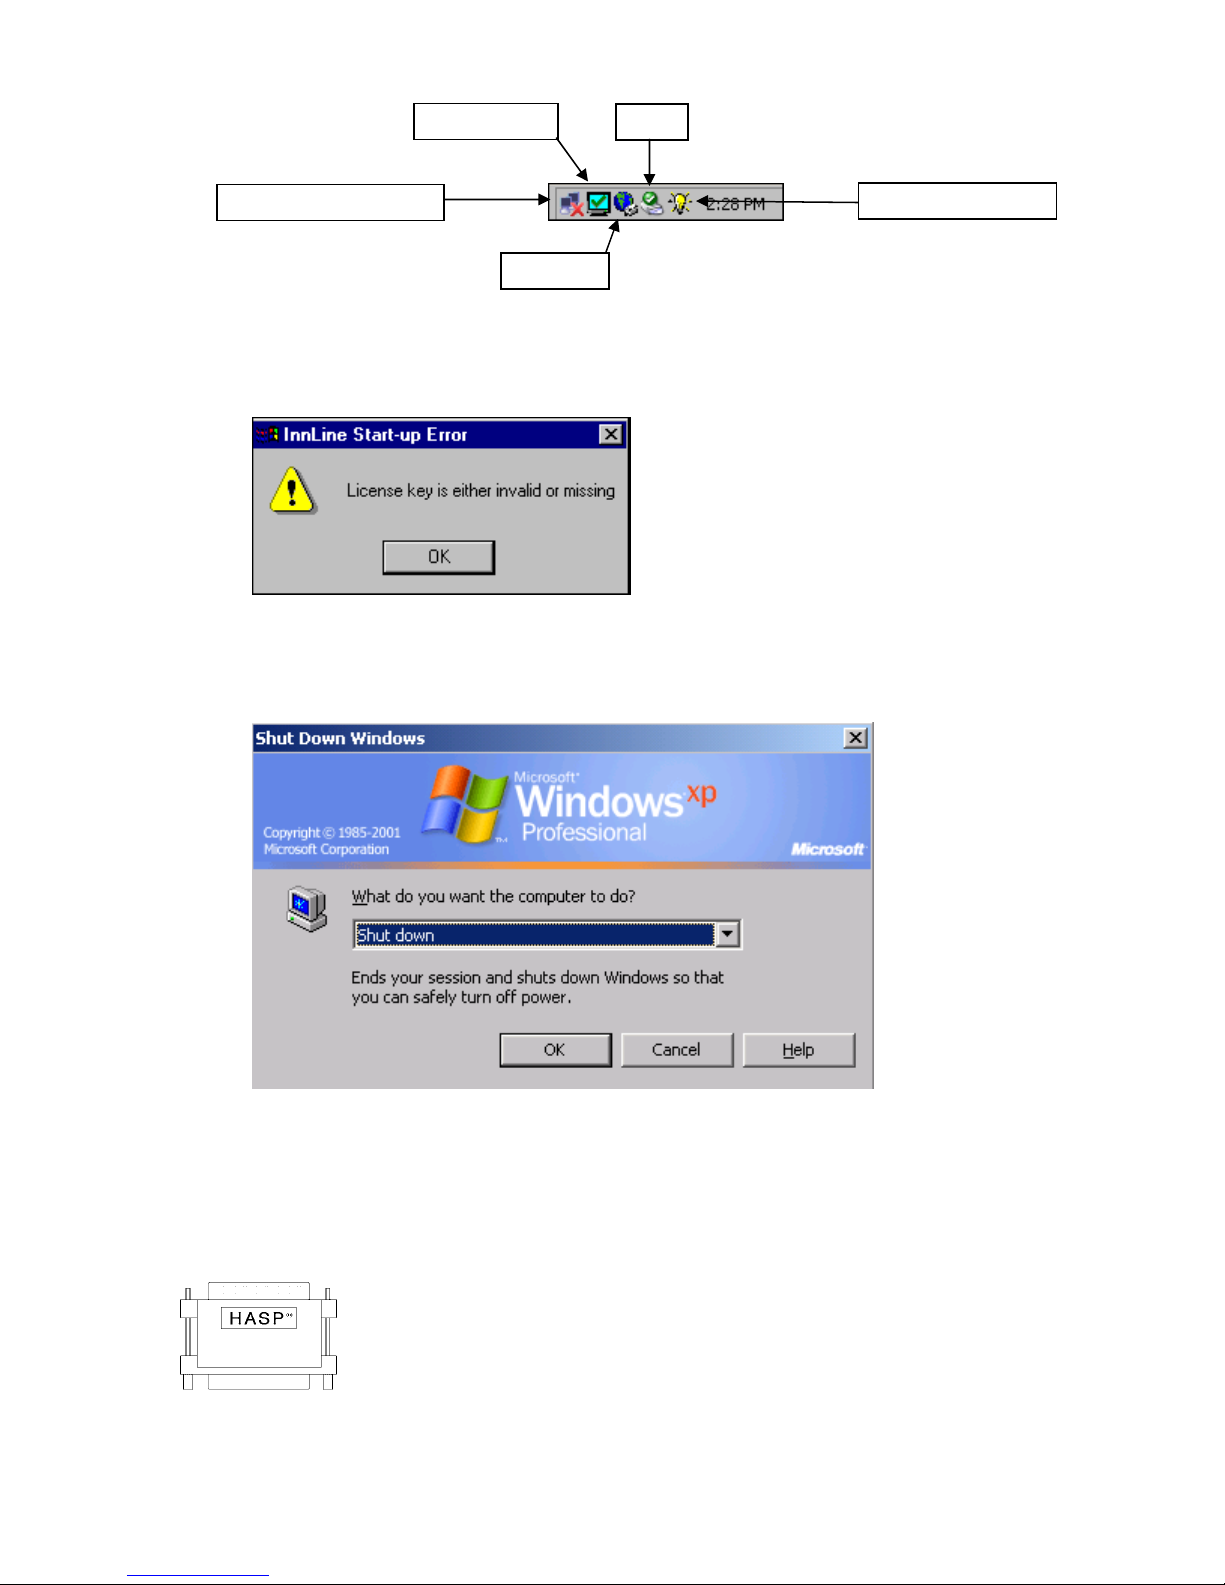
•The UPS on Power Utility status is OK, as shown on the Windows icon tool tray.
If any of these components do not work, call Innovation at the number shown on the
front of this manual.
The diagram below shows which system tray icons typically load on the system:
ELITE Installation guide Chapter 1: Installation
6
`
Because you have not installed the software key (HASP) yet, the following error
message appears:
Click OK to dismiss the error message.
5. Next, click the Start menu and choose the Shut Down option. At the next prompt,
select “Shut down” and then click the OK button.
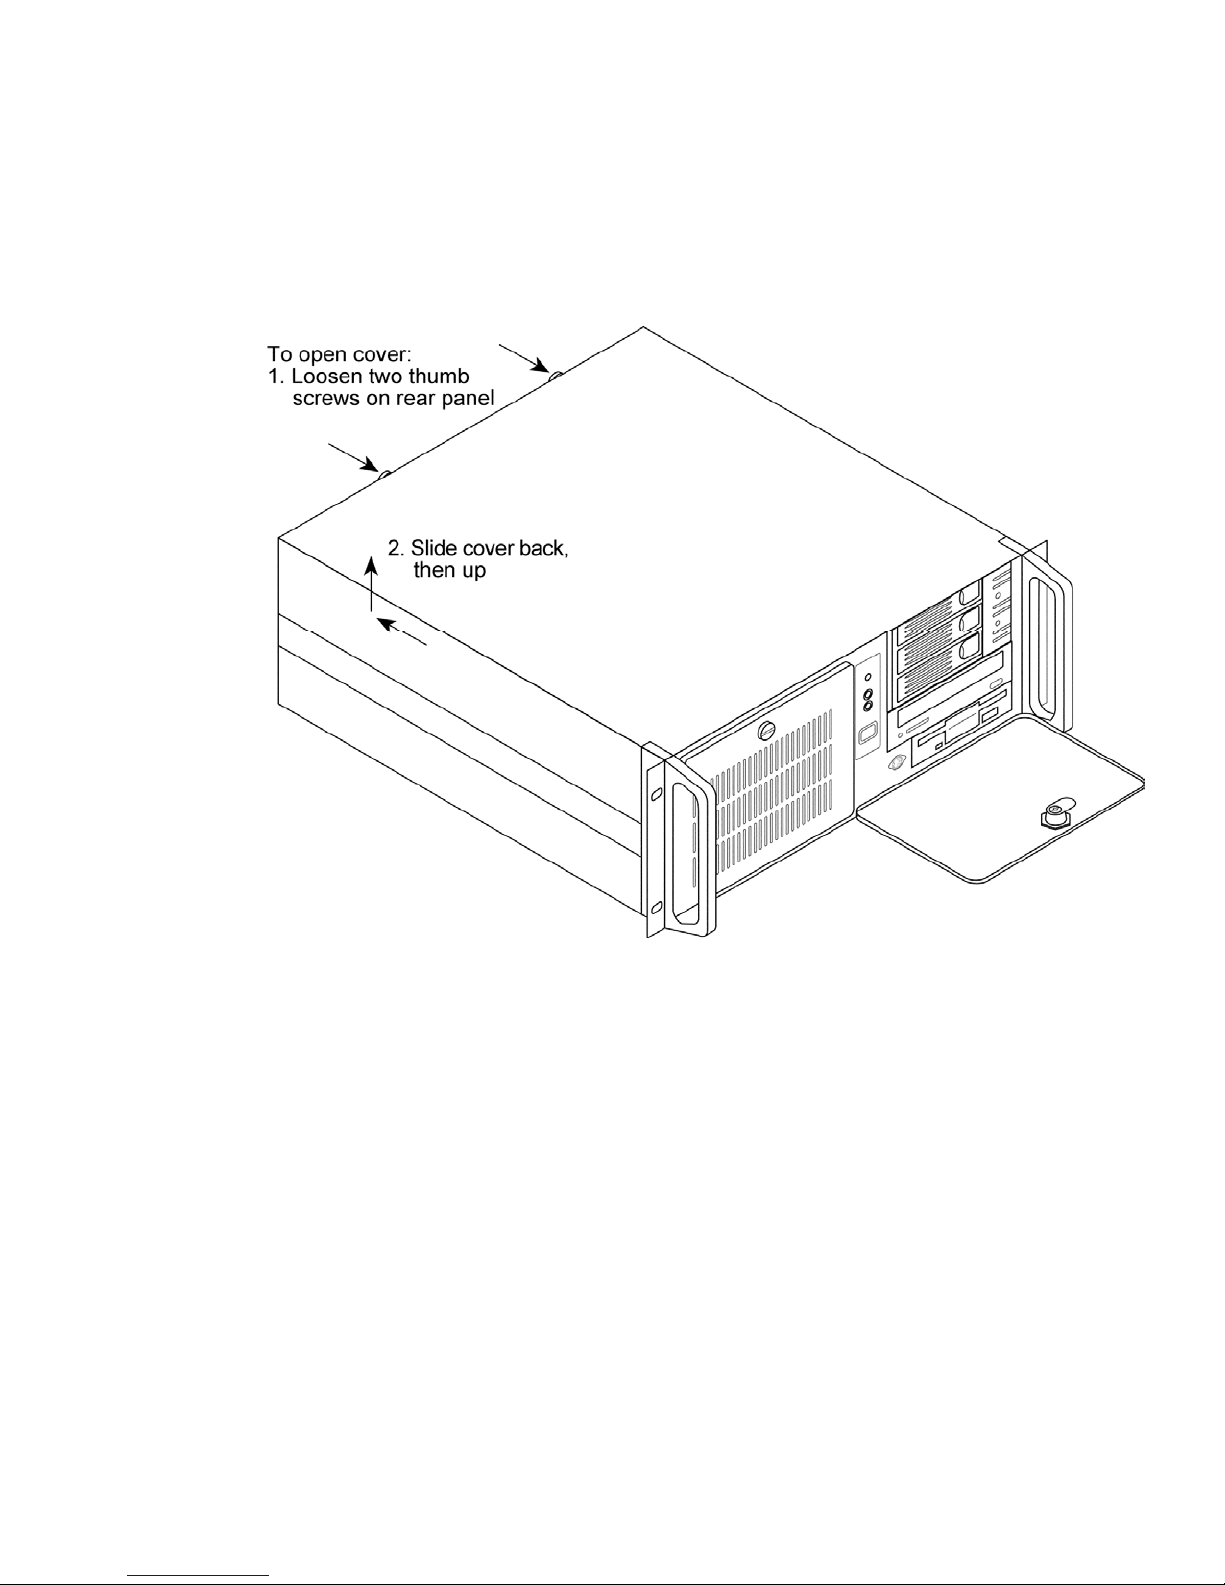
The system will automatically power off. Place the cover back on the Elite voice mail
system. Replace the thumbscrews to secure the cover.
Final connections
Before configuring the system, connect the software key (HASP) and
the telephone line cords. At this point, refer to the PBX installation
guide that came with this system to verify that your PBX is properly
configured and programmed for this installation.
1. Connect the software key (HASP) to the connector labeled LPT1.
This key is required to run the Elite application.
LAN cable (not connected)
PCAnywhere
Fax Utility
InCD
UPS on Utility Power

ELITE Installation guide Chapter 1: Installation
7
2. Connect a dedicated C.O. line or PBX extension for the modem into the RJ-11
connector labeled Modem.
The line cord must plug into the Line jack of the modem, not the Phone jack.
3. Connect the voice mail extensions to the Elite system.
Connect each line cord to the systems jacks labeled L1, L2 and so on. If your system
has proprietary interface cable(s), part # CAB0033, connect them to the 36-position
mini D cable plug(s) labeled L1-L8, L9-L12 (or L16) and so on.
4. Power up the system.
Flip the power toggle switch to the “on” position. The Elite application will start1.
The system is ready to accept calls when you see the screen in the following
illustration.
5. Call each voice mail extension to ensure that Elite answers each line.
Since no mailboxes have been programmed, the system will answer with an
automated attendant greeting. Dial 0 to ensure that the system transfers to the
attendant console. The last port of the system has been pre-configured by Innovation
as out-dial only (displays as “idle”) and will not answer if you call the extension
directly.
1Startup time may take 5 minutes.
Do
Button

ELITE Installation guide Chapter 1: Installation
8
Programming Elite
Before you can use the Elite voice mail system, you must configure it using the GUI
(graphical user interface). You can use the PS/2 mouse (preferred), the keyboard, or
both to program the system. The following sections explain how.
Note: Voice mail functions are available when you are programming the system.
Elite voice mail is a Windows based system. Use the hand-shaped pointer to
navigate through screens and menus. Click the Do button at the top of the screen to
display a menu of options, as shown in the following illustration. Click on a menu
option to display the appropriate screen. If a screen contains folders or icons, double-
click them to open them.
If you click the Configure System option from the Do menu, a list of options called
the system tree appears on the left side of the window. The bar at the top of the
window displays your location in the system tree, as shown in the previous
illustration.
Watch the status bar at the bottom of the window for information as you pass the
mouse pointer over certain items.
Adding general system information
The first step in programming Elite is to enter basic information about the system.
Follow the steps below.
To add basic system information:
1. Click the Do button of the Elite main screen and then select Configure System. In
the next screen, click System in the system tree.
Status
Bar

ELITE Installation guide Chapter 1: Installation
9
Your screen should look like the illustration on the next page.
2. Double-click the Installation Information icon and fill in details about the
installation.
The resulting window contains warranty and software release information.
Enter the installer’s name and installation date in the fields at the bottom of the
window. When you finish, click the OK button to close the window and return to the
System options screen, as shown in the preceding illustration.
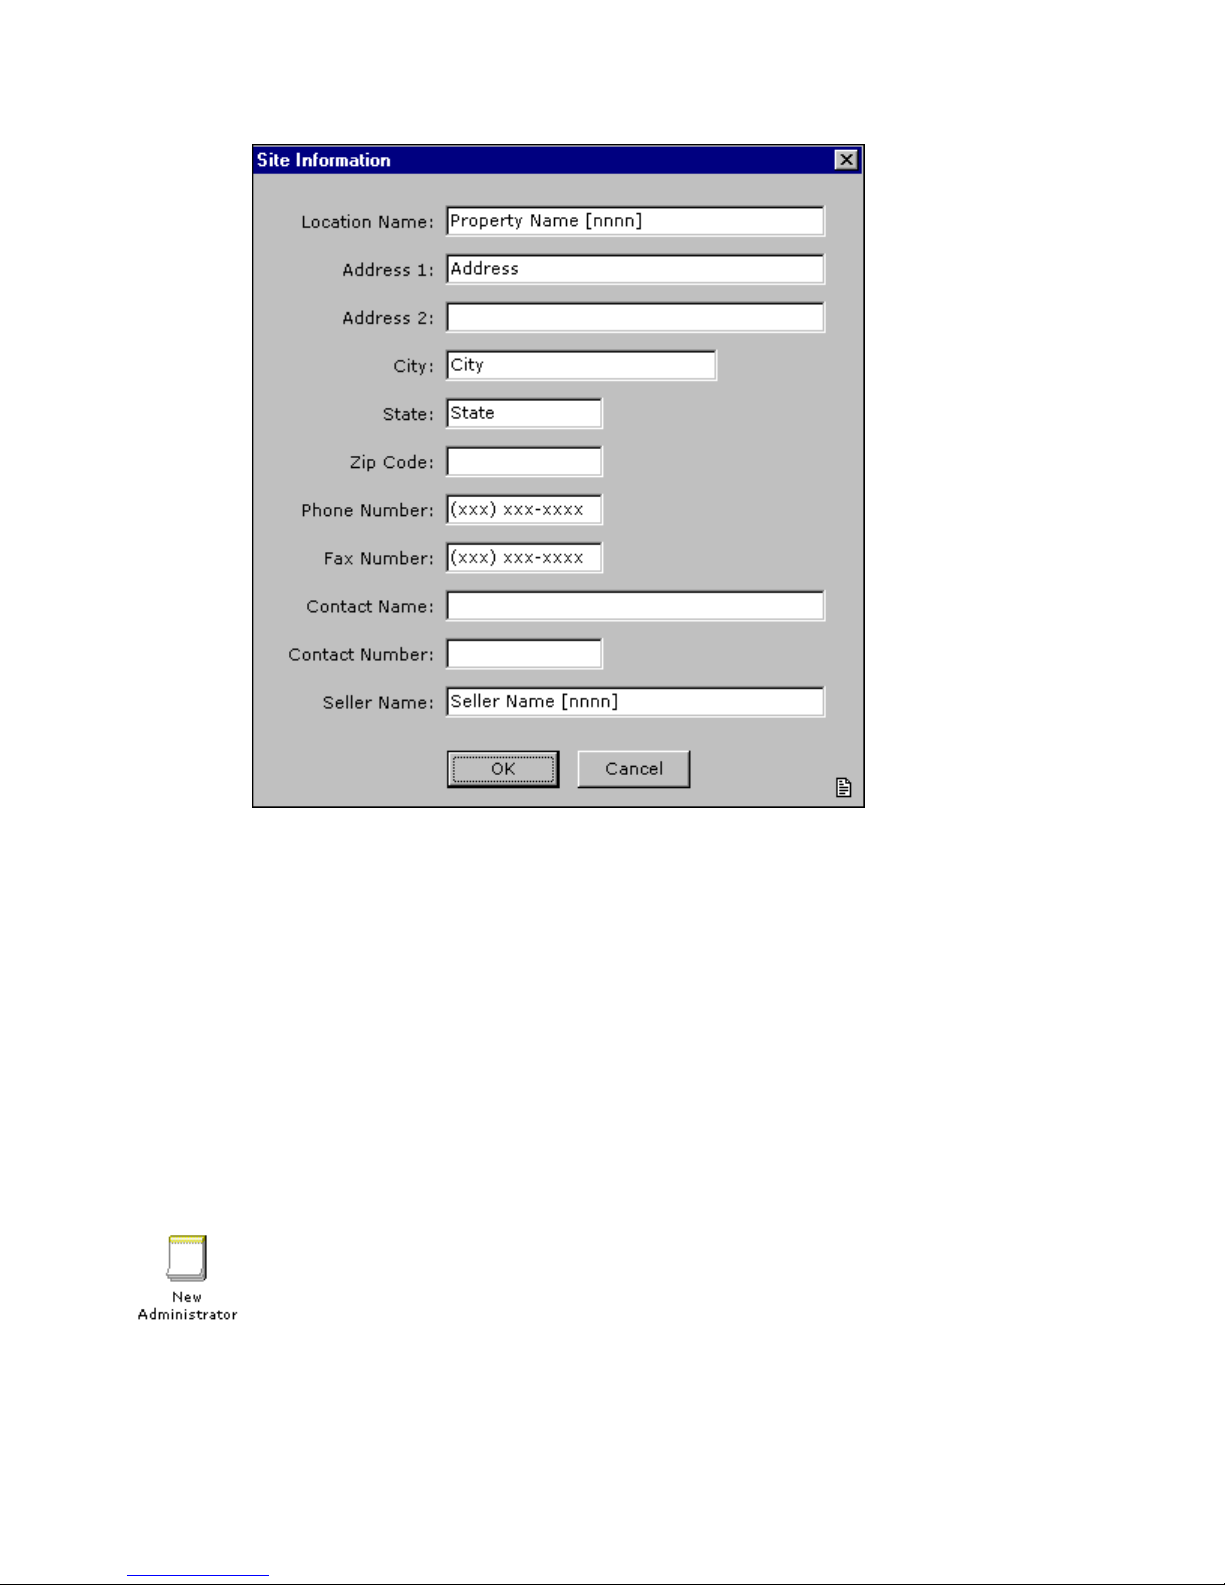
3. Double-click the Site Information icon and fill in details about the system.
Use the window that appears to enter basic information about the system’s location,
such as the address, phone and fax number, and contact information.
Fill in each field and click the OK button to return to the System options screen.
ELITE Installation guide Chapter 1: Installation
10
4. Double-click the Dealer Information icon and fill in basic details about the dealer.
Use the window that appears to enter basic information about the dealer, such as the
address, phone and fax number, and contact information. The window is similar to
the Site Information window shown in the preceding illustration. Fill in each field
and then click the OK button to return to the System options screen.
5. Select the Tenant 1 option in the system tree and then double-click the Tenant
Information icon to fill in basic details about the tenant.
Use the window that appears to enter basic information about the tenant, such as the
address, phone and fax number, and contact information. Fill in each field and then
click the OK button.
Adding a system administrator
Adding a system administrator is very important. It protects Elite against
database changes from unauthorized users.
To create an administrator:
1. Click the Do button of the Elite main screen and then select Configure System. In
the next screen, click Administrators in the system tree.

ELITE Installation guide Chapter 1: Installation
11
If you are adding an administrator to the system for the first time, you are informed
that no administrators have been defined, and that password protection is disabled.
Click OK to dismiss this message.
2. Double-click the New Administrator icon.
The following window appears.
Enter a user ID, such as your company name. Press the Tab key to move between
fields. Enter the same password in the Password and Verify Password fields. Click
OK when you finish.
Note: Administrator passwords are not case-sensitive.
3. Click the Do button again and select the Shutdown System option.
This step is needed to make the password protection active. Otherwise, it will
become active after Elite’s next system restart interval.
Choose Stop InnLine Voice Mail when ports are idle? or Halt InnLine Voice Mail
immediately?, and then click Yes to shut down the system.
4. Double-click the Elite icon on your desktop to restart the Elite voice mail
application.
5. Click the Do button again and select the Sign-on option.

ELITE Installation guide Chapter 1: Installation
12
Enter your user ID and password, and then click OK. If you enter a valid user ID
and password, you are prompted to sign off when you finish. Click OK again.
The user ID of the current administrator is shown at the bottom of the window, right
of the InnLine “heartbeat.”
6. To sign off, click the Do button and select the Sign-off option.
At the next prompt, click the Yes button to sign off the system. Password protection
is now enabled. If you forget to sign off, password protection will be enabled after
Elite’s next system restart interval.
Checking the voice ports
The voice port integration type is pre-programmed by Innovation before your
system is shipped. It’s a good idea to verify that the correct port type was assigned to
each port.
1. Click the Do button of the Elite main screen and then select Configure System. In
the next screen, click Voice Ports in the system tree.
2. Double-click the Port Wizard icon and then click Yes in the next window to
confirm that you want to adjust settings for all voice ports in one operation.
The following window appears. To identify port extensions automatically, enter the
first extension number in the 1st Extension field. The remaining numbers will be
assigned in sequence, based on the number you enter. For example, if you enter 101 as
the 1st Extension, the system assigns 102 as the next extension, and so on.
Table of contents


