Innovative Poultry Products Talon Guide


_______________________________________________________________________________________________
Page 1
Table of Contents
I. Product Identification…………………………………………………………………………………………………………………………………..2-3
a. The Talon®……………………………………………………………………………………………………………………………………..….2
b. Talon® Control Panel………………………………………………………………………………………………………………………….3
c. Talon® Run Times………………………………………………………………………………………………………………………………4
d. Talon® Components……………………………………………………………………………………………………………..……………4
II. Specifications……………………………………………………………………………………………………………………………………..…………..5
III. Mounting Configurations…………………………………………………………………………………………………………………..……………5
IV. Safety…………………………………………………………………………………………………………………………………………..………………6,7
V. Installation……………………………………………………………………………………………………………………………………..……………8,9
a. On a Poultry Hawk®……………………………………………………………………………………………………………………………8
b. On a wall……………………………………………………………………………………………………………………………..…………….9
VI. Talon® Setup………………………………………………………………………………………………………………………………….……………10
VII. Operation……………………………………………………………………………………………………………………………………………………..11
VIII. Maintenance…………………………………………………………………………………………………………………………………………………12
IX. Troubleshooting………………………………………………………………………………………………………………..………………………….12
X. Warranty…………………………………………………………………………………………………………………………….……………………13,14
a. Warranty Coverage…………………………………………………………………………………………………………..………………13
b. Warranty Claim Form……………………………………………………………………………………………………….………………14
_______________________________________________________________________________________________
Page 2
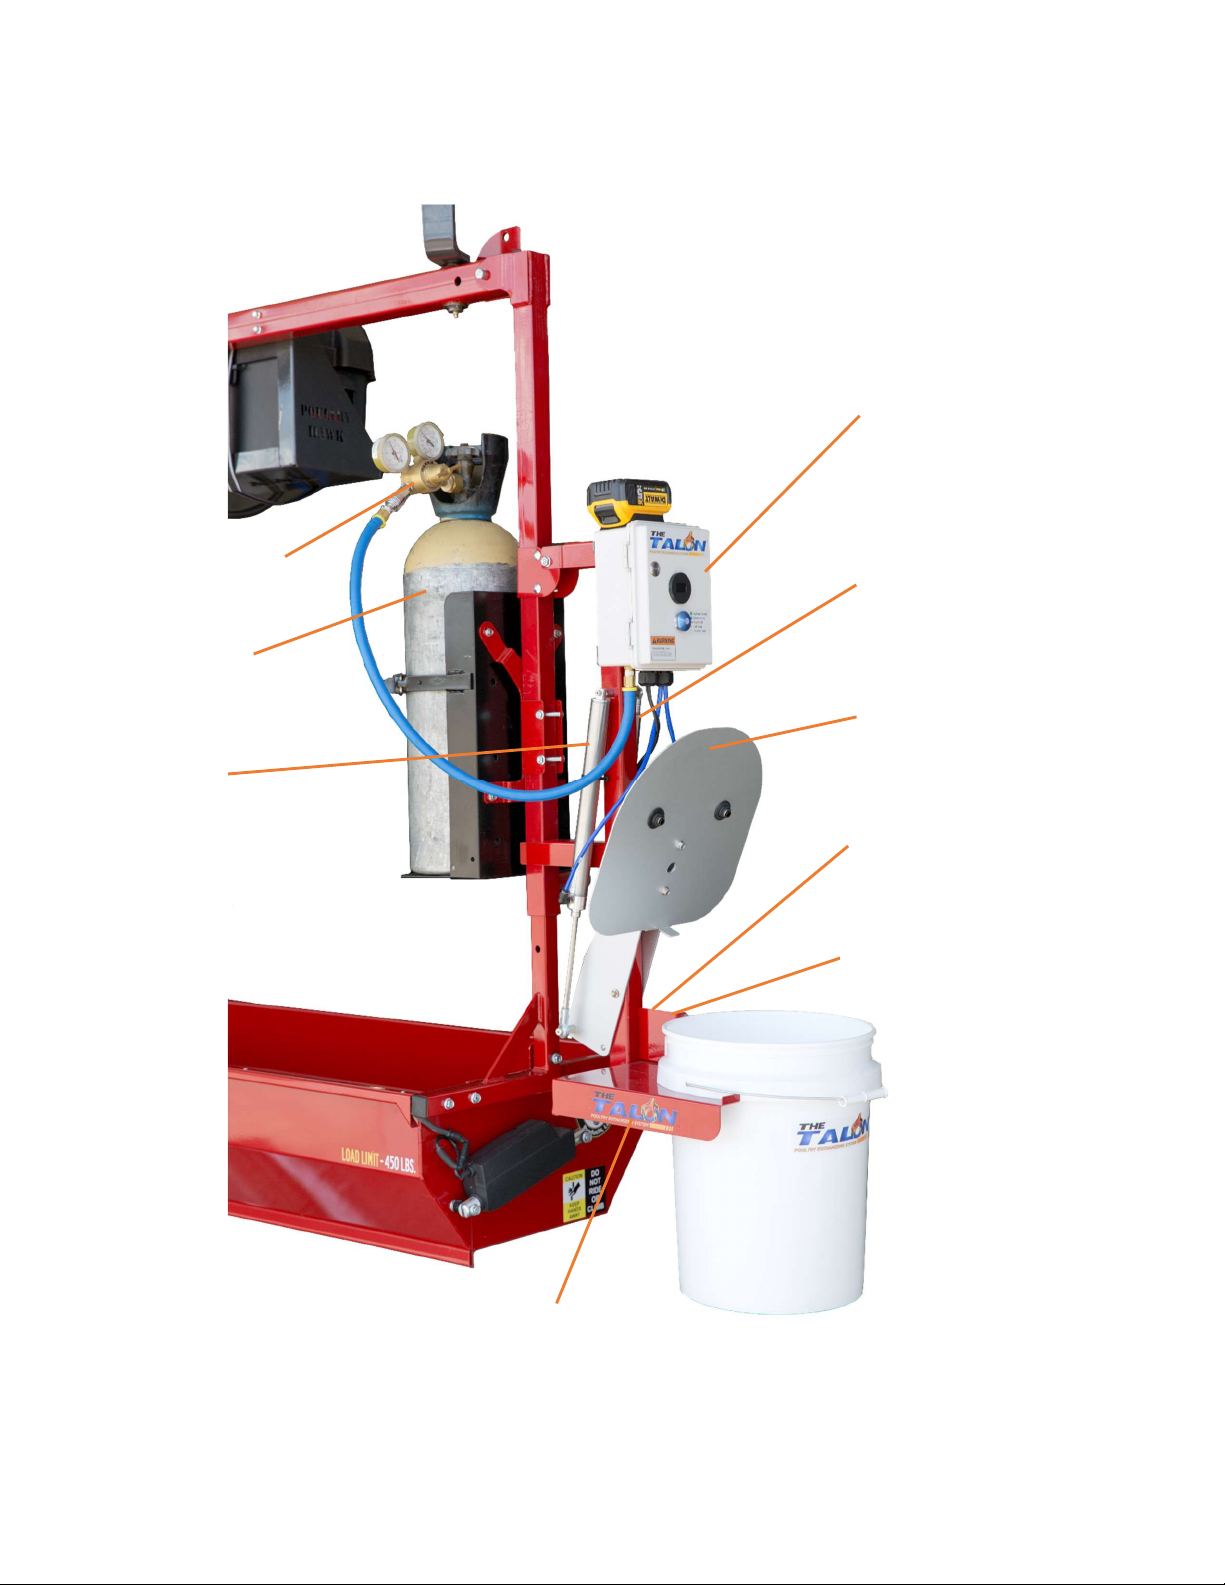
Product Identification
The Talon®:
20 lb. CO
2
bottle
:
(supplied by the customer)
Control Panel
:
IPP
T
LN
-
CTRBX
-
050
Lid
:
IPPTLN
-
BULID
-
030
Bucket holder
:
IPPTLN-SHLFA-011
Lid sensor
:
IPPTLN-PRXSW-025
Bucket sensor
:
IPPTLN-PRXSW-025
CO
2
Flow Regulator:
IPPTLN-CO2RG-041
Air Cylinder:
IPPTLN-ARCYL-001
Gas Spring
:
IPPTLN
-
GSSPR
-
002

_______________________________________________________________________________________________
Page 3
Talon® Control Panel:
Power switch
:
IPPTLN-PWRSW-055
Start/Reset button
:
IPPTLN-STBTN-056
Pneumatic Valve Block
:
IPPTLN
-
PNEVB
-
059
Control Board
:
IPPTLN
-
TALCB
-
061
Pressure Sensor
:
IPPTLN-PRSEN-060
Power Supply
:
(Supplied by the customer)
Valve Solenoid
:
IPPTLN-VASOL-058
Display Screen:
IPPT-DSPLY-050
Battery Adaptor:
DeWalt, Milwaukee, or Makita
Programming Port
Reset Button
Dip Switch
Settings
Control Status
Indicator
3v Power Indicator
12v Power
Indicator
Batter
y
Power
Indicator
Bucket Solenoid
Output Indicator
Lid Solenoid Output
Indicator
_______________________________________________________________________________________________
Page 4
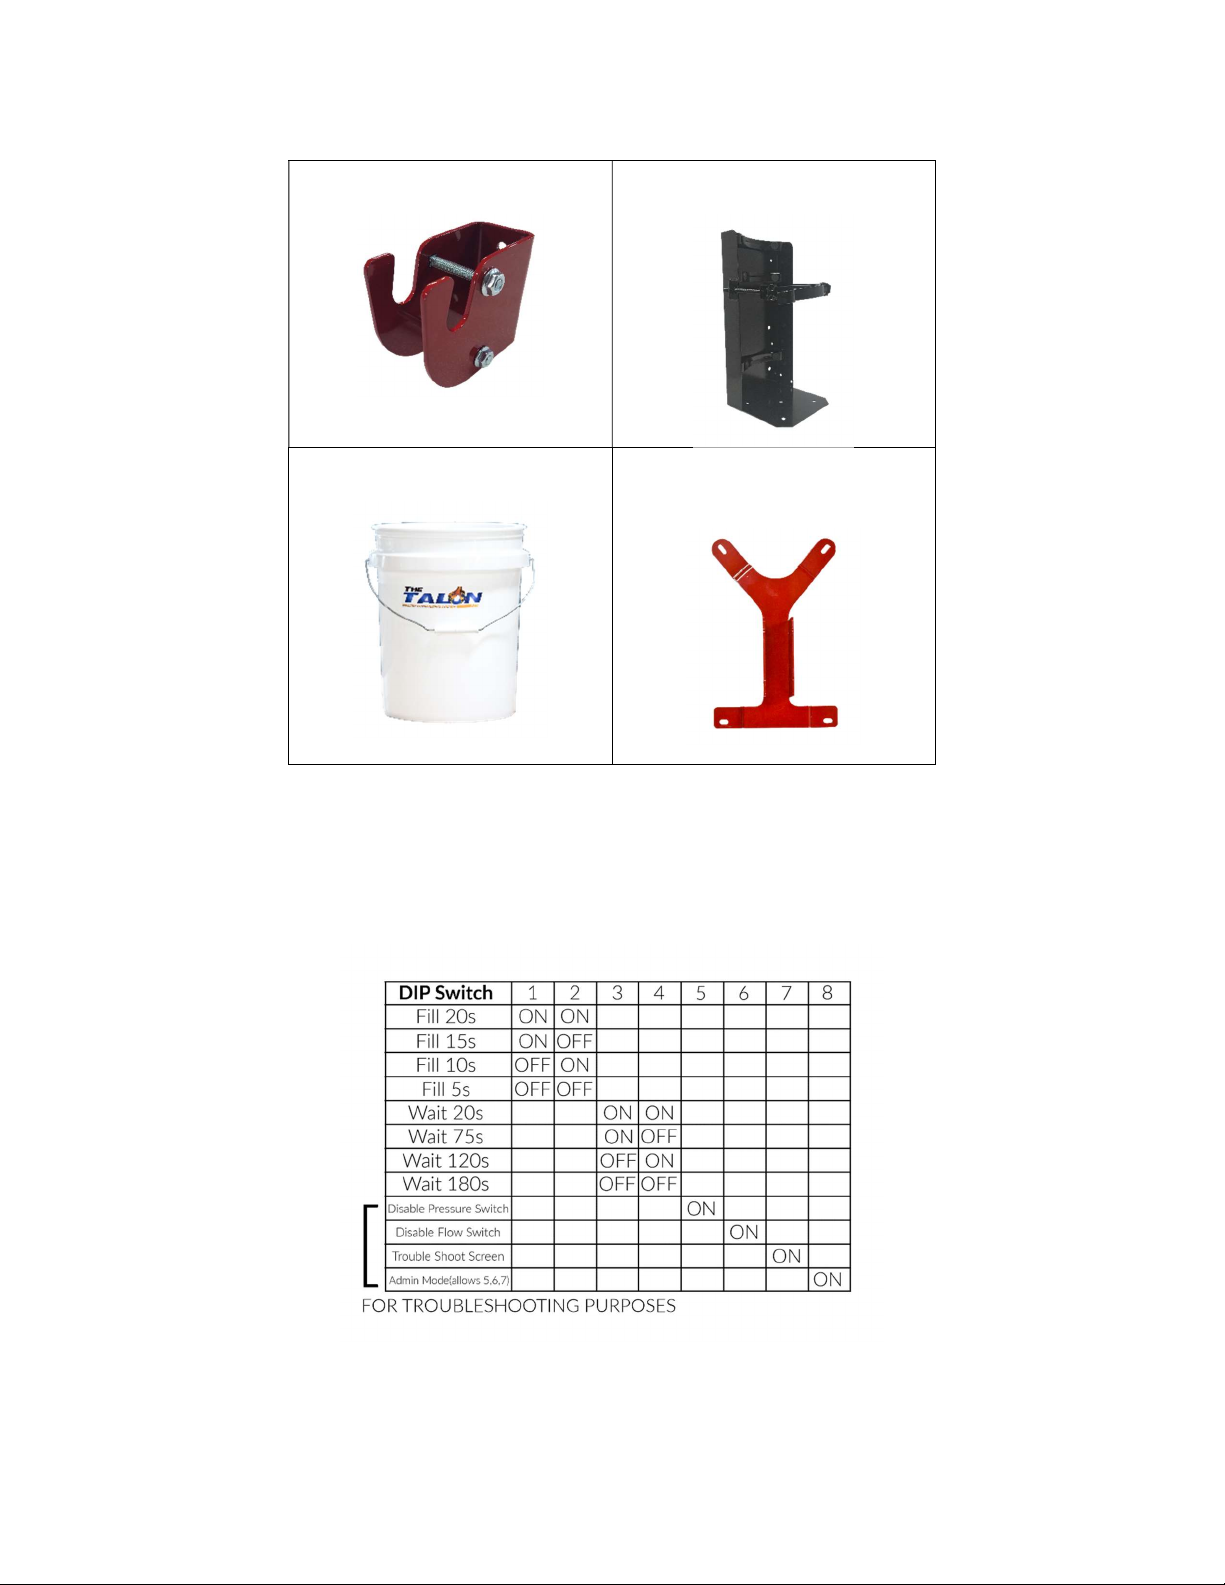
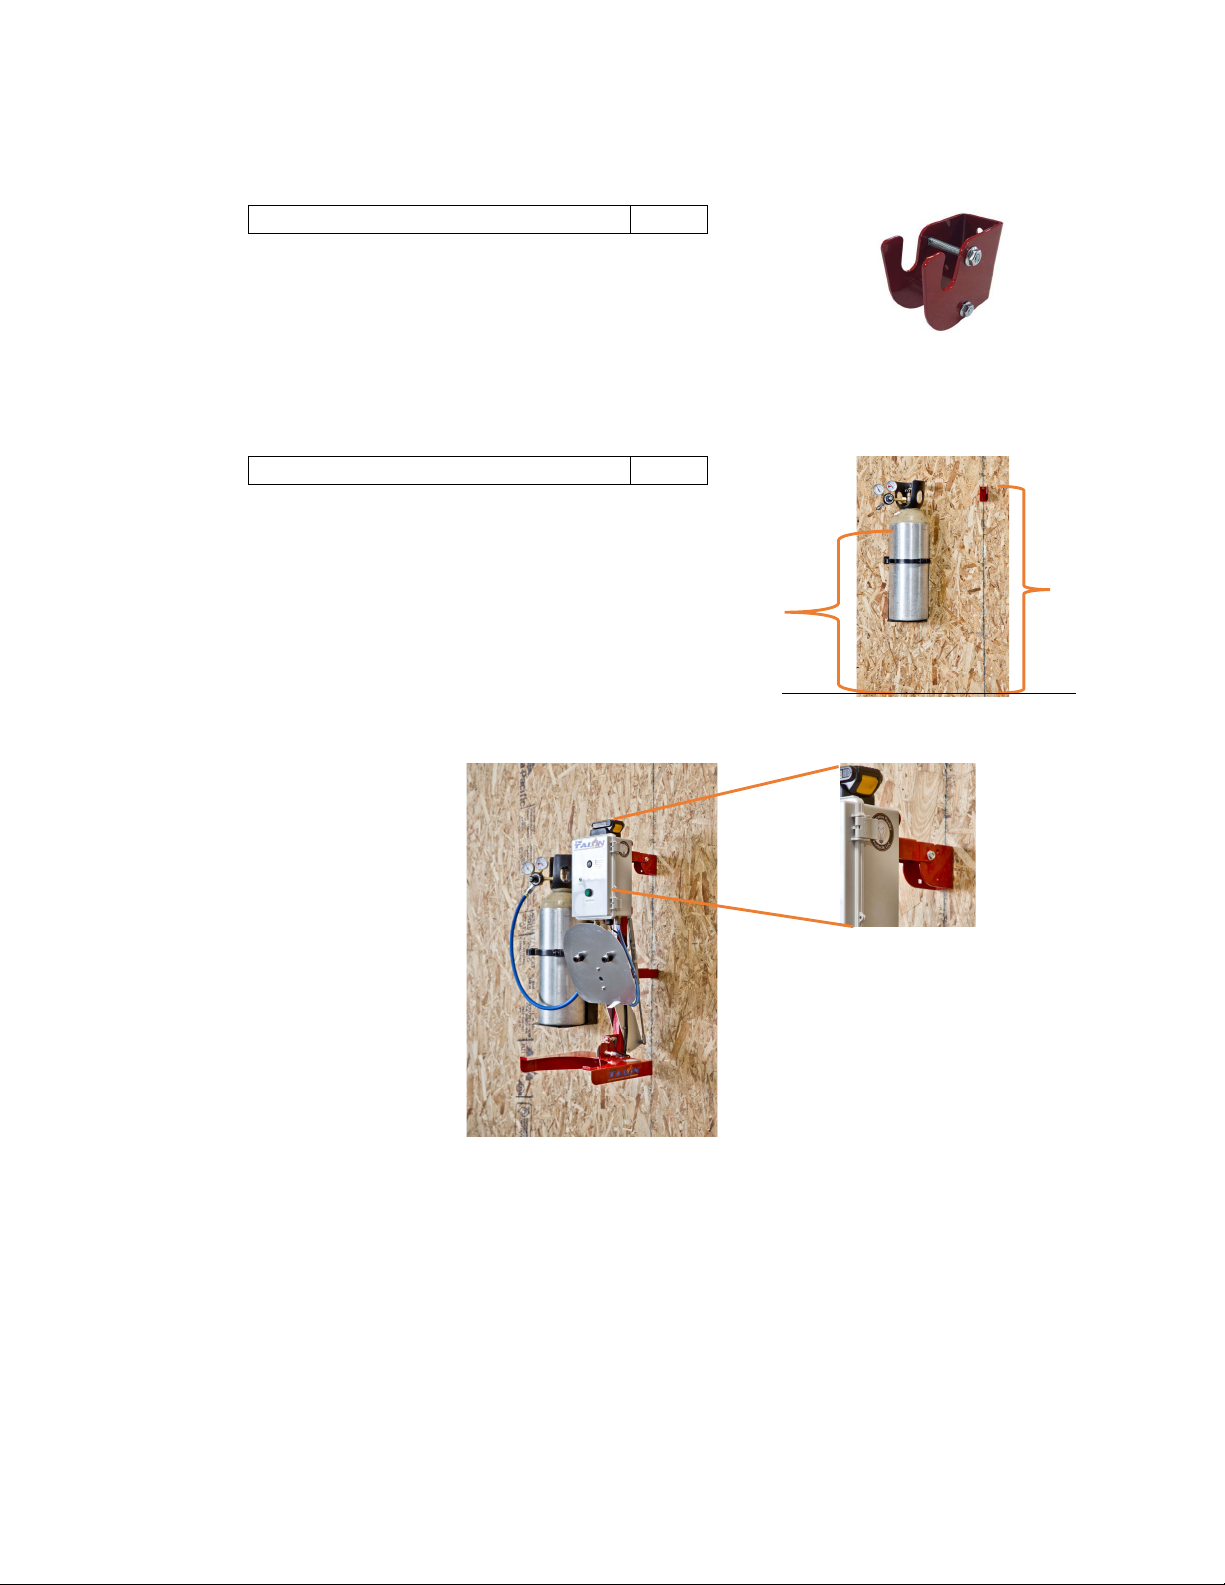
Talon® Components:
Talon
®
mounting bracket:
IPPTLN-MTGBR-103
CO
2
bottle holder:
IPPTLN-CO2BR-040
Talon
®
bucket:
IPPTLN-BUCKE-010
Bottle bracket
:
IPPT-CPBKT-049
Talon® Run Time Chart: (posted inside control panel cover)
_______________________________________________________________________________________________
Page 5
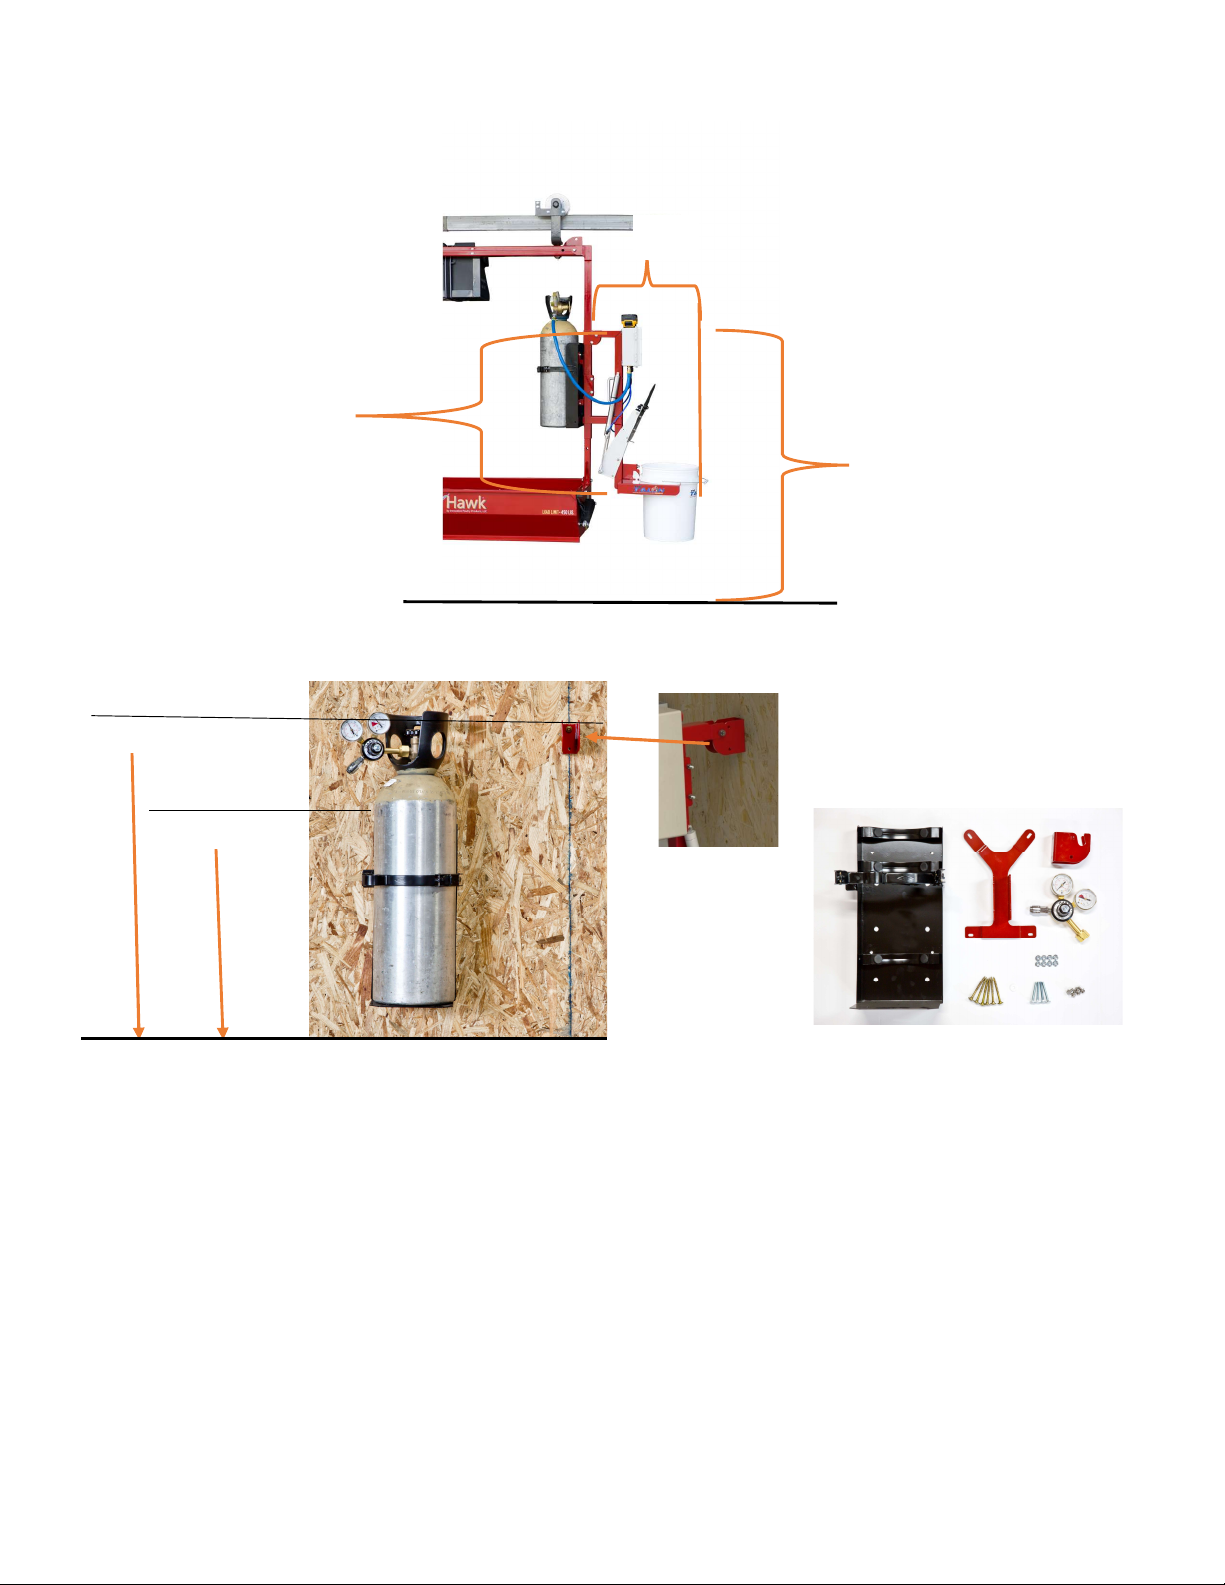
Specifications & Mounting Configurations:
Poultry Hawk® mount: (hardware included)
Wall mount: (hardware included) NOTE: Extra house kits (sold separately) enable the Talon® to be portable and used
in multiple houses.
Weight:
Talon®: 30 lbs.
CO2 Holder w/CO2 Bottle: 70 lbs.
Equipped with battery dock.
Three options available: DeWalt 20-volt, Milwaukee M18, Makita 18-volt. Specify when ordering.
Battery packs must be purchased from your local tool supplier.
Extra batteries are recommended for increased convenience.
20 lb. CO2 bottles are available at a variety of gas supply stores. Extra CO2 bottles are recommended for increased
convenience.
52” to
floor
60” to floor
60”
28”
36”
House Kit
_______________________________________________________________________________________________
Page 6
Safety:
Talon® Safety:
The Talon® comes preassembled, tested, and ready for use. Care must be taken to properly install the Talon®
according to the instructions for Poultry Hawk® mounting or wall mounting.
Use only in a well-ventilated area. When used correctly, the Talon’s® exhaust CO2 gas poses no threat to
operator or poultry. Concentrated or prolonged exposure to significant levels of CO2 may cause dizziness,
headaches, confusion and potentially death.
Do not mount your Talon® or store extra CO2 bottles in small confined areas, e.g. your poultry house service
room.
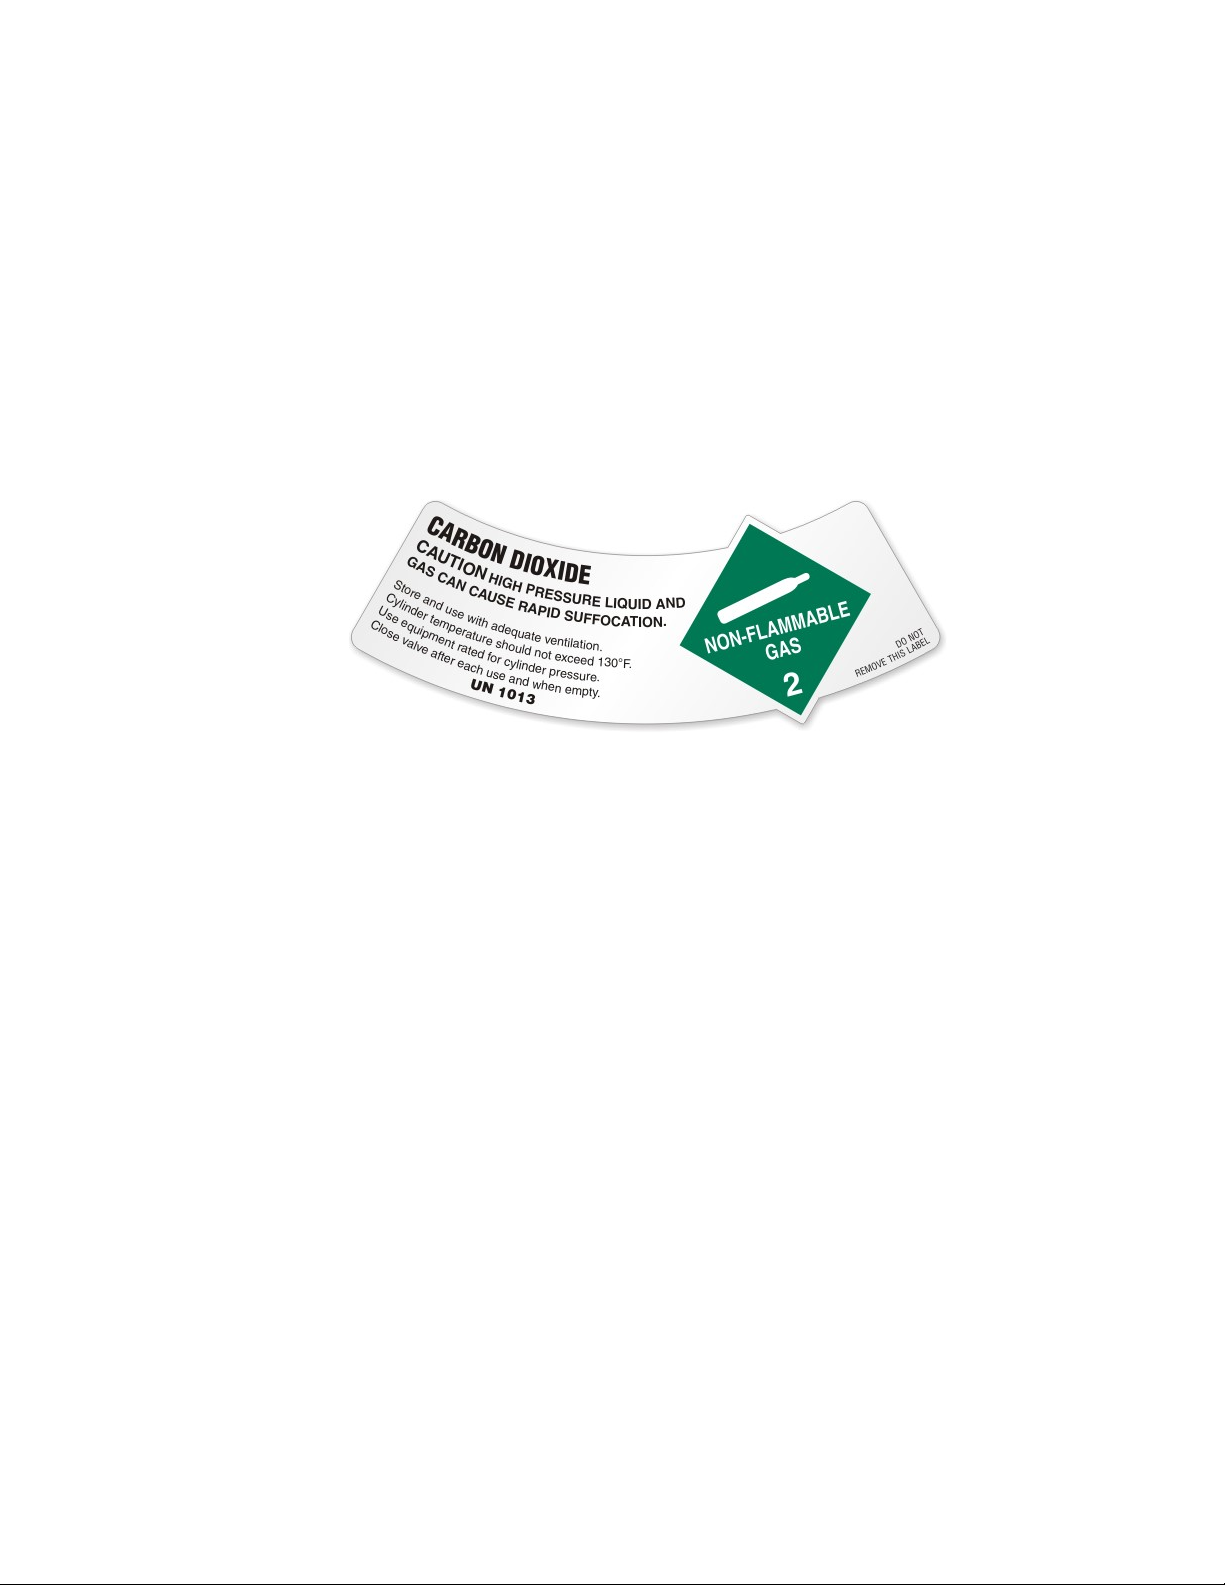
Use only 20 lb. CO2 (carbon dioxide) bottles. Use of other gases may be harmful or fatal to the operator.
Check each bottle label to be sure it indicates CO2.
Stand clear until Talon® cycle is complete.
Use only Talon® buckets with the Talon® system. Other non-Talon® buckets are not approved.
The operator is responsible for confirming the death of each bird before discarding.
Carbon Dioxide Storage Safety:
1. CO2 bottles should always be stored in a specified area. The storage area should:
a. Be well ventilated.
b. Be selected away from the edge of any elevated areas.
c. Be selected away from or protected from areas of high traffic.
d. Be dry and free of a corrosive atmosphere.
e. Have adequate means to secure all bottles stored in the area. The means of securing should be
sufficient to hold the bottles in place, yet not cause damage to the bottles.
f. Be a continuously cool place. Do not store bottles adjacent to any source of heat, intermittent or
continuous. Safety relief devices of CO2 bottles are designed to operate when the pressure of the
bottle exceeds 2800 – 3000 psi (depending on the design of the safety relief device). A properly
charged CO2 bottle could vent through its safety relief device at approximately 150 o F (65.6 o C). A
slightly overfilled CO2 bottle could vent through its safety relief device when exposed to a much
lower temperature. The CGA recommends that CO2 bottle be stored in areas with a temperature less
than 125 o F (51.7 o C).
2. Never store a charged CO2 bottle in a passenger vehicle or in the cab portion of any vehicle.
3. Empty CO2 bottles should be stored with the valve tightly closed.
4. Bottles can be stored standing on their base or lying on their side.

_______________________________________________________________________________________________
Page 7
Safety cont.
5. Bottles should not be stored where they might become part of an electrical circuit.
6. Bottles, which have been manufactured to accommodate a valve protective carrying handle or a protective
cap, should be stored with these accessories in place.

_______________________________________________________________________________________________
Page 8
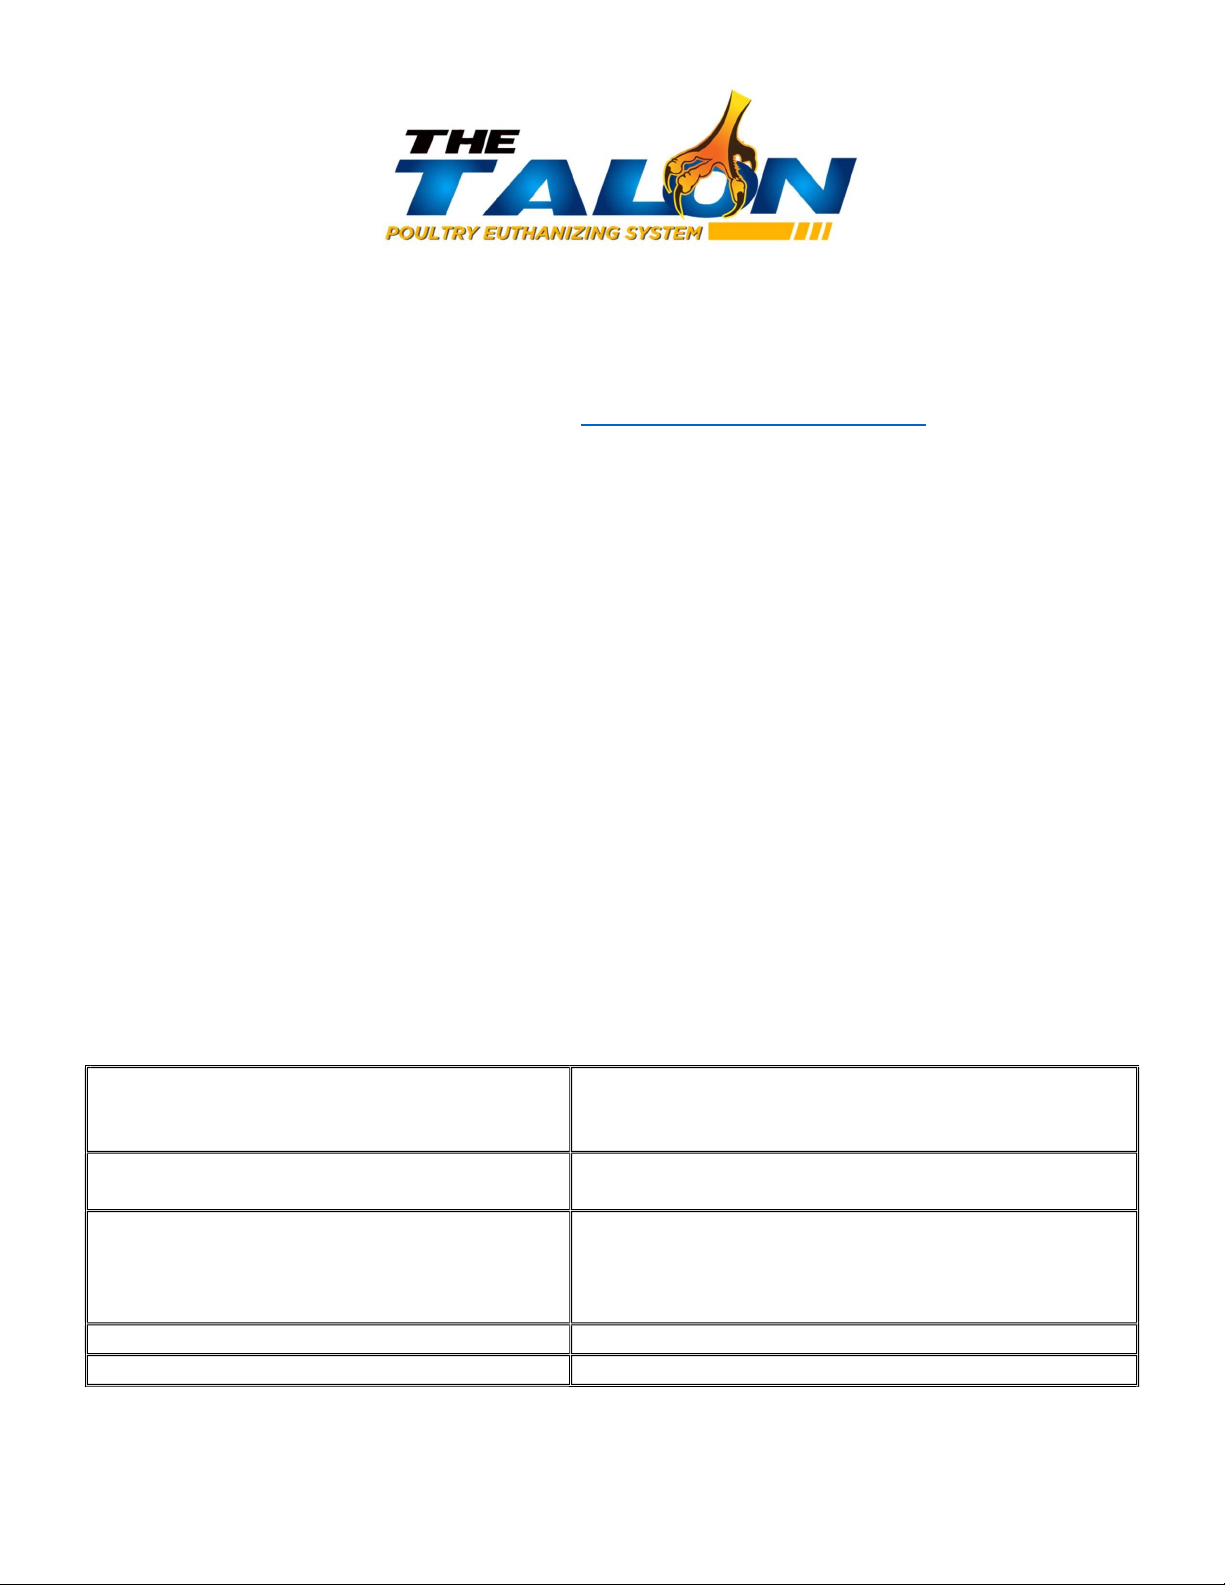
Installation:
Installation on Poultry Hawk®:
1. Attach the Frame Mounting Bracket to the Poultry Hawk® Right Arm, opposite the
Poultry Hawk® control panel. The top of the mounting bracket should measure about
60” from the floor. Tighten the flange nuts to hold the bracket securely in place.
¼
-
20 x 2
-
1/
2
” LONG CARRIAGE BOLT
2 EA
¼
-
20 FLANGE NUT
2 EA
2. Attach the red mounting bracket (included) to the bottle mount
1/4
-
20 x ½
FLANGE BOLT
4
¼
-
20 FLANGE NUT
4
3. Attach the CO2 bottle mount to the Poultry Hawk® right arm, opposite the control
panel. The top of the CO2 bottle mount should measure about 52” from the floor.
¼
-
20 x 2
-
1/2” LONG
CARRIAGE BOLT
2 EA
¼
-
20 FLANGE
NUT
2 EA
4. Hang the Talon® frame on the frame mounting bracket as shown.
5. The final assembly should look like this:
NOTE: The given measurements for mounting are approximate. Every system may vary depending on the
Poultry house setup.
Installation cont.
60”
_______________________________________________________________________________________________
Page 9
Installation on wall:
1. Securely fasten the frame mounting bracket to a stud approximately 60” from the floor.
5/16 X 2
-
3/4 GRK STRUCTURAL SCREW
S
2 EA
2. Mount the CO2 bottle mount to a stud 16” to the left of the frame mounting bracket.
5/16 X 2
-
3/4 GRK STRUCTURAL
SCREW
S
4
EA
3. Hang the Talon® frame on the frame mounting bracket as shown.
52”
60”

_______________________________________________________________________________________________
Page 10
Talon® setup:
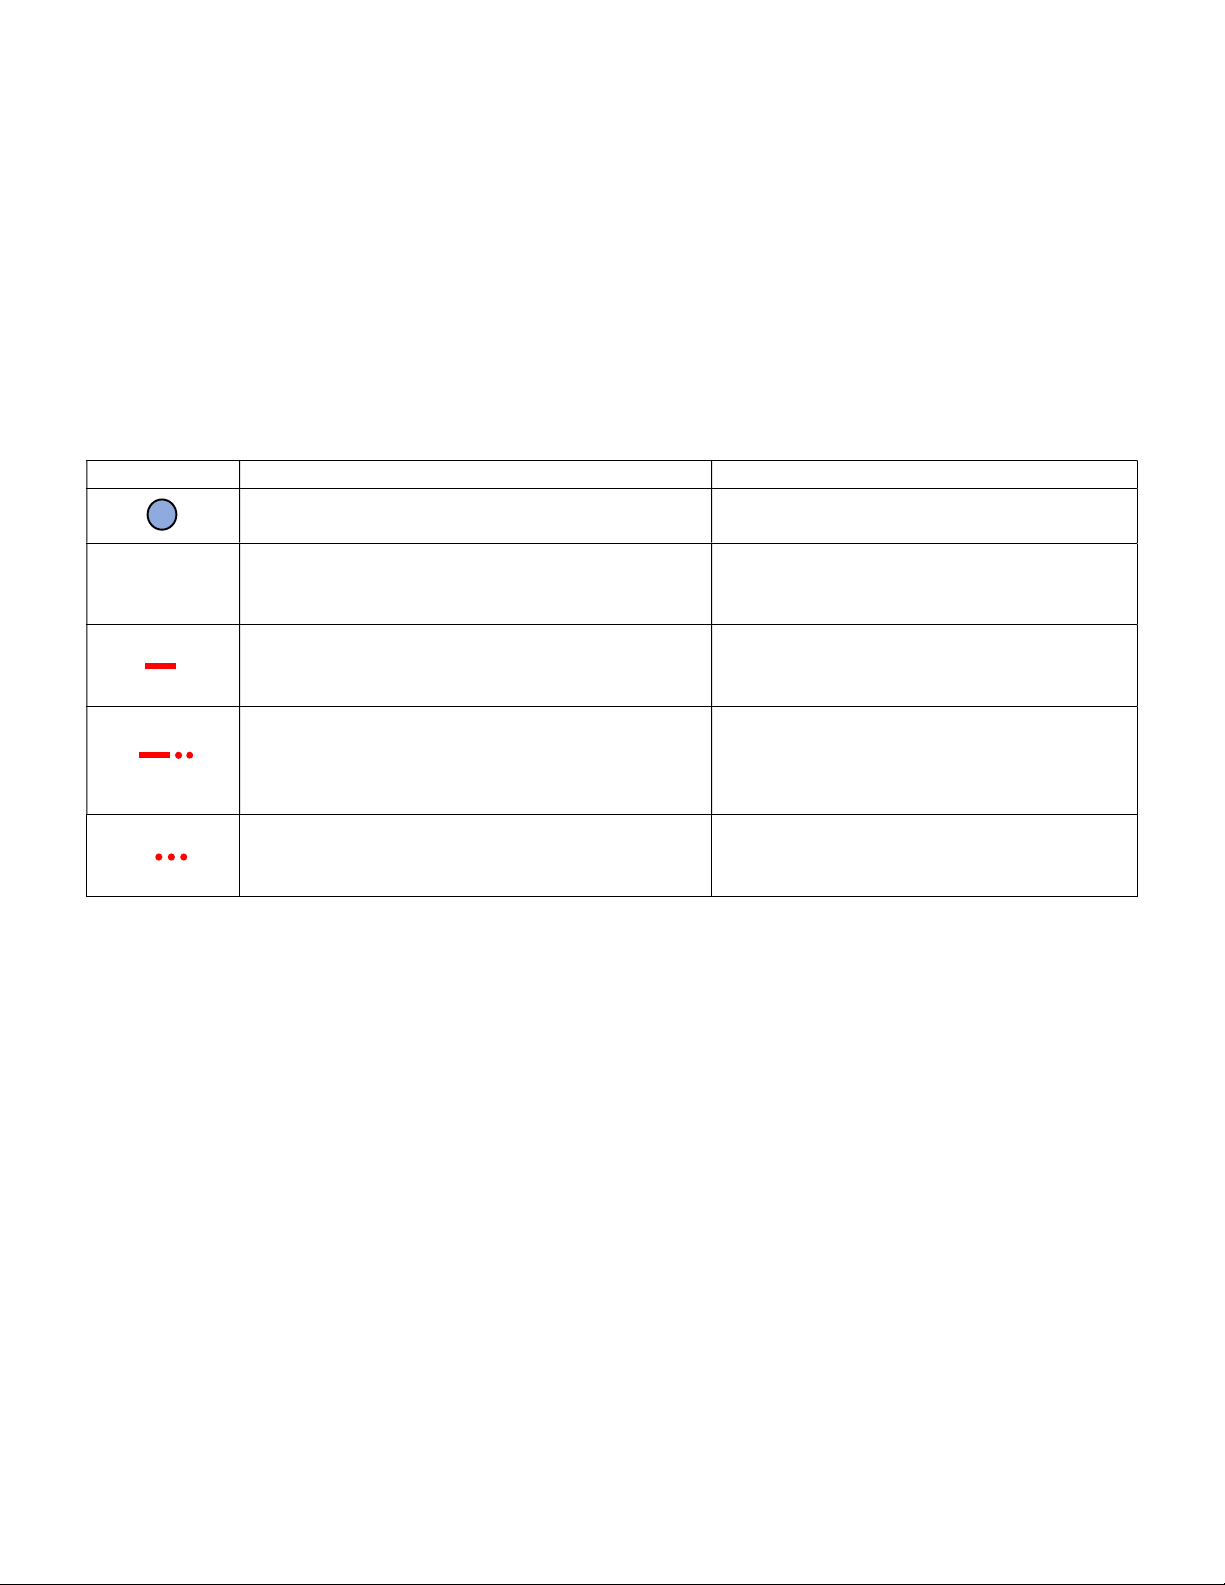
1. Install the pressure regulator onto the CO2 bottle using a crescent wrench. Be careful not to cross thread the
fitting as this could damage the unit and cause injury. Be sure the regulator’s plastic seal ring is properly
seated.
2. Install the CO2 bottle into the bottle mount as shown. The locking arm should hold the bottle securely
without movement.
3. Plug the Talon® air hose into the CO2 regulator and turn gas on. The optimal operating pressure is 80-110 psi
(550-760 kPa). Note that the Talon® will not operate if the bottle pressure falls below 65 psi (345 kPa)
4. Plug the charged battery pack into the docking station at the top of the controller.
5. Turn power ON.
6. Place the Talon® bucket on the bucket holder. Note that the unit will not operate unless the Talon® bucket is
seated properly.
7. The Talon® is now ready for operation.
#
1
#
2
#
3
#
4
#
5
#
6

_______________________________________________________________________________________________
Page 11
Operation:
Note: Run at least one test cycle to ensure the Talon® is operating properly before any animal is euthanized.
1. Place bird in bucket chamber. Never put more than one layer of birds in the bucket at a time.
2. Be sure bucket is seated properly in the Talon® bucket holder.
3. Press START. The lid will close, and gas will flow into the bucket chamber for the preselected time. The lid will
remain closed until the cycle is complete, then will raise automatically.
o A timer switch is located inside the control panel. Please note that the unit comes preset to conform
to time requirements.
o The Talon® control system is programmed to displace a minimum of 70% CO2 by a flow meter switch
in the pneumatics manifold.
4. Be aware that involuntary (unconscious) motor activity such as flapping or other movements may occur in
birds during this process. This is a normal involuntary activity following death.
5. Remove the killed birds after every cycle. Do not allow live birds to be placed with killed birds in the bucket
chamber.
6. The Talon® operator is responsible for confirming the bird’s death after each cycle of operation. Refer to the
Poultry Industry Council Euthanasia Manual on how to confirm death.
https://www.poultryindustrycouncil.ca/resources/euthanasia-resources-training-materials/ Note: If the
Talon® faults out and is not able to function, the operator must euthanize the bird using another approved
method.
7. Turn off the gas and power when done operating the Talon®.
#1
#5
#7
#2
#3
_______________________________________________________________________________________________
Page 12
Maintenance:
Ensure gas hoses are securely seated in their fittings. Simply press the hose end firmly into the fitting.
Inspect gas hoses for nicks and cuts. Replace as needed.
Inspect a complete cycle to ensure the lid lowers and raises smoothly. Uneven motion may indicate damaged
or worn air cylinder, gas spring, or bearings. Contact your local Talon® dealer for repair parts.
It is good to always have an extra CO2 bottle close by
Always have an extra battery to swap out.
Keep dust build up to a minimal by brushing or blowing off the Talon®.
Troubleshooting:
Indicator Light
Condition
Remedy
Euthanizing indicator light is ON.
System is performing a cycle. Do not interfere.
--
No light
No power
Battery charge too low.
Battery not seated properly.
Be sure battery pack is not damaged and is
seated properly.
Recharge battery pack.
Gas Fault indicator light is ON.
CO
2
bottle pressure
is below 50 psi (345 kPa).
Insufficient CO2 flow into the bucket chamber.
Replace CO
2
bottle.
Adjust regulator to recommended pressures.
Repair any gas leaks.
Lid Fault
Lid could not close properly.
Bucket is not securely in place.
Non-approved bucket being used.
Reseat the Talon
®
bucket
.
Inspect the lid for damage.
Inspect the lid sensor for damage or
misalignment.
Bucket Fault
Bucket is not securely in place.
Non-approved bucket being used.
Reseat the Talon
®
bucket
.
Inspect the bucket, sensor and sensor flag
for damage or misalignment.

_______________________________________________________________________________________________
Page 13
Talon® Owner’s Manual
Warranty Coverage
Innovative Poultry Products LLC hereby provides a Limited One (1) Year Warranty on the Products manufactured by Innovative
Poultry Products LLC that such Products shall be free from manufacturer’s defects in any of the Product’s components in the 12-
month period following the original date of purchase from the authorized dealer (the Warranty Period). Innovative Poultry
Products LLC HEREBY EXCLUDES AND DISCLAIMS ANY AND ALL OTHER WARRANTIES, STATUTORY, EXPRESS OR IMPLIED,
INCLUDING WITHOUT LIMITATION ANY IMPLIED WARRANTY OF MERCHANTABILITY OR FITNESS FOR ANY PARTICULAR PURPOSE
AND ANY WARRANTY ARISING FROM USAGE OR TRADE OR COURSE OF DEALING. Defective components will be repaired or
replaced at the discretion of the manufacturer. It is the responsibility of the purchaser to return warranted components to the
manufacturer. This Product Warranty is limited to INCIDENTAL OR CONSEQUENTIAL DAMAGES OF ANY KIND. This Product
Warranty covers the purchaser of this Product and any other owners who own it during Warranty Period.
To retain the Product Warranty, the Product must be operated and maintained as set forth by its owner’s manual. For warranty
service, please have a copy of the purchase invoice available.
Warranty is Void if:
1. The Product has been subjected to, in the opinion of Innovative Poultry Products LLC, negligent handling, misuse, an
accident, or if the instructions in the owner’s manual were not completely followed.
2. The Product’s components have been altered in any manner, not installed per the manufacturer’s instructions, or
repairs have taken place with unapproved parts.
Getting Warranty Service
A Product Warranty claims must be made through an authorized Innovative Poultry Products LLC dealer. All warranty claims
must be submitted with an invoice or a proof of purchase that denotes the purchase date and place of purchase. If you have any
questions or comments concerning this warranty, please contact Innovative Poultry Products LLC or an authorized Innovative
Poultry Products LLC dealer.
Contact Information
Innovative Poultry Products LLC, 2192 Juniper Creek Rd., Olar, SC 29843
www.innovativepoultryproducts.com, sales@innovativepoultryproducts.com, 803.571.3345
Warranty Procedure
1. Fill out Warranty Claim Form. (This form is provided for copying on the next page or can be found under the support tab
of the Innovative Poultry Product LLC website)
2. Return the defective part along with the Warranty Claim Form.
3. Innovative Poultry Products LLC will send a replacement part as soon as the defective part is received and is deemed
worthy of warranty coverage. If the customer needs the new part sooner than the above steps allow, Innovative Poultry
Products LLC will send the part and invoice the customer. In order for the customer to be credited the invoice amount,
the defective part is to be received by Innovative Poultry Products LLC within 21 days after the invoice is sent to the
customer.
Last Updated 8/7/2020
_______________________________________________________________________________________________
Page 14
Warranty Claim Form
Innovative Poultry Products, LLC
2192 Juniper Creek Rd.,
Olar, SC 29042
803.571.3345
List the part being returned:
__________________________________________________________
Description of Problem:
_____________________________________________________________________________
_____________________________________________________________________________
_____________________________________________________________________________
_____________________________________________________________________________
_____________________________________________________________________________
_____________________________________________________________________________
_____________________________________________________________________________
_____________________________________________________________________________
_____________________________________________________________________________
_____________________________________________________________________________
_____________________________________________________________________________
Serial number of the Talon® the part came from: ____________________________________
Date of Purchase:
Date of Failure:
Customer:
Dealer:
Address:
Address:
Phone:
Phone:
Email:
Email:
Table of contents


