Innovo iF100B User manual

iF100B
Non-contact Digital
Infrared Forehead
Thermometer
User Manual Ver 1.0

Copyright © Innovo Medical
2014-2020. All rights reserved.
Innovo Medical owns and reserves all
of the rights comprised in the copyright
of this document. No part of this
document may be changed, excerpted,
copied, reproduced, or imitated in any
form or by any means without prior
written consent of Innovo Medical.
All statements, information, and
recommendations in this document are
provided "AS IS" without warranties,
guarantees or representations of any kind,
either expressed or implied. The information
in this document is subject to change without
notice. Innovo Medical reserves the right of
final interpretation of this document.
Version 1.0
Issuing Date: October 2020
To download the latest manual for the
thermometer, simply scan the QR code below
or visit
https://innovo-medical.com/products/innovo-i
F100B-thermometer
Contact Us
Questions or Comments?
Call: 858-888-9781
Email: cs@innovogroups.com
Visit: www.innovo-medical.com

Introduction
Thank you for purchasing the Innovo iF100B
Non-contact Digital Infrared Forehead
Thermometer. The iF100B Forehead
Thermometer has passed numerous rigorous
clinical tests and has proven to be safe,
reliable and accurate when used in
accordance with the operation manual.
The iF100B Forehead Thermometer has been
specifically designed to measure body
temperature from the forehead. The
non-contact method of measurement is safe,
hygienic and suitable for use by people of all
ages.
Before using the thermometer, please read
this User Manual carefully and follow the
instructions stated herein. Please check and
inspect the package contents. If any
component is damaged or missing, or if you
have any concerns, please contact
cs@innovogroups.com or call 858-888-9781
for assistance.
Keep this User Manual in a safe place for
future reference.

Contents
1. Standard Packing List ........................ 1
2. Features of the iF100B Forehead
Thermometer................................................. 1
3. Important Warnings and Safety
Precautions.................................................... 2
4. Note on Body Temperature................ 4
5. Elements of the Thermometer ........... 5
6. Battery Installation.............................. 6
7. Measuring Forehead Temperature .... 7
8. Temperature Taking Tips for Accurate
Measurement............................................... 11
9. Memory Mode.................................. 12
10. Care and Cleaning........................... 13
11. Errors and Troubleshooting ............. 15
12. Technical Specifications................... 19
13. Warranty and After-Sale Service...... 21
14. Symbols ........................................... 21
15. EMC Information - Guidance and
Manufacturer’s Declaration ......................... 22

1
1.Standard Packing List
iF100B Forehead Thermometer…..1 PC
AAA Batteries (pre-installed)………2 PCS
User Manual…………………………1 PC
Quick Start Guide…………………...1 PC
2.Features of the iF100B Forehead
Thermometer
The iF100B Forehead Thermometer
measures body temperature without making
contact with the body. It detects the natural
infrared heat emitted from the skin surface of
the forehead and displays the corresponding
oral equivalent temperature reading obtained
via clinical trials within 1 second.
Convenient and easy to use
Easy mode of operation –take
measurement with the press of a button
Easily switch reading between Fahrenheit
and Celsius
Can be used anytime –even when your
child is asleep
Obtain reading faster than an oral
thermometer and more comfortable than a
rectal thermometer
Ergonomic design
Visual and audible alarm for fever detection
Accurate and quick
Utilize the latest infrared technology –
accurate, precise and instant readings
Auto distance technology ensures correct
measurement distance from the forehead
Blue tracking light provides visual aid of the
measurement site
Safe and hygienic
Non-contact measurement method
prevents cross-contamination
Unlike traditional thermometers, there is no
glass or mercury that could pose as a
potential health hazard. The thermometer
is made up of ABS plastic, an infrared
sensor, an infrared temperature measuring

2
element, a microcomputer controlled circuit
and an LED display.
BPA and latex free
Memory recall
Has a Memory Mode that automatically
stores up to 30 readings
Conveniently tracks changes in
temperature by recalling stored data
Convenient fever warning
When the temperature registers
99.5°F/37.5°C and above, the thermometer
will warn user of a possible fever with 10 short
beeps and a color coded ring that glows red.
(For normal body temperature, the signal is a
long beep with a color coded ring that glows
blue.)
Intended use
The iF100B Forehead Thermometer is a
non-contact infrared thermometer intended to
measure body temperature via the forehead.
It may be used by medical professionals or by
consumers in a home environment.
Operating principle
The infrared temperature sensor detects
infrared energy emitted from the forehead. A
built-in lens focuses the collected energy,
which is then converted into a temperature
reading by the thermopiles and measurement
circuits.
3.Important Warnings and Safety
Precautions
Warning
This product is not intended to
substitute advice from a physician,
pharmacist, or other licensed
health-care professional. You should
not use this product for self-diagnosis
or for treating a health problem. Seek
advice from your health-care provider
immediately if you suspect that you or
your child is not feeling well, has a
3
fever, appears distressed or has a
medical condition.
Do not use the thermometer for purposes
not specified in this User Manual. Follow
the instructions stated herein and operate
the thermometer carefully as directed.
Do not use the thermometer if any part,
especially the sensor, shows any sign of
damage. Please contact manufacturer if it
is within the warranty period.
Do not attempt to repair, modify or
disassemble the thermometer. This voids
the warranty.
The thermometer is not designed for use
on newborns. Please consult a doctor
before using the thermometer on a
newborn.
The thermometer is not a continuous
monitoring device.
The thermometer is not a toy. Please keep
out of children’s reach. Some parts are
small enough to be swallowed.
Do not use the thermometer in the vicinity
of strong electromagnetic fields such as
mobile telephones or radio installations.
Keep a minimum distance of 3.3 meters
from such devices when using the
thermometer.
Please dispose the used thermometer and
batteries in accordance with local
regulation and requirement.
Caution
Do not use the thermometer in an ambient
temperature higher than 40.0°C (104.0°F)
or lower than 15.0°C (59.0°F). These are
beyond the operating temperature range
of the thermometer.
The thermometer is not waterproof. Do not
immerse in water or other solutions. For
cleaning and disinfecting, please follow
instructions in the ‘Care and Cleaning’
section.
The thermometer is assembled precisely
in order to perform properly. Do not drop
the thermometer or touch the sensor with

4
a hard object. The thermometer is not
designed to withstand intense impact or
vibration.
Please remove the batteries if the
thermometer is not used for an extended
period of time, e.g. more than 1 month.
4.Note on Body Temperature
Normal body temperature is a range. It
varies from person to person and can
fluctuate throughout the day.
Body temperature also varies by sites.
Therefore, the iF100B Forehead
Thermometer should not be used to obtain
body temperature from other parts of the
body.
To determine if an individual is experiencing
an elevated body temperature or has a fever,
it is therefore critical to know, as a reference
point, the individual’s normal body
temperature range when he/she is well.
Normal body temperature fluctuates
throughout the day and is affected
by external factors. The body
temperature of an individual is the
lowest between 2:00 a.m. and 4:00
a.m. and the highest between 2:00
p.m. and 8:00 p.m. An individual's
body temperature typically changes
by less than 1°C (1.8 °F) each day.
5
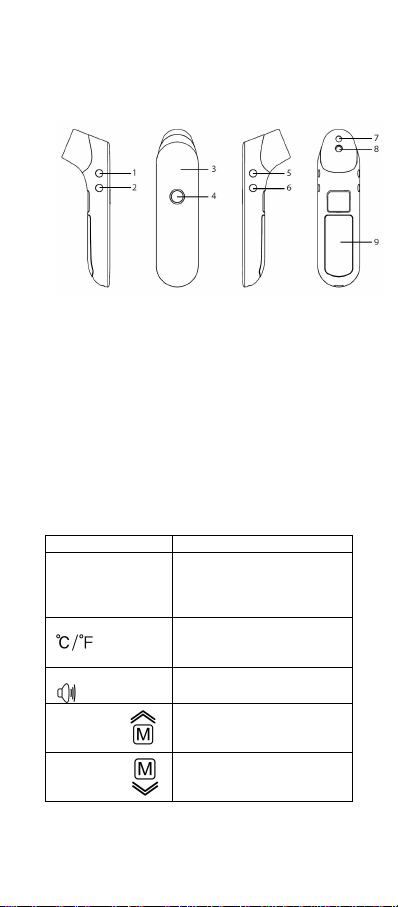
5.Elements of the Thermometer
Measuring unit
(1) Unit button (Celsius/Fahrenheit)
(2) Sound button (On/Off)
(3) LED display
(4) Power/Measure button (with color coded
ring)
(5) Memory UP button
(6) Memory DOWN button
(7) Blue tracking light
(8) Sensor lens
(9) Battery cover
Button and its function
Button
Function
Power/Measure
button
Press once to power on
or to take measurement.
Press for about 3-4
seconds to power off.
Unit button
To switch unit of
measurement between
Celsius and Fahrenheit.
Sound button
To turn sound on and off.
Memory
UP
button
To enter Memory mode.
Memory
DOWN
Button
To scroll down recorded
data while in Memory
mode.
6
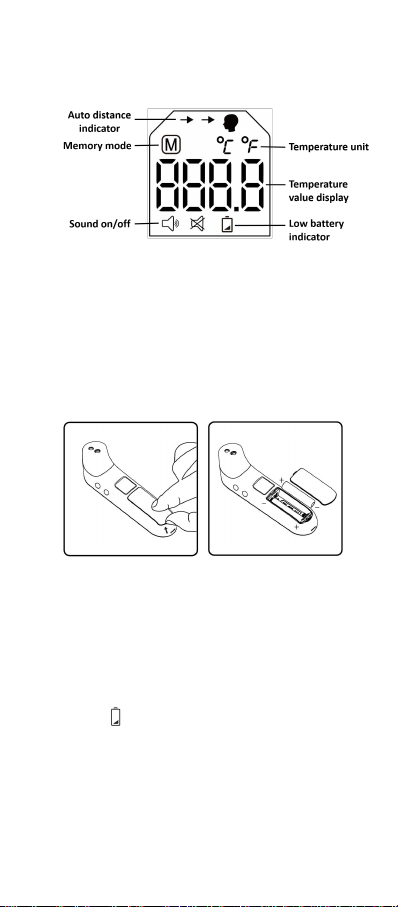
Screen display and symbol designation
6.Battery Installation
1. Open the battery cover.
2. Install two AAA batteries into the battery
compartment according to the stated
polarities.
3. Close the battery cover until it snaps back
in place.
Note:
Prior to using the thermometer for the first
time, pull the plastic tab, if any, off the
battery compartment.
Batteries should be installed according to
the stated polarities. Otherwise, the
thermometer bracket may be damaged.
Replace the batteries when the low battery
icon ( ) flashes on the LED display. When
battery is completely exhausted, the
battery icon appears for 10 seconds, after
which device switches off automatically.
Please remove the batteries if the
thermometer is not used for an extended
period of time, e.g. more than 1 month.
7
Warning
Do not charge the included batteries
because it may cause leakage, fire
disaster or even explosion.
Do not throw batteries into fire because it
can cause an explosion.
Dispose of batteries in accordance with
local laws and regulations.
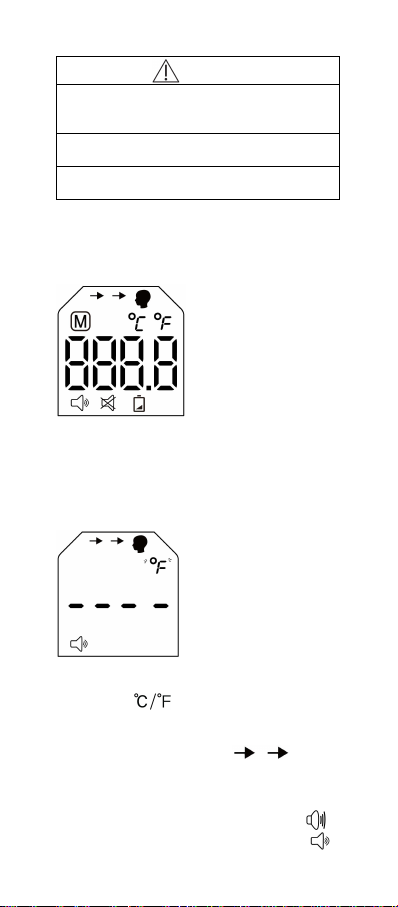
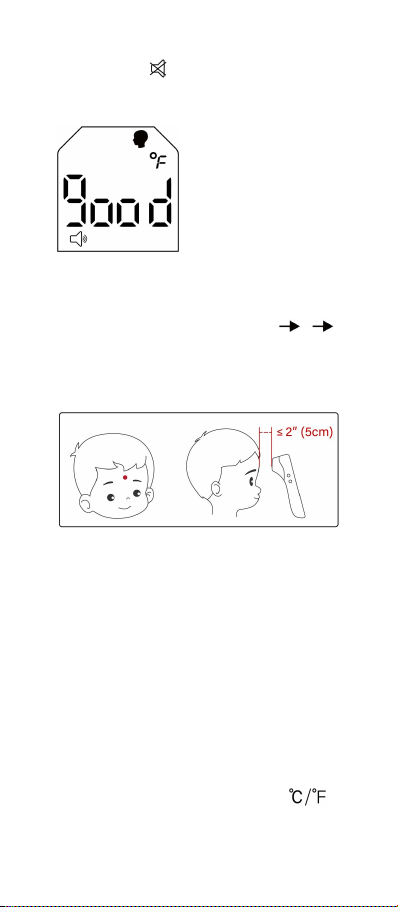
7.Measuring Forehead Temperature
Step 1: Power on
Press the Power/Measure button to turn the
thermometer on.
Backlight comes on, color coded ring glows
blue-to-red and the warm up sequence starts.
Step 2: Ready to measure
The selected unit (°F or °C) blinks. Press the
Unit button ( ) to switch between Celsius
and Fahrenheit.
The auto distance indicator ( ) directs
user to position the thermometer closer to the
forehead. Distance should be within 2” (5cm).
Note: You can press the Sound button ( )
at any time to switch between sound on ( )
8
and sound off ( ).
Step 3: Position
Point thermometer perpendicular to and at the
center of the forehead, just above the
eyebrow. Bring thermometer closer towards
the forehead until “good” registers on the
screen and auto distance indicator ( )
disappears. This means distance is
appropriate (within 2” or 5cm). You will hear a
beep (if sound is on) and the blue tracking
light will activate.
Note: If forehead area is covered with hair,
sweat or dirt, please clean the area to improve
reading accuracy.
Note: Make sure the thermometer is pointing
at the forehead at right angle. Otherwise,
“good” may not register on the screen even if
the thermometer is within appropriate distance.
Adjust the angle and repeat Step 3 above.
Step 4: Taking temperature
Press the Power/Measure button once.
Reading will be displayed in about 1 second.
Note: You can press the Unit button ( )
to switch the result between Celsius and
Fahrenheit.
9
Normal
temperatures
93.2°F to 99.4°F /
34.0°C to 37.4°C
Long beep
Color coded ring
glows blue for 3
seconds
Fever may be
present*
99.5°F to 109.4°F /
37.5°C to 43.0°C
10 short beeps
Color coded ring
glows red for 3
seconds
Out of
measurement range
Higher than 109.4°F /
43.0°C
3 short beeps
Color coded ring
glows red for 1
second
Out of
measurement range
Lower than 93.2°F /
34.0°C
3 short beeps
Color coded ring
glows red for 1
second
*Note: Temperature 99.5°F/37.5°C and above
indicates that fever may be present. Please
consult with your doctor if you are not sure.
10
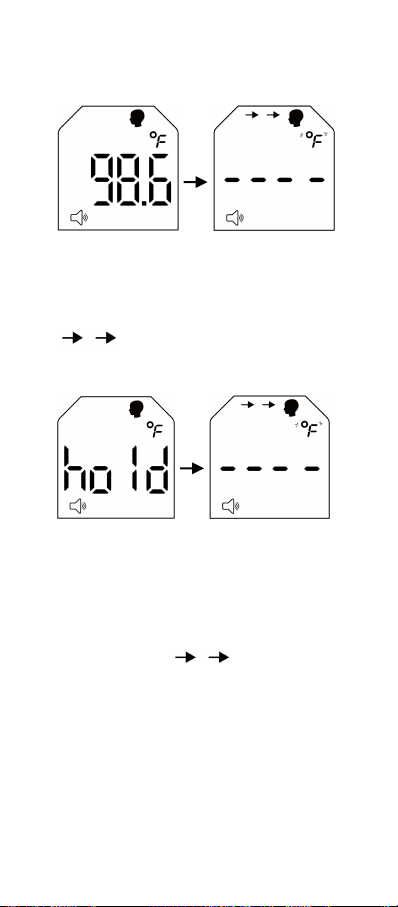
Step 5: Getting ready for next
measurement
Previous reading will continue to show on the
screen. To enter “Ready to measure” mode,
press the Power/Measure button once after
color coded ring stops to glow blue or red (i.e.
after 3 seconds from last reading). Screen will
show “- - - -”with auto distance indicator
( ) on and blinking unit (°F or °C).
Repeat Step 3 and Step 4 to continue with
measurement.
If Power/Measure button is pressed while
color coded ring still glows blue or red (i.e.
within 3 seconds from last reading), the
screen will show “hold” as the thermometer is
not ready for measurement. Please wait until
screen returns to show previous reading.
Press the Power/Measure button again. The
screen now should show “- - - -”with auto
distance indicator ( ) on and blinking
unit (°F or °C). Repeat Step 3 and Step 4 to
continue with measurement.
Step 6: Power off
Press the Power/Measure button for about
3-4 seconds at any time to power off the
device.
Device will also power off automatically in 30
seconds if no activity is detected.

11
8.Temperature Taking Tips for
Accurate Measurement
1. Always start with a clean thermometer to
maintain measurement accuracy and
hygiene. Pay extra attention to the sensor
lens as any obstruction, such as dust or
grease on the lens will prevent an accurate
measurement.
2. If the sensor lens is dirty, please clean
before use (Refer to Care and Cleaning
section). A clean sensor lens should be
reflective and gleaming. If it looks dull and
lackluster, then it is dirty and requires
cleaning.
3. Make sure both user and thermometer
have remained at a constant ambient
temperature for at least 30 minutes. Recent
exposure of the thermometer to hot or cold
temperatures will affect the reading.
4. Please use the thermometer indoor or in
an environment where there is no strong air
draft, such as from a fan, air conditioning or
heater.
5. Before measuring forehead temperature,
remove anything that may interfere with
infra-red detection such as hair, sweat, or
makeup/oil.
6. Do not move when taking temperature.
7. Do not hold the thermometer for a long
time as it is highly sensitive to ambient
temperature and heat.
Note: As with any thermometer, proper
technique is critical to obtain accurate
measurements. Failure to follow
instructions will result in inaccurate
readings.

12
9.Memory Mode
Accessing recorded data
When device is off, press the Memory UP
button to enter Memory mode. Screen shows
“- - - -”and Memory icon .
Press the Memory UP button again. Screen
shows “1”, then the newest recorded reading.
Press the Memory UP button again. Screen
shows “2”, then the next recorded reading.
Repeat the steps above to access more
recorded data.
To scroll back to previous reading, press the
Memory DOWN button.
Note:
You can enter Memory mode from “Ready
to measure” mode by pressing either the
Memory UP button or Memory DOWN
button.

13
A total of 30 readings can be recorded.
When memory is full, the oldest data will be
overwritten as new data is recorded.
“1” corresponds to the newest data and
“30”to the oldest data.
Exiting memory mode
To exit and power off, press the
Power/Measure button for about 3-4
seconds.
To enter measurement mode from memory
mode, press the Power/Measure button
once.
If no button is pressed within 30 seconds,
device will power off automatically.
Deleting recorded data
In Memory mode, press either the Memory
UP button or Memory DOWN button for about
4-5 seconds until screen shows “Clr”. Press
the Memory UP button or Memory DOWN
button again to confirm the deletion. “Clr”
flashes three times and data is deleted.
Screen shows “- - - -”.
Note:
To cancel data deletion after screen shows
“Clr”, press the Power/Measure button
once to return to Memory mode.
After screen shows “Clr” and no button is
pressed within 5 seconds, device will return
to Memory mode. No data is deleted.
10.Care and Cleaning
To clean the sensor lens, gently swab the
surface with a cotton swab slightly
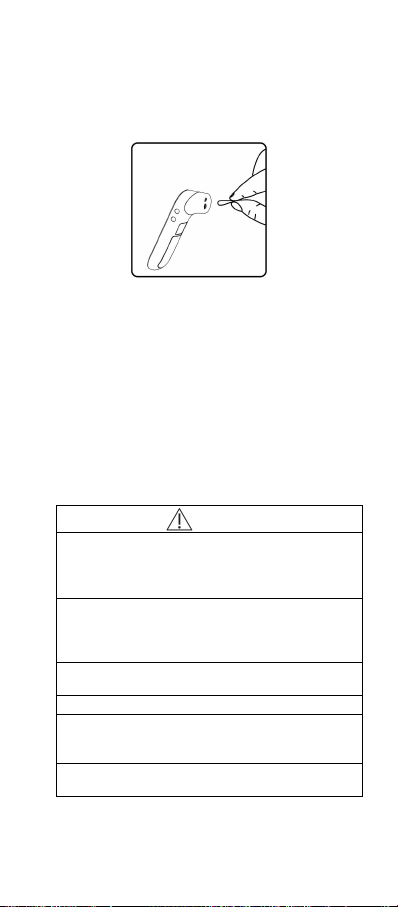
14
moistened with rubbing alcohol (70%
Isopropyl). Do not exert too much pressure
or use hard object to clean as it may
damage the delicate sensor lens.
Place the thermometer in a well ventilated
area and wait for the alcohol to evaporate
completely before using the thermometer.
This may take about 5-10 minutes. Any
residual alcohol will prevent accurate
readings.
To clean the thermometer, wipe with a soft
cloth slightly moistened with water or
rubbing alcohol. Allow to air dry in a well
ventilated area or gently wipe dry with a
piece of tissue.
Caution
The thermometer sensor is extremely
sensitive. The sensor lens has to be
absolutely clean and free of obstruction to
ensure accurate readings.
Always check the sensor before use. The lens
should be reflective and gleaming. If it looks
dull and lackluster, please clean the lens
before use.
Do not use abrasive, acidic or alkaline
cleaners.
Do not immerse in water or cleaning solution.
Do not expose the thermometer to extreme
temperatures, humidity, dust or direct
sunlight.
Do not drop the thermometer and avoid
strong vibrations.
15
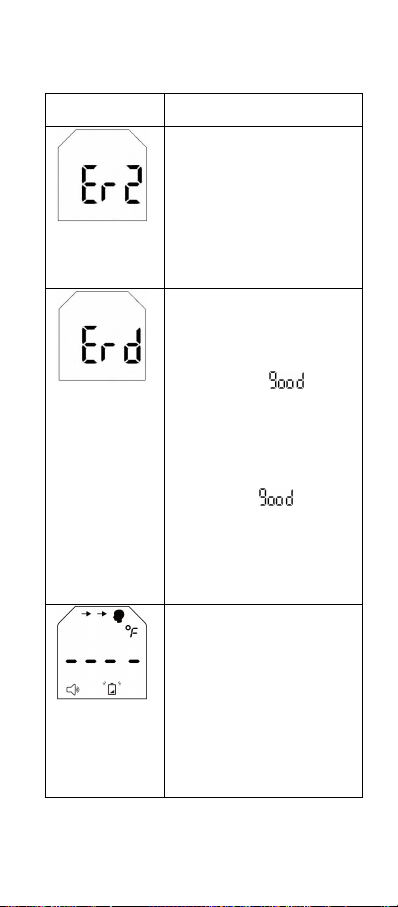
11.Errors and Troubleshooting
Error Message
Possible cause and
solution
Auto distance
sensor
blocked
Possible cause:
The auto distance sensor is
blocked.
Solution:
Do not touch the
thermometer probe,
especially the bottom area
where the auto distance
sensor is embedded.
Distance error
3 short beeps
Color coded
ring glows red
for 1 second
Possible cause:
The Power/Measure button
is pressed when distance
between the thermometer
and forehead is not within 2”
or 5cm (when “ ” is not
displayed on screen).
Solution:
Position thermometer within
2” or 5cm from the forehead.
When distance is
appropriate, “”
registers on the screen. You
will also hear a beep (if
sound is on) and the blue
tracking light will activate.
Press the Power/Measure
button to take a reading.
Low battery
Low battery
icon flashes on
the screen
Possible cause:
Battery life is less than 20%.
However, the device can still
work until battery is
completely exhausted.
Solution:
Replace the batteries. Refer
to Section 6 on ‘Battery
Installation’.

16
Dead battery
Low battery
icon is
displayed on
screen for 10
seconds, then
device powers
off
automatically.
Possible cause:
Battery is completely
exhausted.
Solution:
Replace the batteries. Refer
to Section 6 on ‘Battery
Installation’.
Out of
operating
temperature
range
3 short beeps
Color coded
ring glows red
for 3 seconds,
then device
powers off
automatically in
10 seconds.
Possible cause:
Ambient temperature is too
high (more than 104.0°F/
40.0°C).
Solution:
Thermometer should be
used in an environment
where ambient temperature
is between 59.0°F to
104.0°F /15.0°C to 40.0°C.
Out of
operating
temperature
range
3 short beeps
Possible cause:
Ambient temperature is too
low (less than 59.0°F/
15.0°C).
Solution:
Thermometer should be
used in an environment
where ambient temperature
is between 59.0°F to
104.0°F /15.0°C to 40.0°C.
Table of contents
Other Innovo Thermometer manuals


