Inoxtrend XBP Series Manual
AGS 859
–
AGS 860
–
AGS 903
-
AGS 904
Serie XBP / XDP
106/110/210/120/220
Mod. Programmmable
FORNI A CONVEZIONE - VAPORE
ISTRUZIONI PER L’USO E LA
MANUTENZIONE
CONVECTION-STEAM OVEN
OPERATING AND MAINTENANCE
INSTRUCTIONS
HEISSLUFTDÄMPFER
BEDIENUNGS- UND
WARTUNGSANLEITUNG
ISTRUZIONI PER L’UTENTE
INSTRUCTIONS FOR THE USER
ANLEITUNGEN FÜR DEN BENUTZER
Combination ovens with direct and boiler system, gas and electric models. Programmable panel
1
INDICE
6.0 Premessa
6.1 Messa in funzione
6.2 Descrizione componenti cruscotto
6.3 Impostazione della fase CONVEZIONE nel programma di cottura manuale n°1
6.4 Impostazione della fase VAPORE nel programma di cottura manuale n°2
6.5 Impostazione della fase MISTA nel programma di cottura manuale n°3
6.6 Impostazione della fase MISTA nel programma di rigenerazione n°4.
6.7 Impostazione della fase vapore nel programma di cottura n°5 (HARD STEAMING)
6.8 Dispositivi ed automatismi nei programmi di cottura manuali
6.9 Avviamento del programma di cottura manuale
7.0 Impostazione e modifica di un programma automatico di cottura a più fasi
7.0A Impostazione e modifica della descrizione di un programma di cottura automatico
7.0B Impostazione e modifica del numero delle fasi di un programma di cottura automatico
7.0C Impostazione e modifica della modalità di cottura nella fase di un programma di cottura automatico
7.0D Impostazione e modifica della velocità di ventilazione nella fase di un programma di cottura automatico
7.0E Impostazione e modifica del sistema a potenza ridotta nella fase di un programma di cottura automatico
7.0F Impostazione e modifica della temperatura in camera di cottura nella fase di un programma di cottura automatico
7.0G Impostazione e modifica della temperatura della sonda al cuore nella fase di un programma di cottura automatico
7.0H Impostazione e modifica della Delta T nella fase di un programma di cottura automatico
7.0I Impostazione e modifica del tempo di cottura nella fase di un programma di cottura automatico
7.0L Impostazione e modifica del grado di umidità nella fase di un programma di cottura automatico
7.0M Impostazione e modifica del sistema Cook & Hold nella fase di un programma di cottura automatico
7.1 Avviamento con i programmi automatici
7.2 Programma automatico n°96 (Lavaggio camera di cottura)
7.3 Programma automatico n°97 (Disincrostazione e lavaggio generatore di vapore)
7.4 Programma automatico n°98 (Scarico manuale acqua dal boiler)
7.5 Programma automatico n°99 (Programma di fine lavoro)
7.6 Password di protezione per i programmi di cottura automatici
7.7 Programmazione lingua - giorno - data - ora
7.8 Spegnimento del forno
7.9 Segnalazione e visualizzazione anomalie e guasti
8.0 Manutenzione
8.1 Comportamento in caso di guasto e/o di un prolungato non funzionamento
9.0 Consigli per le cotture
9.1 Modalità e suggerimenti per le cotture a convezione
9.2 Rimedi alle anomalie di cottura
CONTENTS
6.0 Foreword
6.1 Commissioning
6.2 Components description of control panel
6.3 Setting the CONVECTION phase in manual cooking program no.1
6.4 Setting the STEAM phase in manual cooking program no. 2
6.5 Setting the COMBINED phase in manual cooking program no.3
6.6 Setting the combined phase in REGENERATION program no.4
6.7 Setting the steam phase in manual cooking program (HARD STEAMING) no.5
6.8 Devices and automatisms in the manual cooking programs
6.9 Starting the manual cooking program
7.0 Setting and modification ofan automatic cooking program with more phases
7.0A Setting and modification of an automatic cooking program description
7.0B Setting and modification ofthe number of the phases of an automatic cooking program
7.0C Setting and modification of the cooking mode during a phase of an automatic cooking program
7.0D Setting and modification of the fan speed during a phase of an automatic cooking program
7.0E Setting and modification of the reduced power system during a phase ofan automatic cooking program
7.0F Setting and modification ofthe cooking chamber temperature during a phase of an automatic cooking program
7.0G Setting and modification ofthe core probe temperature during a phase of an automatic cooking program
7.0H Setting and modification ofthe Delta T during a phase of an automatic cooking program
7.0I Setting and modification of the cooking time during a phase of an automatic cooking program
7.0L Setting and modification of the percentage of humidity during a phase of an automatic cooking program
7.0M Setting and modification of the Cook & Hold in a phase of an automatic cooking program
7.1 Starting with automatic programs
7.2 Automatic Program no.96 (cooking chamber self-washing)
7.3 Automatic Program no.97 (Descailing and washing of the steam generator)
7.4 Automatic program no. 98 (manual water discharge from the boiler).
7.5 Automatic program no. 98 (End of the work program)
7.6 Protection password for automatic coking programs
7.7 Settinglanguage-day-date-time
7.8 Turning the oven OFF
7.9 Signalling and displaying malfunctions and breakdowns
8.0 Maintenance
8.1 What to do in the case of a breakdown and/or extended period ofnon use
9.0 Cooking tips
9.1 Tips for convection cooking
9.2 Remedies to cooking hitches
ISTRUZIONI PER L’UTENTE
INSTRUCTIONS FOR THE USER
ANLEITUNGEN FÜR DEN BENUTZER
Combination ovens with direct and boiler system, gas and electric models. Programmable panel
2
INHALTSVERZEICHNIS
6.0 Vorwort
6.1 Inbetriebnahme
6.2 Beschreibung Bestandteile
6.3 Einstellung der Phase KONVEKTION für manuelles Garprogramm
6.4 Einstellung der Phase DAMPF für manuelles Garprogramm
6.5 Einstellung der Phase KOMBI für manuelles Garprogramm
6.6 Einstellung der Phase REGENERATION für manuelles Garprogramm n°4
6.7 Einstellung der Phase HARD STEAMING für manuelles Garprogramm no 5
6.8 Vorrichtungen und Automatik für manuelle Garprogramme
6.9 Starten des manuellen Garprogramms
7.0 Einstellung und Änderung von einem automatischen Garprogramm mit mehr als eine Phase
7.0A Einstellung und Änderung der Beschreibung von einem automatischen Garprogramm
7.0B Einstellung und Änderung der Phasennummer von einem automatischen Garprogramm
7.0C Einstellung und Änderung des Garzyklus während einer Phase von einem automatischen Garprogramm
7.0D Einstellung und Änderung der Motorgeschwindigkeit während einer Phase von einem automatischen Garprogramm
7.0E Einstellung und Änderung der verminderte Leistung während einer Phase von einem Garprogramm
7.0F Einstellung und Änderung der Garraumtemperatur während einer Phase von einem automatischen Garprogramm
7.0G Einstellung und Änderung der KTF Temperatur während einer Phase von einem automatischen Garprogramm
7.0H Einstellung und Änderung der Funktion DeltaT während einer Phase von einem automatischen Garprogramm
7.0I Einstellung und Änderung der Garzeit während einer Phase von einem automatischen Garprogramm
7.0L Einstellung und Änderung der Befeuchtungsprozent während einer Phase von einem automatischen Garprogramm
7.0M Einstellung und Änderung der Funktion Cook & Hold während einer Phase von einem automatischen Garprogramm
7.1 Starten mit automatischen Programmen
7.2 Automatisches Programm no 96 (Selbstreinigung)
7.3 Automatisches Programm no. 97 (Entsteinen und Reinigung des Boilers)
7.4 Automatisches Programm no. 98 (manuelles Abfluss des Boilers).
7.5 Automatisches Programm no.98 (Programm Betriebsende)
7.6 Schutzpasswort für automatische Garprogramme
7.7 Einstellung Sprache-Tag-Datum-Uhrzeit
7.8 Ausschalten des Backofens
7.9 Signalis. u. Anzeige von Störungen und Schäden
8.0 Wartung
8.1 Anweisungen bei Störung bzw. längerem Gerätestillstand
9.0 Nützliche Hinweise beim Garen
9.1 Methoden und Ratschläge beim Garen mit Konvektion
9.2 Abhilfe bei abnormalem Garen

ISTRUZIONI PER L’UTENTE
INSTRUCTIONS FOR THE USER
ANLEITUNGEN FÜR DEN BENUTZER
Combination ovens with direct and boiler system, gas and electric models. Programmable panel
3
6.0 PREMESSA
Leggere attentamente le istruzioni per l’uso, con particolare attenzione alle norme relative ai dispositivi di sicurezza. Questa apparecchiatura dovrà
essere destinata solo all’uso per il quale è stata espressamente progettata e costruita e cioè per la cottura delle pietanze e per la rigenerazione dei cibi
precotti e/o surgelati.
Per la corretta comprensione della terminologia usata nei seguenti paragrafi si definisce che la fase di cottura è l’intervallo di tempo nel quale il forno
esegue una delle seguenti modalità:
Modalità convezione aria calda
(campo temperatura 20 - 270°C)
Modalità convezione aria calda e vapore
(campo temperatura 20 - 270°C)
Modalità vapore
(campo temperatura 20 - 100°C)
La fase di cottura utilizza i seguenti dispositivi ed automatismi:
⇒la sonda a spillone per il controllo della temperatura al cuore del cibo da cuocere,
⇒la Δt con il tasto (H) per il controllo della temperatura della camera di cottura,
⇒il tasto (G) Fig. 6.1 pag. 5: valvola di sfiato della camera di cottura,
⇒il tasto (E) Fig. 6.1 pag. 5: riduzione di potenza,
⇒il tasto (F) Fig. 6.1 pag. 5: velocità di ventilazione - alta o bassa.
Ciclo o programma di cottura manuale: la cottura dei cibi avviene in un’ unica fase. Nel corso di tale programma si possono attivare o disattivare i
dispositivi e gli automatismi sopra citati, modificare i valori di temperatura nella camera di cottura, della sonda a spillone, dell’umidità e del tempo di
cottura.
Ciclo o programma di cottura automatico: la cottura dei cibi avviene in più fasi, in modo completamente automatico. Nel corso del programma si
possono modificare, temporaneamente, i dispositivi e gli automatismi sopra citati ed i valori di temperatura, tempo e umidità.
6.0 FOREWARD
Read the instructions for use very carefully paying particular attention to the rules concerning safety devices. This appliance must only be used for what
it has been designed and built for and that is: all baking and boiling of meat, fish and vegetables, for browning, grilling and regenerating pre-cooked
and/or frozen food.
For the exact comprehension of the terminology used in the following paragraphs, we clarify that:
Cooking Phase:
it is the period of time during which the oven carries out one of the following cooking modes:
Convection hot forced air
(Temperature range 20 - 270°C)
Combined hot forced air and steam
(temperature range 20 - 270°C)
Steam
(Temperature range 20 - 100°C)
The cooking phase is characterised by the usage of the following devices and automatisms:
The core probe to check the temperature in the core of the product to be cooked;
The check of the cooking chamber temperature through (Δt) by using the push button (H);
The cooking chamber release system by using the push button (G);
The reduced power by using the push button (E);
The low-high speed fan by using the push button (F);
Manual cooking program or cycle:
the cooking of the food is done in a single phase. During this program you can select or cancel the devices and
the automatisms above mentioned, you can also modify the cooking chamber temperature, the core probe temperature, the percentage of the humidity,
the cooking time.
Automatic cooking program or cycle:
the cooking of the food is done in more than one phase in a completely automatic way. During this program
you can temporary select and cancel devices and values of temperature, time and humidity.
6.0 VORWORT
Lesen Sie sorgfältig diese Bedienungsanleitung und beachten Sie insbesondere die gültigen Richtlinien bezüglich der Sicherheitsvorrichtungen.
Das Gerät darf nur für den ursprünglich vorgesehenen Zweck, d. h. zum Garen und Kochen von Fleisch, Fisch und Gemüse, zum Gratinieren, Grillen
und Regenerieren von vorgekochten bzw. tiefgekühlten Speisen verwendet werden.
Um die Terminologie Korrekt zu verstehen, möchten wir die folgenden Punkte klarmachen:
Garphase: es ist die zwischende Zeit, wann der Ofen einen der folgenden Garprozesse durchführt:
Forcierte Heissumluft
(Temperaturbereich 20 - 270°C)
Mischbetrieb forcierte Heissumluft und Dampf
(Temperaturbereich 20 - 270°C)
Dampf
(Temperaturbereich 20 - 100°C)
Die Garphase wird von den folgenden Vorrichtungen und Automatik gekennzeichnet:
Der Kerntemperaturfühler um die Temperatur im Kern des Produktes zu kontrollieren;
Die Überwachung der Garraumtemperatur durch die Funktion (Δt) , man muss das Druckknopf (H) drücken;
Das Druckknopf (G) drücken, um die Dampfablassventil zu öffnen;
Das Druckknopf (E) drücken um die Leistung zu vermindern;
Das Druckknopf (F) drücken um die niedrige Geschwindigkeit zu benutzen;
Manuelles Garprogramm oder Zyklus: die Speisen werden mit einer einzelnen Phase gebacken. Während dieses Programms kann man die oben
genannten Vorrichtungen und Automatik einstellen oder auslöschen, man kann auch die Garraumtemperatur ,die Temperatur des KTFs, die
Dampfmenge und die Garzeit ändern.
Automatisches Garprogramm oder Zyklus: die Speisen werden mit mehr als eine Phase und voll automatisch gebacken. Während dieses
Programms kann man momentan die Gartemperatur, die Garzeit und die Dampfmenge einstellen oder auslöschen.
ISTRUZIONI PER L’UTENTE
INSTRUCTIONS FOR THE USER
ANLEITUNGEN FÜR DEN BENUTZER
Combination ovens with direct and boiler system, gas and electric models. Programmable panel
4
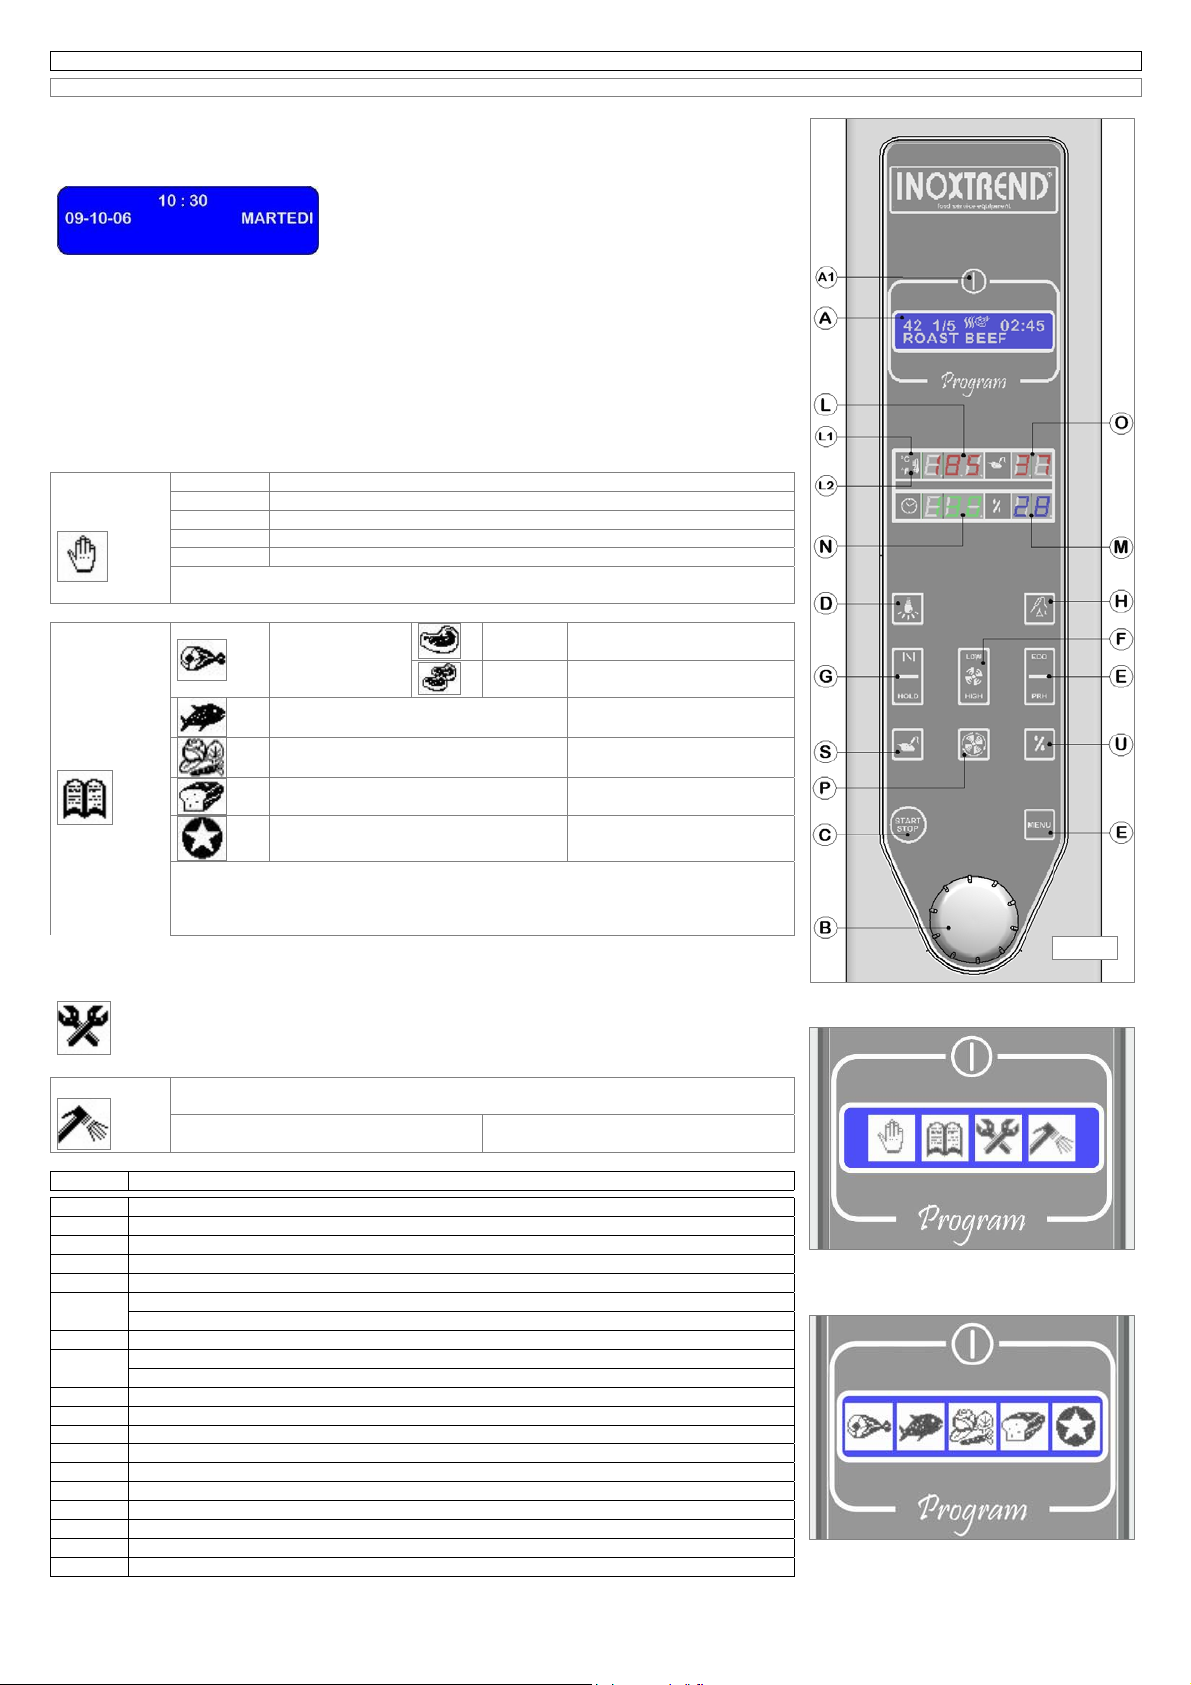
6.1 MESSA IN FUNZIONE (Fig.6.1)
Aprire le valvole di intercettazione acqua, gas e l’interruttore elettrico di protezione, installati a monte
dell’apparecchio. Nel display (A) compariranno successivamente:
la scritta FORNO GRAFICO con il riferimento del software
installato Rev. 1…, la scritta Welcome, la schermata, nel display
(A) che per comodità chiameremo di “stand-by”.
I display luminosi (L) (M) (N) (O) risulteranno spenti.
Premere il tasto ON/OFF (A1), il display grafico (A) visualizzerà
l’ultimo programma di cottura utilizzato, si attiveranno i display (L) (M) (N) (O) in conformità al
programma precedentemente selezionato.
Per selezionare un altro programma ruotare la manopola dell’encoder, detto anche ENTER (B), in
senso orario per aumentare e in senso antiorario per diminuire; non è necessario confermare la scelta
del nuovo programma con alcun tasto.
Digitando il tasto (E) MENU il sistema elettronico visualizza nel display (A) le icone dei menù operativi
all’interno dei quali sono memorizzati i sottomenù con i relativi programmi.
Per selezionare il menù desiderato ruotare la manopola dell’encoder fino a quando l’icona
corrispondente viene visualizzata con il colore blu su sfondo bianco, premere l’encoder x confermare.
Nella seguente tabella sono illustrati tutti i menù operativi.
Cotture
manuali
Prog. 01 Programma cottura manuale con singola fase a convezione
Prog. 02 Programma cottura manuale con singola fase a vapore
Prog. 03 Programma cottura manuale con singola fase mista convezione vapore
Prog. 04 Programma di rigenerazione
Prog. 05 Programma di Hard-steam (solo per modelli con boiler)
I programmi di cottura manuale, con singola fase, sono evidenziati nel display (A) con
la visualizzazione del rispettivo numero posto nel simbolo che rappresenta la mano.
Cotture
automatiche
Carni
Grandi
pezzature
Programmi automatici
dal n°06 al n°16
Piccole
pezzature
Programmi automatici
dal n°17 al n°26
Pesce Programmi automatici
dal n°27 al n°47
Verdure Programmi automatici
dal n°48 al n°68
Prodotti pasticceria da forno Programmi automatici
dal n°69 al n°89
Cotture preferite Programmi automatici
dal n°90 al n°95
Il menù carne prevede due sottomenù per semplificare la memorizzazione e ricerca
dei programmi di cottura automatici.
I numeri di tali programmi vengono visualizzati nel display (A) alternativamente
al’icona del menù all’interno del quale sono stati memorizzati
Manutenzione
Programma scarico manuale boiler
N.B. (solo modelli con boiler)
Programma di fine lavoro
N.B. (solo modelli con boiler)
Lavaggi
Programma lavaggio e disincrostazione boiler
N.B. (solo modelli con boiler)
Programmi lavaggi camera cottura Lavaggio camera cottura breve
Lavaggio camera cottura lungo
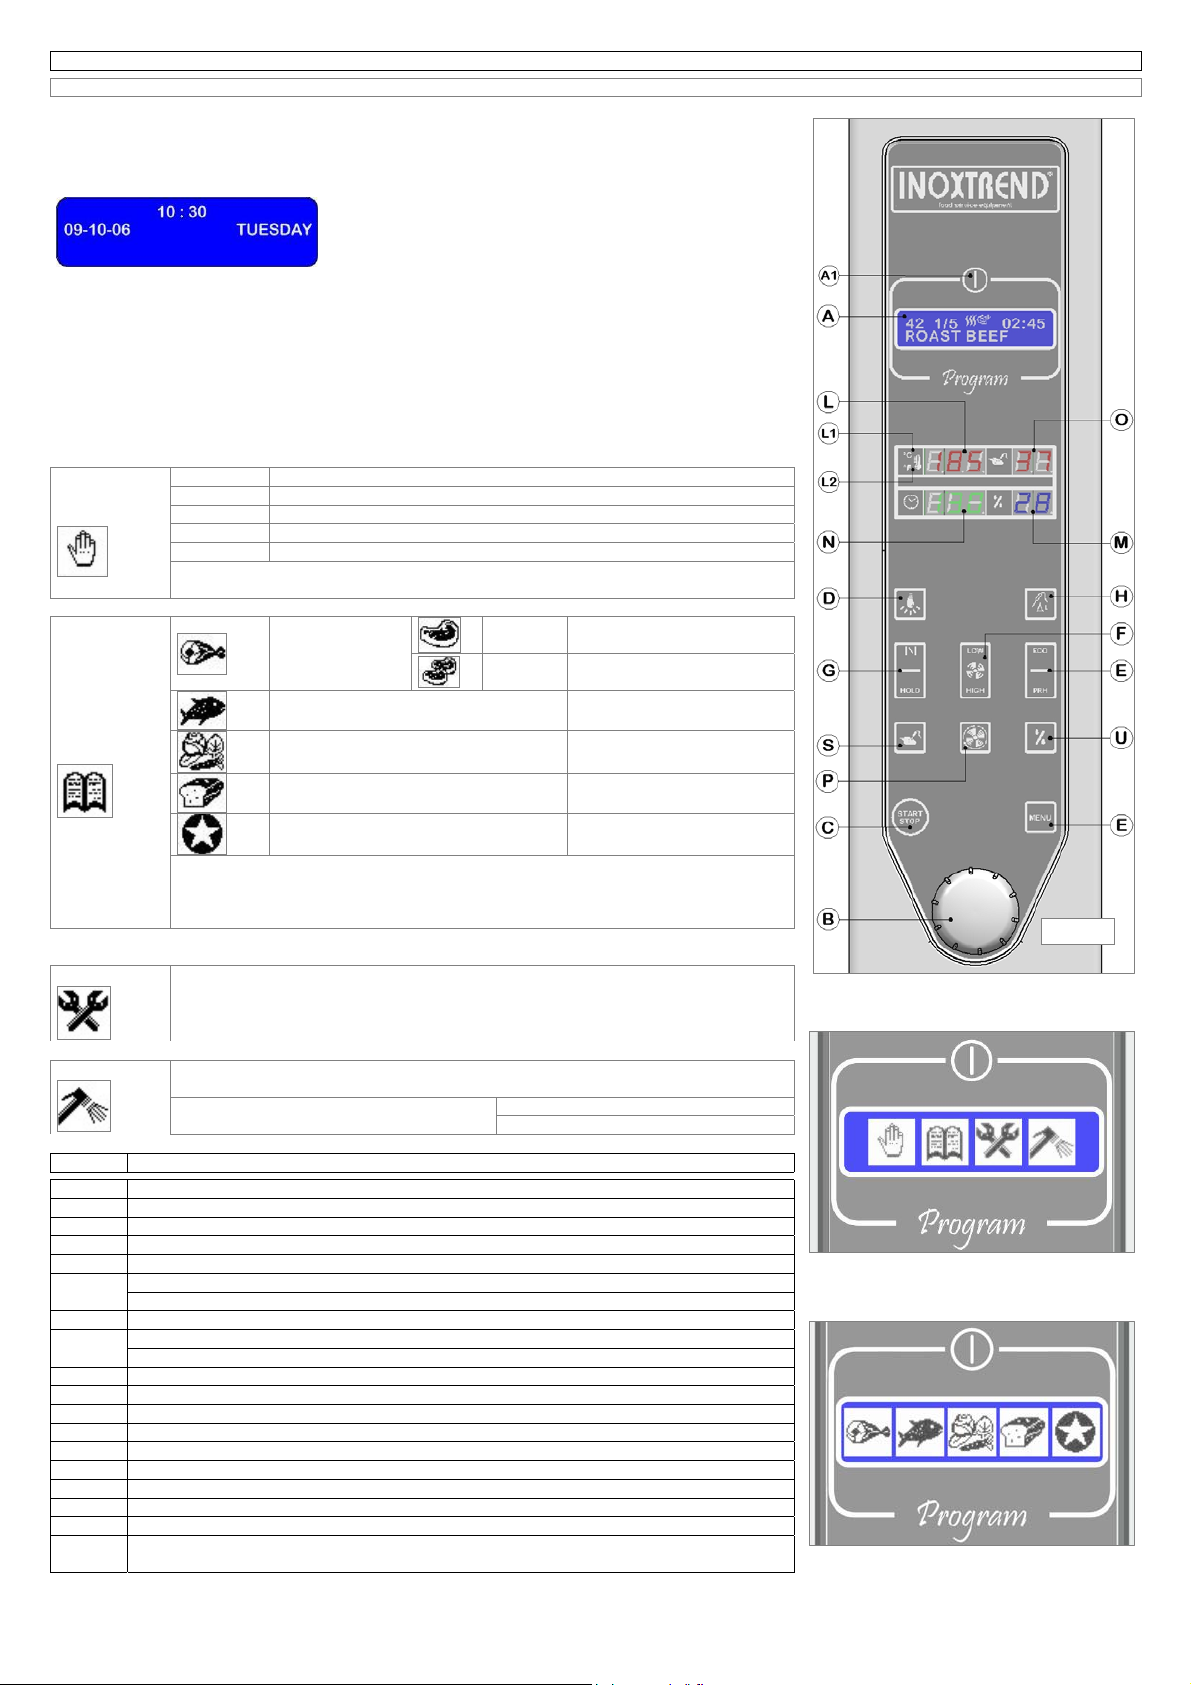
Fig. 6.1 DESCRIZIONE COMPONENTI CRUSCOTTO PROGRAMMABLE
A Display LCD
A1 Pulsante ON/OFF attivazione e spegnimento controllo elettronico
B Encoder (manopola selezione modifica valori programma)
C Pulsante avviamento e arresto ciclo cottura
D Pulsante comando lampada illuminazione
E Pulsante attivazione potenza ridotta
Pulsante avviamento preriscaldo forno (premuto per 3”)
F Pulsante selezione velocità motoventilatori
G Pulsante comando valvola sfiato camera di cottura
Pulsante attivazione ciclo cook & hold. (premuto per 3”)
H Pulsante attivazione Delta T
L Display visualizzazione temperatura camera cottura
L1 Led bianco segnalazione temperatura in °C
L2 Led bianco segnalazione temperatura in °F
M Display visualizzazione valore di umidità
N Display visualizzazione tempo di cottura
O Display visualizzazione temperatura sonda al cuore
P Pulsante attivazione/spegnimento raffreddamento camera cottura
S Pulsante per la visualizzazione e programmazione rapida sonda al cuore
U Pulsante per la visualizzazione e programmazione rapida dell’umidità in camera di cottura
Fi
g
. 6.1
ISTRUZIONI PER L’UTENTE
INSTRUCTIONS FOR THE USER
ANLEITUNGEN FÜR DEN BENUTZER
Combination ovens with direct and boiler system, gas and electric models. Programmable panel
5
6.1 COMMISSIONING
(Fig. 6.1)
Ensure that water and gas supply valves installed upstream are turned on and that the protection
electricity switch is switched on.
On the display (A) it will appear firstly the version of the installed software, then the sign welcome, and
later the left message that for our simplicity we will call of “ stand
by” while the back lighted displays (L) (M) (N) (O) are switched
off.
Press the key ON/OFF (A1), the graphic display (A) will show the
last used cooking cycle, and the displays (L) (M) (N) (O) will switch on in accordance with the program
selected before.
To select a program turn the encoder knob (B) also called ENTER, clockwise to increase and counter
clockwise to decrease; it’s not necessary to confirm the choice of the new program with any control key
on the control panel.
By pressing the key (E) MENU the electronic system will show on the display (A) the symbols of the
operative menus inside which you can find submenus with relative programs.
To select the desired menu turn the encoder-knob until the display will show the corresponding symbol
in blue colour on a white background, push the encoder to confirm.
In the following chart all operative menus are well illustrated.
Manual
cooking
Prog. 01 Manual cooking program with single phase, convention mode
Prog. 02 Manual cooking program with single phase, steam mode
Prog. 03 Manual cooking program with single phase, steam-convection mode
Prog. 04 Regeneration program
Prog. 05 Hard-steam program (only for models with boiler)
The manual cooking programs with single phase are shown on the display (A) with
their respective number inside the symbol representing a hand.
Automatic
cooking
Meat
Big
pieces
Automatic programs
from n°06 to n°16
Small
pieces
Automatic programs
from n°17 to n°26
Fish Automatic programs
from n°27 to n°47
vegetables Automatic programs
from n°48 to n°68
Pastry and bakery products Automatic programs
from n°69 to n°89
Favourite cooking Automatic programs
from n°90 to n°95
The meat menu provides for two under menus to simplify the programming and
research of all automatic cooking programs.
The numbers of such programs are shown on the display (A) alternately to the
symbol, inside which they have been stored.
Maintenance
Program manual discharge of the boiler
Attention (only for models with boiler)
Program end of the work
Attention (only for models with boiler)
Washing
Program descailing and washing of the boiler
Attention (only for models with boiler)
Program cooking chamber washing Short cooking chamber washing
Long cooking chamber washing
Fig. 6.1 COMPONENTS DESCRIPTION OF PROGRAMMABLE PANEL
A LCD Display
A1 Electronic control on/off push button
B Encoder (knob used to select and modify the values of the program)
C Cooking cycle stop/start push button
D Cooking chamber light on/off push button
E Operating with reduced power push button
Start oven pre-heating button (pressed for 3”)
F Fan motor speed selector button
G Cooking chamber release valve control button
Cook & hold cycle start button. (pressed for 3”)
H Delta T start button
L Cooking chamber temperature display
L1 white LED indicating temperature in °C
L2 white LED indicating temperature in °F
M Humidity value display
N Cooking time display
O Core probe temperature display
P Oven cooling mode on/off push button
S Push button for the quick programming and display of the core probe
U Push button for the quick programming and display of humidity percentage into the cooking
chamber
Fig. 6.1

ISTRUZIONI PER L’UTENTE
INSTRUCTIONS FOR THE USER
ANLEITUNGEN FÜR DEN BENUTZER
Combination ovens with direct and boiler system, gas and electric models. Programmable panel
6
6.1 INBETRIEBNAHME (Fig.6.1)
Zuerst die Wasserabsperrventile (und die Gasventile bei den Gasöfen) öffnen und dann den dem Gerät
vorgeschalteten Schutzschalter einschalten.
Auf dem Display (A) erscheint zuerst die Version des
gebrauchten Softwares, dann die Schrift Welcome, danach
erscheint die Anzeige links, die wir “von stand by” nennen,
während die Leuchtdisplays (L) (M) (N) (O) ausgeschaltet
sind.
Die Taste ON/OFF (A1) drücken, der graphische Display (A) wird den letzten gewählten Garzyklus
erscheinen, die Display (L) (M) (N) (O) werden einschalten.
Um ein anderes Program zu wählen, den Encoder-Drehknopf, auch ENTER genannt (B) nach rechts
oder links drehen, um die Werte zu steigern oder verringern; es ist nicht nötig das neue Programm zu
bestätigen.
Die Taste (E) MENU drücken und das elektronische System erscheint auf dem Display (A) die
Kennzeichen der wirkenden Speisekarten, wo auch andere Speiselisten mit relativen Programmen
gespeichert sind. In der folgenden Tabelle finden Sie alle wirkende Speiselisten
Manuelles
Garen
Prog. 01 Manuelles Garprogramm, mit einziger Phase, Heissluftbetrieb
Prog. 02 Manuelles Garprogramm mit einziger Phase, Dampfbetrieb
Prog. 03 Manuelles Garprogramm mit einziger Phase, Mischbetrieb (Heissluft
und Dampf)
Prog. 04 Regenerationsprogramm
Prog. 05 Hard-steam Programm (nur für die Modelle mit Dampferzeuger)
Die manuellen Garprogramme mit einziger Phase erscheinen auf dem Display (A) mit
Ihren Nummern, die im Symbol liegen, das ein Hand darstellt.
Automatisch-
es Garen
Fleisch Grosse Stk Automatische Programme
von n°06 bis n°16
Kleinstk. Automatische Programme
von n°17 bis n°26
Fisch Automatische Programme
von n°27 bis n°47
Gemüse Automatische Programme
von n°48 bis n°68
Bäckerei-und Konditoreiprodukte Automatische Programme
von n°69 bis n°89
Lieblingsspeisen Automatische Programme
von n°90 bis n°95
Das Fleischmenü bietet ein anderes Untermenü um die Speicherung und die Wahl
der automatischen Garprogramme zu simplifizieren.
Die Nummern dieser Programme erscheinen auf dem Display (A) abwechselnd mit
dem Menüsymbol, wo sie gespeichert worden sind.
Service-
arbeiten
Programm manuelles Abfluss des Boilers
Achtung (nur für die Modelle mit Boiler)
Programm Ende der Arbeit
Achtung (nur für die Modelle mit Boiler)
Reinigung
Programm Entsteinen und Reinigung des Boilers
Achtung (nur für die Modelle mit Boiler)
Programme Garraumsreinigung Kurze Garraumsreinigung
Lange Garraumsreinigung
Abb.6.1 BESCHREIBUNG BESTANDTEILE
A Display LCD
A1 Ein-/Aus-Schalter Elektronikkontrolle (ON/OFF)
B Encoder-Knopf (er ist benutzt um den Wert des
Programmes einzustellen oder zu ändern)
C Zyklus - Start-/Stop-Taste
D Ein-Ausschalter Innenbeleuchtung
E Taste reduzierte Leistung
Ein-Taste Backofenvorheizung (3” Drücken)
F Taste Gebläsedrehzahlauswahl
G Ein-Taste Entlüftungsventil Garraum
Ein-Taste Zyklus Cook & Hold. (3” Drücken)
H Drückknopf Delta T
L Display-Anzeige Garraumtemperatur
L1 Weiße Led-Betriebsanzeige Temperatur in °C Grad
L2 Weiße Led-Betriebsanzeige Temperatur in F° Grad
M Display-Anzeige Dampfmenge
N Display-Anzeige Garzeit
O Display-Anzeige Kerntemperaturfühler
P Drückknopf Garraum Ein/aus Schalter
S Drückknopf Anzeige und schnelle Programmierung des Kerntemperaturfühlers
U Drückknopf Anzeige und schnelle Programmierung der Dampfmenge
Fi
g
. 6.1
ISTRUZIONI PER L’UTENTE
INSTRUCTIONS FOR THE USER
ANLEITUNGEN FÜR DEN BENUTZER
Combination ovens with direct and boiler system, gas and electric models. Programmable panel
7
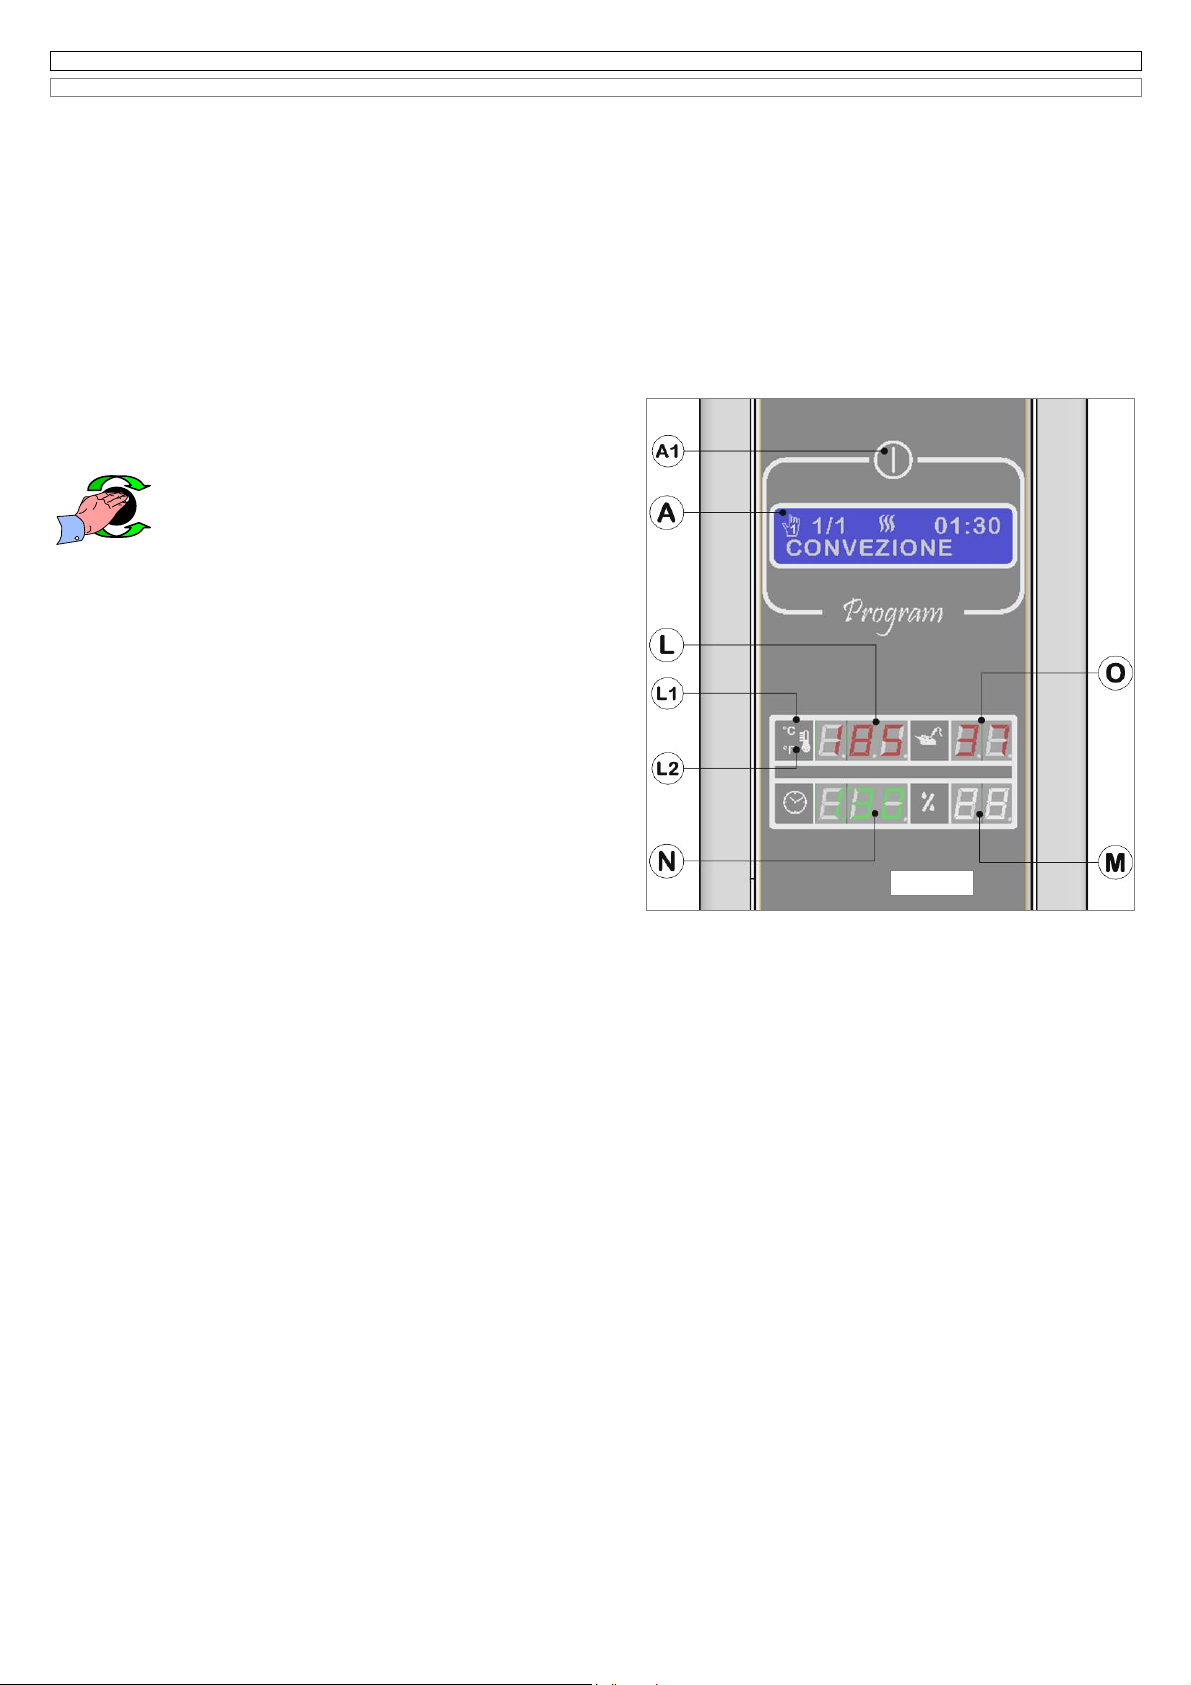
6.3 IMPOSTAZIONE DELLA FASE “CONVEZIONE” E AVVIAMENTO, NEL PROGRAMMA DI COTTURA MANUALE N°1 (Fig.6.3 it)
Questo programma manuale è costituito da un’ unica fase con il nome predefinito corrispondente alla modalità di cottura convezione con aria
surriscaldata.
Ruotando la manopola dell’encoder sul programma 1 il sistema elettronico visualizza:
1 nel display LCD (A) i dati relativi all’ultima cottura eseguita con il programma 1;
2 nel display luminoso (L) la temperatura di set per circa 5 secondi, a cui farà seguito la scritta Go prima di presentare la temperatura reale presente
nella camera di cottura;
3 nel display luminoso (N) il tempo relativo all’ultimo ciclo convezione effettuato.
Se nell’ultima cottura è stata utilizzata la sonda a spillone il display (N) risulterà spento;
4 nel display luminoso (O) la temperatura impostata per la sonda a spillone.
Se nell’ultima cottura era stata abilitata questa opzione, viceversa il display (O) sarà spento.
Nel display luminoso (M) non viene visualizzato alcun valore, in quanto nel ciclo convezione il controllo dell’umidità non viene attivato.
Se la porta del forno è aperta sul display (N) compare la scritta oPn.
Qualora si desideri effettuare un programma di cottura mantenendo gli stessi valori mostrati sui display, basterà premere il pulsante START/STOP per
l’avviamento del ciclo.
6.3A Modifica set temperatura camera cottura
Il valore visualizzato nel display (L) è quello relativo alla temperatura della
camera di cottura e può essere selezionato tra 20°C e 270°C; nel caso venga
selezionata la bassa velocità di ventilazione la temperatura max.
sarà invece di 220°C.
Per modificare il valore di (L) procedere come segue:
- premere la manopola dell’encoder (B);*il valore viene
visualizzato ad intermittenza;
- selezionare il nuovo valore, ruotando la manopola dell’encoder (B), in senso
orario per aumentarlo ed in senso antiorario per diminuirlo.
A selezione avvenuta, fare click sull’encoder per memorizzare il valore
desiderato e abilitare il sistema elettronico alla successiva programmazione della
temperatura al cuore del cibo da cuocere sul display (O).
6.3B Modifica set temperatura sonda al cuore
Questo forno permette il controllo della temperatura al cuore, in alternativa alla
cottura a tempo di durata prestabilita. Il valore visualizzato nel display (O) è
quello relativo alla temperatura al cuore rilevato dalla sonda a spillone, può
essere selezionato tra 20°C e 99°C.
Il sistema elettronico visualizza sempre nel display (O) l’ultimo valore di
temperatura selezionato: per aumentarlo ruotare la manopola dell’encoder in
senso orario, per diminuirlo ruotarla in senso antiorario.
A selezione avvenuta, click sull’encoder (B) per memorizzare il valore desiderato
e abilitare il sistema elettronico all’attesa del comando START per l’avviamento
del ciclo di cottura; la scritta Go verrà visualizzata nel display (L).
Ad avviamento avvenuto, il sistema elettronico visualizza nel display (N) il tempo
trascorso dall’inizio della cottura. Se non si vuole utilizzare il controllo della
temperatura al cuore selezionare le due linee centrali - - nel display (O), tali linee
compaiono nel display prima del valore minimo impostabile per questo dato. Con questa selezione il controllo della temperatura dello spillone viene
disattivato e il sistema elettronico abilita la successiva programmazione del tempo nel display (N).
Il tasto (S) di fig.6.1 permette l’accesso immediato alla visualizzazione e modifica del valore di temperatura al cuore selezionato, con le stesse modalità
precedentemente descritte, anche con ciclo di cottura in funzione.
IMPORTANTE: se la visualizzazione della temperatura è in °F il dato relativo allo spillone viene evidenziato sul display (N), il display (O) sarà spento,
per effettuare una cottura a tempo selezionare e confermare le tre linee centrali - - - di questo display; il tempo di cottura viene effettuato sullo stesso
display.
6.3C Abilitazione della funzione di Δt (Delta T)
Per fare in modo che, durante l’intero ciclo di cottura di grosse pezzature di carni, la perdita di sali e dei principi organolettici venga mantenuta ai valori
minimi, è molto importante che la differenza tra la temperatura della camera del forno e quella del prodotto in fase di cottura rimanga costante.
Questa differenza viene chiamata “Delta T”, brevemente Δt.
Minore risulterà la differenza tra queste due temperature, maggiore sarà la delicatezza del processo di cottura: ne consegue che il sapore dei cibi verrà
esaltato, mentre la perdita di peso sarà minima.
Se è stata impostata una temperatura al cuore, per la cottura con la sonda a spillone, il sistema elettronico propone automaticamente nel display grafico
(A) l’eventuale utilizzo della funzione Δt, la conferma di tale funzione si ottiene visualizzando e confermando la scritta SI con l’encoder (B), il valore Δt
che comparirà nel display (L) potrà essere modificato e confermato ruotando e premendo la manopola dell’encoder.
Il sistema elettronico permette l’abilitazione Δtanche con ciclo di cottura già in funzione tramite il tasto (H) di Fig.6.1, viene acceso il relativo led
luminoso per segnalare l’effettiva attivazione della cottura in modalità SPILLONE + Δt.
Qualora si esegua una nuova programmazione Δt, Il sistema elettronico propone e visualizza sempre nel display (L) l’ultimo valore memorizzato.
Il valore Δtpuò essere modificato solo dopo aver attivato un ciclo di cottura (vedi paragrafi successivi).
Se è stata attivata la funzione Δt, per disabilitarla premere una seconda volta il tasto (H) di Fig.6.1, per una durata di 4”, si spegnerà il led verde.
6.3D Modifica tempo di durata della cottura
Il sistema elettronico di questo forno permette di selezionare la durata della cottura entro i seguenti parametri: da 1 minuto a 9 ore e 59 minuti, oppure
con durata senza limiti di tempo. Per selezionare il nuovo valore ruotare la manopola dell’encoder (B), in senso orario per aumentarlo, in senso
antiorario per diminuirlo. La posizione di durata illimitata è quella contrassegnata dai (-:--) che compaiono nel display (N).
A selezione avvenuta, fare click sull’encoder per memorizzare il valore desiderato e abilitare il sistema elettronico all’attesa del comando START per
l’avviamento del ciclo di cottura. La scritta Go verrà visualizzata nel display (L).
*(Attenzione: per comodità questa frase sarà espressa, anche in altri paragrafi del manuale, “ click sull’encoder (B)”)
Fig.6.3 it

ISTRUZIONI PER L’UTENTE
INSTRUCTIONS FOR THE USER
ANLEITUNGEN FÜR DEN BENUTZER
Combination ovens with direct and boiler system, gas and electric models. Programmable panel
8
6.3 SETTING OF THE PHASE “CONVECTION” AND STARTING, IN THE MANUAL COOKING PROGRAM N°1
(Fig. 6.3 )
This program is manual and it is made up of 1 single phase, having the name corresponding to the convection mode with hot forced air.
By turning the encoder knob on the program 1, the electronic system will show:
1 on the LCD display (A)
the data relating to the last cooking
done using Program 1;
2 on the back lighted display (L)
the set temperature
for about 5 seconds, then the message
Go
before showing the real cooking chamber
temperature;
3 on the back lighted display (N)
the cooking time of the last convection cycle
done. If in the last cooking cycle the core probe has been used, the
display (N) will be switched off;
4 on the back lighted display (O)
the temperature selected for the core probe
,if in the last cooking cycle the core probe was used , vice versa the
display (O) will be switched off.
On the back lighted display (M) no value is shown, because during the convention cycle the humidification control cannot be used.
If the door of the oven is open on the display (N) you will see the message
oPn.
In case you want to choose a cooking program, maintaining the same values shown on the display, you just need to press the START/STOP button to
start the cycle.
6.3A Modification of the cooking chamber temperature
The value shown on the display (L) is that one of the cooking chamber
temperature and it can be selected between 20°C and 270°C; if you select low
speed of fan the maximum temperature will be instead 220°C.
To modify the value (L) please act as follows:
- press the encoder Knob (B);
*
the value will flash;
- select the new value, by turning the encoder knob (B), clockwise
to increase it and counter clockwise to decrease it.
Press the encoder knob to memorize the selected value and let the electronic
system move to the following programming of the temperature core probe on the
display (O).
6.3B Modification core probe temperature
This oven lets you check the core probe temperature, as an alternative to the
established cooking time. The value on the display (O) is the core probe
temperature, measured by the skewer and can be selected between 20°C and
99°C.
The electronic system shows always on the same display (O) the last selected
value of temperature: to increase it turn the encoder-knob clockwise and to
decrease it turn the encoder knob counter clockwise.
Press the encoder knob (B) to memorize the selected value (B), and wait until
the message
Go
will appear on the display (L); now you can press START to
start the cooking cycle.
After pressing the key START, that causes the beginning of the cycle, the
electronic system will show on the display (N) the time passed from the
beginning of the cooking cycle.
Select the symbol
- -
(2 Lines) on the display (O) if you don’t want to use the
core probe temperature, situated before the minimum value to select for this
date. Doing this, the core probe temperature is deactivated and the electronic system is ready for the next programming of the cooking time on the
display (N).
The key (S) of fig.6.1 allows an easy access to display and modify the value of the setted core temperature, with the same modalities as above
described, and also during the cooking cycle.
ATTENTION:
if the temperature is shown in °F degrees , you will see the value of the core probe on the display (N), the display (O) will be switched off;
to select a cooking cycle using time select and confirm the symbol - - - (3 lines) on the display (N), cooking time will be selected on the same display.
6.3C Activation of the function
Δ
t (Delta T)
So that while cooking large pieces of meat the loss of salts and vitamins is reduced, it’s very important to maintain a steady difference between the
cooking chamber temperature and that one in the core of the product.
This difference is called “
Delta T
”, shortly Δ
t.
The smaller this value is, the better the cooking results will be. This function allows a more delicate cooking process: the food is more tasty and the
weight loss is reduced.
If you have selected a cooking cycle with skewer, the electronic system proposes automatically on the display (A) the eventual choice of the function Δ
t
,
to confirm such function select the message SI with the encoder (B), the Δ
t
value will appear on the display (L) and can be modified and confirmed by
turning and pressing the encoder knob.
The electronic system allows the activation of the function Δ
t
also during a cooking cycle by using the button (H) of Fig.6.1, the relative back lighted led
turns on to show that the function
CORE PROBE +
Δ
t
is activated.
In case you have to execute a new programming of Δ
t
, the electronic system proposes and shows on the display (L) the last memorised value.
Δ
t
value can be modified only after you have activated a cooking cycle (see following paragraphs).
If you have selected the function Δ
t
, to cancel it press a second time the key (H) of Fig.6.1, for about 4”, the green led will turn off.
6.3D Modification of the cooking time
The electronic system of this oven lets you select a cooking time within the following parameters: from 1 minute up to 9 hours and 59 minutes, or without
any time limit. To select a new value turn the encoder knob (B) clockwise to increase it and counter clockwise to decrease it. Cooking without any time
limit is marked by the symbol (-:--) that appears on the display (N).
Then press the encoder to store the value and the electronic system waits for the START to begin the cooking cycle. The message
Go
will appear on
the display (L).
Attention:
After the cooking cycle has begun, it is always possible to modify at any time the values of the functions above mentioned.
ATTENTION:
During convection mode the function percentage of humidity is not available, the display (m) is always switched off.
* (Attention: for our simplicity this sentence will be used also in other paragraphs of this notice, “ click on the encoder (B)”)
Fig.6.3 uk

ISTRUZIONI PER L’UTENTE
INSTRUCTIONS FOR THE USER
ANLEITUNGEN FÜR DEN BENUTZER
Combination ovens with direct and boiler system, gas and electric models. Programmable panel
9
6.3 EINSTELLUNG DER PHASE “HEISSUMLUFT” UND STARTEN , IM MANUELLEN GARPROGRAMM N°1 (Fig. 6.3 it)
Dieses Programm ist manuell und verfügt über eine Phase mit dem Namen des Garprozesses forcierte Heissumluft.
Den Encoder-Knopf auf das Programm 1 drehen; das elektronische System macht die folgenden Daten sichtbar:
1 Auf dem Display LCD (A) erscheinen die Daten des letzten Garprozesses mit dem Programm 1;
2 Auf dem Leuchtdisplay (L) erscheint zuerst die Einstellungstemperatur für zirka 5 Sekunden, und danach die Schrift Go, bevor die richtige
Garraumtemperatur gezeigt wird.
3 Auf dem Leuchtdisplay (N) erscheint die Garzeit des letzten Heissluftzyklus. Wenn man im letzten Garzyklus den KTF benutzt hat, wird der
Display (N) ausgeschaltet;
4 Auf dem Leuchtdisplay (O) erscheint die Temperatur des KTFs , wenn diese Funktion im letzten Garzyklus aktiv war, hingegen wird der Display (O)
ausgeschaltet.
Auf dem Leuchtdisplay (M) erscheint kein Wert, da die Dampfmenge im Heissluftzyklus nicht aktiv ist..
Wenn die Tür geöffnet ist, auf dem Display (N) erscheint die Schrift oPn.
Wenn man ein Garprogramm mit den selben erscheinten Werten auf dem Display wählen wird, genügt es den Drehknopf START/STOP drücken, um
den Zyklus zu starten.
6.3A Änderung Garraumtemperatur
Der Wert auf dem Display (L) ist die Garraumtemperatur und kann zwischen
20°C und 270°C eingestellt werden; wenn die niedrige Geschwindigkeit
eingestellt wird, ist die max. Temperatur 220°C.
Um den Wert (L) zu verändern, beachten Sie wie es folgt:
- den Encoder-Knopf drücken (B);*der Wert wird blinken;
- den Encoder-Knopf (B) drehen um den neuen Wert
einzustellen; im Uhrzeigersinn um den Wert zu erhöhen und
umgekehrt um den Wert zu vermindern.
Um den gewählten Wert zu speichern, den Encoder-Knopf drücken und der
Schieber bewegt auf den Wert des KTFs auf dem Display (O).
6.3B Änderung Kerntemperaturfühler
Mit diesem Ofen kann man die Kerntemperatur überwachen, nicht nur die
gewählte Garzeit. Der Wert auf dem Display (O) ist die von der Sondenspitze
gemessenen Kerntemperatur und kann zwischen 20°C und 99°C eingestellt
werden.
Das elektronische System erscheint immer auf dem Display (O) den letzten
eingestellten Wert für den Kerntemperaturfühler: um den Wert zu erhöhen
den Encoder-Knopf Uhrzeigersinn drehen und ungekehrt um den Wert zu
vermindern. Den Encoder-Knopf drücken, um den Wert zu speichern und das
elektronische System wartet auf die Funktion START, um den Garzyklus zu
starten. Die Schrift Go erscheint auf dem Display (L).
Drück START um den Zyklus zu starten, das elektronische System erscheint
auf dem Display (N) die Garzeit, die von Anfang an schon vergangen ist.
Wenn man die Kerntemperatur nicht überwachen möchte, die 2 Linien - - auf
dem Display (O) wählen, die vor dem Minimalwert liegen. Die Funktion
Kerntemperatur wird ausgeschaltet und das elektronische System wartet auf
die Funktion Garzeit auf dem Display (N).
Die Taste (S) von Abb.6.1 ermöglicht die einfache Erscheinung und Veränderung der gewählte Kerntemperatur, mit den selben schon erklärten
Modalitäten, auch wenn der Garzyklus in Betrieb ist.
ACHTUNG: wenn die Temperatur in F° Grad eingestellt wird, erscheint der Wert auf dem Display (N), der Display (O) wird ausgeschaltet. Um mit
Zeitgeber zu garen, muß man die 3 zentralen Linien - - - auf diesem Display wählen und bestätigen.
6.3C Einstellung der Funktion Δt (Delta T)
Beim Garen von großen Fleischstücken, so daß der Verlust an Vitaminen und Mineralsalzen ganz gering bleibt, ist es sehr wichtig eine konstante
Differenz zwischen Garraumtemperatur und Kerntemperatur des Produktes zu bewahren. Diese Differenz wird “Delta T” genannt, kürzer Δt.
Je kleiner diese Differenz ist, desto besser wird das Garergebnis: das Fleisch wird immer wunderbar zart und der Gewichtverlust ist sehr gering.
Wenn man eine Temperatur für das Garen mit Sondenspitze gewählt hat, schlägt das elektronische System automatisch auf dem Display (A) die
Funktion Δt vor; mit dem Encoder (B) die Schrift SI bestätigen, der ΔtWert auf dem Display (L) kann mit dem selben Encoder-Knopf geändert und
bestätigt werden.
Wenn der Garzyklus schon gestartet ist, um die Funktion Δt zu wählen, die Taste (H) von Abb..6.1 drücken, der grüne Led wird eingeschaltet, um zu
zeigen , daß die Funktion KERNTEMPERATURFÜHLER + Δt. In Betrieb ist
Wenn man eine neue Programmierung der Funktion Δt durchführt, erscheint immer auf dem Display (L) der letzte Wert, den Sie gespeichert haben.
Der Δt Wert kann nur nach einem Garzyklus geändert werden. (siehe folgende Abschnitte).
Wenn die Funktion Δt aktiv ist, die Taste (H) von Abb. 6.1 noch mal für zirka 4 Sekunden drücken um Δtauszulöschen; der grüne Led wird ausschalten.
6.3D Änderung Garzeit
Das elektronische System dieses Ofens ermöglicht die Garzeit innerhalb den folgenden Parameter zu speichern: von 1 Minute bis zu 9 Stunden und 59
Minuten, oder ohne Zeitgrenzen. Um den Wert einzustellen den Encoder-Knopf (B) drücken, im Uhrzeigersinn um Ihn zu erhöhen und umgekehrt um
ihn zu vermindern. Die Position ohne Zeitgrenzen ist vom Kennzeichen (-:--) auf dem Display (N) markiert.
Den Encoder-Knopf klicken um den Wert zu speichern, das elektronische System wartet auf die Funktion START, um den Garprozess zu starten.
Die Schrift Go erscheint auf dem Display (L).
Anmerkung: Wenn der Garzyklus begonnen ist, ist es immer möglich die Werte der oben genannten Funktionen zu ändern.
ACHTUNG: Im Garprozess Heissluft, ist die Funktion “Befeuchtungprozent” nicht aktiv, der Display (m) ist immer ausgeschaltet.
*(Achtung: dieser Satz wird auch in anderen Abschnitten dieser Bedienungsanleitung benutzt “ den Encoder-Knopf klicken (B)”)
Abb.6.3 de
ISTRUZIONI PER L’UTENTE
INSTRUCTIONS FOR THE USER
ANLEITUNGEN FÜR DEN BENUTZER
Combination ovens with direct and boiler system, gas and electric models. Programmable panel
10
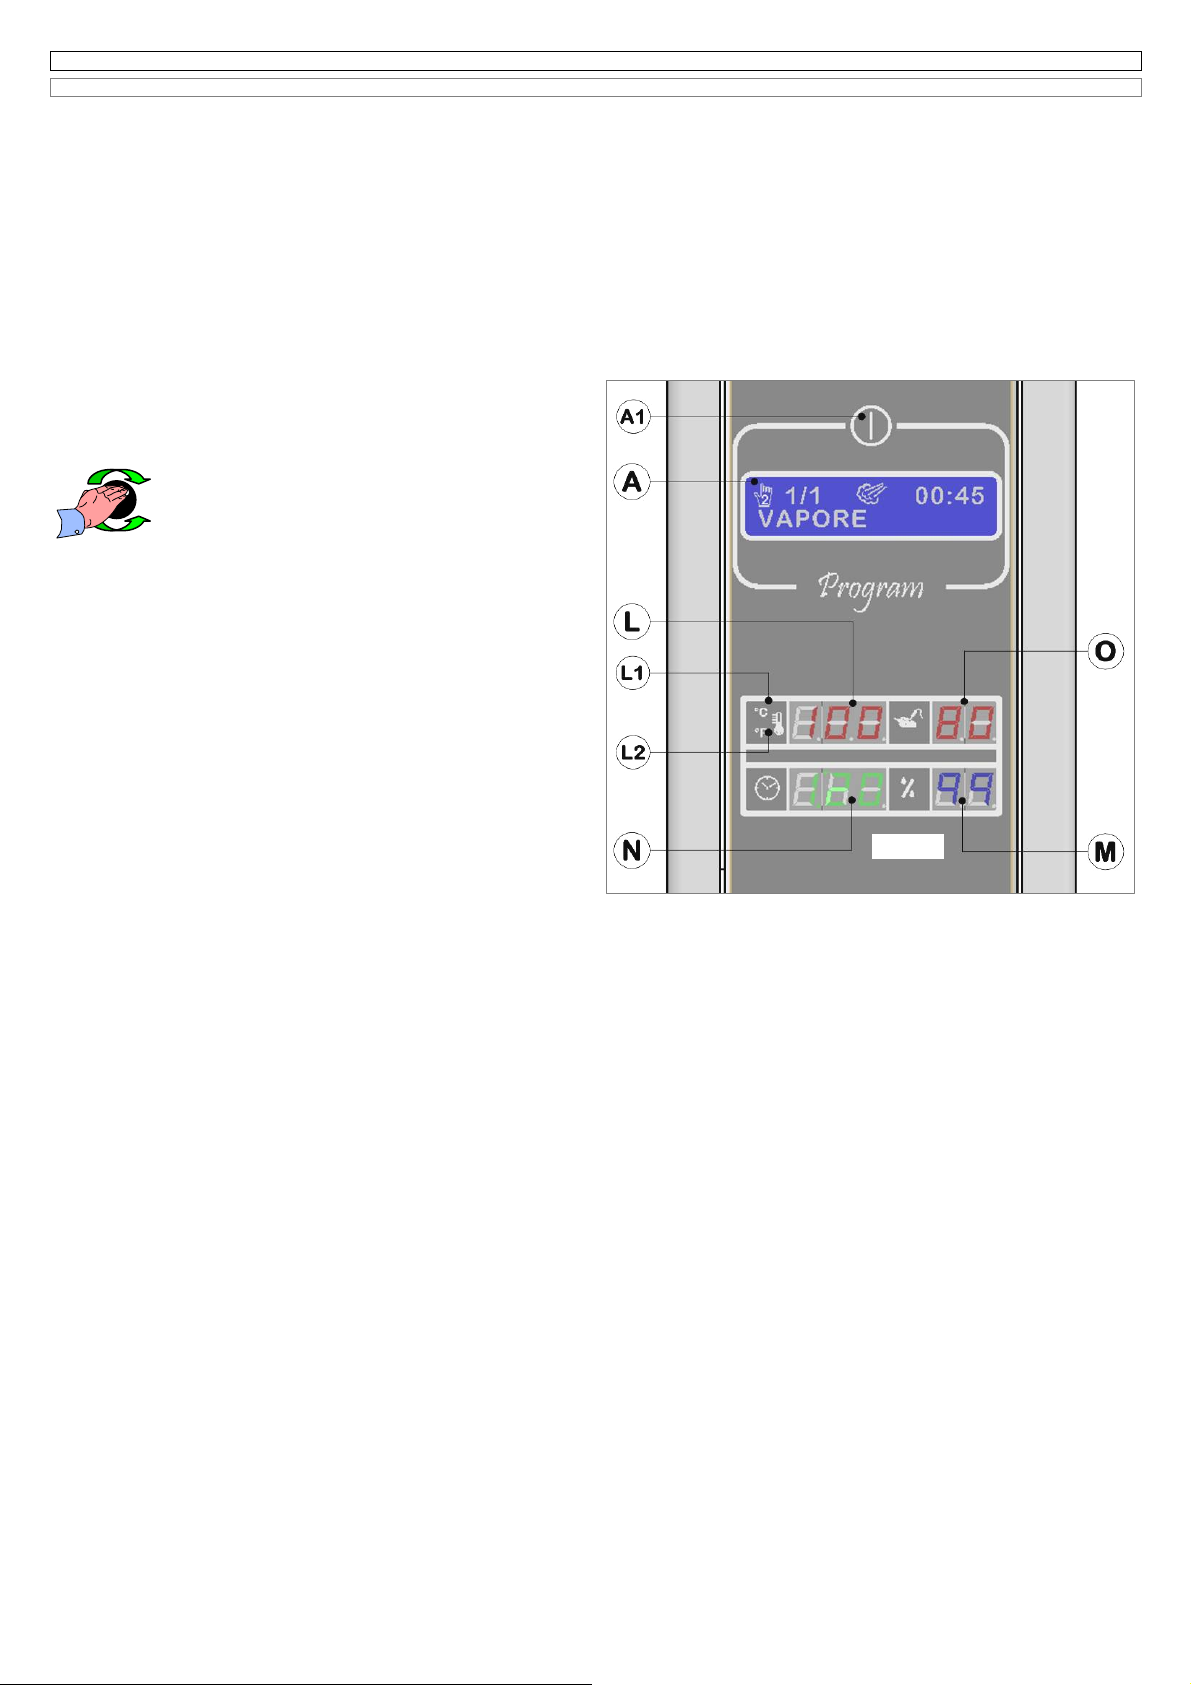
6.4 IMPOSTAZIONE DELLA FASE “VAPORE” E AVVIAMENTO NEL PROGRAMMA DI COTTURA MANUALE N°2 (Fig. 6.4 it)
Questo programma è manuale ed è costituito da un’ unica fase con il nome predefinito corrispondente alla modalità di cottura a vapore.
Ruotando la manopola dell’encoder sul programma 2 il sistema elettronico visualizza:
1 nel display LCD (A) i dati relativi all’ultima cottura eseguita con il programma 2,
2 nel display luminoso (L) la temperatura di set per circa 5 secondi, a cui farà seguito la scritta Go prima di presentare la temperatura reale presente
nella camera di cottura,
3 nel display luminoso (N) il tempo relativo all’ultimo ciclo vapore effettuato.
Se nell’ultima cottura è stata utilizzata la sonda a spillone il display risulterà spento.
4 nel display luminoso (O) la temperatura impostata per la sonda a spillone, se nell’ultima cottura era stata abilitata questa opzione, viceversa il
display (O) sarà spento.
5 nel display luminoso (M) la percentuale di umidità relativa pari al 99%.
Se la porta del forno è aperta, sul display (N) compare la scritta oPn.
Qualora si desideri effettuare un programma di cottura mantenendo gli stessi valori mostrati sui display basterà premere il pulsante START/STOP per
l’avviamento del ciclo.
6.4A Modifica set temperatura camera cottura
Il valore visualizzato nel display (L) è quello relativo alla temperatura della
camera di cottura, può essere selezionato tra 30°C e 100°C.
Per modificare il valore di (L) procedere come segue:
- premere la manopola dell’encoder (B); il valore viene
visualizzato ad intermittenza;
- selezionare il nuovo valore ruotando la manopola
dell’encoder (B), in senso orario per aumentarlo, in senso
antiorario per diminuirlo.
A selezione avvenuta, fare click sull’encoder per memorizzare il valore
desiderato e abilitare il sistema elettronico alla successiva programmazione
della temperatura al cuore del cibo da cuocere sul display (O).
6.4B Modifica set temperatura sonda al cuore
Come descritto al paragrafo 6.3B
6.4C Abilitazione della funzione di Δt (Delta T)
Come descritto al paragrafo 6.3C
6.4D Modifica tempo di durata della cottura
Come descritto al paragrafo 6.3D
6.4E Modifica set umidità relativa
Per la fase “vapore” la percentuale di umidità nella camera di cottura è
impostata dal sistema elettronico sul valore predefinito e non modificabile
del 99%.
Il taso
Molto importante:
E’ noto che la temperatura del vapore a pressione atmosferica non può raggiungere valori superiori a 100°C.
Il sistema elettronico del forno visualizza nel display grafico (A) il messaggio “ALTA TEMP.” qualora venga selezionata la fase vapore con una
temperatura all’interno della camera di cottura superiore a 100°C.
Il messaggio è solo informativo, questa situazione si riscontra dopo una fase a “convezione o mista” con temperature superiori a 100°C al termine delle
quali non sia stato eseguito un ciclo di raffreddamento per diminuire la temperatura.
Il sistema di controllo del forno permette il funzionamento a vapore anche in questa situazione.
Qualora nel display grafico (A), dei modelli dotati di boiler, venga visualizzato il messaggio “NO ACQUA” non sarà possibile avviare il forno in modalità
vapore.
Fig. 6.4 it

ISTRUZIONI PER L’UTENTE
INSTRUCTIONS FOR THE USER
ANLEITUNGEN FÜR DEN BENUTZER
Combination ovens with direct and boiler system, gas and electric models. Programmable panel
11
6.4 SETTING OF THE PHASE “STEAM” AND STARTING IN THE MANUAL COOKING PROGRAM N°2
(Fig. 6.4 it)
This program is manual and is made up of a single phase, having the name corresponding to the cooking mode only steam.
By turning the encoder-knob on the program 2, the electronic system will show:
1 on the LCD display (A)
the data relating to the last cooking
done using Program 2;
2 on the back lighted display (L)
the set temperature
for about 5 seconds, then the message
Go
before showing the real cooking chamber
temperature;
3 on the back lighted display (N)
the cooking time of the last steam cycle
done. If in the last cooking cycle the core probe has been used, the
display (N) will be switched off;
4 on the back lighted display (O)
the temperature selected for the core probe
if in the last cooking cycle the core probe was used , vice versa the
display (O) will be switched off.
5 On the back lighted display (M)
the percentage of humidification
of 99 %.
If the door of the oven is open on the display (N) you will see the message
oPn.
If you want to select a cooking program, maintaining the same values shown on the display, you just need to press the button START/STOP to start the
cycle.
6.4A Modification cooking chamber temperature
The value shown on the display (L) is that one of the cooking chamber
temperature and it can be selected between 30°C and 270°C; if you select
low speed of fan the maximum temperature will be instead
220°C.
To modify the value (L) please act as follows:
- press the encoder Knob (B);*the value will flash;
- select the new value, by turning the encoder knob (B),
clockwise to increase it and counter clockwise to decrease it.
Press the encoder knob to memorize the selected value and let the
electronic system move to the following programming of the temperature
core probe on the display (O).
6.4B Modification core probe temperature
As described on the paragraph 6.3B
6.4C Activation of
Δ
t function (Delta T)
As described on the paragraph 6.3C
6.4D Modification cooking time
As described on the paragraph 6.3D
6.4E Modification humidification percentage
For the phase “steam” the percentage of humidity inside the cooking
chamber is automatically set by the electronic system on a fixed and not
modifiable value of 99%.
ATTENTION:
It is well known that the steam temperature at atmospheric pressure cannot reach values over 100°C.
The electronic system of the oven shows on the display (A) the message “HIGH TEMP.” , when you select the steam phase with a cooking chamber
temperature over 100°C.
The message is only informative , this situation can happen after a “convention or combination” phase with temperature over 100°C , in case you haven’t
done a cooling cycle at the end of the phase to reduce the temperature.
The control system of the oven allows the functioning of steam also in this situation.
If the display (A) shows the message “NO WATER” it won’t be possible to activate the steam mode. (only for the models with boiler)
Fig.6.4 uk

ISTRUZIONI PER L’UTENTE
INSTRUCTIONS FOR THE USER
ANLEITUNGEN FÜR DEN BENUTZER
Combination ovens with direct and boiler system, gas and electric models. Programmable panel
12
6.4 EINSTELLUNG DER PHASE “DAMPF” UND STARTEN IM MANUELLEN GARPROGRAMM N°2 (Abb. 6.4 it)
Dieses Programm ist manuell und verfügt über eine einzelne Phase, mit den Namen des Garprozesses nur Dampf.
Den Drehknopf auf das Programm 2 drehen und das elektronische System macht die folgenden Daten sichtbar:
1 Auf dem Display LCD (A) erscheinen die Daten des letzten Garprozesses mit dem Programm 2;
2 Auf dem Leuchtdisplay (L) erscheint zuerst die Einstellungstemperatur für zirka 5 Sekunden, und danach die Schrift Go, bevor die richtige
Garraumtemperatur gezeigt wird.
3 Auf dem Leuchtdisplay (N) erscheint die Garzeit des letzten Dampfzyklus. Wenn man im letzten Garzyklus den KTF benutzt hat, wird der
Display (N) ausgeschaltet;
4 Auf dem Leuchtdisplay (O) erscheint die Temperatur des KTFs , wenn diese Funktion im letzten Garzyklus aktiv war, hingegen wird der Display (O)
ausgeschaltet.
5 Auf dem Leuchtdisplay (M) erscheint die Dampfmenge, mit Prozentual 99%.
Wenn die Tür geöffnet ist, auf dem Display (N) erscheint die Schrift oPn.
Wenn man ein Garprogramm mit den selben erscheinten Werten auf dem Display wählen wird, genügt es den Drehknopf START/STOP drücken, um
den Zyklus zu starten.
6.4A Änderung Garraumtemperatur
Der Wert auf dem Display (L) ist die Garraumtemperatur und kann zwischen
30°C und 270°C eingestellt werden; wenn die niedrige Geschwindigkeit
eingestellt wird, ist die max. Temperatur 220°C.
Um den Wert (L) zu verändern, beachten Sie wie es folgt:
- den Encoder-Knopf drücken (B); der Wert wird blinken;
- den Encoder-Knopf (B) drehen um den neuen Wert
einzustellen; im Uhrzeigersinn um den Wert zu erhöhen und
umgekehrt um den Wert zu vermindern.
Um den gewählten Wert zu speichern, den Encoder-Knopf drücken und der
Schieber bewegt auf den Wert des KTFs auf dem Display (O).
6.4B Änderung Kerntemperaturfühler
Wie im Abschnitt 6.3B beschrieben
6.4C Einstellung der Funktion Δt (Delta T)
Wie im Abschnitt 6.3C beschrieben.
6.4D Änderung Garzeit
Wie im Abschnitt 6.3D beschrieben
6.4E Änderung Dampfmenge
Für die Phase “nur Dampf” wird die Dampfmenge im Garraum automatisch
vom elektronischen System eingestellt, auf einen Wert .Für die Phase
“Dampf” wird die Dampfmenge im Garraum automatisch vom elektronischen
System mit einem festen Wert von 99%, den man nicht modifizieren kann.
ACHTUNG: Es ist allgemein bekannt, daß die Dampftemperatur beim atmosphärischen Druck eine höhere Temperatur als 100 ° C nicht erreichen
kann. Das elektronische System erscheint auf dem Display (A) die Schrift “HOHE TEMP.”, immer wenn man eine Dampf-Phase mit Garraumtemperatur
über 100°C einstellt.
Diese Mitteilung ist nur informativ, diese Situation kann nur mit einer Heißluft- oder Mischbetrieb-Phase und Temperatur über 100 °C geschehen, falls
man die Abkühlung am Ende der Phase nicht gemacht hat, um die Temperatur zu reduzieren.
Das System ermöglicht die Dampferzeugung auch in dieser Situation.
Wenn auf dem Display (A) erscheint die Schrift “KEIN WASSER” wird es unmöglich den Dampfzyklus einzustellen.( nur für die Modelle mit
Dampferzeuger)
Fig. 6.4 de

ISTRUZIONI PER L’UTENTE
INSTRUCTIONS FOR THE USER
ANLEITUNGEN FÜR DEN BENUTZER
Combination ovens with direct and boiler system, gas and electric models. Programmable panel
13
6.5 IMPOSTAZIONE DELLA FASE “MISTA” E AVVIAMENTO NEL PROGRAMMA DI COTTURA MANUALE N°3 (Fig. 6.5 it)
Questo programma è manuale ed è costituito da un’ unica fase con il nome predefinito corrispondente alla modalità di cottura convezione con aria
surriscaldata e vapore detta anche mista.
Ruotando la manopola dell’encoder sul programma 3 il sistema elettronico visualizza:
1 nel display LCD (A) i dati relativi all’ultima cottura eseguita con il programma 3;
2 nel display luminoso (L) la temperatura di set per circa 5 secondi, a cui farà seguito la scritta Go prima di presentare la temperatura reale presente
nella camera di cottura;
3 nel display luminoso (N) il tempo relativo all’ultimo ciclo misto effettuato.
Se nell’ultima cottura è stata utilizzata la sonda a spillone il display risulterà spento.
4 nel display luminoso (O) la temperatura impostata per la sonda a spillone se nell’ultima cottura era stata abilitata questa opzione, viceversa il
display (O) sarà spento.
5 nel display luminoso (M) la percentuale di umidità relativa utilizzata per l’ultimo programma di cottura misto.
Se la porta del forno è aperta sul display (N) compare la scritta oPn.
Qualora si desideri effettuare un programma di cottura mantenendo gli stessi valori mostrati sui display basterà premere il pulsante START/STOP per
l’avviamento del ciclo.
6.5A Modifica set temperatura camera cottura
Come descritto al paragrafo 6.3A
6.5B Modifica set temperatura sonda al cuore
Come descritto al paragrafo 6.3B
6.5C Abilitazione della funzione di Δt (Delta T)
Come descritto al paragrafo 6.3C
6.5D Modifica tempo di durata della cottura
Come descritto al paragrafo 6.3D
6.5E Modifica set umidità relativa
Il sistema elettronico di questo forno permette di selezionare una
percentuale di umidità relativa nella camera di cottura, nel campo di valori
compreso tra 1% - 99%.
Per selezionare il nuovo valore ruotare la manopola dell’encoder (B), in
senso orario per aumentarlo, in senso antiorario per diminuirlo.
A selezione avvenuta, fare click sull’encoder per memorizzare il valore
desiderato e abilitare il sistema elettronico all’attesa del comando START
per l’avviamento del ciclo di cottura.
La scritta Go verrà visualizzata nel display (L).
Il tasto (U) di fig.6.1 permette l’accesso immediato alla visualizzazione e
modifica del valore di umidità selezionato, con le stesse modalità
precedentemente descritte, anche con ciclo di cottura in funzione.
Fig.6.5 it

ISTRUZIONI PER L’UTENTE
INSTRUCTIONS FOR THE USER
ANLEITUNGEN FÜR DEN BENUTZER
Combination ovens with direct and boiler system, gas and electric models. Programmable panel
14
6.5 SETTING OF THE PHASE “COMBINATION” AND STARTING IN THE MANUAL COOKING PROGRAM N°3
(Fig. 6.5 it)
This program is manual and is made up of a single phase, having the name corresponding to the cooking mode convection with hot forced air and steam
also called combination.
By turning the encoder-knob on the program 3, the electronic system will show:
1 on the LCD display (A) the data relating to the last cooking done using Program 3;
2 on the back lighted display (L) the set temperature for about 5 seconds, then the message
Go
before showing the real cooking chamber
temperature;
3 on the back lighted display (N) the cooking time of the last steam cycle done. If in the last cooking cycle the core probe has been used, the
display (N) will be switched off;
4 on the back lighted display (O) the temperature selected for the core probe if in the last cooking cycle the core probe was used , vice versa the
display (O) will be switched off.
5 On the back lighted display (M) the percentage of humidification used for the last combination cooking program.
If the door of the oven is open on the display (N) you will see the message
oPn.
If you want to select a cooking program, maintaining the same values shown on the display, you just need to press the button START/STOP to start the
cycle.
6.5A Modification cooking chamber temperature
As described on paragraph 6.3A.
6.5B Modification core probe temperature
As described on the paragraph 6.3B.
6.5C Activation of
Δ
t function (Delta T)
As described on the paragraph 6.3C.
6.5D Modification cooking time
As described on the paragraph 6.3D.
6.5E Modification percentage of humidity
The electronic system of this oven allows to select a percentage of humidity
inside the cooking chamber, varying from 1% to 99%.
To select a new value, turn the encoder knob (B), clockwise to increase it
and counter clockwise to decrease it. Press the encoder to memorize the
value and the electronic system waits for the message START to start the
cooking cycle.
The message
Go
will appear on the display (L).
The key (U) of fig.6.1 allows an easy access to display and modify the
setted percentage of humidity, with the same modalities above described,
also during the cooking cycle.
Fig.6.5 it

ISTRUZIONI PER L’UTENTE
INSTRUCTIONS FOR THE USER
ANLEITUNGEN FÜR DEN BENUTZER
Combination ovens with direct and boiler system, gas and electric models. Programmable panel
15
6.5 EINSTELLUNG DER PHASE “MISCHBETRIEB” UND STARTEN IM MANUELLEN GARPROGRAMM N°3 (Abb. 6.5 it)
Dieses Programm ist manuell und verfügt über eine einzelne Phase, mit den Namen des Garprozesses forcierte Heißluft mit Dampf, kürzer Mischbetrieb
genannt.
Den Drehknopf auf das Programm 3 drehen und das elektronische System macht die folgenden Daten sichtbar:
1 Auf dem Display LCD (A) erscheinen die Daten des letzten Garprozesses mit dem Programm 3;
2 Auf dem Leuchtdisplay (L) erscheint zuerst die Einstellungstemperatur für zirka 5 Sekunden, und danach die Schrift Go, bevor die richtige
Garraumtemperatur gezeigt wird.
3 Auf dem Leuchtdisplay (N) erscheint die Garzeit des letzten Dampfzyklus. Wenn man im letzten Garzyklus den KTF benutzt hat, wird der Display
(N) ausgeschaltet;
4 Auf dem Leuchtdisplay (O) erscheint die Temperatur des KTFs , wenn diese Funktion im letzten Garzyklus aktiv war, hingegen wird der Display (O)
ausgeschaltet.
5 Auf dem Leuchtdisplay (M) erscheint die Dampfmenge, die man im letzten Garzyklus Mischbetrieb benutzt hat. .
Wenn die Tür geöffnet ist, auf dem Display (N) erscheint die Schrift oPn.
Wenn man ein Garprogramm mit den selben erscheinten Werten auf dem Display wählen wird, genügt es den Drehknopf START/STOP drücken, um
den Zyklus zu starten.
6.5A Änderung Garraumtemperatur
Wie im Abschnitt 6.3A beschrieben.
6.5B Änderung Kerntemperaturfühler
Wie im Abschnitt 6.3B beschrieben.
6.5C Einstellung der Funktion Δt (Delta T)
Wie im Abschnitt 6.3C beschrieben.
6.5D Änderung Garzeit
Wie im Abschnitt 6.3D beschrieben.
6.5E Änderung Dampfmengeprozentual
Das elektronische System des Ofens ermöglicht die Dampfmenge im
Garraum vom 1% bis 99% zu regulieren.
Um einen neuen Wert einzustellen, den Drehknopf (B) Im Uhrzeigersinn
drehen um zu erhöhen und umgekehrt um den Wert zu vermindern.
Den Drehknopf drücken um den Wert zu speichern und das elektronische
System wartet auf die Schrift START, um den Garzyklus zu starten.
Die Schrift Go erscheint auf dem Display (L).
Die Taste (U) von Abb.6.1 ermöglicht die einfache Erscheinung und
Veränderung der gewählten Dampfmenge, mit den selben schon erklärten
Modalitäten, auch wenn der Garzyklus in Betrieb ist.
Abb. 6.5 de
ISTRUZIONI PER L’UTENTE
INSTRUCTIONS FOR THE USER
ANLEITUNGEN FÜR DEN BENUTZER
Combination ovens with direct and boiler system, gas and electric models. Programmable panel
16
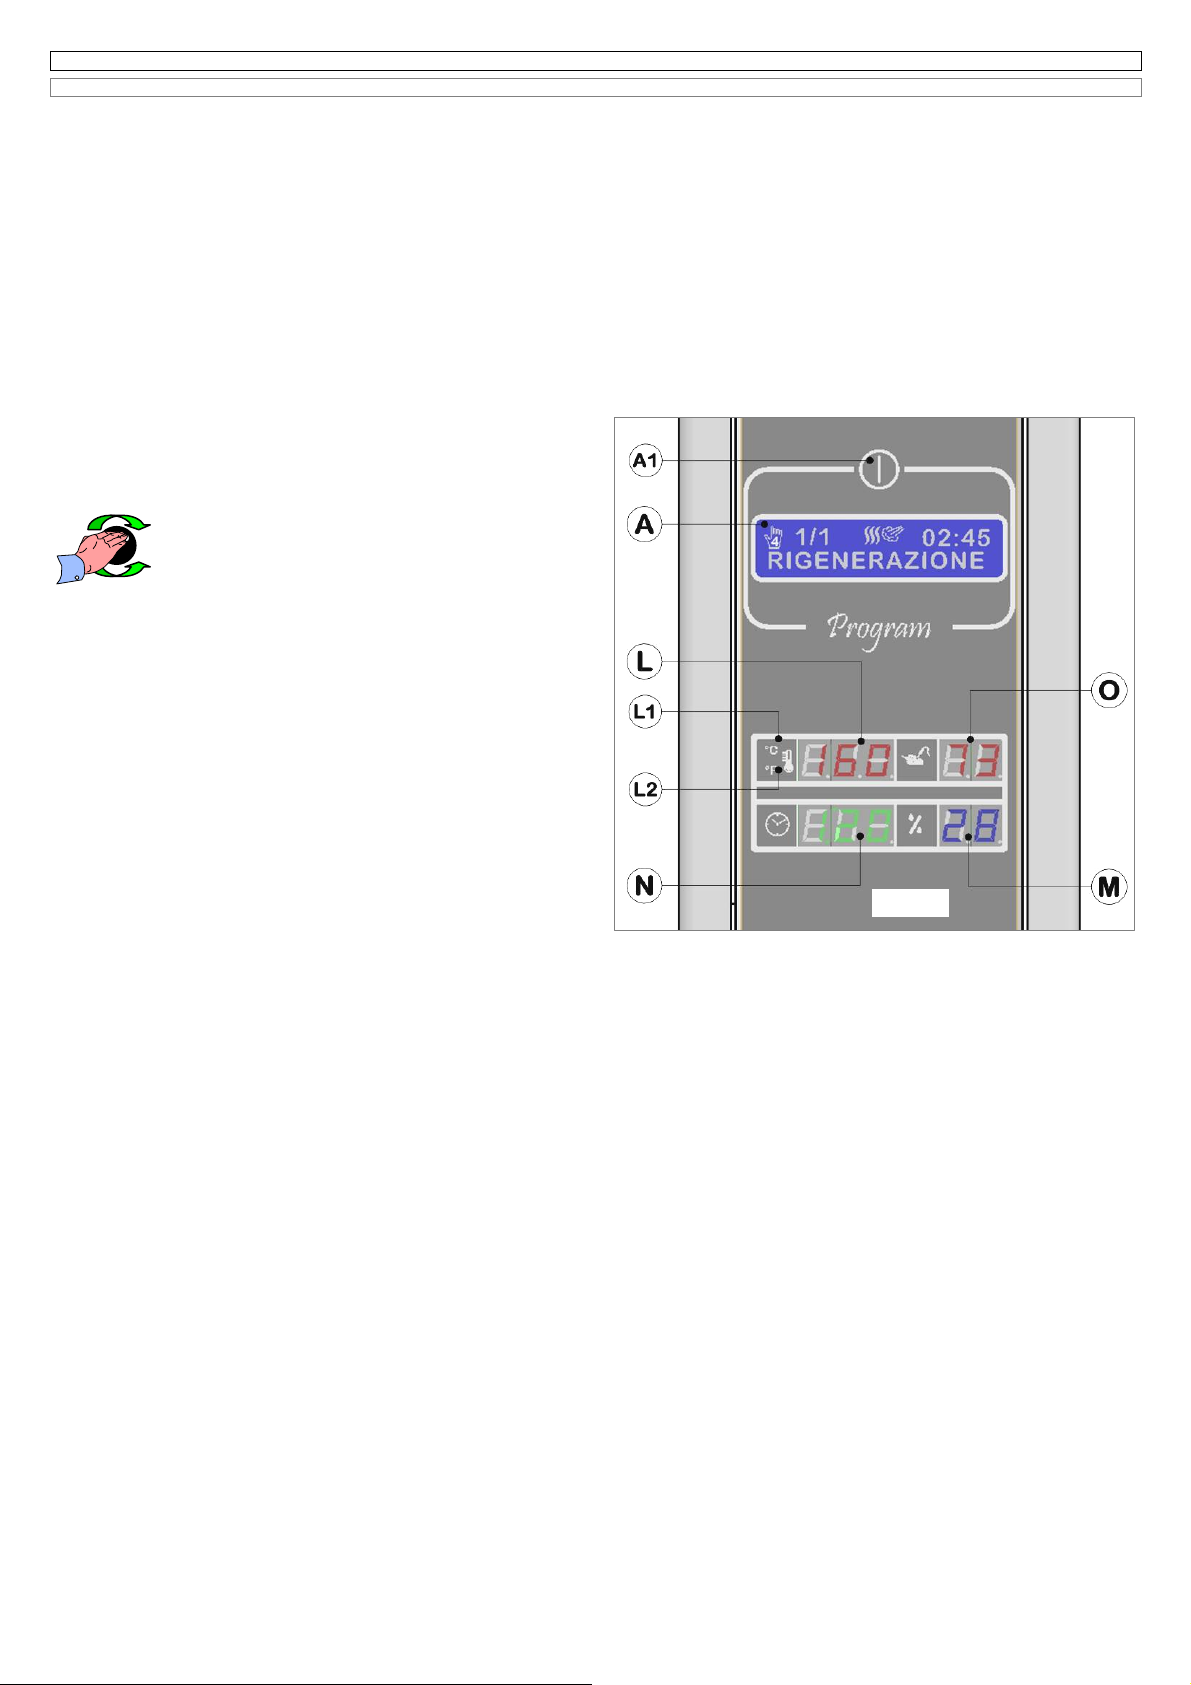
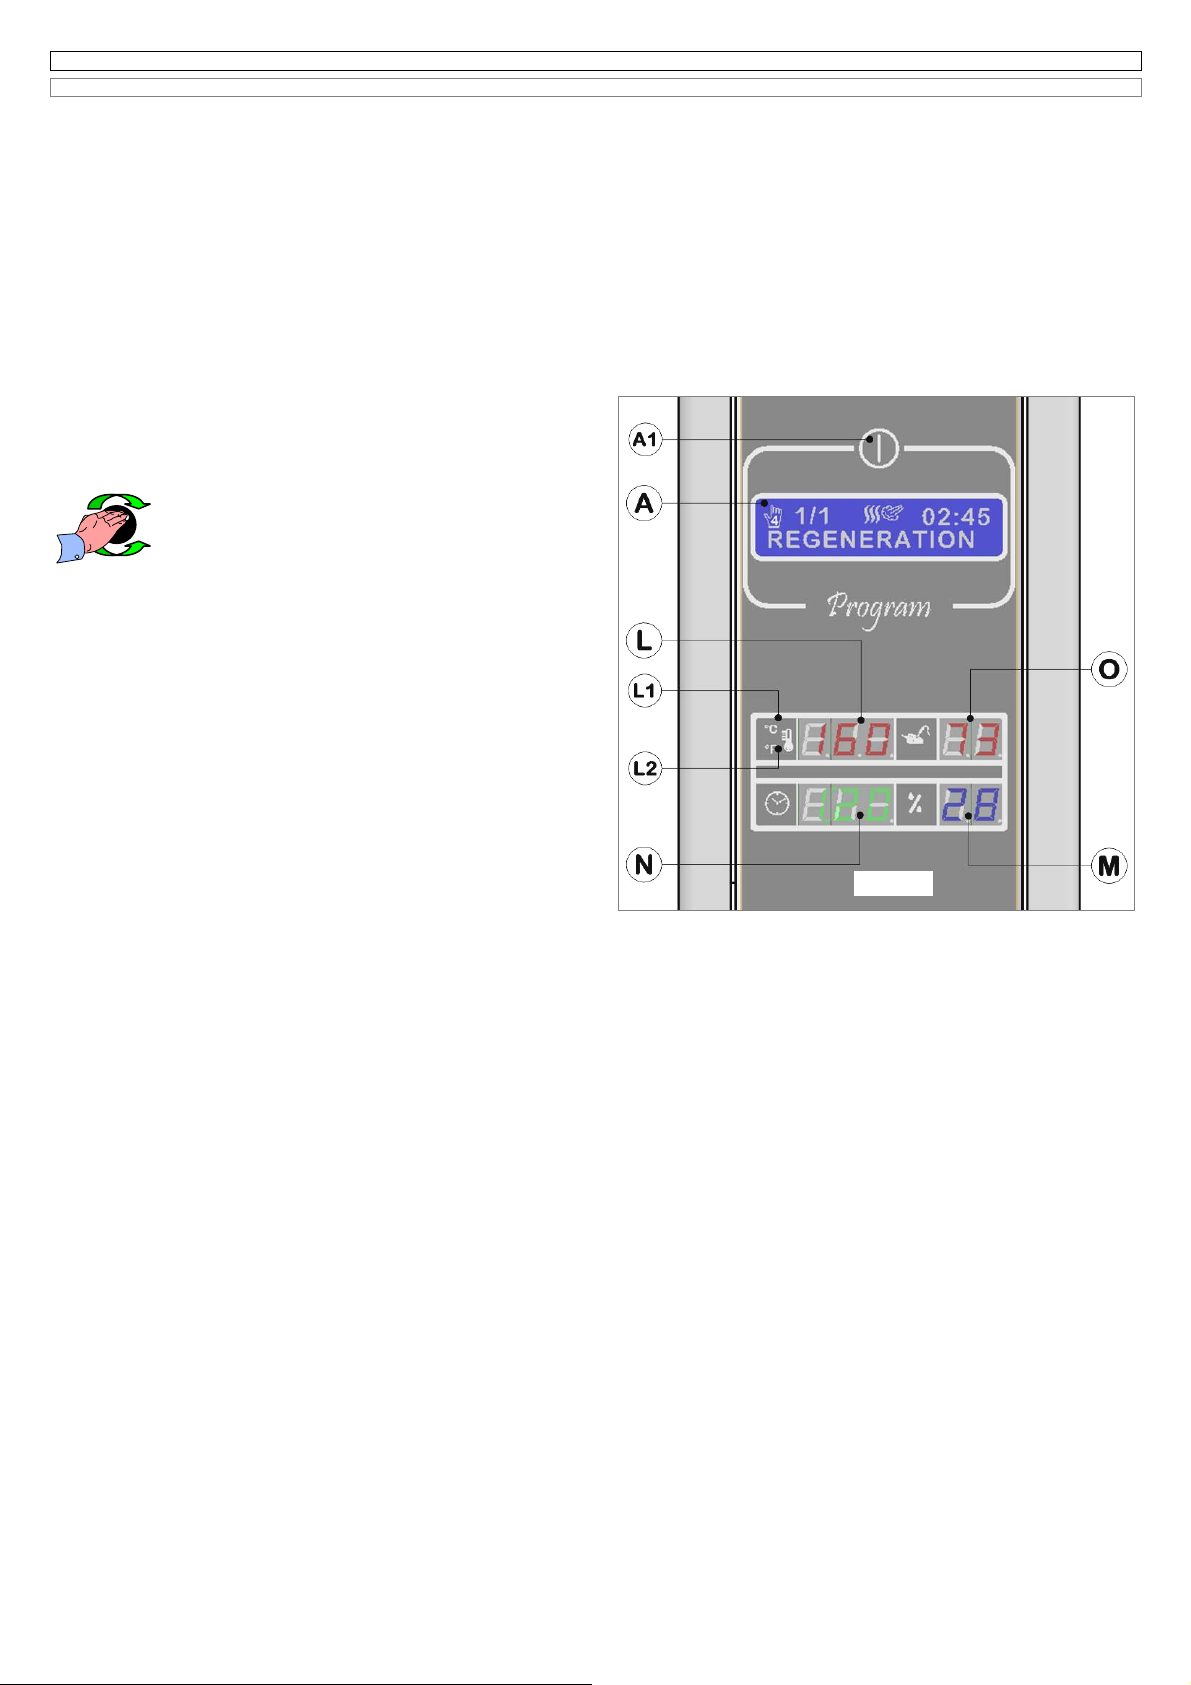
6.6 IMPOSTAZIONE DELLA FASE “MISTA DI RIGENERAZIONE” E AVVIAMENTO NEL PROGRAMMA MANUALE N°4 (Fig. 6.6 it)
Questo programma è manuale ed è costituito da una unica fase con il nome predefinito corrispondente alla modalità di cottura convezione con aria
surriscaldata e vapore, particolarmente adatta per la rigenerazione dei cibi precotti refrigerati.
Ruotando la manopola dell’encoder sul programma 4 il sistema elettronico visualizza:
1 nel display LCD (A) i dati relativi all’ultima cottura eseguita con il programma 4;
2 nel display luminoso (L) la temperatura di set per circa 5 secondi, a cui farà seguito la scritta Go prima di presentare la temperatura reale presente
nella camera di cottura;
3 nel display luminoso (N) il tempo relativo all’ultimo ciclo misto effettuato.
Se nell’ultima cottura è stata utilizzata la sonda a spillone il display risulterà spento.
4 nel display luminoso (O) la temperatura impostata per la sonda a spillone se nell’ultima cottura era stata abilitata questa opzione, viceversa il
display (O) sarà spento.
5 nel display luminoso (M) la percentuale di umidità relativa utilizzata per l’ultimo programma di cottura misto.
Se la porta del forno è aperta sul display (N) compare la scritta oPn.
Qualora si desideri effettuare un programma di cottura mantenendo gli stessi valori mostrati sui display basterà premere il pulsante START/STOP per
l’avviamento del ciclo.
La visualizzazione ad intermittenza del valore di temperatura nel display (L)
significa che si è entrati nella programmazione.
6.6A Modifica set temperatura camera cottura
Il valore visualizzato nel display (L) è quello relativo alla temperatura della
camera di cottura, può essere selezionato tra 120°C e 160°C, nel caso
venga selezionata la bassa velocità di ventilazione la
temperatura max sarà invece di 220°C.
Per modificare il valore di (L) procedere come segue:
-premere la manopola dell’encoder (B);*il valore viene
visualizzato ad intermittenza;
-selezionare il nuovo valore ruotando la manopola dell’encoder (B), in senso
orario per aumentarlo ed in senso antiorario per diminuirlo.
A selezione avvenuta, fare click sull’encoder per memorizzare il valore
desiderato e abilitare il sistema elettronico alla successiva programmazione
della temperatura al cuore del cibo da cuocere sul display (O).
6.6B Modifica set temperatura sonda al cuore
Come descritto al paragrafo 6.3B
6.6C Abilitazione della funzione di Δt (Delta T)
Come descritto al paragrafo 6.3C
6.6D Modifica tempo di durata della cottura
Come descritto al paragrafo 6.3D
6.6E Modifica set umidità relativa
Come descritto al paragrafo 6.5E
Fi
g
.6.5 it
ISTRUZIONI PER L’UTENTE
INSTRUCTIONS FOR THE USER
ANLEITUNGEN FÜR DEN BENUTZER
Combination ovens with direct and boiler system, gas and electric models. Programmable panel
17
6.6 SETTING OF THE PHASE “COMBINATION FOR REGENERATION” AND STARTING IN THE MANUAL COOKING PROGRAM N°4
(Fig.
6.5 it)
This program is manual and is made up of a single phase, having the name corresponding to the cooking mode convection with hot forced air ,
particularly suitable to regenerate precooked frozen food. By turning the encoder-knob on the program 4, the electronic system will show:
1 on the LCD display (A) the data relating to the last cooking done using Program 4;
2 on the back lighted display (L) the set temperature for about 5 seconds, then the message
Go
before showing the real cooking chamber
temperature;
3 on the back lighted display (N) the cooking time of the last steam cycle done. If in the last cooking cycle the core probe has been used, the
display (N) will be switched off;
4 on the back lighted display (O) the temperature selected for the core probe if in the last cooking cycle the core probe was used , vice versa the
display (O) will be switched off.
5 On the back lighted display (M) the percentage of humidification used for the last combination cooking program.
If the door of the oven is open on the display (N) you will see the message
oPn.
If you want to select a cooking program, maintaining the same values shown on the display, you just need to press the button START/STOP to start the
cycle. The flashing of the temperature value means that the programming
has begun.
6.6A Modification cooking chamber temperature
The value shown on the display (L) is that one of the cooking chamber
temperature and it can be selected between 120°C and 160°C; if you select
low speed of fan the maximum temperature will be instead
220°C.
To modify the value (L) please act as follows:
- press the encoder Knob (B);*the value will flash;
- select the new value, by turning the encoder knob (B),
clockwise to increase it and counter clockwise to decrease it.
Press the encoder knob to memorize the selected value and let the electronic
system move to the following programming of the temperature core probe on
the display (O).
6.6B Modification core probe temperature
As described on the paragraph 6.3 B.
6.6C Activation of the function
Δ
t (Delta T)
As described on the paragraph 6.3 B.
6.6D Modification cooking time
As described on paragraph 6.3 B.
6.6E Modification percentage of humidity
As described on paragraph 6.5E.
Fig.6.6 uk

ISTRUZIONI PER L’UTENTE
INSTRUCTIONS FOR THE USER
ANLEITUNGEN FÜR DEN BENUTZER
Combination ovens with direct and boiler system, gas and electric models. Programmable panel
18
6.6 EINSTELLUNG DER PHASE “MISCHBETRIEB FÜR REGENERATION” UND STARTEN IM MANUELLEN GARPROGRAMM N°4 (Abb. 6.5
de)
Dieses Programm ist manuell und verfügt über eine einzelne Phase, mit den Namen des Garprozesses forcierte Heißluft mit Dampf, besonders
geeignet für vorgekochte tiefgekühlte Produkte .
Den Drehknopf auf das Programm 4 drehen und das elektronische System macht die folgenden Daten sichtbar:
1 Auf dem LCD Display (A) erscheinen die Daten des letzten Garprozesses mit dem Programm 4;
2 Auf dem Leuchtdisplay (L) erscheint zuerst die Einstellungstemperatur für zirka 5 Sekunden, und danach die Schrift Go, bevor die richtige
Garraumtemperatur gezeigt wird.
3 Auf dem Leuchtdisplay (N) erscheint die Garzeit des letzten Dampfzyklus. Wenn man im letzten Garzyklus den KTF benutzt hat, wird der Display
(N) ausgeschaltet;
4 Auf dem Leuchtdisplay (O) erscheint die Temperatur des KTFs , wenn diese Funktion im letzten Garzyklus aktiv war, hingegen wird der Display (O)
ausgeschaltet.
5 Auf dem Leuchtdisplay (M) erscheint die Dampfmenge, die man im letzten Garzyklus Mischbetrieb benutzt hat.
Wenn die Tür geöffnet ist, auf dem Display (N) erscheint die Schrift oPn.
Wenn man ein Garprogramm mit den selben erscheinten Werten auf dem Display wählen wird, genügt es den Drehknopf START/STOP drücken, um
den Zyklus zu starten.
Wenn der Wert der Temperatur blinkt, bedeutet es dass die
Programmierung gestartet ist.
6.6A Änderung Garraumtemperatur
Der Wert auf dem Display (L) ist die Garraumtemperatur und kann zwischen
120°C und 160°C eingestellt werden; wenn die niedrige Geschwindigkeit
eingestellt wird, ist die max. Temperatur 220°C.
Um den Wert (L) zu verändern, beachten Sie wie es folgt:
- den Encoder-Knopf drücken (B);*der Wert wird blinken;
- den Encoder-Knopf (B) drehen um den neuen Wert
einzustellen; im Uhrzeigersinn um den Wert zu erhöhen und
umgekehrt um den Wert zu vermindern.
Um den gewählten Wert zu speichern, den Encoder-Knopf drücken und der
Schieber bewegt auf den Wert des KTFs auf dem Display
6.6B Änderung Kerntemperatur
Wie beschrieben im Abschnitt 6.3 B.
6.6C Einstellung der Funktion Δt (Delta T)
Wie beschrieben im Abschnitt 6.3B.
6.6D Änderung Garzeit
Wie beschrieben im Abschnitt 6.3B.
6.6E Änderung Dampfmenge
Wie beschrieben im Abschnitt 6.5E.
Fi
g
.6.6 de

ISTRUZIONI PER L’UTENTE
INSTRUCTIONS FOR THE USER
ANLEITUNGEN FÜR DEN BENUTZER
Combination ovens with direct and boiler system, gas and electric models. Programmable panel
19
6.7 IMPOSTAZIONE DELLA FASE “VAPORE (HARD STEAM)” E AVVIAMENTO NEL PROGRAMMA DI COTTURA MANUALE N°5 (Fig. 6.7)
(SOLO PER MODELLI CON BOILER).
Questo programma è manuale ed è costituito da una unica fase con il nome predefinito corrispondente alla modalità di cottura a vapore.
Ruotando la manopola dell’encoder sul programma 5 il sistema elettronico visualizza:
1 nel display LCD (A) i dati relativi all’ultima cottura eseguita con il programma 5;
2 nel display luminoso (L) la temperatura di set per circa 5 secondi, a cui farà seguito la scritta Go prima di presentare la temperatura reale presente
nella camera di cottura;
3 nel display luminoso (N) il tempo relativo all’ultimo ciclo vapore effettuato.
Se nell’ultima cottura è stata utilizzata la sonda a spillone il display risulterà spento.
4 nel display luminoso (O) la temperatura impostata per la sonda a spillone se nell’ultima cottura era stata abilitata questa opzione, viceversa il
display (O) sarà spento.
5 nel display luminoso (M) la percentuale di umidità relativa utilizzata per l’ultimo programma di cottura misto.
Se la porta del forno è aperta sul display (N) compare la scritta oPn.
Qualora si desideri effettuare un programma di cottura mantenendo gli stessi valori mostrati sui display basterà premere il pulsante START/STOP per
l’avviamento del ciclo.
La visualizzazione ad intermittenza del valore di temperatura nel display (L)
significa che si è entrati nella programmazione.
6.7A Modifica set temperatura camera cottura
Il valore visualizzato nel display (L) è quello relativo alla
temperatura della camera di cottura, tale valore è di 110°C e non
è modificabile.
Fare click sull’encoder per abilitare il sistema elettronico alla
successiva programmazione della temperatura al cuore del cibo da cuocere
sul display (O).
6.7B Modifica set temperatura sonda al cuore
Come descritto al paragrafo 6.3B
6.7C Abilitazione della funzione di Δt (Delta T)
Come descritto al paragrafo 6.3C
6.7D Modifica tempo di durata della cottura
Come descritto al paragrafo 6.3D
6.7E Modifica set umidità relativa
Come descritto al paragrafo 6.5E
6.7 SETTING OF THE PHASE “HARD STEAM” AND STARTING IN THE MANUAL COOKING PROGRAM N°5
(Fig. 6.7 it)
(ONLY FOR MODELS WITH BOILER)
This program is manual and is made up of a single phase, having the name corresponding to the cooking mode hard steam.
By turning the encoder-knob on the program 5, the electronic system will show:
1 on the LCD display (A) the data relating to the last cooking done using Program 5;
2 on the back lighted display (L) the set temperature for about 5 seconds, then the message
Go
before showing the real cooking chamber
temperature;
3 on the back lighted display (N) the cooking time of the last steam cycle done. If in the last cooking cycle the core probe has been used, the
display (N) will be switched off;
4 on the back lighted display (O) the temperature selected for the core probe if in the last cooking cycle the core probe was used , vice versa the
display (O) will be switched off.
5 On the back lighted display (M) the percentage of humidification used for the last combination cooking program.
If the door of the oven is open on the display (N) you will see the message
oPn.
If you want to select a cooking program, maintaining the same values shown on the display, you just need to press the button START/STOP to start the
cycle. The flashing of the temperature value means that the programming has begun.
6.7A Modification cooking chamber temperature
The value shown on the display (L) is the cooking chamber temperature, it is 110°C and it’s not changeable.
Press the encoder knob to go to the next programming of the core probe temperature on the display (O)
6.7B Modification core probe temperature
As described on the paragraph 6.3B.
6.7C Activation of the function
Δ
t (Delta T)
As described on the paragraph 6.3C.
6.7D Modification cooking time
As described on paragraph 6.3D.
6.7E Modification percentage of humidity
As described on paragraph 6.5E
Fig.6.7 it
Fi
g
.6.7 uk
This manual suits for next models
6
Table of contents
Languages:
Other Inoxtrend Oven manuals


