Inpax X-2008 ISDBT Receiver User manual

X-2008 ISDBT Receiver
USER MANUAL
Please read this user manual before using or connecting this product.
And keep it handy for future reference.

2
Contents
Safety Instructions--------------------------------------------------------------------3
Precaution-------------------------------------------------------------------------------4
Features----------------------------------------------------------------------------------5
Accessories-----------------------------------------------------------------------------5
Front Panel------------------------------------------------------------------------------5
Rear Panel--------------------------------------------------------------------------------6
About Remote Control --------------------------------------------------------------7
Start----------------------------------------------------------------------------------------8
Basic connections---------------------------------------------------------------------------------------8
Preparation----------------------------------------------------------------------------------------------------------------8
Connecting Antenna and TV-Set------------------------------------------------------------------------------------8
Battery Installation----------------------------------------------------------------------------------------------------8-9
Operation Range of Remote Control-------------------------------------------------------------------------------9
Advanced Operation------------------------------------------------------------10-16
Fast Installation ----------------------------------------------------------------------------------------10
Menu Operation------------------------------------------------------------------------------------10-11
Edit Channel-------------------------------------------------------------------------------------------------------------11
Installation-----------------------------------------------------------------------------------------------------------11-12
System Setup-------------------------------------------------------------------------------------------------------12-13
Tools------------------------------------------------------------------------------------------------------------------13-14
Game----------------------------------------------------------------------------------------------------------------------14
REC-------------------------------------------------------------------------------------------------------------------15-16
Appendix--------------------------------------------------------------------------------17
Maintenance --------------------------------------------------------------------------------------------17
Specifications ------------------------------------------------------------------------------------------17
Troubleshooting ---------------------------------------------------------------------------------------18

3
Safety Instructions
Dear Customer,
Thank you for purchasing this DVB Terrestrial Receiver. Please read this manual carefully
before operating your product and pay close attention to the precautions which are mentioned
below.
Note:
This product only can be used where the mains supply is ~100-240V,50/60 Hz.
Warning
To avoid fire and electric shock, do not expose this equipment to rain or moisture.
Do not use any accessories which are not recommended by the manufacturer. It may cause
hazard or damage the product.
To reduce the chance of fire, electric shock, do not open the cover when it works.
This product conforms to the International ISDB-T Standards.
Please peruse the following safety precautions before use it.
OVERLOADING
Do not overload wall outlets, extension cords or adapters as this may result in fire or electric
shock.
LIQUIDS
Do not install this appliance in any locations where it may become in contact with any liquid
or vapor. Or any locations where atmospheric moisture is too low, such as basement
CLEANING
Unplug the power cord from the wall outlet before cleaning. Do not use aerosol products to
clean the product. Wipe the outer surface with a cloth lightly dampened with water (no solvents).
VENTILATION
Do not block the ventilation holes which are on the outer surface of the product. Do not install
this product in any locations where it may expose to direct sunlight or heat resources. Do not
stack other electric products on the top of this product
ACCESSORIE
Do not use any accessories which are not recommended by the manufacturer. It may cause
a hazard or damage the product.
CONNECTING TO ANTENNA
Unplug the power cord when connecting or disconnecting to antenna. Otherwise, it may
damage the product and antenna.
CONNECTING TO TV SET
Unplug the power cord when connecting or disconnecting to TV Set. Otherwise, it may
damage the product and antenna
EARTHING
The antenna cable must be earthed to the antenna system and the Earthing System must
comply with the local Electric Safety Standard.
LOCATION
The DVB-T is designed for indoor use only. Do not install the product where it may expose to
bright light or direct sunlight.

4
Precautions
Peruse the following precautions before using.
Power Cord Protection
Please complaint the following
regulations to avoid malfunction, fire and
electric shock or other damage to human
body.
Make sure to connect and disconnect the
power cord with holding the plug.
◆Do not connect or disconnect the
AC power with wet hands.
◆Separate the AC power cord from
heating appliances as distance as possible.
◆Do not stack any heavy objects on
the AC power cord.
◆Do not repair or reconstruct the
AC power cord without authorization.
◆Clean the plug regularly.
◆Cut off the power and disconnect
the AC cord immediately if the product has
been dropped or damaged.
◆Cut off the power and disconnect
the AC cord immediately if you find the
product is smoking, burning or noisy.
Location
Do not install the product in following
locations,
Where it may expose to direct
sunlight or heat resources such as
heat register and stove.
Ambient temperature over 35°C or
ambient atmospheric moisture over
90%.
Dusty place.
Where it may influence by magnetic
field or static electricity.
Where it may subject to physical
shock, vibration or dropping.
Non-use Periods
Switch the product to standby status
or turn off the power when the
product will not be used.
Unplug the power cord from the AC
outlet when the product will be idle
for a long period of time.
Do not insert fingers or other objects
into the product
It may damage the product or even
hurt human body by touching any
internal parts of the product because
of high voltage.
Do not dismantle the product.
Do not stack any object on the
product.
Keep water and magnetic things away
Contact with liquid may cause
serious damage, please keep the
product away from it.
Keep product far away from
magnetic things, such as speaker
and so on.
Position
Place the product on a horizontal
surface. Do not stack heavy things
on it.
Do not place the product beneath
the magnifier or other devices that
emit heat.
Signal Interference
Under the condition of TV signal
receive situation, TV Set may get
signal interference when you are
watching a TV program with the
DVB-T on. This is not means that the
product or the TV Set is malfunction.
Please turn off the DVB-T while
watching the TV.
5
Features
Fully MPEG-2 / SDB-T compliant
Intelligentized Operation Menu (OSD)
Electronic Program Guide(EPG)
Multi-language Support
User-friendly Graphical Interface
Auto scan/ Manual Scan
Power Memory
USB PVR
Support USB Upgrade
Time Shift
Accessories
After purchasing receiver, unpack it and check to make sure that all of the following items are
included in the packaging.
Receiver one piece
Remote control one piece
User Manual one piece
Batteries (AAA) two pieces
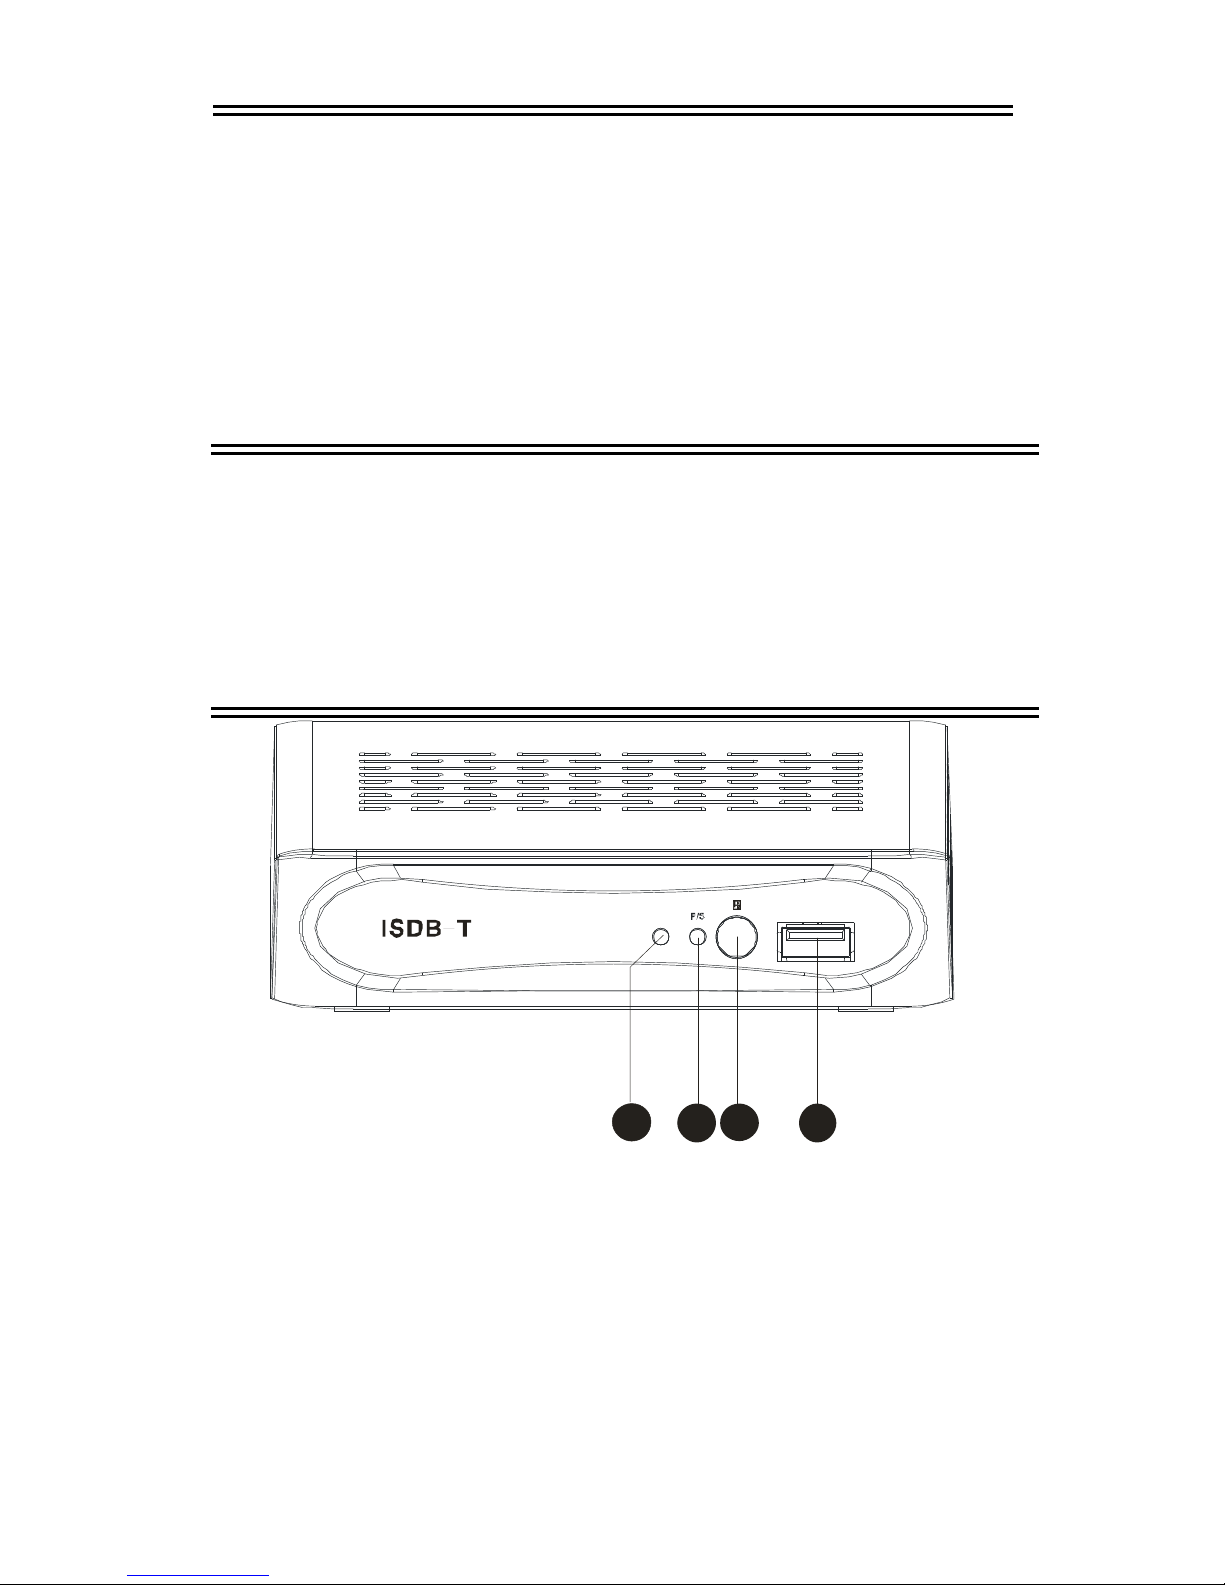
Front Panels
1 2 3
U S B /R E C .
U S B
4
1. USB/REC Indicator
The indicator goes green when USB device has been connected, goes red while recording.
2. POWER/STANDBY Indicator
The indicator goes green when device is turned on, goes red in standby mode.
3. IR Receiver Window
4. USB Port

6
Rear Panels
21 53 4
DC 5V / 1. 5 A
- +
VIDEO L R
RF OUTRF IN AUDIO
6 7
1. RF IN
2.
RF OUT
3.
HDMI Socket
4.
VEDIO Socket
5.
AUDIO Output – Left
6.
AUDIO Output – Right
7.
DC IN
NOTE
In order to avoid electric leakage and shock caused by scratched power cord, please unplug
the power cord from the wall outlet and keep it orderly if the product is not going to be used for a
long period time.
7
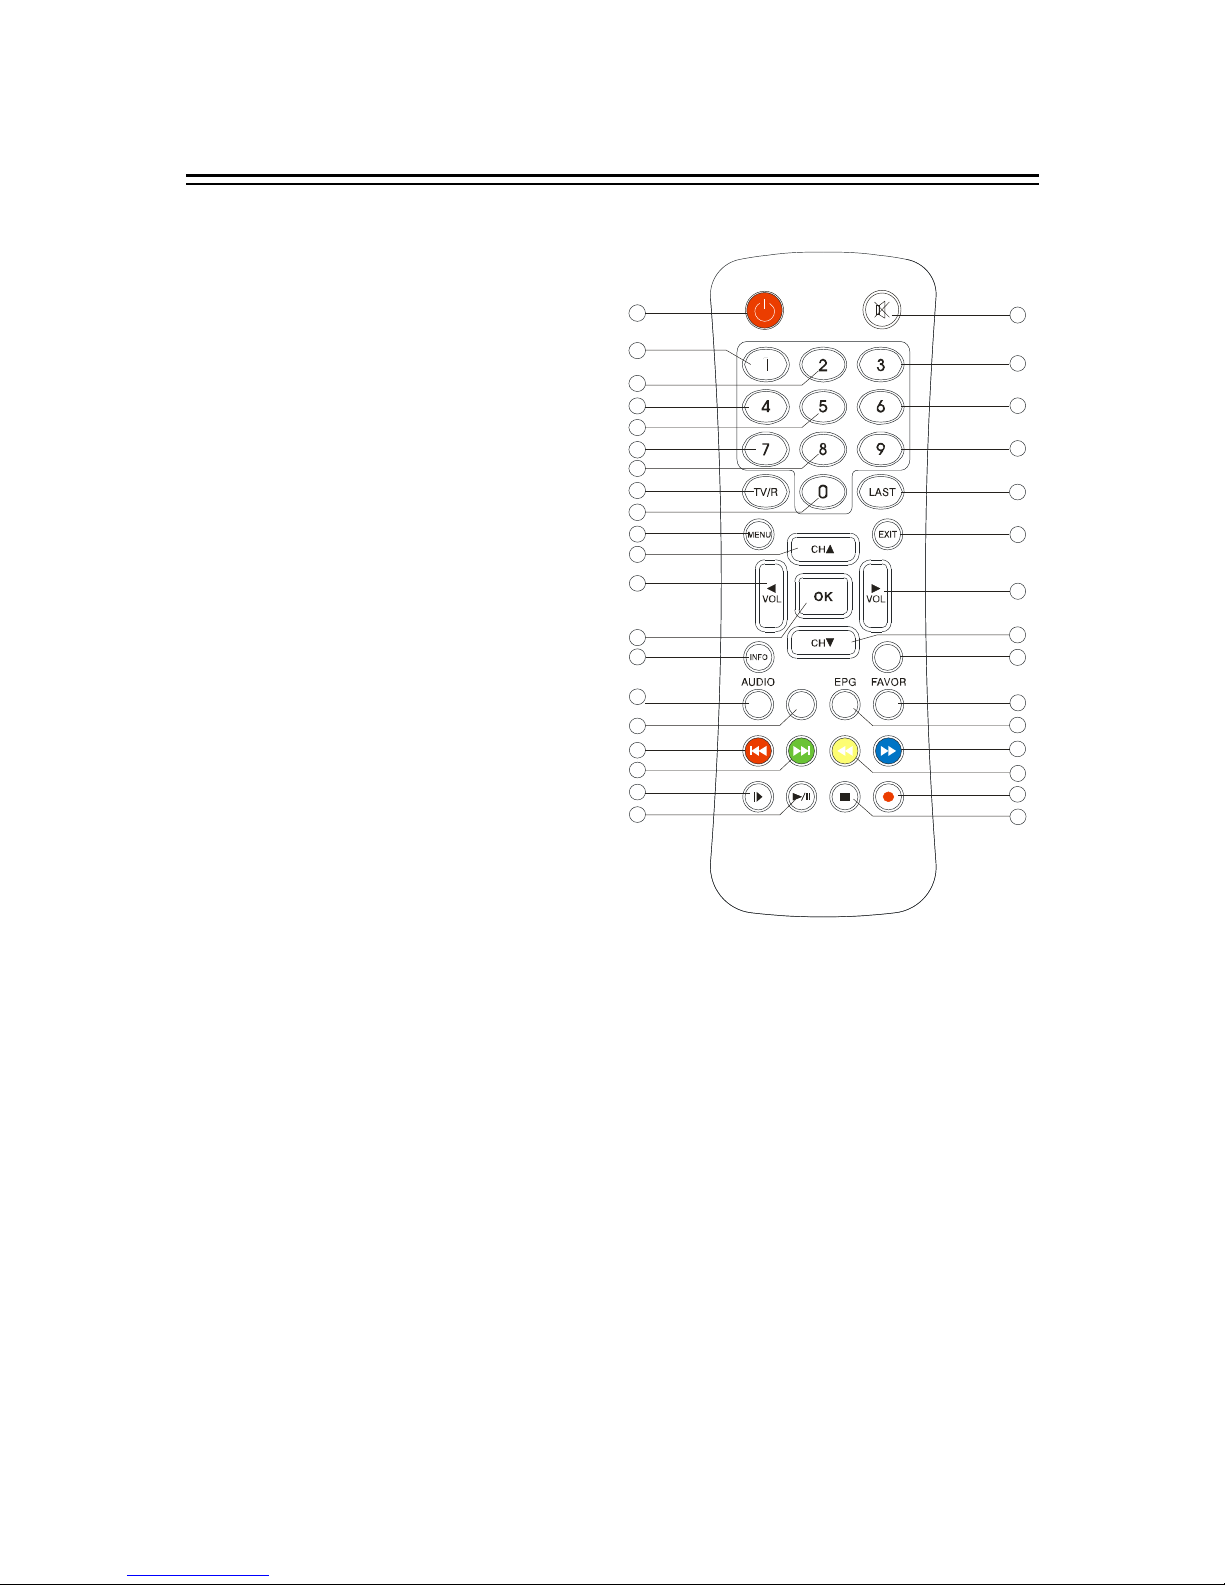
About Remote Control
1. STANDBY Button
2. Numeric Button 1
3. Numeric Button 2
4. Numeric Button 4
5. Numeric Button 5
6. Numeric Button 7
7. Numeric Button 8
8. TV/RADIO Button
9. Numeric Button 0
10.MENU Button
11. Navigation Button-Up
12. Navigation Button- Left
13. OK Button
14. INFO Button
15. AUDIO Button
16.CC (CLOSE CAPTION) Button
17.PREV(RED)
18. NEXT Button(GREEN)
19. STEP Button
20. PLAY/PAUSE Button
21. STOP Button
22. REC Button
23. F.REW Button(YELLOW)
24. F.FWD Button(BLUE)
25. EPG Button
26. FAVOR Button
27. PVR Button
28. Navigation Button-Down
29. Navigation Button-Right
30. EXIT Button
31. LAST Button
32. Numeric Button 9
33. Numeric Button 6
34. Numeric Button 3
35. MUTE Button
1
10
2
3
4
5
6
7
8
9
11
12
13
14
15
16
17
18
19
20 21
22
23
24
25
26
27
28
29
30
31
32
35
34
33
CC
PVR

8
Start
Basic Connections
Preparation
Switch off this product and other equipments before connecting
Read the User Manual carefully before connecting other equipments
Plug the Audio and Video cable correctly
When connecting this product with TV set, only one kind of video output format will be
accepted. Please choose a corresponding video output mode for the product, otherwise the
image will be distorted.
NOTE
Users can choose any proper video output formats according to the TV socket via
requirements.
Connecting antenna and TV-set (Figure A)
1. Antenna (Not including)
2. TV Set (Not including)
3. ISDB-T Receiver
4. HDMI cable for connecting TV set and
ISDB-T receiver (Not including)
5. AV cable for connecting TV set and ISDB-
T receiver (Not including)
6. Antenna to connecting to another ISDB-T
receiver. (Not including)
7. Adapter
1
2
3
5
4
DC5 V / 1.5 A
- +
VIDEO L R
RF OUTRF IN AUDIO
USB/ R EC .
USB
7
6
Battery installation
Install the batteries and make sure the positive (+) and negative (-) polarities matches as shown in
Figure A.
Service life of batteries
◆The batteries normally last for about one year despite that it depends on how often and in what
way the remote control is operated.
◆Replace the batteries if the remote control fails to work even when it is operated near the DVB-T
receiver.
◆Use 2 pieces of 7 (AAA) batteries.
Notes:
◆Do not use rechargeable (Ni-Cd) batteries.
◆Do not attempt to recharge, short circuit, disassemble, heat the batteries or dispose of in fire.
◆Do not drop or step on the remote control unit or subject it to shocks. Otherwise the parts of the
remote control unit may get damaged and lead malfunction.

9
Start
◆Do not use the new and old batteries together.
◆Please remove the batteries if the remote control is not going to be used for a long period of
time. Otherwise, it may cause electrolyte leakage and lead malfunction, even fire accidents.
Carefully wipe the electrolyte out of the remote control compartment and replace with new
batteries. If any electrolyte happens to touch your skin, wash it off thoroughly with clean water
immediately.
Operation range of remote control (Figure B)
◆Point the remote control to the IR receiver window. The remote control shall be effective within
a distance of about 5 meters and an angle of about 60 degrees as shown in Figure B.
◆The effective range may vary slightly with the brightness of the room.
Notes:
◆Do not shine bright light to the remote control sensor.
◆The remote control unit may not work if there are obstacles between the remote control and the
sensor.
◆Do not recommend this remote control using for other products.
CC
PVR
US B/REC .
USB

10
Advanced Operation
Fast Installation Operation
Connect this unit and other apparatus according to Chapter “BASIC CONNECTIONS”. Plug
the power cord, the device will turn on automatically and wait “Installation Guide” window appears:
1. Use [CH▲/▼] button to select item and [VOL◄/►] button to enter into its setup interface.
2. The default OSD Language is “Portuguese”, country is “Brazil”.
3. Move cursor to ”Channel Search” and press [OK] button to start auto search.
4. Press [EXIT] button to back to channel list after auto search has been done. Press [OK]
button to display channel list, use [CH▲/▼] button to select channel and press [OK] button to
enjoy watching.
If the “Installation Guide” does not appear:
5. Press [MENU] button, move cursor to “Tools” and press [VOL►] or [OK] button to enter into
its interface to load factory default. Default password is “0000”. (This step must be done at
first use or after upgrade.)
6. After the factory default has been done, wait “Installation Guide” window and please operate
according to step 1, 2, 3 and 4.
Read Menu Operation Instruction for more details.
Menu Operation
Main Menu
Press [MENU] button to browse the Main Menu including 6 sub-menus which are listed below:
◆Edit Channel
◆Installation
◆System Setup
◆Tools
◆Game
◆REC
Use [▲/▼] button to select item, [VOL►] or [OK] button to browse its submenu. Press [EXIT]
button to quit current menu.
Notes
1. The four navigation buttons ([▲/▼/◄/►]), [OK] and [SEARCH/EXIT] button have same
functions in all levels menus.
2. Some buttons have different functions in different menus. Please find out according to the
screen.
3. Programmable buttons (which with color) functionality depends on the menu that is active
at the press moment. Please find out according to screen.
Tips for Buttons
EPG:View Electronic Program Guide information of current channel.
CC:Turn on/off the subtitle.
INFO:View information of current channel.
TV/RADIO: Shift between TV and Radio mode.

11
Advanced Operation
RED, GREEN, YELLOW, BLUE buttons:Functionality depends on the menu that is active at
the press moment.
LAST: Return to the previous channel.
AUDIO:Shift the audio track according to screen.
STANDBY: Switch device on from standby mode.
MUTE: Enable or disable the audio.
PVP: Switch to PVR mode.
RECORDE: Start to record video.
1. Edit Channel
Enter in “Edit Channel” menu including 3 submenus which are listed below.
TV Channel List
Radio Channel List
Delete All
1.1 TV Channel List
Choose channel by [CH▲/▼] button and press [OK] button to enter in its setup interface. Use
programmable buttons (which with color) to set up according to screen.
Favor button works only when the favorite channels have been set.
Lock: Press [RED] button to enter in “Lock” interface. Use [CH▲/▼] button to select channel
and press [OK] button to lock, press [OK] button twice to cancel lock. Press [EXIT] button to
quit current menu and save according to screen.
Skip: Press [Green] button to set the chosen TV program to be skipped when consecutive
switching of programs.
Move: Press [YELLOW] button to move the channel. Choose channel by pressing [CH▲/▼]
button and [OK] button to confirm. Press [EXIT] to quit current menu after setup has been
done. Save according to screen.
Edit: Press [GREEN] button to rename the program. In “Edit” interface, press [RED] button to
sort channels by Name (A-Z)/Name (Z-A)/Free/Scramble/Lock/Default.
1.2 Radio Channel List
All searched radio channel will be listed here.
Refer to the operation of TV Channel List (Item 1.1) for detailed instructions.
1.3 Delete All
Delete all edited favorite TV and radio programs according to the screen.
2. Installation
Enter in “Installation” menu including 4 submenus which are listed below.
Auto Scan
Channel Scan
Aerial Adjustment
LCN
2.1 Auto Scan
FTA: Yes/No.
Search: Select “Search” and press [OK] button to start channel search. Press [EXIT] button to
quit from current menu.

12
Advanced Operation
2.2 Channel Scan
Scan Mode: By Channel and By Frequency.
Scan Band: VHF and UHF.
Ch No. : Channel 5~12 (VHF) and Channel 21~69(UHF)
Frequency: 174~230 MHz (VHF), 470~862 MHz (UHF). (The frequency system will be set
automatically according to regions.)
Band Width: 6MHz, 7 MHz and 8 MHz.
Search: Select “Search” and press [OK] button to start channel search. Press [EXIT] button to
quit.
Notes
1. The “Scan Band” and “Ch No.” will be available only when “By Channel” is selected in
Scan Mode.
2. The “Frequency” and “Band Width” will be available only when “By Frequency” is selected
in Scan Mode.
2.3 Aerial Adjustment
CH No.
Tuner power: On/Off
Note: A 5V (30mA) antenna is needed in Tuner power on mode.
2.4 LCN
The channels will be listed according to signal flow if the LCN mode is on, otherwise the
channels will be listed normally.
LCN mode: ON/OFF
Note: It is suggested that set LCN off in LCN deactivated countries.
3. System Setup
Enter in “Installation” menu including 8 submenus which are listed below.
Language
TV System
Local Time Setting
Timer Setting
Parental Lock
OSD Setting
Favorite
Auto Standby
3.1 Language
Choose “Language” and press [OK] button to enter in its setup submenu.
Language: English, Spanish and Portuguese.
First Audio: English, Spanish and Portuguese.
Second Audio: English, Spanish and Portuguese.
3.2 TV System
Video Resolution: By Native/480i/480P/576i/576P/720i/720P/1081i/1080P.
Aspect Ratio: Auto/4:3 L:B /4:3 PS/ 16:9
Display Mode: PAL/NTSC/PAL-N/PAL-M

13
Advanced Operation
3.3 Local Time Setting
Region: Argentina/Brazil.
GMT Usage: OFF/User Define/By Region.
GMT Offset: GMT+12:00~GMT-11:30.
Summer Time: ON/OFF
Date: Enter in its setup interface, use [VOL◄/►] button to move the cursor and numeric
buttons to input date. Press [OK] button to confirm imputation.
Time: Enter in its setup interface, use [VOL◄/►] button to move the cursor and numeric
buttons to input time. Press [OK] button to confirm imputation.
Notes
1. “GMT Offset” is only activated in “User Define” mode.
2. “Summer Time” is only activated in “By Region” mode.
3. “Date” and “Time” is only activated when “GMT Usage” in “OFF” mode.
3.4 Timer Setting
Timer Mode: OFF/Once/Daily/Weekly/Monthly
Timer Service: Channel/Record. (It’s deactivated when timer mode is off.)
Wakeup Channel: The system will start automatically once the Timer Mode is activated.
Wakeup Date: Set up time to wakeup. Use navigation buttons to set up date.
Wakeup Time Set up time to wakeup. Use navigation buttons to set up time.
Duration: Set up the length of an alarm. Use navigation buttons to set up time.
3.5 Parental Lock
Default password is “0000”.
Menu Lock: OFF/ON
Password will be required for all levels of menu if the menu lock is ON.
Channel Lock: OFF/ON
Password will be required for locked channels.
Parental Lock: OFF/4-18 years, total 16 levels
New Password
Confirm Password
Use navigation buttons to set up new password.
3.6 OSD Setting
OSD Time out: 1-10 seconds.
OSD Transparency: OFF/10%/20%/30%/40%.
Load Default OSD Setting
3.7 Favorite
Totally 8 groups for optional.
4. Tools
Enter in “Tools” menu including 6 submenus which are listed below.
Information
Load Factory Setting
S/W Upgrade By OTA
Upgrade By USB
USB Device

14
Advanced Operation
Remove USB device safely
4.1 Information
Display information of the device.
4.2 Load Factory Default
The default password is “0000”.This step must be done at first time use or after upgrade.
4.3 S/W Upgrade By OTA
Enter in “S/W Upgrade By OTA” menu including 3 submenus which are listed below.
Frequency
Download PID
Start
Note: Do not cut off power supply while upgrading, otherwise it may destroy the device.
4.4 Upgrade By USB
Enter in “Upgrade By USB” menu including 3 submenus which are listed below.
Upgrade Mode: All Code/ Main Code/ Radio back
Upgrade File
Start
Note: Do not cut off power supply while upgrading, otherwise it may destroy the device.
4.5 USB Device
Enter in “USB Device” menu including 4 submenus which are listed below.
Music
Image
Video
Record
4.6 Remove USB Device Safely
Press [OK] button to enter in its setup interface. A window will displayed to ask you confirm to
remove the USB device. Press [OK] button to confirm remove, [EXIT] button to cancel.
5. Game
Othello
Sudoku
Operate according to screen.
6. REC
Enter in “REC” menu including 5 submenus which are listed below.
Record Manager
DVR HDD Information
HDD Format
DVR Configuration
Jump
Notes:
Password will be required if the menu is locked. The default password is “0000”.
Press [REC] button to start recording video. Press [STOP] button to display the quit window.
Choose “YES”to quit. Save video according to screen.
REC mode is deactivated in standby mode.

15
Advanced Operation
6.1 Record Manager
Lock: Press [GREEN] button to lock recorded video. Password will be need to open locked
recorded video.
Delete: Press [BULE] button to delete recorded video.
Rename: Press [RED] button to rename the recorded video.
Notes
1. Press [PVR] button to shift to “Record Manager” interface directly.
2. Use [CH▲/▼] button to select recorded video and press [OK] button to play. It will back to
“Record Manager” interface automatically when the video is finished or press [EXIT] button.
TIPS
Press [PLAY] button to have a preview.
Press [OK] button to watch recorded video by full screen.
Press [PAUSE] button to make a pause while playing.
Press [STOP] button to stop playing.
There are 5 options, ×2, ×4, ×8, ×16, ×24 in “Fast Backward” and “Fast Forward” mode.
Press [INFO] button twice to open “HDD Record List” in full screen while playing,
Note: Find further operation according to screen.
6.2 DVR HDD Information
Enter in “DVR HDD Information” interface to display information of disk.
6.3 HDD Format
Enter in “HDD Format” interface to format disk.
6.4 DVR Configuration
Enter in “DVR Configuration” menu including 4 submenus which are listed below.
Time Shift: ON/FF
Tips for record real-time channel program.
Connect USB device with receiver.
Turn on “Time Shift” mode.
Press [PAUSE] button to stop the TV program and the receiver will start recording as
much as the USB device capacity is. Press [PLAY] button to continue watch the program
from the stopped.
Use [F.REW] and [F.FWD] buttons to forward or backward of recorded program. There
are 5 options, 2、×4、×8、×16 and ×32.
Press [INFO] button twice to enter in “HDD Record List” interface, choose one of it and
press [OK] button to watching by full screen.
The recorded program will be eased automatically once channel has been shifted.
Time shift to Record : ON/OFF
Tips for record video
Connect USB device with receiver.
Press [REC] button to start recording program.
Press [STOP] button to stop recording.
The receiver will start recording as much as the USB device capacity is.
Recorded video will be stored in the disk.

16
Advanced Operation
Record Type: TS/PS
Record Selection
6.5 Jump
Enter in “Jump” menu including 5 options which are listed below.
30sec
1min
5min
10min
30min
“Jump” function is only activated to non-real-time program. Use [VOL◄/►], [PREV] and
[NEXT] buttons to operate.
While using [VOL◄/►] button:
The screen will jump to the time as set, requiring [OK] button to confirm the jump.
While using [PREV] and [NEXT] button:
The screen will jump to the time as set directly.
17
Appendix
Maintenance
◆Unplug the power cord before maintenance.
◆Keep the product surface clean. Please use a piece of soft cloth to clean the outer if it’s dirty.
◆Do not use any chemical products like Alcohol or dilution to clean the product.
◆Refer all servicing to a qualified service agent.
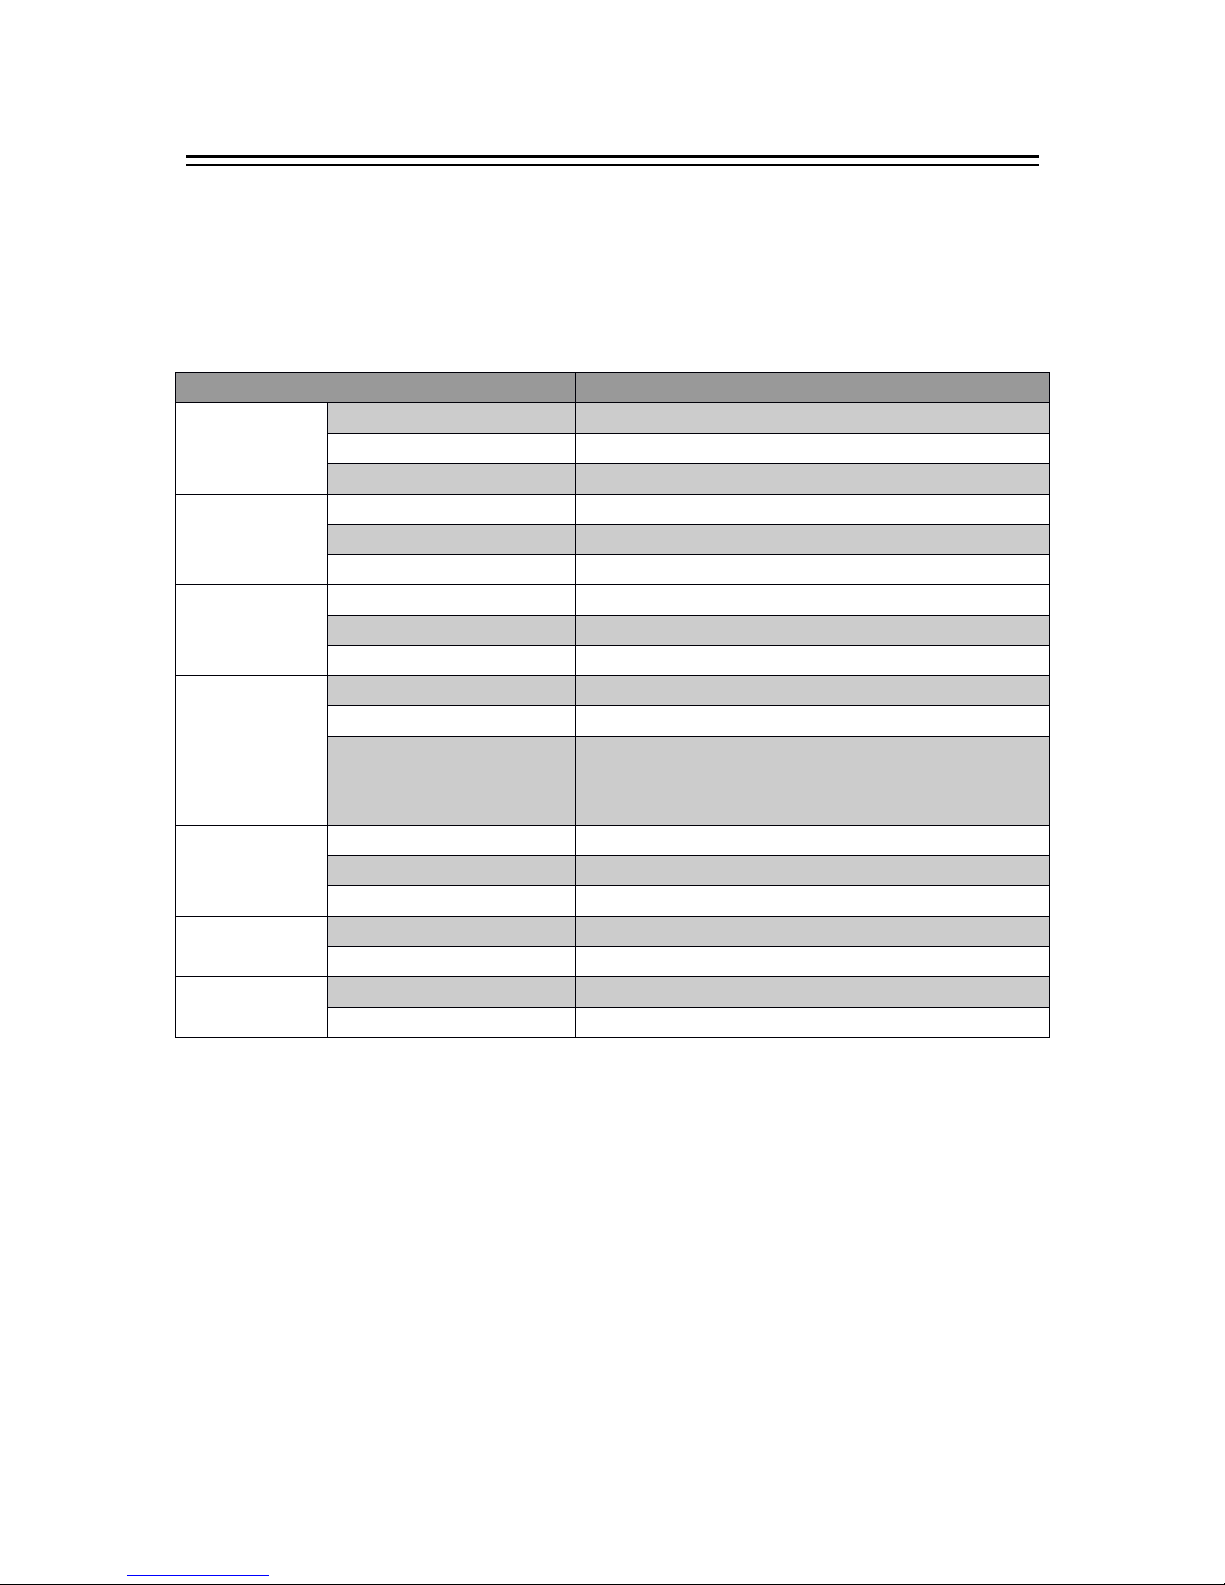
Specifications
Note:
The data for weight and size are approximately only.
Specifications are subject to change (by manufacturer) without notice.
Items Features
Demodulation
Mode
Demodulation DQPSK,QPSK,QAM16,QAM64
Symbol Rate 2~45Mbit/s
Code Rate 1/2, 2/3, 3/4, 5/6, 7/8
Video
Decoding
Video Decoding ISO/IEC13818-2 MPEG2(MP@ML)Compatible
Video Resolution PAL 720×576/ NTSC 720X480
Video Input Code Rate 30.9 Mbit/s Max.
Audio
Decoding
Audio Decoding ISO/IEC 13818-3
Audio Track Stereo, Dual Track, Monophony (L, R), SPDIF
Audio Sampling Rate 32,44.1, 48KHz
USB
USB Port USB2.0
Format MP3/JPGE/BMP
Power Supply
5V/300mA (Max). Note: External power source
needed when electric current of USB device is over
300mA.
Power
Input Power ~100-240V
Power Consumption ≤ 7 W
Max Consumption ≤ 7.5 W
Work
Environment
Temperature 0-40℃
Humidity <90%
Dimensions Weight <1 Kg
Size 130(W)×108(L)×33(H)mm

18
Appendix
Troubleshooting
Look through the trouble shooting information. Some simple checks or minor adjustment of
the unit on your part may help resolve the problems. If the problems prove to beyond your
capability, you had better hand it over to a professional qualified technician.
The integrated circuits are easily breakdown by static. Make sure the antistatic protection has
been well taken before maintenance.
Troubles
Possible
Cause
Suggested
Solutions
No power The power cord has not been well
connected
Plug the power cord into the outlet
tightly and turn on the power; if still
no power, turn off the power again,
and wait for 5-10 minutes, then
restart again.
Can
not
scan
programs
The
antenna
is
not
adjusted
well
Adjust
the
antenna
or
use
an
outdoor
antenna.
Antenna
incorrectly
Use
an
antenna
with
75
Ω
impedance
input.
Parameter
input
incorrectly
Input
Frequency,
Bandwidth
parameter
correctly.
No picture
Output cord is connected incorrectly
Connect the output cord correctly.
If the problem is still exit, the
output cord may damage.
The video output mode of the unit is
different from the mode of monitor Reset the mode
No Color The video output system of the unit is
different from the mode of monitor Reset the color system
Image distortion
at channel shift normal
The remote
control fails to
work
Batteries incorrectly installed Install the battery correctly
Batteries exhausted Replace the battery
Beyond the effective operation range Operate within an effective range
The remote sensor is pointed to by
bright light.
Place the unit elsewhere for a
change
Audio track and
subtitle language
are not the
chosen items
Has not chosen the right sound track Press the Audio button to shift the
track
No sound
The unit is in a mute status Cancel the mute
Volume is too low Augment the volume
Cable
is
connected
incorrectly
Connect
the
cable
correctly
No
sound
by
chance
There
might
be
a
short
circuit
Correct
the
output
cable
connection,
and
turn
on
again.
In
mute
status
Cancel
the
mute
Stay asleep Turn on the unit
Poor picture
quality Too much interferential signals Adjust the position of antenna.
Flash Drive can’t
be read
The USB cable connected incorrectly Connect the cable correctly.
The flash drive’s current is too heavy,
the product wouldn’t afford it. Provide external power source.
The flash drive runs self-protection
program because of external device
short circuit.
Change the short circuit device
and restart the product.

19
Address: Floor-809,West Tower, Coastal City,
Hai De 3 road, Nanshan Area, Shenzhen City, Guangdong Province,China
地址:(中国)广东省深圳市南山区海德三道海岸城西座 809 室
Tel: +86 755 216 79069
Mob: +86 159 893 964 29
Email:[email protected].cn
Inpax-china@inpax.com.cn
Web: www.inpax.com.cn
Table of contents
Other Inpax TV Receiver manuals


