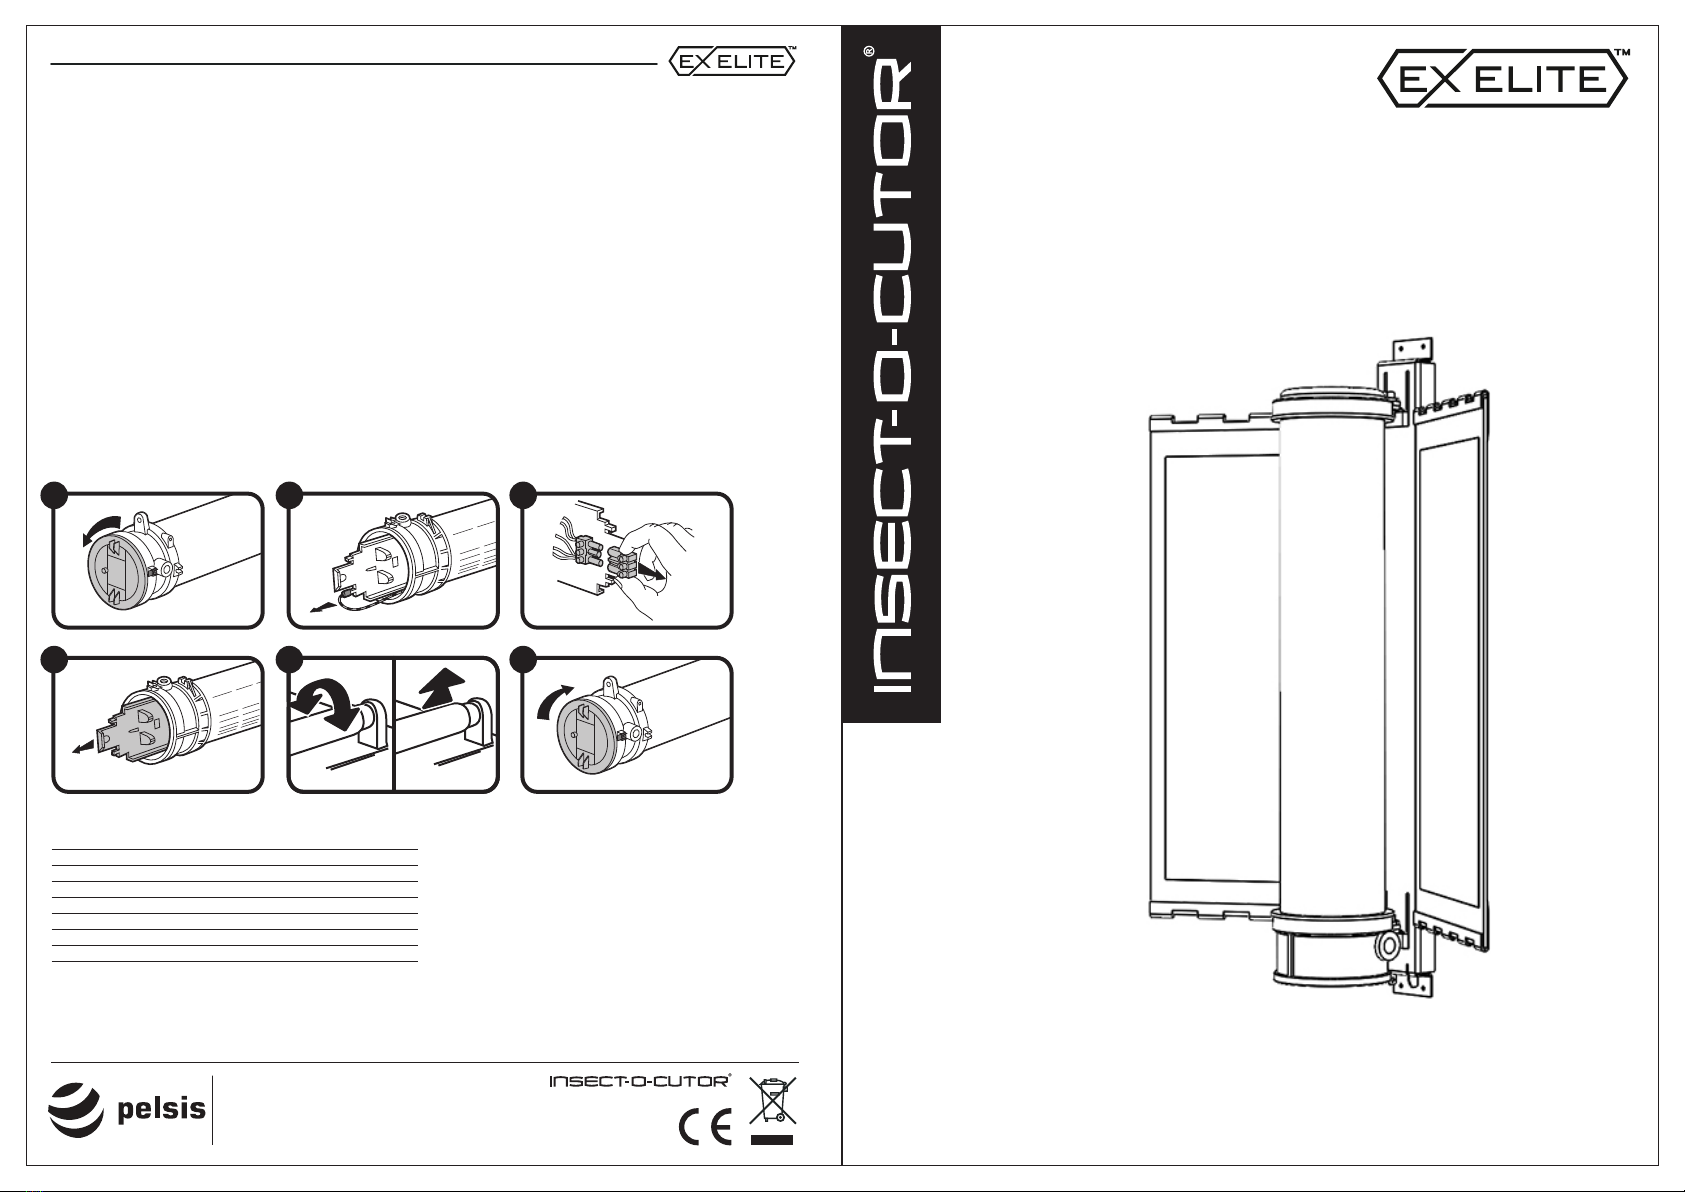
Frame assembly instructions
The main components of the EX EliteTM are the UV light unit, the stainless steel wall bracket (x1) and glueboard holders (x2).
Before the stainless steel wall bracket and glueboard holder assembly can be secured to the wall, the parts need to be secured
together using the fixing kit provided. The packaging in which the unit is supplied has been designed to assist in this assembly
process.
English
Take parts A & B and slot them together
Once together the A & B parts can be used to support one of the glueboard
holders
On a flat surface, position the packaging box marked C so it is standing upright lengthways. Place the
wall bracket face down top of part C
Slide the 2 parts together so that the fixing holes on the
glueboard holder are aligned with the fixing holes on the
wall bracket
Use the fixing kit provided to screw the glueboard holder to the wall bracket
Repeat the process to secure the other glueboard holder
From the packaging locate the parts marked as A, B & C
Please read these instructions carefully and store in a safe
place for future reference.
EX EliteTM
As part of the Insect-O-Cutor® brand of insect control
products, EX EliteTM is a professional glueboard flykiller which
utilises highly effective UV lamps and is designed for use with
a high specification Glupac® glueboard.
ATEX certification
Certified to the European Directive 94/9/EC ‘Equipment,
intended for use in a potential explosive atmospheres’,
EX EliteTM is a professional flykiller, intended for use in special
ATEX rated environments, and appropriate for use in zones 1
& 2 / 21 & 22.
CONTENTS OF PACKAGE
- 1 x EX EliteTM flykiller
- 1 x 316 grade stainless steel wall bracket
- 2 x 316 grade stainless steel glueboard holders
- 2 x Glupac® pheromone impregnated glueboard
- 2 x High powered shatterproof UV lamps (fitted)
- 4 x Screws and wall plugs
- 1 x Stainless steel assembly fixing kit
WARNING - THIS APPLIANCE MUST BE EARTHED (CLASS 1)
INSECT CONTROL PRODUCTS
EX EliteTM utilises high powered UV lamps to attract flying
insects and retains the caught insects on pheromone
impregnated glueboards for inspection or hygienic disposal.
WARNING
EX EliteTM is IP66 rated and is designed for use in applications
appropriate to this Ingress Protection rating.
EX EliteTM is designed for vertical wall mounting only.
EX EliteTM is not to be used by children or persons with reduced
physical, sensory or mental capabilities, or lack of experience
and knowledge, unless they have been given supervision or
instruction. Children should be supervised to ensure they do
not play with the appliance.
POSITIONING AND GUIDANCE FOR USE
THIS UNIT IS FOR INDOOR USE ONLY. NOT SUITABLE FOR BARNS,
STABLES AND SIMILAR LOCATIONS.
EX EliteTM should ideally be fixed around two metres above the
ground, preferably in the darkest place within the area to be
protected. ENSURE THERE IS A MINIMUM OF 350mm AT EITHER
SIDE OF THE WIDEST PART OF EX EliteTM AND THE ADJACENT
SURFACE, TO PROVIDE ENOUGH SPACE TO INSERT THE
GLUEBOARD.
(SEE MOUNTING INSTRUCTIONS)
Do not position the unit close to windows, skylights or other
sources of light, or where it may be obscured by equipment,
doors or other obstacles. Ideally, EX EliteTM should be visible
from every part of the area to be protected. EX EliteTM should
ideally be in operation for 24 hours a day, ensuring your
premises are kept free of flying insects. Insects are most
attracted to EX EliteTM at night when there is no competition
from daylight or other light sources.
Please note this unit has a type Y power cable and as such, if
it is damaged it must be replaced by Pelsis Ltd, its service
agent or similar qualified person.
GUARANTEE
EX Elite
TM
has a 2 year guarantee and if maintained as
recommended in these instructions should continue to work
for many years.* Use of non-approved consumables may
invalidate the guarantee. Ensure genuine Glupac®
glueboards are used in conjunction with this product.
INSTALLATION
INSTALLATION SHOULD BE CARRIED OUT BY SERVICE
PERSONNEL ONLY.
EX EliteTM
is designed for vertical wall mounting only. Use the
supplied wall mounting plugs and screws, or the correct
fixings for specialist mounting materials, such as
plasterboard.
1. Use the fixing holes in the wall mounting bracket to mark the
correct wall fixing points.
2. Fix the glueboard holders to the either side of the wall
bracket using the fixings supplied – Parts of the packaging
(marked A, B & C) have been designed to assist this process –
See assembly instructions.
3. Fix the wall bracket and glueboard assembly to the wall,
ensuring that the arrow on the specification label is pointing
upwards.
4. Fit the light unit to the wall bracket by inserting the tabs into
the slots of the wall bracket and lowering the light unit to lock
into place. Note the tabs at the bottom of the light fitting
should protrude through the lower face of the wall bracket. If
required the light unit can be locked into place using the hole
in the lower tab (anti-tamper options include; nut and bolt,
padlock or cable tie).
5.
EX EliteTM
should be hardwired into an appropriate power
supply (as indicated on the specification label) by a qualified
electrician. Allow sufficient cable length so that when the unit
is removed for servicing, it can be placed on a suitable
horizontal surface.
6. Fit the Glupac® glueboards in place as described in the
glueboard replacement section of this document.
CLEANING
CLEANING SHOULD BE CARRIED OUT BY SERVICE PERSONNEL
ONLY, AFTER ENSURING THAT THE UNIT IS DISCONNECTED
FROM THE MAINS SUPPLY.
It is recommended that cleaning is carried out regularly
when the glueboards are replaced. Once the glueboards
are removed, the unit should be thoroughly wiped down
with a damp cloth, removing any build-up of dirt. Ensure the
unit is completely dry before reconnecting it to the power
supply.
GLUEBOARD REPLACEMENT
GLUEBOARD REPLACEMENT SHOULD BE CARRIED OUT BY
SERVICE PERSONNEL ONLY, AFTER ENSURING THAT THE UNIT IS
DISCONNECTED FROM THE MAINS SUPPLY.
The glueboards should be replaced every month with
genuine Glupac® glueboards. Use of non-approved
glueboards may invalidate your guarantee.
EX EliteTM
comes supplied with high efficacy black
glueboards. To replace the glueboard:
1. Remove the used Glupac® glueboard by simply sliding it
clear from the glueboard holders.
2. Slowly slide the new Glupac® glueboard into position.
3. Remove the protective release paper from the new
Glupac® glueboard.
Always ensure the selected genuine Glupac® glueboards
are compatible with your unit, available from your pest
control operator or Pelsis Ltd.
*Excludes lamps and glueboards. Does not cover breakdown due to
misuse, incorrect operation or use in an incorrect application.
Professional Glueboard Insect Control English