Integra LifeSciences CUSA Excel 23 kHz User manual

Integra LifeSciences (Ireland) Limited
IDA Business & Technology Park
Sragh
Tullamore
County Offaly
Ireland
© 2021 Integra LifeSciences Corporation.
All rights reserved.
Made in USA
integralife.com
US and Canada
800-654-2873
609-275-0500 (Outside USA)
609-275-5363 (Fax)
UK/ International
+44 (0) 1264 345 700
+44 (0) 1264 363 782 (Fax)
Caution: Federal (USA) law restricts this device
to sale by or on the order of a physician.
Large brush
Nonlinting swab (2)
Refurbishing tool
Small brush
NONSTERILE
Read Instructions
Before Use
Single Use Only Latex Free
CUSA® Excel 23 kHz
Handpiece/Extended Life
Tip Maintenance Kit
C0023
REF
C AT.
Integra, the Integra logo, CUSA and CUSA Excel are registered trademarks of Integra
LifeSciences Corporation or its subsidiaries in the United States and/or other countries.
92901585 Rev B 2021-01 1814675-1
Medical Device
This maintenance kit maintains the
reliability of the handpiece connecting body
and tip. You can prolong the life of the
handpiece by avoiding direct contact with
metal instruments or bone and by making
proper use of a maintenance kit whenever
you observe pitting on the connecting body
or tip.
The following instructions describe the
process of preparing connecting body and
tip surfaces for reuse.
You can use the maintenance kit with all 23
kHz CUSA® Excel handpieces and extended
life tips.
All items in this pack are for single use
only. They contain no latex.
Refer to your user’s guide for further
assembly, disassembly, and cleaning
instructions for CUSA Excel handpieces
and tips.
Preparing to Clean
1. After a surgical procedure using a CUSA
Excel handpiece, remove the flue and
other disposable components. Then
remove the extended life tip from the
handpiece.
2. Clean all handpiece components
according to hospital policy. (For more
information, refer to your user’s guide.)
3. Open the maintenance kit, and remove all
contents: 1 small brush, 1 large brush, 1
refurbishing tool, 2 nonlinting swabs, and
this instruction sheet.
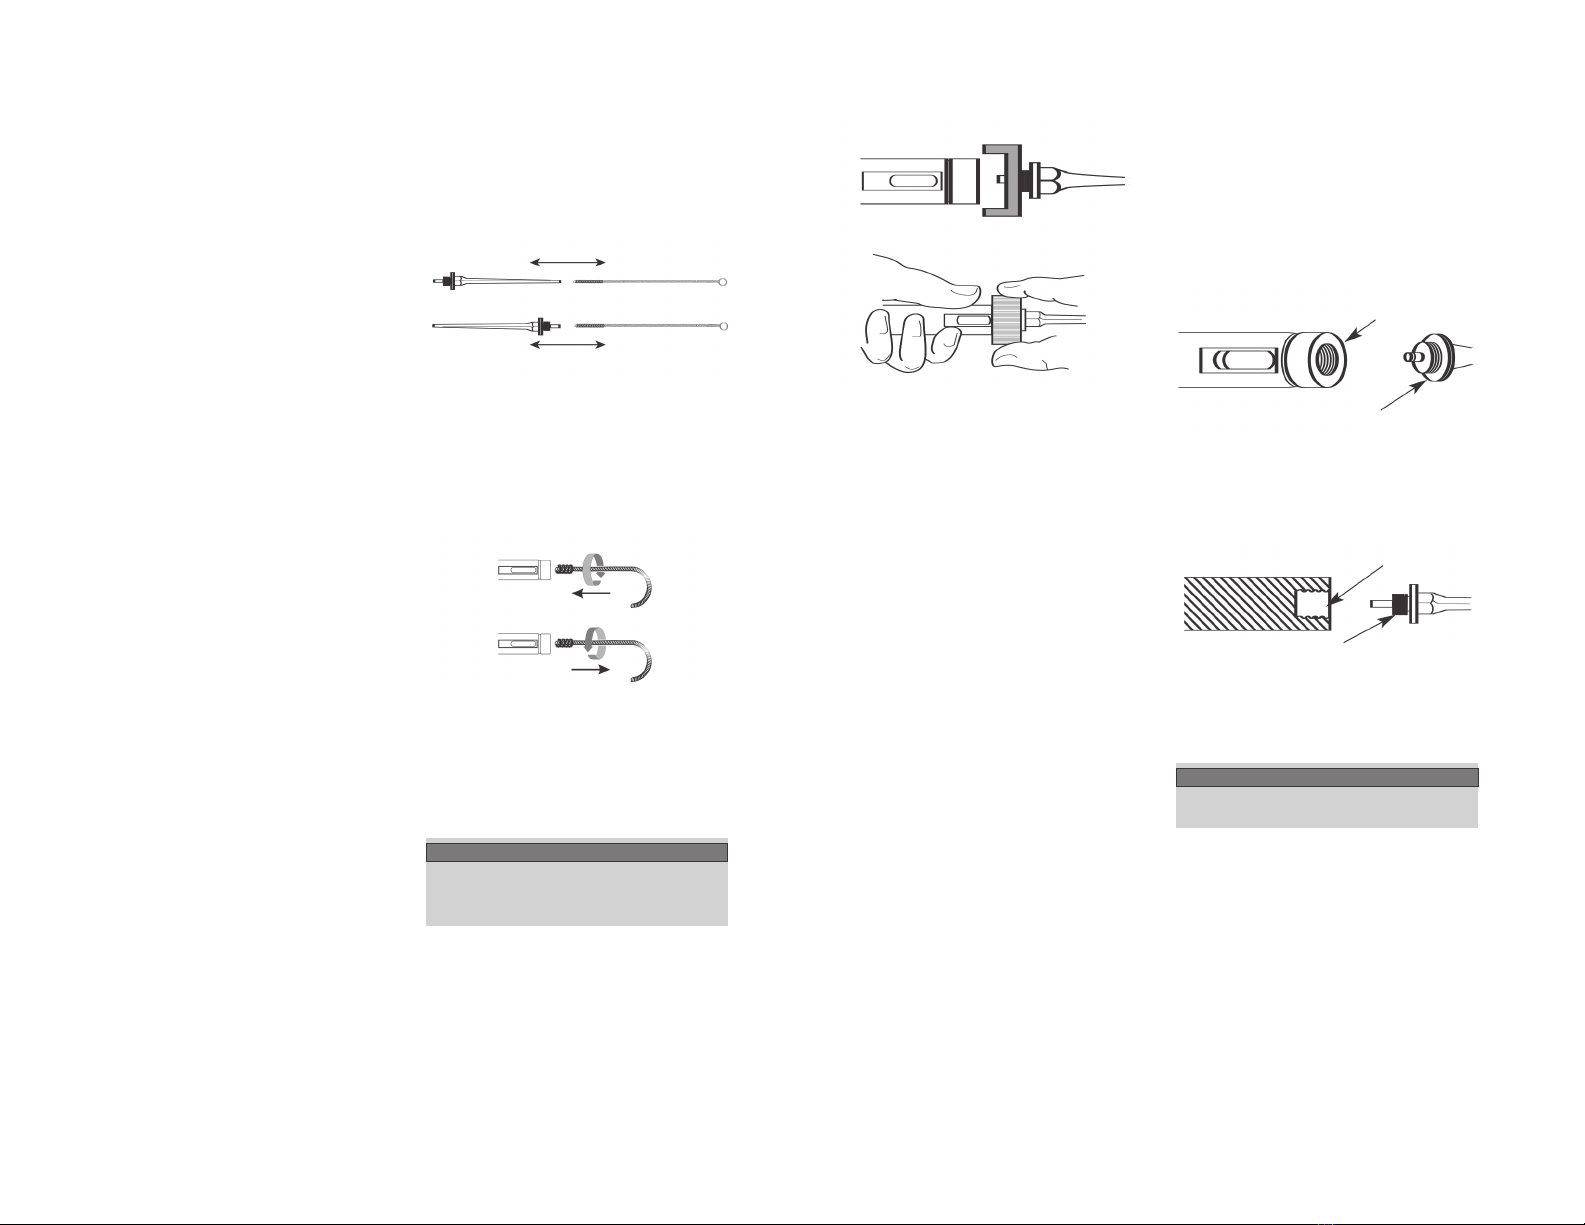
Clean the Inside of the Tip and
Female Threads
1. Insert the long slender brush completely
through both ends of the tip.
2. Insert curved handle brush into
connecting body threads. When inserting
the brush, turn it clockwise. When
extracting the brush, turn it
counterclockwise.
Refurbish Connecting Surfaces
Use the refurbishing tool to polish all
connecting surfaces of the connecting body
and tip.
Caution
Improper use of the refurbishing tool may
reduce the effectiveness of the handpiece.
1. Place the threaded end of the tip into the
hole on the flat side of the refurbishing
tool.
2. Place the tool between the surfaces to be
polished. Lightly screw the tip, with the
tool, into the connecting body.
3. Use one hand to hold the connecting
body and the other to hold the tip. Rotate
the tool with your index finger and
thumb.
4. Turn the tool clockwise to tighten it;
counter-clockwise to loosen it. Repeat
this cycle several times. This procedure
cleans both surfaces simultaneously.
5. Whenever you observe pitting on the
connecting body or tip, perform Steps 1-4
above.
6. Separate the connecting body and the tip
from the tool and view both surfaces of
the refurbishing tool. The green discs
should have a grey residue. This confirms
the polishing of the tip and connecting
body. Look at both connecting surfaces to
confirm that they are polished uniformly.
Refer to the CUSA Excel user manual for
more information.
Any serious incident that has occurred
in relation to the device for the user and/
or the patient should be reported to the
manufacturer and the competent authority
of the member state in which the user and/
or patient is established.
Wipe Connecting Surfaces and
Threads
1. Dip one of the white, nonlinting swabs
into alcohol. Rub the connecting surfaces
of the connecting body and tip. Discard
the soiled swab.
2. Dip the other white, nonlinting swab into
alcohol and clean the inside and outside
threads of the connecting body and tip.
The parts are now clean and ready to be
assembled for the next surgical procedure.
Caution
Sterilize the handpiece before use.
Tip Threads
Connecting Body Tip
Refurbishing
tool
Connecting body
threads
Tip connecting
surface
Large brush
Connecting
body
Small brushTip
Connecting body surface
This manual suits for next models
1
Popular Dental Equipment manuals by other brands

BRASSELER USA
BRASSELER USA HygienePro Air Operation manual

Tecno-gaz
Tecno-gaz B-MAX Instructions for use

EKOM
EKOM DO 2.1 Installation, operation and maintanance manual

Durr
Durr 2134-510-50E quick start guide

Durr Dental
Durr Dental XR 24 Nova Series manual

Siemens
Siemens PORTARAY HELIODENT 70 Maintenance Instruction

BK-Medent
BK-Medent Art Waxer User's operation manual

Nouvag
Nouvag 5052 operating instructions

Renfert
Renfert Twister venturi instruction manual

Treedental
Treedental TR-CWL07 Operation and installation manual

Ultradent Products
Ultradent Products VALO GRAND instructions

Belmont
Belmont SP-CLEO II operating instructions


