IntelligentAg Engage Zone Control User manual

1810 NDSU Research Circle N
Fargo, ND 58102
www.intelligentag.com
Page 1 of 5
INFORMATION NOTICE
DOCUMENT NUMBER: 600870-000038
SUBJECT: END OF YEAR CLEANING - ENGAGE® ZONE CONTROL
DATE: SEPTEMBER 1, 2020
This information notice describes the importance of and how to properly clean the Engage® Zone
Control Bin Kit at the end of the season.
Affected Parts
PART NAME IAS PART
NUMBER IMAGE PROBLEM
Engage Zone
Control unit 153510-000121
Improper cleaning
can lead to
excessive motor
corrosion
Document References
The content in this information notice and additional maintenance instructions are found in the
Engage® Zone Control Maintenance Manual (600840-000047). This document and all other
Intelligent Ag support documentation is found at www.intelligentag.com/support.
1810 NDSU Research Circle N
Fargo, ND 58102
www.intelligentag.com
Page 2 of 5
About
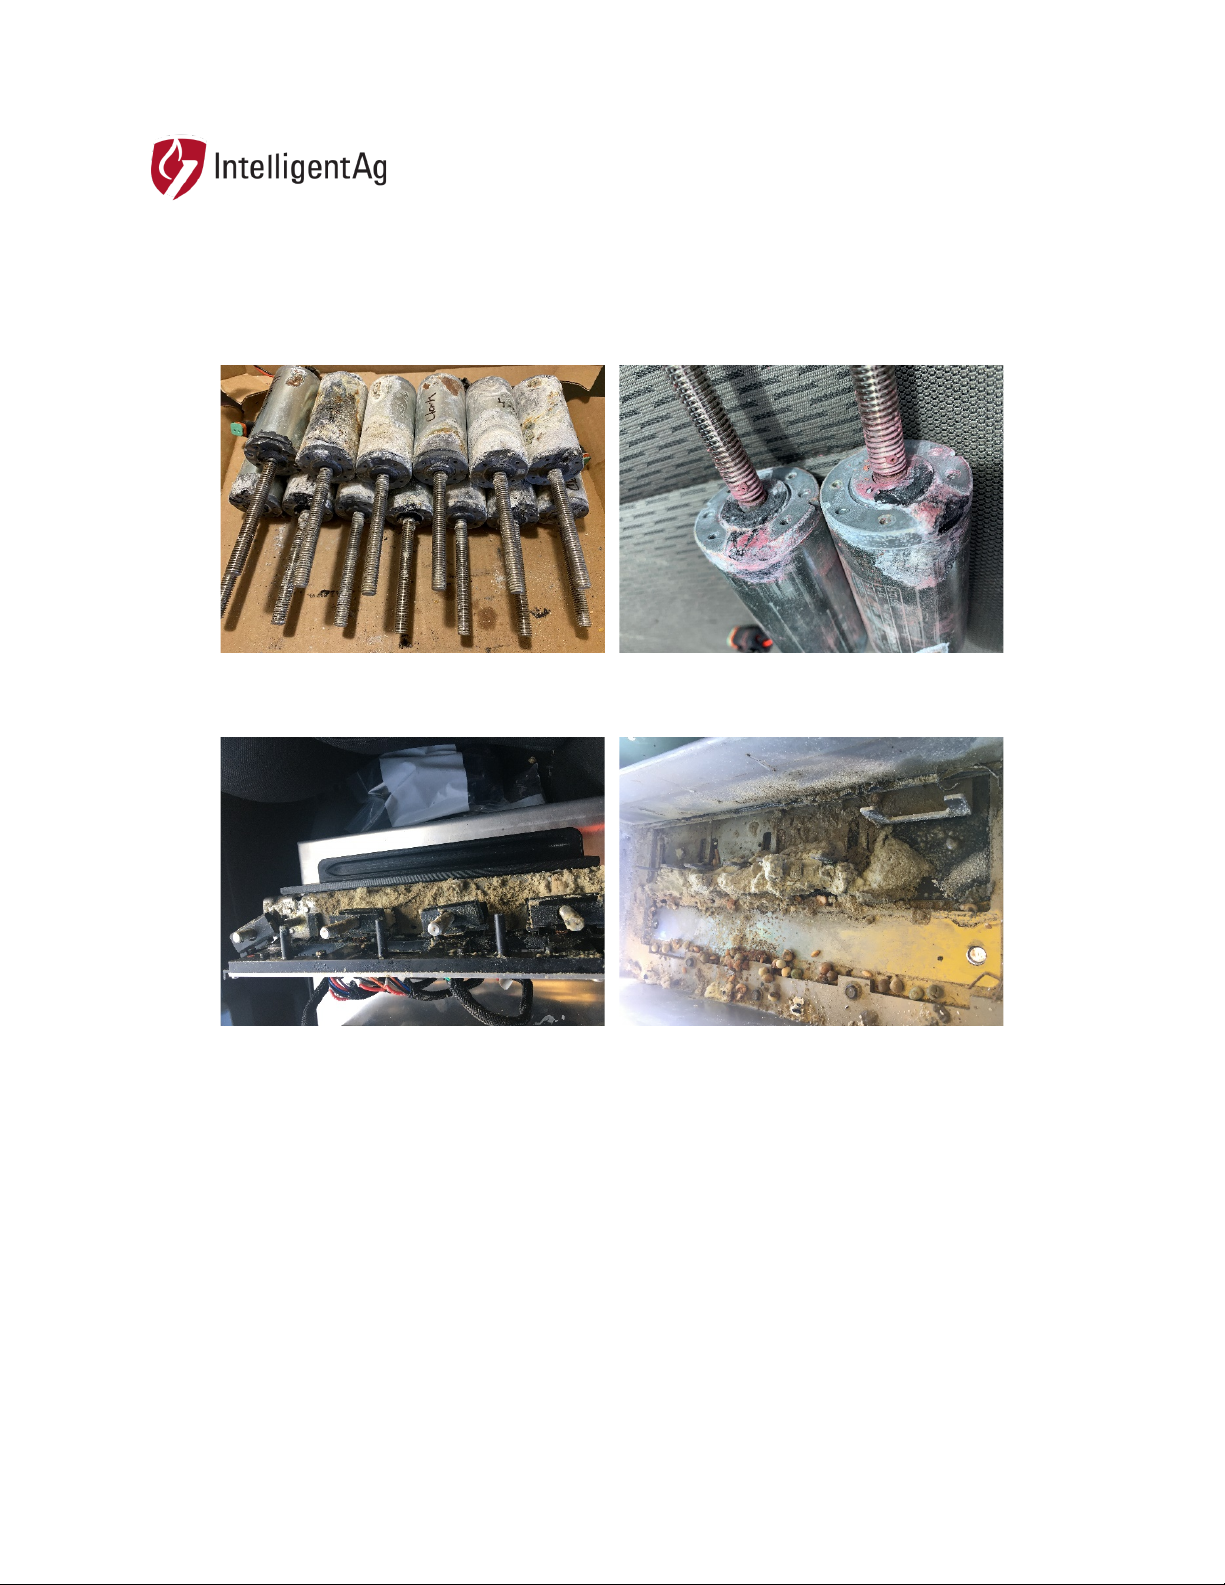
Motors within the Engage Zone Control unit (153510-000121) can excessively corrode if allowed to
sit in fertilizer residue during long term storage, as shown below.
This buildup is shown primarily on the faceplate of the motor assemblies and on the area around the
gates within the unit enclosure, as shown below.
Intelligent Ag implemented improvements to the motor in spring 2020, including a corrosion resistant
coating; however, the best protection against severe corrosion is the proper cleaning and
maintenance of unit. This will help ensure motor corrosion is minimal and reduces the likelihood that
a replacement will be needed next season.
If proper maintenance of the units is not performed, warranty may be voided on the motors.

1810 NDSU Research Circle N
Fargo, ND 58102
www.intelligentag.com
Page 3 of 5
Tools Needed
•15 mm socket, ratchet, and extension
•15 mm wrench
•Torque wrench
•¼” hex drive (for ground wire screw)
•Shop vac (recommended) or compressed air
•Wire brush (such as a bore brush) or plastic scraper
•Cleaning tool (included)
Corrective Actions
Disassembling the Engage® Zone Control Unit (Performed prior to End-of-Season
Maintenance)
TIP: Refer to the diagram on page 8 of the Maintenance Manual for labelled part names.
1. Cycle the gates open and closed through the tractor’s virtual terminal.
2. Unplug the bin harness that plugs into the Engage® Zone Control unit enclosure.
NOTE: Be careful not to damage the gasket when removing the lid.
3. Clean off any dirt from the enclosure lid. Remove the pin from the latches on the sides of the unit
and undo the latches. Then, slide the lid off.
4. Unplug all connections from the motor controller harness.
5. Unscrew the screw holding the ground wire to the motor mount and remove the ground wire.
IMPORTANT: Before removing the motor mounts, make note of the serial number of each motor
controller and if it is installed on the left side or right side of the enclosure. The motor controllers
must be reinstalled in their original position.
6. Remove the 2 bolts holding each motor mount to the enclosure and remove the motor mounts.
CAUTION: Engage® Zone Control unit gates are sharp. Use caution when handling gates.
7. Pull the gates toward the back of the enclosure and remove them. Do not pry the gates out.

1810 NDSU Research Circle N
Fargo, ND 58102
www.intelligentag.com
Page 4 of 5
End-of-Season Maintenance
1. Disassemble the Engage® Zone Control unit by following the instructions in the previous section.
2. Use a shop vac (recommended) or compressed air to remove any residue inside the enclosure and
on the end stop (see diagram on page 8 of the Maintenance Manual). Use a wire brush or scraper
to get any remaining residue.
3. Clean residue from the gates and motors using a wire brush or scraper.
4. Insert the provided cleaning tool through each gate slot. Use the tool to scrape the sides and the
end stop to remove any residue or debris buildup. Thoroughly clean the end stop to ensure proper
functioning of the gates.
5. Use a shop vac (recommended) or compressed air to clean out any additional dirt that was
loosened in the previous step.
BEFORE STORAGE: Reassembling the Engage® Zone Control Unit
After cleaning, follow the suggestions below for storing your system, depending on if you’ll be storing
your air seeder indoors or outdoors.
If you store your air seeder indoors:
1. Push the gates back into the gate slots with the two tabs on the gates facing up.
2. Re-position the motor mounts in their original position in the enclosure (left or right side of the
enclosure).
Ensure that the nut holding clips rest on top of the short side of the gates (as seen in the diagram
on page 8 of the Maintenance Manual) and that the magnet is facing up. You can move the nut
holding clips to align with the gates, or pull the gates out to meet the position of the nut holding
clips.
TIP: It is easier to align the nut holding clips if you position the motor mount at an angle and align
the nut holders individually from one side to the other.
IMPORTANT: Use care when reinstalling the motors so that you do not bend the lead screws.
3. Tighten the 2 bolts on the motor mounts. Torque to 31 ft-lbs.
4. Re-attach the ground wire to the motor mount, making sure that the serrated tooth washer is
between the ring terminal and the motor mount.
5. Plug all connections of the motor controller harness back into their respective connections. Refer
to the motor controller harness connections diagram at the end of this document.
NOTE: Ensure that that harness is routed toward the back of the enclosure.

1810 NDSU Research Circle N
Fargo, ND 58102
www.intelligentag.com
Page 5 of 5
6. Place the lid back on the enclosure, but do not latch the lid until you are ready to use the system
again next season.
7. Plug the bin harness into the Engage® Zone Control unit enclosure.
8. Cycle the gates open and closed through the tractor’s virtual terminal.
If you store your air seeder outdoors:
1. Do not re-install the gates or motor mounts. Place the lid back on the enclosure and secure the lid
with the latch.
2. Store the gates and motor mounts indoors or in a climate-controlled area to prevent
condensation on electrical components. Ensure that the motor mounts are protected so that the
lead screws do not get bent.
IMPORTANT: At the beginning of the next season, perform the steps found in the Maintenance
Manual before using the system.
Contact
Questions? Contact Intelligent Ag Product Support
Canadian Product Support: 1-306-993-1156
United States Product Support: 1-701-436-1219
Other manuals for Engage Zone Control
3
This manual suits for next models
1
Table of contents
Popular Ultrasonic Jewelry Cleaner manuals by other brands

Silvercrest
Silvercrest SUR 46 B1 operating instructions

Silvercrest
Silvercrest SUR 46 B1 operating instructions

Good Way
Good Way IRAM-EX-100 Operating and maintenance instructions

General Sonic
General Sonic GS6 Operating instuructions

Silvercrest
Silvercrest SUR 46 B1 operating instructions

TriStar
TriStar KR-2154 instruction manual


