Walter BIO-CIRCLE MINI User manual

MINI Model 100A
Owner’s Manual

2
Thank you for choosing the BIO-CIRCLE
TM MINI
Parts Cleaning System (Model 100A)
This operating instruction booklet has been designed to give you
all the information on the BIO-CIRCLE
TM MINI.
To ensure perfect functioning of your Parts Cleaning System,
carefully read these instructions before using the unit.
Familiarize yourself with this unit’s operation, its particular
features, applications and limitations. You will also nd useful
tips on safety and maintenance.
This unit is designed to function only with
genuine Bio-Circle L
TM cleaning solution.
The use of any other cleaning uid will void any warranty,
cause malfunctions and may create a hazard.
Titles Page
Safety Instructions ............................................................................................... 2
Introduction .......................................................................................................... 3
Voltage.................................................................................................................. 3
Extension Cord .................................................................................................... 3
Model Illustration .............................................................................................. 4-5
Aeration ............................................................................................................... 5
Solution Temperature .......................................................................................... 6
Start-up Instructions ............................................................................................ 6
Operating Instructions ......................................................................................... 7
Recommended Preventive Maintenance ........................................................... 10
Annual Maintenance ...........................................................................................11
Waste Disposal .................................................................................................. 12
Troubleshooting Guide ...................................................................................... 12
Accessories ....................................................................................................... 14
Technical Data ................................................................................................... 16
WALTER Sales & Service .................................................................................. 17
Warranty Policy ................................................................................................. 18
60-C 793

3
SAFETY INSTRUCTIONS
BIO-CIRCLE™ Parts Cleaning Systems are produced in accordance with
applicable standards governing the manufacture, performance and safety of
industrial products.
WARNING: Before using this machine, read all safety and operating instructions
carefully and save this owner's manual for future reference. When using this
parts cleaning system, basic safety precautions should always be observed to
reduce the risk of re, electric shock and personal injury, including the following:
1. Read this owner's manual to familiarize yourself with the unit's operation, its
particular features, applications and limitations.
2. Parts that are damaged or otherwise defective should be repaired or
replaced.
3. Adequate ventilation should be provided when operating the unit. Keep work
areas clean. A cluttered environment invites accidents.
4. Keep children and other persons at a safe distance from the work area. Do
not let unqualied persons handle this machine.
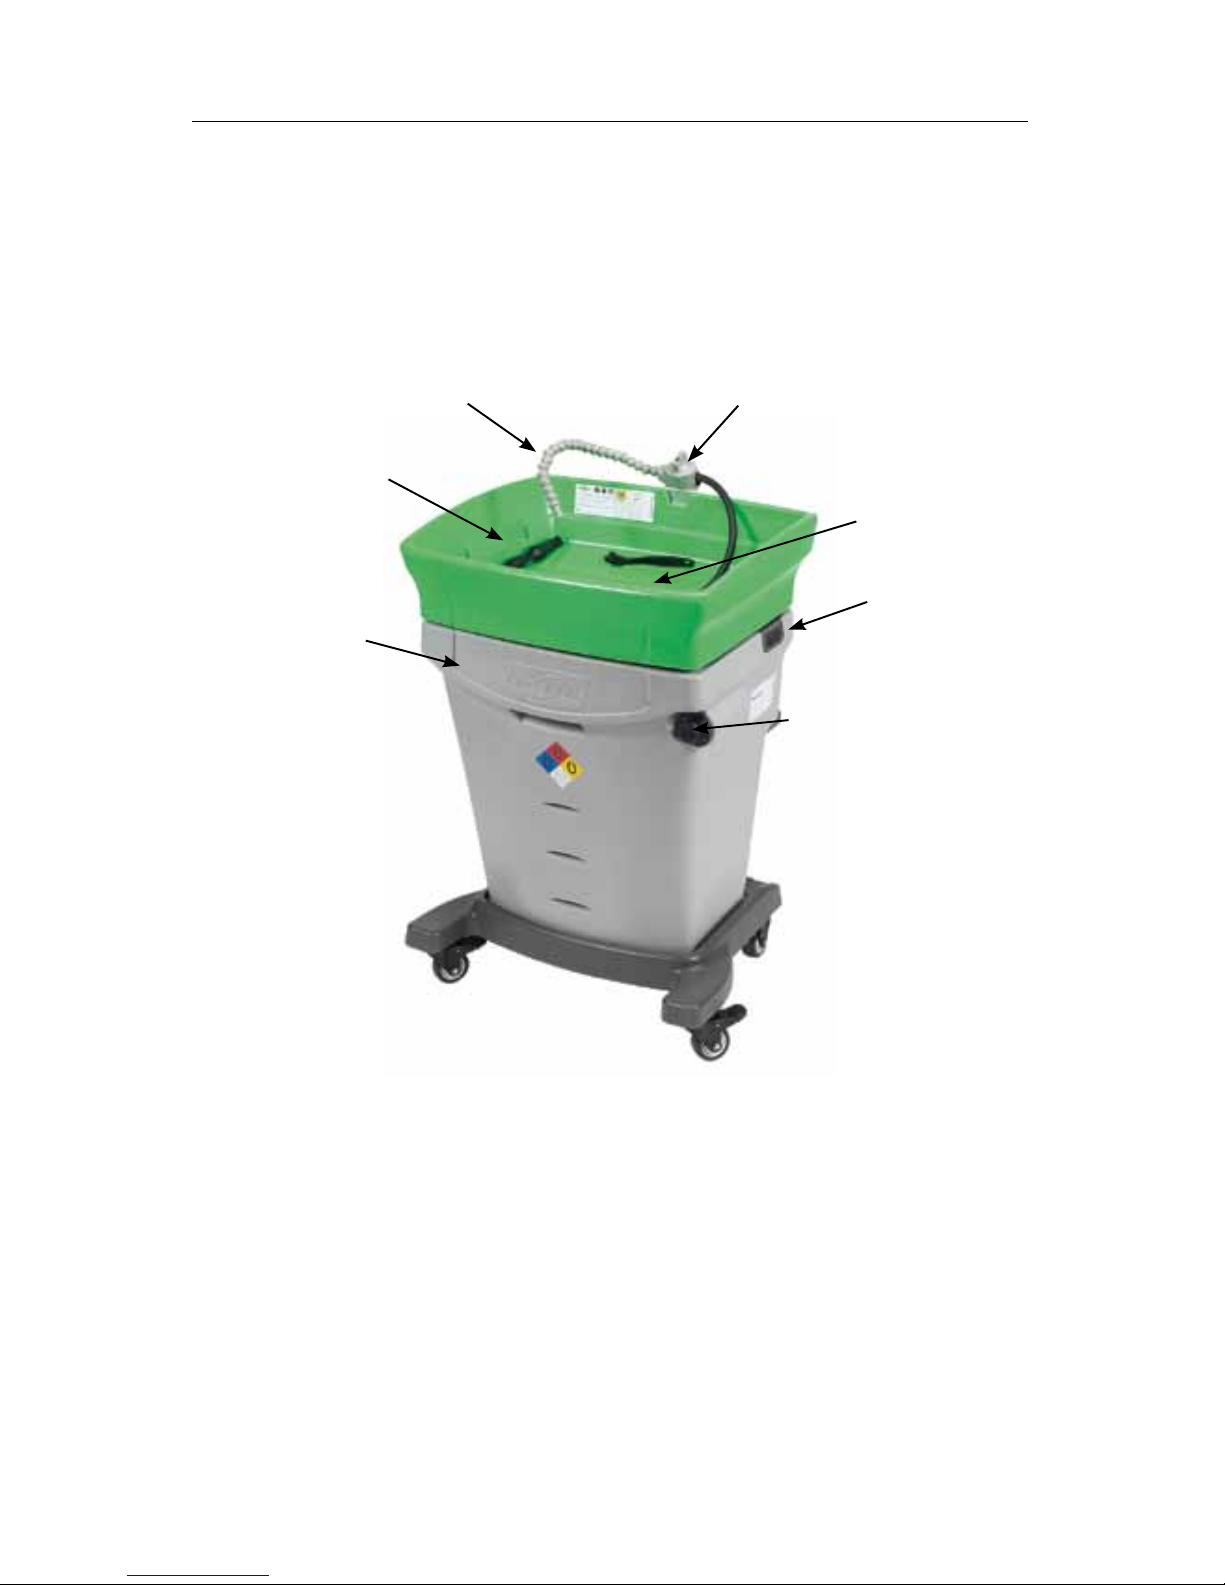
5. Your BIO-CIRCLE™ machine is equipped with a magnet inserted underneath
the grated receptacle in the sink. Always handle it with care, as it will shatter
if dropped and may cause injuries. Keep magnet away from electronic
devices and magnetic media such as oppy discs, credit cards and computer
monitors. Keep magnet away from pacemakers.
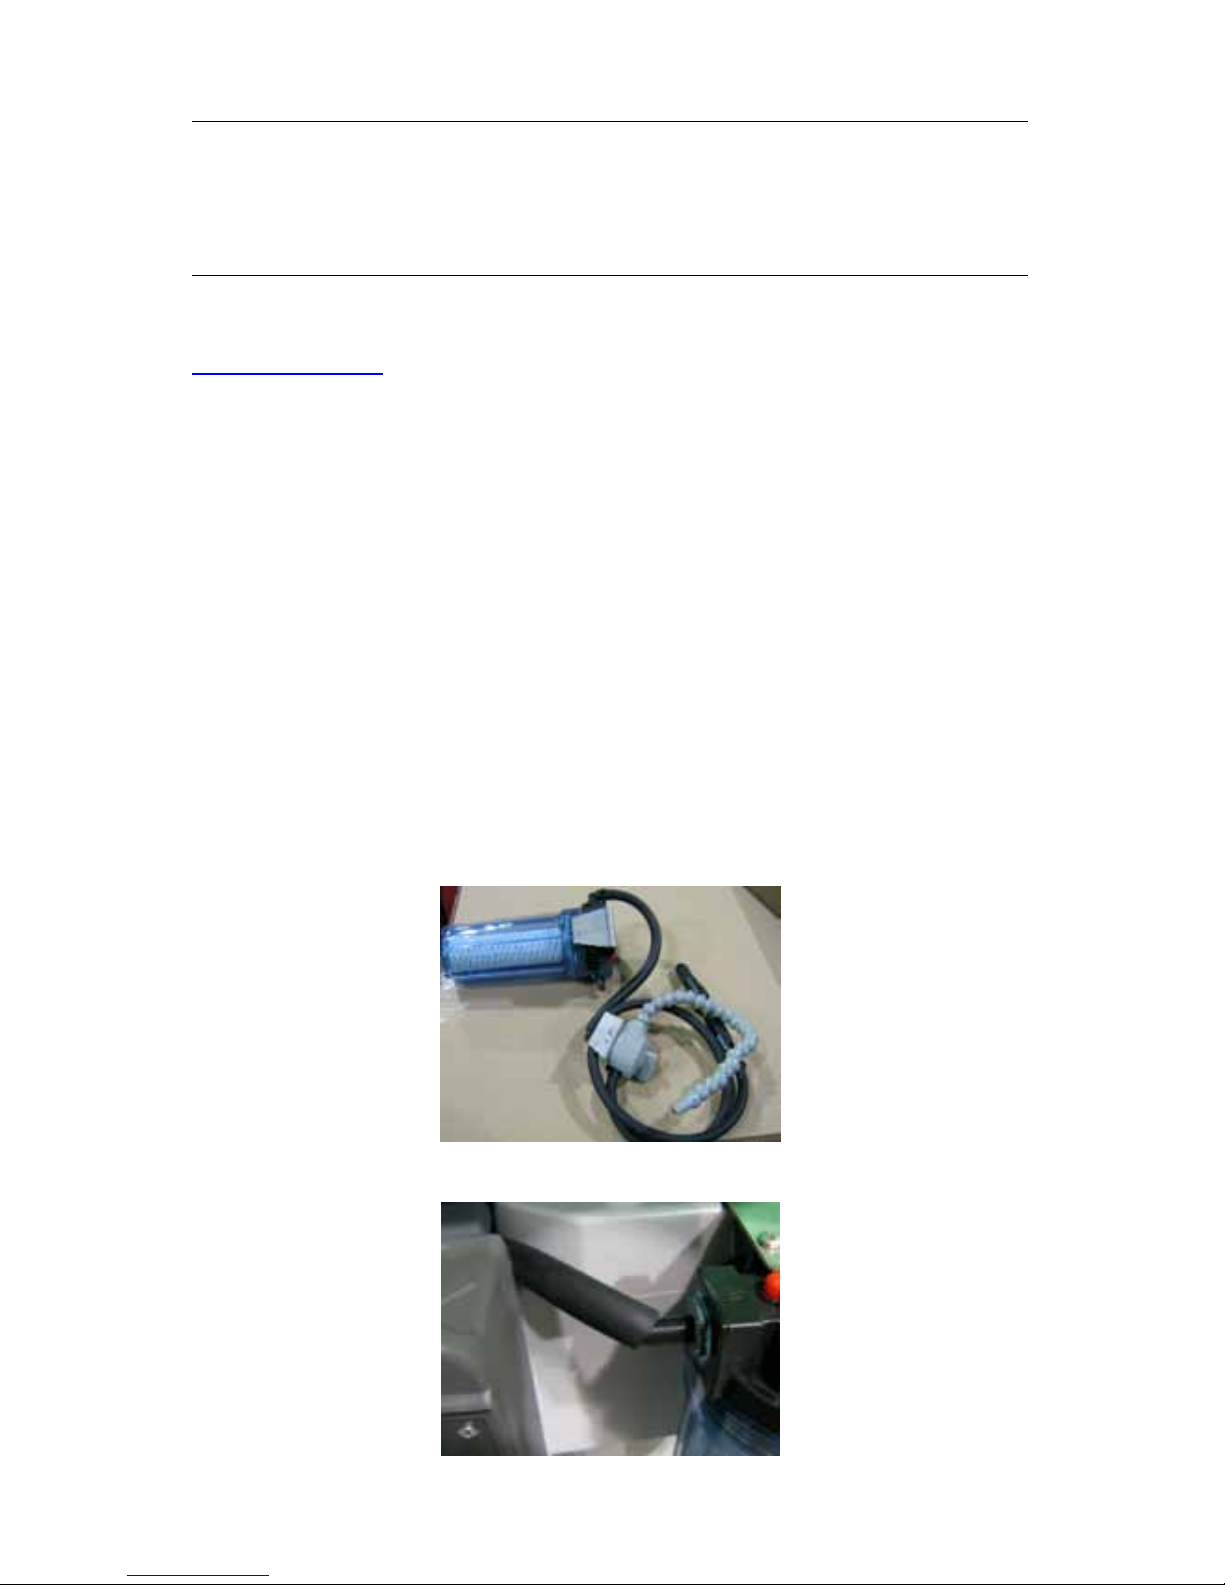
6. Do not contaminate the cleaning solution with any ammable or combustible
substances such as gasoline, alcohol, mineral spirits, solvents etc. Drain
parts to be cleaned of any ammable or combustible material before placing
them into cleaning sink. Even small quantities can create a re hazard. Do
not introduce into the unit any cleaning solution other than Bio-Circle L™ as
this will cause malfunctions.
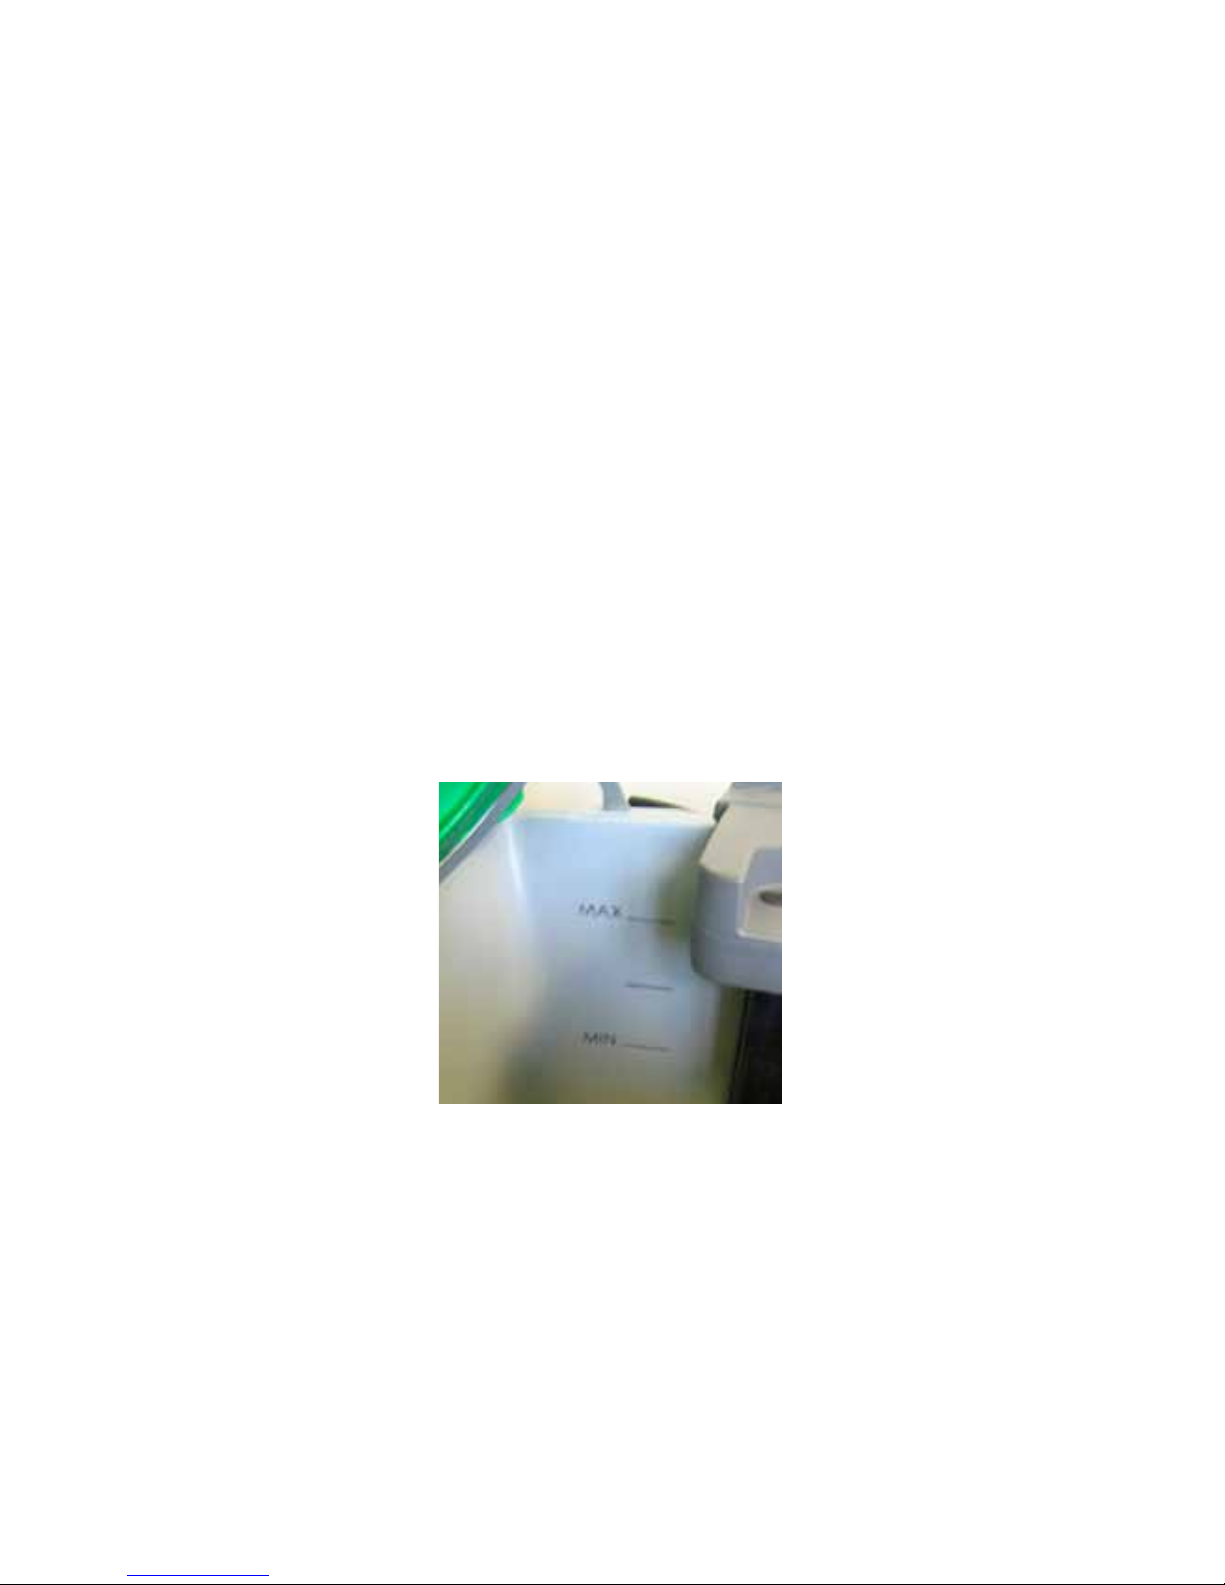
7. The circulation pump & heater coil must always be immersed. Failure to keep
the solution at the proper level can result in a burned-out pump or
overheating heater coil thereby creating a potential re hazard. To help
prevent this, the unit is equipped with a liquid level sensor and a high
temperature limit switch, which will shut off the pump and the heater coil
when the liquid level is low.
8. CAUTION: Used cleaning solution may be irritating to skin and eyes. While
working, always wear appropriate gloves and approved safety goggles.
First Aid: If used cleaning solution is splashed on clothing, change promptly.
Thoroughly wash any body areas that have been in contact with the solution.
Saturated clothing must not remain in contact with skin.
Eye Contact: Flush with water for 15 minutes, lifting eyelid often. See a
physician if required.
Ingestion: Rinse mouth and drink plenty of water. See a physician if
required.
Please refer to WALTER Bio-Circle L™ MSDS No.: L-78E for complete
safety data information.

4
9. This unit is equipped with a 3-conductor power cord and 3-prong grounding
plug. It must be connected to a correspondingly grounded power outlet
protected by a class A Ground Fault Circuit Interrupter (GFCI) to prevent
electric shock hazard. (Trip current < 6 mA)
10. Should you encounter any problems within the rst year of purchase, contact
the BIO-CIRCLE™ Technical support center. See page 17
INTRODUCTION
Your BIO-CIRCLE™ Parts Cleaning System is precision built to meet the highest
industrial standards. For maximum performance and longest life, follow the
operating instructions and maintenance procedures outlined in this manual.
This unit is CSA certied for both Canada and USA. It is supplied
with a 3-conductor power cord and a 3-prong grounded plug. It must
be connected to a grounded receptacle protected by a Class A
Ground Fault Circuit Interrupter (GFCI).
VOLTAGE
Before connecting this unit, check that the voltage shown on the rating plate is
the same as that of the power source.
Operating this unit on a voltage other than specied on its rating plate may result
in personal injury to the user and damage to the unit.
EXTENSION CORD
The use of an extension cord is not recommended, however if one must be used,
use one that is heavy enough for the power requirement of the unit. Extension
cords of inadequate wire size cause a serious drop in voltage and possible
electrical component damage.
To limit line voltage drop to a safe level, refer to the following table:
Length in Meters 8 15 23 30
Length in Feet 25 50 75 100
Wire Size AWG 14 14 12 10
Note: Extension cords that are used outdoors must be approved for outdoor use.

5
MINI MODEL 100A ILLUSTRATION - FRONT
A) Flexible faucet F) Grated receptacles & magnet
B) 3-way control valve G) Sink
C) Flow-through brush
D) Evaporation barrier
E) Cleaning pump switch
C
D
E
F
G
B
A

6
MINI MODEL 100A ILLUSTRATION – BACK
H) Filter housing J) Removable multi-function unit (RMU)
I) Main ON/OFF switch K) Drain valve
L) Air button hose M) Filter bag
AERATION
The air pump located inside the RMU (J) should always be heard and air bubbles
should be visible at the surface of the liquid, close to the pump support tube,
when the machine is under power.
This built-in aeration feature is vital to the high-quality performance of the
bioremediation process.
L
HM
I
J
K

7
SOLUTION TEMPERATURE
The temperature control is factory set to maintain the solution at 41º C ± 1º
(106°F ±2°). At this temperature the bioremediation process is at its most efcient
level, cleaning is faster and operator comfort is at its best.
START UP INSTRUCTIONS
Please be sure to read and observe, the "SAFETY INSTRUCTIONS" at the
beginning of this manual. Detailed start-up instructions can also be found at
www.biocircle.com
1. Remove the BIO-CIRCLE™ Parts Cleaning System from its packaging and
check for any shipping damage. Should any be detected, DO NOT connect
the machine but report the damage to the transport carrier and to J. Walter.
The original packaging must be retained.
2. - Open the sink. Use the retainer bar at the back to maintain it in
the open position.
- Remove all packaging material around the unit and from inside the tank.
(ex.: from underneath or behind pump/heater coil)
- Remove lter housing (A+B+C+H) from inside the base and slide the
stainless bracket into the slot located in the back right hand corner of the
base. Do the same for the 3-way valve stainless bracket by inserting it
rmly in the sink. It is recommended to use a hammer and a screwdriver
in order to properly put in place the metal plate in the sink. Then add the
lter bag (M) under the sink. Make sure you replace the bag when it’s full of
non-bioremediable waste. This lter bag will keep your liquid clean and will
increase the efciency of the cleaning process.
- Connect the hose coming from the pump to the lter housing (H) IN tting.
- Secure all connections with a hose clamp.

8
- Ensure lter bowl (H) is tightened. (Hand tighten only). Install the hose
- Ensure drain valve (K) is closed.
Place unit indoor, on a smooth level surface away from exposure to direct
sunlight. Use only genuine Bio-Circle L™ cleaning solution
(55-A 007, 20liters/5.3gal. or 55-A 008, 208liters/55gal.).
When lling the unit from a drum, ensure the transfer pump being used is clean
and close the drum once done.
Fill the tank to normal operating capacity of up to 80 liters/21.2 gal. Refer to level
lines shown on page 9.
Note: Open the container’s vent holes and pour slowly to prevent splashing
and excessive foaming of Bio-Circle L™liquid.
3. Plug power cord into properly grounded 3-prong, 120V, 60Hz, outlet protected
by a class A GFCI.
4. Turn main power switch (E) to “I”.
Note: Do not turn ON the main power switch (E) and the cleaning pump switch
(F) with no liquid inside the machine.
5. Allow the heater coil to warm Bio-Circle L™ solution to working temperature
for optimal cleaning efciency. This may take up to 4 hours.
Once the solution has reached its proper working temperature of 41ºC/106°F
(This can take up to 3.5 hours), periodically, the heater will turn itself ON
automatically to maintain the proper working temperature.
Never turn OFF the BIO-CIRCLE™ unit except for servicing.
OPERATING INSTRUCTIONS
The BIO-CIRCLE™ Parts Cleaning System is designed for the removal and
bioremediation of biodegradable oil and grease from ferrous and non-ferrous
parts and other washable surfaces. It is NOT recommended for cleaning other
non-biodegradable substances.
DO NOT INTRODUCE DISINFECTANTS, SOLVENTS, BRAKE FLUID, ENGINE
COOLANT, CHLORINATED, ACIDIC OR ALKALINE SOLUTIONS OR ANY
CLEANING SOLUTION OTHER THAN Bio-Circle L™ INTO THIS SYSTEM.
DO NOT ADD WATER.
1. Place parts to be cleaned into sink (G). Maximum load capacity is 90kg/200 lbs.
Do not plug drain to ll cleaning sink. Use optional Parts Washing Basket
(55-B 004) to contain small parts.
Note: Any parts susceptible to oxidation should not be left in the sink (G) after
cleaning.

9
2. Position 3-way Control Valve (B) toward desired direction of solution ow.
Solution can ow through both the exible faucet (A) and the ow-through brush
(C) simultaneously when the handle is positioned mid-way between the two.
3. Turn the cleaning pump ON & OFF by pressing ON/OFF switch (E).
To minimize uid consumption, always turn the cleaning pump OFF after use
by pressing the pump switch (E) again.
Wet the sink, parts to be cleaned and any brushes prior to cleaning; this will
prevent grease and dirt from sticking to the surfaces.
The BIO-CIRCLE™ unit is supplied with an efcient multi-jet ow-through
brush, which is well suited for most cleaning applications. However, for best
results, when cleaning smaller or intricate parts, it is recommended to run
the cleaning solution through the exible faucet (A) and use brushes that are
well adapted to the shape of the part being cleaned. Always clean parts while
holding them under the ow of liquid.
4. For optimum performance, always keep unit topped-up to the proper
working level of at least 80L/21 gal., do not ll above the MAX level. Do not
allow solution level to fall below 55 L/15 gal. Observe uid level lines molded
into the tank wall.
When the solution level falls below minimum, the oat switch will cut power to
the cleaning pump and the heater coil. The air pump, however, will continue
running. Check the uid level every other week and top-up to operating
level.
Note: The cleaning pump will start automatically after the uid level has been
topped up if the cleaning pump switch (E) is in the ON position. To prevent spills,
always put switch (E) in the OFF position when the oat switch has cut power to
the cleaning pump.
90L
75L
60L

10
5. The bioremediation process requires a favorable environment at all times,
even when the unit is not in use. Always keep the solution level topped-up
and the unit turned on to maintain proper temperature and oxygen supply
through the built-in air pump and heater.
6. As with all parts cleaners, excess grease and oil should be disposed of prior
to cleaning. Do not use this unit as a waste dump.
7. Inspect the grated receptacle (F) daily, it should be emptied of accumulated
solid waste and disposed of outside the parts washer in order to extend the
life of the solution.
8. A magnet is located underneath the grated receptacle (F) to separate all the
ferrous particles, thus enhancing the bioremediation process. The magnet
should be cleaned periodically with a clean rag to maintain its efciency and
ensure rapid draining of the sink.
9. This unit is equipped with a damper located underneath the grated receptacle
(F) to slow down evaporation. If too much evaporation occurs, verify that the
damper moves freely.
10. The BIO-CIRCLE™ Parts Cleaning System is designed for removing oil and
grease from parts and then remediating those substances. Any other use of
this system, such as dumping waste oil, is not recommended and will cause
damage to the system.
11. For stubborn grime and other hard to clean spots, rst spray or soak parts
using WALTER X-Force™ (53-X 002, 500ml aerosol or 53-X 003, 500ml
trigger sprayer) prior to cleaning with Bio-Circle L™ solution.
DO NOT USE ANY OTHER TYPES OF CLEANERS, as they will reduce or
prevent the bioremediation process and cause malfunctions to the unit. Also,
adding water will considerably reduce the bioremediation process as well as
the solution’s ability to clean.
12. The built-in thermostat has been factory set to maintain an ideal environment
for the bioremediation process as well as preventing skin burns to the user and
damage to the pump. Do not attempt to alter this unit in any way.
13. Condensation will accumulate underneath the sink top. This is normal due to
the temperature of the cleaning solution. Always ensure that the sink is closed
properly and that the gasket underneath the sink is not damaged to prevent

11
excessive evaporation.
Note: After a power interruption, the machine will restart automatically,
including the cleaning pump if pump switch (E) is in the ON position.
14. When using the machine, it is recommended to lock the front wheels in order
to give it more stability.
RECOMMENDED PREVENTIVE MAINTENANCE
Lift sink (G). A retainer bar at the back will maintain it the open position.
Do not open the sink while heavy objects are placed inside as the weight
may exceed the force of the retainer bar.
1. If unit is to be idle during weekends or for several days, it should be topped
up and the machine must remain ON.
2. If the unit is to be idle for more than one week, it is recommended to turn the
unit off. Before doing so, lift sink (G) and skim off or absorb any accumulation
of oil from the surface of the liquid. The unit should not remain turned off for
more than 4 weeks.
3. If a high concentration of non-digestible contaminants remains in suspension
inside the liquid, turn on the cleaning pump and let the uid circulate for a
couple of hours. The liquid will ow through the lter (H) and the lter bag (M)
which will remove the contaminants.
4. Liquid lter (H) should be inspected periodically. If lter is clogged or very
dirty, (weak or no liquid ow through brush and exible faucet) replace it. The
same process applies for the lter bag (M). This ltering is essential to keep
your liquid clean. See the section “ACCESSORIES” for a listing of available
lter cartridges and lter bags.
5. Ensure that the oat switch oats freely in the liquid.
6. The pH of the cleaning solution should always be between 6 and 9. If the
pH of the solution is outside this range, please contact the BIO-CIRCLE™
technical support line. See page 17 for contact information.
7. Inspect the electrical cord and plug regularly. Replace any damaged parts.
ANNUAL MAINTENANCE
Walter recommends that your MINI 100A be inspected and cleaned annually to
perform at optimal efciency.
Depending on the application, non-digestible matter can accumulate as sludge at
the bottom of the tank over time, which can negatively affect the bioremediation
activity. To facilitate the removal of the sludge, the tank bottom is tapered towards
the drain valve.
- Turn main power switch (I) to “0” and unplug unit.
- Connect a 1 in. hose to the barbed tting of drain valve (K). Fully open the
valve, wait a few seconds and then close the valve. Repeat these steps 3
times to remove most of the sludge.
If the sludge cannot be removed with this method, follow the instructions below:

12
- Open sink (G) and empty the unit of all the cleaning solution using a hand
pump until the sludge becomes visible. If cleaning solution is still cleaning
well, save it for re-use.
- Remove the sludge using a scoop and clean the tank walls and pumps.
- Visually inspect pumps, tubing and connections. Rinse the inside of the
machine with clean water. Replace parts that show excessive wear.
- When everything appears to be in good working condition, ll unit to working
level with Bio-Circle L™, turn it on and allow solution to warm-up to its
proper working temperature of 41º C (106° F) before cleaning parts.
Note: A CLEANING KIT (No. 55-B 020) is available, which contains all the
necessary items and instructions to make it easy to clean your Bio-Circle™ unit.
WASTE DISPOSAL
Refer to WALTER Material Safety Data Sheet for Bio-Circle L™ solution,
MSDS No.: L-78E.
Used Bio-Circle L™ can usually be added to your other oil-water waste (such
as water soluble cutting uids) for disposal. Always dispose of residual waste in
compliance with Federal, Provincial, State and local environmental regulations.
Check with local authorities for any special regulatory considerations. J. Walter
accepts no responsibility or liability for user’s failure to comply with governmental
and other safety regulations.
TROUBLESHOOTING GUIDE
SINK FILLS UP
The sink will ll up if the grated receptacle or magnet (F) are dirty or clogged
Remove grated receptacle and clean all parts. Ensure the drain damper moves
freely.
WEAK OR NO LIQUID FLOW FROM NOZZLE OR FLOW-THROUGH BRUSH
The rubber hose may be pinched along its length. Ensure the hose is not kinked
or squeezed. Also, lter (H) could be dirty or clogged, remove lter cartridge
and replace with a new one. See the section “ACCESSORIES” for a listing of
available lter cartridges.
The cleaning pump intake may be clogged. Turn the unit off (I) and un plug it.
Disconnect the rubber hose from the lter (H) intake tting. Lift the RMU (J) out of
the uid, unscrew the pump intake screen and clean it.
CLEANING PUMP STOPS
The built-in oat switch will cut power to the cleaning pump when solution level
has reached the minimum of approx. 55L/15 gal.
- Top-off tank to the proper working level of at least 80L/21.2gal.
with Bio-Circle L™ (No. 55-A 007, 20liters/5.3gal. or 55-A 008,
208liters/55gal.).
- Lift the oat switch vertically to reset it.

13
THE CLEANING FLUID IS COLD
If the cleaning uid is cold although the unit has been turned on for several
hours, and the uid level is topped up, please ensure the large oat switch can
move freely and is in the “up” position. If the uid is still not being heated, please
contact the BIO-CIRCLE™ technical support line. See page 17 for contact
information.
NO MORE AERATION
Aeration has stopped but air pump is still running.
– Check if the air hoses are pinched somewhere along their length.
– Check the air diffuser attached to the end of the air hose next to the pump
and clean or replace if necessary.
– Turn power switch (I) to “0”, unplug the unit, remove the cover of RMU (J)
and check whether the air hose is not disconnected from the air pump or
pinched somewhere along its length.
SOLUTION DOES NOT CLEAN WELL ANYMORE
If solution is dirty, refer to section “RECOMMENDED PREVENTIVE
MAINTENANCE” and “ANNUAL MAINTENANCE”.
The bioremediation process may have been reduced or prevented by
the introduction of harmful or incompatible substances or an unfavorable
environment. Depending on the situation, replacing all or part of the cleaning
solution to re-start the system may be required.
Please contact the BIO-CIRCLE™ technical support before proceeding.
See page 17 for contact information.
SOLUTION ODOR
It is normal that the solution may emit an apple odor at start-up. As oil and grease
are introduced into the cleaning solution, this odor will quickly diminish leaving
only a faint, pleasant scent. If the solution emits a strong foul odor, ensure that
the aeration system is functioning properly. Call the BIO-CIRCLE™ technical
support. See page 17 for contact information.
REMOVING THE REMOVABLE MULTI-FUNCTION UNIT (RMU) (J)
To remove the RMU, follow these steps. Do so only for maintenance/
troubleshooting as described in this manual or if you were instructed by Walter
personnel.
• Turn the unit OFF (I) and unplug it
• Open the sink (G) and disconnect the air button hose (L)
• Open the hose clamp that secures the hose to the lter (H) intake and pull the
hose from the tting
• Pull up the RMU
To put a RMU back in place, follow the above steps in reverse order.
Notes: - Store the RMU only in the upside down position.
- Ensure the RMU is completely drained once removed.

14
ACCESSORIES:
X-Force™
Cleaner/degreaser, protects against corrosion
- 500ml trigger sprayer
- Order No.: 53-X 003
- MSDS L-74
45º angled multijet ow-through brush
- Order No.: 55-B 007
Replacement multijet ow-through brush
- Order No.: 55-B 005
Washing basket
- 1/4” galvanized wire mesh (W 9” x H 8-1/4”)
- Order No.: 55-B 004
Re-usable lter cartridge 350 microns
- For removing non-digested particles in
suspension Bio-Circle L™
- Order No.: 55-B 011
Disposable lter cartridge 100 microns
- For removing non-digested particles in suspension
Bio-Circle L™
- Order No.: 55-B 012
Disposable lter cartridge 200 microns
- For removing non-digested particles in
suspension Bio-Circle L™
- Order No.: 55-B 021

15
Annual maintenance kit
- Contains a pump, absorbent pads, scoop, pH
paper and cleaners.
- Step-by-step instructions with photos
- Makes sludge removal quick and easy
- Order No.: 55-B 020
Hand pump
- For effective uid transfer
- Only for use with Bio-Circle L™
- Order no.: 55-B 051
Lid
- Installs without tools
- Protects sink from dust and dirt
- Order No.: 55-B 039
Sink insert
- Protects the sink from scratches and damage
- Perforated stainless steel
- Order No.: 55-B 044

16
TECHNICAL DATA
Model: 100A
Voltage: 120VAC, 60Hz
Amperage: 6.6 A
Heater: 700 Watts max.
Cleaning Pump: Approx. 515 liters/hr (135gal./hr)
Fluid Temperature: 41°C (106°F) - Factory set
Overall Dimensions W x D x H:
75cm x 73cm x 113cm (29.5 x 29 x 44.5in.)
Front Sink Edge Height: 100cm (39.5in.)
Sink Dimensions W x D (inside): 65cm x 51cm (30 x 20in.)
Max. Load Capacity: 90kg (220lbs)
Max. Fluid Level: 90liters (29gal.)
Min. Operating Fluid Level: 55liters (16gal.)
Net Weight (Empty): 39kg (100lbs.)
For information only. Technical data may change without notice.
Made in USA

17
WALTER SALES AND SERVICE
www.walter.com
CANADA
MONTREAL: 5977 Trans Canada Hwy. Tel: (514) 630-2801
Head Ofce Pointe-Claire, QC H9R 1C1 Toll free: 1-888-592-5837
Fax: (514) 630-2825
TORONTO: 151 Superior Blvd., Unit 12 Tel: (905) 795-8555
Mississauga, ON L5T 2L1 Fax: (905) 795-8558
EDMONTON: 18527-104 Avenue NW, Tel: 780-451-2053
Edmonton, AB T5S 2V8 Toll free: 877-366-9258
Fax: 780-453-1589
VANCOUVER: 1-1595 Cliveden Avenue Tel: (604) 540-4777
Delta, BC V3M 6M2 Fax: (604) 540-4778
U.S.A.
WINDSOR:
J. Walter Inc.
810 Day Hill Road
Windsor, CT 06095
Tel: (860) 298-1100
Fax: (866) 274-4435
MEXICO
ZAPOPAN:
Walter de México S.A. de C.V.
Blvd. La Carreta #835
Parque Industrial Belenes Norte
Zapopan, Jalisco 45145
Tel: (52) 33 1199-1515
Fax: (52) 33 1199-5119
BIO-CIRCLE TECHNICAL SUPPORT:
Should you have any trouble with the operation of your BIO-CIRCLE Parts
Cleaning System, please refer to the section “TROUBLESHOOTING”.
Should you require further assistance:
In Canada: CALL TOLL FREE 1-877-BIO-DRUM (1-877-246-8736)
In the USA: CALL TOLL FREE 1-888-246-2725
In Mexico: CALL TOLL FREE 01 800 263 6310
Visit us at: www.biocircle.com for additional information.

18
WARRANTY POLICY
All BIO-CIRCLE™ Parts Cleaning Systems and accessories are inspected and
tested before shipment and are warranted to be free from any defect in material
and faulty workmanship. Should any malfunction occur within one year from the
date of original purchase please call WALTER
(see page 17 for contact information).
Should a component examination reveal that the malfunction was caused by
defective material or faulty workmanship, WALTER will repair (or at our option,
replace) without charge. This warranty does not apply when; normal maintenance
is required, repairs or replacements have been made or were attempted by
anyone other than WALTER authorized service personnel, and does not cover
any damage caused by accidents, modications, use of improper solutions,
accessories, abuse or misuse as well as continued use after partial failure. No
other warranty, written or verbal, is authorized.
In no event shall WALTER be liable for any indirect, incidental or consequential
damages from the sale of the product. This disclaimer applies both during and
after the term of this warranty.
This warranty gives you specic rights. The provisions contained in this warranty
are not intended to limit, modify, take away from, disclaim or exclude any
warranties set forth in any provincial or state legislation. To the extent required
by law, the provisions in any provincial, state or federal legislation with respect to
warranties take precedence over the provisions in this warranty.

MINI Modèle 100A
Manuel de l’utilisateur
SYSTÈME DE NETTOYAGE
19

20
Nous vous remercions d’avoir choisi le
SYSTÈME DE NETTOYAGE BIO-CIRCLE
MC MINI (Model 100A)
Plus vous serez familiarisé avec le BIO-CIRCLE
TM MINI mieux vous pourrez
exploiter cet appareil
C’est pourquoi nous vous prions de lire attentivement ce mode d’emploi avant
de mettre la machine en service. Vous y trouverez des indications importantes
pour une utilisation sans problème, ainsi que des informations importantes
relatives à la sécurité et à la maintenance.
Cette machine est conçue pour fonctionner uniquement avec du liquide de
nettoyage Bio-Circle LMC. L’utilisation de toute autre solution de nettoyage
annule toute garantie, cause un mauvais fonctionnement et peut
présenter des dangers.
Titres Page
Directives de sécurité ....................................................................................... 21
Introduction ....................................................................................................... 22
Voltage................................................................................................................ 22
Extension électrique ......................................................................................... 22
Illustration du modèle .................................................................................. 23-24
Aération ............................................................................................................. 24
Température de la solution ............................................................................... 25
Procédures de démarrage ................................................................................ 25
Instructions d’utilisation .................................................................................... 25
Entretien préventif recommandé ...................................................................... 29
Entretien annuel ............................................................................................... 29
Élimination des déchets .................................................................................... 30
Guide de dépannage ........................................................................................ 30
Accessoires ....................................................................................................... 32
Données techniques ......................................................................................... 34
Ventes et service WALTER ............................................................................... 35
Politique de garantie ......................................................................................... 36
60-C 793
This manual suits for next models
1
Table of contents
Languages:
Other Walter Ultrasonic Jewelry Cleaner manuals