Inter-Play Electric Dragster User manual

Provided that you follow the construction directions accurately, Technokits normally
function correctly first time, however, here are some helpful tips in case your model
should fail to work correctly:
Follow the instructions on the reverse of this sheet to construct your ‘Dragster’
The motor does not run
when the Dragster is
switched on
Check that the batteries are in good condition
Ensure that the battery box is switched on
Ensure that the wires are firmly connected to the
motor terminals
Motor runs but Dragster
does not move
The Dragster
runs backwards
Reverse the electrical connections on the motor
Check that the rubber band is on both pulleys
Check that the wheels rotate freely
Once you are happy that your model runs correctly, you can apply the decals, or
‘stickers’. The illustrations will show you where each sticker should be located.
Alternatively, you could paint your Dragster to your own design!
Be careful not to obstruct moving parts with paint or stickers.
FITTING DECALS (STICKERS) / DECORATING YOUR MODEL
BUILDING YOUR DRAGSTER
Safety Advice for Supervising Adults: This project is safe to do, but you must follow the
instructions as specified. Because children’s abilities vary so much, even within age groups,
supervising adults should exercise discretion as to whether this project is suitable for children
in their care. The supervising adult should discuss the warnings and safety information with
children before commencing the activities, and observe the activities at all times. The activity
in this kit should only be completed with the materials specified and used as instructed. Read
and follow these instructions, the safety rules and first aid information. Keep them and our
address for reference.
Keep Small Children and animals away from the components at all times. Carefully put all
equipment away when not in use and store out of the reach of small children and babies.
Batteries: Do not insert batteries into the battery holder/s / box/es until the model is
complete, or where instructed to do so. Slide the switch to the off position before inserting
batteries. 2 x 1.5v AA batteries are required. Do not use rechargeable batteries. Never try the
activities with different batteries to those recommended. Never mix old and new batteries. Do
not try to recharge non-rechargeable batteries. Remove and carefully dispose of exhausted
batteries. Batteries are to be inserted with the correct polarity. The spring in the battery
compartment corresponds to the negative (-) end of the battery.
Mains Electricity: Never connect any of the components in this kit to mains electricity.
Children should be instructed about the dangers of mains electricity.
The Battery Box: When connecting the battery box to the motor (either directly or
indirectly), the black wire connects to the terminal marked with a red dot, and the red wire
to the other terminal on the motor Never cross or hold bare wires when the batteries are
connected as heat can be generated that may cause injury, fire or burning.
The Battery Box: Keep small children and animals away from the components at all times.
Carefully put all equipment away when the kit is not being used and store out of the reach
of small children. Never leave electrical circuits unattended, even if they don't seem to be
working. Remove batteries from the battery holder/s when not in use.
WARNING!
This kit is for use by children aged 8 years and over.
This kit is not suitable for children under 36 months due to small parts
that could cause a choking hazard. Adult supervision is required at all
times. Contains functional sharp points that could cause injury.
Contains wooden parts that could represent a splinter hazard.
IMPORTANT SAFETY ADVICE
This Kit is Manufactured in Taiwan for Interplay UK Limited - Marlow - SL7 1LW
Please retain all packaging and instructional material for future reference
This kit conforms to the following safety standards: CE: European, A.S.T.M. United States
Technokits™ Is a trademark of Interplay UK Ltd TS013 Instruction v1.0 2009
www.interplayuk.com
Rear axle x 1
Stub axle x 4
Plastic
washer x 4
Front axle x 1
Rear wheel x 2
Rubber band x 1
Universal
pulley x 1 pair
Motor x 1
Drive
pulley x 1
Foam insert x 1
Battery box x 1 Parts list
Motor mount x 1
Decal sheet x 1
(not illustrated)
Front wheel x 2
Washer
x 2
Upper rear wing
Lower rear wing x 2
Front cross-
member
Battery floor Rear motor mount
Front L
motor
mount
Front R
motor
mount
Main body side x 2
Middle crossmember
Rear body side x 2
ASSEMBLY
INSTRUCTIONS

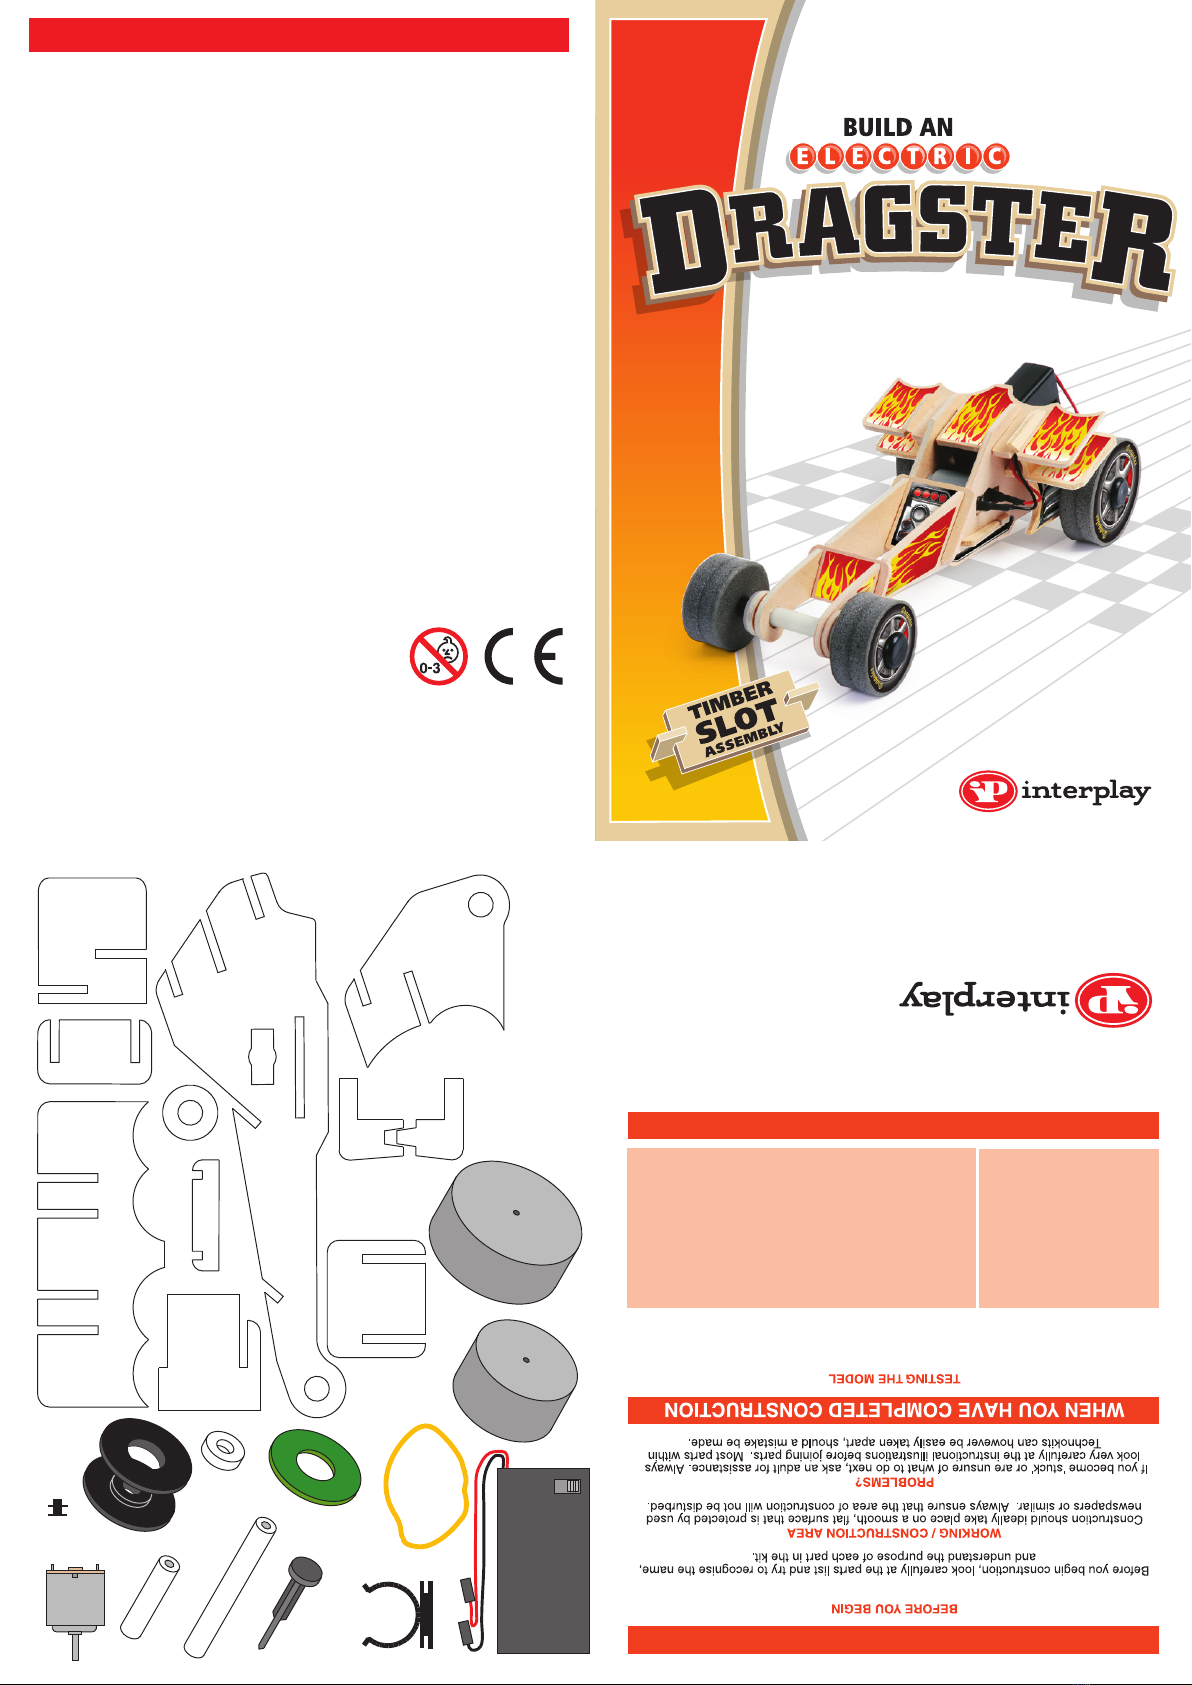
DRAGSTER ASSEMBLY INSTRUCTIONS
Carefully separate the
wooden components. Use the
sandpaper provided to round
off any rough edges. The slots
should slide together without
excessive force, but may need
sanding to achieve a good fit.
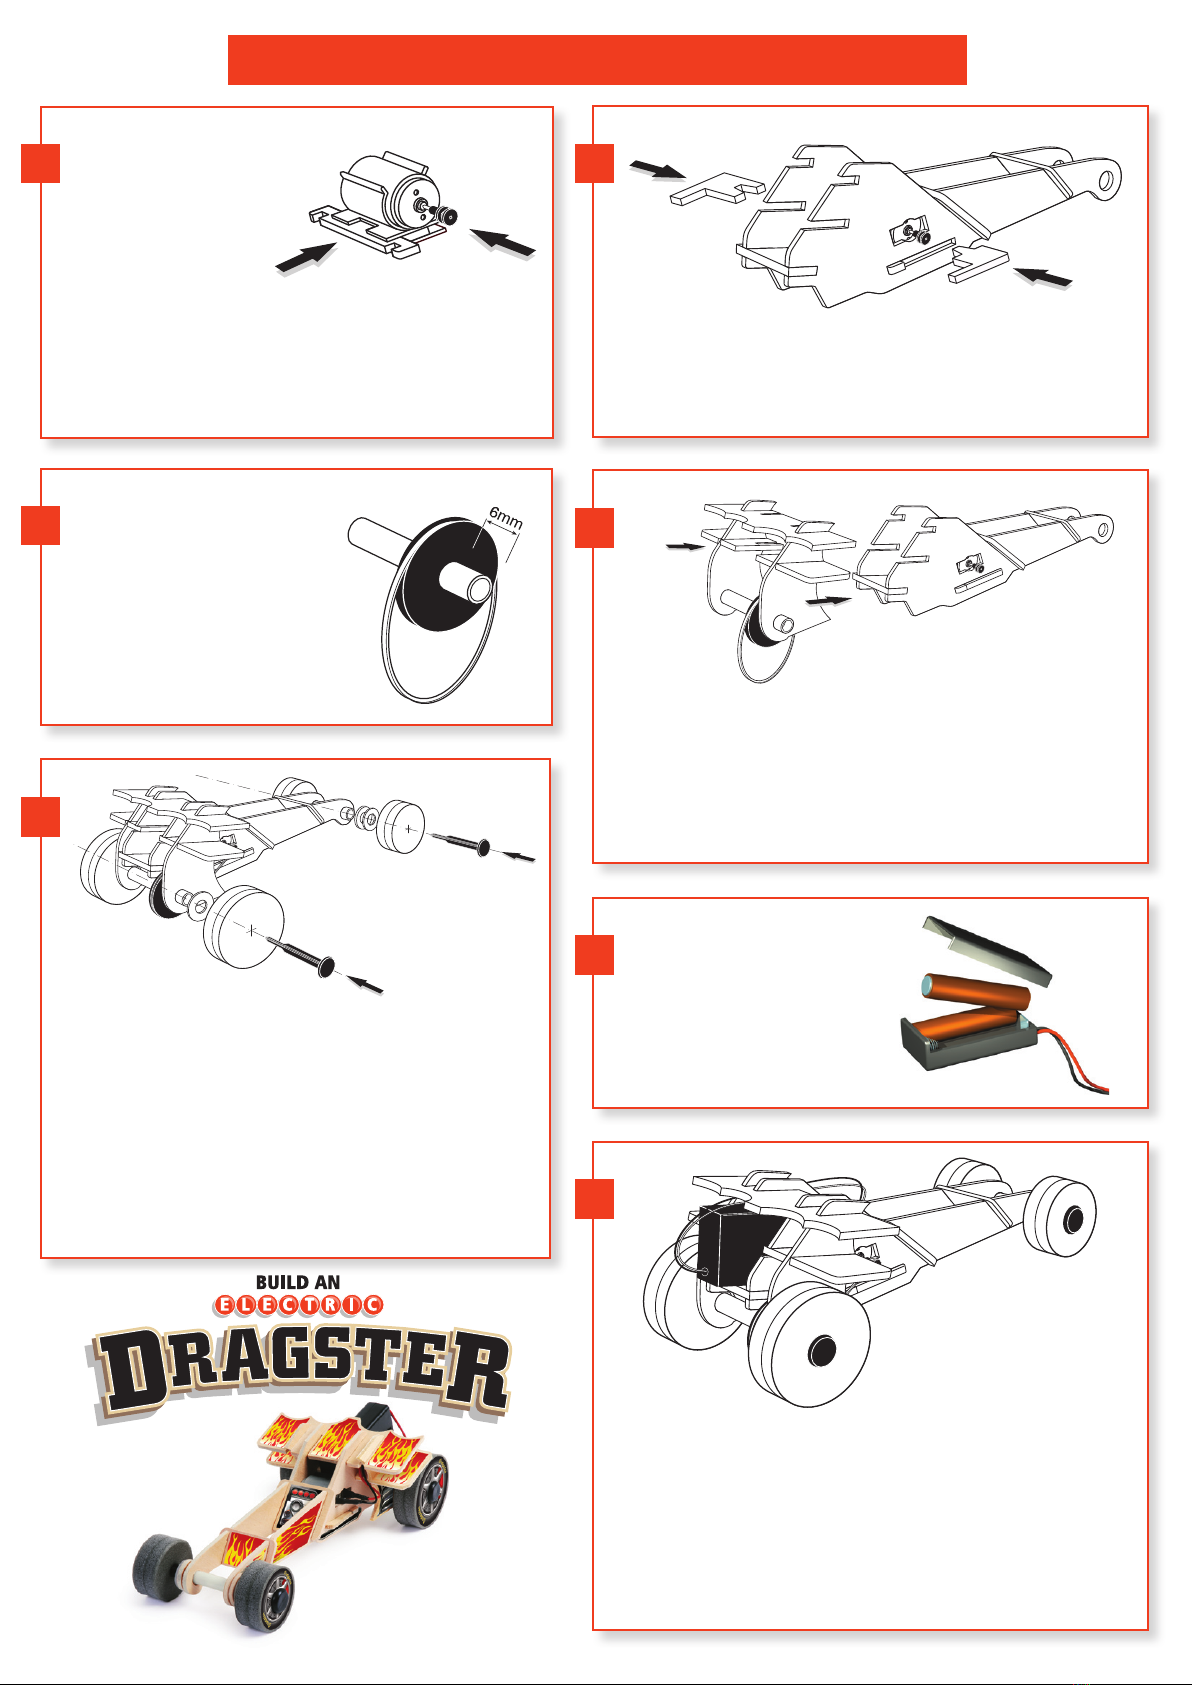
Push the drive pulley onto the
shaft of the motor, then locate the motor into the motor mount, taking
care to ensure that the ‘bump’ on the mount locates into the slot on the
rear of the motor casing.
Push the rear motor mount into the slot in the motor mounting as shown.
Ensure that the switch on the battery
box is in the off position and insert 2 x
AA batteries (as shown above).
Push the foam insert over the spigot on a
universal pulley, then snap the other half
of the pulley into place. Slide the universal
pulley assembly onto the rear axle (it is a
tight fit). There should be about 6mm (2
thicknesses of plywood) of axle sticking out
from the pulley. Put the rubber band over
the pulley, in preparation for the next step.
Slot the battery box into the rear of the Dragster, with the switch to the rear, and
thread the wires through the hole between the upper and lower wings on the
left hand side.
Connect the wires from the battery box to the terminals on the motor. The black
wire should go on the unmarked terminal and the red wire on the red terminal.
Stick the decals to the Dragster as shown, (you may find it easier to take some of
the parts off to fit the decals). Alternatively, you may decide to paint the Dragster
yourself, but take care not to paint moving parts.
1
3
Slot the front crossmember and rear motor mount into the main body sides,
then lock the motor in place by inserting the middle crossmember and the two
front motor mounts. The battery floor can then be inserted as shown into the
rear of the Dragster.
Fit the upper slot in each of the rear body sides into the outer slots on the upper
rear wing, then fit the central slot of each lower rear wing into the remaining slot
in each rear body side. The rear axle can now be threaded through the holes in
the rear body sides, with the universal pulley to the right hand side. The whole
assembly can then be slotted into the 2 slots on each of the main body sides.
Stretch the rubber band so that it fits over the universal pulley and the drive
pulley.
Push a stub axle through the hole in the centre of a foam rear wheel, then
thread a plastic washer onto the end of the stub axle, before pushing this
end into the hole in the rear axle. Repeat for the opposite side of the rear
axle.
Push a stub axle through the hole in the centre of a foam front wheel,
then thread a plastic washer and a wooden washer onto the end of the
stub axle, before pushing this end into the hole in the front axle. Thread
the front axle through the two holes in the front of the main body sides,
then fit the other front wheel onto the axle using the last stub axle, with
the plastic and wooden washer.
2
4
5
6
7
Other Inter-Play Motorized Toy Car manuals
Popular Motorized Toy Car manuals by other brands

Reely
Reely Top Speed operating instructions

LiteHawk
LiteHawk 285-42007 instruction manual

Carson
Carson Amphi Shark 2.4 GHz instruction manual

Carrera
Carrera Evolution 20025230 FERRARI TROPHY Assembly and operating instructions

Jamara
Jamara Ride on Traktor Strong Bull 6V instructions

Magom
Magom CAT D11 manual

Lean Cars
Lean Cars JT5158 owner's manual

WJG
WJG Hummer H2 Reference manual

Team Losi
Team Losi XXX-SCT Brushless instruction manual

Lenoxx
Lenoxx PR4411 Operational instructions

TDC
TDC BMW S1000 RR Owner's manual with assembly instructions

Carrera RC
Carrera RC Mario Kart 8 Mario Assembly and operating instructions