interion 695761 User manual
Assembly Instructions Instrucciones de Ensamblaje Directives d’assemblage
Customer Service
US: 1-800-645-2986
Servicio de atención al Cliente
US: 1-800-645-2986
Service à la clientèle
Canada: 888-645-2986
050620
1
36" Low Credenza with
File Cabinet
WARNING
An improperly installed file cabinet can become
Unstable or tip over, causing serious injury. Follow
all instructions in this manual for correct Installation,
use and maintenance These files are for storing and
filing non-combustible materials that do not require
special protection. Do not use this cabinet to store
combustible or hazardous materials.
Wear Safety Glasses When Using Tools.
Adjustable glides are provided in the base of each
cabinet. Depending on which model you have, your
cabinet may have 4 glides (one at each corner)
or 2 glides in the front corners of the base. Glide
adjustment is critical for cabinet stability and proper
operation of lock, interlock, drawers or other moving
features that may be present on your cabinet.
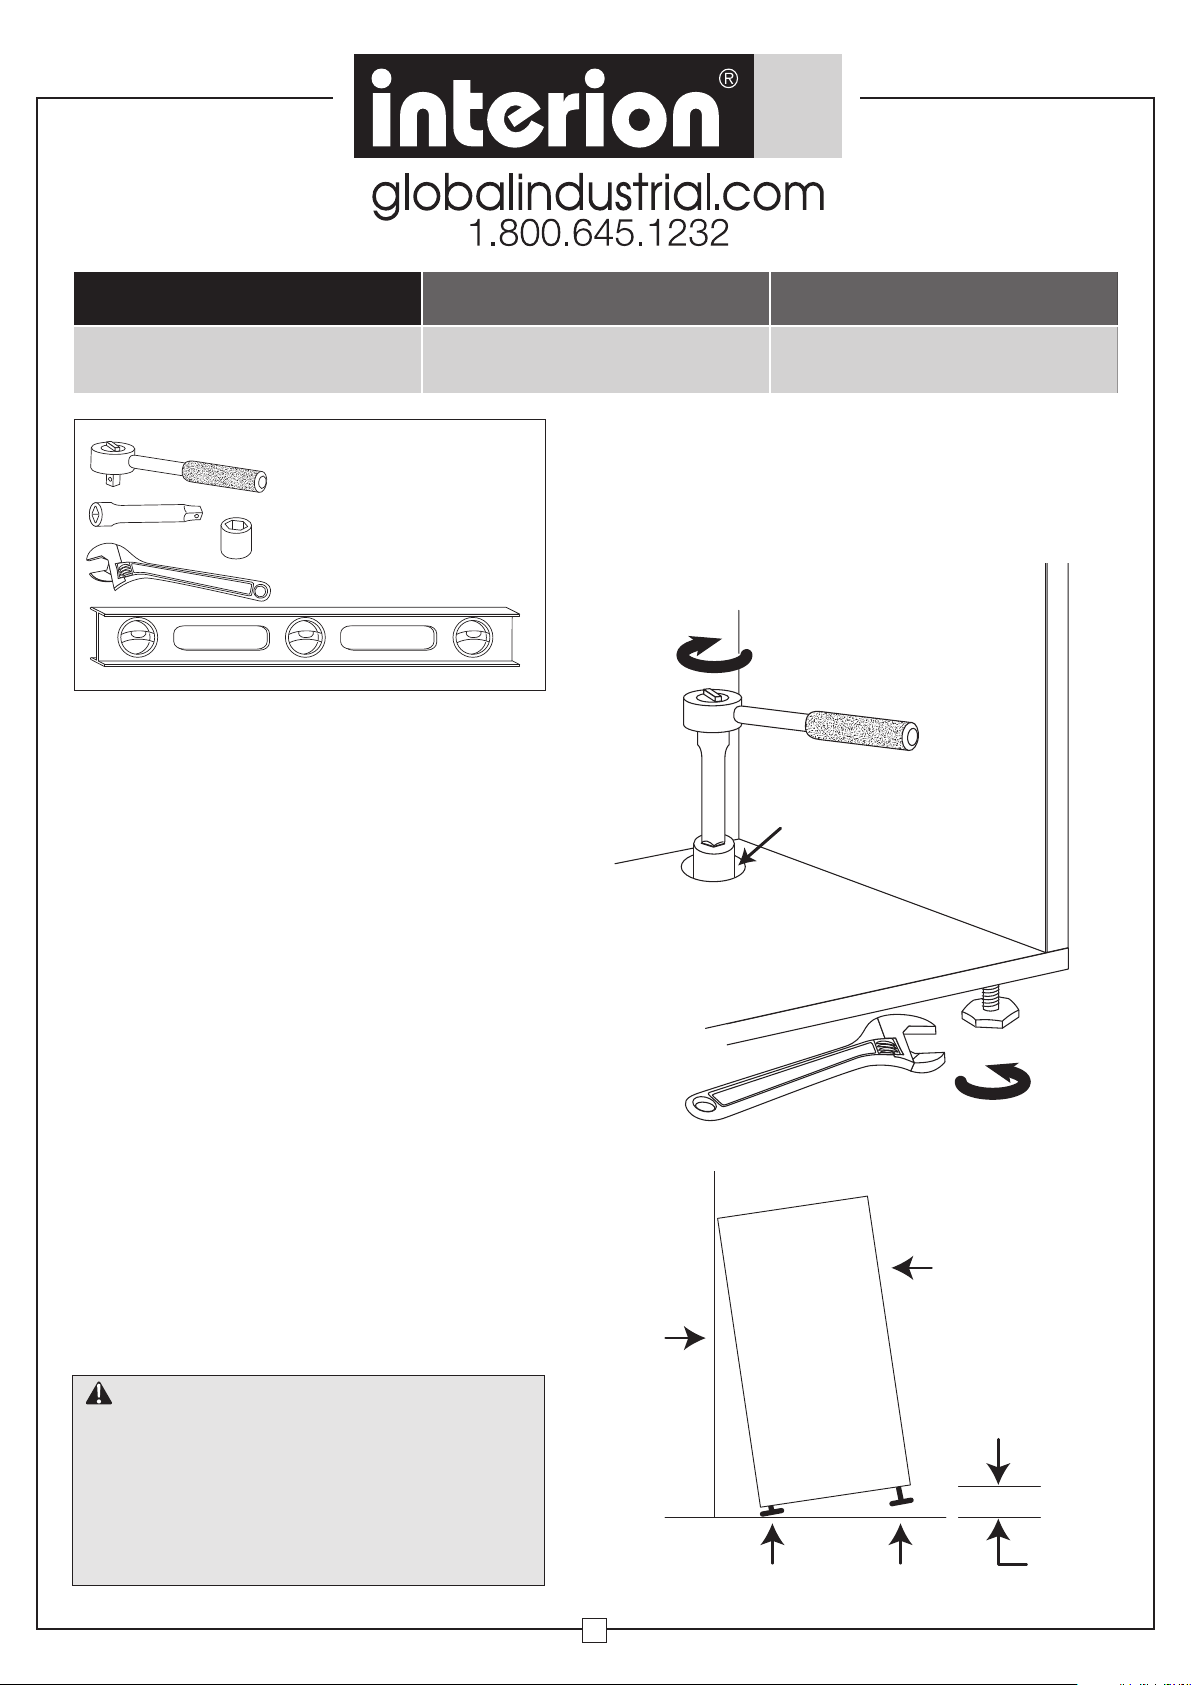
1. Be sure cabinet is empty.
2. Place a 24" level across the front of the cabinet to
level side to side. Adjust the front glides from the
outside of the cabinet using an adjustable open
end wrench. Turn the glides clockwise to raise the
cabinet and counterclockwise to lower the cabinet.
It may be necessary to cautiously tip the cabinet
back slightly to make the front glide adjustments.
The rear glides can be adjusted from the inside
of the cabinet using a socket wrench with a 1/4"
drive. Depending on your model, an access hole
may be present to access the rear glides.
3. The final glide adjustment is to adjust the glides so
that the front of the cabinet is higher than the rear
while maintaining the side to side levelness. On
carpeted surfaces, the front is 1/4" higher. On hard
surfaces , the front is 1/8" higher.
4. Check cabinet for proper operation. All drawers
on your cabinet should open and close smoothly
and be evenly aligned with the frame. The glide
adjustment and levelness of your cabinet can
effect. this operation.
Model 695761
Tools required for file adjustment:
1/4" Drive socket wrench
1/4" Drive extension
1/4" six point socket with 1/4" drive
Adjustable open end wrench
24" long level
Access holes
Rear
glides
Front
glides
Counterclockwise to lower.
Bottom drawer/shelf not shown for clarity
Front of cabinet
Wall
Adjustment glides 1/8" to 1/4"

36" Low Credenza
with Filing Cabinet
2
Assembly Instructions
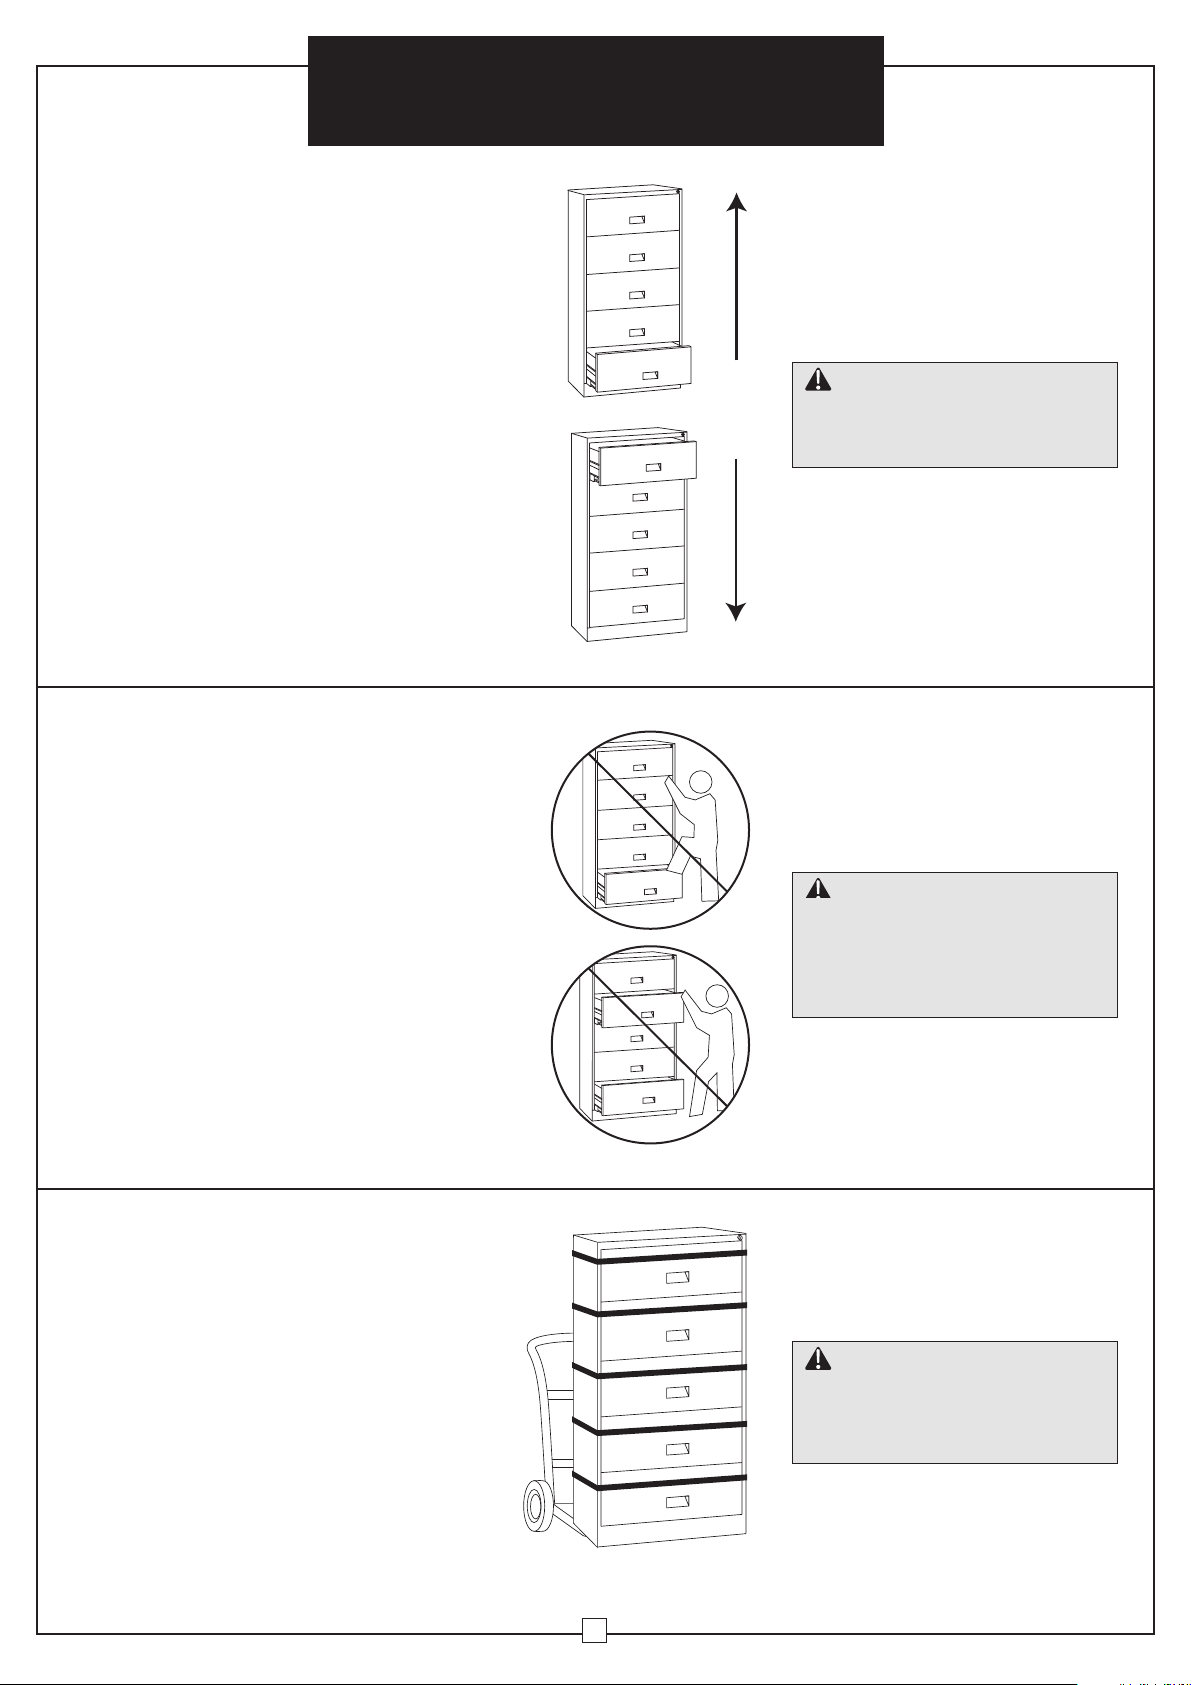
Loading:
1.
Check cabinet for proper adjustment and stability.
2. Load bottom drawer first to increase stability.
3. Distribute contents and weight evenly among
remaining drawers.
4. Check to see if cabinet is stable after loading
is complete (on carpeted surfaces, settling
may occur). If necessary, empty cabinet
completely, then readjust glides.
Unloading:
1. Remove contents from top drawer first.
2. Remove contents from bottom drawer last.
1. Do not stand or lean on an open drawer.
2. Do not put materials on an open drawer. Use
posting shelf or table to sort or collate.
3.
If this cabinet ever seems unstable, do not use it.
Have it checked for proper leveling and loading.
Have any problems corrected immediately.
4. This cabinet has an interlock to prevent
opening more than one drawer at a time. Do
not try to defeat this interlock.
5. These files are for storing and filing
non-combustible materials that do not require
special protection. Do not use this cabinet to
store combustible or hazardous materials.
Before moving cabinet:
1. Unload contents. (Unload from the top. See
loading and unloading above.)
2. Secure the unit:
• Close and lock the cabinet.
• Use furniture straps and appropriate
moving equipment.
3. After positioning cabinet in new location,
follow instructions for adjusting and installing.
LOADING AND UNLOADING
OPERATING
RELOCATING
WARNING
An improperly loaded or unloaded file
cabinet can become unstable or tip
over, causing serious injury.
WARNING
If misused, this file cabinet can
become unstable or tip over,
causing serious injury. To help
prevent accidents, follow the
operating instructions.
WARNING
If not properly secured when
moving, this file cabinet can
become unstable or tip over,
causing serious injury.
Load
Unload
36" Low Credenza
with Filing Cabinet
3
Assembly Instructions
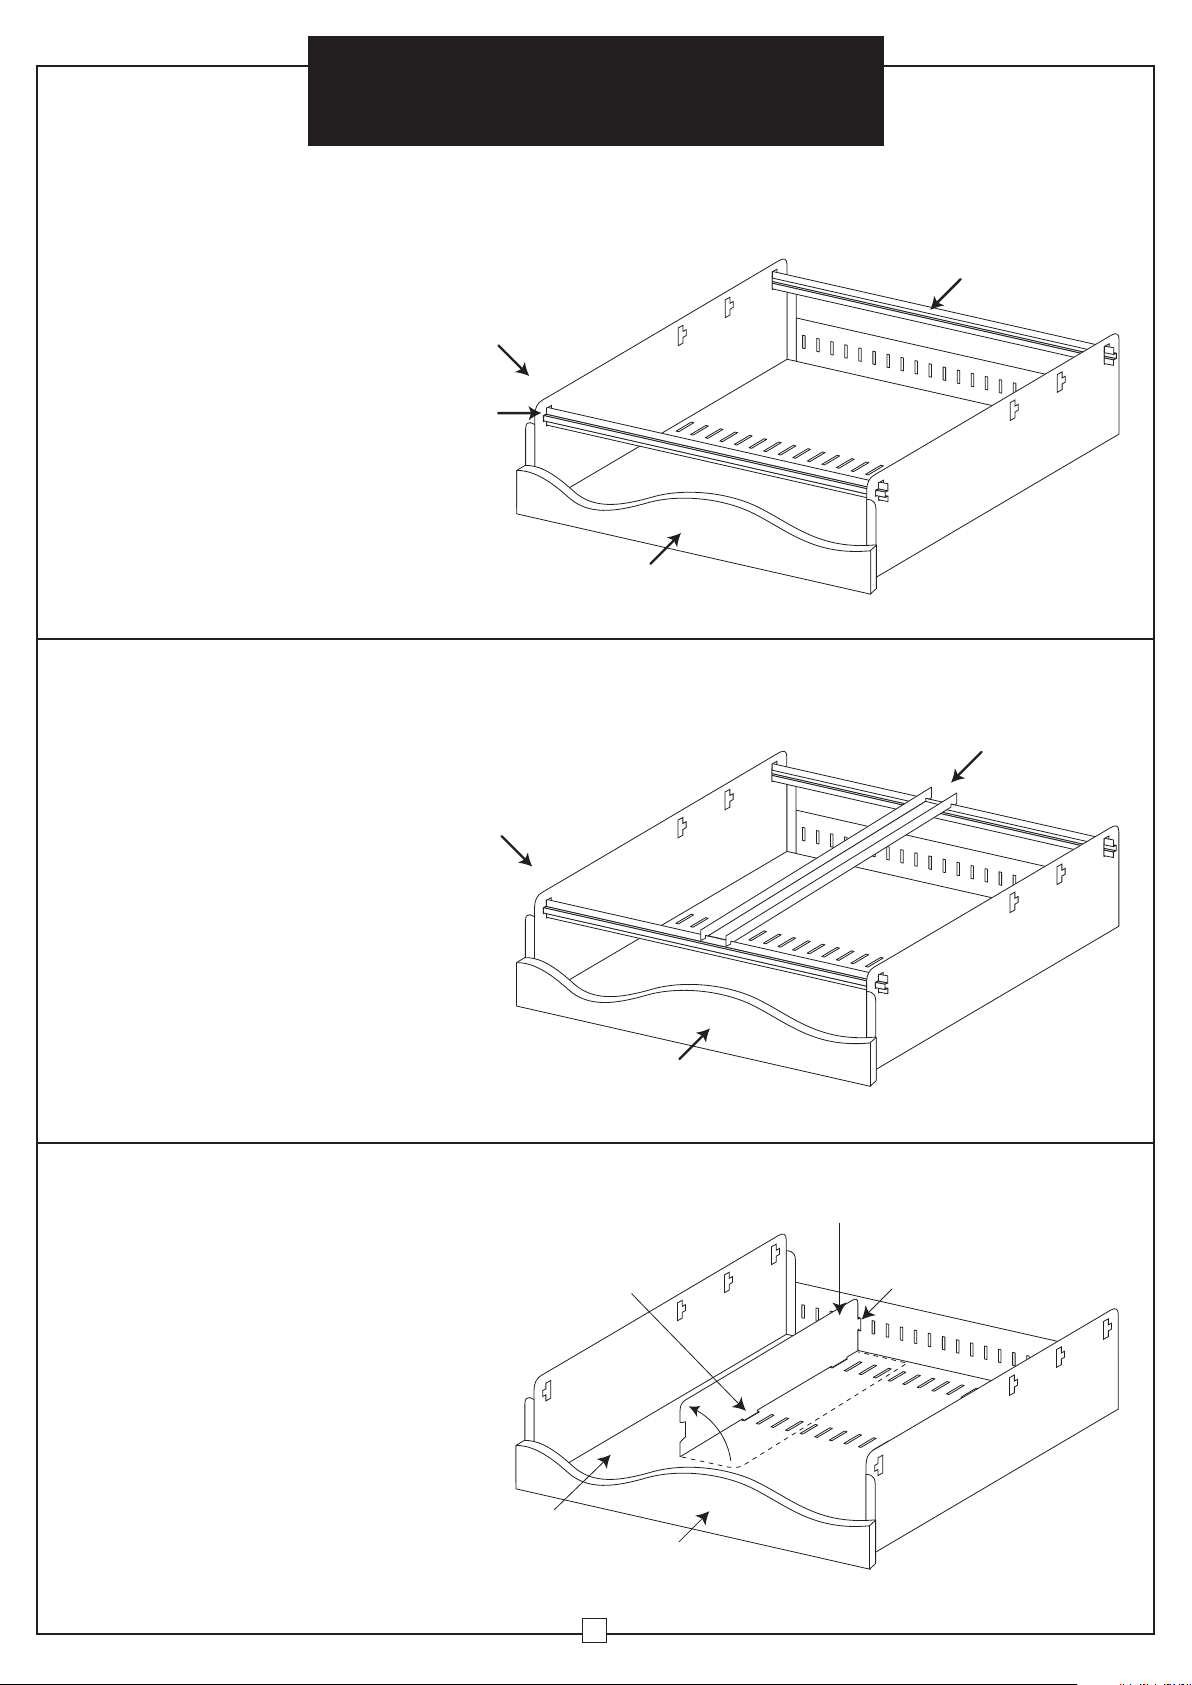
There are two hanging folder frames per drawer.
Recommended ling positions are as follows:
Positions 1 & 2 - Letter ling (side-to-side)
Positions 1 & 4 - Legal ling (side-to-side)
Positions 1 & 3 - A4 fling (side-to-side)
1. Hanging folder frames must be in
positions 1 & 4 as shown.
2. Position hanging file racks on front and
rear hanging folder frames for each
bank of file folders. Side of drawer/
shelf should be used for outermost
side of folders.
1. Position lower tabs pointing down and
rear tab pointing toward rear of drawer.
2. Insert rear tab into s lot in back of drawer.
3. Lower bottom tabs into s lots in
bottom of drawer.
4. Reverse procedure to remove divider.
HANGING FOLDER FRAMES
OPTIONAL FRONT-TO-BACK FILING
OPTIONAL DIVIDERS
Position
number
Ribs must face
away from filing
system
1
2
3
4
Front of drawer/shelf
Hanging folder frames
Double rail hanging file rack
Position
number
1
Front of drawer/shelf
Lower tab
Bottom of drawer
Front of drawer/shelf
Divider
Rear tab

Assembly Instructions Instrucciones de Ensamblaje Directives d’assemblage
Customer Service
US: 1-800-645-2986
Servicio de atención al Cliente
US: 1-800-645-2986
Service à la clientèle
Canada: 888-645-2986
050620
1
Credenza baja de 36
pulgadas con archivador
ADVERTENCIA
Un archivador instalado incorrectamente puede volverse inestable o
volcarse, y ocasionar lesiones graves. Siga todas las instrucciones de
este manual para una correcta instalación, uso y mantenimiento. Estos
gabinetes son para almacenar y archivar materiales no combustibles
que no requieren protección especial. No use este gabinete para
almacenar materiales combustibles o peligrosos.
Use gafas de seguridad cuando use herra
mientas.
Se proporcionan deslizadores ajustables en la base de
cada gabinete. Dependiendo del modelo que tenga, su
gabinete puede tener 4 deslizadores (uno en cada esquina)
o 2 deslizadores en las esquinas frontales de la base. El
ajuste del deslizador es fundamental para la estabilidad
del gabinete y la operación adecuada de la cerradura, el
enclavamiento, los cajones u otras piezas móviles que
puedan estar presentes en su gabinete
.
1. Asegúrese de que el gabinete esté vacío.
2.
Coloque un nivel de 24 in en la parte frontal del gabinete
para nivelar un lado con el otro. Ajuste los deslizadores
delanteros desde el exterior del gabinete con una llave
ajustable de extremo abierto. Gire los deslizadores en
sentido horario para levantar el gabinete y en sentido
antihorario para bajar el gabinete. Puede ser necesario
inclinar cuidadosamente el gabinete hacia atrás para
hacer los ajustes del deslizador frontal. Los deslizadores
traseros se pueden ajustar desde el interior del gabinete
usando una llave de tubo con un encastre de 1/4 in.
Dependiendo de su modelo, puede haber un orificio de
acceso a los deslizadores traseros
.
3.
El ajuste final es ajustar los deslizadores de modo que la
parte delantera del gabinete esté más alta que la parte
trasera mientras se mantiene la nivelación de los lados.
En superficies alfombradas, el frente es 1/4 in más alto.
En superficies duras, el frente es 1/8 in más alto.
4.
Verifique que el gabinete funcione correctamente. Todos
los cajones de su gabinete deben abrirse y cerrarse
suavemente y estar alineados de manera uniforme con
el marco. Esto puede verse afectado por el ajuste de los
deslizadores y la nivelación de su gabinete.
Modelo 695761
Herramientas necesarias para el ajuste
del archivador:
Llave de tubo con encastre de 1/4 in
Extensión de llave de 1/4 in
Zócalo hexagonal de 1/4 in con
encastre de 1/4 in
Llave ajustable de extremo abierto
Nivel de 24 in de largo
Orificios de
acceso
Deslizadores
traseros
Deslizadores
delanteros
Sentido antihorario para bajar. El cajón/estante
inferior no se muestra para mayor claridad
Frente del gabinete
Pared
Ajuste de deslizadores
1/8 in a
1/4 in
Credenza baja de 36
pulgadas con archivador
2
Carga:
1. Verifique que el gabinete esté correctamente
ajustado y sea estable.
2. Cargue primero el cajón inferior para aumentar
la estabilidad.
3. Distribuya el contenido y el peso de manera
uniforme entre los cajones restantes.
4. Verifique si el gabinete es estable después
de completar la carga (en superficies
alfombradas, puede ocurrir un asentamiento).
Si es necesario, vacíe completamente el
gabinete y luego reajuste los deslizadores.
Descarga:
1. Retire primero el contenido del cajón superior.
2. Retire el contenido del último cajón al final.
1. No se pare ni se apoye en un cajón abierto.
2.
No coloque materiales sobre un cajón abierto.
Use el estante o la mesa para ordenar o clasificar.
3. Si en algún momento el gabinete parece
inestable, no lo use. Haga que se verifique la
nivelación y la carga para garantizar que sean
las adecuadas. Solucione cualquier problema
de inmediato.
4. Este gabinete tiene un enclavamiento para
evitar abrir más de un cajón a la vez. No
intente forzar este enclavamiento.
5.
Estos gabinetes son para almacenar y guardar
materiales no combustibles que no requieren
protección especial. No use este gabinete para
almacenar materiales combustibles o peligrosos.
Antes de mover el gabinete:
1. Descargue el contenido. (Descargue desde
la parte superior. Consulte la sección de
carga y descarga antes mencionada.
2. Asegure la unidad:
• Cierre y bloquee el gabinete.
• Use correas para muebles y equipo de
mudanza apropiado.
3. Después de colocar el gabinete en una
nueva ubicación, siga las instrucciones para
ajustar e instalar.
CARGA Y DESCARGA
USO
REUBICACIÓN
ADVERTENCIA
Un archivador cargado o descargado
incorrectamente puede volverse inestable
o caerse y ocasionar lesiones graves.
ADVERTENCIA
Si se usa incorrectamente,
este
archivador puede volverse inestable
o caerse y ocasionar lesiones graves.
Para ayudar a prevenir accidentes,
siga las instrucciones de uso.
ADVERTENCIA
Si no se asegura correctamente
al mover, este archivador puede
volverse inestable o caerse y ocasionar
lesiones graves.
Carga
Descargar
Instrucciones de Ensamblaje
Table of contents
Languages:
Other interion Indoor Furnishing manuals

interion
interion 695729 User manual

interion
interion 695505 User manual

interion
interion 695737 User manual

interion
interion 695931MH User manual

interion
interion 695643 User manual

interion
interion 695739 User manual

interion
interion 695504 User manual

interion
interion 695503 User manual

interion
interion 695546 User manual

interion
interion 695549C User manual


Popular Indoor Furnishing manuals by other brands

Regency
Regency LWMS3015 Assembly instructions

Furniture of America
Furniture of America CM7751C Assembly instructions

Safavieh Furniture
Safavieh Furniture Estella CNS5731 manual

PLACES OF STYLE
PLACES OF STYLE Ovalfuss Assembly instruction

Trasman
Trasman 1138 Bo1 Assembly manual

Costway
Costway JV10856 manual


