Interline 57100253 User manual

1
Interline Fiberclean filter set
6 m3 - with RCD plug
Art.nr. 57100253
Handleiding
Instruction manual
Bedienungsanleitung
Instructions de service
DE
EN
NL
FR

21
1.VEILIGHEID
1.A. Instructies voor elektrische veiligheid
1.B.Veiligheidsinstructies voor personen en materiaal
2.VERPAKKING
3.TECHNISCHE GEGEVENS
4. INSTALLATIE
5. INBEDRIJFSTELLING
6.WINTERKLAAR MAKEN
7.PROBLEEM OPLOSSINGEN
8. GARANTIE
Item No.: D9HS
Deluxe Solar shower D9HS
COLD
WATER IN
HOT
WATER
OUT
COLD
WATER IN
HOT
WATER
OUT
The water
is heated
by thesun
for free
4
5
NL

1. VEILIGHEID
1.A. Instructies voor elektrische veiligheid
Lees alle veiligheidsaanwijzingen en waarschuwingen.
Het niet naleven van de veiligheidsaanwijzingen kan leiden tot ernstige
ongevallen.
VEILIGHEIDSWAARSCHUWING
Lees aandachtig deze gebruiksaanwijzing en maak uzelf vertrouwd met de
elementen en het correcte gebruik van dit product. De fabrikant kan niet
aansprakelijk worden gehouden voor schade ten gevolge van de niet-naleving
van de instructies en aanwijzingen. Schade ten gevolge van de niet-naleving
van de instructies en aanwijzingen wordt niet gedekt door de garantie. Bewaar
deze gebruiksaanwijzing. Ze moet worden overhandigd aan elke gebruiker
aan wie de pomp zou worden overgedragen.
• Personen die niet vertrouwd
zijn met de inhoud van deze
gebruiksaanwijzing mogen dit toestel
niet gebruiken. Kinderen vanaf 8
jaar en personen met verminderde
lichamelijke, zintuiglijke of geestelijke
capaciteit of gebrek aan kennis en
ervaring kunnen dit toestel gebruiken
mits zij dit onder toezicht doen of
informatie hebben gekregen over
het veilige gebruik van het toestel en
de bijbehorende risico’s begrijpen.
Kinderen mogen niet met het toestel
spelen.
Kinderen mogen dit toestel niet
reinigen of onderhouden zonder
toezicht.
• De pomp mag niet worden gebruikt
wanneer mensen zich in het water
bevinden.
• De pomp moet worden gevoed via
een aardlekschakelaar (RCD) met
een lekstroom van maximaal 30mA.
• Als het netsnoer beschadigd is,
moet het worden vervangen door de
fabrikant, de dienst na verkoop of
een bevoegde persoon om risico’s te
vermijden.
• Koppel de voeding af en laat het
toestel afkoelen alvorens het te
reinigen, onderhouden en op te
slagen.
• Bescherm elektrische onderdelen
tegen vocht. Tijdens de reiniging
of werking mogen ze niet worden
ondergedompeld in water of andere
vloeistoffen om elektrische schokken
te voorkomen. Houd het toestel nooit
onder stromend water.
• De elektrische bedrading moet
worden uitgevoerd door een bevoegde
specialist en conform de geldende
lokale regelgeving.
• Gebruik om elektrische schokken te
voorkomen nooit verlengsnoeren.
NL

1.B. . Veiligheidsinstructies
voor personen en materiaal
• Het risico op vastzitten door zuigen van de
pomp kan, indien het niet wordt vermeden,
leiden tot ernstige of dodelijke ongevallen.
Blokkeer de aanzuiging aan de pomp of in
het zwembad niet, want dat kan ernstige
letsels of zelfs de dood veroorzaken.
•
Dompel de filter en/of de pomp nooit
onder in water.
•
Plaats de pomp of filter nooit in uw
zwembad.
•
Lucht die zit ingesloten in het
filtersysteem kan het deksel doen
wegschieten, wat schade kan
veroorzaken aan het filtersysteem, en
ernstige letsels of zelfs de dood tot
gevolg kan hebben. Zorg ervoor dat
alle lucht uit het systeem is alvorens
het in bedrijf te stellen.
•
Verander nooit de positie van de
multipoortklep met 7 standen terwijl het
filtersysteem in werking is.
•
Installeer het filtersysteem op een
voldoende veilige afstand van het
zwembad zodat kinderen de installatie
niet kunnen gebruiken om in of uit het
zwembad te gaan.
•
Koppel het filtersysteem nooit af of
aan terwijl u in het water staat.
•
Voer op het filtersysteem nooit
werkzaamheden uit terwijl het nog
aangesloten is.
•
Stel het filtersysteem niet in bedrijf
terwijl het zwembad nog wordt gebruikt.
•
Houd kinderen uit de buurt van
elektrische installaties.
•
Laat kinderen nooit aan de installatie
komen.
Wij kunnen niet aansprakelijk worden
gesteld voor schade indien het
product niet wordt gebruikt volgens de
meegeleverde instructies.
2. VERPAKKING
De met het ltersysteem meegeleverde
pomp is een horizontale,
zelfaanzuigende centrifugepomp.
Om de pomp correct te laten
functioneren mag de watertemperatuur
niet hoger zijn dan 35°C. De gebruikte
materialen in de pomp hebben strenge
hydraulische proeven en elektrische
inspecties doorstaan.
De met het ltersysteem meegeleverde
lter is gemaakt van hoogwaardig
polypropyleen (PP).
Datisnaadlooseninéénstukvervaardigd
(absoluut corrosiebestendig en bestand
tegen alle in de kleinhandel verkrijgbare
zwembadchemicaliën).
(Vereiste: conformiteit met de
aanbevolen standaardspecicaties
voor pH- en chloorwaarden).
Het systeem is uitgerust met een
afvoersysteem, drukmeter, ingebouwde
onderdelen, zoals de bodemzeef voor
een gelijkmatige verdeling van het water
en een stabiele PE-scheidingsplaat
tussen de lter en compartiment met
schoon water.
Lees deze handleiding grondig door
alvorens over te gaan tot de installatie.
Het ltersysteem en de pomp moeten
worden geïnstalleerd conform de
geldende normen.
NL

Schade bij levering
Uw ltersysteem werd voor de
levering zorgvuldig en professioneel
verpakt. Controleer dat de verpakking
onbeschadigd is en dat alle onderdelen
in de doos zitten. Indien u dit product
op bestelling heeft gekocht en het naar
u werd verzonden, controleer dan dat
de levering volledig is. De leverancier
is niet verantwoordelijk voor schade
aan het product door de verzending en
eventuele schade moet meteen aan de
verzenderwordengemeld.Deverzender
neemt de verantwoordelijkheid voor
schade tijdens de levering op zich, de
leverancier is daar niet verantwoordelijk
voor.
Debiet (m³/u. - bar) 5,5
MAX werkdruk (bar) 1,5
Filteroppervlak (m²) /
Nominale spanning (VAC / Hz) 230 / 50
Vermogen (watt) 250W
Beschermingsklasse (I.P.) X5
Max. omgevingstemperatuur (°C) 35
Volume Fiberclean (g) 550
Volume zand (kg) /
3. TECHNISCHE GEGEVENS
ONDER-
DELEN IN
DE TANK
NL
3. DONNÉES TECHNIQUES
4. INSTALLATION
Déballage du système de
Retirez soigneusement tous les
composants du produitde l’emballage.
Avantde commencer l’installation,
ATTENTION : certaines pièces se
Pour atteindre ces pièces,retirez le
COMBO-S2
COMBO-4 COMBO-6 COMBO-10
Débit (m
3
/h - bar) 3,2 - 0,4 4 - 0,4 6 - 0,4 10 - 0,4
Surpression de service (bar) 1,5 1,5 1,5 1,5
Surface de (m
2
) 0,13 0,13 0,13 0,13
Tension nominale (VAC / Hz) 230 / 50 230 / 50 230 / 50 230 / 50
Puissance (Watts)200200450600
Degré de protection (I.P.) X5 X5 X5 X5
Température ambiante maximale (°C)
35 35 35 35
Quantité d’Aqualoon (g) 5505505501150
Quantité de sable(Kg)
Taille des grains de sable de 0,4 à 0,8 mm
16 16 16 33
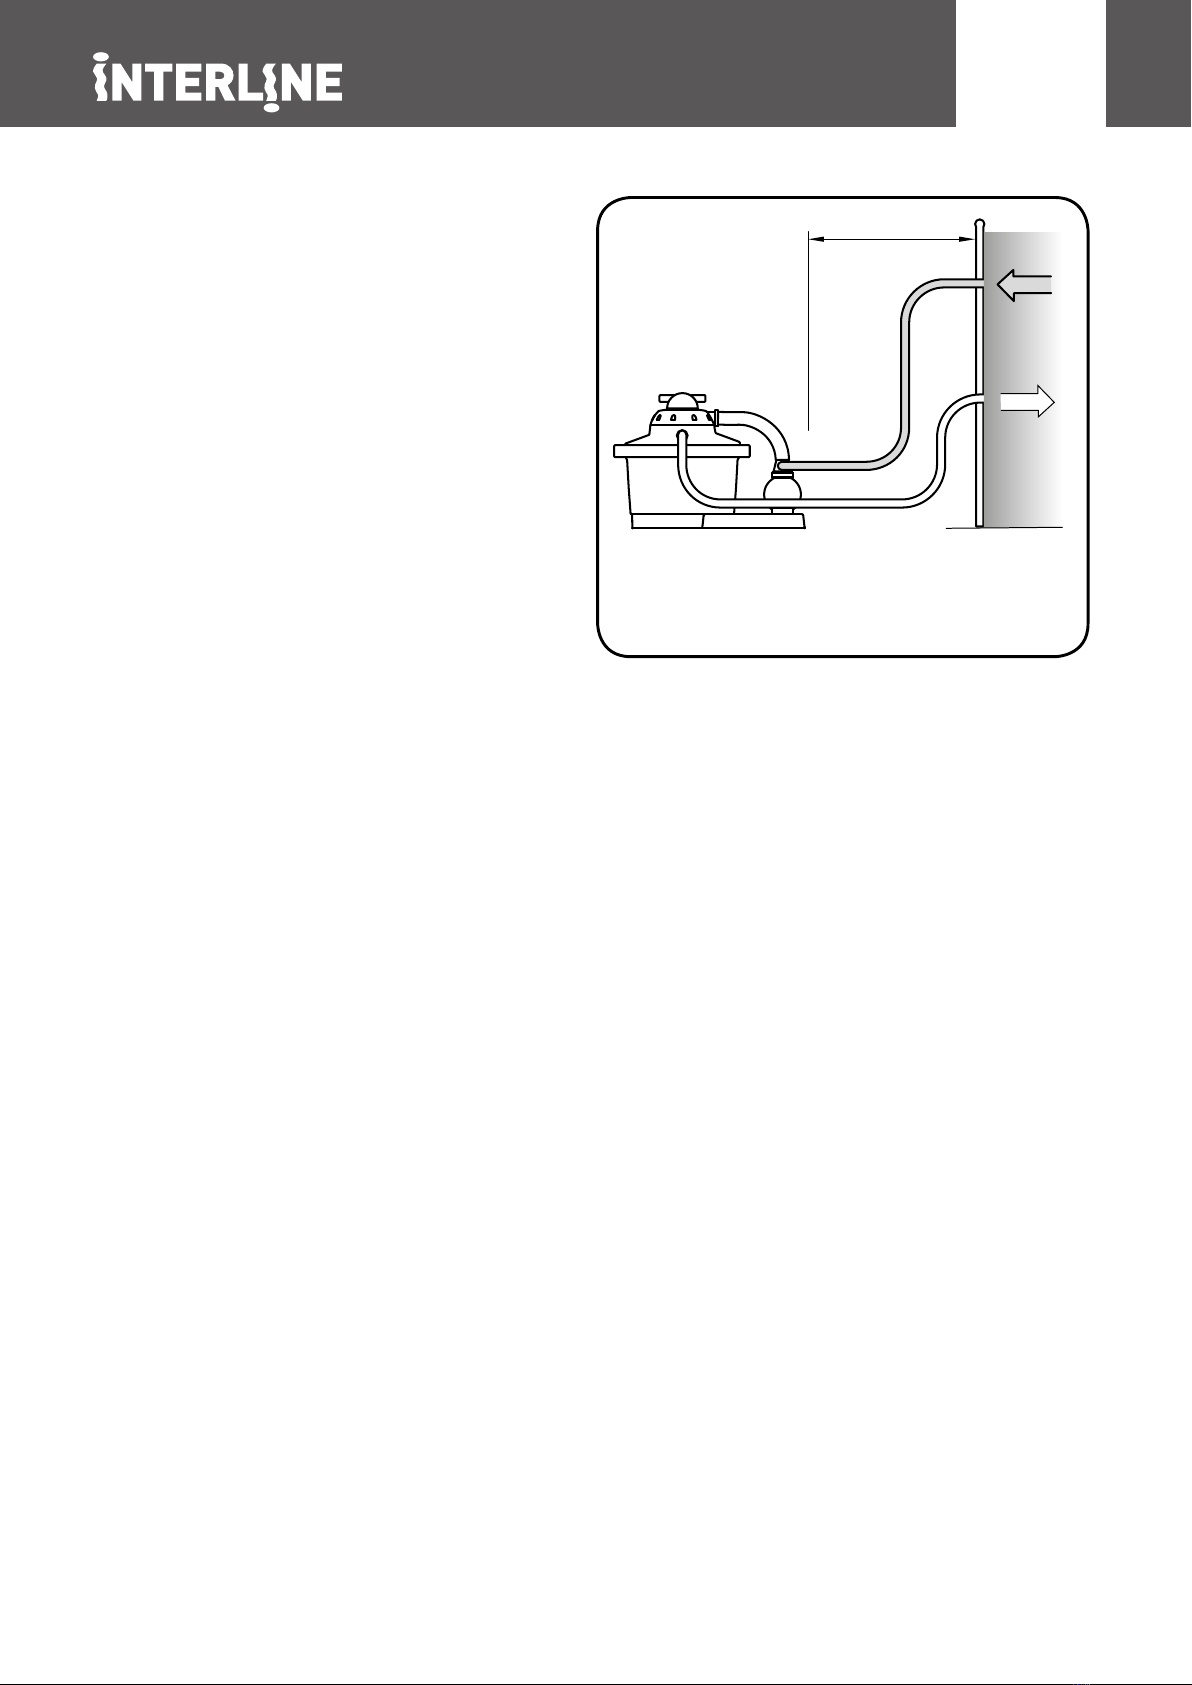
2.50 m
min.
Installez le groupe de à
une distance de sécurité
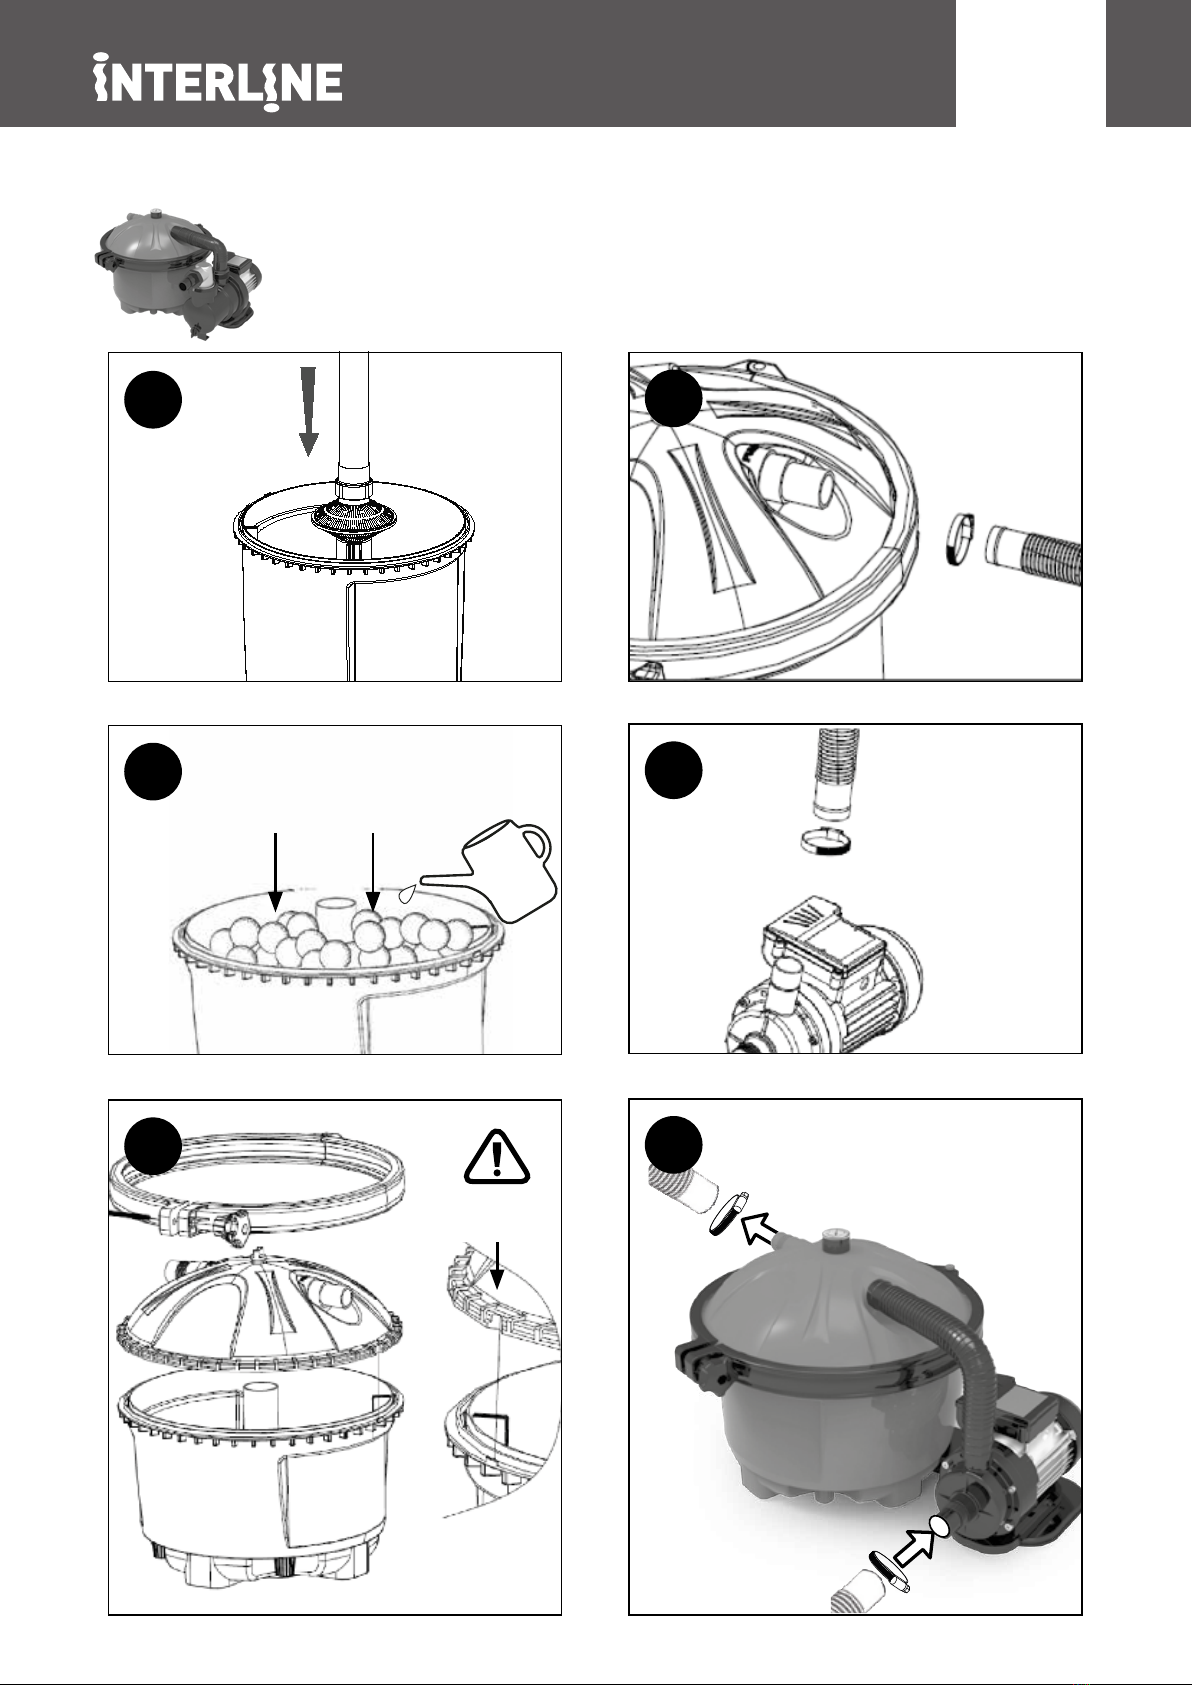
4. INSTALLATIE
Neemhetproductenalleonderdelen
voorzichtig uit de verpakking.
Ga alvorens de montage aan te
vatten na dat alle onderdelen in de
verpakking zitten aan de hand van
de onderdelenlijst. OPMERKING:
Sommige onderdelen kunnen zich
in de ltertank bevinden. Verwijder
het tankdeksel om toegang te
krijgen tot die onderdelen.
Installeer dit product op een
voldoende veilige afstand van het
zwembad
NL

IN
UIT
14
25
36
Fiberclean
550 g
Aligner les
repères
Afstemmen
met richtpunten
NL

5. INBEDRIJFSTELLING
Zodra het ltersysteem correct is ge-
monteerd, kunt u het zandcompartiment
vullen met zand en de slangen aansluiten
zoals hierboven beschreven, en kunt u
beginnen te lteren. Wij raden u echter
aan het nieuwe zand in het comparti-
ment eerst proper te maken en voor te
bereiden. Door het zand proper te maken
alvorens uw zwembad te lteren zullen
de meeste stofdeeltjes en deeltjes klein
zand worden verwijderd. Indien u direct
begint te lteren, zullen die deeltjes in uw
zwembad terechtkomen. Volg onders-
taande aanwijzingen om het zand proper
te maken. Koppel het systeem niet aan
tot u de aanwijzing krijgt om dat te doen.
1) Zorg ervoor dat de pomp niet op een
voeding is aangesloten.
2) Start met de klep in stand 5 Closed
(gesloten).
3) Als dat nog niet is gebeurd, vul dan
uw zwembad met water. Zorg ervoor dat
het waterpeil minstens 2,5 - 5 cm boven
de bovenkant van de inlaatslang (skim-
mer) en de terugstroomopeningen in het
zwembad uitkomt.
4) Draai de afsluitklep aan de inlaatope-
ning (skimmer) open zodat het water in
de inlaatslang kan stromen.
5) Als het lter-pompsysteem wordt
geïnstalleerd op een plek lager dan het
waterpeil van uw zwembad, zal het wa-
ter automatisch in het pomp-ltersysteem
stromen.
6) Laat de ltertank vollopen met water.
7) Controleer op lekken en voer alle no-
dige afstellingen uit. Toleranties (ten ge-
volge van het productieproces) kunnen
het noodzakelijk maken dat de verbin-
dingen bijkomend met een Teon-tape
moeten worden omwikkeld alvorens de
verbindingsbuis vast te zetten, om die
toleranties te corrigeren.
8) Volg de hieronder beschreven
terugspoelprocedure.
Terugspoelprocedure
• Koppel de motor/pomp af van de voe-
dingsbron.
• Sluitde(nietmeegeleverde)
terugspoels-lang aan op de
terugspoelopening.
• Zet de multipoortklep in stand 4
BACKWASH (terugspoelen).
• Koppel de voedingsbron weer aan.
•Laat de filter werken in BACKWASH tot
het afvoerwater helder is.
• Koppel de motor/pomp af van de voe-
dingsbron.
• Zet de multipoortklep in stand 2 RINSE
(spoelen).
• Het is belangrijk dat u de instructies
over correcte voedingsbronnen - leest en
naleeft.
• Koppel de voedingsbron weer aan.
•Laat de filter 60 seconden werken om
alle eventuele resten uit pomp en klep te
verwijderen.
• Koppel de motor/pomp af van de voe-
dingsbron.
• Zet de multipoortklep in stand
1 FILTRA-TION (filtratie).
• Koppel de voedingsbron weer aan. Uw
filtratiesysteem is nu in werking en is
klaar voor verder gebruik.
Filtratietijd
Afhankelijk van de belasting en de grootte
van de installatie moet het zwembadwa-
ter binnen de 24 uur minstens 3 tot 5
keer doorheen de lter circuleren. Die ti-
jdsspanne hangt af van de capaciteit van
het ltersysteem en de grootte van het
zwembad. We raden u aan het systeem
minstens 12 uur per dag te laten werken.
NL
6. WINTERKLAAR MAKEN
1) Koppel de pomp af van de voedingsbron.
2) Sluit de afdichtingskleppen of blokkeer de waterstroom aan de zwembadinlaat en de
terugstroomopeningen.
3) Koppel het ltratiesysteem af van het zwembad, laat de tank en slangen leeglopen.
4) Zet de hendel op de centrale klep in positie 7 Winterize om de spanning op de veer en de
interne kleponderdelen weg te nemen.
5) Bewaar het ltersysteem op een vorstvrije plek waar het niet te koud wordt. In een garage
of een geïsoleerde opslagplaats is aanbevolen.
Neem voor meer technische informatie, ontbrekende onderdelen of klachten
contact op met onze klantendienst:
7. PROBLEEM OPLOSSINGEN
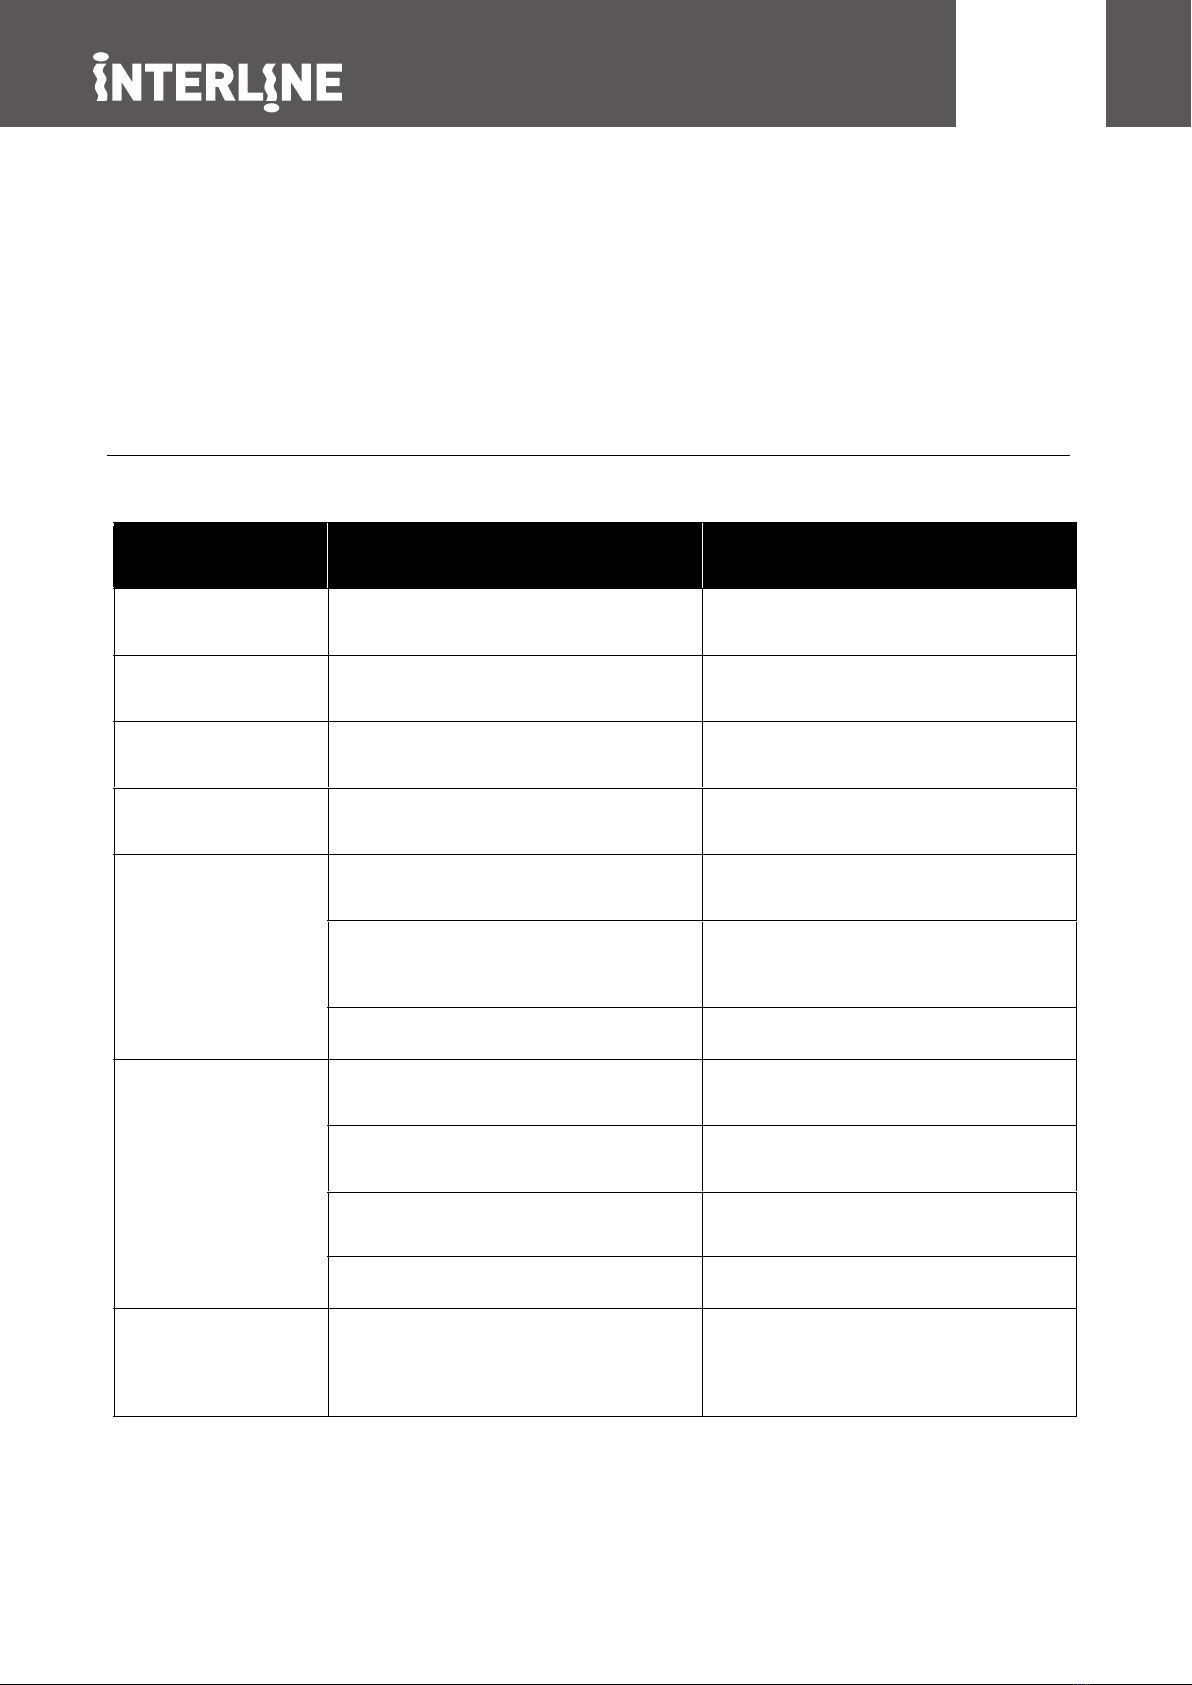
MALFUNCTION Cause Solution
Pressure gauge has
reading over 1 bar
Pressure is too low Hair and lint strainer basket is dirty;
Pump gels too little water
Clean the hair and lint strainer; check the
suction line and the water level
Air in the pump Poor seal on the in-take side of the
pump.
Tighten hose clamps and connecting
Leaking Seal Defective C heck the seal, replace if needed
Pump does not run Not plugged in C heck the socket and power cord
G.F.C.1/ or main circuit breaker tripped Switch on the breaker (if it is immediately
tripped again, there is a defect in pump
or controls)
Pump motor defective
R eplace the entire pump
Sand in Pool If the sand is newly replaced, the under-
sized grains are still present
Backwash several limes until the
backwash water is clear (position 4)
Sand in Central Valve (from back-wash)
P urge into drainpipe for 30 seconds
(position 6)
in-stalled
Check the separation wall for proper
positioning
Filter bottom strainer is damaged
Air in system Loosen, but do not remove, the
allow any trapped air to escape.Tighten
the cover once ail of the air has escaped
STORING
Drukmeter geeft meer
dan 1 bar aan
Te lage druk
Lucht in de pomp
Lekkend
filter
De pomp werkt niet
Lucht in systeem
Zand in het zwembad
De haar- en pluizenzeef is vuil; de pomp
voert te weinig water aan
Slechte afdichting aan de invoerzijde van
de pomp
Afdichting defect
De stekker steekt niet in
Als het zand pas werd vervangen,
zijn er nog kleinere zandkorrels aanwezig
Zand in de centrale klep (van terugspoeling)
Scheidingsplaat in lter is niet
correct geïnstalleerd
Filterbodemzeef is beschadigd
Pompmotor defect
G.F.C.1 / of hoofdstroomonderbreker
is afgeslagen
De haar- en pluizenzeef reinigen, de
aanzuigleiding en het waterpeil controleren
De slangklemmen en aansluitstukken
aandraaien
Afdichting controleren en vervangen
indien nodig
Stopcontact en netsnoer controleren
Het doorzichtige deksel op de ltertank
losdraaien, maar niet verwijderen, om even-
tueel ingesloten lucht te laten ontsnappen.
Het deksel weer aandraaien zodra de lucht
is ontsnapt.
Meermaals terugspoelen tot het
spoelwater helder is (positie 4)
30 seconden lang afvoeren in de
afvoerleiding (positie 6)
Controleren of de scheidingsplaat
in de juiste positie zit
Filterbodemzeef vervangen
De hele pomp vervangen
De onderbreker aanschakelen (als die
meteen weer afslaat is er een defect in de
pomp of de bedieningselementen)
Er zit te veel vuil in het filter. De filter terugspoelen (positie 4)
Oorzaak Oplossing
NL

8. GARANTIE
De fabrikant waarborgt de veilige werking
en betrouwbaarheid uitsluitend onder de
volgende voorwaarden:
Het ltersysteem is geïnstalleerd en
functioneert in overeenstemming met de
montage- en bedieningsinstructies.
Er worden alleen originele
vervangonderdelen gebruikt
(verbruiksartikelen vallen niet onder de
garantie).
Slijtageonderdelen vallen niet onder de
garantie. Hiertoe behoren:
- Alle O-ringen
- Drukmeter
- Mechanische afdichting, compleet
NL

1. SAFETY
1.A. Electrical Safety warning
1.B. Safety instructions
2. INSIDETHE BOX
3.TECHNICAL DATA
4. MOUNTING INSTRUCTIONS
5. STARTING
6.WINTERIZE
7.TROUBLESHOOTING
8.WARRANTY
Item No.: D9HS
Deluxe Solar shower D9HS
COLD
WATER IN
HOT
WATER
OUT
COLD
WATER IN
HOT
WATER
OUT
The water
is heated
by thesun
for free
4
5
EN
1. SAFETY
1.A. Electrical Safety warning
Read all Warnings and Cautions noted blow. Failure to do so could result
in serious or fatal injury.
SAFETY WARNING
Please read through these operating instructions carefully and make
yourself conversant with the control elements and the proper use of this
product. We shall not be liable in the case of damage caused as a result of
the non-observance of instructions and provisions of the present operating
instructions. Any damage caused as a result of the non-observance of the
instructions and regulations contained in the present operating instructions
shall not be covered by the warranty terms. Please keep these operating
instructions in a safe place and hand them on together with the device
should you ever dispose of it
• Persons not conversant with
the contents of these operating
instructions must not use this device.
This appliance can be used by
children aged from 8 years and above
and persons with reduced physical,
sensory or mental capabilities or
lack of experience and knowledge
if they have been given supervision
or instruction concerning use of
the appliance in a safe way and
understand the hazards involved.
Children shall not play with the
appliance. Cleaning and user
maintenance shall not be made by
children without supervision.
• The pump must not be used when
people are in the water.
• The pump must be supplied through
a residual current device (RCD)
having a rated residual operating
current not exceeding 30mA.
• If the supply cord is damaged, it must
be replaced by the manufacturer, its
service agent or similarly qualied
persons in order to avoid a hazard.
• Disconnect the device from the
power supply and let it cool down
before cleaning and maintenance is
performed and before the device is
stored.
• Always protect electrical parts
against moisture. During cleaning or
operation, they must not be immersed
in water or other liquids to ensure
that an electrical shock is prevented.
Never hold the device under running.
EN

1.B. Safety instructions
• risk of suction entrapment hazard, which,
if not avoidedcan result in serious injury
or death. Do not block pump suction at
the pump or in the pool as this can cause
severe injury or death
• Electrical wiring MUST be installed by a
trained professional and adhere to local
code and regulations.
• Avoid electric shock. DO NOT USE
power extension cords.
• Never submerge the lter and/or pump in
water.
• Never place the pump or lter in your pool.
• Trapped air in the pump-lter system may
cause the TANK COVER to be blown off
which can result in death, serious injury, or
damage to the pumplter system. Ensure
all air is out of system before operating.
• NEVER change the 7 Position Multi-Port
valve while the system is operating.
• ALWAYS unplug the system before
changing the control valve.
• Instal this product with a sufcient safety
margin from the pool to prevent children
from using the system to access the pool.
• Never PLUG or UNPLUG this unit from
an electrical source while standing in water.
• NEVER service this unit with the electrical
power cord connected.
• Do NOT operate the system while the
pool is being used.
• KEEP CHILDRENAWAY from all electrical
equipment.
• NEVER ALLOW CHILDREN TO
OPERATE THIS EQUIPMENT
• The Pool Owner should always exercise
The Pool Owner should always exercise
We cannot be responsible for damages
to the product if the product is not used in
accordance with the instructions provided.
2. INSIDE THE BOX
The pump included with the ltration
system is a horizontal, selfpriming
centrifuge pump. For the pump
to function correctly, the water
temperature must not exceed 35°C
/95° F. The materials used in the pump
have undergone stringent hydraulic
testing and electrical inspections. The
lter included in the ltration system
consists of high-grade polypropylene
(PP). It is seamless and manufactured
as a single unit (absolutely corrosion
resistant and resistant to commercially
available swimming pool chemicals).
(Prerequisite: Compliance with the
standard recommended specications
for the pH- and chlorinevalue). It is
equipped with a container drainage
system, pressure gauge, built-in
container components, e.g. bottom
strainer for even water distribution and
a stable PE separation wall between
the lter and the fresh water chamber.
Read this manual carefully before
installation. The ltration system and
pump must be installed in accordance
with the standards in effect.
Damage during delivery
Your lter system has been carefully
and professionally packed for delivery.
Please checkto ensure that thepackage
is undamaged and that ailparts are in
EN

the box. If you purchased this product
on order and the product was shipped
to you, ensure that delivery is complete.
Damage to product as a result of
shipping is not the responsibility of
the supplier and must be immediately
reported to the shipper.
The shipper assumes the liability for
damages during delivery, the supplier
is not responsible for it.
Flow Volume (m3/h - bar) 5,5
MAX Operating Pressure (bar) 1,5
Filtration Area (m2) /
Rated Voltage (VAC / Hz) 230 / 50
Power (Watts) 250W
Protection Class (I.P.) X5
Max. ambient temperature (°C) 35
Fiberclean Volume (g) 550
Sand Volume (Kg) /
3. TECHNICAL DATA
PARTS
INTO
THE TANK
EN

3. DONNÉES TECHNIQUES
4. INSTALLATION
Déballage du système de
Retirez soigneusement tous les
composants du produitde l’emballage.
Avantde commencer l’installation,
ATTENTION : certaines pièces se
Pour atteindre ces pièces,retirez le
COMBO-S2
COMBO-4 COMBO-6 COMBO-10
Débit (m
3
/h - bar) 3,2 - 0,4 4 - 0,4 6 - 0,4 10 - 0,4
Surpression de service (bar) 1,5 1,5 1,5 1,5
Surface de (m
2
) 0,13 0,13 0,13 0,13
Tension nominale (VAC / Hz) 230 / 50 230 / 50 230 / 50 230 / 50
Puissance (Watts)200200450600
Degré de protection (I.P.) X5 X5 X5 X5
Température ambiante maximale (°C)
35 35 35 35
Quantité d’Aqualoon (g) 5505505501150
Quantité de sable(Kg)
Taille des grains de sable de 0,4 à 0,8 mm
16 16 16 33
2.50 m
min.
Installez le groupe de à
une distance de sécurité
4. MOUNTING
INSTRUCTIONS
Carefully remove the product and
ail component parts from the box.
Cross reference ail parts in the box
with the parts list reference chart to
make certain ail parts are present
before beginning assembly. NOTE:
Sorne parts may be located within
the lter tank. To access these
parts you must remove the tank
cover.
Instal this product with a sufcient
safety margin from the pool
EN
IN
OUT
14
25
36
Fiberclean
550 g
Aligner les
repères
benchmarks
EN

5. STARTING
Once the lter system has been properly
assembled, the sand chamber lled
with sand and the hoses connected as
described above, you may begin with
ltration. However, we recommend that
you clean and prepare the new sand that
is in the sand chamber rst. Cleaning
the sand prior to ltering your pool will
remove most of the dus! and tiny sand
particles that may exist in the sand. If you
move straight to ltering, these particles
will end up in your pool. To clean the sand,
please follow the instructions below. Do
not plug the system in until advised to do
so below.
1) Make certain the pump is not plugged
in to a power supply.
2) Start with the valve in the 5 Closed
position.
3) If you haven’t done so already, ll your
pool with water. Ensure that the water
level is al least 2,5 - 5 cm above the top
of the hose intake (Skimmer) and return
ports in the pool.
4) Release the shut off valve al the intake
port (Skimmer) in the allow the water to
ow into the intake hose.
5) With the lter-pump system installed
in a location level lower than your pool’s
water level - water will automatically ow
into the pump-lter system.
6) Allow the lter tank to ll with water.
7)Checkforleaksandmakeanynecessary
adjustments. Because of tolerances (in
consequence of the production process),
it is possible that it may be necessary to
use a Teon tape additionally which has
to be wrapped around the connections,
before the connection tube is xed, in
order to correct these tolerances.
8) Follow the backwash process
described below.
Backwash Process
• Disconnect the Motor/Pump from the
Power Source.
• Attach backwash hose (not included) to
backwash port.
• Place the Multi-Port Valve in the «4 -
Backwash» position.
• Reconnect to power source.
• Run lter in BACKWASH mode until
discharge water is clear.
• Disconnect the Motor/Pump from the
Power Source.
• Place the Multi-Port Valve in the «2 -
RINSE» position. It is important that you
read and follow the instructions on proper
power supply sources.
• Reconnect to power source.
• Allow lter to run for 60 seconds to
remove any remaining residue from
pump and valve.
• Disconnect the Motor/Pump from the
Power Source.
• Place the Multi-Port Valve in the «1-
Filtration» position.
• Reconnect to power source.
Your ltration system is RUNNING and
ready for further operation.
Filtration time
Depending on the load and the size of
the installation, the pool water should
circulate at least 3 to 5 times through the
lter within 24 hours. The time required
depends on the performance of the
ltration group and the size of the pool.
We recommend a minimum operating
time of 12 hours per day.
EN

6. WINTERIZE
1) Unplug the pump from the power source.
2) Close the shut off valves or block the ow of water al the pool inlet and return ports.
3) Disconnect the ltration system from the pool, drain the tank and hoses.
4) Place the handle on the central valve in position 7- “Winterize” to relieve the tension on
the spring and internal valve components.
5) Store the lter system in a location protected from frost and severely cold temperatures.
ln a garage or insulated storage shed is recommended.
parts or in the case of a complaint, please contact our customer service:
7. TROUBLESHOOTING
MALFUNCTION Cause Solution
Pressure gauge has
reading over 1 bar
Pressure is too low Hair and lint strainer basket is dirty;
Pump gels too little water
Clean the hair and lint strainer; check the
suction line and the water level
Air in the pump Poor seal on the in-take side of the
pump.
Tighten hose clamps and connecting
Leaking Seal Defective C heck the seal, replace if needed
Pump does not run Not plugged in C heck the socket and power cord
G.F.C.1/ or main circuit breaker tripped Switch on the breaker (if it is immediately
tripped again, there is a defect in pump
or controls)
Pump motor defective
R eplace the entire pump
Sand in Pool If the sand is newly replaced, the under
-
sized grains are still present
Backwash several limes until the
backwash water is clear (position 4)
Sand in Central V
alve (from back-wash)
P urge into drainpipe for 30 seconds
(position 6)
in-stalled
Check the separation wall for proper
positioning
Filter bottom strainer is damaged
Air in system Loosen, but do not remove, the
allow any trapped air to escape.Tighten
the cover once ail of the air has escaped
ENEN

8. WARRANTY
The manufacturer warranties safe
operation and reliability only under the
following conditions:
The lter system is installed and operated
according to the assembly and operating
instructions.
Only original replacement parts are used
(consumable parts do not fall under the
warranty). Expendable parts do not fall
under the warranty. These include:
- All O-rings
- Pressure gauge
- Mechanical seal, complete
EN
1. SICHERHEIT
1.A. Hinweise zur elektrischen Sicherheit
1.B. Sicherheitshinweise für Personen und Material
2.VERPACKUNG
3.TECHNISCHE DATEN
4. INSTALLATION
5. INBETRIEBNAHME
6.WINTERFEST MACHEN
7.PROBLEMLÖSUNGEN
8. GARANTIE
Item No.: D9HS
Deluxe Solar shower D9HS
COLD
WATER IN
HOT
WATER
OUT
COLD
WATER IN
HOT
WATER
OUT
The water
is heated
by thesun
for free
4
5
DE
Table of contents
Languages:
Other Interline Water Filtration System manuals


Popular Water Filtration System manuals by other brands

Klimawent
Klimawent BIG-2000/Ex Use and maintenance manual

Honeywell
Honeywell WTE-G-D-3.6-PT01 product manual

3M
3M ScaleGard HP Installation and operation instructions

Ultraviolet Sysrtems Inc.
Ultraviolet Sysrtems Inc. Ultra UV2 Installation & operation manual

Millipore
Millipore milli-q user manual

SimPure
SimPure V7 user manual


H2gO
H2gO Prime quick start guide

Wyckomar
Wyckomar UV-1 Installation and maintenance manual

GE
GE GNUL30B Owner's manual and installation

Waterdrop
Waterdrop WD-TSB-10 installation instructions

Zip
Zip HydroTap G5 Touch-Free Wave Quick start installation guide

Zodiac
Zodiac CLEARWATER LM3 Series Installation guide and owner's manual