Interphone Motioncam01 User manual

INSTRUCTION MANUAL

DE
ES
FR
EN
IT
MOTIONCAM01 Full HD action camera
Manualediistruzioni ...............................4
MOTIONCAM01 Full HD action camera
Instructionmanual.................................20
MOTIONCAM01 Caméra action full HD
Manueld’utilisation................................36
MOTIONCAM01 Cámara de acción full HD
Manualdeinstrucciones ...........................52
MOTIONCAM01 Full HD Action-Cam
Bedienungsanleitungen. . . . . . . . . . . . . . . . . . . . . . . . . . . . 68
IT
EN
FR
ES
DE

4DE
ES
FR
EN
IT
INSTRUCTION MANUAL
MicroSD
3
5
2
10
9
7
8
6
1 4
11
15
12
B
E
G
C
J
D
F
A
I H

6
IT
DE
ES
FR
EN
Si prega di leggere con attenzione il presente manuale
prima di utilizzare il prodotto e di conservarlo corretta-
mente come riferimento futuro in caso di necessità.
INTRODUZIONE
Grazie per aver acquistato MOTIONCAM01, la videoca-
mera digitale waterproof HD 1080p. È un prodotto dal-
la linea compatta e maneggevole, impermeabile e dal
design perfettamente ergonomico. Grazie al suo rivesti-
mento protettivo multifunzione è possibile eettuare
registrazioni in qualsiasi condizione ambientale.
Questo manuale contiene importanti informazioni rela-
tive alla sicurezza e all’utilizzo del prodotto.
CERTIFICAZIONI PRODOTTO
Questo prodotto è certicato dalle autorità CE e FCC.
Il presente dispositivo è conforme alle indicazioni di
legge.
PRESENTAZIONE DEL PRODOTTO
MOTIONCAM01 è ideale per riprese in moto, in auto
all’aria aperta e tutti gli sport in generale.
Grazie al suo rivestimento impermeabile, MOTION-
CAM01 ti permette di scattare foto e girare video in con-
dizioni estreme, sotto la pioggia, la neve e in acqua no
a 20 metri di profondità.
L’ obiettivo HD e la sua sensibilità a bassi livelli di luce,
consentono inoltre l’opportunità di scattare meraviglio-
se foto sottomarine.
Caratteristiche del prodotto
- Impermeabile no a 20 metri di profondità, ideale per
attività all’aria aperta o subacquee
- Sensore CMOS 1/2,5”5 Mp
- Grandangolo da 120° e obiettivo HD per foto in totale
libertà
- Eetto vibrazione avanzato che rende il cambio moda-
lità più agevole e semplice
- Opzioni risoluzione video:
A) 720p60: 1280x720p 60fps H.264 AVI
B) 720p30: 1280x720p 30fps H.264 AVI
C) FULL HD30: 1920x1080p 30pfs H.264 AVI
D) 1080p30: 1440x1080p 30fps H.264 AVI
- Risoluzione foto 12 Mp, formato JPG
- Funzione per sola registrazione audio
- Batteria integrata al litio ad alta capacità con autono-
mia di registrazione video no a 2,5 ore
- Supporto HDMI e uscita TV per condividere facilmente
i lmati
- Funzione registrazione continua (loop recording) e re-
gistrazione audio
- Puntatore laser per una corretta inquadratura del sog-
getto
- 2 luci LED ad alta luminosità per uso notturno
- Funzione torcia con autonomia no a 10 ore
- Luci LED lampeggianti ad alta luminosità per segnali
di emergenza
- Supporta scheda Micro SD no a 32GB (preferibilmen-
te classe 4)
- USB 2.0 - UPnP. Ricarica USB.
STRUTTURA DEL PRODOTTO
Componenti:
1. Tasto accensione / cambio modalità / freccia su
2. Luce LED (gialla)
3. Tasto avvio registrazione / riproduzione
4. Tasto luci LED / laser / freccia giù
5. Luce LED (rossa e blu)
6. Presa USB / AV / caricatore
7. Presa HDMI
8. Slot scheda TF
9. Coperchio impermeabile/ aggancio laccetto (opzionale)
10. Microfono
11. Luce laser
12. Luce LED
13. Obiettivo videocamera
INDICE
INTRODUZIONE................................................................. 7
CERTIFICAZIONI PRODOTTO .......................................... 7
PRESENTAZIONE DEL PRODOTTO ................................ 7
Caratteristiche del prodotto...................................... 7
STRUTTURA DEL PRODOTTO.......................................... 7
CONFEZIONE E ACCESSORI............................................. 8
Contenuto della confezione ...................................... 8
Accessori opzionali...................................................... 8
DESCRIZIONE FUNZIONI ................................................. 8
1. Come iniziare.......................................................... 8
2. Cambio modalità operative ................................ 8
3. Registrazione video............................................... 9
4. Funzione registrazione continua........................ 9
5. Scattare fotograe............................................... 10
6. Registrazioni audio..............................................10
7. Luci LED e laser..................................................... 10
8. Funzione luce lampeggiante e sistema
puntamento laser ................................................ 11
9. Spegnimento e funzione spegnimento
automatico............................................................ 11
10. Avviso errore scheda MicroSD e
spegnimento automatico del dispositivo.......11
11. Avviso batteria scarica e spegnimento
automatico............................................................ 11
12. Download di le e funzione disco rimovibile .. 11
13. Ricarica .................................................................. 12
14. Registrazione video durante la fase di ricarica.. 12
15. Riproduzione le su televisore .........................12
16. Scattare foto quando la videocamera è
collegata al televisore......................................... 14
17. Impostazione parametri di sistema ................. 14
18. Resettare il sistema ............................................. 15
SPECIFICHE ...................................................................... 16
MANUALE DI ISTRUZIONI

8
IT
DE
ES
FR
EN
NOTE:
MOTIONCAM01 può essere utilizzata manualmente o
essere ssata su più superci in vari modi mediante i
supporti in dotazione.
CONFEZIONE E ACCESSORI
Contenuto della confezione:
A. Motioncam01
B. Coperchio posteriore impermeabile
C. Cavo Audio video (connessione a TV )
D. Cavo USB (ricarica/dati)
E. Base per lacci elastici
F. Base adesiva
G. Lacci elastici tre misure (68/36/16 cm)
H. Staetta verticale per basi
I. Staetta orizzontale per basi
J. Custodia in tessuto
Note: le immagini del contenuto possono dierire leg-
germente da quanto presente nel kit e la confezione
può essere soggetta a variazioni senza che vengano
fornite ulteriori indicazioni.
Accessori opzionali:
scheda Micro SD, cavo HDMI, staa di ssaggio a manu-
brio, staa di ssaggio a ventosa.
DESCRIZIONE FUNZIONI
1. Come iniziare
- Inserire la scheda Micro SD e tenere premuto il tasto
on/o “1” per 2 secondi. L’indicatore LED si accenderà
con luce viola producendo una vibrazione e il disposi-
tivo passerà allo stato di inizializzazione. Attendere al-
cuni istanti no alla successiva vibrazione. L’indicatore
LED viola diventerà blu: il dispositivo è ora in modalità
stand-by.
- È possibile che siano necessari alcuni secondi prima
che il dispositivo passi allo stato di inizializzazione, a
seconda della capacità della scheda Micro SD e della
quantità di dati memorizzati.
- Per registrazioni video con risoluzione HD 1080p, si rac-
comanda l’utilizzo di scheda Micro SD ad alta velocità
(consigliata CLASSE 4) per garantire una qualità video
ottima e uida nelle immagini.
Note: qualora il dispositivo venga acceso senza prima
avere inserito la scheda Micro SD, l’indicatore lampegge-
rà rapidamente con luce viola e il dispositivo emetterà
frequenti vibrazioni. In tal caso spegnere il dispositivo e
inserire la scheda Micro SD.
MOTIONCAM01, se priva di scheda SD, si spegnerà auto-
maticamente dopo circa 20 secondi.
2. Cambio modalità operative
Se MOTIONCAM01 non viene connessa ad un cavo AV /
HDMI dopo l’accensione, il dispositivo passa automati-
camente alla modalità 1.
Premendo brevemente il tasto cambio modalità “1”, il
dispositivo passerà alle successive 3 modalità:
Modalità 1: modalità stand-by registrazione video. L’in-
dicatore rimane acceso con luce ssa blu.
Modalità 2: modalità stand-by scatto foto. L’indicatore
rimane acceso con luce ssa rossa.
Modalità 3: modalità stand-by registrazione audio. L’in-
dicatore rimane acceso con luce ssa viola.
Se avete collegato un cavo AV o HDMI a MOTIONCAM01,
dopo l’accensione il dispositivo passa automaticamente
alla modalità 1. Premendo brevemente il tasto cambio
modalità “1”, il dispositivo passerà alle seguenti 4 mo-
dalità:
Modalità 1: modalità stand-by registrazione video. L’in-
dicatore rimane acceso con luce ssa blu.
Modalità 2: modalità stand-by scatto foto. L’indicatore
rimane acceso con luce ssa rossa.
Modalità 3: modalità riproduzione video e foto. L’indica-
tore rimane acceso con luce ssa viola.
Per passare alla modalità 4 (registrazioni audio), tenere
premuto per circa due secondi il tasto cambio modalità
“1”.
Modalità 4: modalità riproduzione audio. L’indicatore
rimane acceso con luce ssa viola.
(Tenere premuto circa due secondi il tasto cambio mo-
dalità “1” per tornare alla modalità 1)
Note:
1) Premendo i tasti della videocamera, l’indicatore di
modalità cambia colore e la videocamera produce
una vibrazione segnalando il corretto completamen-
to dell’operazione.
2) Quando si utilizza il tasto cambio modalità “1”, il di-
spositivo produce due vibrazioni per indicare il pas-
saggio dalla modalità di registrazione audio alla mo-
dalità stand-by registrazione video. Grazie alla doppia
vibrazione è possibile sapere quando ci si trova in
modalità stand-by di registrazione video anche senza
controllare l’indicatore luminoso.
3) Il dispositivo può passare alla modalità di riprodu-
zione solo dopo essere stato collegato a un cavo AV
/ HDMI. In caso contrario, il dispositivo salterà auto-
maticamente questa modalità.
4) Non è possibile passare alla modalità di registrazione
audio dopo avere collegato il dispositivo al televisore.
5) In modalità riproduzione, premere brevemente il ta-
sto cambio modalità “1” per spostarsi verso l’alto e
tenere premuto il tasto cambio modalità “1” per pas-
sare alla modalità successiva. Vedi sezione “Riprodu-
zione le su televisore”.
3. Registrazione video
Dopo avere acceso il dispositivo, premere brevemente
il tasto “3” (avvio registrazione / riproduzione). Il dispo-
sitivo produrrà una vibrazione e l’indicatore lampeg-
gerà lentamente con luce blu, indicando l’inizio della
registrazione video. Per interrompere la registrazione,
premere brevemente il tasto “3” avvio registrazione /
riproduzione. L’indicatore lampeggerà rapidamente con
luce blu per alcuni secondi e il dispositivo produrrà una
vibrazione. L’indicatore rimarrà quindi acceso con luce
ssa blu, indicando che la registrazione è stata interrotta
e il video correttamente salvato.
Note:
1) Per registrazioni di video sportivi in condizioni am-
bientali estreme, la risoluzione video consigliata è
1280x720p 60fps.
Per ottenere una qualità dell’immagine più chiara
e luminosa in ambienti chiusi scarsamente illumi-
nati è consigliabile impostare la risoluzione video a
1280x720p 30fps
2) Quando la funzione di registrazione continua (loop
recording) è disattivata, il dispositivo salva automati-
camente un le dopo avere registrato un volume dati
pari a 4GB, quindi inizia la registrazione di un nuovo
le (con scheda da 16Gb verranno creati quattro vi-
deo separati).
3) In caso di uso non subacqueo, rimuovere il coperchio
impermeabile collocato sul retro del dispositivo per
ottenere una migliore qualità audio
4) Quando la funzione di registrazione continua è disat-
tivata e la scheda Micro SD o la batteria è esaurita o la
modalità stand-by ha superato i 3 minuti (l’intervallo
di tempo può essere impostato diversamente), il di-
spositivo si spegne automaticamente.
4. Funzione registrazione continua (loop recording)
- È possibile attivare la funzione di registrazione con-
tinua (loop recording) mediante le impostazioni dei
parametri di sistema. Vedi sezione “Impostazione pa-
rametri di sistema”.
- Dopo avere attivato la funzione di registrazione con-
tinua, in modalità video il dispositivo salverà automa-
ticamente il le in base alla durata dell’intervallo di
registrazione impostata. Le impostazioni del sistema

10
IT
DE
ES
FR
EN
prevedono tre opzioni di durata: 2 minuti, 5 minuti e
15 minuti.
5. Scattare fotograe
Dopo avere acceso il dispositivo, premere brevemente
il tasto “1” per passare alla modalità stand-by/scatto
foto. L’indicatore rimane acceso con luce rossa ssa. Per
scattare una foto, premere brevemente il tasto avvio re-
gistrazione / riproduzione “3”. L’indicatore lampeggerà
rapidamente con luce rossa per diversi secondi e il di-
spositivo produrrà una vibrazione, indicando che la foto
è stata scattata e salvata correttamente. Quindi la video-
camera ritornerà alla condizione iniziale, Led acceso con
luce ssa rossa pronta per scattare di nuovo.
Note:
1) Durante lo scatto, l’indicatore lampeggerà rapida-
mente con luce rossa, in questa fase per ottenere
una migliore qualità dell’immagine non muovere il
dispositivo.
2) Quando la scheda Micro SD è piena, la batteria è esau-
rita o la modalità stand-by ha superato i 3 minuti, il
dispositivo si spegne automaticamente (l’intervallo di
tempo può essere impostato diversamente).
6. Registrazione audio
Dopo avere acceso il dispositivo, premere brevemente
il tasto cambio modalità “1” per passare alla modalità
stand-by registrazione audio (Led colore viola sso).
Premere brevemente il tasto avvio registrazione / ri-
produzione “3”. Il dispositivo produrrà una vibrazione
e l’indicatore lampeggerà lentamente con luce viola,
segnalando che il dispositivo ha iniziato la registrazione
audio. Per interrompere la registrazione, premere breve-
mente il tasto avvio registrazione / riproduzione “3” una
seconda volta. Il dispositivo vibrerà nuovamente, indi-
cando che la registrazione audio è terminata e il le è
stato salvato correttamente. L’indicatore rimarrà acceso
con luce ssa viola.
Note:
1) In caso di uso non subacqueo o in condizioni estreme
(neve,pioggia,etc ..), rimuovere il coperchio imperme-
abile collocato sul retro del dispositivo per ottenere
una migliore qualità audio.
2) Quando la scheda Micro SD è piena, la batteria è esau-
rita o la modalità stand-by ha superato i 3 minuti (l’in-
tervallo di tempo può essere impostato diversamen-
te), il dispositivo si spegne automaticamente.
7. Luci LED e laser
- Il dispositivo è dotato di 2 luci LED ad alta luminosità
e di 1 luce laser.
- In qualsiasi modalità (ad eccezione della modalità di
riproduzione su televisore), premere brevemente il ta-
sto luci LED / laser “4” per passare a una delle seguenti
cinque modalità:
Modalità 0: tutte le luci sono spente. (Il dispositivo pas-
sa a questa modalità dopo l’accensione.)
Modalità 1: la luce laser rimane accesa per 30 secondi
per consentire di inquadrare correttamente il soggetto.
Trascorsi i 30 secondi, la luce laser si spegne.
Modalità 2: le luci LED sono accese per permettere la
registrazione video e migliorare la qualità del colore in
condizioni di scarsa luminosità.
Modalità 3: la luce laser rimane accesa per permettere
una corretta inquadratura durante tutta la registrazio-
ne.
Modalità 4: le luci LED continuano a lampeggiare ra-
pidamente ad alta frequenza per inviare un segnale di
SOS.
Note:
1) Ogni volta che si preme correttamente il tasto di ac-
censione delle luci, il dispositivo produce una vibra-
zione.
2) In tutte le modalità, tenere premuto il tasto luci LED /
laser “4” un paio di secondi per far tornare il dispositi-
vo alla modalità 0 (luci spente).
3) L’ordine delle modalità è il seguente: modalità 0 - mo-
dalità 1 - modalità 2 - modalità 3 - modalità 4 - mo-
dalità 0.
8. Funzione luce lampeggiante e sistema puntamen-
to laser
Il dispositivo è dotato di funzione torcia e sistema pun-
tamento laser. Quando viene attivata la funzione torcia,
è consigliabile spegnere la videocamera in questo modo
otterrete una maggiore autonomia di utilizzo.
Per utilizzare queste funzioni, seguire le indicazioni ri-
portate sotto:
Se avete spento la videocamera per attivare la funzione
torcia tenere premuto il tasto luci LED / laser “4” un paio
di secondi. Premendo brevemente il tasto luci LED / laser
“4”, il dispositivo passerà in sequenza attraverso le se-
guenti cinque modalità:
Modalità 0: stato torcia. La torcia è accesa e ha un’auto-
nomia di 10 ore.
Modalità 1: la luce laser è accesa per il puntamento.
Modalità 2: le luci LED continuano a lampeggiare rapida-
mente ad alta frequenza per inviare un segnale di SOS.
Modalità 3: la luce laser lampeggia lentamente per pun-
tamento laser intermittente.
Modalità 4: tutte le luci LED sono spente.
Note:
1) La pressione di due secondi del tasto luci LED / laser
“4” serve solamente dopo che la videocamera è stata
spenta, diversamente basta una breve pressione per
passare da una funzione all’altra.
2) In tutte le modalità, tenere premuto il tasto luci LED /
laser “4” un paio di secondi per passare alla modalità
4 (luci spente).
9. Spegnimento e funzione spegnimento automatico
- In modalità stand-by, premere il tasto on/o “1” per cir-
ca due secondi. L’indicatore lampeggerà con luce viola
e il dispositivo vibrerà 3 volte prima di spegnersi.
- Quando la scheda Micro SD è piena, la batteria è esauri-
ta o la modalità stand-by ha superato i 3 minuti (l’inter-
vallo di tempo può essere impostato diversamente), il
dispositivo si spegnerà automaticamente.
10. Avviso errore scheda Micro SD e spegnimento au-
tomatico del dispositivo
Qualora la scheda Micro SD non sia stata inserita, sia
danneggiata o piena, il dispositivo segnalerà un errore:
l’indicatore LED lampeggerà rapidamente con luce viola
e il dispositivo produrrà frequenti vibrazioni.
Il dispositivo si spegnerà automaticamente dopo circa
15 secondi.
11. Avviso batteria scarica e spegnimento automa-
tico
Durante l’utilizzo del dispositivo, quando la batteria
integrata al litio si scarica viene emesso un segnale di
avviso. L’indicatore lampeggerà lentamente con luce al-
ternata rossa e blu e il dispositivo produrrà vibrazioni. Il
dispositivo si spegnerà automaticamente dopo circa 15
secondi.
12. Download di le e funzione disco rimovibile
- Collegare il dispositivo alla presa USB del computer.
- Premere il tasto on/o “1” per accendere il dispositivo.
In “Risorse del computer” verrà visualizzata un’unità di-
sco rimovibile. È possibile visualizzare immagini, video
o le audio memorizzati sul dispositivo e copiarli sul
proprio computer.
- Nel caso in cui si utilizzi una porta USB1.1, copiare i
video sul desktop e riprodurli per visualizzare corret-
tamente i video, diversamente la velocità di lettura
diretta tramite USB 1.1 potrebbe non essere suciente
e generare immagini di scarsa qualità e/o blocchi delle
stesse.
Note:
1) In questa modalità è possibile premere brevemente

12
IT
DE
ES
FR
EN
il tasto luci LED / laser “4” per attivare la funzione
torcia. Il dispositivo può essere utilizzato come una
lampada da tavolo USB.
2) Collegando il dispositivo alla presa USB, se l’indicatore
giallo lampeggia, il dispositivo si sta caricando.
13. Ricarica
- Per ricaricare la batteria, collegare la videocamera a
una presa USB del PC mediante il cavo in dotazione o
utilizzare un carica batterie da rete con uscita USB (op-
tional ACHUSBCOMPACT) Durante la fase di ricarica
l’indicatore giallo rimarrà acceso e si spegnerà a carica
ultimata.
Il completamento della carica da batteria totalmente
scarica richiede circa 3 ore.
- Collegando il dispositivo al computer per scaricare i
dati, la fase di ricarica inizierà automaticamente. Per
evitare di allungare i tempi di ricarica, non premere il
tasto on/o “1” dopo avere collegato il dispositivo al
computer.
Note: se si collega il dispositivo acceso all’adattatore per
ricaricare la batteria, il dispositivo si spegnerà automa-
ticamente dopo essere rimasto in modalità stand-by
per 3 minuti (l’intervallo di tempo può essere impostato
diversamente), senza che il processo di ricarica venga
interrotto.
14. Registrare video durante la fase di ricarica
Collegare la videocamera a una presa USB del PC.
Tenere premuto il tasto on/o “1” per accendere il di-
spositivo. Dopo alcuni secondi l’indicatore passerà da
viola a blu e il dispositivo produrrà una vibrazione. Il
dispositivo è ora in modalità stand-by. L’indicatore giallo
rimarrà acceso per indicare che la fase di ricarica è in cor-
so. A questo punto è possibile utilizzare tutte le funzioni
del dispositivo.
Note: il dispositivo si spegne automaticamente se rima-
ne in modalità stand-by per più di 3 minuti (l’intervallo
di tempo può essere impostato diversamente), ma rima-
ne comunque in carica.
15. Riproduzione le su televisore
1) È possibile scegliere tra due opzioni per l’uscita audio
e video: AV e HDMI.
Per ottenere la migliore qualità video HD raccoman-
diamo l’utilizzo dell’HDMI.
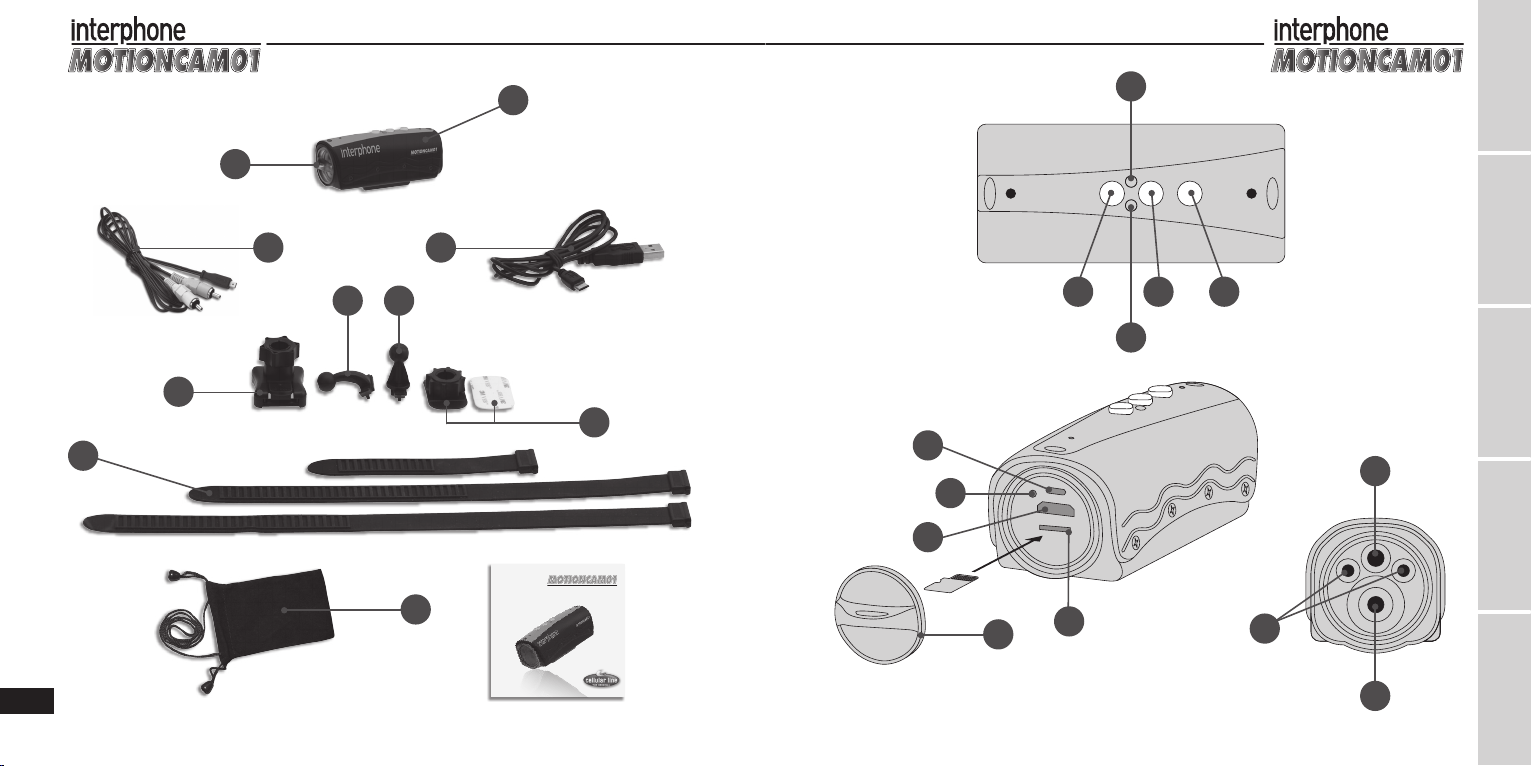
A - Mediante cavo AV. Collegare il cavo AV alla porta
USB/AV-OUT della videocamera: il jack giallo deve
essere inserito nella porta di ingresso video del te-
levisore (gialla), mentre il jack bianco deve essere
inserito nella porta di ingresso audio del televiso-
re (bianca). Fare riferimento al manuale utente del
televisore per impostare l’ingresso audio/video
appropriato.
B - Mediante cavo HDMI (opzionale). Collegare un
jack del cavo HDMI alla porta HDMI della videoca-
mera e collegare il secondo jack alla porta HDMI
del televisore. Fare riferimento al manuale del
televisore per impostare l’ingresso audio/video
appropriato.
2) Accendere la videocamera. Verrà visualizzato il LOGO
DI ACCENSIONE ed emesso un breve tono di avviso.
L’indicatore rimarrà acceso con luce ssa blu e il di-
spositivo passerà alla modalità stand-by.
3) Riproduzione video: vedi sezione “Cambio modalità”.
Premere brevemente il tasto modalità “1” per pas-
sare alla modalità di riproduzione video. L’indicatore
rimarrà acceso con luce viola ssa. Premere quindi il
tasto “1” per spostarsi verso l’alto o il tasto “4” per
spostarsi verso il basso. Premere brevemente il tasto
avvio registrazione / riproduzione “3” nella scherma-
ta di interfaccia per la riproduzione e premere breve-
mente il tasto “3” una seconda volta per avviare la
riproduzione video.
Durante la riproduzione, ai tasti sono assegnate le
seguenti funzioni:
A - Premere brevemente il tasto avvio registrazione /
riproduzione “3” per mettere in pausa o riprende-
re la riproduzione.
B - Tenere premuto il tasto avvio registrazione / ri-
produzione “3” per tornare al livello superiore del
menu.
C - Durante la riproduzione video, premere breve-
mente il tasto “4” per eettuare l’avanzamento
rapido o premere brevemente il tasto “1” per ef-
fettuare il riavvolgimento rapido.
4) Riproduzione immagini: vedi sezione “Cambio mo-
dalità”. Premere brevemente il tasto cambio modalità
“1” per passare alla modalità di riproduzione di im-
magini e video. L’indicatore rimarrà acceso con luce
viola ssa.
Premere quindi il tasto “1” per spostarsi verso l’alto o
il tasto “4” per spostarsi verso il basso. Premere bre-
vemente il tasto avvio registrazione / riproduzione
“3” nella schermata di interfaccia per la riproduzio-
ne e premere brevemente il tasto “3” una seconda
volta per visualizzare automaticamente le immagini.
Durante la riproduzione, ai tasti sono assegnate le
seguenti funzioni:
A - Premere brevemente il tasto avvio registrazione /
riproduzione “3” per mettere in pausa o riprende-
re la riproduzione.
B - Tenere premuto il tasto avvio registrazione / ri-
produzione “3” per tornare al livello superiore del
menu.
C - Se si interrompe la riproduzione, premere breve-
mente il tasto “4” per visualizzare le foto prece-
denti o il tasto “3” per visualizzare le foto succes-
sive.
5) Riproduzione audio: vedi sezione “Cambio modalità”.
Premere brevemente il tasto cambio modalità “1”
per passare alla modalità di riproduzione audio. L’in-
dicatore rimarrà acceso con luce viola ssa. Premere
quindi il tasto “1” per spostarsi verso l’alto o il tasto
“4” per spostarsi verso il basso. Premere brevemente
il tasto avvio registrazione / riproduzione “3” nella
schermata di interfaccia per la riproduzione e pre-
mere brevemente il tasto “3” una seconda volta per
avviare la riproduzione audio.
Durante la riproduzione, ai tasti sono assegnate le
seguenti funzioni:
A - Premere brevemente il tasto avvio registrazione /
riproduzione “3” per mettere in pausa o riprende-
re la riproduzione.
B - Tenere premuto il tasto avvio registrazione / ri-
produzione “3” per tornare al livello superiore del
menu.
C - Durante la riproduzione audio, premere breve-
mente il tasto “4” per eettuare l’avanzamento
rapido o il tasto “1” per eettuare il riavvolgimen-
to rapido del le audio.
Note:
1) Qualora le dimensioni del le video fossero troppo
grandi, sarà necessario attendere alcuni secondi pri-
ma dell’avvio della riproduzione.
2) Quando il dispositivo è in modalità riproduzione vi-
deo, è possibile regolare il volume del televisore per
ottenere una migliore qualità del suono.
3) Durante la riproduzione, si consiglia l’utilizzo di un
cavo HDMI (opzionale)per una migliore qualità audio
e video.
4) Dopo avere eettuato il collegamento mediante cavo
AV/HDMI ed avere acceso il dispositivo, la videocame-
ra passerà automaticamente alla modalità 1. Premen-
do il tasto cambio modalità “1”, il dispositivo passerà
alle seguenti 4 modalità:
Modalità 1: modalità stand-by registrazione video.
L’indicatore rimane acceso con luce ssa blu.
Modalità 2: modalità stand-by scatto foto. L’indicatore
rimane acceso con luce ssa rossa.
Modalità 3: modalità riproduzione video e scatto foto.
L’indicatore rimane acceso con luce ssa viola. (In
questa modalità, premere il tasto cambio modalità

14
IT
DE
ES
FR
EN
“1” per passare alla modalità successiva.)
Modalità 4: modalità riproduzione audio. L’indicatore
rimane acceso con luce ssa viola. (In questa modali-
tà, premere il tasto cambio modalità “1” per passare
alla modalità successiva.)
16. Scattare foto quando la videocamera è collegata
al televisore
Vedi sezione “Riproduzione le su televisore”. Collegan-
do correttamente il cavo AV o HDMI, è possibile visio-
nare in TV il campo inquadrato dalla videocamera per
registrare video e scattare foto.
17. Impostazione parametri di sistema
Vedi sezione “Riproduzione le su televisore”. Mediante
cavo AV o HDMI collegare il dispositivo al televisore. Il di-
spositivo passerà in modalità stand-by. Tenendo premu-
to il tasto avvio registrazione / riproduzione “3”, sullo
schermo del televisore verrà visualizzata la schermata di
interfaccia per l’impostazione dei parametri di sistema.
Ai tasti sono assegnate le seguenti funzioni:
A - Premere brevemente il tasto avvio registrazione /
riproduzione “3” per selezionare e deselezionare
elementi dal menu impostazioni.
B - Premere brevemente il tasto “1” per passare al va-
lore precedente di un elemento delle impostazioni.
Premere brevemente il tasto “4” per passare al valore
successivo.
C - Tenere premuto il tasto avvio registrazione / riprodu-
zione “3” per uscire e salvare le impostazioni.
Descrizione impostazioni:
•RISOLUZIONE: 720p 30fps - 720p 60fps - 1080p 30fps -
FULL HD 30fps. L’impostazione di default è 720p 60fps.
A - 720p30 - 1280x720p 30fps
B - 720p60 - 1280x720p 60fps. Adatto per la registrazio-
ne di video sportivi in condizioni ambientali estre-
me. Si consiglia di impostare la risoluzione video a
1280x720p 30fps per ottenere una qualità dell’imma-
gine più chiara e luminosa in ambienti chiusi scarsa-
mente illuminati.
C - 1080p30 - 1440x1080p 30fps
D - FULL HD30 - 1920x1080p 30pfs - Scatti Full HD
Note: la qualità fotograca e l’utilizzo della memoria
variano in base alla risoluzione video selezionata. Im-
postare la risoluzione video più adatta alle condizioni di
registrazione.
Note: si consiglia l’utilizzo di una scheda Micro SD ad
alta velocità (almeno CLASSE 4) per ottenere una qualità
video migliore e uida.
•QUALITÀ: A - M - B
Descrizione: più alta è la qualità video selezionata, mag-
giore sarà l’utilizzo della capacità di memoria.
•DIMENSIONE FOTO: 5Mp - 8Mp - 12Mp
Descrizione:
1) 5Mp = risoluzione foto 2592x1944; 8Mp = risoluzione
foto 3200x2400; 12Mp = risoluzione foto 4000x 3000.
2) La dimensione dell’immagine e l’utilizzo della me-
moria variano in base alla risoluzione fotograca se-
lezionata.
•INDICAZIONE DATA: DATA/ORA - OFF
Descrizione: utilizzare questa funzione per visualizzare o
nascondere i marker sulle immagini.
•FLICKER: AUTO - 60Hz - 50Hz
Descrizione: impostazione della frequenza della sorgen-
te luminosa secondo la griglia di frequenza per elimina-
re lo sfarfallio sotto sorgenti luminose.
•MODELLO TV: NTSC - PAL
Descrizione: selezionare correttamente il formato video
della videocamera e del televisore durante la visualizza-
zione su televisore per evitare problemi di resa croma-
tica.
•ORA E DATA: ANNO.MESE.GIORNO ORA:minuti
Descrizione: se le indicazioni orarie visualizzate su foto
e video non sono corrette, correggere le impostazioni di
ora e data utilizzando questa funzione.
Funzioni tasti:
A - Utilizzare il tasto “1” per passare al valore precedente
o il tasto “4” per passare al valore successivo.
B - Utilizzare il tasto avvio registrazione / riproduzione
“3” per salvare e uscire dalle impostazioni.
•SOVRASCRITTURA REGISTRAZIONE: OFF - 2 MIN - 5
MIN - 15 MIN
Descrizione: impostazione della funzione di registrazio-
ne continua (loop recording):
1) Il dispositivo è impostato di default su OFF. Il dispositi-
vo si spegne automaticamente durante la registrazio-
ne quando la memoria è piena.
2) Dopo avere impostato 2 MIN - 5 MIN - 15 MIN, il dispo-
sitivo salva il video registrato al termine dell’intervallo
di tempo selezionato.
Quando la scheda TF è piena, il dispositivo cancella
automaticamente uno a uno i video precedenti per
recuperare lo spazio per la memorizzazione dei nuovi
video.
•SEGNALE ACUSTICO: ON - OFF
Descrizione: utilizzare questa funzione per attivare o
disattivare il segnale acustico collegato all’uso dei tasti
dopo che il dispositivo è stato collegato al televisore.
•FORMATTAZIONE: SÌ - NO
Descrizione: utilizzare questa funzione per resettare la
scheda Micro SD
Note: dopo avere selezionato SÌ, tutti i le presenti sulla
scheda Micro SD verranno eliminati. Si raccomanda di
prestare la massima attenzione.
Prima di formattare la scheda Micro SD assicurasi di ave-
re salvato i dati sul PC.
•SPEGNIMENTO AUTOMATICO: 1 MIN - 2 MIN - 3 MIN - 5
MIN - OFF
Descrizione: dopo avere impostato l’intervallo desidera-
to per lo spegnimento automatico, il dispositivo si spe-
gnerà automaticamente anche durante il suo utilizzo.
Note: se si sceglie l’impostazione“OFF”, il dispositivo non
si spegnerà automaticamente anche nel caso in cui non
venga utilizzato.
•IMPOSTAZIONI DI DEFAULT: SÌ - NO
Descrizione: se si desidera resettare il sistema, selezio-
nare SÌ e premere brevemente il tasto avvio registrazio-
ne / riproduzione “3”. In questo modo verranno ripri-
stinate le impostazioni di fabbrica e il dispositivo verrà
riavviato.
•VERSIONE FIRMWARE:
Descrizione: utilizzare questa funzione per visualizzare
la versione del software e le relative informazioni.
18. Resettare il sistema
Qualora il dispositivo non funzioni correttamente, pre-
mere contemporaneamente il tasto avvio registrazione
/ riproduzione “3” e il tasto luci LED / laser “4” per reset-
tare e spegnere il dispositivo. Riaccendere il dispositivo
per utilizzare nuovamente le varie funzioni.
Note: dopo avere resettato il dispositivo, attendere 3 se-
condi prima di utilizzarlo nuovamente.

16
IT
DE
ES
FR
EN
SPECIFICHE
Tipo Obiettivo F/2,8 f = 3mm 120° grandangolo - Illuminazione min.1LUX
Sensore CMOS 5 Megapixel 1/ 2,5”
Risoluzione foto 12M 4000x3000 JPG Approssimativamente 900pcs/4GB
8M 3200x2400 JPG Approssimativamente 1200pcs/4GB
5M 2592x1944 JPG Approssimativamente 1700pcs/4GB
Risoluzione video ** QUALITÀ: H QUALITÀ: M QUALITÀ: L
1920x1080p 30fps H.264 AVI 41 min. circa (4GB) 49 min. circa (4GB) 62 min. circa (4GB)
1440x1080p 30fps H.264 AVI 41 min. circa (4GB) 49 min. circa (4GB) 62 min. circa (4GB)
1280x720p 60fps H.264 AVI 41 min. circa (4GB) 54 min. circa (4GB) 82 min. circa (4GB)
1280x720p 30fps H.264 AVI 62 min. circa (4GB) 82 min. circa (4GB) 123 min. circa (4GB)
Registrazione audio Formato WAV ADPCM 48Khz , Mono circa 22h/4GB
Autonomia utilizzo torcia 10 ore circa
Distanza laser 20mt (interno)
Frequenza scansione Auto - 60Hz - 50Hz
Sistema segnale NTSC - PAL
Avviso a vibrazione Supportato
Capacità batteria 3,7V/ 1000mAh Li-Battery
Consumo 1,5W
Durata registrazione 2,5 ore circa (con luci LED spente e 4GB di memoria)
Alimentazione DC5V 1A o superiore
Tempo ricarica 3 ore circa
Jack USB USB2.0 Alta velocità
HDMI supportato
Tipo memoria Scheda Micro SD (Scheda TF)
Capacità scheda SD supportate Da 2GB a 32GB
Waterproof IPX8 20 metri
Peso 85 gr
Dimensioni 91 (lung.) x 41 (alt.) x 36 (prof.) mm
Sistemi operativi supportati Microsoft Windows2000/XP/VISTA/WIN 7/mac10.4 o superiori
**Avviso: Le durate reali del tempo di registrazione potrebbero dierire lievemente da quelle sopra indicate.
(Applicabile in paesi dell’Unione Europea e in quelli con sistemi di rac-
colta dierenziata)
Il marchio riportato sul prodotto o sulla sua documentazione indica che
il prodotto non deve essere smaltito con altri riuti domestici al termine
del ciclo di vita. Per evitare eventuali danni all’ambiente o alla salute cau-
sati dall’inopportuno smaltimento dei riuti, si invita l’utente a separare
questo prodotto da altri tipi di riuti e di riciclarlo in maniera responsabi-
le per favorire il riutilizzo sostenibile delle risorse materiali.
Gli utenti domestici sono invitati a contattare il rivenditore presso il quale
è stato acquistato il prodotto o l’ucio locale preposto per tutte le in-
formazioni relative alla raccolta dierenziata e al riciclaggio per questo
tipo di prodotto.
Gli utenti aziendali sono invitati a contattare il proprio fornitore e verica-
re I termini e le condizioni del contratto di acquisto.
Questo prodotto non deve essere smaltito unitamente ad altri riuti
commerciali.
Questo prodotto è contrassegnato dal marchio CE in conformità con le
disposizioni della Direttiva R & TTE (99/5/CE). Con ciò Cellular Italia S.p.A.
dichiara che questo prodotto è conforme ai requisiti essenziali e ad altre
rilevanti disposizioni previste dalla Direttiva 1999/5/CE. È fatto divieto
all’utente di eseguire variazioni o apportare modiche di qualsiasi tipo
al dispositivo. Variazioni o modiche non espressamente approvate da
Cellular Italia S.p.A. annulleranno l’autorizzazione dell’utente all’utilizzo
dell’apparecchiatura. Bluetooth® è un marchio di proprietà di Bluetooth
SIG, Inc.
Per ulteriori informazioni visitare il sito web http://www.cellularline.com
Questo prodotto ha all’interno una batteria non sostituibile dall’utente,
non tentare di aprire il dispositivo o rimuovere la batteria, questo può
causare malfunzionamenti e danneggiare seriamente il prodotto. In
caso di smaltimento del prodotto si prega di contattare il locale ente di
smaltimento riutiper eettuare la rimozione della batteria. La batteria
contenuta al’interno del dispositivo è stata progettata per poter essere
utilizzata durante tutto il ciclo di vita del prodotto.

18 DE
ES
FR
IT
EN
Before using this product, please read this manual care-
fully and keep it on hand for future reference.
PREFACE
Thank you for purchasing our 1080P HD digital water-
proof video camera model MOTIONCAM01. This prod-
uct is compact, easy-to-handle and waterproof, and fea-
tures a highly ergonomic design. With its multipurpose
cover, it can record video in all ambient conditions.
This manual contains important safety and operating
information.
PRODUCT CERTIFICATIONS
Certied by the FCC and CE authorities, this product
complies with all provisions of law.
PRODUCT OVERVIEW
The MOTIONCAM01 is ideal for shooting on motorcy-
cles, in cars, outdoors, and when enjoying any kind of
sports activity.
With its multipurpose cover, it can record video and take
photos underwater down to a depth of 20 meters.
And with its HD lens and sensitivity at low light levels,
you can take beautiful underwater pictures.
Product features
- Waterproof down to 20 meters, so it’s ideal for outdoor
and underwater activities
- 1/2.5”, 5 MP CMOS sensor
- 120° wide-angle HD lens for total freedom to shoot
photos
- Advanced vibration advisory makes changing modes
easier and more convenient
- Optional video resolutions:
A) 720p 60:1280x720p 60 fps H.264 AVI
B) 720p 30:1280x720p 30 fps H.264 AVI
C) FULL HD 30:1920x1080p 30 fps H.264 AVI
D) 1080p 30: 1440x1080p 30 fps H.264 AVI
- 12 MP photo resolution, JPG format
- Audio-only recording feature
- Built-in high capacity Li battery provides up to 2.5
hours of video recording
- Support for HDMI and TV-OUT allows you to share vid-
eos easily
- Loop recording and audio recording functions
- Laser pointer for correct framing of subject
- 2 high-brightness LED lights for night recording
- Flashlight function with up to 10 hrs of operation
- High-brightness LEDs can ash to signal an emergency
- Supports Micro SD card with capacity of up to 32 GB
(class 4 is recommended)
- USB 2.0 UPnP. USB recharging.
PRODUCT CONFIGURATION
Components:
1. Power ON/mode change/arrow up key
2. LED light (yellow)
3. Record/playback key
4. LED ON/laser/arrow down key
5. LED indicator (red and blue)
6. USB/AV/recharge port
7. HDMI socket
8. TF card slot
9. Waterproof cover/ hook for carry cord (optional)
10. Microphone
11. Laser light
12. LED light
13. Camera lens
NOTES:
The MOTIONCAM01 can be hand-held or fastened to a
number of surfaces in dierent ways using the holders
supplied with the unit.
SUMMARY
PREFACE........................................................................... 19
PRODUCT CERTIFICATIONS .......................................... 19
PRODUCT OVERVIEW .................................................... 19
Product features ........................................................ 19
PRODUCT CONFIGURATION..........................................19
PACKAGE CONTENTS AND ACCESSORIES...................20
Contained in the package ........................................ 20
Optional accessories ..................................................20
DESCRIPTION OF FUNCTIONS...................................... 20
1. Starting up............................................................. 20
2. Changing the operating mode ......................... 20
3. Video Recording....................................................21
4. Loop recording function..................................... 21
5. Taking Pictures......................................................21
6. Recording audio....................................................22
7. LED lights and laser light.....................................22
8. Flashlight and laser pointer functions..............22
9. Shuto and automatic shuto function...........23
10. Micro SD card error warning and
automatic shuto function.................................23
11. Low battery warning and automatic
shut down...............................................................23
12. Downloading les - removable disk function...23
13. Charging.................................................................23
14. Shooting video while charging .........................23
15. Playing back les on a TV set .............................24
16. Taking pictures when the unit is connected
to a TV.....................................................................25
17. Setting the system parameters..........................25
18. Resetting the system ...........................................26
SPECIFICATIONS ..............................................................27
INSTRUCTION MANUAL

20 DE
ES
FR
IT
EN
PACKAGE CONTENTS AND ACCESSORIES
Contained in the package:
A. Motioncam01
B. Waterproof rear cover
C. Audio/video cable (TV connection)
D. USB cable (recharge/data)
E. Base for elastic cords
F. Adhesive base
G. Elastic cords in three sizes
H. Vertical bracket for bases
I. Horizontal bracket for bases
J. Cloth case
Notes: Pictures may be slightly dierent from the actual
product. Packaging is subject to change without notice.
Optional accessories:
Micro SD card, HDMI cable, bracket for mounting on
handlebar, mounting bracket with suction cups.
DESCRIPTION OF FUNCTIONS
1. Starting up
- Insert the Micro SD card and press ON/OFF button “1”
for 2 seconds.The LED indicator will icker with a violet
color and the unit will vibrate as it initializes. Wait a
moment until the unit vibrates again and the LED in-
dicator changes to blue. The unit will now be in the
standby mode.
- It may take a few seconds for the unit to initialize, de-
pending on the capacity of the Micro SD card and the
quantity of data stored.
- For recording with HD 1080p video resolution, we rec-
ommend using a high-speed (Class 4) Micro SD card for
smooth, excellent quality video.
Notes: The indicator will ash rapidly with a violet color
and the unit will vibrate frequently if it is turned on with-
out a Micro SD card inserted in the slot. If this occurs,
turn o the unit and insert a Micro SD card.
If the MOTIONCAM01 is left on without an SD card, it will
turn o automatically after about 20 seconds.
2. Changing the operating mode
If the MOTIONCAM01 is not connected to an AV/HDMI
cable, it will automatically enter mode 1 when it is
turned on.
Press mode change button “1” briey to cycle the unit
through these 3 modes:
Mode 1: Video recording standby mode. The indicator
light is steadily lit with a blue color.
Mode 2: Photo shooting standby mode. The indicator
light is steadily lit with a red color.
Mode 3: Audio recording standby mode. The indicator
light is steadily lit with a violet color.
In you have connected the MOTIONCAM01 to an AV/
HDMI cable, it will automatically enter mode 1 when it
is turned on.
Press mode change button “1” briey to cycle the unit
through these 4 modes:
Mode 1: Video recording standby mode. The indicator
light is steadily lit with a blue color.
Mode 2: Photo shooting standby mode. The indicator
light is steadily lit with a red color.
Mode 3: Video and photo playback mode. The indicator
light is steadily lit with a violet color.
To change to Mode 4 (audio playback mode), hold down
button“1” for around 2 seconds.
Mode 4: Audio playback mode. The indicator light is
steadily lit with a violet color.
(To return to Mode 1, hold down button “1” for around
2 seconds).
Important:
1) When a button on the unit is pressed, it will vibrate
once and the mode indicator light will change color
to show that the operation has completed correctly.
2) When operating mode change button “1” is used to
change from the audio recording mode to the video
recording standby mode, the unit will vibrate twice.
This enables you to know that the unit has entered
the video recording standby mode without the need
to look at the indicator light.
3) The unit can enter the playback mode only if an AV/
HDMI cable has been connected. Otherwise, this
mode will automatically be skipped.
4) The audio recording mode is disabled when the unit
is connected to a TV.
5) When the unit is in the playback mode, press mode
change button “1” briey to move to the previous
mode, or hold the button down to enter the next
mode. See the section entitled, “Playing back a le
on your TV”.
3. Video Recording
After turning on the unit, briey press record/playback
start button “3”. The camera will vibrate once, and the
indicator light will ash slowly with a blue color to show
that the unit is beginning to record video. To stop re-
cording, briey press record/playback start button “3”
again. The indicator will ash quickly with a blue color
for several seconds, and the unit will vibrate once. Then,
the indicator will light up steadily with a blue color to
show that video recording has been stopped and the
video has been saved.
Notes:
1) For outdoor video recording of sports under ex-
treme ambient conditions, set video resolution to
1280x720p 60 fps for best results.
In closed, poorly lit settings, set video resolution to
1280x720p 30 fps for clearer, brighter images.
2) When the loop recording function is disabled, the unit
will automatically save a le after it records 4 GB of
data. It then will start to record a new le (four sepa-
rate videos will be created on a 16 GB card).
3) Remove the waterproof cover on the back of the unit
for better audio quality when the camera is not being
used underwater.
4) The unit will shut down automatically when the loop
recording function is disabled and the Micro SD card
or battery is exhausted, or when the unit has been in
standby for 3 minutes (this time can be programmed
dierently).
4. Loop recording function
- The loop recording function can be activated by set-
ting the relative system parameter. See the section
entitled,“Setting system parameters”.
- After the loop recording function has been activated,
when the unit is in the video mode, it will automatically
save the le according at the interval programmed in
the system. This system time setting has three options:
2 minutes, 5 minutes, 15 minutes.
5. Taking Pictures
After turning on the unit, briey press mode button “1”
and switch to the photo shooting standby mode, with
the indicator light steadily lit with a red color. To take
a picture, briey press record/playback start button B.
The indicator light will ash rapidly with a red color for
several seconds and the unit will vibrate once to show
that the photo has been taken and that the le has been
saved successfully. The unit will then return to its origi-
nal state, with the indicator light steadily lit with a red
color, and will be ready to take another picture.
Notes:
1) The indicator will ash rapidly with a red color while a
picture is being taken. During this time, hold the unit
steady for best picture quality.
2) When the Micro SD card is full, the battery is exhaust-
ed or the unit has been in the standby mode for over

22 DE
ES
FR
IT
EN
3 minutes (this time can be programmed dierently),
the unit will shut down automatically.
6. Recording audio
After turning on the unit, briey press mode button “1”
and switch to the audio recording standby mode, with
the indicator light steadily lit with a violet color.
To record audio, briey press record/playback start but-
ton “3”. The indicator light will ash slowly with a violet
color and the unit will vibrate once, which means that
it has begun to record audio. To stop recording, briey
press record/playback start button “3” again. The unit
will vibrate again, which means that audio recording has
been stopped and the le has been saved successfully.
The indicator light will remain steadily lit with a violet
color.
Notes:
1) Remove the waterproof cover on the back of the unit
for better audio during use in extreme conditions
(snow, rain, etc.) or out of the water.
2) When the Micro SD card is full, the battery is exhaust-
ed or the unit has been in the standby mode for over
3 minutes (this time can be programmed dierently),
the unit will shut down automatically.
7. LED lights and laser light
- The unit is equipped with 2 high-brightness LED lights
and 1 laser light.
- In any operating mode (except TV-OUT playback),
briey press LED/laser light control button “4” to cycle
the unit through these 5 modes:
Mode 0: All lights are o (the unit enters this mode
when it is turned on).
Mode 1: The laser light turns on for 30 seconds to allow
the subject to be framed correctly, and then goes out.
Mode 2: The LED lights stay on for video recording and
to improve color in low-light conditions.
Mode 3: The laser light stays on to allow the subject
to be framed correctly during the entire video record-
ing session.
Mode 4: The LED lights continuously ash at a high
frequency for use as an emergency beacon.
Notes:
1) The unit vibrates when LED/laser light control button
“4” is pressed.
2) During operation in any mode, the unit can be set
to mode 4 (all lights shut o) by holding down LED/
laser light control button “4” for a few seconds.
3) The order of the light mode cycle is mode 0 - mode
1- mode 2 - mode 3 - mode 4 - mode 0.
8. Flashlight and laser pointer functions
The unit is equipped with ashlight and laser pointer
functions. When the ashlight function is on, it is a good
idea to turn the video camera o, which maximizes the
duration of ashlight operation.
To use these functions, proceed as follows:
If you’ve turned o the video camera to turn on the
ashlight function, hold down LED/laser light control
button “4”, ashlight for a few seconds. Now, briey
press LED/laser light control button “4” to cycle the unit
through these 5 modes:
Mode 0: Flashlight mode - the ashlight is lit and can
operate up to 10 hrs.
Mode 1: The laser light is lit for use as a continuous
pointer.
Mode 2: The LED lights continuously ash at a high fre-
quency for use as an emergency beacon.
Mode 3: The laser light ashes slowly for use as an inter-
mittent pointer.
Mode 4: All LED lights are o.
Notes:
1) Holding down LED/laser light control button “4” for
two seconds will work only if the video camera has
been shut o. Otherwise, a brief press of the button
will cycle the unit from one mode to another.
2) When the Micro SD card is full, the battery is exhaust-
ed or the unit has been in the standby mode for over
3 minutes (this time can be programmed dierently),
the unit will shut down automatically.
9. Shuto and automatic shuto function
- In the standby mode, hold down ON/OFF button “1”
around two seconds, The indicator light will ash with
a violet color, and the unit will vibrate 3 times and then
shut o.
- When the Micro SD card is full, the battery is exhausted
or the unit has been in the standby mode for over 3
minutes (this time can be programmed dierently), the
unit will shut down automatically.
10. Micro SD card error warning and automatic shut-
o function
If the Micro SD card is missing, damaged or full, the unit
will signal an error. The LED will ash with a violet color
and the unit will vibrate frequently.
The unit will turn o automatically after about 15 sec-
onds.
11. Low battery warning and automatic shut down
When the unit is in use, if the charge level on the built-in
lithium battery runs low, a warning signal will sound, the
indicator light will ash with an alternating red and blue
color, and the unit will vibrate.
The unit will turn o automatically after about 15 sec-
onds.
12. Downloading les - removable disk function
- Connect the unit to a USB port on your computer.
- Press ON/OFF button “1” to turn on the unit. A remov-
able disk will now appear in My Computer. You can
view pictures, or video and audio les on the remov-
able disk, and you can also copy these les to your
computer.
- If you are using a USB 1.1 port, copy the videos to the
desktop and then play them to display them correctly.
Otherwise, the playback speed on your USB 1.1 port
may not be fast enough, and the images may be of
poor quality and/or freeze during playback.
Notes:
1) In this mode, you can briey press LED/laser light con-
trol button “4” to turn on the ashlight function and
use the unit as a USB table lamp.
2) When the unit is connected to the USB port, the in-
dicator light ashes yellow while the battery is being
recharged.
13. Charging
- To recharge the battery, use the cable provided with
the unit to connect it to a USB port on your computer,
or use a mains-powered charger with a USB port (such
as the ACHUSBCOMPACT, optional at extra cost). When
the unit is connected to a USB port, the indicator light
ashes yellow while the battery is recharged and shuts
o when it is fully charged.
A fully discharged battery takes around 3 hours to
charge fully.
- When you connect the unit to your computer to down-
load data, the charging function begins automatically.
To minimize charging time, do not press ON/OFF but-
ton“1” when the unit is connected to your computer.
Notes: If the unit is on when you connect it to the char-
ger/adapter, it will turn o automatically after remaining
in the standby mode for 3 minutes (this time can be pro-
grammed dierently), but will still charge normally.
14. Shooting video while charging
Connect the unit to a USB port on your computer.
Hold down ON/OFF button“1”to turn on the unit. Sever-
al seconds later, the color of the indicator will change from
violet to blue, and the unit will vibrate once to signal that

24 DE
ES
FR
IT
EN
the unit has entered the standby mode. Also, the indica-
tor will light up yellow to show that the battery is charg-
ing. At this point, the unit can be operated normally.
Notes: The unit will turn o automatically after remain-
ing in the standby mode for 3 minutes (this time can be
programmed dierently), but will still charge normally.
15. Playing back les on a TV set
1) The unit has two options for audio and video output:
AV and HDMI
For best HD video quality, we recommend using
HDMI.
A - Output using an AV cable. Connect the AV cable
to the camera’s USB/AV-OUT port. The yellow plug
must be inserted into the video input jack (yellow)
on yourTV, and the white plug must be inserted into
the audio input jack (white). To set up the audio/
video input, see the TV user manual for your TV.
B - Output using an HDMI cable (optional). Connect
one plug on the HDMI cable to the camera’s HDMI
port and insert the other plug into the HDMI port
on yourTV.To set up the audio/video input, see the
user manual for your TV.
2) Turn on the camera. The POWER ON logo will be dis-
played, and you will hear a short warning tone. Then,
the indicator light will light up steadily with a blue
color, and the unit will be in the standby mode.
3) Video playback: See the section entitled, “Changing
the operating mode”. Briey press ON/OFF/mode
selection button “1” to switch to the video playback
mode. The indicator light will light up steadily with a
violet color. Now, press button“1” to scroll up or but-
ton “4” to scroll down. Briey press record/playback
start button B on the playback interface and briey
press button “3” once again to start video playback.
During playback, the buttons function as follows:
A - Briey press record/playback start button “3” to
pause or resume play.
B - Hold down record/playback start button “3” re-
turn to the higher level menu.
C - During video playback, briey press button “4” to
fast forward or button“1”to fast rewind the video.
4) Picture viewing: See the section entitled, “Changing
the operating mode”. Briey press ON/OFF/mode se-
lection button“1”to switch to the video/picture play-
back mode. The indicator light will light up steadily
with a violet color.
Now, press button “1” to scroll up or button “4” to
scroll down. Briey press record/playback start but-
ton B on the playback interface and briey press but-
ton “3” once again to display the pictures automati-
cally.
During playback, the buttons function as follows:
A - Briey press record/playback start button “3” to
pause or resume play.
B - Hold down record/playback start button “3” re-
turn to the higher level menu.
C - If play is interrupted, briey press button “4” to
show the previous pictures or button “3” to show
the next pictures.
5) Audio playback: See the section entitled, “Changing
the operating mode”. Briey press ON/OFF/mode
selection button “1” to switch to the audio playback
mode. The indicator light will light up steadily with a
violet color.
Now, press button “1” to scroll up or button “4” to
scroll down. Briey press record/playback start but-
ton B on the playback interface and briey press but-
ton “3” once again to start audio playback.
During playback, the buttons function as follows:
A - Briey press record/playback start button “3” to
pause or resume play.
B - Hold down record/playback start button “3” re-
turn to the higher level menu.
C - During audio playback, briey press button “4” to
fast forward or button“1”to fast rewind the audio.
Notes:
1) If the video le is too large, you must wait a few sec-
onds before starting playback.
2) When the unit is in the video playback mode, the vol-
ume on the TV can be adjusted to obtain better audio
quality.
3) An (optional) HDMI cable is recommended for best
audio and video quality.
4) When an AV/HDMI cable is connected and the unit is
turned on, it will enter operating mode 1 automati-
cally. Press mode change button “1” briey to cycle
the unit through these 4 modes:
Mode 1: Video recording standby mode. The indica-
tor light is steadily lit with a blue color.
Mode 2: Photo shooting standby mode. The indicator
light is steadily lit with a red color.
Mode 3: Video and photo playback mode. The indica-
tor light is steadily lit with a violet color.
To change to Mode 4 (audio playback mode), hold
down button“1” for around 2 seconds.
Mode 4: Audio playback mode. The indicator light is
steadily lit with a violet color.
(To return to Mode 1, hold down button “1” for
around 2 seconds).
16.Taking pictures when the unit is connected to aTV
See the section entitled, “Playing back les on a TV
set”. When an AV or HDMI cable is connected, the eld
framed by the video camera can be viewed to record
video and take pictures.
17. Setting the system parameters
See the section entitled, “Playing back les on a TV set.”
Connect the unit with an AV or HDMI cable to your TV
set. The unit will enter the standby mode. Hold down
record/playback start button “3” to bring up the system
parameter settings interface on the TV screen.
The buttons will now function as follows:
A - Briey press record/playback start button “3” to se-
lect and deselect items on the settings menu.
B - Briey press button“1” to move to the previous item
or briey press button “4” to move to the next item
on the settings menu.
C - Hold down record/playback start button “3” to save
the changes you have made and to exit the settings
menu.
Setting illustration:
•RESOLUTION: 720p 30 fps - 720p 60 fps - 1080p 30 fps
- FULL HD 30 fps.
The default setting is 720p 60 fps.
A - 720p 30 - 1280x720p 30 fps
B - 720p 60 - 1280x720p 60 fps. Suitable for video re-
cording of outdoor sports under extreme conditions.
We suggest you set video resolution to 1280x720p
30 fps for clearer and brighter image quality when
shooting in poorly lit areas indoors.
C - 1080p 30 - 1440x1080p 30 fps
D - FULL HD 30 - 1920x1080p 30 fps - Full HD shooting
Notes: Photo quality and memory use depend on video
resolution. Set the video resolution that is most suited to
the conditions you are recording in.
Notes: We recommend using a high-speed (at least class
4) Micro SD card for better, smoother video.
•QUALITY: H - M - L
Description: The higher the video quality setting, the
more available memory is used.
•PHOTO SIZE: 5 Mp - 8 Mp - 12 Mp
Description:
1) 5 Mp=photo resolution is 2592x1944, 8 Mp=photo
resolution is 3200x2400, 12 Mp=photo resolution is
4000x3000.
2) Photo size and memory use depend on the photo
resolution selected.

26 DE
ES
FR
IT
EN
•TIME STAMP: DATE/TIME - OFF
Description: This function is used to display or hide the
date/time markers on the images.
•FLICKER: AUTO - 60 Hz - 50 Hz
Description: This function sets the frequency of the light
source to match the frequency of the power grid, which
eliminates ickering.
•TV FORMAT: NTSC - PAL
Description: Choose right video format on the camera
and on the TV when using the TV-OUT function to pre-
vent color rendering problems.
•TIME AND DATE: YEAR.MONTH.DATE TIME: minutes
Description: If the time markers on videos and photos
are incorrect, the time and date can be corrected with
this function.
Button functions:
A - Press button “1” to move to the next lower value or
press button “4” to move to the next higher value.
B - Press record/playback start button “3” to save the
setting and exit the function.
•RECORD OVERWRITE: OFF - 2 MIN - 5 MIN - 15 MIN
Description: This function sets up the loop recording
feature:
1) The default setting is OFF. The unit will shut o auto-
matically when memory is full during recording.
2) After 2 MIN - 5 MIN - 15 MIN has been set, the unit
will save the recorded video when the selected time
interval expires.
When the TF card is full, the unit will automatically de-
lete the preceding videos one by one to recover space
for storing new videos.
•AUDIBLE SIGNAL: ON - OFF
Description: This function is used to turn on and o the
audible signal that the unit makes when it is connected
to a TV and the buttons are pushed.
•FORMAT: YES - NO
Description: This function is used to reset the Micro SD
card.
Notes: Since all les on the Micro SD card are deleted
when YES is selected, use this function very carefully.
Be sure you have saved all the les onto your PC before
formatting the Micro SD card.
•AUTOMATIC SHUTOFF: 1 MIN - 2 MIN - 3 MIN - 5 MIN
- OFF
Description: Once the desired time interval for automat-
ic shuto has been set, the unit will shut o automati-
cally even while it is being used.
Notes: If this function is set to OFF, the unit will not shut
down automatically even if it is not being used.
•RESTORE DEFAULT SETTINGS: YES - NO
Description: To reset the system, select YES and briey
press the record/playback start button “3”. System pa-
rameters will be restored to the factory default settings,
and the unit will restart.
•FIRMWARE VERSION:
Description: Use this function to display the rmware
version and relative information currently stored in the
unit.
18. Resetting the system
If the unit is not operating correctly, press record/play-
back start button “3” and LED/laser light control button
“4” at the same time to reset and shut down the unit.
Now, turn the unit back on and operate it normally.
Notes: After resetting the unit, wait 3 seconds before
operating it.
SPECIFICATIONS
Lens type f/2.8, f=3 mm, 120° wide angle - Min. Illumination 1 LUX
Sensor 5 Megapixel, 1/ 2.5”CMOS
Photo Resolution 12 M 4000x3000 JPG Approx. 900 photos/4 GB
8 M 3200x2400 JPG Approx. 1200 photos/4 GB
5 M 2592x1944 JPG Approx. 1700 photos/4 GB
Video resolution** H QUALITY M QUALITY L QUALITY
1920x1080p 30 fps H.264 AV Approx. 41 min.(4 GB) Approx. 49 min.(4 GB) Approx. 62 min (4 GB)
1440x1080p 30 fps H.264 AVI Approx. 41 min (4 GB) Approx. 49 min.(4 GB) Approx. 62 min. (4 GB)
1280x720p 60 fps H.264 AVI Approx. 41 min. (4 GB) Approx. 54 min. (4 GB) Approx. 82 min. (4 GB)
1280x720p 30 fps H.264 AVI Approx. 62 min. (4 GB) Approx. 82 min. (4 GB) Approx. 123 min. (4 GB)
Audio recording ADPCM WAV format. 48 Khz, Mono, approx. 22 hrs/4 GB
Torch function usage time Approx. 10 hours
Laser distance 20 meters (indoor)
Scanning frequency Auto - 60 Hz - 50 Hz
Signal system NTSC - PAL
Warning vibration Supported
Battery capacity 3.7 V/ 1000 mAh, Li battery
Power consumption 1.5W
Video recording time Approx. 2.5 hrs (with LED lights o and 4 GB memory)
Voltage requirement 5 VDC, 1A or more
Charging time Approx. 3 hrs
USB Jack High speed USB 2.0
HDMI Supported
Memory type Micro SD Card (TF Card)
SD card capacities supported 2 GB to 32 GB
Waterproof rating IPX8, 20 meters
Weight 85 g
Dimensions 91 (L) x 41 (H) x 36 (D) mm
OS supported Microsoft Windows 2000/XP/VISTA/WIN 7, Mac OS 10.4 or above
**Important: Actual video recording times may vary slightly from those indicated above.

28 DE
ES
FR
IT
EN
(Applicable in those countries of the European Union with recycling
systems)
The symbol shown on this product or on its documents indicates that the
product must not be disposed of with other domestic refuse at the end
of its life cycle. To avoid damage to the environment or to health caused
by the inappropriate disposal of refuse, the user is requested to separate
this product from other refuse and to recycle it responsibly to favour the
sustainable re-use of material resources.
Domestic users are invited to contact the sales point where the product
was purchased or the local oce with information regarding recycling
of this type of product.
Business users are invited to contact their suppliers and to check terms
and conditions of purchase. This product must not be disposed of to-
gether with other commercial refuse.
This product bears the CE mark in conformity with the regulations of the
R & TTE Directive (99/5/EC). Cellular Italia S.p.A. hereby declares that this
product conforms to essential standards and other norms under Direc-
tive 1999/5/EC. The user is forbidden from making variations or modi-
cations of any kind to the device. Any variations or modications not
expressly approved by Cellular Italia S.p.A. will cancel the user’s authori-
sation for the use of the device. The Bluetooth® trademark is the property
of Bluetooth SIG, Inc.
For further information please consult http://www.cellularline.com
This product has an embedded, non-replaceable battery, do not attempt
to open the product or remove the battery as this may cause injury and
damage the product. Please contact the local recycling facility for remov-
al of the battery. The embedded, non-replaceable battery is designed to
last the life time of the product.
Federal Communications Commission (FCC) Statement
Industry Canada (IC) Statement
15.21
You are cautioned that changes or modications not expressly approved
by the part responsible for compliance could void the user’s authority to
operate the equipment.
15.105(b)
This equipment has been tested and found to comply with the limits for
a Class B digital device, pursuant to part 15 of the FCC/IC rules. These
limits are designed to provide reasonable protection against harmful
interference in a residential installation. This equipment generates, uses
and can radiate radio frequency energy and, if not installed and used in
accordance with the instructions, may cause harmful interference to ra-
dio communications.
However, there is no guarantee that interference will not occur in a par-
ticular installation. If this equipment does cause harmful interference to
radio or television reception, which can be determined by turning the
equipment o and on, the user is encouraged to try to correct the inter-
ference by one or more of the following measures:
- Reorient or relocate the receiving antenna.
- Increase the separation between the equipment and receiver.
- Connect the equipment into an outlet on a circuit dierent from that to
which the receiver is connected.
- Consult the dealer or an experienced radio/TV technician for help.
Operation is subject to the following two conditions:
1) this device may not cause interference and
2) this device must accept any interference, including interference that
may cause undesired operation of the device.
FCC/IC RF Radiation Exposure Statement:
This equipment complies with FCC/IC radiation exposure limits set forth
for an uncontrolled environment. End users must follow the specic op-
erating instructions for satisfying RF exposure compliance. This transmit-
ter must not be co-located or operating in conjunction with any other
antenna or transmitter.

30 DE
ES
EN
FR
IT
Il est recommandé de lire attentivement le présent
mode d’emploi avant d’utiliser l’appareil et de veiller à
bien le conserver pour pouvoir le consulter en cas de
besoin.
INTRODUCTION
Nous vous remercions d’avoir fait l’achat de la caméra
MOTIONCAM01 : caméra numérique waterproof HD
1080p. Il s’agit d’un appareil compact et maniable,
imperméable, au design parfaitement ergonomique.
Grâce à son revêtement de protection multifonction,
il permet d’eectuer des enregistrements dans toute
condition ambiante.
Le présent mode d’emploi contient des informations
importantes relatives à la sécurité et à l’utilisation de
l’appareil.
CERTIFICATION DU PRODUIT
Le produit est certié par les autorités CE et FCC. Il est
par ailleurs conforme aux dispositions légales en vi-
gueur.
PRÉSENTATION DE L’APPAREIL
La caméra MOTIONCAM01 est idéale pour lmer à moto,
en voiture, à ciel ouvert et est utilisable lors de la pra-
tique de tout sport.
Grâce à son revêtement imperméable, la caméra MO-
TIONCAM01 permet de prendre des photos et de réa-
liser des vidéos en conditions extrêmes, sous la pluie, la
neige et dans l’eau jusqu’à une profondeur de 20mètres.
L’objectif HD et sa sensibilité à la faible luminosité per-
mettent par ailleurs de réaliser de superbes photos
sous-marines.
Caractéristiques de l’appareil
- Imperméable jusqu’à une profondeur de 20 mètres,
idéal à ciel ouvert et sous l’eau
- Capteur CMOS 1/2,5» 5Mp
- Grand angle de 120° et objectif HD pour des photos
en toute liberté
- Eet vibration avancé qui facilite et rend plus rapide le
changement de modalité
- Options résolution vidéo:
A) 720p60: 1280x720p 60fps H.264 AVI
B) 720p30: 1280x720p 30fps H.264 AVI
C) FULL HD30: 1920x1080p 30pfs H.264 AVI
D) 1080p30: 1440x1080p 30fps H.264 AVI
- Résolution photos 12Mp, format JPG
- Fonction pour le seul enregistrement audio
- Batterie intégrée au lithium à haute capacité avec une
autonomie d’enregistrement vidéo de 2,5heures max.
- Support HDMI et sortie TV pour partager sans diculté
les vidéos
- Fonction enregistrement continu (loop recording) et
enregistrement audio
- Pointeur laser pour assurer le bon cadrage du sujet
- 2 lumières à LED à haute luminosité pour utilisation
nocturne
- Fonction torche d’une autonomie de 10heures max.
- Lumières à LED clignotantes à haute luminosité pour
signaux d’urgence
- Supporte les cartes Micro SD jusqu’à 32Go (classe4 de
préférence)
- USB 2.0 - UPnP. Charge USB.
STRUCTURE DE L’APPAREIL
Composants:
1. Touche allumage / changement modalité / èche
Haut
2. Lumière à LED (jaune)
3. Touche activation enregistrement / reproduction
4. Touche lumières à LED / laser / èche Bas
5. Lumière à LED (rouge et bleue)
6. Prise USB / AV / chargeur
7. Prise HDMI
8. Logement carte TF
9. Couvercle imperméable / crochet lacet (option)
10. Micro
11. Lumière laser
12. Lumière à LED
13. Objectif caméra
TABLE DES MATIÈRES
INTRODUCTION ..........................................................................31
CERTIFICATION DU PRODUIT .................................................. 31
PRÉSENTATION DE L’APPAREIL .............................................. 31
Caractéristiques de l’appareil ............................................ 31
STRUCTURE DE L’APPAREIL...................................................... 31
EMBALLAGE ET ACCESSOIRES................................................. 32
Contenu de l’emballage ..................................................... 32
Accessoires en option.......................................................... 32
DESCRIPTION DES FONCTIONS............................................... 32
1. Premières opérations à effectuer................................ 32
2. Changement de modalité de fonctionnement........ 32
3. Enregistrement vidéo.................................................... 33
4. Fonction enregistrement continu (loop recording).. 33
5. Prendre des photos........................................................ 34
6. Enregistrement audio ................................................... 34
7. Lumières LED et laser.................................................... 34
8. Fonction lumière clignotante et système
pointeur laser.................................................................. 35
9. Extinction et fonction extinction automatique....... 35
10. Avis erreur carte Micro SD et extinction
automatique de l’appareil ........................................... 35
11. Avis batterie déchargée et extinction automatique... 35
12. Téléchargement de fichiers et fonction disque
amovible.......................................................................... 35
13. Charge.............................................................................. 36
14. Enregistrer des vidéos durant la phase de charge.. 36
15. Reproduction de fichiers sur le téléviseur................ 36
16. Prendre des photos quand la caméra est
connectée au téléviseur ............................................... 37
17. Réglage paramètres de système................................. 38
18. Réinitialiser le système................................................. 39
CARACTÉRISTIQUES TECHNIQUES .................................... 40
MANUEL D’UTILISATION

32 DE
ES
EN
FR
IT
NOTE:
La caméra MOTIONCAM01 peut être utilisée manuel-
lement ou bien être xée de diverses manières sur dif-
férents types de surface à l’aide des supports fournis à
cet eet.
EMBALLAGE ET ACCESSOIRES
Contenu de l’emballage:
A. Motioncam01
B. Couvercle postérieur imperméable
C. Câble Audio vidéo (connexion à TV)
D. Câble USB (charge/données)
E. Base pour lacets élastiques
F. Base adhésive
G. Lacets élastiques trois longueurs (68/36/16cm)
H. Bride verticale pour bases
I. Bride horizontale pour bases
J. Étui en tissu
Notes: les images du contenu peuvent diérer sensible-
ment du contenu du kit et l’emballage peut être sujet
à des variations sans qu’aucune autre indication ne soit
fournie.
Accessoires en option:
carte Micro SD, câble HDMI, bride de xation sur guidon,
bride de xation à ventouse.
DESCRIPTION DES FONCTIONS
1. Premières opérations à eectuer
- Introduire la carte Micro SD et maintenir enfoncée la
touche on/o «1» pendant 2secondes. Le VOYANT
indicateur s’allume (lumière violette) en produisant
une vibration et l’appareil passe à l’état d’initialisa-
tion. Attendre quelques secondes jusqu’à la vibration
suivante. Le VOYANT indicateur violet devient bleu: le
dispositif est alors en modalité de stand-by.
- Il est possible que quelques secondes soient néces-
saires avant que l’appareil ne passe à la condition d’ini-
tialisation, en fonction de la capacité de la carte Micro
SD et de la quantité de données mémorisées.
- Pour les enregistrements vidéo en résolution HD
1080p, il est recommandé d’utiliser une carte Micro SD
à haute vitesse (CLASSE4 recommandée) pour garan-
tir une qualité vidéo optimale et uide au niveau des
images.
Notes: dans le cas où l’appareil serait allumé sans que
la carte Micro SD ait été préalablement mise en place,
l’indicateur clignote rapidement (lumière violette) et
l’appareil émet de fréquentes vibrations. Dans ce cas,
éteindre l’appareil et mettre en place la carte Micro SD.
Sans la carte SD, la caméra MOTIONCAM01 s’éteint auto-
matiquement au bout de 20secondes environ.
2. Changement de modalité de fonctionnement
Si la caméra MOTIONCAM01 n’est pas connectée à un
câble AV / HDMI, après l’allumage, elle passe automati-
quement à la modalité1.
En appuyant brièvement sur la touche de changement
de modalité «1», l’appareil passe successivement dans
les 3modalités suivantes:
Modalité 1 : modalité stand-by enregistrement vidéo.
L’indicateur reste allumé (lumière bleue xe).
Modalité2: modalité stand-by photo. L’indicateur reste
allumé (lumière rouge xe).
Modalité 3 : modalité stand-by enregistrement audio.
L’indicateur reste allumé (lumière violette xe).
Si un câble AV ou HDMI a été connecté à la caméra MO-
TIONCAM01, après l’allumage, la caméra passe automa-
tiquement à la modalité1. En appuyant brièvement sur
la touche de changement de modalité «1», l’appareil
passe successivement dans les 4modalités suivantes:
Modalité 1 : modalité stand-by enregistrement vidéo.
L’indicateur reste allumé (lumière bleue xe).
Modalité2: modalité stand-by photo. L’indicateur reste
allumé (lumière rouge xe).
Modalité 3 : modalité reproduction vidéos et photos.
L’indicateur reste allumé (lumière violette xe).
Pour passer à la modalité 4 (enregistrements audio),
maintenir enfoncée pendant deux secondes environ la
touche de changement de modalité «1».
Modalité 4 : modalité reproduction audio. L’indicateur
reste allumé (lumière violette xe).
(maintenir enfoncée pendant deux secondes environ la
touche de changement de modalité «1» pour revenir
à la modalité1)
Notes:
1) En appuyant sur les touches de la caméra, l’indicateur
de modalité change de couleur et la caméra vibre une
fois pour signaler que l’opération a été correctement
eectuée.
2) Quand la touche de changement de modalité «1»
est utilisée, l’appareil vibre deux fois pour indiquer le
passage de la modalité d’enregistrement audio à la
modalité de stand-by enregistrement vidéo. Grâce à
la double vibration, il est possible de savoir quand l‘on
se trouve en modalité de stand-by d’enregistrement
vidéo, y compris sans contrôler l’indicateur lumineux.
3) L’appareil peut passer à la modalité de reproduction
uniquement après avoir été branché à un câble AV /
HDMI. Dans le cas contraire, l’appareil ignore automa-
tiquement cette modalité.
4) Il n’est pas possible de passer à la modalité d’enre-
gistrement audio après avoir branché l’appareil au
téléviseur.
5) En modalité de reproduction, appuyer brièvement
sur la touche de changement de modalité «1» pour
se déplacer vers le haut, et maintenir enfoncée cette
même touche pour passer à la modalité suivante. Voir
section «Reproduction de chiers sur un téléviseur».
3. Enregistrement vidéo
Après avoir allumé l’appareil, appuyer brièvement sur la
touche «3» (activation enregistrement / reproduction).
Ensuite l’appareil vibre une fois et l’indicateur clignote
lentement (lumière bleue) pour indiquer le début de
l’enregistrement vidéo. Pour interrompre l’enregistre-
ment, appuyer brièvement sur la touche «3» (activation
enregistrement / reproduction). Ensuite, l’indicateur cli-
gnote rapidement (lumière bleue) pendant quelques
secondes et l’appareil vibre une fois. L’indicateur reste
ensuite allumé (lumière xe bleue) pour indiquer que
l’enregistrement a été interrompu et que la vidéo a été
correctement sauvegardée.
Notes:
1) Pour les enregistrements de vidéos de sport en condi-
tions ambiantes extrêmes, la résolution vidéo recom-
mandée est de 1280x720p 60fps.
Pour obtenir une qualité d’image plus claire et lumi-
neuse dans des environnements fermés faiblement
éclairés, il est recommandé de régler la résolution
vidéo sur 1280x720p 30fps.
2) Quand la fonction d’enregistrement continu (loop
recording) est désactivée, l’appareil sauvegarde auto-
matiquement un chier après avoir enregistré un vo-
lume de données de 4Go; ensuite l‘enregistrement
d’un nouveau chier est entamé (avec une carte de
16Go, sont ainsi créés quatre chiers distincts).
3) Si la caméra n’est pas utilisée sous l’eau, retirer le cou-
vercle imperméable présent au dos de l’appareil pour
obtenir une meilleure qualité audio.
4) Quand la fonction d’enregistrement continu est dé-
sactivée et que la carte Micro SD est pleine ou la bat-
terie déchargée ou encore si la modalité de stand-by
a dépassé les 3 minutes (l’intervalle de temps peut
être réglé diéremment), l’appareil s’éteint automa-
tiquement.
4. Fonction enregistrement continu (loop recording)
- Il est possible d’activer la fonction d’enregistrement
continu (loop recording) à travers le réglage des para-
mètres de système. Voir section «Réglage paramètres
de système».
- Après avoir activé la fonction d’enregistrement continu,
en modalité vidéo, l’appareil sauvegarde automatique-
ment le chier en fonction de la durée d’enregistrement
sélectionnée. Les réglages du système prévoient trois
options de durée: 2minutes, 5minutes et 15minutes.

34 DE
ES
EN
FR
IT
5. Prendre des photos
Après avoir allumé l’appareil, appuyer brièvement sur la
touche «1» pour passer à la modalité de stand-by/pho-
tos. L’indicateur reste allumé (lumière rouge xe). Pour
prendre une photo, appuyer brièvement sur la touche
activation enregistrement / reproduction « 3 ». En-
suite, l’indicateur clignote rapidement (lumière rouge)
pendant quelques secondes et l’appareil vibre une fois
pour indiquer que la photo a été correctement prise et
sauvegardée. Ensuite la caméra se replace dans la condi-
tion initiale: voyant allumé (lumière xe rouge), prête à
prendre une nouvelle photo.
Notes:
1) Au moment où la photo est prise, l’indicateur clignote
rapidement (lumière rouge): durant cette phase, pour
obtenir une plus haute qualité d’image, ne pas bou-
ger l‘appareil.
2) Quand la carte Micro SD est pleine, quand la batterie
est déchargée ou encore si la modalité de stand-by
a dépassé les 3minutes, l’appareil s’éteint automati-
quement (l’intervalle de temps peut être réglé dié-
remment).
6. Enregistrement audio
Après avoir allumé l’appareil, appuyer brièvement sur la
touche de changement de modalité «1» pour passer à
la modalité de stand-by/enregistrement audio (Voyant
violet xe).
Appuyer brièvement sur la touche d’activation enregis-
trement / reproduction «3». Ensuite l’appareil vibre une
fois et l’indicateur clignote lentement (lumière violette)
pour indiquer qu’il a entamé l’enregistrement audio.
Pour interrompre l’enregistrement, appuyer brièvement
une deuxième fois sur la touche d’activation enregistre-
ment / reproduction « 3 ». L’appareil vibre à nouveau
pour indiquer que l’enregistrement audio est terminé et
que le chier a été correctement sauvegardé. L’indica-
teur reste allumé (lumière violette xe).
Notes:
1) Si la caméra n’est pas utilisée sous l’eau ou en condi-
tions extrême (neige, pluie, etc.), retirer le couvercle
imperméable présent au dos de l’appareil pour obte-
nir une meilleure qualité audio.
2) Quand la carte Micro SD est pleine, quand la batterie
est déchargée ou encore si la modalité de stand-by
a dépassé les 3minutes, l’appareil s’éteint automati-
quement (l’intervalle de temps peut être réglé dié-
remment).
7. Lumières LED et laser
- L’appareil est doté de 2lumières à LED à haute lumino-
sité et de 1lumière laser.
- Dans toute modalité (à l’exception de la modalité de
reproduction sur téléviseur), appuyer brièvement sur
la touche lumières LED / laser «4» pour passer à une
des cinq modalités suivantes:
Modalité0: toutes les lumières sont éteintes. (le dispo-
sitif passe à cette modalité après l’allumage)
Modalité 1 : la lumière laser reste allumée pendant
30 secondes pour permettre de cadrer le sujet. Au
bout de 30secondes, la lumière laser s’éteint.
Modalité2: les lumières LED sont allumées pour per-
mettre l’enregistrement vidéo et améliorer la qualité
de la couleur en conditions de faible luminosité.
Modalité 3 : la lumière laser reste allumée pour per-
mettre un bon cadrage durant tout l’enregistrement.
Modalité4: les lumières LED continuent de clignoter
rapidement à haute fréquence pour envoyer un signal
de SOS.
Notes:
1) À chaque fois que la touche d’allumage des lumières
est correctement enfoncée, l’appareil vibre une fois.
2) Dans toutes les modalités, maintenir enfoncée la
touche lumières LED / laser «4» pendant deux se-
condes environ pour replacer l’appareil en modalité0
(lumières éteintes).
3) L’ordre des modalités est le suivant: modalité0 – mo-
dalité1 – modalité2 – modalité3 – modalité4 – mo-
dalité0.
8. Fonction lumière clignotante et système pointeur
laser
L’appareil est doté d’une fonction torche et d’un système
pointeur laser. Quand la fonction torche est activée, il est
recommandé d’éteindre la caméra pour assurer une plus
grande autonomie d’utilisation.
Pour utiliser ces fonctions, suivre les indications ci-des-
sous:
Si la caméra a été éteinte pour activer la fonction torche,
maintenir enfoncée la touche lumières LED / laser «4»
pendant deux secondes environ. En appuyant briève-
ment sur la touche lumières LED / laser «4», l’appareil
passe successivement dans les cinq modalités suivantes:
Modalité0: état torche. La torche est allumée avec une
autonomie de 10heures.
Modalité1: la lumière laser est allumée pour la fonction
pointeur.
Modalité 2 : les lumières LED continuent de clignoter
rapidement à haute fréquence pour envoyer un signal
de SOS.
Modalité3: la lumière laser clignote lentement pour la
fonction pointeur laser intermittent.
Modalité4: toutes les lumières LED sont éteintes.
Notes:
1) La pression de deux secondes sur la touche lumières
LED / laser «4» sert uniquement après avoir éteint la
caméra, sinon, une brève pression sut pour passer
d’une fonction à l’autre
2) Dans toutes les modalités, maintenir enfoncée la
touche lumières LED / laser « 4 » pendant deux se-
condes environ pour replacer l’appareil en modalité4
(lumières éteintes).
9. Extinction et fonction extinction automatique
- En modalité stand-by, appuyer sur la touche « 1 »
pendant deux secondes environ. L’indicateur clignote
(lumière violette) et l’appareil vibre 3 fois avant de
s’éteindre.
- Quand la carte Micro SD est pleine, quand la batterie
est déchargée ou encore si la modalité de stand-by a
dépassé les 3minutes, l’appareil s’éteint automatique-
ment (l’intervalle de temps peut être réglé diérem-
ment).
10. Avis erreur carte Micro SD et extinction automa-
tique de l’appareil
Dans le cas où la carte Micro SD n’aurait pas été mise en
place, serait endommagé ou pleine, l’appareil signale
une erreur : le voyant indicateur clignote rapidement
(lumière violette) et l’appareil produit de fréquentes vi-
brations.
Ensuite, l’appareil s’éteint automatiquement au bout de
15secondes environ.
11. Avis batterie déchargée et extinction automa-
tique
Durant l’utilisation de l’appareil, quand la batterie inté-
grée au lithium se décharge, un signal d’avis est émis.
L’indicateur clignote lentement (lumières bleue et rouge
alternées) et l’appareil produit des vibrations. Ensuite,
l’appareil s’éteint automatiquement au bout de 15 se-
condes environ.
12. Téléchargement de chiers et fonction disque
amovible
- Connecter l’appareil à la prise USB de l’ordinateur.
- Appuyer sur la touche on/o « 1 » pour allumer le
dispositif. Ensuite, une unité disque amovible s’ache
dans «Ressources de l’ordinateur». Il est possible de
visualiser des images, des vidéos ou des chiers audio
mémorisés sur l’appareil et de les copier sur l’ordina-
teur.
- En cas d’utilisation d’un port USB1.1, copier les vidéos
sur le bureau et les reproduire pour les visualiser cor-
rectement, sinon la vitesse de reproduction directe via
USB1.1 pourrait ne pas être susante et générer des
images de qualité médiocre et/ou des blocages des
images.
Notes:
1) Dans cette modalité, il est possible d’appuyer briè-

36 DE
ES
EN
FR
IT
vement sur la touche lumières LED / laser «4» pour
activer la fonction torche. L’appareil peut être utilisé
comme lampe de table USB.
2) En connectant l’appareil à la prise USB, si l’indicateur
jaune clignote, cela indique que l’appareil est en
charge.
13. Charge
- Pour charger la batterie, connecter la caméra à une
prise USB du PC à l’aide du câble fourni à cet eet ou
utiliser un chargeur sur secteur à sortie USB (option
ACHUSBCOMPACT). Durant la phase de charge, l’indi-
cateur jaune reste allumé et s’éteint une fois la charge
terminée.
La charge complète de la batterie entièrement déchar-
gée dure environ 3heures.
- En connectant l’appareil à l’ordinateur pour décharger
les données, la phase de charge est automatiquement
lancée. Pour éviter d’allonger les temps de charge,
ne pas appuyer sur la touche on/o «1» après avoir
connecté l’appareil à l’ordinateur.
Notes: si l’appareil est connecté allumé à l’adaptateur
pour charger la batterie, il s’éteint automatiquement
après être resté en modalité de stand-by pendant 3mi-
nutes (l’intervalle de temps peut être réglé diérem-
ment), sans que la charge ne soit interrompue.
14. Enregistrer des vidéos durant la phase de charge
Connecter la caméra à une prise USB du PC.
Maintenir enfoncée la touche on/o «1» pour allumer
le dispositif. Au bout de quelques secondes, l’indicateur
passe du violet au bleu, et l’appareil vibre une fois. L’ap-
pareil est alors en modalité de stand-by. L’indicateur
jaune reste allumé pour indiquer que la phase de charge
est en cours. Ensuite, il est possible d’utiliser toutes les
fonctions du dispositif.
Notes: le dispositif s’éteint automatiquement s’il reste
in modalité de stand-by pendant plus de 3minutes (l’in-
tervalle de temps peut être réglé diéremment), mais
reste en charge.
15. Reproduction de chiers sur le téléviseur
1) Il est possible de choisir deux options pour la sortie
audio et vidéo: AV ou HDMI.
Pour obtenir la meilleure qualité vidéo HD, il est re-
commandé d’utiliser l’option HDMI.
A - Avec câble AV. Connecter le câble AV au port USB/
AV-OUT de la caméra: le jack jaune doit être bran-
ché au port d’entrée vidéo du téléviseur (jaune),
alors que le jack blanc doit être branché au port
d’entrée audio du téléviseur (blanc). Faire réfé-
rence au mode d’emploi du téléviseur pour sélec-
tionner l’entrée audio/vidéo appropriée.
B - Avec câble HDMI (option) Connecter un jack du
câble HDMI au port HDMI de la caméra et connec-
ter le second jack au port HDMI du téléviseur. Faire
référence au mode d’emploi du téléviseur pour sé-
lectionner l’entrée audio/vidéo appropriée.
2) Allumer la caméra. Ensuite, le LOGO D’ALLUMAGE
s’ache et un avis sonore est émis. L’indicateur reste
allumé (lumière xe bleue) et l’appareil passe à la mo-
dalité de stand-by.
3) Reproduction vidéo: voir section «Changement de
modalité». Appuyer brièvement sur la touche moda-
lité «1» pour passer à la modalité de reproduction
vidéo. L’indicateur reste allumé (lumière violette xe).
Appuyer ensuite sur la touche «1» pour se déplacer
vers le haut ou sur la touche «4» pour se déplacer
vers le bas. Appuyer brièvement sur la touche d’acti-
vation enregistrement / reproduction «3» sur la page
d’interface de reproduction et appuyer brièvement
sur cette même touche une deuxième fois pour lancer
la reproduction vidéo.
Pendant la reproduction, les touches correspondent
aux fonctions suivantes:
A - Appuyer brièvement sur la touche d’activation
enregistrement / reproduction «3» pour mettre en
pause ou pour reprendre la reproduction.
B - Maintenir enfoncée la touche d’activation enregis-
trement / reproduction «3» pour revenir au niveau
supérieur du menu.
C - Pendant la reproduction vidéo, appuyer briève-
ment sur la touche «4» pour commander l‘avance ra-
pide ou appuyer brièvement sur la touche «1» pour
commander le retour rapide.
4) Reproduction images : voir section « Changement
de modalité». Appuyer brièvement sur la touche de
changement de modalité «1» pour passer à la mo-
dalité de reproduction d’images et de vidéos. L’indica-
teur reste allumé (lumière violette xe).
Appuyer ensuite sur la touche «1» pour se déplacer
vers le haut ou sur la touche «4» pour se déplacer
vers le bas. Appuyer brièvement sur la touche d’acti-
vation enregistrement / reproduction «3» sur la page
d’interface de reproduction et appuyer brièvement
cette même touche une deuxième fois pour visuali-
ser automatiquement les images. Pendant la repro-
duction, les touches correspondent aux fonctions
suivantes:
A - Appuyer brièvement sur la touche d’activation en-
registrement / reproduction «3» pour mettre en
pause ou pour reprendre la reproduction.
B - Maintenir enfoncée la touche d’activation enregis-
trement / reproduction «3» pour revenir au niveau
supérieur du menu.
C - Si la reproduction est interrompue, appuyer briè-
vement sur la touche «4» pour visualiser les pho-
tos précédentes ou la touche «3» pour visualiser
les photos suivantes.
5) Reproduction audio: voir section «Changement de
modalité ». Appuyer brièvement sur la touche de
changement de modalité «1» pour passer à la moda-
lité de reproduction audio. L’indicateur reste allumé
(lumière violette xe). Appuyer ensuite sur la touche
«1» pour se déplacer vers le haut ou sur la touche
« 4 » pour se déplacer vers le bas. Appuyer briève-
ment sur la touche d’activation enregistrement / re-
production «3» sur la page d’interface de reproduc-
tion et appuyer brièvement sur cette même touche
une deuxième fois pour lancer la reproduction audio.
Pendant la reproduction, les touches correspondent
aux fonctions suivantes:
A - Appuyer brièvement sur la touche d’activation en-
registrement / reproduction «3» pour mettre en
pause ou pour reprendre la reproduction.
B - Maintenir enfoncée la touche d’activation enregis-
trement / reproduction «3» pour revenir au niveau
supérieur du menu.
C - Pendant la reproduction audio, appuyer briève-
ment sur la touche «4» pour commander l‘avance
rapide ou sur la touche «1» pour commander le
retour rapide du chier audio.
Notes:
1) Dans le cas où les dimensions du chier vidéo seraient
excessives, il est nécessaire d‘attendre quelques se-
condes avant de lancer la reproduction.
2) Quand l’appareil est en modalité de reproduction vi-
déo, il est possible de régler le volume du téléviseur
pour obtenir une meilleure qualité du son.
3) Pendant la reproduction, il est recommandé d’utiliser
un câble HDMI (option) pour assurer une meilleure
qualité audio et vidéo.
4) Après avoir eectué la connexion à l’aide du câble
AV/HDMI et après avoir allumé le dispositif, la caméra
passe automatiquement à la modalité1. En appuyant
sur la touche de changement de modalité «1», l’ap-
pareil passe successivement aux 4modalités:
Modalité1: modalité stand-by enregistrement vidéo.
L’indicateur reste allumé (lumière bleue xe).
Modalité 2 : modalité stand-by photo. L’indicateur
reste allumé (lumière rouge xe).
Modalité3: modalité reproduction vidéos et photos.
L’indicateur reste allumé (lumière xe violette); dans
cette modalité, appuyer sur la touche de changement
de modalité «1» pour passer à la modalité suivante.
Modalité4: modalité reproduction audio. L’indicateur
reste allumé (lumière xe violette); dans cette modali-
té, appuyer sur la touche de changement de modalité
«1» pour passer à la modalité suivante.
16. Prendre des photos quand la caméra est connec-
tée au téléviseur
Voir section «Reproduction de chiers sur le téléviseur».

38 DE
ES
EN
FR
IT
En connectant correctement le câble AV ou HDMI, il est
possible de visionner sur le téléviseur le champ cadré
par la caméra pour enregistrer des vidéos et prendre
des photos.
17. Réglage paramètres de système
Voir section «Reproduction de chiers sur le téléviseur».
À l’aide du câble AV ou HDMI, connecter l’appareil au té-
léviseur. L’appareil est alors en modalité de stand-by. En
maintenant enfoncé la touche d’activation enregistre-
ment / reproduction «3», sur l’écran du téléviseur, s’af-
che la page d’interface pour le réglage des paramètres
du système. Les touches correspondent aux fonctions
suivantes:
A - Appuyer brièvement sur la touche d’activation enre-
gistrement / reproduction «3» pour sélectionner et
désélectionner des éléments dans le menu réglage.
B - Appuyer brièvement sur la touche«1» pour passer à
la valeur précédente d’un élément des réglages. Ap-
puyer brièvement sur la touche «4» pour passer à la
valeur suivante.
C - Maintenir enfoncée la touche activation enregistre-
ment / reproduction «3» pour quitter et sauvegar-
der les réglages.
Description des réglages:
•RÉSOLUTION: 720p 30fps - 720p 60fps - 1080p 30fps
- FULL HD 30fps. Le réglage par défaut est 720p 60fps.
A - 720p30 - 1280x720p 30fps
B - 720p60 - 1280x720p 60fps. Adapté à l’enregistre-
ment de vidéos de sport en conditions ambiantes
extrêmes. Pour obtenir une qualité d’image plus
claire et lumineuse dans des environnements fermés
faiblement éclairés, il est recommandé de régler la
résolution vidéo sur 1280x720p 30fps.
C - 1080p30 - 1440x1080p 30fps
D - FULL HD30 - 1920x1080p 30pfs - Clichés Full HD
Notes : la qualité photographique et l’utilisation de la
mémoire varient en fonction de la résolution vidéo sé-
lectionnée. Sélectionner la résolution vidéo la mieux
adaptée aux conditions d’enregistrement.
Notes: il est recommandé d’utiliser une carte Micro SD
à haute vitesse (CLASSE4 minimum) pour obtenir une
qualité vidéo supérieure et uide.
•QUALITÉ: A - M - B
Description : la capacité de mémoire utilisée est d’au-
tant plus importante que la qualité vidéo sélectionnée
est élevée.
•DIMENSIONS PHOTOS: 5Mp - 8Mp - 12Mp
Description:
1) 5Mp = résolution photos 2592x1944; 8Mp = résolu-
tion photos 3200x2400 ; 12Mp = résolution photos
4000x 3000.
2) Les dimensions de l’image et l’utilisation de la mé-
moire varient en fonction de la résolution photogra-
phique sélectionnée.
•INDICATION DATE: DATE/HEURE - OFF
Description : utiliser cette fonction pour visualiser ou
masquer les marqueurs sur les images.
•FLICKER: AUTO – 60Hz – 50Hz
Description: réglage de la fréquence de la source lumi-
neuse selon la grille de fréquence pour éliminer le pa-
pillonnement sous les sources lumineuses.
•MODÈLE TV: NTSC - PAL
Description: sélectionner correctement le format vidéo
de la caméra et du téléviseur pendant la visualisation
sur téléviseur pour éviter les problèmes de rendu chro-
matique.
•HEURE ET DATE: ANNÉE.MOIS.JOUR HEURE:minutes
Description: si les indications horaires achées photos
et vidéo sont incorrectes, corriger les réglages de heure
et date en utilisant cette fonction.
Fonction des touches:
A - Utiliser la touche «1» pour passer à la valeur pré-
cédente ou la touche «4» pour passer à la valeur
suivante.
B - Utiliser la touche d’activation enregistrement / re-
production «3» pour sauvegarder et quitter les ré-
glages.
•ÉCRASEMENT ENREGISTREMENT: OFF - 2MIN - 5MIN
- 15MIN
Description : réglage de la fonction d’enregistrement
continu (loop recording):
1) L’appareil est réglé par défaut sur OFF. L’appareil
s’éteint automatiquement pendant l’enregistrement
quand la mémoire est pleine.
2) Après avoir sélectionné 2MIN - 5MIN - 15MIN, l’ap-
pareil sauvegarde la vidéo enregistrée au terme de la
durée sélectionnée.
Quand la carte TF est pleine, l’appareil eace automa-
tiquement une par une les vidéos précédentes pour
récupérer l’espace de mémorisation nécessaire aux
nouvelles vidéos.
•SIGNAL SONORE: ON - OFF
Description: utiliser cette fonction pour activer ou dé-
sactiver le signal sonore lié à l’utilisation des touches
après que l’appareil a été branché au téléviseur.
•FORMATAGE: OUI - NON
Description : utiliser cette fonction pour réinitialiser la
carte Micro SD.
Notes: après avoir sélectionné OUI, tous les chiers pré-
sents sur la carte Micro SD sont éliminés. Il est recom-
mandé d’utiliser cette fonction avec précaution.
Avant de formater la carte Micro SD, s’assurer d’avoir
sauvegardé les données sur le PC.
•EXTINCTION AUTOMATIQUE: 1MIN - 2MIN - 3MIN -
5MIN - OFF
Description : après avoir sélectionné la durée voulue
pour l’extinction automatique, l’appareil s’éteint auto-
matiquement y compris durant l’utilisation.
Notes: si la fonction est réglée sur «OFF», l’appareil ne
s’éteint pas automatiquement, y compris s’il n’est pas
utilisé.
•RÉGLAGES PAR DÉFAUT: OUI - NON
Description : pour réinitialiser le système, sélectionner
OUI et appuyer brièvement sur la touche d’activation
enregistrement / reproduction « 3 ». De la sorte, les
réglages par défaut sont rétablis et l’appareil est redé-
marré.
•VERSION FIRMWARE:
Description : utiliser cette fonction pour visualiser la
version du logiciel et les informations correspondantes.
18. Réinitialiser le système
Dans le cas où l’appareil ne fonctionnerait pas correc-
tement, appuyer simultanément sur la touche d’activa-
tion enregistrement / reproduction «3» et sur la touche
lumières LED / laser «4» pour réinitialiser et éteindre
l’appareil. Rallumer l’appareil pour utiliser à nouveau les
diérentes fonctions.
Notes: après avoir réinitialisé le dispositif, attendre 3se-
condes avant de l’utiliser à nouveau.
Table of contents
Languages: