InteTrend Smart Deadbolt Lock User manual

User Manual
for Smart Deadbolt Lock
Please read this user manual before operating your smart lock,
and keep it for further reference.
Smart by InteTrend
intetren[email protected]

Warm Notice
1. In order to enhance security and reduce risk, you should consult a
qualified locksmith or other security professional before installation.
2. This lock can be defeated by forcible or technical means, or evaded
by entry elsewhere on the property. No lock can substitute for caution,
awareness of your environment, and common sense.
3. Do not use electric screwdriver during installation.
4. There is one film protector with the keypad panel, pls remove the
protective film to use it after installation
5. Select correct installation guide video following your door direction
and also you can search for InteTrend Smart Door Lock to see it.
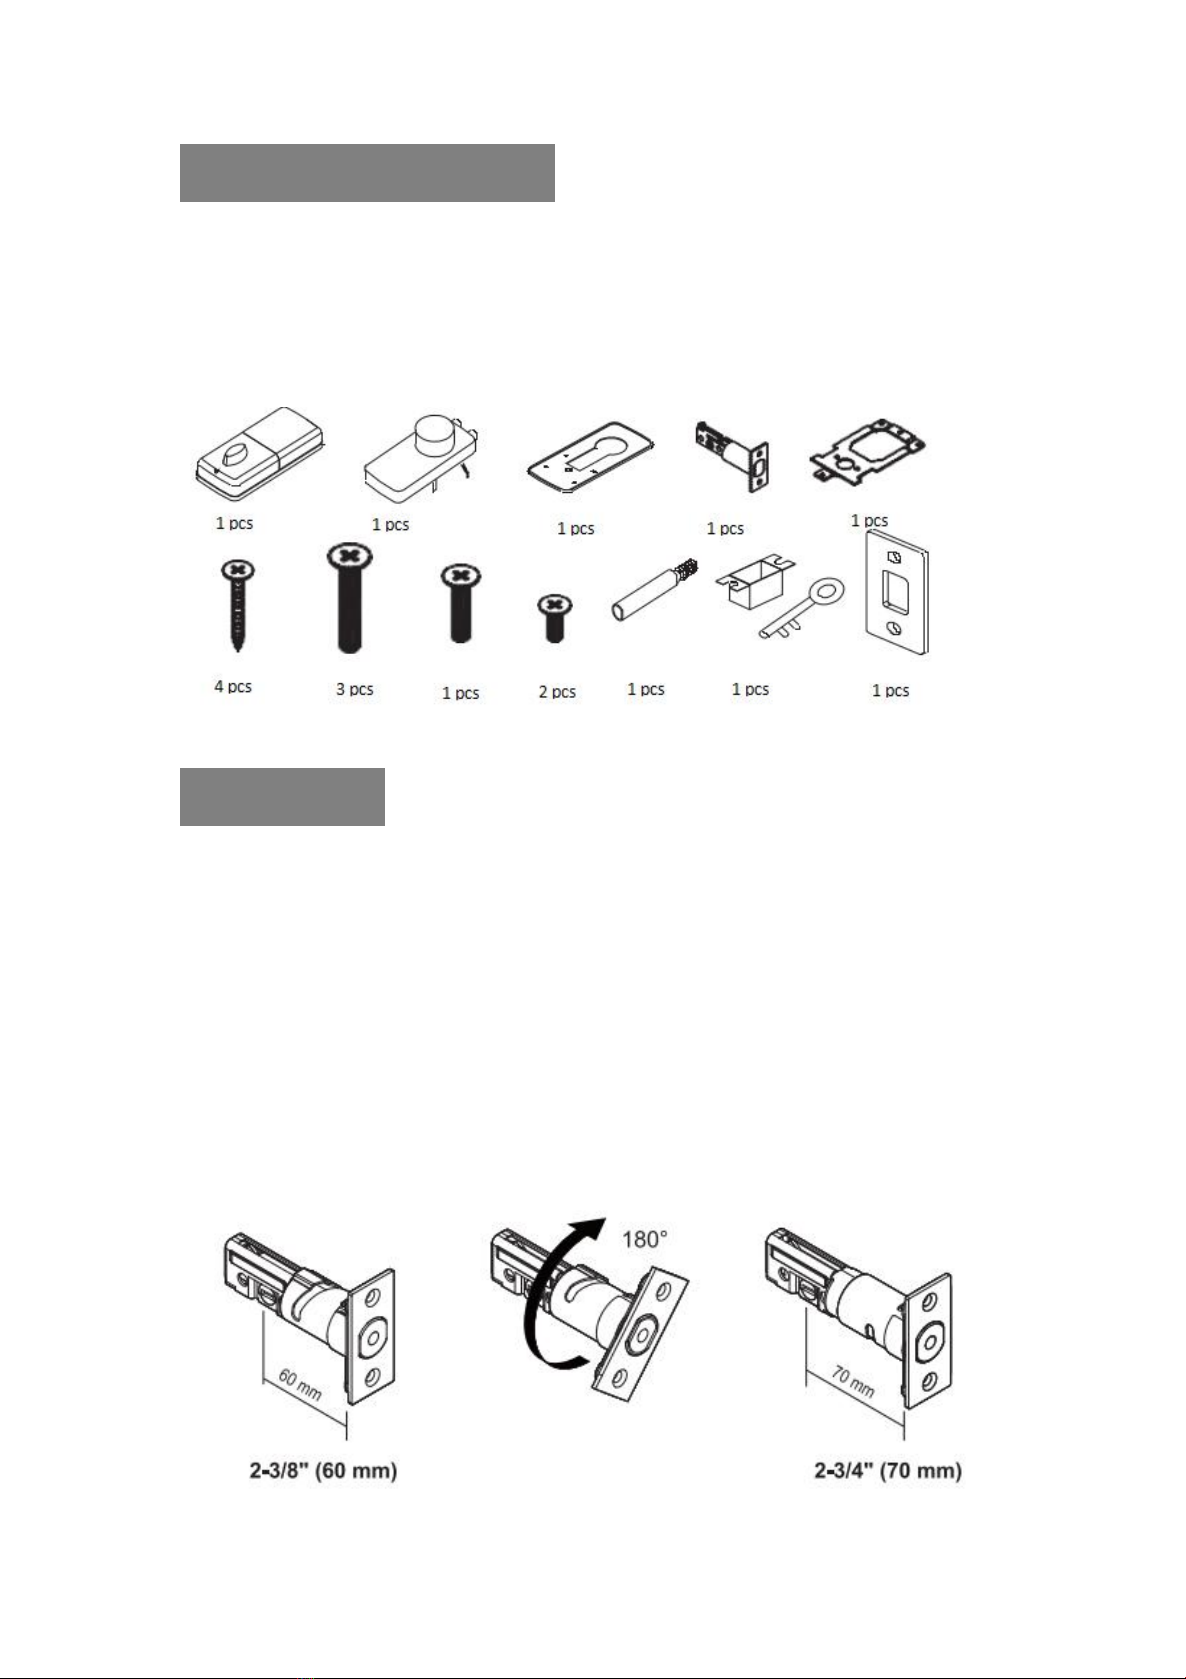
Package information
Please check the package for all information, keep all accessories are
included in the package. Any problem, please do not hesitate to e-mail to
us.
Installation
Step 1 Install Latch
1. If you have existing deadbolt, please adjust the new latch with this
smart lock following your your original latch:
Rotate the latch until it stops, and reverse the direction to the
2-3/8’’(60mm) backset.

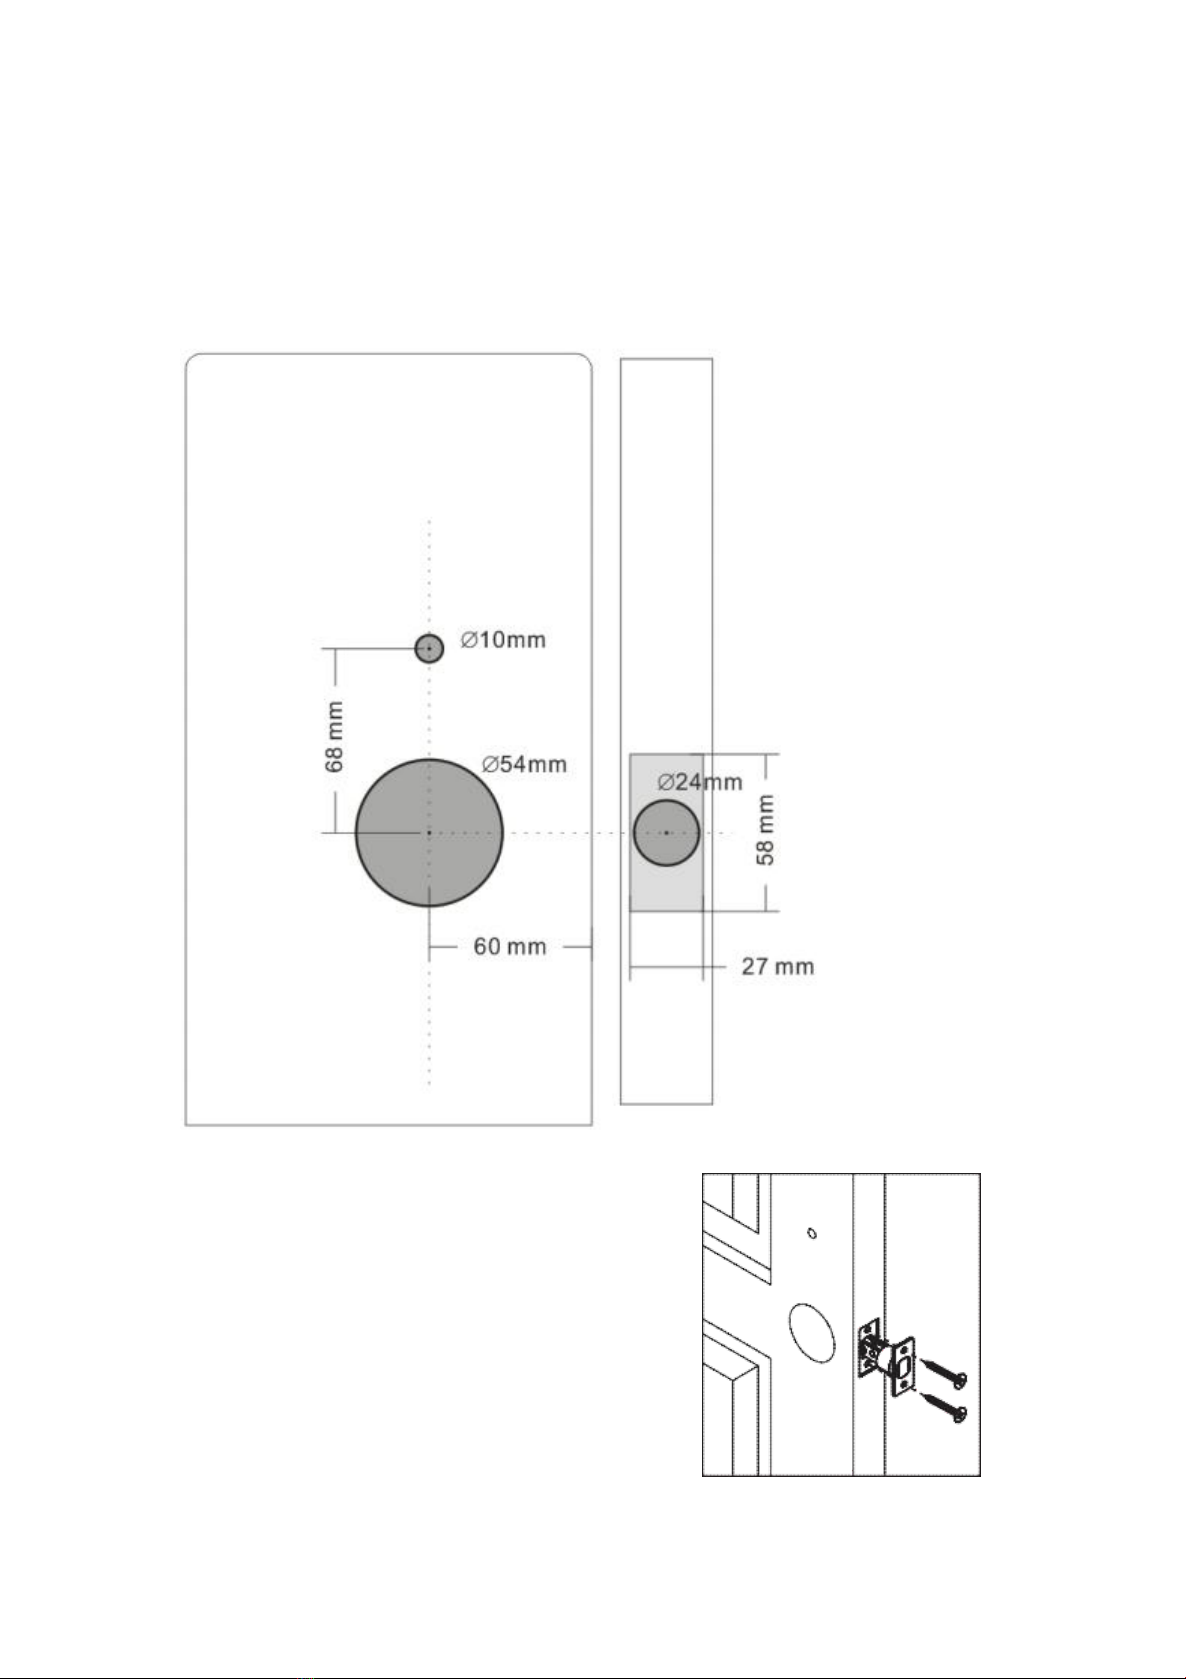
2. If you have a new door, please drive the new holes following the
Auxiliary mounting paper in the package.
There are 3 holes need to be drilled upon
your doors, one for latch, one for keypad
assembly and receiver assembly(Need to
drill through), one for receiver
assembly(Need to drill through).
a, Mark the door with template with the help

of mounting paper
b, Drill holes with the marks as guide
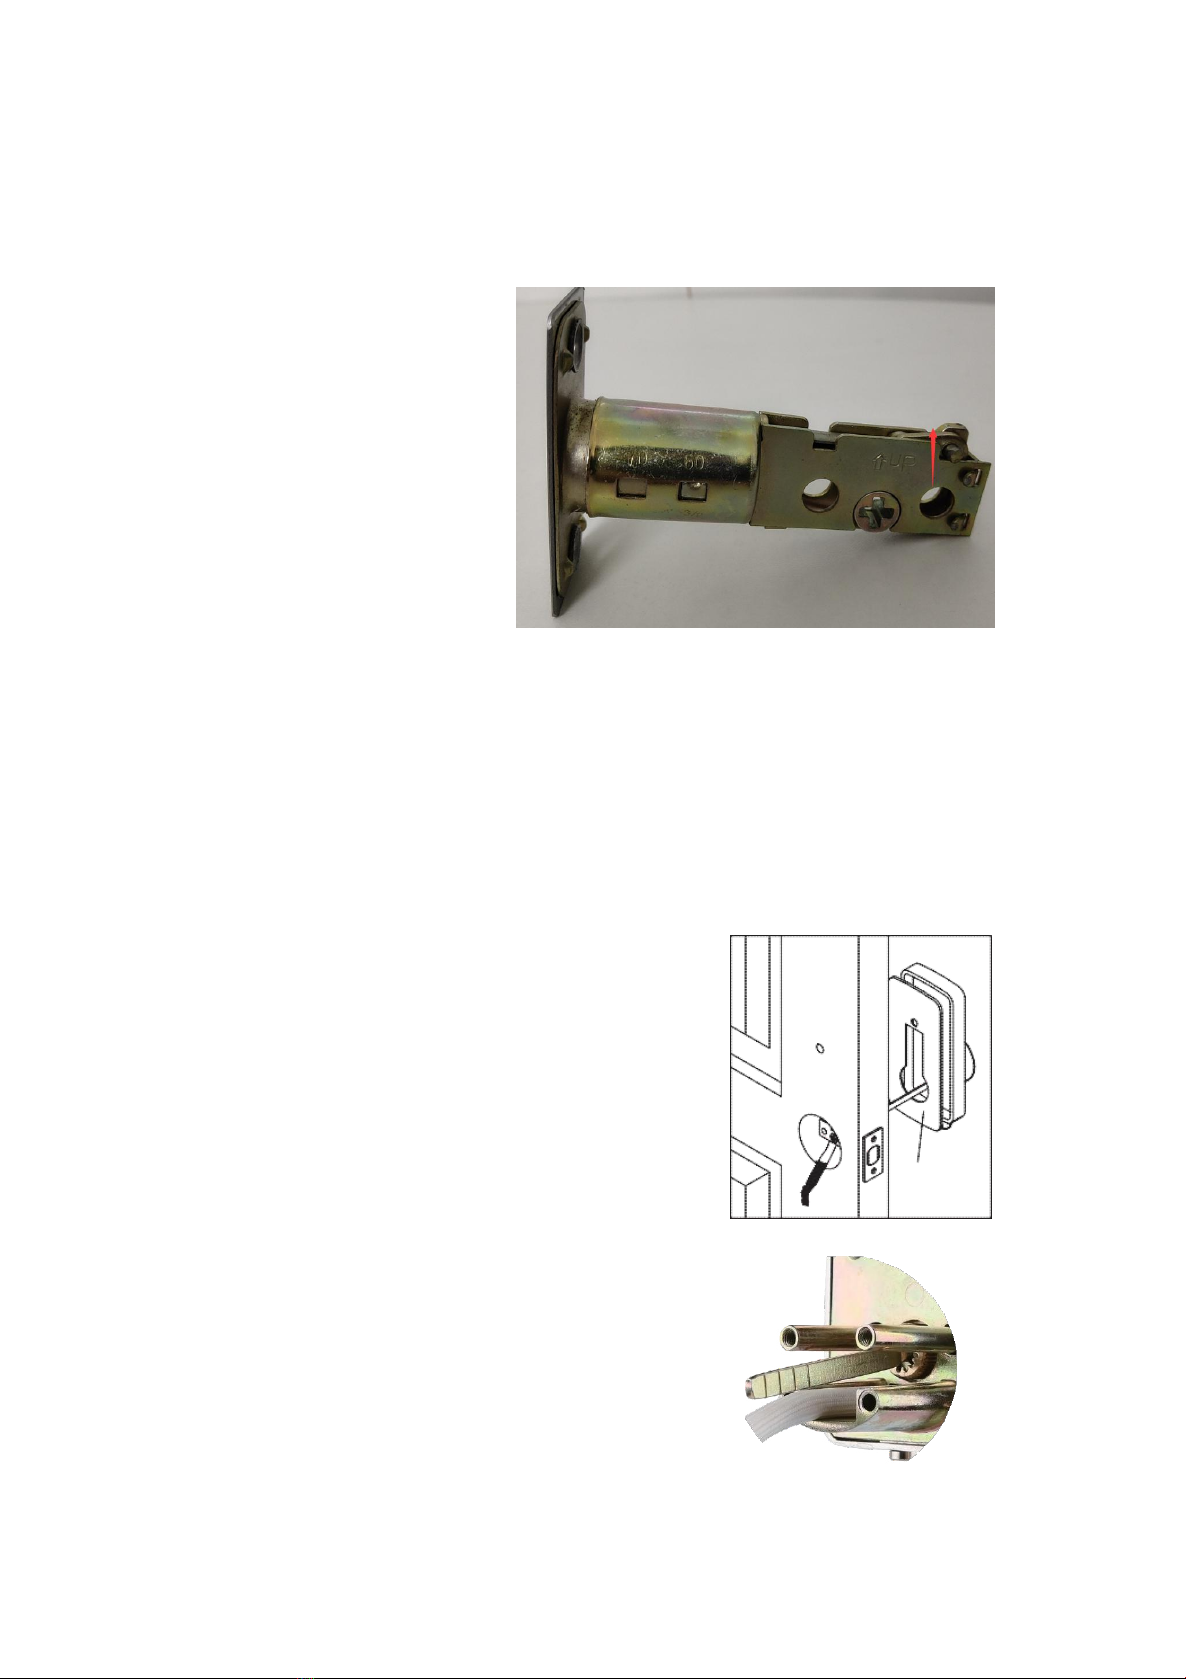
3. Insert the latch into the
door and ensure it is parallel
to the door face, you need
to stay ‘up’ upward when
inserting the latch, and use
2 wood screws to secure the
latch(Please do not fully tighten the screws until lock is completely
installed).
Step 2 Install Keypad Assembly
1. Pass the IC wire under the latch to the
interior side of the door
2. Please insert the lock cylinder vertically into
the hole

Step 3 Install Inside Mounting Plate
1. Fix the plate with correct direction
2. Pass the IC wire through the wire hole of the
mounting plate
3. Fix the mounting plate with screws, if
keypad assembly is lopsided, please loosen the screws of keypad
assembly to adjust its position and tighten the screws of keypad assembly
and mounting plate.
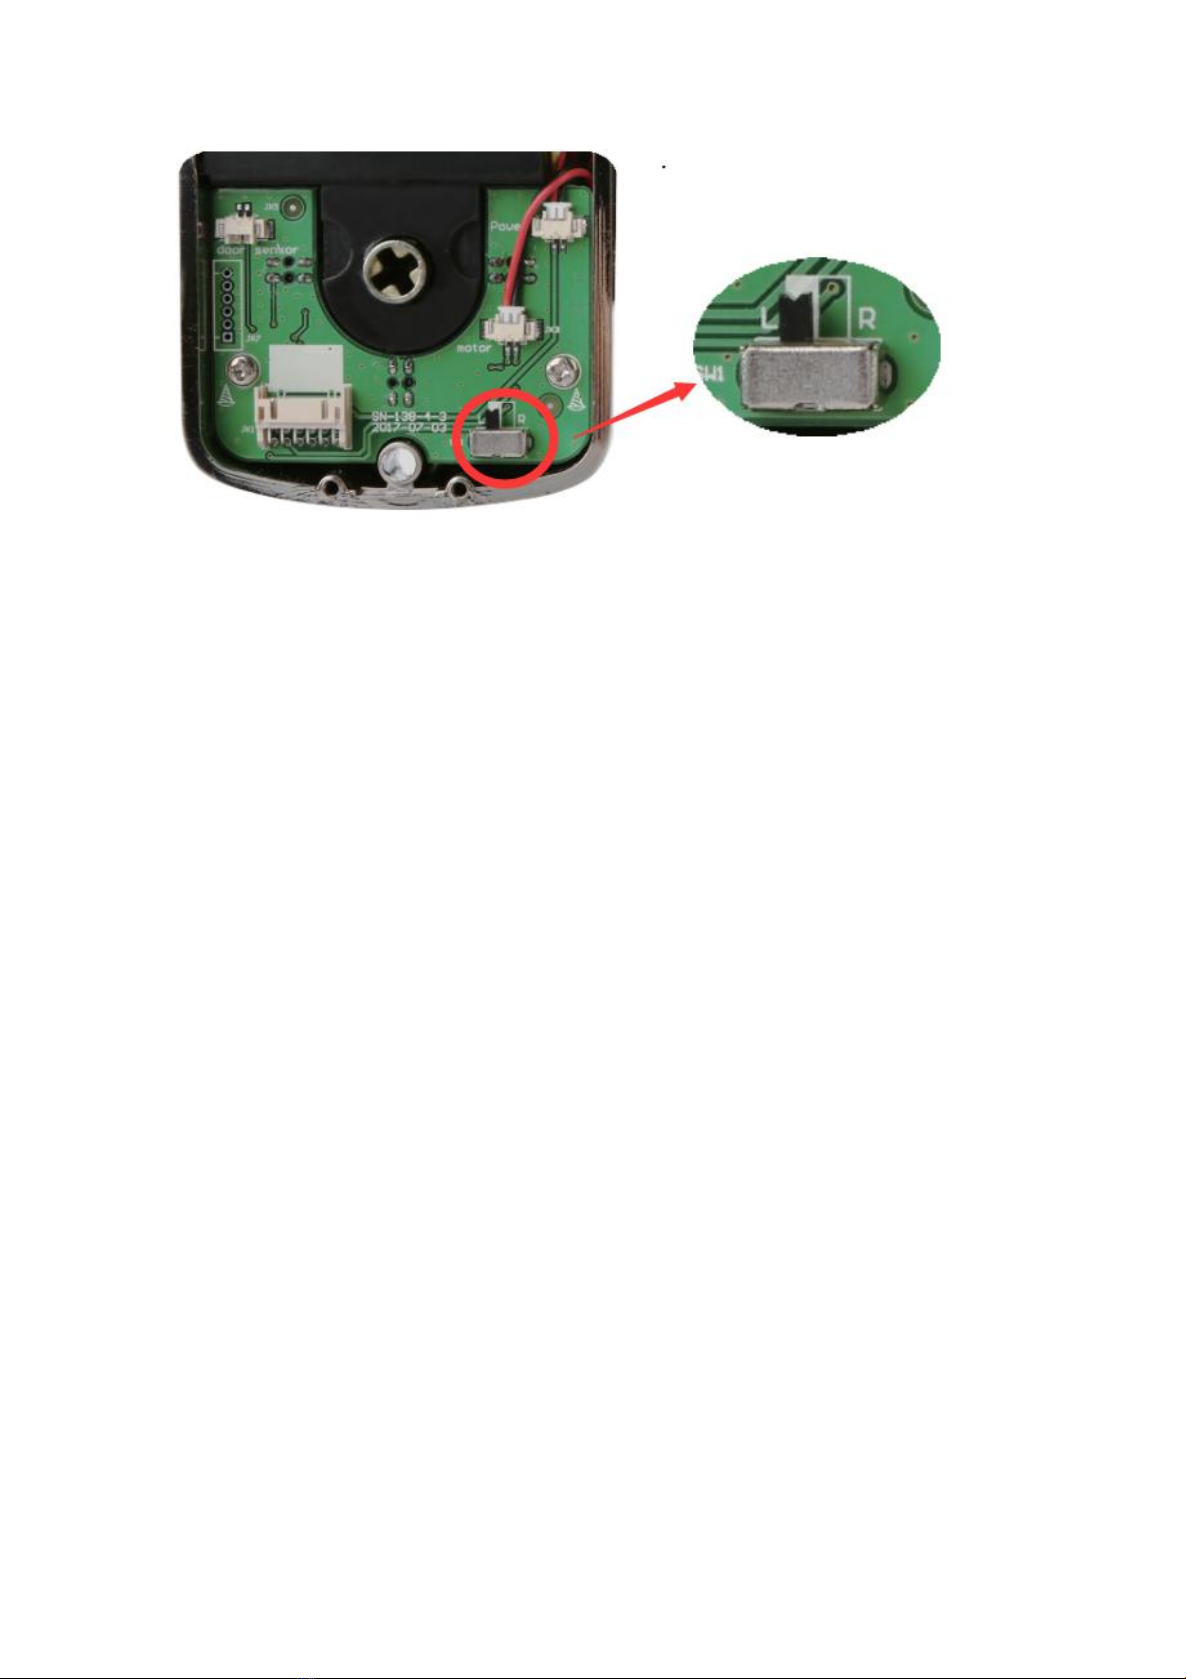
Step 4 Identify Door Handing, and adjust the toggle
switch on the inside receiver assembly
Face the door from outside, the door is
left-handling door if the the hinges are on the
left side of the door, please switch the toggle
to L
Whereas the door is right-handling door if the
hinges are on the right side of the door, please
switch the toggle to R


Step 5 Adjust interior knob of inside receiver
assembly according to your door
Please keep the knob vertically during
installation if you have a right-handling
door
Whereas please keep the knob
horizontally during installation if you
have a left-handling door
Step 6 Install inside Receiver Assembly
1. Connect the IC wire into
the back of the receiver
2. Put the receiver on the
mounting plate
3. Remove the battery
cover
Press the pin button then push the cover out
4. Secure the receiver assembly with three
screws
5. Insert 4 (AA) 1.5V alkaline batteries(Not
Included in the package) and slide the

battery cover back until the pin button comes out
Remarks:
a, Alkaline batteries are recommended in order to stabilize the power
supply, if you don’t use alkaline, the standby performance may be
reduced
b, All settings will be retained in the memory even if the batteries are
completed dead
After installation completed, please test if you can unlock or lock your
door with inside knob correctly and if the keypad could be lighted on by
touching.
APP Operation
APP Connection
Step 1 Download and install TTLock from Google Play or
APP Store
Step 2 Register account with phone
number or e-mail
We recommend register with your
private e-mail

Step 3 Connect your smart lock to TTLock app
Remarks:
a, Please keep your smartphone close to the smart lock
b, Please open Bluetooth function with your phone before connection
c, Please light on the keypad by touching any key when searching for
device
d, One APP can work with multiple smart phones from us without limit

Step 4 Test if you can unlock or lock your door correctly with APP
within Bluetooth signal distance
a, Unlock your door by
touching the lock button, it
will pop up ‘unlocked’
b, Lock your door by
long-pressing the lock button,
it will pop up ‘locked’
Remarks: Please check if
your door lock operate in
correct direction, if it reverse,
please following Step 4 of Installation to re-install

APP Function operation
1. Auto Lock
When you turn on ‘Auto Lock’ option, the smart lock will be locked
automatically after preset period.
Remarks: Auto Lock is setting up only by the program, which couldn’t
be used to determine if your door is locked.
Step 1 Click ‘Settings’ on the APP screen
Step 2 Click ‘Auto Lock’ and click ‘Read The Time’ at the first time

Step 3 Click ‘Current Setting’ to change the time period by yourself
The time period can be set to 5-900s
2. Multiple users by APP control(eKey)
eKey is a function for you to authorize the rights to your family members
and guests, who has the same APP and registered a new account. People

who are shared will be able to control the smart lock via APP within
Bluetooth signal distance.
Remarks:
a, eKey is highly suggested to be Only applied among the most reliable
person, and do not authorize anyone to be Admin except for yourself.
b, This is not for remote control, all settings need to be set close to your
smart lock. If you need remote control, please reference the following
function, and do not authorize anyone to allow remote control.
c, eKey can be authorized to MAX. 20 smart phone users.
Step 1 Download TTLock app and register a new account on new smart
phone
Step 2 Click ‘Send eKey’ on the APP screen
with first smart phone
Step 3 Select Time, Permanent, One-time,
Recurring eKey by yourself, then input
Recipient account and name it
Step 4 Select time period if necessary, then
click ‘send’
Step 5 Refresh by pulling down on the APP
screen with new smart phone, the smart lock will
show up on the APP screen with new smart
phone

There is one option to delete eKeys, you can click ‘eKeys’ on APP screen,
then click the account you want to delete and click ‘Delete’.
3. IC Cards
This smart lock doesn’t support IC Cards unlock
4. Remote control
This smart lock can be added to your smart home and reach for remote
control with extra wifi gateway, which is sold individually. Please e-mail
to our service to get it with requirement.
Remarks:
After pairing your smart lock to your home wifi
through the wifi gateway, you can unlock your
door remotely by touching the little button, and
you can lock your door by long-pressing the same
lock button with local control
5. Records
You can see the operation records by clicking ‘Records’ on APP screen, it
is not the real-time status with your door, you can only see the records
even if you have wifi gateway.
Keypad programming
All programming settings need to be set up on the APP close to your

smart lock
1. Generate Passcode
Click ‘Generate Passcode’ on APP screen, then select Permanent, Timed,
One-time, Erase, Custom, Recurring Passcode by yourself, and then click
‘Generate Passcode’
The correct operation for keypad is:
Unlock by inputting passcode, then press ‘#’
Lock by long-pressing ‘#’
Remarks:
a, Passcode must be used at least once, within
24 hours from current time, or it will be
suspended for security reasons
b, Custom Passcode only support 4-9 digits
in length

2. Delete Passcode
There is one option to delete Passcodes, you can click ‘Passcodes’ on
APP screen, then click the Passcode you want to delete and click ‘Delete’,
nobody with this Passcode can get in now
More function
1. Unlock or lock from inside
There is knob for unlock and lock from inside, people with Passcode or
eKey still can get in with knob locked.
2. Unlock or lock from outside
There are two mechanical keys for backup, please press the pin and take
the cover out, and you will be able to see the keyhole
3. Deadbolt button inside
There is one deadbolt button inside for security,
nobody can get in with both APP and Passcode
once function activated
Lock it by Long-pressing the deadbolt button
until it beeps once

Unlock it by Long-pressing the deadbolt button until it beeps twice
4. Alarm
Anti-theft Alarm: If someone picks your smart lock, it will sound a
beep alarm when the keypad got loose
Low Voltage Alarm: When the batteries close to
be dead, this smart lock will sound a beep alarm,
and if you forget to replace the batteries before to
be dead, you can use 9V Alkaline batteries to
operate from outside
FAQ Trouble shooting
Q: How to fix that it reverses when I unlock it locked?
A: You must have left-handling door, please follow the installation below
to switch the toggle of receiver to L and re-install
Q: Why I’m trying to control it, this deadbolt is sucked?
A: You must install the flat ruler pin with horizontal direction, please
re-install with vertical direction
Q: How can I control my smart lock remotely?
A: You need to purchase extra wifi gateway, please e-mail to our service
to get the URL

Q: No response when you press any button of keypad, how can I fix it?
A: Check to see if the battery polarities have been reversed or if the
battery is dead. If so, re-install or change the battery, if not, please check
to see if the cable properly connected.
Q: How to reset this smart lock if in non-addable state
A: If the door lock is in a non-addable state (the name is gray on the APP
or can’t find), please hold the withe button and press the reset hole with
pin on the back of keypad assembly
Q: How to reset this smart lock if in non-addable state
A: If the door lock is in a non-addable state (the name is gray on the APP
or can’t find), please hold the withe button and press the reset hole with
pin on the back of keypad assembly
Warranty
The manufacturer warrants the product to be free from detects in material
and workmanship for a period of 12 months from the original date of
purchase. If you discover a defect in the product covered by this warranty,
we will repair or replace the item at our option using new or refurbished
components.
Remarks: We will not accept any return without contact with our service.
Exclusions
This warranty covers defects in manufacturing discovered while using

the products as recommended by the manufacturer rather than occurred
by the act of God, damages caused by misuse, abuse, and unauthorized
modification.
Limited Liability
The manufacturer will not be held liable for incidental or consequential
losses or damages from any act of God
Smart by InteTrend
intetren[email protected]
Table of contents