Intex 198 PO User manual

(198PO) AUTO CLEANER ENGLISH SIZE: 4.875” X 7.25” PANTONE 295U 06/23/2019
198
PO
English
IMPORTANT
SAFETY RULES
Read, understand, and follow all
instructions carefully before installing
and using this product.
Auto Cleaner
Don’t forget to try these other fine Intex products: pools,
pool accessories, inflatable pools and in-home toys,
airbeds and boats available at fine retailers or visit our
website.
Due to a policy of continuous product improvement,
Intex reserves the right to change specifications and
appearance, which may result in updates to the
instruction manual without notice.
OWNER’S MANUAL
IMPORTANT!
DO NOT RETURN PRODUCT TO STORE
To purchase parts and accessories or to obtain non-technical assistance, visit
www.intexcorp.com
For technical assistance and missing parts call us toll-free (for U.S. and Canadian Residents):
1-800-234-6839
Monday through Friday, 8:30am to 5:00pm Pacific Time
198-*PO-R0-2006
For illustrative purposes only.

(198PO) AUTO CLEANER ENGLISH SIZE: 4.875” X 7.25” PANTONE 295U 06/23/2019
SAVE THESE INSTRUCTIONS
English 198
PO
Page 2
Warnings........................................................................ 3
Parts Reference............................................................. 4
Set Up Instructions....................................................... 5-9
Debris Net Cleaning...................................................... 10
Micro-screen Cleaning................................................. 11
Troubleshooting Guide................................................. 12
Long Term Storage....................................................... 13
General Aquatic Safety................................................. 13
TABLE OF CONTENTS

(198PO) AUTO CLEANER ENGLISH SIZE: 4.875” X 7.25” PANTONE 295U 06/23/2019
SAVE THESE INSTRUCTIONS
English 198
PO
Page 3
IMPORTANT SAFETY RULES
Read, Understand and Follow All Instructions Carefully Before Installing and Using this Product.
WARNING
•
TO REDUCE THE RISK OF INJURY, DO NOT PERMIT CHILDREN
TO USE THIS PRODUCT.
• REMOVE THE PRODUCT FROM THE POOL WHILE THE POOL IS
OCCUPIED OR IN USE.
• TURN OFF OR UNPLUG THE FILTER PUMP BEFORE ADJUSTING,
CLEANING OR SERVICING.
• REMOVE THE PRODUCT FROM THE POOL BEFORE PLACING A
POOL COVER OVER THE POOL.
• STORE THE PRODUCT AND ACCESSORIES IN A DRY AND SAFE
PLACE INDOORS.
• FOR POOL AND FILTER PUMP PROBLEMS REFER TO THEIR
RESPECTIVE OWNER'S MANUAL FOR ADVICE.
FAILURE TO FOLLOW THESE WARNINGS MAY RESULT IN PROPERTY
DAMAGE, SERIOUS INJURY OR DEATH.
This Filter-Pump system is intended to be used only for the purposes
described in the manual! Failure to follow all product, package and
package insert safety and installation instructions could result in
electric shock, entanglement, other serious injury or death.

(198PO) AUTO CLEANER ENGLISH SIZE: 4.875” X 7.25” PANTONE 295U 06/23/2019
SAVE THESE INSTRUCTIONS
English 198
PO
Page 4
PARTS REFERENCE
Before assembling your product, please take a few minutes to check the
contents and become familiar with all the parts.
NOTE: Drawings for illustration purpose only. Actual product may vary. Not to
scale.
13
3
4
5
10 12
11
1
2
678 9 8
14
14
REF.
NO. DESCRIPTION QTY. SPARE
PARTS NO.
1 CLEANER TOP 1 12857
2 COLLAR NUT 1 11569
3 GEAR MODULE 1 12858
4 DEBRIS NET 1 11751
5 CLEANER BASE 1 11750
6 MICRO-SCREEN 1 12860
7 HOSE ADAPTOR 1 12859
8 HOSE COLLAR NUT 2 12863
9 HOSE 1 12862
10 BRUSH SUPPORT A (WITH 2 EXTRA) 4 11493
11 BRUSH (WITH 10 EXTRA) 12 11567
12 BRUSH SUPPORT B (WITH 2 EXTRA) 4 11494
13 EXHAUST RING PLATE 1 11752
14 CAP SEAL O-RING 2 12861

(198PO) AUTO CLEANER ENGLISH SIZE: 4.875” X 7.25” PANTONE 295U 06/23/2019
SAVE THESE INSTRUCTIONS
English 198
PO
Page 5
Please read, understand, and follow all instructions carefully before
installing and using this product.
General
• The Auto Cleaner must be connected to a filter pump with a flow
rate between 1600 - 3500 gallons/hour (6056 - 13248 liters/hour).
• For Intex®above ground pools.
• The cleaning performance depends on the filter pump flow rate,
the higher the flow rate the better the performance.
• First assemble your filter pump and then set up the auto cleaner.
• If using a sand filter, ensure the sand media is clean by
backwashing it first. Run the filter pump for 10-15 minutes before
connecting the auto cleaner to the water return connector.
• The auto cleaner will not work if the filter pump is not operating.
SETUP INSTRUCTIONS
IMPORTANT PREPARATION INFORMATION

(198PO) AUTO CLEANER ENGLISH SIZE: 4.875” X 7.25” PANTONE 295U 06/23/2019
SAVE THESE INSTRUCTIONS
English 198
PO
Page 6
SETUP INSTRUCTIONS (continued)
1. Turn off the filter pump. From inside of the pool, unscrew the nozzle
from the water return connector. See Fig. 1.
2. Make sure the micro-screen (6) is inside the hose adaptor (7),
then screw the hose adaptor to the threaded strainer connector,
from inside of the pool. See Fig. 2.
1
Threaded
Strainer
Connector Nozzle
3. Screw the hose (9) with the hose collar nut (8) to the hose
adaptor
(7). See Fig. 3.
3
79
2
Threaded
Strainer
Connector
7
6
7

(198PO) AUTO CLEANER ENGLISH SIZE: 4.875” X 7.25” PANTONE 295U 06/23/2019
SAVE THESE INSTRUCTIONS
English 198
PO
Page 7
SETUP INSTRUCTIONS (continued)
4. Extend the hose (9) to the opposite side of the pool wall so that it
over hang the wall and cut the excess hose with a scissor, refer to
below table and fig 4.
Note:
Unscrew (clockwise direction) the hose collar nut (8) from the
other end of the hose (9) before cutting the excess hose. Screw
(counter-clockwise direction) the hose collar nut (8) back onto the
main hose
(9) after cutting.
Pool size
Recommend hose
length (m)
INTEX ABOVE GROUND POOLS (AGP’s)
Circular
15’ x 42”, 15’ x 48” 4.5
16’ x 48”, 16’ x 52” 5.0
18’ x 48”, 18’ x 52” 5.5
20’ x 48”, 20’ x 52” 6.0
24’ x 52”, 26’ x 52” 6.5
Oval
16’6” x 9’ x 48”
4.0
20’ x 10’ x 48”
4.5
Rectangular
18’ x 9’ x 52” 5.0
24’ x 12’ x 52” 6.0
32’ x 16’ x 52” 6.5
4
8
99
Rectangular pool/
Oval pool
Circular pool
Pool inlet
Pool inlet

(198PO) AUTO CLEANER ENGLISH SIZE: 4.875” X 7.25” PANTONE 295U 06/23/2019
SAVE THESE INSTRUCTIONS
English 198
PO
Page 8
SETUP INSTRUCTIONS (continued)
5. Brush assembly. See Fig. 5.
NOTE: Remove the brushes from underneath the device when
vacuuming large debris or leaves on the pool floor.
6. From outside of the pool, connect the end of hose with the hose
collar nut (8) to the auto pool cleaner inlet.
Vertically insert the hose collar nut (8) into the inlet opening, while
pushing down the hose collar nut, turn the inlet rim clockwise
to tighten the hose. To remove the hose, turn the inlet rim
counter-clockwise. See Fig. 6.
6
Press Clockwise direction Screw
5
10 12
11

(198PO) AUTO CLEANER ENGLISH SIZE: 4.875” X 7.25” PANTONE 295U 06/23/2019
SAVE THESE INSTRUCTIONS
English 198
PO
Page 9
SETUP INSTRUCTIONS (continued)
8. Turn on the filter pump and make sure water is flowing through the
micro-screen
(6) and the hose adaptor (7). The auto cleaner is now
moving and vacuuming the pool floor. See Fig. 8.
Note: The cartridge filter pump and sand filter pump will clean the
pool water. It’s essential to clean or replace the filter cartridge or
backwash sand media frequently to keep the water clean.
If the auto cleaner starts to stir the debris, sediments on the
pool floor, you will require to clean or replace the filter
cartridge more frequently as the fine sediments are retained
by the cartridge.
IMPORTANT NOTE
7
7. Hold the auto cleaner upside
down below the water surface
to jet out the water. See Fig. 7.
This will evacuate all the air in
the hose and auto cleaner, so
the cleaner will sink to the
bottom of the pool floor.
8
76

(198PO) AUTO CLEANER ENGLISH SIZE: 4.875” X 7.25” PANTONE 295U 06/23/2019
SAVE THESE INSTRUCTIONS
English 198
PO
Page 10
DEBRIS NET CLEANING
1. Make sure the filter pump is turned
off, and disconnect the power cord
from the electrical outlet.
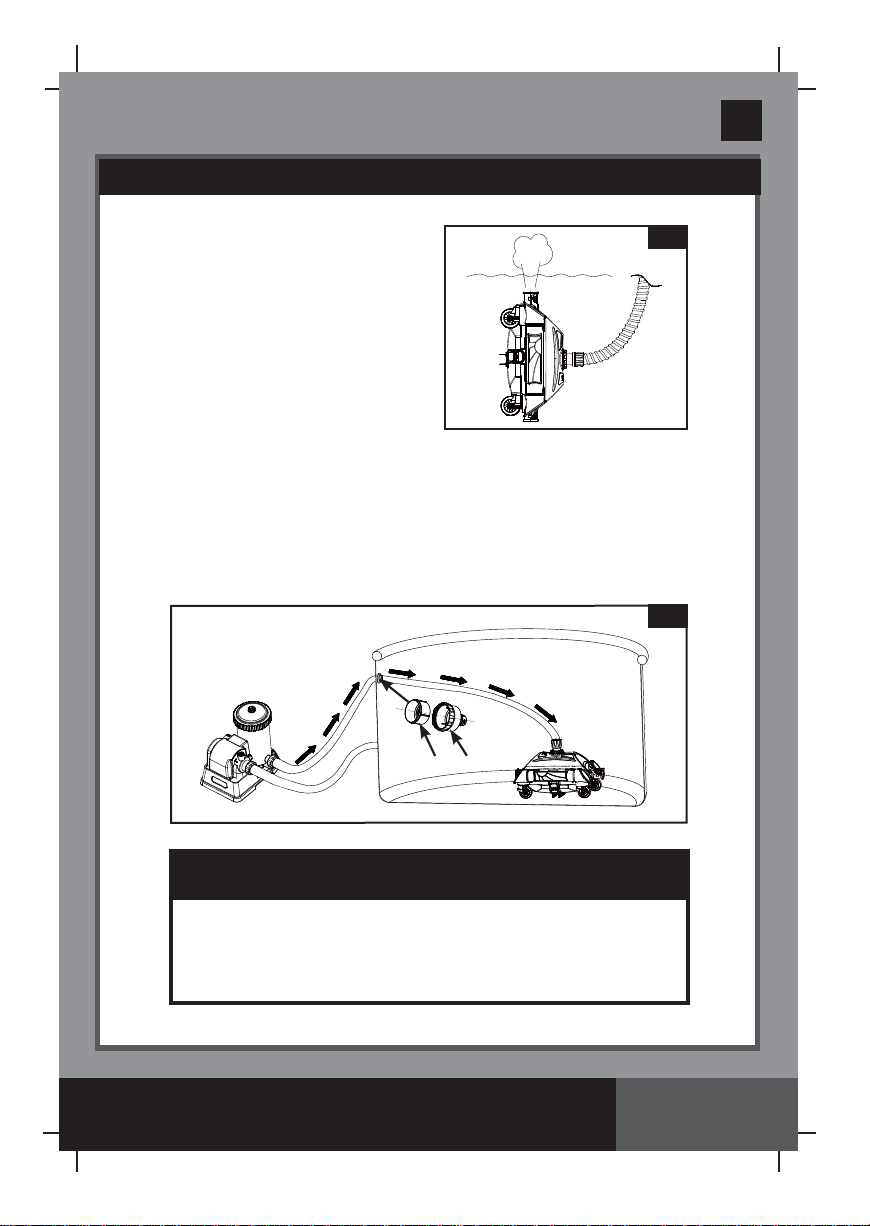
2. Lift the auto cleaner’s hose slowly
then hold the auto cleaner up with
both hands. See Fig. 9.
CAUTION:
Do not pull the hose
directly which could damage the
auto cleaner hose connection fitting.
.
3. Grasp the cleaner base with two
hands, lift the auto cleaner up slowly
with an angle (either head or tail up).
See Fig.10. After the water has been
fully released from the auto cleaner,
carry the auto cleaner out of the
pool and put it on the ground.
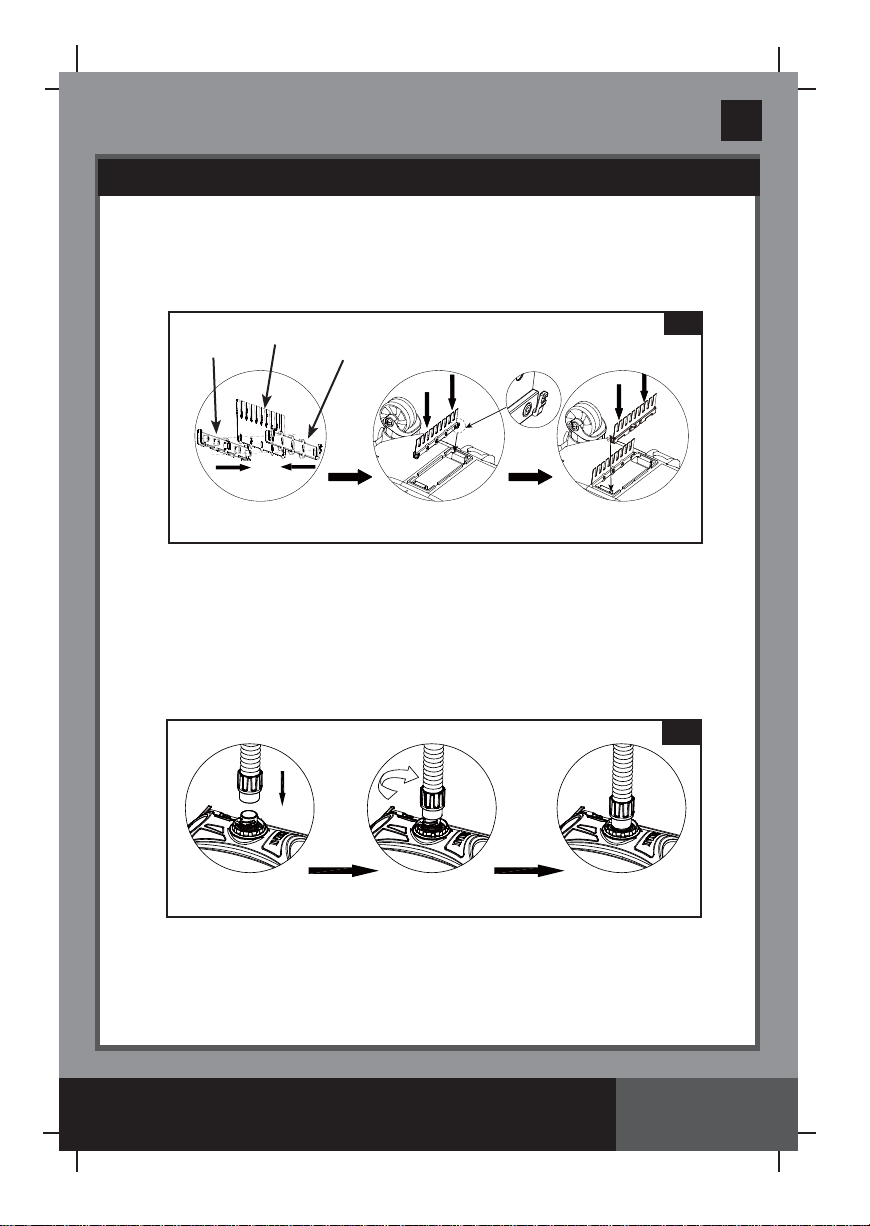
4. Unlock the four buckles located on
the four sides. See Fig. 11.
5. Remove the debris net (4) from the
cleaner base
(5). If debris is on the
debris net and cleaner base, use
garden hose to flush the debris off.
See Fig. 12.
6. Reassemble auto cleaner reversing
steps 1, 2, 3, 4 and 5.
10
9
(1) (2)
11
12
4
5

(198PO) AUTO CLEANER ENGLISH SIZE: 4.875” X 7.25” PANTONE 295U 06/23/2019
SAVE THESE INSTRUCTIONS
English 198
PO
Page 11
MICRO-SCREEN CLEANING
1. Make sure the filter pump is turned off, and disconnect the power
cord from the electrical outlet.
2. To remove the hose, unscrew (counter-clockwise direction) the hose
collar nut
(8) from the hose adaptor (7). See Fig. 13.
3. Unscrew (counter-clockwise direction) the hose adaptor (7) from the
threaded strainer connector. Remove the micro-screen (6) from the
hose adaptor. Use a garden hose to clean and flush out any debris
from the micro-screen and hose adaptor. See Fig. 14.
4. Reassemble all the components back by reversing previous steps.
13
8
9
7
14
7
77
6

(198PO) AUTO CLEANER ENGLISH SIZE: 4.875” X 7.25” PANTONE 295U 06/23/2019
SAVE THESE INSTRUCTIONS
English 198
PO
Page 12
TROUBLESHOOTING GUIDE
AUTO CLEANER
DOESN’T MOVE
MOVEMENT IS
VERY SLOW
LIFTS OFF FROM
THE POOL FLOOR
CAN NOT PICK UP
THE LEAVES ON
POOL FLOOR
TROUBLE SOLUTION
• Ensure the filter pump is operating. Lift the auto cleaner
out of the water and check if water is flowing out from
either end of the device.
• Tighten hose and hose collar nut securely, and connect
the hose to the water return connector, see “Setup”
section. If you are not sure which return connector is,
try connecting the auto cleaner to each pool outlet until
water is flowing out of either end of the device.
• Lift the auto cleaner out of the wrinkled area, and make
sure the pool floor is as smooth as possible.
• Contact Intex Service Center.
• Check and clean the debris net and micro-screen.
• Clean or replace the filter pump cartridge.
• If using a sand filter, ensure the sand media is clean
by backwashing it. See sand filter owner’s manual.
• If you are still not satisfied with the speed, a higher flow
rate filter pump is recommended.
• Release the air from the auto cleaner by following the
“Setup” instructions.
• Pool water too dirty. Ensure the pool water chemistry
is balanced. If the pool water is green, brown or black,
adjust the chlorine and pH level. See pool owner’s
manual.
• Check if the pump flow rate is within the specified
range, if the flow rate is more than 3500 gal/h, change
pump with lower flow rate.
• Remove the brushes from the underside and put the
Auto Cleaner back into the pool, see “Setup” section.
• Clean all the debris from the Auto Cleaner after
operating for 2-3 hours continuously.
If you continue to experience difficulty, please contact our Consumer Service
Department for assistance. See separate “Authorized Service Centers” sheet.
IMPORTANT

(198PO) AUTO CLEANER ENGLISH SIZE: 4.875” X 7.25” PANTONE 295U 06/23/2019
SAVE THESE INSTRUCTIONS
English 198
PO
Page 13
LONG TERM STORAGE
1. Make sure the filter pump is turned off, and disconnect the power cord from
the electrical outlet.
2. Using the Set Up instructions in reverse, disassemble the auto cleaner.
3. Clean and air dry all the accessories and parts thoroughly.
4. Loosely roll up and avoid twisting the hose during storage. Do not
put heavy objects on top of the hose.
5. Remove the brushes and keep them flat and straight during storage.
6. The original packaging can be used for storage. Store in a dry, cool storage
location.
GENERAL AQUATIC SAFETY
Water recreation is both fun and therapeutic. However, it involves inherent
risks of injury and death. To reduce your risk of injury, read and follow all
product, package and package insert warnings and instructions. Remember,
however, that product warnings, instructions and safety guidelines cover
some common risks of water recreation, but do not cover all risks and or
dangers.
For additional safeguards, also familiarize yourself with the following general
guidelines as well as guidelines provided by nationally recognized Safety
Organizations:
• Demand constant supervision. A competent adult should be appointed as a
“lifeguard” or water watcher, especially when children are in and around the pool.
• Learn to swim.
• Take the time to learn CPR and first aid.
• Instruct anyone who is supervising pool users about potential pool hazards and
about the use of protective devices such as locked doors, barriers, etc.
• Instruct all pool users, including children what to do in case of an emergency.
• Always use common sense and good judgement when enjoying any water
activity.
• Supervise, supervise, supervise.
For additional information on safety, please visit
• The Association of Pool and Spa Professionals: The Sensible Way to Enjoy
Your Aboveground/Onground Swimming Pool www.nspi.org
• American Academy of Pediatrics: Pool Safety for Children www.aap.org
• Red Cross www.redcross.org
• Safe Kids www.safekids.org
• Home Safety Council: Safety Guide www.homesafetycouncil.org
• Toy Industry Association: Toy Safety www.toy-tia.org
Table of contents