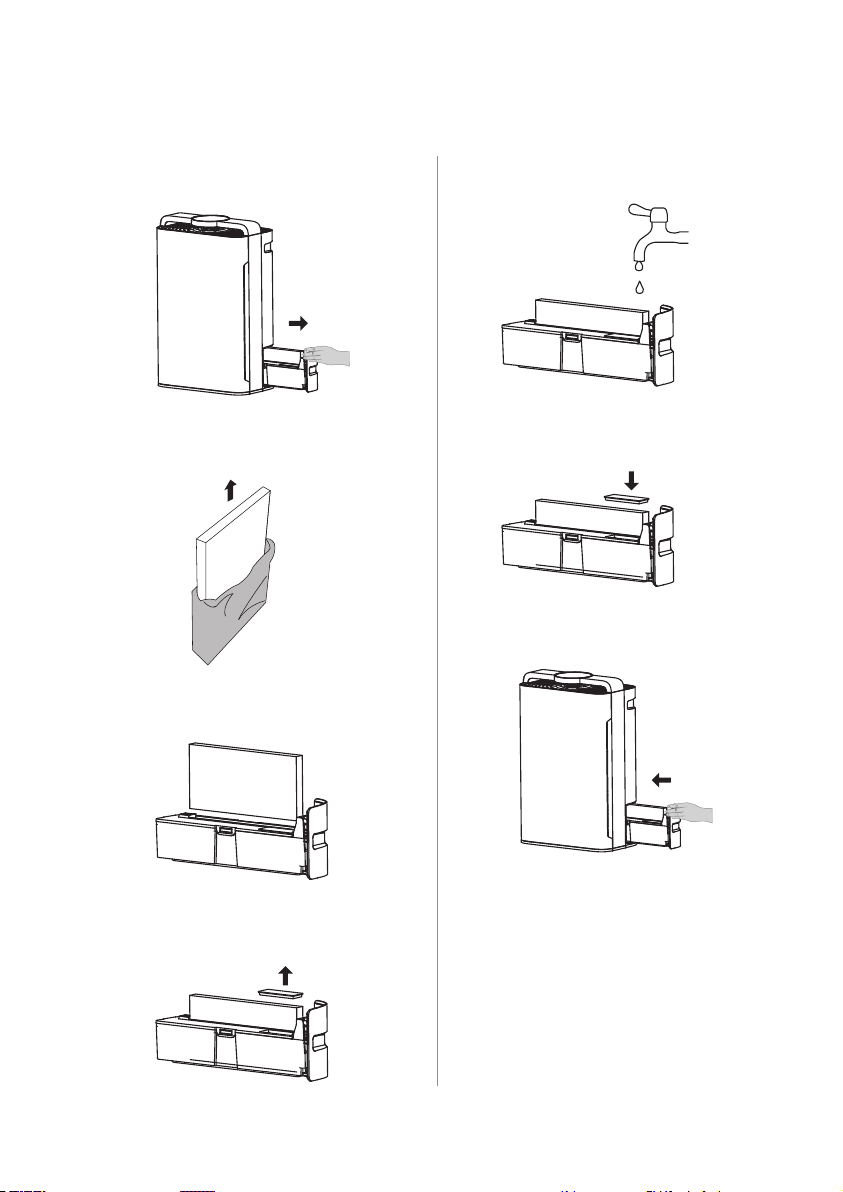
INTU Evolution X5 User manual

1
User Manual
PERFORMANCE ON DEMAND
X5

2
Dear Customer,
Thank you for purchasing our air purier. In order to facilitate the installation and use of
this machine, we recommend that you carefully read this manual, and keep it stored safely.
To ensure that you always enjoy fresh air, use this manual for qualied and standardized
installation, proper use, and maintenance. This will ensure you always enjoy fresh air.
Our anion air purier was developed by our researchers bringing together technology from
home and abroad to give you the latest generation of air purication devices.
If any questions arise from use, please consult this manual. If it is in accordance with the
warranty, we kindly welcome you to contact us with the address and phone number on the
card. We welcome any comments or suggestions you have about our product and service.

3
Contents
Performance Index ......................................................................................................................... 04
Product Features .............................................................................................................................05
Product Appearance and Structure ...............................................................................................07
Installing the Filter ........................................................................................................................... 09
Function Description .........................................................................................................................11
How to Use ....................................................................................................................................... 14
Precautions ....................................................................................................................................... 15
Prohibited .......................................................................................................................................... 16
Mandatory .........................................................................................................................................18
Filter/Dust Sensor/Anion Producer Cleaning and Maintenance .................................................... 19
Packaged Items ................................................................................................................................ 21
WIFI .................................................................................................................................................... 22
Troubleshooting ...............................................................................................................................24

4
Product Name Air Purier
Rated Voltage 220V-240V~
Rated Frequency 50Hz/60Hz
Rated Power 95W
Noise (Low Speed) ≤24.0dB
Anion Concentration 10million/cm3
Amount of Particulate-
Cleaned Air (CADR)
488 m3/h
Amount of Formaldehyde-
Cleaned Air (CADR)
90 m3/h
Applicable Area 34~58 m2
Suggested Period to
Replace Filters
#1 Filter 2 years
#2 Filters 6 months
Net Weight 10.8kg
Product Measurements 400x230x620mm
Method of Cleaning 1. Washable pre-lter
2. Composite cold catalyst lter
+ activated carbon lter
3. Composite anti-bacterial lter + HEPA lter
* Product maintenance and lter replacement cleaning information, please refer to the
instruction manual;
* Purication performance parameters are tested under specic third-party laboratory
conditions with specic dust particles and formaldehyde gas as target pollutants;
* The recommended area is calculated according to (0.07~0.12) xCADR particles, which is the
theoretical value. With the dierent use environment and building structure,The applicable
area will also change due to various factors such as the degree of indoor pollution.
Performance Index

5
Pre-lter
The primary ltration uses an aluminum alloy lter located in the pre-lter. It is mainly used
for ltering dust larger than 5 microns, including large dust particles, dander, pollen, oating
debris, and other pollutants. It can be washed many times and used repeatedly.
Cold Catalyst Filter
1. The catalytic decomposition reaction of the cold catalyst does not require UV rays, high
temperature, or high pressure. In normal living environments it can play a catalytic eect
in controlling air pollution.
2. The main components of the cold catalyst come from additives found in food and
pharmaceuticals. It is non-toxic, non-corrosive, and non-ammable. Under normal
temperature conditions, the catalytic reaction can remove formaldehyde, benzene,
xylene, TVOC and other harmful gasses. The reaction creates water and carbon dioxide.
It does not produce any secondary pollution. It is a safe and environmentally friendly
product on the cutting edge, suitable for a healthy home.
3. During the catalytic reaction, the cold catalyst itself is not directly involved in the
reaction. The cold catalyst does not change nor is lost. Because of this, without any
external damage, this lter will eective for more than ve years. It is basically synched
with the release of the formaldehyde for long-term control.
Cellular -Activated Carbon Filter
The cellular-activated carbon carries high ecient additives. It has good absorption and dust
collection characteristics.
Antibacterial Cotton Filter
The antibacterial lter is a precision lter trapping particles with a diameter of 5 microns. At
the same time there is an antibacterial agent added into the lter, can eectively killing any
airborne germs at an eectively killing 99% or more of bacteria.
High Eciency HEPA Filter
The eective HEPA lter lters airborne germs, smoke and dust particles 0.3 microns large at
a rate of 99% or more. In combination with the multifunctional lter, the HEPA lter can lter
out microscopic particles larger than 20 nanometers in diameter, including bacterial mold,
dust, allergens, and some viruses, while ltering out smoke. According to the World Health
Organization, the avian u virus, inuenza virus, and Legionella bacteria are greater than 20
nanometers. The HEPA lter can lter them out.
Product Features

6
Sterilizing UV light
UV sterilization using 365 nanometer UV wavelengths light can kill a variety of airborne
bacteria. The UV disinfection lamp is generally used for air, surface, and water disinfection. It
can purify the air, eliminate musty odors, as well as produce a certain amount of anions. This
makes the air fresh while avoiding the spread of viruses in the air or on surfaces.
Anion Purier
A large amount of anions are released into the air, which oxygen molecules then add to
their outer shell to obtain a negative charge. It has an extraordinary ability to combine with
positively charged oating dust, smoke, bacteria, and viruses indoors. This makes free oating
debris fall, thus purifying the air and environment without harm to humans. These ultrane
particles are dicult to lter out with common mechanical equipment. Anions in the air have
a special ability to capture these harmful substances. The smaller the size of the particle, the
higher the capture rate. It is an eective way to eliminate these pollutants.

7
Product Appearance
and Structure
Surface Cover
Air Inlet (On Both Sides)
Display Screen
Operation Panel

8
Handle (On Both Sides)
Water Tank
Air Inlet (On Both Sides)
Indicator Light of
Air Quality
Air Outlet

9
Installing the Filter
A.There are differences between the inside and the
outside of the dust filter 1 (antibacterial cotton
filter and HEPA filter). Attention: The side with a
handle should be placed outwards
B.There are differences between the inside and the
outside of the absorption filter 2 (Cellular -Activated
Carbon Filter and cold catalyst filter).
Attention: The side with a handle should be placed
outwards
C.There are differences between the inside and the
outside of the front filter (pre-filter). Attention: The
side with a handle should be placed outwards
D.Install the front cover
0504
1. Removing the filter from the
p
lastic bag:
2. Installing the filter and front cover.
A. Remove the front cover.
B. Remove the filter.
C. Take the filter out of the
packaging.
※
Make sure to remove plastic bag off the
f
ilter before use. ※The machine will not run if the front panel is
uncovered.
Prepare for humidification
1. Pull the water tank out from the side of the
purifier.
2. Remove the package of the humidifying
filter.
3. Put the humidifying filter into the water tank.
4. Open the rubber lid of the inlet.
5. Add about 1L cold water through the inlet,
filling around 80% of the water tank.
6. After adding water, close the lid.
7. Push the tank back into the purifier.
8. This machine has evaporative
humidifying function.
If water is added into the water tank, the machine
will generate steam automatically. The
humidification effect is related to the wind speed,
and it works better when the machine is operating
at a higher gear. If the water level becomes low, the
indicator light will flash while the machine
continues working normally. If the water tank is
taken out, the indicator light will stay on, and the
machine will stop working.

10
Prepare for Humidication
Installing the Filter
A.There are differences between the inside and the
outside of the dust filter 1 (antibacterial cotton
filter and HEPA filter). Attention: The side with a
handle should be placed outwards
B.There are differences between the inside and the
outside of the absorption filter 2 (Cellular -Activated
Carbon Filter and cold catalyst filter).
Attention: The side with a handle should be placed
outwards
C.There are differences between the inside and the
outside of the front filter (pre-filter). Attention: The
side with a handle should be placed outwards
D.Install the front cover
0504
1. Removing the filter from the
plastic bag:
2. Installing the filter and front cover.
A. Remove the front cover.
B. Remove the filter.
C. Take the filter out of the
packaging.
※Make sure to remove plastic bag off the
filter before use. ※The machine will not run if the front panel is
uncovered.
Prepare for humidification
1
. Pull the water tank out from the side of the
p
urifier.
2
. Remove the package of the humidifying
f
ilter.
3
. Put the humidifying filter into the water tank.
4
. Open the rubber lid of the inlet.
5. Add about 1L cold water through the inlet
,
filling around 80% of the water tank.
6. After adding water, close the lid.
7. Push the tank back into the purifier.
8. This machine has evaporative
humidifying function.
If water is added into the water tank, the machine
will generate steam automatically. The
humidification effect is related to the wind speed,
and it works better when the machine is operating
at a higher gear. If the water level becomes low, th
e
indicator light will flash while the machine
continues working normally. If the water tank is
taken out, the indicator light will stay on, and the
machine will stop working.

11
Function Description
When the machine is plugged in and on standby, “POWER” button
works to turn on the machine. After this button being touched for the
second time, the machine turns to standby state. (The icon is red when
standby and green when on.)
Power
Auto
Timer
Inoizer
Sterilizer
Powering On
Selecting the Operating Mode
When the machine is on, after “auto” button being touched, negative
ion generator and germicidal lamp will start to work, and the gear will
be changed according to sensor’s data. (The icon will stay on when the
machine operates in auto mode, otherwise it will be o.) Attention: If
users change “wind speed” under auto mode, the machine will quit this
mode automatically.
When the machine is on, every touch of “TIMER” button will add 1 hour
to the timing. When it accumulates to 12 hours, one more touch will turn
it o. (The icon will stay on when the machine operates in timing mode,
otherwise it will be o.)
When the machine is on, pressing “INOIZER” button will turn on
negative ion mode, and pressing one more time will turn it o. (The icon
will stay on when the machine operates in negative ion mode, otherwise
it will be o.)
When the machine is on, pressing “STERILIZE” button will turn on UV
sterilization mode, and pressing one more time will turn it o. (The icon
will stay on when the machine operates in sterilization mode, otherwise
it will be o.)
0706
Function Description
1. Powering On
2. Selecting the Operating Mode
When the machine is plugged in and on standby, "POWER" button works to turn on
the machine. After this button being touched for the second time, the machine
turns to standby state. (The icon is red when standby and green when on.)
AUTO
When the machine is on, after "auto" button being touched, negative ion generator
and germicidal lamp will start to work, and the gear will be changed according to
sensor's data. (The icon will stay on when the machine operates in auto mode,
otherwise it will be off.) Attention: If users change "wind speed" under auto mode,
the machine will quit this mode automatically.
Relations Between the Gear and PM2.5 Data
Gear PM2.5 Data
1 0-50
2 51-80
3 81-100
4 101-120
5 121-140
6 141-160
7 161-300
8 301-500
Light Color Gear PM2.5 Data Light Color
Yellow
Red
Green
Blue
TIMER
When the machine is on, every touch of "TIMER" button will add 1 hour to the
timing. When it accumulates to 12 hours, one more touch will turn it off.
(The icon will stay on when the machine operates in timing mode, otherwise
it will be off.)
INOIZER
When the machine is on, pressing "INOIZER" button will turn on negative ion
mode, and pressing one more time will turn it off. (The icon will stay on when the
machine operates in negative ion mode, otherwise it will be off.)
STERILIZE
When the machine is on, pressing "STERILIZE" button will turn on UV sterilization
mode, and pressing one more time will turn it off. (The icon will stay on when the
machine operates in sterilization mode, otherwise it will be off.)
RESET
This machine has a regular reminding function of filter replacement, which works
every 320 hours and 1500 hours. After every 320 hours, the indicator light on the
panel will flash to inform users to clean the filter No.1. After cleaning, press the
"RESET" button for 5 seconds, then the light will stop flashing. After every 1500
hours, the indicator light will stay on to inform users to renew the filter No.2 and
No.3. At that time, press the button for 5 seconds so that the timing can be reset.
The second function of the "RESET" button: When the machine is on, press this
button and the total working time will be shown in hours on the screen. This equals
a check of working time. Since the screen can only display three figures, the
thousands digit will be displayed first, then hundreds, tens and single. Please
read them together.
Power
SLEEP
When the machine is on, it will turn to sleeping mode 5 seconds after the
"SLEEP" button being pressed. In sleeping mode, all the lights turns off and the
machine works at the first gear. Press any button to wake it up and then press
"SLEEP" button to quit sleeping mode, or press "wind speed" button or smart
button to quit after waking it up.
CHILD LOCK
When the machine is on, touch "CHILD LOCK" button to lock all the buttons.
At that time all the buttons have no reaction to any touch, while the machine
still works how it is set before. Press "CHILD LOCK" button for 5 seconds
and the machine will quit this mode. (The icon will stay on when the machine
operates in child-lock mode, otherwise it will be off.)
When the machine is on, touch "+" or "-" to switch the gear and change the
operating speed. After the gear being changed, the motor will work only at the
setting level without being affected by the sensor. (Touch "wind speed"
button, and the machine will quit auto mode)
In auto mode, the machine will turn to sleeping mode 2 minutes after the
surrounding light <5x. It will quit sleeping mode 3 minutes after the
surrounding light >5x, and then continue to work in auto mode.
Wind Speed
Light-sensitive

12
This machine has a regular reminding function of lter replacement,
which works every 320 hours and 1500 hours. After every 320 hours, the
indicator light on the panel will ash to inform users to clean the lter
No.1. After cleaning, press the “RESET” button for 5 seconds, then the
light will stop ashing. After every 1500 hours, the indicator light will stay
on to inform users to renew the lter No.2 and No.3. At that time, press
the button for 5 seconds so that the timing can be reset.
The second function of the “RESET” button: When the machine is on,
press this button and the total working time will be shown in hours on
the screen. This equals a check of working time. Since the screen can
only display three gures, the thousands digit will be displayed rst, then
hundreds, tens and single. Please read them together.
When the machine is on, it will turn to sleeping mode 5 seconds after the
“SLEEP” button being pressed. In sleeping mode, all the lights turns o
and the machine works at the rst gear. Press any button to wake it up
and then press “SLEEP” button to quit sleeping mode, or press “wind
speed” button or smart button to quit after waking it up.
When the machine is on, touch “CHILD LOCK” button to lock all the
buttons. At that time all the buttons have no reaction to any touch, while
the machine still works how it is set before. Press “CHILD LOCK” button
for 5 seconds and the machine will quit this mode. (The icon will stay on
when the machine operates in child-lock mode, otherwise it will be o.)
In auto mode, the machine will turn to sleeping mode 2 minutes after
the surrounding light <5x. It will quit sleeping mode 3 minutes after the
surrounding light >5x, and then continue to work in auto mode.
When the machine is on, touch “+” or “-” to switch the gear and change
the operating speed. After the gear being changed, the motor will work
only at the setting level without being aected by the sensor. (Touch
“wind speed” button, and the machine will quit auto mode)
Reset
Sleep
Child-lock
Light Sensitive
Wind Speed
0706
Function Description
1. Powering On
2. Selecting the Operating Mode
When the machine is plugged in and on standby, "POWER" button works to turn on
the machine. After this button being touched for the second time, the machine
turns to standby state. (The icon is red when standby and green when on.)
AUTO
When the machine is on, after "auto" button being touched, negative ion generator
and germicidal lamp will start to work, and the gear will be changed according to
sensor's data. (The icon will stay on when the machine operates in auto mode,
otherwise it will be off.) Attention: If users change "wind speed" under auto mode,
the machine will quit this mode automatically.
Relations Between the Gear and PM2.5 Data
Gear PM2.5 Data
1 0-50
2 51-80
3 81-100
4 101-120
5 121-140
6 141-160
7 161-300
8 301-500
Light Color Gear PM2.5 Data Light Color
Yellow
Red
Green
Blue
TIMER
When the machine is on, every touch of "TIMER" button will add 1 hour to the
timing. When it accumulates to 12 hours, one more touch will turn it off.
(The icon will stay on when the machine operates in timing mode, otherwise
it will be off.)
INOIZER
When the machine is on, pressing "INOIZER" button will turn on negative ion
mode, and pressing one more time will turn it off. (The icon will stay on when the
machine operates in negative ion mode, otherwise it will be off.)
STERILIZE
When the machine is on, pressing "STERILIZE" button will turn on UV sterilization
mode, and pressing one more time will turn it off. (The icon will stay on when the
machine operates in sterilization mode, otherwise it will be off.)
RESET
This machine has a regular reminding function of filter replacement, which works
every 320 hours and 1500 hours. After every 320 hours, the indicator light on the
panel will flash to inform users to clean the filter No.1. After cleaning, press the
"RESET" button for 5 seconds, then the light will stop flashing. After every 1500
hours, the indicator light will stay on to inform users to renew the filter No.2 and
No.3. At that time, press the button for 5 seconds so that the timing can be reset.
The second function of the "RESET" button: When the machine is on, press this
button and the total working time will be shown in hours on the screen. This equals
a check of working time. Since the screen can only display three figures, the
thousands digit will be displayed first, then hundreds, tens and single. Please
read them together.
Power
SLEEP
When the machine is on, it will turn to sleeping mode 5 seconds after the
"SLEEP" button being pressed. In sleeping mode, all the lights turns off and the
machine works at the first gear. Press any button to wake it up and then press
"SLEEP" button to quit sleeping mode, or press "wind speed" button or smart
button to quit after waking it up.
CHILD LOCK
When the machine is on, touch "CHILD LOCK" button to lock all the buttons.
At that time all the buttons have no reaction to any touch, while the machine
still works how it is set before. Press "CHILD LOCK" button for 5 seconds
and the machine will quit this mode. (The icon will stay on when the machine
operates in child-lock mode, otherwise it will be off.)
When the machine is on, touch "+" or "-" to switch the gear and change the
operating speed. After the gear being changed, the motor will work only at the
setting level without being affected by the sensor. (Touch "wind speed"
button, and the machine will quit auto mode)
In auto mode, the machine will turn to sleeping mode 2 minutes after the
surrounding light <5x. It will quit sleeping mode 3 minutes after the
surrounding light >5x, and then continue to work in auto mode.
Wind Speed
Light-sensitive

13
If you press the power button on the operational panel while the
machine is running, the machine will enter into standby mode. (And the
icon will turn red)
This product is provided with a remote control powered by button cells.
(Please take out the cell if the remote control will not be used for long
periods) Attention: There is a one-to-one correspondence between the
buttons on the remote control and the operation panel. The functions
and operation methods are generally the same. Attention: On rst use,
please take out the cell cover and remove the protective lm of the cell,
then replace the cell and its cover. Otherwise without power supply the
remote control will not work.
Power
Powering O
Remote Control
0706
Function Description
1. Powering On
2. Selecting the Operating Mode
When the machine is plugged in and on standby, "POWER" button works to turn on
the machine. After this button being touched for the second time, the machine
turns to standby state. (The icon is red when standby and green when on.)
AUTO
When the machine is on, after "auto" button being touched, negative ion generator
and germicidal lamp will start to work, and the gear will be changed according to
sensor's data. (The icon will stay on when the machine operates in auto mode,
otherwise it will be off.) Attention: If users change "wind speed" under auto mode,
the machine will quit this mode automatically.
Relations Between the Gear and PM2.5 Data
Gear PM2.5 Data
1 0-50
2 51-80
3 81-100
4 101-120
5 121-140
6 141-160
7 161-300
8 301-500
Light Color Gear PM2.5 Data Light Color
Yellow
Red
Green
Blue
TIMER
When the machine is on, every touch of "TIMER" button will add 1 hour to the
timing. When it accumulates to 12 hours, one more touch will turn it off.
(The icon will stay on when the machine operates in timing mode, otherwise
it will be off.)
INOIZER
When the machine is on, pressing "INOIZER" button will turn on negative ion
mode, and pressing one more time will turn it off. (The icon will stay on when the
machine operates in negative ion mode, otherwise it will be off.)
STERILIZE
When the machine is on, pressing "STERILIZE" button will turn on UV sterilization
mode, and pressing one more time will turn it off. (The icon will stay on when the
machine operates in sterilization mode, otherwise it will be off.)
RESET
This machine has a regular reminding function of filter replacement, which works
every 320 hours and 1500 hours. After every 320 hours, the indicator light on the
panel will flash to inform users to clean the filter No.1. After cleaning, press the
"RESET" button for 5 seconds, then the light will stop flashing. After every 1500
hours, the indicator light will stay on to inform users to renew the filter No.2 and
No.3. At that time, press the button for 5 seconds so that the timing can be reset.
The second function of the "RESET" button: When the machine is on, press this
button and the total working time will be shown in hours on the screen. This equals
a check of working time. Since the screen can only display three figures, the
thousands digit will be displayed first, then hundreds, tens and single. Please
read them together.
Power
SLEEP
When the machine is on, it will turn to sleeping mode 5 seconds after the
"SLEEP" button being pressed. In sleeping mode, all the lights turns off and the
machine works at the first gear. Press any button to wake it up and then press
"SLEEP" button to quit sleeping mode, or press "wind speed" button or smart
button to quit after waking it up.
CHILD LOCK
When the machine is on, touch "CHILD LOCK" button to lock all the buttons.
At that time all the buttons have no reaction to any touch, while the machine
still works how it is set before. Press "CHILD LOCK" button for 5 seconds
and the machine will quit this mode. (The icon will stay on when the machine
operates in child-lock mode, otherwise it will be off.)
When the machine is on, touch "+" or "-" to switch the gear and change the
operating speed. After the gear being changed, the motor will work only at the
setting level without being affected by the sensor. (Touch "wind speed"
button, and the machine will quit auto mode)
In auto mode, the machine will turn to sleeping mode 2 minutes after the
surrounding light <5x. It will quit sleeping mode 3 minutes after the
surrounding light >5x, and then continue to work in auto mode.
Wind Speed
Light-sensitive
0908
3.••Powering Off
If you press the power button on the operational panel while the machine is
running, the machine will enter into standby mode. (And the icon will turn red)
Power
4. Remote Control
This product is provided with a remote control powered by button cells. (Please
take out the cell if the remote control will not be used for long periods) Attention:
There is a one-to-one correspondence between the buttons on the remote control
and the operation panel. The functions and operation methods are generally the
same. Attention: On first use, please take out the cell cover and remove the
protective film of the cell, then replace the cell and its cover. Otherwise without
power supply the remote control will not work.
1. Auto mode. When the machine is plugged in, press "power" button and "auto" button in
sequence, then it can operate under the control of intellisense. The motor's operating gear
will adjust automatically to the PM2.5 data collected by the sensor. This mode is suitable for
most situations.
2. Compulsory mode. When the machine is plugged in, press "power" button. Press "wind
speed" button to choose the gear, and then choose to turn on or off the negative ion
generator and the UV germicidal lamp. This mode is suitable for the situations where
compulsory purification is needed. The machine cannot change the gear automatically in
this mode.
3. Night mode. In the two modes mentioned above, the machine will turn to work at the first
gear as long as "sleeping" button is touched, making sure there is no noise affecting your
rest. (In auto mode, it will turn to sleeping mode when the environment becomes dark,
sensed by the photosensitive sensor)
4. Timing mode. In the three modes mentioned above, after "timing" button being pressed
and operating time being set, the machine will start to count down. The machine will stop
working after the countdown is finished. (If you need to cancel the countdown, please press
the button until the time displayed is accumulated to 12 hours, then one more touch will
cancel this mode)
5. Child-proof lock mode. In the four modes mentioned above, the machine will turn to child-
proof lock mode after "child-proof lock" button is pressed. Any operation through the panel
or the remote control will be invalid before quitting this mode. (It can be quitted by pressing
"child-proof lock" button for 3 seconds or the unlock button on the remote control.)
During Installation
2. The product must be placed on the floor for pollen and other indoor
dust. Since such particles easily fall near the floor, we recommend placing the product on
a flat surface on the floor.
4. Do not place items on the main unit or it may lead to malfunction.
Be careful not to place magnets or any other metal items on here.
3. For effective room circulation, place the product approximately 30cm
or more away from walls or other objects.Please keep the backside at
least 20cm away from the wall to enable it to work more effectively.
1. Do not place in direct sunlight, facing air conditioner vents, or heated
places. It may cause the unit to warp, deteriorate, discolor, or
malfunction.
Do not place near TVs or radios. This may distort images or produce
noise. Using the purifier remote may cause interference with your TV
or radio. Please place at a distance of 1m or more away from these
devices. In addition, if you are sharing outlets with these devices,
plugging in the purifier may distort images or produce noise. If this
happens, please plug the purifier into a different outlet.
5. Do not block the exhaust vent or supply vent. For example, do not
place an object on top of the exhaust vent or in front of the supply vent.
Sunshine
1m
Item
≥30cm
≥30cm
Precautions
Exhaust Vent
Supply Vent
How to Use

14
1. Auto mode. When the machine is plugged in, press “power” button and “auto” button
in sequence, then it can operate under the control of intellisense. The motor’s operating
gear will adjust automatically to the PM2.5 data collected by the sensor. This mode is
suitable for most situations.
2. Compulsory mode. When the machine is plugged in, press “power” button. Press “wind
speed” button to choose the gear, and then choose to turn on or o the negative ion
generator and the UV germicidal lamp. This mode is suitable for the situations where
compulsory purication is needed. The machine cannot change the gear automatically in
this mode.
3. Night mode. In the two modes mentioned above, the machine will turn to work at the
rst gear as long as “sleeping” button is touched, making sure there is no noise aecting
your rest. (In auto mode, it will turn to sleeping mode when the environment becomes
dark, sensed by the photosensitive sensor)
4. Timing mode. In the three modes mentioned above, after “timing” button being pressed
and operating time being set, the machine will start to count down. The machine will
stop working after the countdown is nished. (If you need to cancel the countdown,
please press the button until the time displayed is accumulated to 12 hours, then one
more touch will cancel this mode)
5. Child-proof lock mode. In the four modes mentioned above, the machine will turn to
childproof lock mode after “child-proof lock” button is pressed. Any operation through
the panel or the remote control will be invalid before quitting this mode. (It can be
quitted by pressing “child-proof lock” button for 3 seconds or the unlock button on the
remote control.)
How to Use

15
During Installation
1. Do not place in direct sunlight, facing air conditioner vents, or
heated places. It may cause the unit to warp, deteriorate, discolor,
or malfunction.
Do not place near TVs or radios. This may distort images or
produce noise. Using the purier remote may cause interference
with your TV or radio. Please place at a distance of 1m or more
away from these devices. In addition, if you are sharing outlets
with these devices, plugging in the purier may distort images
or produce noise. If this happens, please plug the purier into a
dierent outlet.
2. The product must be placed on the oor for pollen and other indoor dust. Since such
particles easily fall near the oor, we recommend placing the product on a at surface on
the oor.
Precautions
0908
3.••Powering Off
If you press the power button on the operational panel while the machine is
running, the machine will enter into standby mode. (And the icon will turn red)
Power
4. Remote Control
This product is provided with a remote control powered by button cells. (Please
take out the cell if the remote control will not be used for long periods) Attention:
There is a one-to-one correspondence between the buttons on the remote control
and the operation panel. The functions and operation methods are generally the
same. Attention: On first use, please take out the cell cover and remove the
protective film of the cell, then replace the cell and its cover. Otherwise without
power supply the remote control will not work.
1. Auto mode. When the machine is plugged in, press "power" button and "auto" button in
sequence, then it can operate under the control of intellisense. The motor's operating gear
will adjust automatically to the PM2.5 data collected by the sensor. This mode is suitable for
most situations.
2. Compulsory mode. When the machine is plugged in, press "power" button. Press "wind
speed" button to choose the gear, and then choose to turn on or off the negative ion
generator and the UV germicidal lamp. This mode is suitable for the situations where
compulsory purification is needed. The machine cannot change the gear automatically in
this mode.
3. Night mode. In the two modes mentioned above, the machine will turn to work at the first
gear as long as "sleeping" button is touched, making sure there is no noise affecting your
rest. (In auto mode, it will turn to sleeping mode when the environment becomes dark,
sensed by the photosensitive sensor)
4. Timing mode. In the three modes mentioned above, after "timing" button being pressed
and operating time being set, the machine will start to count down. The machine will stop
working after the countdown is finished. (If you need to cancel the countdown, please press
the button until the time displayed is accumulated to 12 hours, then one more touch will
cancel this mode)
5. Child-proof lock mode. In the four modes mentioned above, the machine will turn to child-
proof lock mode after "child-proof lock" button is pressed. Any operation through the panel
or the remote control will be invalid before quitting this mode. (It can be quitted by pressing
"child-proof lock" button for 3 seconds or the unlock button on the remote control.)
During Installation
2. The product must be placed on the floor for pollen and other indoor
dust. Since such particles easily fall near the floor, we recommend placing the product on
a flat surface on the floor.
4. Do not place items on the main unit or it may lead to malfunction.
Be careful not to place magnets or any other metal items on here.
3. For effective room circulation, place the product approximately 30cm
or more away from walls or other objects.Please keep the backside at
least 20cm away from the wall to enable it to work more effectively.
1. Do not place in direct sunlight, facing air conditioner vents, or heated
places. It may cause the unit to warp, deteriorate, discolor, or
malfunction.
Do not place near TVs or radios. This may distort images or produce
noise. Using the purifier remote may cause interference with your TV
or radio. Please place at a distance of 1m or more away from these
devices. In addition, if you are sharing outlets with these devices,
plugging in the purifier may distort images or produce noise. If this
happens, please plug the purifier into a different outlet.
5. Do not block the exhaust vent or supply vent. For example, do not
place an object on top of the exhaust vent or in front of the supply vent.
Sunshine
1m
Item
≥30cm
≥30cm
Precautions
Exhaust Vent
Supply Vent
How to Use
3. For eective room circulation, place the product approximately
30cm or more away from walls or other objects.Please keep the
backside at least 20cm away from the wall to enable it to work
more eectively.
4. Do not place items on the main unit or it may lead to malfunction.
Be careful not to place magnets or any other metal items on here.
5. Do not block the exhaust vent or supply vent. For example, do
not place an object on top of the exhaust vent or in front of the
supply vent.
0908
3.••Powering Off
If you press the power button on the operational panel while the machine is
running, the machine will enter into standby mode. (And the icon will turn red)
Power
4. Remote Control
This product is provided with a remote control powered by button cells. (Please
take out the cell if the remote control will not be used for long periods) Attention:
There is a one-to-one correspondence between the buttons on the remote control
and the operation panel. The functions and operation methods are generally the
same. Attention: On first use, please take out the cell cover and remove the
protective film of the cell, then replace the cell and its cover. Otherwise without
power supply the remote control will not work.
1. Auto mode. When the machine is plugged in, press "power" button and "auto" button in
sequence, then it can operate under the control of intellisense. The motor's operating gear
will adjust automatically to the PM2.5 data collected by the sensor. This mode is suitable for
most situations.
2. Compulsory mode. When the machine is plugged in, press "power" button. Press "wind
speed" button to choose the gear, and then choose to turn on or off the negative ion
generator and the UV germicidal lamp. This mode is suitable for the situations where
compulsory purification is needed. The machine cannot change the gear automatically in
this mode.
3. Night mode. In the two modes mentioned above, the machine will turn to work at the first
gear as long as "sleeping" button is touched, making sure there is no noise affecting your
rest. (In auto mode, it will turn to sleeping mode when the environment becomes dark,
sensed by the photosensitive sensor)
4. Timing mode. In the three modes mentioned above, after "timing" button being pressed
and operating time being set, the machine will start to count down. The machine will stop
working after the countdown is finished. (If you need to cancel the countdown, please press
the button until the time displayed is accumulated to 12 hours, then one more touch will
cancel this mode)
5. Child-proof lock mode. In the four modes mentioned above, the machine will turn to child-
proof lock mode after "child-proof lock" button is pressed. Any operation through the panel
or the remote control will be invalid before quitting this mode. (It can be quitted by pressing
"child-proof lock" button for 3 seconds or the unlock button on the remote control.)
During Installation
2. The product must be placed on the floor for pollen and other indoor
dust. Since such particles easily fall near the floor, we recommend placing the product on
a flat surface on the floor.
4. Do not place items on the main unit or it may lead to malfunction.
Be careful not to place magnets or any other metal items on here.
3. For effective room circulation, place the product approximately 30cm
or more away from walls or other objects.Please keep the backside at
least 20cm away from the wall to enable it to work more effectively.
1. Do not place in direct sunlight, facing air conditioner vents, or heated
places. It may cause the unit to warp, deteriorate, discolor, or
malfunction.
Do not place near TVs or radios. This may distort images or produce
noise. Using the purifier remote may cause interference with your TV
or radio. Please place at a distance of 1m or more away from these
devices. In addition, if you are sharing outlets with these devices,
plugging in the purifier may distort images or produce noise. If this
happens, please plug the purifier into a different outlet.
5. Do not block the exhaust vent or supply vent. For example, do not
place an object on top of the exhaust vent or in front of the supply vent.
Sunshine
1m
Item
≥30cm
≥30cm
Precautions
Exhaust Vent
Supply Vent
How to Use

16
1. Do not pick up or move the machine while it is running. When moving or storing, do not
pull the power cord. This may cause a short circuit or do internal damage to the power
cord. This may lead to a re or electric shock.
2. Do not damage power cord or outlet. Do not cut, excessively
twist, pull, or bend the power cord. If the power cord is damaged,
for your safety please call the manufacturer, service department,
or a trained professional to replace it.
3. Do not use power supplies, universal sockets, or connective
devices that exceed the recommended power rating. Use only
220V~ 5A AC power. Using a universal socket or connected power
source that exceeds this rating may lead to overheating and cause
a re.
Prohibited
1. Do not pick up or move the machine while it is running. When moving or storing, do not pull
the power cord. This may cause a short circuit or do internal damage to the power cord. This
may lead to a fire or electric shock.
220V~
5A
Prohibited
2. Do not damage power cord or outlet. Do not cut, excessively twist,
pull, or bend the power cord. If the power cord is damaged, for your
safety please call the manufacturer, service department, or a trained
professional to replace it.
3. Do not use power supplies, universal sockets, or connective devices
that exceed the recommended power rating. Use only 220V~ 5A AC
power. Using a universal socket or connected power source that
exceeds this rating may lead to overheating and cause a fire.
4. Do not touch the plug with wet hands. This may result in electrical
shock.
5. Do not place your fingers or metal objects into the air vents. This may
cause electrical shock or injury.
6. To avoid electrical shock or fire, do not allow water, flammable
cleaners, or other liquids enter the product.
11.The two arches at both sides of the operation panel are not handles
and cannot be pulled. The handles are at both sides of the purifier
body.
12.Do not place this machine up-side-down, because there is a liquid humidification
device in it.
13.Do not place in the following locations:
-Unstable places: this may cause the product to topple or fall down. This may lead to injury,
electrical leakage, or fire.
-Hot or humid places, such as the shower: this may result in electrical shock or fire due to
electrical leakage.
-Places like the kitchen that emit fumes.
14、Do not use the air purifier in a room that is using an incense-type insect killer.
-Chemical residue may accumulate in the machine and then be released, causing harm to
physical health.
-After using insect killer or mosquito coils, allow the room to be fully
ventilated before using the air purifier.
1110
√
×
7. This product cannot replace normal ventilation equipment, vacuum
cleaners, or kitchen fans.
8. Please do not use this product near gas appliances, heating
appliances, or stoves.
9. Do not use this product in a humid or hot environment, such as the
shower, restroom, or kitchen.
10. Make sure the remote is placed somewhere children cannot reach to
avoid unintended damage.
4. Do not touch the plug with wet hands. This may result in electrical
shock.
5. Do not place your ngers or metal objects into the air vents. This
may cause electrical shock or injury.
6. To avoid electrical shock or re, do not allow water, ammable
cleaners, or other liquids enter the product.

17
7. This product cannot replace normal ventilation equipment,
vacuum cleaners, or kitchen fans.
8. Please do not use this product near gas appliances, heating
appliances, or stoves.
9. Do not use this product in a humid or hot environment, such as
the shower, restroom, or kitchen.
10. Make sure the remote is placed somewhere children cannot reach
to avoid unintended damage.
11. The two arches at both sides of the operation panel are not
handles and cannot be pulled. The handles are at both sides of the
purier body.
12. Do not place this machine up-side-down, because there is a liquid humidication device in it.
13. Do not place in the following locations:
• Unstable places: this may cause the product to topple or fall down. This may lead to
injury, electrical leakage, or re.
• Hot or humid places, such as the shower: this may result in electrical shock or re
due to electrical leakage.
• Places like the kitchen that emit fumes.
14. Do not use the air purier in a room that is using an incense-type insect killer.
• Chemical residue may accumulate in the machine and then be released, causing
harm to physical health.
• After using insect killer or mosquito coils, allow the room to be fully ventilated
before using the air purier.
1. Do not pick up or move the machine while it is running. When moving or storing, do not pull
the power cord. This may cause a short circuit or do internal damage to the power cord. This
may lead to a fire or electric shock.
220V~
5A
Prohibited
2. Do not damage power cord or outlet. Do not cut, excessively twist,
pull, or bend the power cord. If the power cord is damaged, for your
safety please call the manufacturer, service department, or a trained
professional to replace it.
3. Do not use power supplies, universal sockets, or connective devices
that exceed the recommended power rating. Use only 220V~ 5A AC
power. Using a universal socket or connected power source that
exceeds this rating may lead to overheating and cause a fire.
4. Do not touch the plug with wet hands. This may result in electrical
shock.
5. Do not place your fingers or metal objects into the air vents. This may
cause electrical shock or injury.
6. To avoid electrical shock or fire, do not allow water, flammable
cleaners, or other liquids enter the product.
11.The two arches at both sides of the operation panel are not handles
and cannot be pulled. The handles are at both sides of the purifier
body.
12.Do not place this machine up-side-down, because there is a liquid humidification
device in it.
13.Do not place in the following locations:
-Unstable places: this may cause the product to topple or fall down. This may lead to injury,
electrical leakage, or fire.
-Hot or humid places, such as the shower: this may result in electrical shock or fire due to
electrical leakage.
-Places like the kitchen that emit fumes.
14、Do not use the air purifier in a room that is using an incense-type insect killer.
-Chemical residue may accumulate in the machine and then be released, causing harm to
physical health.
-After using insect killer or mosquito coils, allow the room to be fully
ventilated before using the air purifier.
1110
√
×
7. This product cannot replace normal ventilation equipment, vacuum
cleaners, or kitchen fans.
8. Please do not use this product near gas appliances, heating
appliances, or stoves.
9. Do not use this product in a humid or hot environment, such as the
shower, restroom, or kitchen.
10. Make sure the remote is placed somewhere children cannot reach to
avoid unintended damage.

18
1. Should any of the following conditions occur, turn o the machine immediately (electrical
shock, sparks, or smoke may occur):
• Strange noises or vibrations during operation.
• Product is unusually hot, or has a burnt odor.
2. Please clean the plug regularly If there is dust or moisture on the plug it could damage it.
This may result in a re.
• Unplug the power cord, and wipe it with a dry cloth.
• Unplug the power cord if the appliance is not used for a long period of time.
3. Before electrical maintenance, make sure to unplug the device.
• The product may suddenly turn on, leading to electrical shock or injury.
4. Please plug the power cord securely into the power outlet. If the plug is not securely
seated, this may cause overheating which may lead to electrical shock and even re.
• Do not use a damaged plug or loose power outlet.
6. Should any of the following circumstances arise, please turn o the machine power
immediately and contact the service department:
• A switch does not work.
• Power cord or plug is unusually hot.
• You detect an abnormal sound or vibration.
• Any other abnormalities or malfunctions.
7. To prevent the hazard of electrical shock, only trained professionals should disassemble
the machine.
Mandatory
5. Please unplug the cord using the plug insulator.
• Pulling the power cord to unplug it may cause damage to the
power cord, electrical shock, short circuit, or re.
1312
2. Cellular -Activated Carbon, cold catalyst filter (approximately once every two months)
-Clean the dust from the front of the filter with a vacuum cleaner.
-Place the filter in a ventilated area, this will allow harmful gasses
and germs to dissipate. Do not place under too much sun exposure.
-The filter is delicate. Do not press too hard on the filter while
vacuuming.
-Do not use water to clean this filter.
1. Pre-filter (approximately twice per month)
-Clean the surface of the filter with a vacuum cleaner or wash
with water. Allow to dry thoroughly.
3. Antibacterial cotton, HEPA filter (approximately once every two months)
-Place the filter in a ventilated area, this will allow harmful gasses
and germs to dissipate. Do not place under too much sun exposure.
-Do not use water to clean this filter.
-When you hear the machine produce
a creaking sound, use a #1 or #2
paintbrush as a cleaning tool. Insert
the brush from the ventilation window
above the anion emission head.
Regularly clean the dust all around
the emission head.
4. Anion producer cleaning and maintenance.
Paintbrush
220V~
5A
Mandatory
1. Should any of the following conditions occur, turn off the machine immediately
(electrical shock, sparks, or smoke may occur):
-Strange noises or vibrations during operation.
-Product is unusually hot, or has a burnt odor.
2. Please clean the plug regularly
If there is dust or moisture on the plug it could damage it. This may result in a fire.
-Unplug the power cord, and wipe it with a dry cloth.
-Unplug the power cord if the appliance is not used for a long period of time.
3. Before electrical maintenance, make sure to unplug the device.
-The product may suddenly turn on, leading to electrical shock or injury.
4. Please plug the power cord securely into the power outlet. If the plug is not
securely seated, this may cause overheating which may lead to electrical shock
and even fire.
-Do not use a damaged plug or loose power outlet.
5. Please unplug the cord using the plug insulator.
-Pulling the power cord to unplug it may cause damage to the
power cord, electrical shock, short circuit, or fire.
6. Should any of the following circumstances arise, please turn off the machine
power immediately and contact the service department:
-A switch does not work.
-Power cord or plug is unusually hot.
-You detect an abnormal sound or vibration.
-Any other abnormalities or malfunctions.
7. To prevent the hazard of electrical shock, only trained professionals should
disassemble the machine.
Filter/Dust Sensor/Anion Producer Cleaning and Maintenance

19
Filter/Dust Sensor/Anion
Producer Cleaning and
Maintenance
Pre-lter (approximately twice per month)
• Clean the surface of the lter with a vacuum cleaner or wash with
water. Allow to dry thoroughly.
Cellular -Activated Carbon, cold catalyst lter (approximately once
every two months)
• Clean the dust from the front of the lter with a vacuum cleaner.
• Place the lter in a ventilated area, this will allow harmful gasses
and germs to dissipate. Do not place under too much sun
exposure.
• The lter is delicate. Do not press too hard on the lter while
vacuuming.
• Do not use water to clean this lter.water. Allow to dry
thoroughly.
Antibacterial cotton, HEPA lter (approximately once every two
months)
• Place the lter in a ventilated area, this will allow harmful gasses
and germs to dissipate. Do not place under too much sun
exposure.
• Do not use water to clean this lter.
Anion producer cleaning and maintenance.
• When you hear the machine produce a creaking sound, use a
#1 or #2 paintbrush as a cleaning tool. Insert the brush from the
ventilation window above the anion emission head. Regularly
clean the dust all around the emission head.
1312
2. Cellular -Activated Carbon, cold catalyst filter (approximately once every two months)
-Clean the dust from the front of the filter with a vacuum cleaner.
-Place the filter in a ventilated area, this will allow harmful gasses
and germs to dissipate. Do not place under too much sun exposure.
-The filter is delicate. Do not press too hard on the filter while
vacuuming.
-Do not use water to clean this filter.
1. Pre-filter (approximately twice per month)
-Clean the surface of the filter with a vacuum cleaner or wash
with water. Allow to dry thoroughly.
3. Antibacterial cotton, HEPA filter (approximately once every two months)
-Place the filter in a ventilated area, this will allow harmful gasses
and germs to dissipate. Do not place under too much sun exposure.
-Do not use water to clean this filter.
-When you hear the machine produce
a creaking sound, use a #1 or #2
paintbrush as a cleaning tool. Insert
the brush from the ventilation window
above the anion emission head.
Regularly clean the dust all around
the emission head.
4. Anion producer cleaning and maintenance.
Paintbrush
220V~
5A
Mandatory
1. Should any of the following conditions occur, turn off the machine immediately
(electrical shock, sparks, or smoke may occur):
-Strange noises or vibrations during operation.
-Product is unusually hot, or has a burnt odor.
2. Please clean the plug regularly
If there is dust or moisture on the plug it could damage it. This may result in a fire.
-Unplug the power cord, and wipe it with a dry cloth.
-Unplug the power cord if the appliance is not used for a long period of time.
3. Before electrical maintenance, make sure to unplug the device.
-The product may suddenly turn on, leading to electrical shock or injury.
4. Please plug the power cord securely into the power outlet. If the plug is not
securely seated, this may cause overheating which may lead to electrical shock
and even fire.
-Do not use a damaged plug or loose power outlet.
5. Please unplug the cord using the plug insulator.
-Pulling the power cord to unplug it may cause damage to the
power cord, electrical shock, short circuit, or fire.
6. Should any of the following circumstances arise, please turn off the machine
power immediately and contact the service department:
-A switch does not work.
-Power cord or plug is unusually hot.
-You detect an abnormal sound or vibration.
-Any other abnormalities or malfunctions.
7. To prevent the hazard of electrical shock, only trained professionals should
disassemble the machine.
Filter/Dust Sensor/Anion Producer Cleaning and Maintenance

20
Particulate sensor (approximately once every two months).
Wipe the lens with a dry cotton swab periodically to remove any dirt. (Moisture or tobacco
smoke residue may cause it to no longer work properly). First remove the particulate sensor
cover, use a dry cotton swab to wipe the lens.
• Do not insert the cotton swab into any area other than the lens.
• Be sure to unplug the power cord.
• If you are unable to see clearly, please use a light.
Friendly Reminders:
• Before cleaning and maintenance, unplug the power cord.
• Do not operate the machine in absence of a lter. It will not be able to remove the dust.
Dust taken into the machine may cause malfunction.
• When not using the machine for a long period of time, please unplug it. Power is also
consumed while in standby mode.
• You may need to replace lters sooner depending on where and how you use the
appliance (such as a household with a large smoking population or areas with higher air
pollution). Replace the lter if ltration is not noticeable.
1514
5. Particulate sensor (approximately once every two months).
Wipe the lens with a dry cotton swab periodically to remove any dirt. (Moisture or tobacco smoke residue
may cause it to no longer work properly). First remove the particulate sensor cover, use a dry cotton swab
to wipe the lens.
-Do not insert the cotton swab into any area other than the lens.
-Be sure to unplug the power cord.
-If you are unable to see clearly, please use a light.
Cotton Swab
※Friendly Reminders:
-Before cleaning and maintenance, unplug the power cord.
-Do not operate the machine in absence of a filter. It will not be able to remove the dust. Dust taken into
the machine may cause malfunction.
-When not using the machine for a long period of time, please unplug it. Power is also consumed while
in standby mode.
-You may need to replace filters sooner depending on where and how you use the appliance (such as a
household with a large smoking population or areas with higher air pollution). Replace the filter if
filtration is not noticeable.
1PC
Packaged Items
Body
Remote Control
Filters
Instructional Manual
1PC
3PCS
1PCHumidification Mesh
1PC
Table of contents
Other INTU Evolution Air Cleaner manuals