INTU Evolution X7 User manual

1
User Manual
PERFORMANCE ON DEMAND
X7

2
Dear Customer,
Thank you for purchasing our air purier. In order to facilitate the installation and use of
this machine, we recommend that you carefully read this manual, and keep it stored safely.
To ensure that you always enjoy fresh air, use this manual for qualied and standardized
installation, proper use, and maintenance. This will ensure you always enjoy fresh air.
Our anion air purier was developed by our researchers bringing together technology from
home and abroad to give you the latest generation of air purication devices.
If any questions arise from use, please consult this manual. If it is in accordance with the
warranty, we kindly welcome you to contact us with the address and phone number on the
card. We welcome any comments or suggestions you have about our product and service.

3
Contents
Performance Index ......................................................................................................................... 04
Functions ......................................................................................................................................... 04
Product Features .............................................................................................................................05
Product Appearance and Structure .............................................................................................. 06
Function Description ....................................................................................................................... 08
Replacement reminder for lter screen ........................................................................................ 09
Requirements on placement ........................................................................................................... 10
Installation of lter screen ................................................................................................................11
How to use ........................................................................................................................................ 13
Maintenance and service ................................................................................................................. 16
Precautions .......................................................................................................................................20
Packaged Items ................................................................................................................................ 21
WIFI ....................................................................................................................................................22
Troubleshooting ...............................................................................................................................24

4
Product Name Air Purier
Rated Voltage 220V-240V~
Rated Frequency 50Hz/60Hz
Rated Power 85W
Noise (Low Speed) ≤66dB(A)
PM CADR 800m3/h
PM CCM P4
Aseous pollutant CADR ≥300m3/h
Gaseous pollutant CCM F4
Applicable Area 56 ~ 96m²
Net Weight 14kg
Product Measurements (L×W×H) 40x40x66.9 cm
Method of Cleaning 1. Washable pre-lter
2. Composite activated carbon lter
+ HEPA lter
• To purify gaseous pollutants such as smoke, dust particles and formaldehyde.
• To realize the sterilization and air purication of large-space houses, oces, restaurants,
bars and entertainment places.
Performance Index
Functions

5
• Air quality is shown by the four-color LED atmosphere light.
• Double lter screens generate clean air of double volume.
• The built-in high-precision particle sensor detects air quality in real time.
• WiFi function, manual operation control, night sleep automatic control and infrared
remote control.
• MANUAL, AUTO, TOPSPEED and NIGHT models.
Characteristics of lter screen
• Primary lter screen: To lter out large particles such as human hair, pet hair, cotton wool
and other substances.
• HEPA composite lter screen: To lter out smoke, dust, pollen, oxygen source,
pollutant and ne particles over 0.3 micron, together with harmful gas such as benzene,
formaldehyde and odor.
Product Features

6
Product Appearance
and Structure
Host
HEPA composite
filter screen
HEPA composite
filter screen
Rear cover
Front cover
解锁
锁定
复位 极速
Remote controller
Primary filter screen Primary filter screen

7
Key Panel Display Panel Key Panel
Operation Panel
Air Outlet
360º Universal Wheels
Air Inlet
(both sides)
Handle
(both sides)
Sensor
8
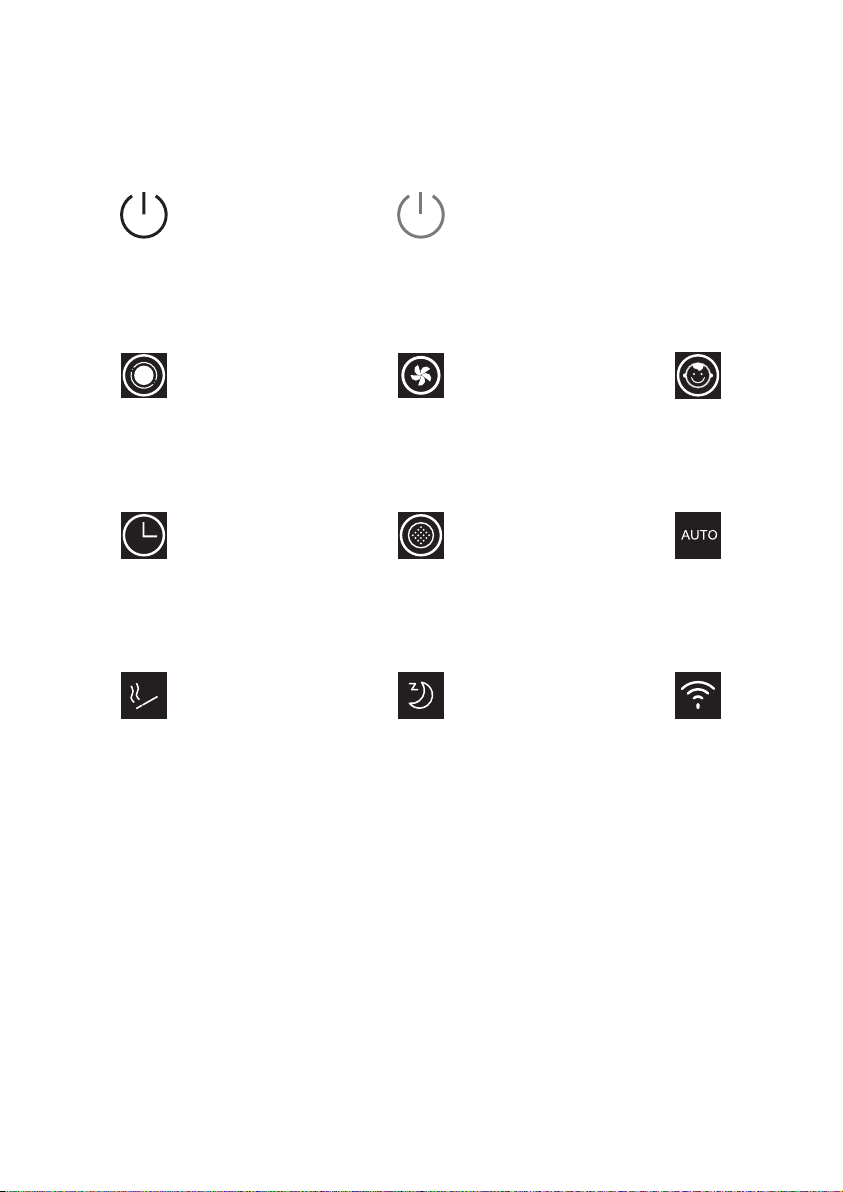
Function Description
Standby (Red) Standby (Green)
Mode Air Speed Child Lock
Timing Filter Screen AUTO
Topspeed SLEEP WiFi

9
Replacement reminder for
lter screen
The machine is designed with a reminder for regular replacement of lter screen.
When the machine has been operated for 300 hours, the red indicator ashes
to indicate the need of cleaning the lter screen. When the machine has been
running for 3,000 hours, the red indicator on the panel will be on normally to
indicate the need of replacing the lter screen. At this time, the reset function of
the key comes into eect. Keep pressing the key to reset the timing and re-start
the timing.
Product Name Normal Air Purier
Primary lter screen No display The ashing red
indicator, indicates the
cleaning of the lter
screen.
HEPA composite lter
screen
No display The normally-on red
indicator, indicates the
replacement of the lter
screen.
PM value correspondence table
Air quality
indicator
PM2.5 concentration ug/m³ 1-35 36-75 76-150 151-500
Air quality (Blue) Good (Green) Fair (Orange) Bad (Red) Dirty

10
Requirements on placement
The back is 20cm away from the wall
30cm way from the wall
30cm way from the wall
In the operation, the back of purier should be kept 20cm away from the wall, and over 30cm
on both sides.
Table of contents
Other INTU Evolution Air Cleaner manuals


