Invitrogen PowerEase PSHV00 User manual

For Research Use Only. Not for use in diagnostic procedures.
PowerEase™Touch HV Power Supply
USER GUIDE
Catalog NumbersPSHV00 (115 VAC), PSHV01 (230 VAC), PSHV02 (230 VAC Australia),
PSHV03 (230 VACChina)
Publication NumberMAN0028692
Revision A.0

Shanghai Life Technologies Biotechnology Co., LTD | No.7 Rong Chang East Street, Long Sheng Industry Park | Building 203 BDA,100176,
P.R.China
For descriptions of symbols on product labels or product documents, go to thermofisher.com/symbols-definition.
Revision history:MAN0028692 A.0 (English)
Revision Date Description
A.0 3 March 2023 New document for PowerEase™Touch HV Power Supply.
The information in this guide is subject to change without notice.
DISCLAIMER: TO THE EXTENT ALLOWED BY LAW, THERMO FISHER SCIENTIFIC INC. AND/OR ITS AFFILIATE(S) WILL NOT BE
LIABLE FOR SPECIAL, INCIDENTAL, INDIRECT, PUNITIVE, MULTIPLE, OR CONSEQUENTIAL DAMAGES IN CONNECTION WITH OR
ARISING FROM THIS DOCUMENT, INCLUDING YOUR USE OF IT.
Important Licensing Information: These products may be covered by one or more Limited Use Label Licenses. By use of these
products, you accept the terms and conditions of all applicable Limited Use Label Licenses.
TRADEMARKS: All trademarks are the property of Thermo Fisher Scientific and its subsidiaries unless otherwise specified.
©2023 Thermo Fisher Scientific Inc. All rights reserved.

Contents
■CHAPTER1Productinformation .................................................. 5
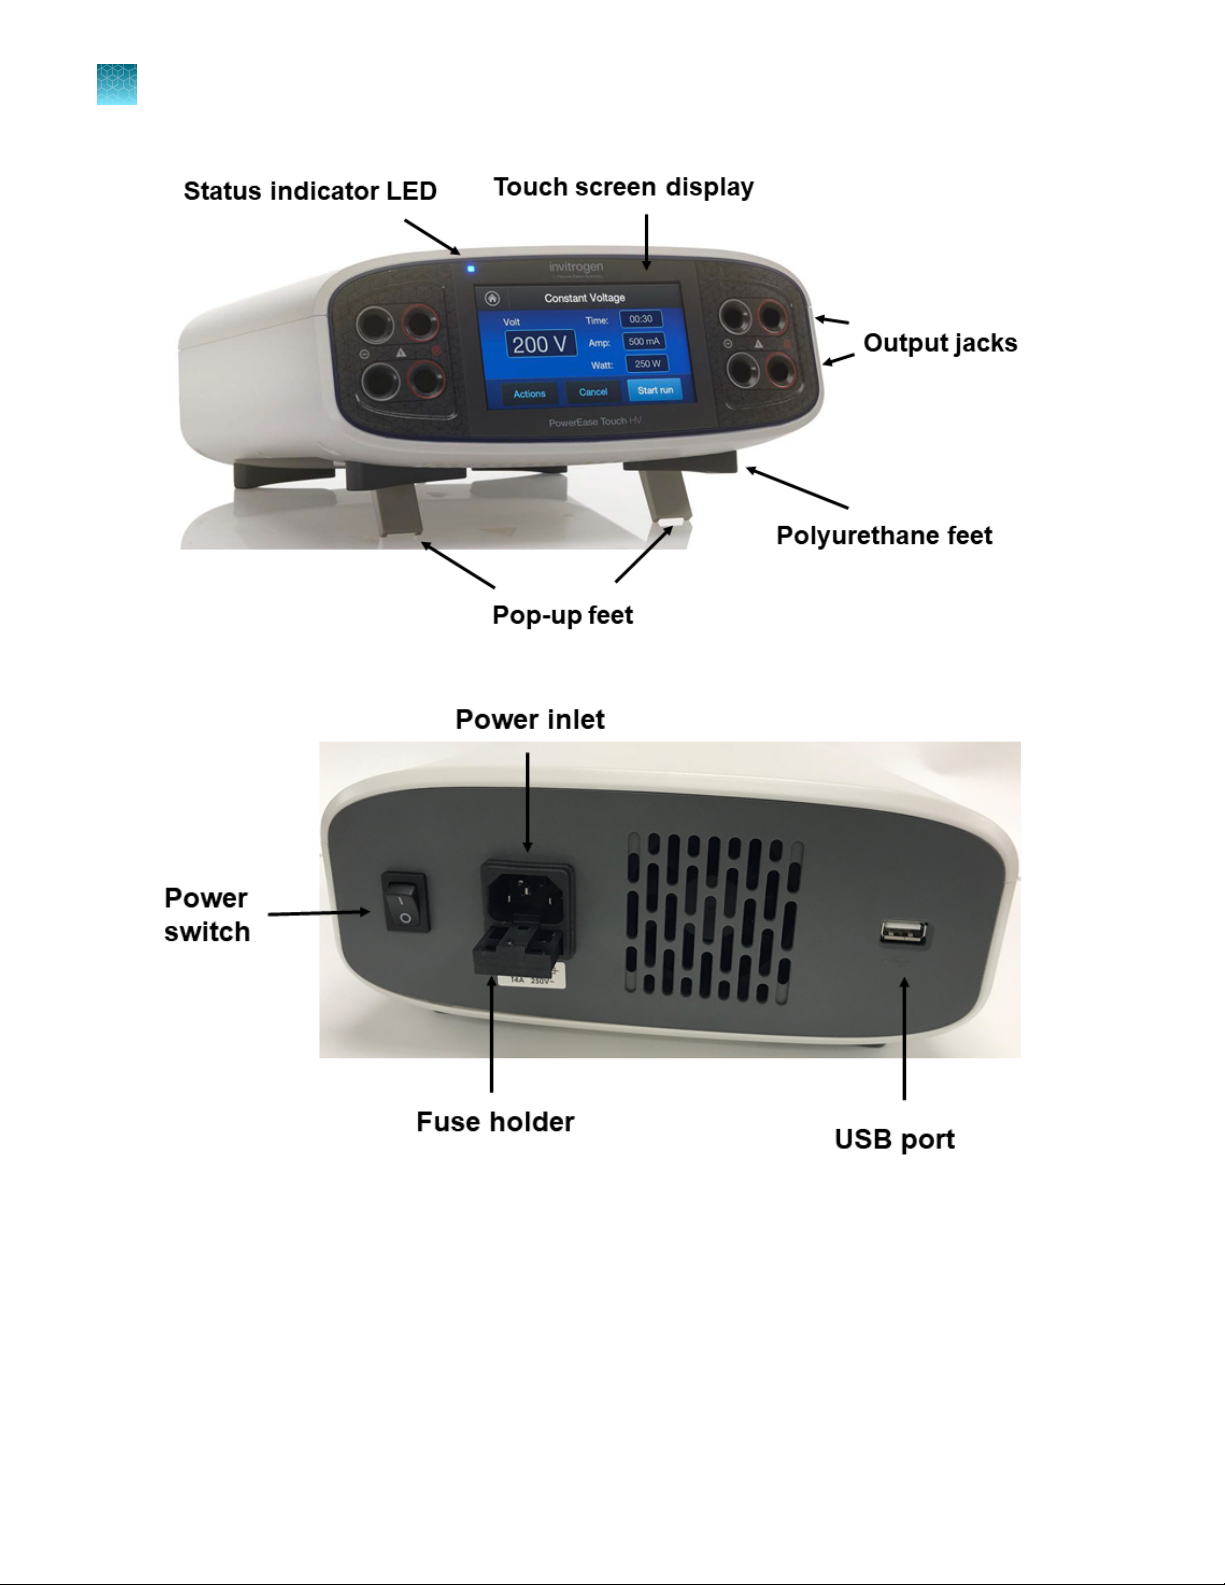
Productdescription ............................................................. 5
Product contents ................................................................ 7
■CHAPTER2Methods ............................................................... 9
Proceduralguidelines ............................................................ 9
Install the powersupply ......................................................... 10
HV adapters ................................................................... 10
Programingoptions ............................................................ 11
Menunavigation ............................................................... 11
Home screen .................................................................. 11
Set up arun ................................................................... 12
Constant current ........................................................... 13
Constantpower ........................................................... 14
VoltageRamp ............................................................. 14
Custommethods .............................................................. 14
Select a pre-programedmethod ................................................. 15
IPG stripfocusing .............................................................. 17
Managemethods .............................................................. 17
Save amethod ............................................................ 17
Edit amethod ............................................................. 18
Delete amethod ........................................................... 19
Change the name of a savedmethod ........................................ 19
Add a step ................................................................ 20
Delete a step .............................................................. 20
Save amethod ............................................................ 20
Instrument display during arun .................................................. 21
Run screen features ........................................................ 21
Method Settings screen features ............................................ 22
Instrument display after run completion .......................................... 23
Settings ....................................................................... 24
Settings screen features .................................................... 25
PowerEase™Touch HV Power Supply User Guide 3

■APPENDIXATroubleshooting .................................................... 29
■APPENDIXBRepair and maintenance .......................................... 32
Encountering Problems ......................................................... 32
Replace thefuse ............................................................... 32
■APPENDIXCElectrical parameters for electrophoresis ........................ 34
Ohm’s Law and Joule’sLaw ..................................................... 34
Resistance .................................................................... 34
Voltage ....................................................................... 34
Current ....................................................................... 34
Power ........................................................................ 34
■APPENDIXDGeneralsafety ...................................................... 35
Instrument safety .............................................................. 35
Avoid electricalshock ...................................................... 35
Avoid damage to theinstrument ............................................. 35
Dischargefunction ......................................................... 36
Explanation of symbols andwarnings ............................................ 36
Symbols andwarnings ..................................................... 36
Product regulatory compliance .................................................. 37
Federal Communications Commission Advisory ............................... 37
Environmental designcompliance ........................................... 37
■APPENDIXEProductspecifications ............................................. 38
Productspecifications .......................................................... 38
■APPENDIXFDocumentation and support ...................................... 40
Customer and technical support ................................................. 40
Limited product warranty ........................................................ 40
Contents
4PowerEase™Touch HV Power Supply User Guide

Product information
Product description
The Invitrogen™PowerEase™Touch HV Power Supply is a high voltage power supply that uses a
touchscreen interface. This power supply is ideal for DNA/RNA electrophoresis, SDS-PAGE, IEF, IPG,
and native PAGE.
The power supply unit has the following features:
•Touchscreen LCD display and user interface with clear menu prompts for easy use by hand or
stylus
•Maximum output of 3500 V, 500 mA, and 250 W (for complete specifications see “Product
specifications” on page38)
•Four sets of output terminals allow running of multiple electrophoresis units
•Pop-up feet allow change to screen viewing angle
•Sturdy polyurethane feet and stackable housing design allow stacking of power supplies
•Running modes include Constant Voltage, Constant Power, Constant Current, or Voltage Ramp
•Programming capabilities for limiting voltage (V), current (mA) and power (W)
•Ability to power o No Load Detection (NLD) for low current runs (see “No Load Detection” on
page27)
•Method programming flexibility (up to 100 methods, 20 steps per method, 999 minutes per step)
•Pause button for editing method parameters during the run
•User-adjustable device settings such as beep volume, screen brightness and sleep mode duration
•Automatic safety features such as No Load, Over Temperature, Over Voltage, Over Current, Load
Change, Ground Leak detection, and Discharge function
This manual describes the setup and operation of the PowerEase™Touch HV Power Supply and
includes important information about safety and maintenance of the unit.
1
PowerEase™Touch HV Power Supply User Guide 5

Figure1Front view of PowerEase™Touch HV Power Supply.
Figure2Rear view of PowerEase™Touch HV Power Supply.
Chapter1Product information
Product description
1
6PowerEase™Touch HV Power Supply User Guide

Figure3USB port dust cover (Rear view of PowerEase™Touch HV Power Supply).
The USB port is shipped with a plastic dust cover for protection during shipment. This cover must be removed before port
use. Remove by gently prying o with a small flat blade screwdriver.
Product contents
On receipt, examine the unit carefully for any damage incurred during transit. Any damage claims
must be filed with the carrier, and keep the supplied box for inspection. The warranty does not cover
in-transit damage.
IMPORTANT! Some power cords appear similar; use the cord approved for the country/region.
·North America – Type B power cord
·Japan – JIS 8303 power cord
·China – GB 15934-2008 power cord
·Australia/New Zealand – Type I power cord
Table1Cat. No. PSHV00 (115 VAC)
Component Quantity Regulatory mark(s) on electrical plug
PowerEase™Touch HV Power Supply 1 each —
PowerEase™Touch HV Adapters 4 sets —
Extra Fuse 1 each —
Type B Power Cord 1 each CSA
JIS 8303 Power Cord 1 each PSE
USB Cover 1 each —
Quick Reference Card 1 each —
Certificate of Performance 1 each —
Chapter1Product information
Product contents 1
PowerEase™Touch HV Power Supply User Guide 7

Table2Cat. No. PSHV01 (230 VAC)
Component Quantity Regulatory mark(s) on electrical plug
PowerEase™Touch HV Power Supply 1 each —
PowerEase™Touch HV Adapters 4 sets —
Extra Fuse 1 each —
Type G Power Cord 1 each ASTA
Type CEE 7/7 Power Cord 1 each CE
USB Cover 1 each —
Quick Reference Card 1 each —
Certificate of Performance 1 each —
Table3Cat. No. PSHV02 (230 VAC Australia)
Component Quantity Regulatory mark(s) on electrical plug
PowerEase™Touch HV Power Supply 1 each —
PowerEase™Touch HV Adapters 4 sets —
Extra Fuse 1 each —
Type I Power Cord 1 each NSW 18392
USB Cover 1 each —
Quick Reference Card 1 each —
Certificate of Performance 1 each —
Table4Cat. No. PSHV03 (230 VAC China)
Component Quantity Regulatory mark(s) on electrical plug
PowerEase™Touch HV Power Supply 1 each —
PowerEase™Touch HV Adapters 4 sets —
Extra Fuse 1 each —
Type GB 15934-2008 Power Cord 1 each CCC
USB Cover 1 each —
Quick Reference Card 1 each —
Certificate of Performance 1 each —
Chapter1Product information
Product contents
1
8PowerEase™Touch HV Power Supply User Guide

Methods
Procedural guidelines
We recommend that you carefully review these guidelines before operating the instrument.
•To ensure safe, reliable operation, always operate the PowerEase™Touch HV Power Supply in
accordance with the manufacturer’s instructions.
•Avoid exposing the power supply to liquids as these can damage the unit and void the warranty.
•IMPORTANT! Do not use the PowerEase™Touch HV Power Supply at its maximum electrical load
limits. Variations in buer conditions can result in exceeding the power supply’s maximum voltage,
current, or power output capacity and produce undesirable variations in performance.
•When using this or any electrophoresis product, we recommend that you adhere to the protocols
given in the electrophoresis product manuals.
For best results:
•We recommend using the Constant Voltage mode for protein gels, nucleic acid gels, or blots.
For the PowerEase™Touch HV Power Supply, a Voltage Ramp mode is available for IPG strip
focusing.
Note: For most electrophoresis methods, resistance increases throughout the run. Limiting the
voltage allows for an improving margin of safety over time because the current and power decrease
through the run. Also, the same voltage can be used regardless of the number or the thickness of
gels being electrophoresed.
•Avoid running samples of widely diering salt concentrations or sample buers at the same time or
on the same gel.
Note: Variations in conductivity due to dierences in buer salt concentrations can aect the run
of all the samples run at the same time.
•Properly prepare the samples.
2
PowerEase™Touch HV Power Supply User Guide 9

Install the power supply
1. Check the label located on the bottom of the power supply to ensure that the unit is compatible
with locally provided voltage.
2. Place the power supply on a level laboratory bench and position it such that the On/O switch and
the AC inlet at the rear of the power supply are easily accessible. Keep the area around the power
supply clear to ensure proper ventilation of the unit.
3. Ensure the On/O switch located at the rear of the power supply is in the O position.
4. Attach the power cord to the AC inlet of the power supply.
5. Plug the power supply into an appropriate electrical outlet (use properly grounded AC outlets and
power cords).
6. Connect the leads from the electrophoresis unit to the power supply by inserting the positive lead
(+) into the red output jack and the negative lead (–) into the black output jack.
7. Turn the AC power switch at the back of the power supply On.
IMPORTANT! If restarting the power supply after a previous use, allow at least 10 seconds to
elapse before switching the power supply back on to allow for electrical discharge.
HV adapters
The PowerEase™Touch HV Adapters enable connection of specific electrophoresis equipment to the
PowerEase™Touch HV Power Supply.
Note: When using the adapters, attach to the electrophoresis equipment electrical leads before
inserting the adapters into the power supply. Remove the adapters with the electrical leads when the
run is completed. DO NOT leave the adapters in the power supply when not in use.
Figure4PowerEase™Touch HV Adapters.
Chapter2Methods
Install the power supply
2
10 PowerEase™Touch HV Power Supply User Guide

Programing options
The PowerEase™Touch HV Power Supply can be programed to run single-step and multi-step
methods. Up to 100 user-defined methods can be saved; up to 20 steps can be saved for each
multi-step method.
This power supply is also equipped with several pre-programed gel electrophoresis, transfer and IPG
strip methods. These methods include voltage and time parameters needed to run and transfer many
precast gel products from Thermo Fisher Scientific.
This power unit has a touch-sensitive screen, so the selection of on-screen buttons and parameters is
accomplished by touching the screen at the location of the item to be selected.
Menu navigation
The PowerEase™Touch HV Power Supply uses several screen icons that simplify menu navigation.
Icon Description
The Home icon returns to the Home screen (Figure5).
The back arrow returns to the previous screen.
Left and right arrows indicate that an additional screen is available. Touch the arrow to
display the additional screen.
Touch this icon to close the current screen
Touch this icon to navigate to the Settings screen (available on the Home screen only).
Home screen
On power up, the Home screen is displayed (see Figure5).
The Set up run option will appear on the Home screen when the power supply is switched on for the
first time or if it is switched on after running an unsaved custom method (see below).
The Last run option will appear on the Home screen when the power supply is switched on after
having previously run a saved custom method or a pre-programed method. It will also be shown after
an un-saved custom method is run until the power supply is shut o.
Chapter2Methods
Programing options 2
PowerEase™Touch HV Power Supply User Guide 11

Figure5Home screens.
The following options can be selected from the Home screen:
•Select Set up run to program a new run method.
•Select Custom methods to choose a previously saved run method.
•Select Pre-programed methods to choose a pre-loaded run method.
Set up a run
1. Switch the power switch located at the rear of the unit to the On position.
2. Touch Set up run.
3. In the Method Type screen touch Voltage control, Constant current, or Constant power.
Figure6Method Type screens.
4. From Voltage control, select Constant Voltage or Voltage Ramp. Default run parameters are
shown.
Figure7Method Type screens for Voltage Control.
Chapter2Methods
Set up a run
2
12 PowerEase™Touch HV Power Supply User Guide

5. Edit the run parameters (Volts, Time, Amps, and Watts) by touching the parameter on the screen
to bring up the Run parameter edit screen.
Default maximum values for most user-defined methods are 500 V, 500 mA, and 250 W.
Voltage Ramp default maximums are 2.5 mA and 5.0 W.
Note: If run parameters are entered using the Custom methods button instead of Set up run, a
back arrow ( ) displays at the upper left corner of the run parameter screens instead of the Home
button.
Note: When using constant voltage or constant power, and operating at 500 V or less, it
is recommended that the maximum default settings not be reduced to avoid unwanted power
limitations during the run. Above 500 V, current output will be limited to a 10 mA maximum.
If No Load Detection is disabled, current output will be limited to a 5 mA maximum. If a
pre-programed IPG strip method is run, current will be further limited to a 2.5 mA maximum.
6. Enter the parameter value needed, then touch Enter to advance with the newly changed run
parameter displayed.
7. (Optional) Add or delete extra steps by touching Actions.
8. Touch Start run to start the run. When the run begins, the Run screen displays (see “Instrument
display during a run” on page21).
Note: If the run needs to be stopped or paused before completion, touch Stop or Pause. If run
parameters must be edited during the run, pause the run, enter changes, then touch Resume.
When resumed, the run time continues from where it was paused.
9. When the run is complete, the Run Complete screen displays (see Figure15).
If the method used is a custom method not yet saved, the Run Complete screen displays a
Save as option. If the method is a saved or pre-programed method, the Save as option will not
be present. This screen also displays an option to navigate to the Home screen or to repeat the
method.
Constant current
Discontinuous buer systems and, to a lesser extent, continuous systems increase resistance during
the run. With the current limiting setting on the PowerEase™Touch HV Power Supply, the voltage will
increase as resistance increases to satisfy Ohm’s law (V = IR). If no voltage limit is set and a local
fault condition occurs, such as a poor connection, very high local resistance may cause the voltage to
increase to the maximum capacity of the power supply. This may lead to local overheating and damage
to the electrophoresis cell or create unsafe conditions.
Note: When operating under constant current conditions, it is recommended to set a voltage limit on
the power supply slightly above the maximum expected for the run.
Chapter2Methods
Set up a run 2
PowerEase™Touch HV Power Supply User Guide 13

Constant power
Power is a function of voltage and current P = IV. For a typical gel run at constant power, the current
will decrease during the run, causing the voltage to increase. The power limiting function may be used
when running sequencing gels to remove the ammonium persulfate from the wells and to heat the gel to
an optimal temperature for DNA separations.
Voltage Ramp
A linear Voltage Ramp function available as a programming option can be useful for IEF and IPG
applications. Using this function, voltage is increased at a constant rate from the start voltage to the
end voltage while still being constrained by set current and power maximums.
Custom methods
Select Custom Methods on the Home screen to bring up the Custom Methods screen. From here, the
Saved Methods or Method Type screen can be selected (see Figure8).
The Saved Methods screen displays methods that have been previously saved (shown in alphabetical
order). Selecting a method brings up the run screen for the method, allowing the method to be run or
edited. The saved method can be edited by touching any of the run parameter fields.
The Method Type screen displays method types that can be entered (see Figure6).
Figure8Custom Methods screen options.
Chapter2Methods
Custom methods
2
14 PowerEase™Touch HV Power Supply User Guide

Select a pre-programed method
1. On the Home screen touch Pre-Programed Methods.
2. In the Pre-Programed Methods screen, touch either Mini gels, Midi gels, IPG strip, or
Western/Southern blotting (see Figure9).
•Selecting Mini gels brings up a list of preloaded methods for electrophoresing mini gels sold
by Thermo Fisher Scientific.
•Selecting Midi gels brings up a list of preloaded methods for electrophoresing midi gels sold
by Thermo Fisher Scientific.
•Selecting IPG strip brings up a list of preloaded methods for focusing IPG strips.
•Selecting Western/Southern blotting brings up a list of preloaded methods for transferring
gels to western or Southern blots.
3. To view method options not available on the first screen, gently swipe up with your finger.
4. Touch a method to bring up the Run screen for that method.
These screens display default running conditions (voltage and time) for the pre-programed method
selected. With the exception of IPG strip methods, the current and power settings shown are the
power supply maximums. IPG strip methods require lower current and power settings.
5. Edit the method by touching Edit, then save the method using a new name (see Figure11) or
begin the run by touching Start run.
Note: For a pre-programed method, only the run time can be edited until it is saved as a custom
method.
IMPORTANT! For a given gel buer type (Tris-Glycine, Bis-Tris, etc.) and run voltage, gel
run times are dependent on several factors. Factors such as running buer concentration and
temperature, type of gel tank used (because of the electrical path distance between anode and
cathode wires), gel separation gradient and level of running buer above the wells can aect run
times to some degree. The exact run time for your gel can be slightly dierent from the default
value given by the pre-programed method. The default run times shown in mini gel pre-programed
methods assume the use of the Invitrogen™Mini Gel Tank (Thermo Fisher Scientific (Cat. No.
A25977)). Midi gel run times assume the use of the Invitrogen™SureLock™Tandem Midi Gel Tank
(Thermo Fisher Scientific (Cat. No. STM1001)). Pre-programed IPG strip methods assume the use
of the ZOOM™IPGRunner™Mini-cell (Cat. No. ZM0001).
Chapter2Methods
Select a pre-programed method 2
PowerEase™Touch HV Power Supply User Guide 15

Figure9Pre-Programed Methods screens.
Example: The pre-programed method for running Invitrogen™NuPAGE™Bis-Tris mini gels with MES
running buer is shown in Figure10.
After the run has started, the Run screen displays real-time parameter values. To view run parameters
as they were set, touch (Right arrow) to view the Method Settings screen (see Figure14).
Figure10Pre-programed method for NuPAGE™Bis-Tris Mini Gels run with MES running buer.
Chapter2Methods
Select a pre-programed method
2
16 PowerEase™Touch HV Power Supply User Guide

IPG strip focusing
The PowerEase™Touch HV Power Supply enables IPG strip focusing by delivering high voltage with
very low current. As shown in Figure9, there are 3 pre-programed methods for the focusing of Thermo
Fisher Scientific IPG strips. Before performing an IPG focusing method, it is highly recommended
that the No Load Detection (NLD) function be disabled so the power supply continues to operate at
currents below 0.01mA (see “No Load Detection” on page27 for details).
When pre-programed IPG strip methods are run, No Load Detection automatically disables before the
run and automatically enables when the run is completed. During a run when No Load Detection is
disabled, an NLD icon ( ) displays in the upper right corner of all run screens.
IMPORTANT! When a pre-programed IPG strip method is run, because No Load Detection
is automatically disabled and very high voltages are used, the current and power outputs
are limited to 2.5 mA and 5 W maximums, respectively for user safety. No Load Detection
automatically enables after a pre-programed IPG strip method is completed, canceled, or
stopped.
Manage methods
New custom methods can be saved and pre-programed methods can be edited and then saved under
a new (custom) name. Methods can be single-step or have up to 20 steps per method. Up to 100
custom methods can be saved (Figure12).
Save a method
1. Save a new method by touching Actions on the Method Run screen (see Figure11).
2. Save an edited pre-programed method by touching Edit.
3. Touch the Name of method field in the Save As screen to bring up a keyboard that will allow entry
of the method name.
Method names can contain a maximum of 17 characters. Keyboards displaying numbers and
lower-case letters are accessed using buttons in the lower left corner of the screen.
4. Enter the name, touch Enter, then touch Save.
Note: Do not save custom methods with the same name as a pre-programed method.
Chapter2Methods
IPG strip focusing 2
PowerEase™Touch HV Power Supply User Guide 17

(New method) (Pre-programed method)
Figure11Screens for saving methods
Edit a method
1. To change any of the run parameters in a method, touch the data field for the parameter you wish
to change. Selecting a run parameter will bring up its Edit screen.
2. Enter the parameter value required, then press Enter.
Note: Do not save custom methods with the same name as a pre-programed method.
Chapter2Methods
Manage methods
2
18 PowerEase™Touch HV Power Supply User Guide

Delete a method
1. On the Home screen, touch Custom methods, then touch Saved methods (Figure5).
This will bring up the Saved Methods screen.
2. Touch Manage to bring up the Manage Saved Methods screen.
The methods are listed in alphabetical order.
3. Select the method to be deleted by touching its row in the list of displayed methods, then press
Delete.
If several methods have been saved, swipe up as you would with a smart phone to scroll down the
list.
Figure12Managing saved methods
Change the name of a saved method
1. Touch Actions, then Save As (see Figure11).
This will bring up the Save As screen with the current method name as the header.
2. Touch the method name and use the keyboard to change the name.
3. Touch Enter to save.
Chapter2Methods
Manage methods 2
PowerEase™Touch HV Power Supply User Guide 19

Add a step
1. Touch Actions, then Add step (see Figure11).
This will bring up the Constant Voltage, Constant Current, or Constant Power screen,
depending on the method type selected for the method (see Figure6).
2. Repeat for additional steps.
The step number will be displayed below the constant parameter value (see Figure13). To view
adjacent steps when viewing the constant parameter screen, touch the left arrow (previous step) or
right arrow (next step).
3. When all steps have been entered, touch Start run to initiate the run.
To next step
To previous step
Figure13Method step number location
Delete a step
1. Navigate to the step to be deleted using the left and right arrows on the Constant parameter
screen (see Figure13).
2. Touch Actions, then Delete step.
Save a method
1. Touch Actions, then Save As.
2. Touch the name field in the Save As screen to bring up the keyboard, then enter the method name.
3. Touch Enter, then touch Save.
Chapter2Methods
Manage methods
2
20 PowerEase™Touch HV Power Supply User Guide
This manual suits for next models
3
Table of contents
Other Invitrogen Power Supply manuals