IOGear GMD2025U120 User manual

1
GMD2025U120
Part No. M1032
Installation
Installation Guide
Portable Media Player

3
NOTE :
This product is intended to be used for your home and personal enjoyment. Copying and commercial use
of copyrighted material without permission of the copyright owner may be prohibited by law. The user of
this product is solely responsible for ensuring that this device is used in a manner which complies with all
copyright and applicable intellectual property laws.

3
Table of Contents
Package Contents 4
Requirements 5
Part Reference 6
Initial Setup – Remote 14
Initial Setup - Adding Media 15
Setup – AV connections 17
Media Playback 20
Setup Menu 22
General Setup 23
Audio Setup 24
Video Setup 25
Introduction and Playback of the Media Files 28
Replacing the remote battery 32
File types 33
FCC 36
CE 38
MPEG Disclaimer 39
Contact 40
Warranty 41

4
5
Package Contents
• 1 x Portable Media Player
• 1 x Remote Control
• 1 x Travel Pouch
• 1 x Universal power adapter
• 1 x USB Cable
• 1 x Component cable
• 1 x Audio cable
• 1 x User Manual

4
5
Requirements
Desktop or Notebook PC with USB 2.0 port for USB 2.0 connection
Operating systems: Windows 2000/XP/2003/Vista
This unit is not for in-car entertainment use. Unstable power or vibration may damage the unit.

6
7
Part Reference
1
3
5
2
4
6

6
7
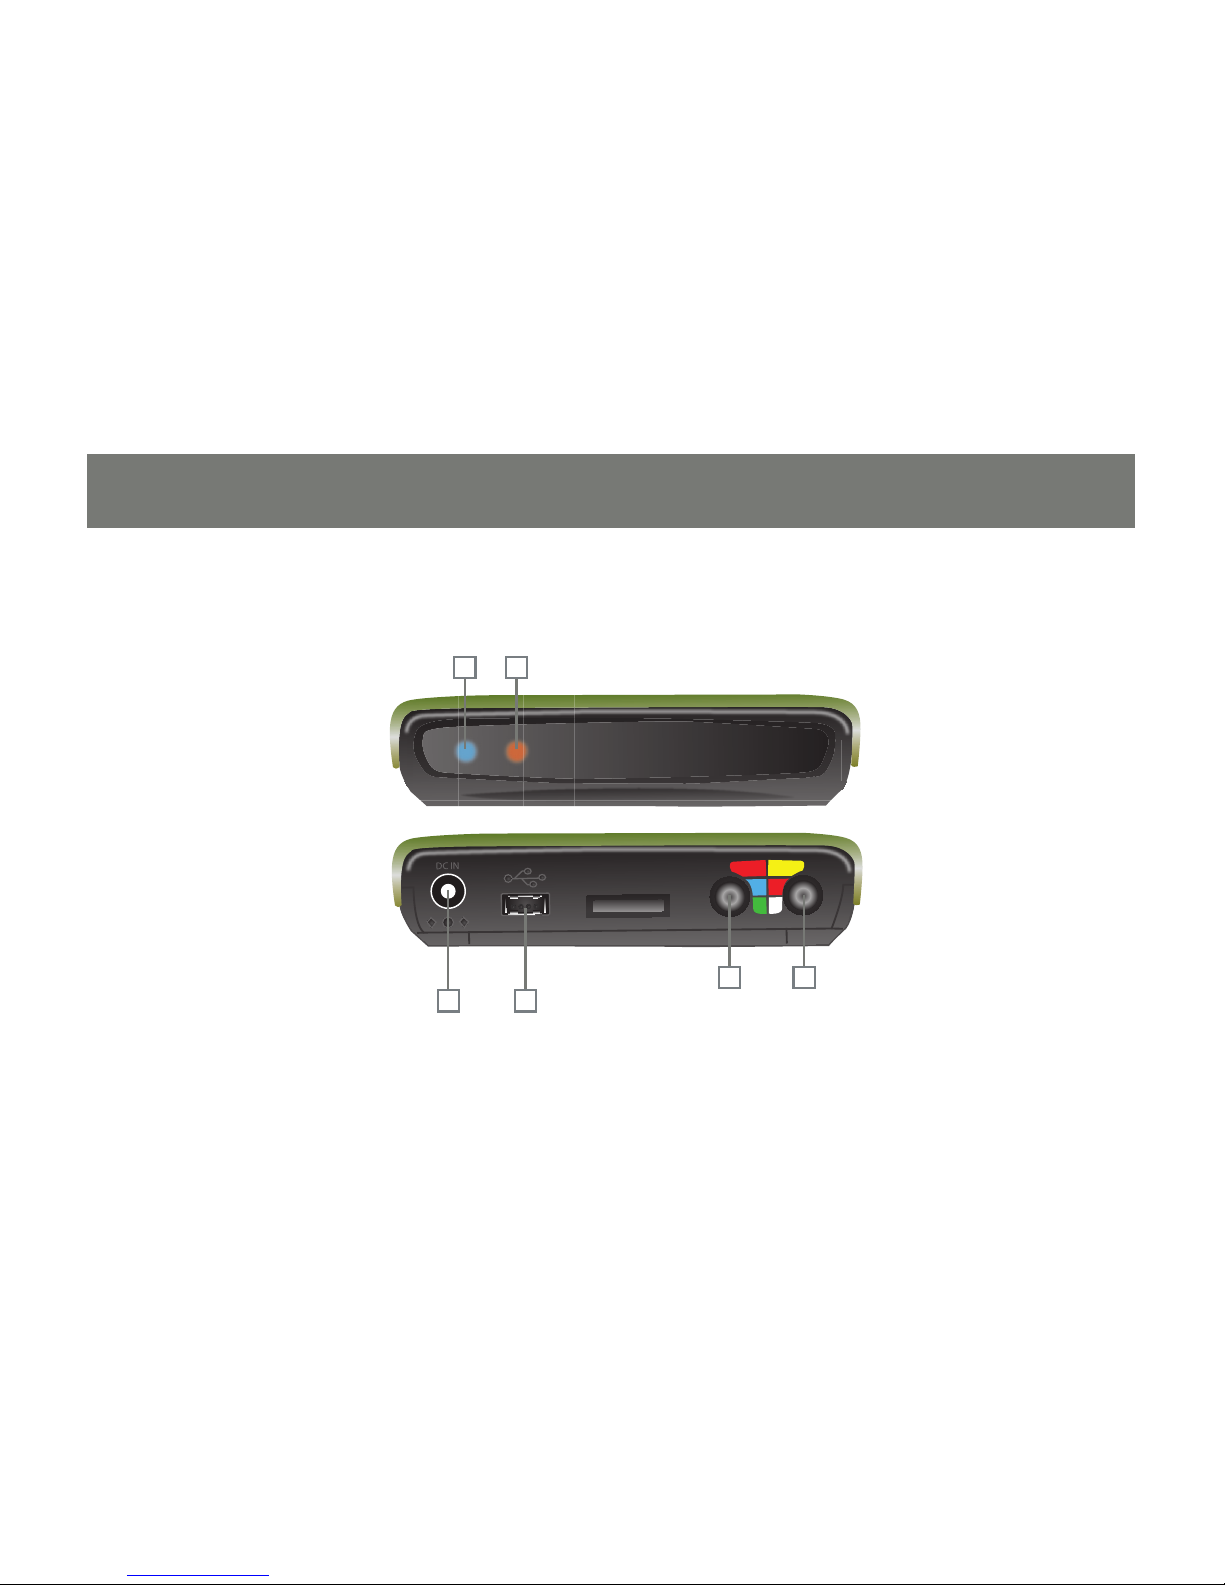
1 - Power light (blue) On: The device is on.
Blinking: The device is booting up or being accessed
via USB.
2 - Remote light (orange) One blink: Received a remote control command.
Three blinks: Remote control command not available - make sure device is
not connected to a PC.
3 - Composite audio/video Carries composite video and audio signals using the cable provided (yellow,
red, white).
4 - Component video Carries component video signals using the cable provided (red, blue, green).
5 - USB connector Connects to a PC to add or remove content from the drive.
6 - Power connector Connect to the AC adapter. (DC 5V, 2A)

8
9
1 8 9 2 10
16 15 57 6 14 413 123
11

8
9
The drive buttons labeled in orange are used to navigate the browser interface.
1 - Power Power up / Enter standby mode
2 - Up arrow Move the cursor up
3 - Right arrow Move the cursor right
4 - Down arrow Move the cursor down
5 - Left arrow Move the cursor left
6 - Setup Enter setup menu
7 - Video mode Changes video detail level

10
11
The drive buttons labeled in white are used during media playback.
8 - Menu Switch to browse mode / DVD main menu
9 - Previous Play the previous le
10 - Next Play the next le
11 - Play/Pause Play current le or folder / Pause playback
12 - Stop Stop playback
13 - FF Fast forward
14 - Rewind Rewind
15 - Subtitle Switch DVD / DivX subtitles
16 - Audio Switch audio channels

10
11

13
12
1 Power up / Enter standby mode
2 Enter setup menu
3 Open DVD title menu
4 Switch to browse mode / DVD main menu
5 Play the previous / next le
6 Fast rewind / Fast forward
7 Switch audio channels
8 Cursor keys
9 Switch DVD angles / Rotate image
10 Switch DVD / DivX subtitles
11 Play current le / folder

13
12
12 Display le properties / played time
13 Search by Title / Time
14 Stop current playback
15 Pause current playback
16 Repeat from A to B
17 Change the repeat mode
18 Enlarge image
19 Slow motion playback
20 Number pad
21 Volume up
22 Volume Down

15
14
A protective tab is inserted into the battery compartment of the remote to maintain the charge of the battery.
Before rst using the remote you must pull gently on this tab to remove it completely.
Initial Setup – Remote
PULL

15
14
Before you can enjoy your pictures, music, and movies on the go you must copy them onto the drive from a
computer. Simply connect the included USB cable to the drive and an available USB port on your home laptop or
PC. In most cases you will not need to use the power cable, but if your computer is having dif culty recognizing
the drive then please connect it as well.
Initial Setup - Adding Media
No additional software is needed - your media drive should be recognized automatically. You will see a new drive
letter appear in the My Computer window. Treat your media drive the same as you would any storage device
such as a thumb drive or memory stick. Arrange your pictures, music, and movies in folders however you wish.
Keep in mind that placing many les in one large folder will take longer to browse than several well-organized
smaller folders.

17
16
This device can play back MPEG1/VCD, MPEG2, DivX/Xvid(AVI), DVD Folder, MP3 and WAV music les,
JPEG photo and graphic les. You can store program and other data les on the drive as well.
When you have nished adding your own content to the media drive, look for a tray icon such as this one
called Safely Remove Hardware in the lower right and left click on it. Choose the menu option
that lists your media drive and wait for conrmation that it is safe to remove the drive before unplugging
the USB cable.

17
When connecting your drive to a television, projector, or receiver you may use either composite or
component cabling.
Setup – AV connections
Composite cabling is the most common and supports only standard de nition. You will need only the
cable with the yellow, white, and red connections for a composite setup.

18
19
Component cabling is considered higher quality and allows your drive to output a high resolution signal.
Keep in mind that even when your drive is displaying at high resolution the content is being scaled up
from standard resolution and is not truly high de nition.
When using component cabling you will need the cable with green, blue, and red connections. You will
also need the composite cable, but only for the audio (white and red) plugs.

18
19
After the audio and video cables are connected simply plug in the power adapter, and turn on the drive
using the power button on the drive or remote control. After a few seconds the blue power light on the
drive should stop blinking and you should see the media drive interface on your screen. If you do not,
please press the video mode button on the drive (see reference above) until you see a clear picture.
If you prefer, you may also press the Menu and Fast Forward buttons on the remote
simultaneously to do the same thing. This will cycle the unit through available output modes
until you fi nd one that is supported by your display.

20
21
When rst started, your media drive will display its contents in a list view called the browser interface. This
base level of the drive will be labeled ROOT. You may return to this point at any time by pressing the
Title button on the remote.
Media Playback
Table of contents