ION Karaoke Party User manual

Karaoke Party™
Quickstart Guide English ( 3 – 5 )
Guía de inicio rápido Español ( 6 – 8 )
Guide d'utilisation rapide Français ( 9 – 11 )
Guida rapida Italiano ( 12 – 14 )
Schnellstart-Anleitung Deutsch ( 15 – 17 )
Snelstartgids Nederlands ( 18 – 20 )
Appendix English ( 21 )

2

3
OPEN OPEN
Quickstart Guide (English)
Introduction
Box Contents
Karaoke Party
Microphone
Power Adapter
RCA Audio/Video Cable
Karaoke Disc (CD+G)
Quickstart Guide
Safety & Warranty Manual
Support
For the latest information about this product (system requirements, compatibility information,
etc.) and product registration, visit ionaudio.com.
Quick Setup
Connection Diagram
Items not listed under Introduction > Box Contents are sold separately.
Top Panel Rear Panel
Microphone
Television
Powered Speakers
Power
Power
Media
Player

4
Features
Top Panel
1. Power: Press this button to
turn Karaoke Party on or off.
2. Microphone Volume: Adjust
this knob to increase or
decrease the signal gain for the
Mic 1 and Mic 2 inputs.
3. Echo: Adjust this knob to add
an echo effect to the Mic 1 and
Mic 2 signal.
4. AVC (Automatic Voice
Control): When the AVC
function is activated, the main
vocal on a multiplex track (split
track) is removed when the
singer begins singing into the
microphone. When the singer
stops singing, the main vocal
on the multiplex track is
automatically re-activated. This
is useful during practice
sessions when a singer is
learning a song.
Note: The AVC function only
works with multiplex (split
track) recordings and not with
standard audio recordings.
5. Light: Press this switch in to
activate the light effects.
6. Program: Press this button to program the track playback order. See Programming CD Track
Playback Order for more details on using this function.
7. Rep: Press this button once to repeat a single track (a blinking dot will appear near the Rep option on
the display). Press this button again to repeat the entire CD (a solid dot will appear near the Rep
option on the display). Press this button again to turn off repeat (the dot near the Rep option on the
display will disappear).
8. Mic 1: Connect the included dynamic microphone to this 1/4” (6.35 mm) input.
9. Mic 2: For duet singing, connect another dynamic microphone (sold separately) to this 1/4” (6.35 mm)
input.
10. CD Compartment: Open the CD compartment to load/remove a CD.
11. Master Volume: Adjust this knob to control the overall volume of the internal speakers and RCA
outputs from the CD audio, microphone inputs, and Aux In sources.
12. Balance: Adjust this knob to control the separation between the left and right channel signal going to
the internal speakers.
13. Play/Pause: Press this button to play or pause the CD.
14. Stop: Press this button to stop CD playback.
15. Next Track/Scan Forward: Press and release this button to go to the next CD track. Press and hold
this button to scan forward through the current track.
Note: Scan-forward will not work with CD+G discs.
16. Previous Track/Scan Backward: Press and release this button to go to the previous CD track. Press
and hold this button to scan backward through the current track.
Note: Scan backward will not work with CD+G discs.
17. Display: This screen shows the unit’s current operation.
1
2
3
4
5
6
7
8 9
11
12
13
14
15
16
10
17

5
Rear Panel
1. Power Adapter Input: Connect the included power adapter
from here to a standard power outlet.
2. Video Output: Connect this composite video output to a
computer monitor or television.
3. RCA Output: Connect these audio outputs to powered
speakers.
4. Aux In: Connect a smartphone, MP3 player, or other audio
source to this stereo 1/8” (3.5 mm) input.
5. Battery Compartment: For mobile use, install 6 “C” type
batteries here to power Karaoke Party.
Note: If a CD will not spinup or playback, try installing fresh
batteries.
Programming CD Track Playback Order
Follow these steps to program a sequence of tracks to playback in a certain order.
1. Press the button to stop a loaded disc.
2. Press the Prog button.
3. Press the Previous Track/Next Track buttons to select a track.
4. Press the Prog button to add the selected track to the program.
5. Repeat steps 2-3 to add more tracks in a specified order.
6. Press ►ǁto start playback of the tracks.
Using the Video Output
1. Load a CD+G disc into Karaoke Party.
2. Select a CD+G track with the Previous Track/Next Track buttons and press ►ǁto start playback.
3. Connect a RCA video cable from the Video Output of Karaoke Party to a composite video input on
your television or computer monitor.
4. Adjust the television/computer monitor to select the composite video input.
Video content played through Karaoke Party will now be seen on the connected television/computer
monitor.
5
1
2
3
OPEN OPEN
4

6
OPEN OPEN
Guía de inicio rápido (Español)
Introducción
Contenido de la caja
Karaoke Party
Micrófono
Adaptador de corriente
Cable de audio/video RCA
Disco de karaoke (CD+G)
Guía de inicio rápido
Manual sobre la seguridad y garantía
Soporte
Para obtener la información más reciente acerca de este producto (requisitos de sistema,
información de compatibilidad, etc.) y registrarlo, visite ionaudio.com.
Instalación rápida
Diagrama de conexión
Los elementos que no se enumeran enIntroducción > Contenido de la caja se venden por
separado.
Panel superior Panel trasero
Micrófono
Televisión
Altavoces
alimentados
Suministro
eléctrico
Suministro
eléctrico
Reproductor
multimedia

7
Características
Panel superior
1. Encendido: Pulse este botón
para encender y apagar el
Karaoke Party.
2. Volumen del micrófono:
Ajuste esta perilla para
aumentar o disminuir la
ganancia de la señal para las
entradas Mic 1 y Mic 2.
3. Eco: Ajuste esta perilla para
agregar un efecto de eco a la
señal de Mic 1 y Mic 2.
4. AVC (Control automático de
voz): Cuando se activa la
función AVC, la voz principal
en una pista multiplexada
(pista dividida) se elimina
cuando el cantante comienza
a cantar con el micrófono.
Cuando el cantante deja de
cantar, la voz principal de la
pista multiplexada se reactiva
automáticamente. Esto resulta
útil durante sesiones de
práctica cuando el cantante
está aprendiendo una canción.
Nota: La función AVC sólo
funciona con grabaciones multiplexadas (pistas divididas) y no con grabaciones de audio estándar.
5. Luz: Pulse este interruptor para activar los efectos de luz.
6. Programa: Pulse este botón para programar el orden de reproducción de una pista. Consulte
Programación del orden de reproducción de las pistas de un CD para más detalles sobre el uso
de esta función.
7. Rep: Pulse este botón una vez para repetir una sola pista (aparecerá un punto intermitente cerca de la
opción Rep en la pantalla). Pulse este botón nuevamente para repetir el CD entero (aparecerá un
punto permanente cerca de la opción Rep en la pantalla). Pulse este botón nuevamente para
desactivar la repetición (el punto cerca de la opción Rep en la pantalla desaparecerá).
8. Mic 1: Conecte a esta entrada de 6,35 mm (1/4 pulg.) el micrófono dinámico incluido.
9. Mic 2: Para cantar duetos, conecte a esta entrada de 6,35 mm (1/4 pulg.) otro micrófono dinámico (se
vende por separado).
10. Compartimiento para CD: Abra el compartimiento para CD para insertar/expulsar un CD.
11. Volumen maestro: Ajuste esta perilla para controlar el volumen general de los altavoces internos y
salidas de RCA proveniente de las fuentes de CD de audio, entradas de micrófono y entradas
auxiliares.
12. Balance: Ajuste esta perilla para controlar la separación entre la señal del canal izquierdo y derecho
que se dirigen a los altavoces internos.
13. Reproducir/Pausa: Pulse este botón para reproducir o poner en pausa la reproducción del CD.
14. Detener: Pulse este botón para detener la reproducción del CD.
15. Pista siguiente/Explorar hacia adelante: Pulse y suelte este botón para pasar a la siguiente pista del
CD. Mantenga pulsado este botón para explorar la pista actual hacia adelante.
Nota: La exploración hacia adelante no funcionará en discos CD+G.
16. Pista anterior/Explorar hacia atrás: Pulse este botón para volver a la pista anterior del CD.
Mantenga pulsado este botón para explorar la pista actual hacia atrás.
Nota: La exploración hacia atrás no funcionará en discos CD+G.
17. Pantalla: Esta pantalla indica el funcionamiento actual de la unidad.
1
2
3
4
5
6
7
8 9
11
12
13
14
15
16
10
17

8
Panel trasero
1. Entrada para adaptador de corriente: Conecte el
adaptador de corriente incluido desde aquí a una toma de
corriente estándar.
2. Salida de vídeo: Conecte esta salida de vídeo compuesta al
monitor de un ordenador o a un televisor.
3. Salida RCA: Conecte estas salidas de audio a altavoces
alimentados.
4. Entrada auxiliar: Conecte a esta entrada estéreo de 3,5 mm
(1/8 pulg.) un reproductor de MP3, un teléfono inteligente
(smartphone) u otra fuente de audio.
5. Compartimiento para pilas: Para darle un uso móvil, instale
aquí 6 baterías de tipo "C" para alimentar al Karaoke Party.
Nota: Si los CD no giran ni se reproducen, intente instalar
pilas nuevas.
Programación del orden de reproducción de las pistas de un CD
Siga estos pasos para programar la reproducción de una secuencia de pistas en un orden determinado.
1. Pulse el botón para detener un disco cargado.
2. Pulse el botón Prog.
3. Pulse los botones Previous Track/Next Track para seleccionar una pista.
4. Pulse el botón Prog para agregar la pista seleccionada al programa.
5. Repita los pasos 2-3 para agregar más pistas en un orden especificado.
6. Pulse ►ǁ para comenzar la reproducción de las pistas.
Uso de la salida de vídeo:
1. Inserte un disco CD+G en el Karaoke Party.
2. Seleccione una pista del CD+G con los botones Previous Track/Next Track y luego pulse ►ǁ para
comenzar la reproducción.
3. Conecte un cable de vídeo RCA desde la salida de vídeo del Karaoke Party a una entrada de vídeo
compuesto en su televisor o monitor de su ordenador.
4. Ajuste el televisor/monitor del ordenador para seleccionar la entrada de vídeo compuesto.
El contenido de vídeo reproducido desde el Karaoke Party podrá verse ahora en el televisor/monitor
del ordenador conectado.
5
1
2
3
OPEN OPEN
4

9
OPEN OPEN
Guide d’utilisation rapide (Français)
Présentation
Contenu de la boîte
Karaoke Party
Microphone
Câble d’alimentation
Câble de audio/video RCA
Disque compact pour karaoké (CD+G)
Guide d’utilisation rapide
Consignes de sécurité et informations concernant la garantie
Assistance technique
Pour les toutes dernières informations concernant ce produit (configuration système,
compatibilité, etc.), veuillez visiter le site ionaudio.com.
Installation
Schéma de connexion
Les articles qui ne figurent pas dans la section Présentation > Contenu de la boîte sont
vendus séparément.
Panneau supérieur Panneau arrière
Microphone
Téléviseur
Enceintes
amplifiées
Alimentation
Alimentation
Lecteur
multimédia

10
Caractéristiques
Panneau supérieur
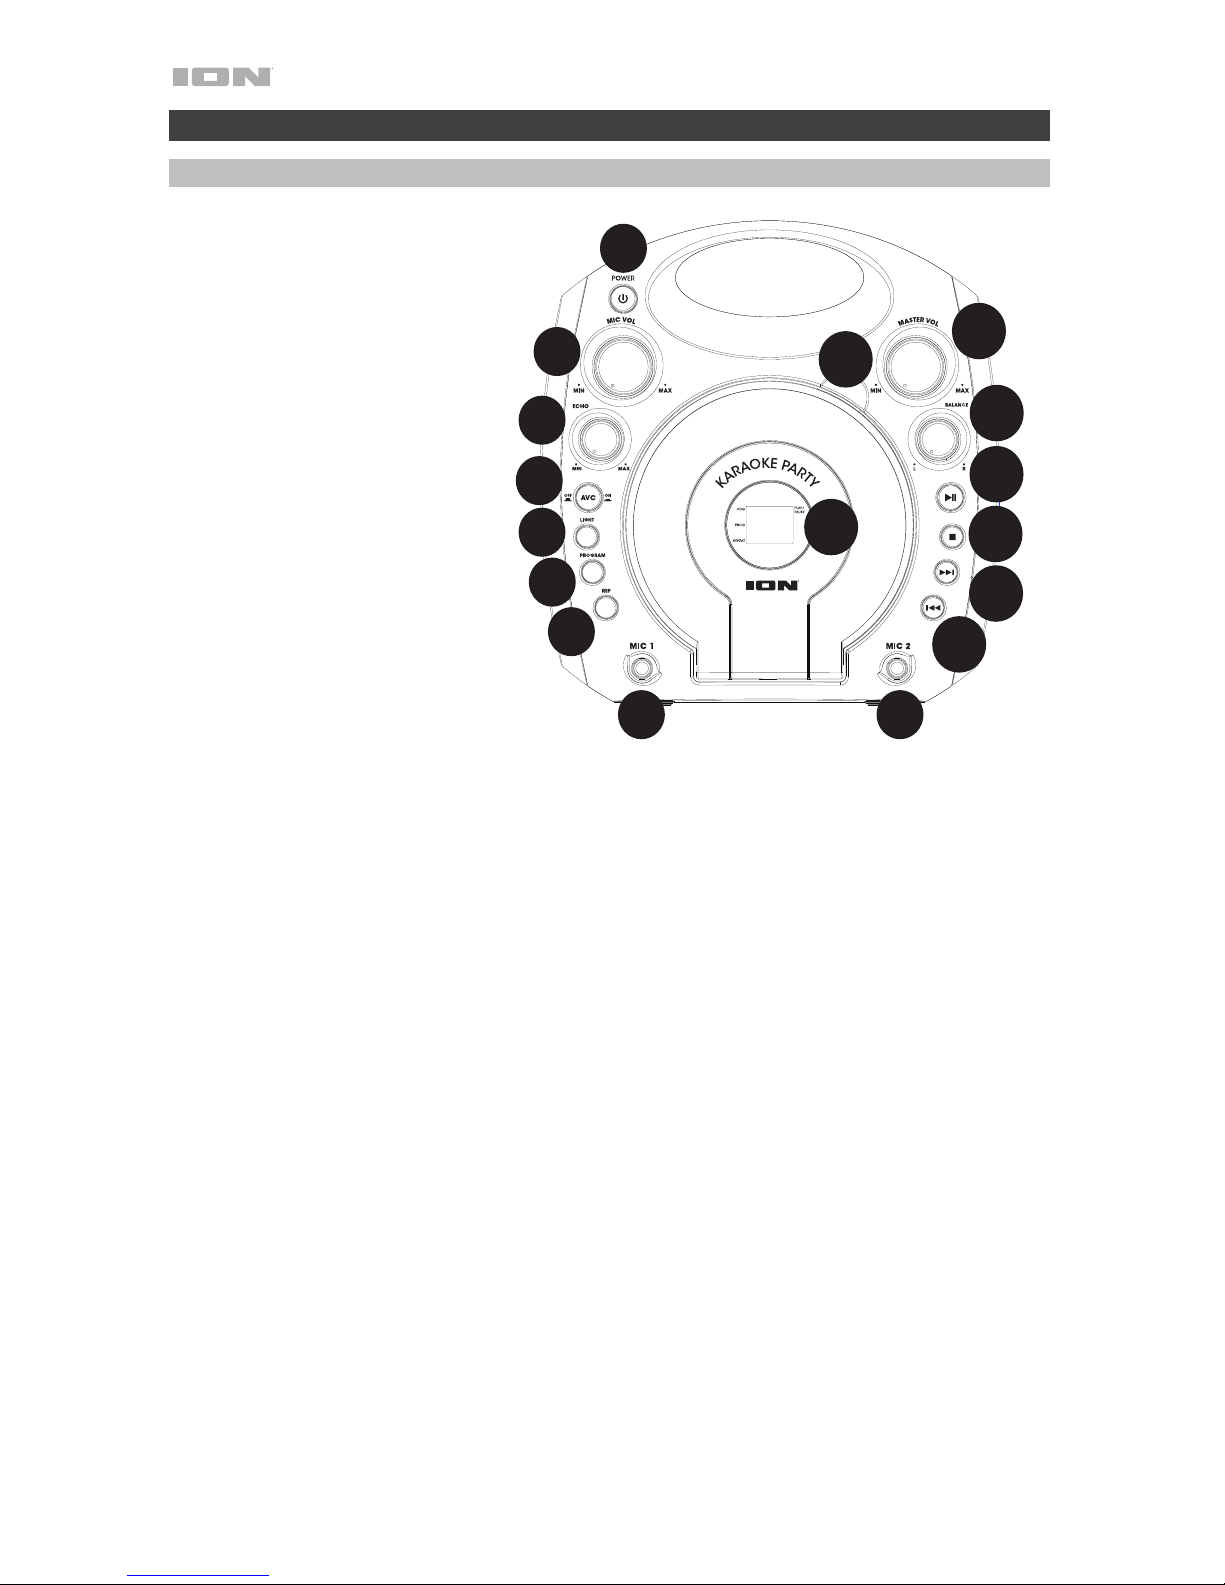
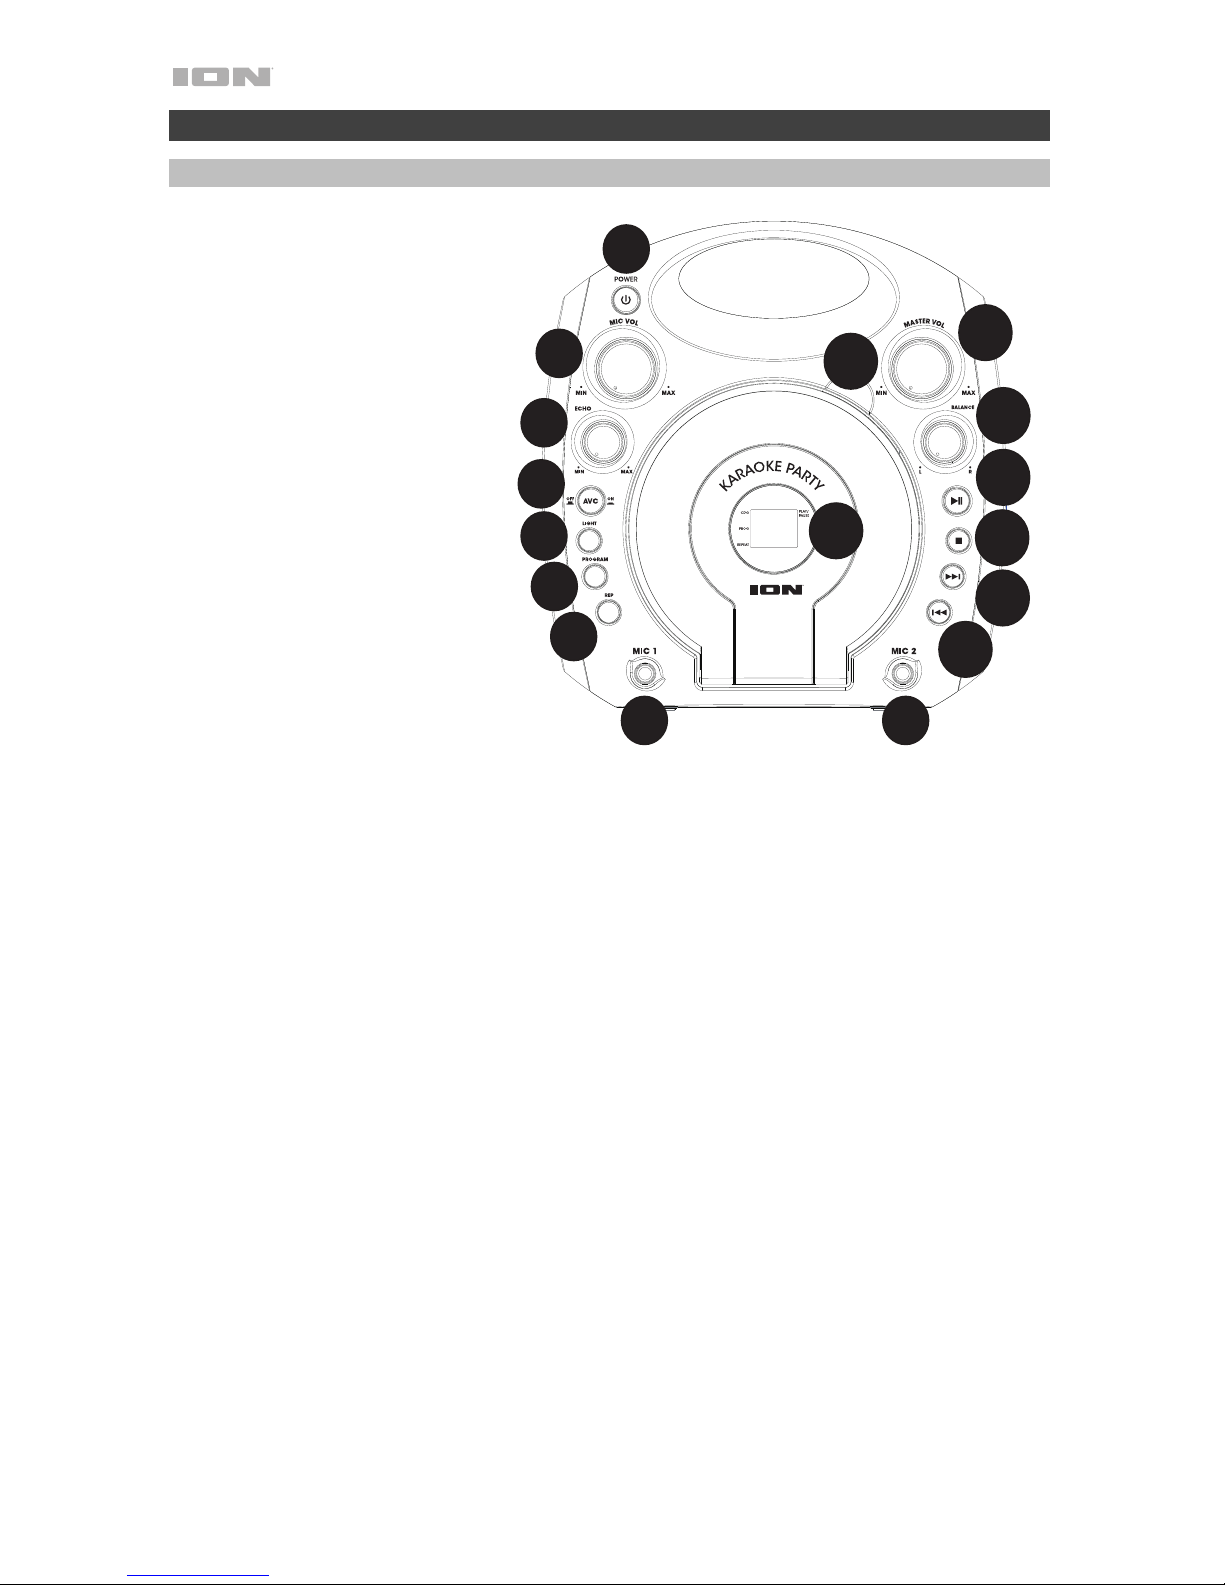
1. Interrupteur d’alimentation :
Cette touche permet de mettre
le Karaoke Party sous et hors
tension.
2. Volume microphone : Ce
bouton permet d'augmenter et
de diminuer le gain des entrées
Mic 1 et Mic 2.
3. Effet d’écho : Ce bouton
permet d'ajouter un effet d’écho
au signal Mic 1 et Mic 2.
4. Fonction AVC (commande
automatique de la voix) :
Lorsque la fonction AVC est
activée, la voix principale sur
une piste multiplex (piste
séparée) est supprimée lorsque
le chanteur ou la chanteuse
commence à chanter dans le
microphone. Lorsque le
chanteur s’arrête de chanter, la
voix principale de la piste
multiplex est automatiquement
réactivée. Ceci s’avère utile
durant les séances de pratique
lorsqu’un chanteur ou une
chanteuse apprend une
chanson.
Remarque : La fonction AVC ne fonctionne qu’avec des pistes multiplex (pistes séparées) et non pas
avec des pistes audio ordinaires.
5. Effets de lumière : Cette touche permet d’activer les effets de lumière.
6. Programme : Cette touche permet de programmer l’ordre de lecture des pistes. Veuillez consulter la
section Programmation de l’ordre de lecture des pistes du CD afin d’en savoir plus sur cette
fonction.
7. Lecture répétée : Appuyer une fois sur cette touche permet de faire la lecture répétée d’une piste (un
point clignote près de l’option Rep sur l’écran). Appuyer une deuxième fois sur cette touche permet de
faire la lecture répétée de toutes les pistes du CD (un point fixe apparaît près de l’option Rep sur
l’écran). Appuyer une troisième fois sur cette touche permet de désactiver la lecture répétée (le point
près de l’option Rep sur l’écran disparaît).
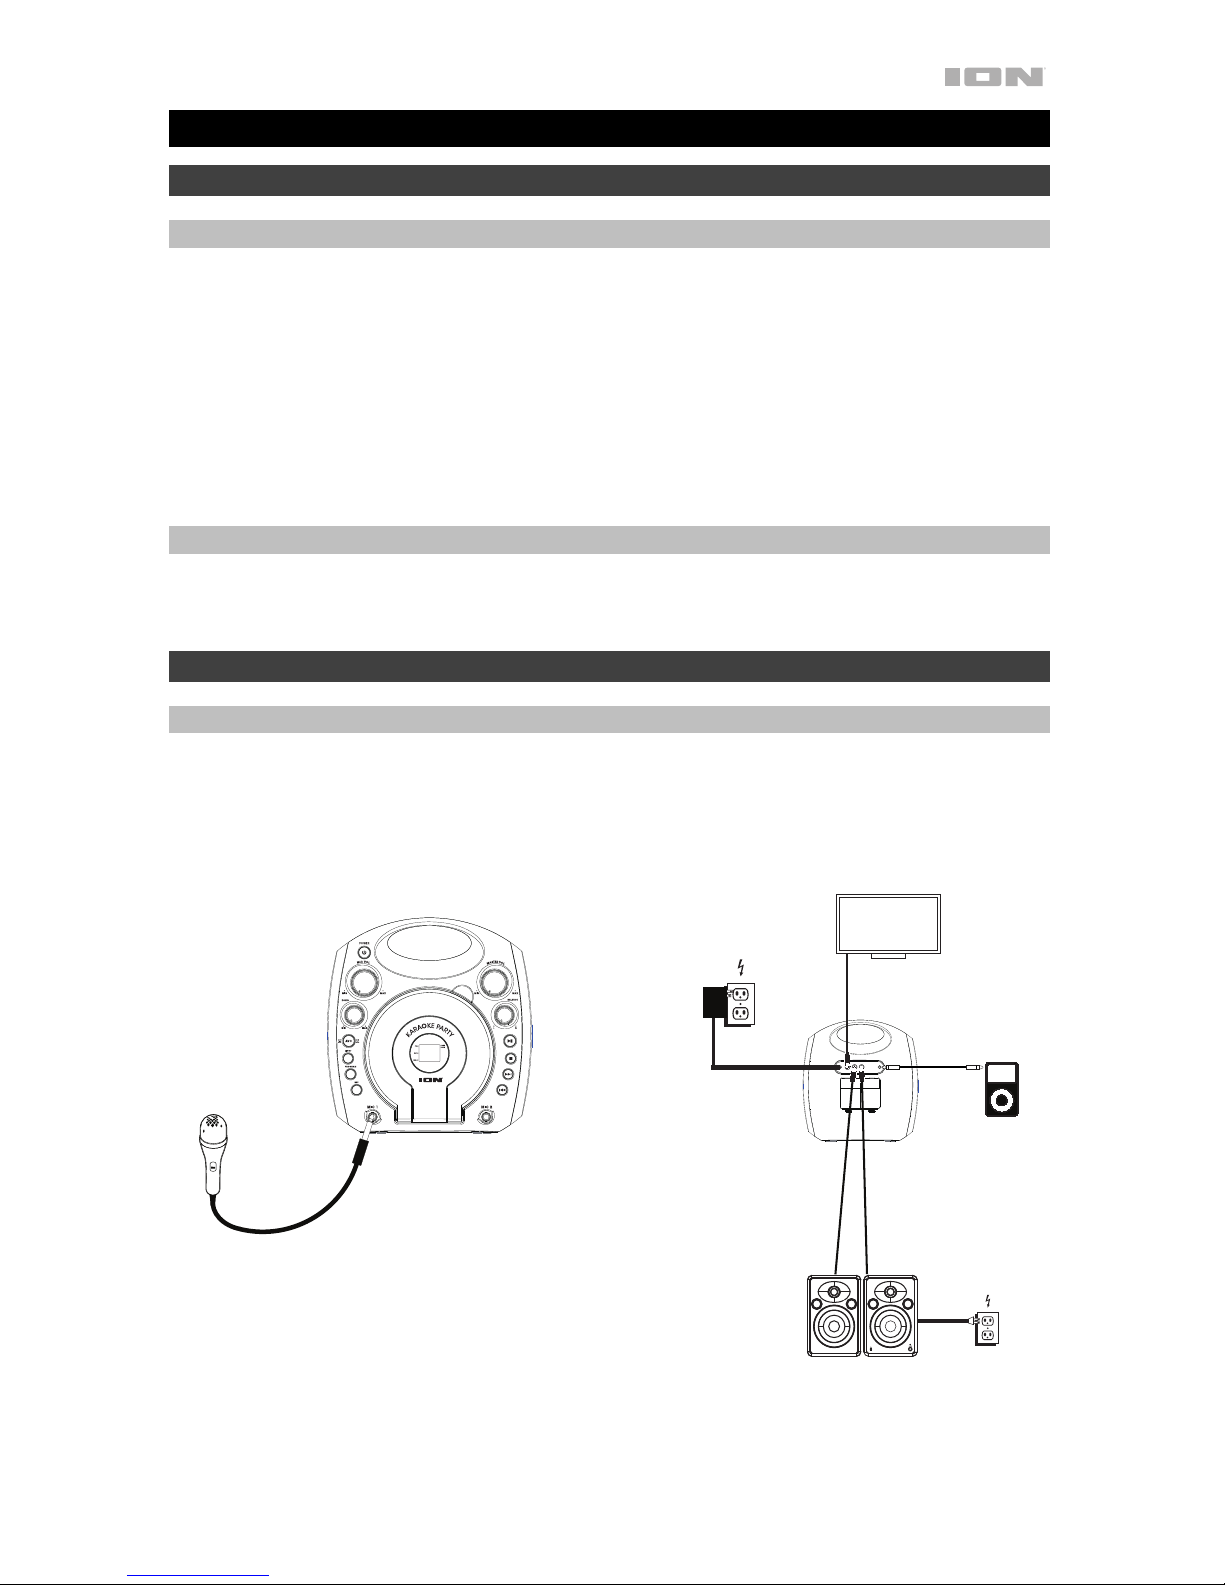
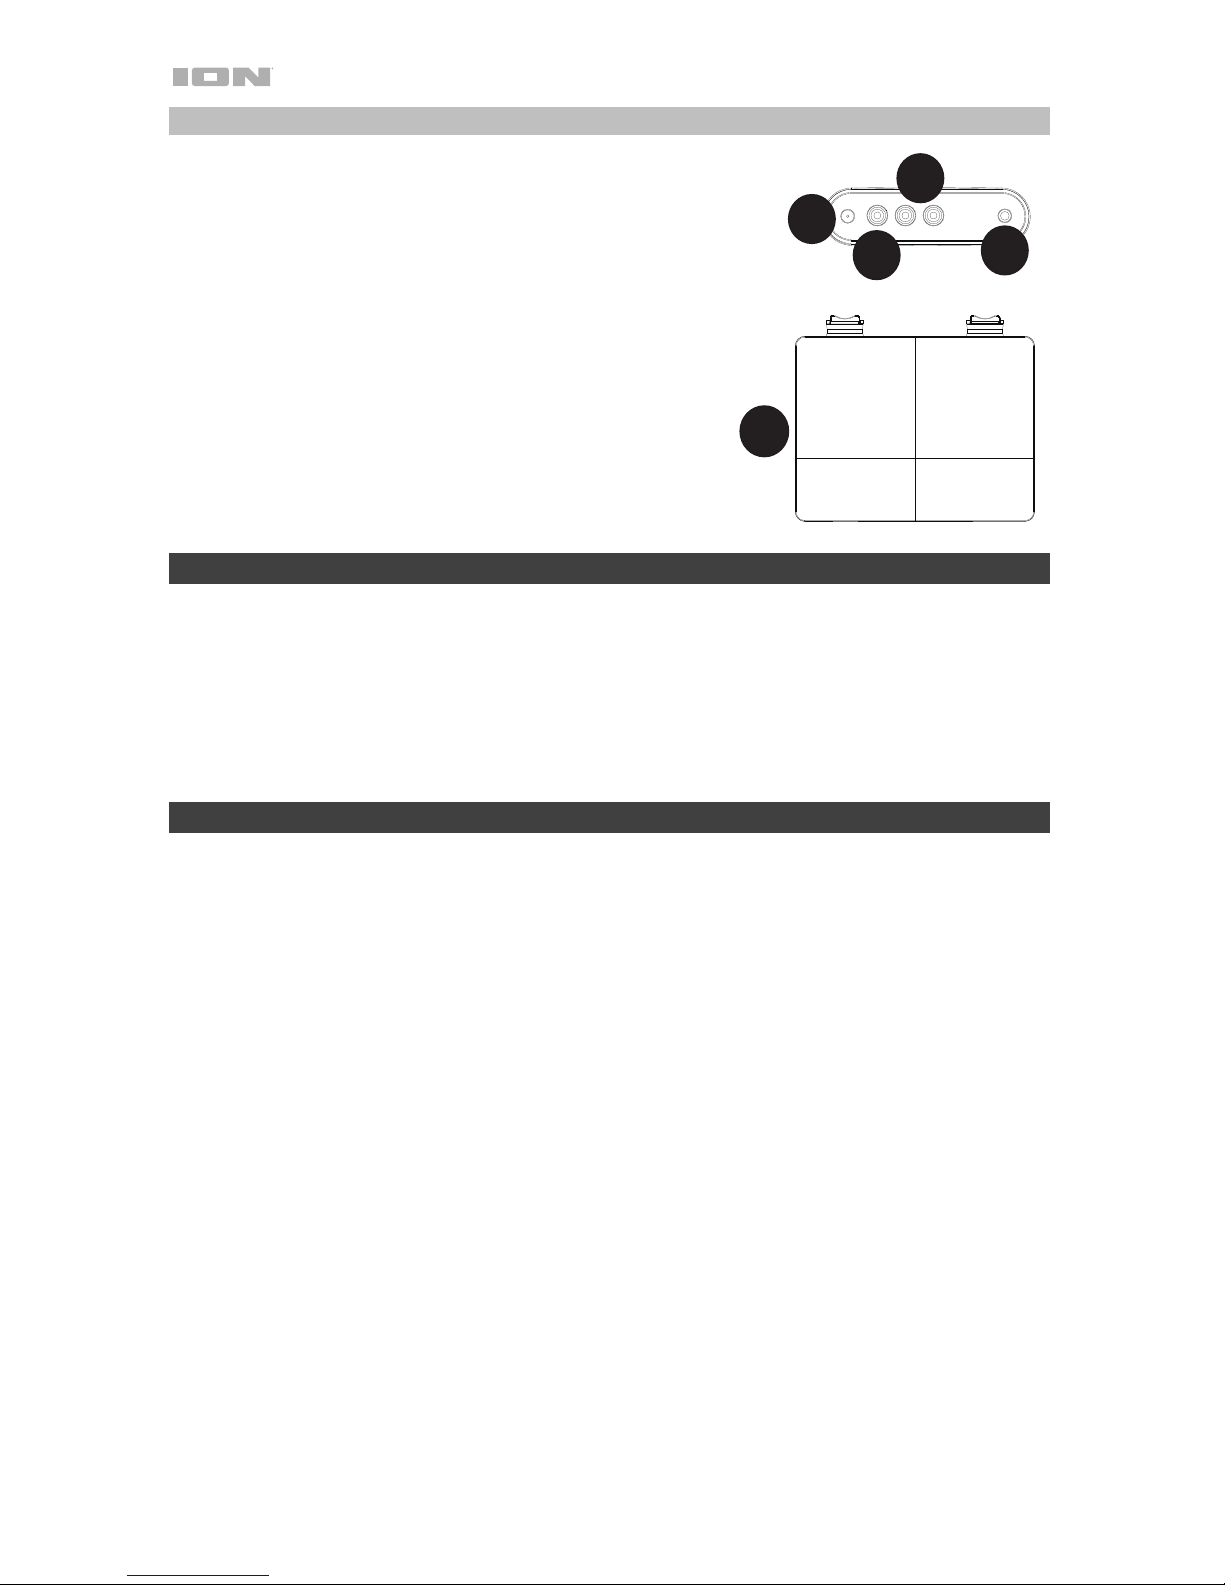
8. Entrée Mic 1 : Cette entrée 6,35 mm permet de brancher le microphone électrodynamique inclus.
9. Entrée Mic 2 : Cette entrée 6,35 mm permet de brancher un deuxième microphone électrodynamique
(non inclus) pour chanter en duo.
10. Compartiment du CD : Ouvrez le compartiment pour insérer ou retirer un CD.
11. Volume général : Ce bouton permet de régler le volume général des haut-parleurs internes, des
sorties RCA, des entrées microphone et des sources branchées aux entrées auxiliaires.
12. Équilibre : Ce bouton permet d’ajuster le niveau de séparation entre le signal du canal gauche et le
signal du canal droit acheminés aux haut-parleurs internes.
13. Lancer/interrompre la lecture : Cette touche permet de lancer ou d’interrompre la lecture du CD.
14. Arrêt de lecture : Cette touche permet d’arrêter la lecture du CD.
15. Piste suivante/balayage avant : Appuyer et relâcher cette touche permet de passer à la piste
suivante sur le CD. Maintenir cette touche enfoncée permet de balayer la piste sélectionnée vers
l’avant.
Remarque : Le balayage avant ne fonctionne pas avec les disques CD+G.
16. Piste précédente/balayage arrière : Appuyer et relâcher cette touche permet de revenir à la piste
précédente sur le CD. Maintenir cette touche enfoncée permet de balayer la piste sélectionnée vers
l’arrière.
Remarque : Le balayage arrière ne fonctionne pas avec les disques CD+G.
17. Écran d’affichage : Cet écran indique les opérations en cours de l'appareil.
1
2
3
4
5
6
7
8 9
11
12
13
14
15
16
10
17

11
Panneau arrière
1. Entrée d'alimentation : Cette entrée permet de brancher le
câble d’alimentation fourni à une prise secteur.
2. Sortie vidéo : Cette sortie vidéo composite permet de relier
l’appareil à un écran d’ordinateur ou à un téléviseur.
3. Sortie RCA : Ces sorties audio permettent de relier l’appareil
à des enceintes amplifiées.
4. Entrée auxiliaire : Cette entrée stéréo 3,5 mm permet de
brancher un smartphone, un lecteur MP3 ou une autre
source audio.
5. Compartiment des piles : Pour une utilisation mobile,
insérez 6 piles de type C dans ce compartiment afin
d’alimenter le Karaoke Party.
Remarque : Si le CD ne tourne pas ou ne veut pas jouer,
essayez d’installer des piles neuves.
Programmation de l’ordre de lecture des pistes d’un CD
Veuillez suivez les étapes suivantes afin de programmer l’ordre de lecture des pistes d’un CD.
1. Appuyez sur la touche d’arrêt de lecture () pour arrêter le CD.
2. Appuyez sur la touche programme (Prog).
3. Utilisez les touches piste précédente/piste suivante pour sélectionner une piste.
4. Appuyez sur la touche programme (Prog) pour ajouter la piste sélectionnée au programme.
5. Répétez les étapes 2 et 3 pour ajouter plus de pistes dans un ordre spécifique.
6. Appuyez sur la touche lancer/interrompre la lecture (►ǁ) afin de lancer la lecture des pistes.
Utilisation de la sortie vidéo
1. Insérez un disque CD+G le Karaoke Party.
2. Sélectionnez une piste sur le CD+G en utilisant les touches piste précédente/piste suivante, puis
appuyez sur lancer/interrompre la lecture (►ǁ) afin de lancer la lecture.
3. Utilisez un câble vidéo RCA pour brancher la sortie vidéo du Karaoke Party à l’entrée vidéo d'un
téléviseur ou d’un écran d’ordinateur.
4. Réglez les paramètres du téléviseur ou de l’écran d’ordinateur sur l’entrée vidéo composite.
Le contenu visuel joué par le biais du Karaoke Party sera affiché sur le téléviseur ou sur l’écran
d’ordinateur.
5
1
2
3
OPEN OPEN
4

12
OPEN OPEN
Guida rapida (Italiano)
Introduzione
Contenuti della confezione
Karaoke Party
Microfono
Adattatore di alimentazione
Cavo RCA audio/video
Disco karaoke (CD+G)
Guida rapida
Istruzioni di sicurezza e garanzia
Assistenza
Per le ultime informazioni in merito a questo prodotto (requisiti di sistema, informazioni sulla
compatibilità, ecc.) e per la registrazione del prodotto, recarsi alla pagina ionaudio.com.
Configurazione rapida
Schema dei collegamenti
Elementi non elencati sotto Introduzione > Contenuti della confezione sono venduti
separatamente.
Pannello superiore Pannello posteriore
Microfono
Televisione
Altoparlanti
Alimentazione
Alimentazione
Media
Player

13
Caratteristiche
Pannello superiore
1. Alimentazione (Power): premere
questo tasto per accendere o
spegnere il Karaoke Party.
2. Volume microfono: regolare
questa manopola per aumentare o
ridurre il guadagno del segnale per
gli ingressi Mic 1 e Mic 2.
3. Echo: regolare questa manopola
per aggiungere un effetto eco al
segnale Mic 1 e Mic 2.
4. AVC (Automatic Voice Control):
quando la funzione AVC è attiva, la
voce principale su una traccia
multiplex (traccia suddivisa) viene
rimossa quando il cantante inizia a
cantare nel microfono. Quando il
cantante smette di cantare, la voce
principale sulla traccia multiplex
viene riattivata automaticamente.
Questo è utile durante le sessioni di
allenamento, quando un cantante
sta imparando una canzone.
Nota bene: la funzione AVC
funziona solo con registrazioni
multiplex (traccia suddivisa) e non
con registrazioni audio standard.
5. Light (luce): premere questo interruttore per attivare gli effetti luminosi.
6. Program: premere questo tasto per programmare l'ordine di riproduzione delle tracce. Si veda
Programmazione dell'ordine di riproduzione delle tracce CD per maggiori dettagli sull'uso di
questa funzione.
7. Rep: premere una volta questo tasto per ripetere una traccia singola (un pallino lampeggiante
compare accanto all'opzione Rep a display). Premere nuovamente questo tasto per ripetere l'intero
CD (un pallino fisso compare accanto all'opzione Rep a display). Premere nuovamente questo tasto
per spegnere la ripetizione (il pallino vicino all'opzione Rep scomparirà).
8. Mic 1: collegare il microfono dinamico in dotazione a questo ingresso da 1/4" (6,35 mm).
9. Mic 2: per cantare in duetto, collegare un altro microfono dinamico (venduto separatamente) a questo
ingresso da 1/4" (6,35 mm).
10. Scomparto CD: aprire lo scomparto CD per caricare/rimuovere un CD.
11. Volume Master: regolare questa manopola per controllare il volume complessivo degli altoparlanti
interni e delle uscite RCA dal CD audio, ingressi microfono e fonti Aux In.
12. Balance: regolare questa manopola per controllare la distanza tra il segnale del canale sinistro e del
canale destro diretto agli altoparlanti interni.
13. Play/Pause: premere questo tasto per riprodurre o interrompere momentaneamente la riproduzione
del CD.
14. Stop: premere questo tasto per interrompere la riproduzione del CD.
15. Next Track/Scan Forward (traccia successiva/scansione in avanti): premere e rilasciare questo
tasto per passare alla traccia CD successiva. Tenere premuto questo tasto per scorrere avanti lungo
la traccia corrente.
Nota bene: la scansione in avanti non funziona con dischi CD+G.
16. Previous Track/Scan Backward (traccia precedente/scansione indietro): premere e rilasciare
questo tasto per passare alla traccia CD precedente. Tenere premuto questo tasto per scorrere
indietro lungo la traccia corrente.
Nota bene: la scansione indietro non funziona con dischi CD+G.
17. Display: questo schermo mostra l'operazione corrente dell'apparecchio.
1
2
3
4
5
6
7
8 9
11
12
13
14
15
16
10
17

14
Pannello posteriore
1. Ingresso adattatore di alimentazione: collegare
l'adattatore di alimentazione in dotazione da questo livello a
una presa di alimentazione standard.
2. Uscita video: collegare questa uscita video composita al
monitor di un computer o a una televisione.
3. Uscita RCA: collegare queste uscite audio agli altoparlanti
alimentati.
4. Ingresso Aux: collegare uno smartphone, un lettore MP3 o
altre fonti audio a questo ingresso stereo da 1/8” (3,5 mm).
5. Scomparto batterie: per un utilizzo portatile, inserire 6
batterie “C” a questo livello per alimentare il Karaoke Party.
Nota bene: se un CD non gira o non viene riprodotto,
provare a inserire batterie nuove.
Programmazione dell'ordine di riproduzione delle tracce CD
Procedere come segue per programmare una sequenza di tracce da riprodurre in un determinato ordine.
1. Premere il tasto per interrompere un disco caricato.
2. Premere il tasto Prog.
3. Premere i tasti Previous Track/Next Track (traccia precedente/successiva) per selezionare una
traccia.
4. Premere il tasto Prog per aggiungere la traccia selezionata al programma.
5. Ripetere i passaggi 2-3 per aggiungere ulteriori tracce in un ordine specifico.
6. Premere ►ǁper avviare la riproduzione delle tracce.
Utilizzo dell'uscita video
1. Caricare un disco CD+G nel Karaoke Party.
2. Selezionare una traccia CD+G con i tasti Previous Track/Next Track (traccia precedente/successiva)
e premere ►ǁper avviare la riproduzione.
3. Collegare un cavo video RCA dall'uscita video del Karaoke Party a un ingresso video composito del
televisore o del monitor del computer.
4. Regolare il televisore/monitor del computer per selezionare l'ingresso video composito.
Il contenuto video riprodotto tramite il Karaoke Party sarà ora visualizzato sul televisore/monitor del
computer collegato.
5
1
2
3
OPEN OPEN
4

15
OPEN OPEN
Schnellstart-Anleitung (Deutsch)
Einführung
Lieferumfang
Karaoke Party
Mikrofon
Netzteil
Cinch-Audio-/Video-Kabel
Karaoke-Disc (CD+G)
Schnellstart-Anleitung
Sicherheitshinweise und Garantieinformationen
Kundendienst
Für die neuesten Informationen zu diesem Produkt (Systemanforderungen, Informationen zur
Kompatibilität etc.) und für die Produktregistrierung besuchen Sie ionaudio.com.
Schnelles Einrichten
Anschlussdiagramm
Teile, die nicht unter Einführung > Lieferumfang angegeben sind, sind separat erhältlich.
Oberseite Rückseite
Mikrofon
Fernsehen
Aktivlautsprecher
Stromversorgung
Stromversorgung
Media
Player

16
Funktionen
Oberseite
1. Stromversorgung: Drücken Sie diese Taste,
um Karaoke Party ein- oder auszuschalten.
2. Mikrofonlautstärke: Mit diesem Regler
können Sie die Signalverstärkung für die Mic 1
und Mic 2-Eingänge erhöhen oder verringern.
3. Echo: Mit diesem Regler fügen Sie dem Mic 1-
und Mic 2-Signal einen Echo-Effekt hinzu.
4. AVC (Automatische Sprachsteuerung):
Wenn die AVC-Funktion aktiviert ist, wird die
Hauptgesangsspur eines Multiplex-Tracks
(Split Track) entfernt, sobald der Sänger
beginnt ins Mikrofon zu singen. Wenn der
Sänger zu singen aufhört, wird die
Hauptgesangsspur des Multiplex-Tracks
automatisch wieder aktiviert. Dies ist beim
Erlernen eines Songs nützlich.
Hinweis: Die AVC-Funktion funktioniert nur mit
Multiplex (Split Track)-Aufnahmen und nicht
mit standardmäßigen Audioaufnahmen.
5. Beleuchtung: Betätigen Sie diesen Schalter,
um die Lichteffekte zu aktivieren.
6. Programmieren: Drücken Sie diese Taste, um
die Wiedergabereihenfolge zu programmieren. Siehe Programmieren der CD-Track-
Wiedergabereihenfolge für nähere Details zu dieser Funktion.
7. Rep: Drücken Sie einmal auf diese Taste, um einen einzigen Track zu wiederholen (ein blinkender
Punkt wird in der Nähe der Rep-Option am Display angezeigt). Drücken Sie diese Taste erneut, um die
gesamte CD zu wiederholen (ein durchgehend angezeigter Punkt ist in der Nähe der Rep-Option am
Display zu sehen). Drücken Sie diese Taste erneut, um die Wiederholung wieder auszuschalten (der
Punkt in der Nähe der Rep-Option am Display verschwindet).
8. Mic 1: Schließen Sie das mitgelieferte dynamische Mikrofon an diesen 1/4" (6,35 mm) Eingang an.
9. Mic 2: Wenn Sie im Duett singen, schließen Sie ein weiteres dynamisches Mikrofon (separat erhältlich)
an diesen 1/4 "(6,35 mm) Eingang an.
10. CD-Fach: Öffnen Sie das CD-Fach, um eine CD einzulegen/herauszunehmen.
11. Master-Lautstärke: Mit diesem Regler steuern Sie die Gesamtlautstärke der internen Lautsprecher
und der Cinch-Ausgänge von CD-Audiosignalen, Mikrofon-Eingängen und Aux In-Quellen.
12. Balance: Mit diesem Regler steuern Sie die Trennung zwischen dem linken und rechten Kanalsignal,
das an die internen Lautsprecher gesendet wird.
13. Wiedergabe/Pause: Drücken Sie diese Taste, um die Wiedergabe der CD anzuhalten oder
fortzusetzen.
14. Stopp: Drücken Sie diese Taste, um die CD-Wiedergabe zu stoppen.
15. Nächster Track/Suchlauf: Drücken Sie kurz diese Taste, um zum nächsten CD-Track zu springen.
Halten Sie diese Taste gedrückt, um im aktuellen Track vorzuspulen.
Hinweis: Der Suchlauf funktioniert bei CD+G-Discs nicht.
16. Vorheriger Track/Rücklauf: Drücken Sie kurz diese Taste, um zum vorherigen CD-Track zu springen.
Halten Sie diese Taste gedrückt, um im aktuellen Track zurückzuspulen.
Hinweis: Der Rücklauf funktioniert bei CD+G-Discs nicht.
17. Display: Dieses Display zeigt die aktuelle Funktion des Geräts.
1
2
3
4
5
6
7
8 9
11
12
13
14
15
16
10
17

17
Rückseite
1. Netzteilbuchse: Schließen Sie hier den mitgelieferten
Netzadapter an und stecken das andere Ende in eine
Standard-Steckdose.
2. Video-Ausgang: Verbinden Sie diesen Composite-Video-
Ausgang mit einem Computermonitor oder Fernseher.
3. Cinch-Ausgang: Verbinden Sie diese Audioausgänge mit
Aktivlautsprechern.
4. Aux-Eingang: Schließen Sie ein Smartphone, einen MP3-
Player oder andere Audioquellen an diesen 1/8" (3,5 mm)
Stereo-Eingang an.
5. Batteriefach: Für den mobilen Einsatz legen Sie hier 6 "C"-
Batterien in Karaoke Party ein.
Hinweis: Falls eine CD nicht abgespielt wird, legen Sie
frische Batterien ein.
Programmieren der CD-Track-Wiedergabereihenfolge
Gehen Sie wie folgt vor, um eine Trackfolge zu programmieren, die in einer bestimmten Reihenfolge
wiedergegeben wird.
1. Drücken Sie die Taste , um eine eingelegte Disc zu stoppen.
2. Drücken Sie die Taste Prog.
3. Drücken Sie die Tasten Vorheriger/Nächster Track, um einen Track auszuwählen.
4. Drücken Sie die Taste Prog, um den ausgewählten Track dem Programm hinzuzufügen.
5. Wiederholen Sie die Schritte 2-3, um weitere Tracks in einer bestimmten Reihenfolge hinzuzufügen.
6. Drücken Sie ►ǁ, um die Wiedergabe der Tracks zu starten.
Verwendung des Videoausgangs
1. Legen Sie eine CD+G-Disc in Karaoke Party ein.
2. Wählen Sie einen CD+G-Track mit den Tasten Vorheriger/Nächster Track und drücken ►ǁ, um die
Wiedergabe zu starten.
3. Schließen Sie ein RCA-Videokabel an den Videoausgang von Karaoke-Party und an den Composite-
Video-Eingang Ihres Fernsehgeräts oder Computer-Monitors an.
4. Stellen Sie den Fernseher/Computer-Monitor so ein, dass der Composite-Video-Eingang ausgewählt
ist.
Über Karaoke-Party abgespielte Videoinhalte sind nun am angeschlossenen Fernseher/Computer-
Monitor zu sehen.
5
1
2
3
OPEN OPEN
4

18
OPEN OPEN
Snelstartgids (Nederlands)
Inleiding
Inhoud van de doos
Karaoke Party
Microfoon
Stroomadapter
RCA audio/videokabel
Karaokecd (CD+G)
Snelstartgids
Handleiding veiligheid en garantie
Ondersteuning
Voor de laatste informatie over dit product (systeemvereisten, informatie over compatibiliteit,
enz.) en productregistratie, ga naar: ionaudio.com.
Snelle opstelling
Aansluitschema
Artikelen die niet zijn vermeld in Inleiding > Inhoud van de doos worden afzonderlijk
verkocht.
Bovenpaneel Achterpaneel
Microfoon
Televisie
Actieve luidsprekers
Voeding
Voeding
Multimediaspeler

19
Kenmerken
Bovenpaneel
1. Aan-uit: Druk op deze knop om de
Karaoke Party aan of uit te zetten.
2. Microfoonvolume: Draai aan deze
knop om het signaal van de Mic1- en
Mic2-ingangen te versterken of
verzwakken.
3. Echo: Draai aan deze knop om een
galmeffect toe te voegen aan het Mic1-
en Mic2-signaal.
4. AVC (Automatische stemcontrole):
Als de AVC-functie actief is, wordt de
leadstem op een multiplex nummer
(gesplitst nummer) verwijderd wanneer
de zanger in de microfoon begint te
zingen. Wanneer de zanger stopt met
zingen, wordt de leadstem op het
multiplex nummer automatisch opnieuw
geactiveerd. Dit is handig tijdens het
oefenen, voor zangers die leren zingen.
Opmerking: De AVC-functie werkt
alleen met multiplex (gesplitste)
opnames en niet met standaard audio-
opnames.
5. Licht: Druk op deze schakelaar om de
lichteffecten te activeren.
6. Programma: Druk op deze knop om de afspeelvolgorde van de nummers te programmeren. Zie De
afspeelvolgorde van een cd programmeren voor meer details over het gebruik van deze functie.
7. Herh: Druk één keer op deze knop om een enkel nummer te herhalen (naast de Rep-optie op het
scherm verschijnt een knipperende stip). Druk nog een keer op deze knop om de volledige cd te
herhalen (naast de Rep-optie op het scherm verschijnt een vaste stip). Druk nogmaals op deze knop
om het herhalen stop te zetten (de stip naast de Rep-optie op het scherm verdwijnt).
8. Mic 1: Sluit de meegeleverde dynamische microfoon aan op deze ingang van 1/4" (6,35 mm).
9. Mic 2: Sluit om te zingen als duet een extra dynamische microfoon aan op deze ingang van 1/4"
(6,35 mm).
10. Cd-vak: Open het cd-vak om een cd te laden/verwijderen.
11. Hoofdvolume: Draai aan deze knop om het algemene volume van de interne luidsprekers en RCA-
uitgangen voor de cd-audio, microfooningangen en Aux In-bronnen te bedienen.
12. Balans: Draai aan deze knop om de scheiding tussen de linkse en rechtse kanalen naar de interne
luidsprekers te bedienen.
13. Afspelen/pauzeren: Druk op deze knop om de cd af te spelen of te onderbreken.
14. Stoppen: Druk op deze knop om een cd te stoppen.
15. Volgend nummer/vooruitspoelen: Deze knop indrukken en loslaten om naar het volgende nummer
op de cd te gaan. Deze knop ingedrukt houden om vooruit te spoelen door het huidige nummer.
Opmerking: Vooruitspoelen werkt niet met CD+G-cd's.
16. Vorig nummer/achteruitspoelen: Deze knop indrukken en loslaten om naar het vorige nummer op de
cd te gaan. Deze knop ingedrukt houden om achteruit te spoelen door het huidige nummer.
Opmerking: Achteruitspoelen werkt niet met CD+G-schijven.
17. Scherm: Op dit scherm wordt de huidige werkingsstatus van het apparaat weergegeven.
1
2
3
4
5
6
7
8 9
11
12
13
14
15
16
10
17

20
Achterpaneel
1. Ingang voor stroomadapter: Sluit de meegeleverde
stroomadapter aan tussen deze ingang en een standaard
stopcontact.
2. Video-uitgang: Sluit deze composietvideo-uitgang aan op
een computerscherm of televisie.
3. RCA-uitgang: Sluit deze audio-uitgangen aan op actieve
luidsprekers.
4. Aux In: Sluit een smartphone, mp3-speler of andere
audiobron aan op deze stereoingang van 1/8” (3,5 mm).
5. Batterijvak: Plaats hier voor mobiel gebruik 6 type “C”-
batterijen om de Karaoke Party te voeden.
Opmerking: Als een cd niet draait of niet afspeelt, installeer
dan nieuwe batterijen.
De afspeelvolgorde van een cd programmeren
Volg deze stappen om een opeenvolging van nummers te programmeren en ze in een bepaalde volgorde af
te spelen.
1. Druk op de toets om een cd stop te zetten.
2. Druk op de knop Prog.
3. Druk op de knoppen Vorig nummer/Volgend nummer om een nummer te selecteren.
4. Druk op de knop Prog om het geselecteerde nummer aan het programma toe te voegen.
5. Herhaal stappen 2-3 om extra nummers in een bepaalde volgorde toe te voegen.
6. Druk op ►ǁom de nummers te beginnen afspelen.
De Video-uitgang gebruiken
1. Plaats een CD+G-cd in de Karaoke Party.
2. Selecteer een CD+G-nummer met de toetsen Vorig nummer/Volgend nummer en druk op ►ǁom
het afspelen te starten.
3. Sluit een RCA-videokabel van de Video-uitgang van de Karaoke Party aan op een composietvideo-
ingang van uw televisie of computerscherm.
4. Pas de televisie/het computerscherm aan om de composietvideo-ingang te selecteren.
Videomaterialen die worden afgespeeld door de Karaoke Party verschijnen nu op de aangesloten
televisie/computerscherm.
5
1
2
3
OPEN OPEN
4
Table of contents
Languages:
Other ION Karaoke System manuals

ION
ION Party Rocker Express User manual

ION
ION Karaoke Star User manual

ION
ION star power User manual

ION
ION BLOCK ROCKER FLASH User manual

ION
ION iPK5B User manual

ION
ION Party Rocker Max MK2 User manual

ION
ION PARTY ROCKER EFFECTS User manual

ION
ION PARTY ROCKER User manual

ION
ION Karaoke Pro User manual

ION
ION HOUSE PARTY User manual