iota Sciences isoCell User manual

V1.0r1
isoCell user manual
For software versions 1.0.0 - 1.0.8

Software v1.0.7 release notes
From software version 1.0.7 onwards, the total volume of fluid in the
chambers has been reduced from 800nl to 600nl. This will provide greater
chamber stability. Chambers are still plated with 200nl, but Fill will now only
add 400nl to the chambers (rather than 600nl). Other programs have been
modified to work with the lower volume chambers, but are otherwise
unchanged.

›
isoCell Manual
isoCell Manual
Version
Version v1.1
v1.1
Introduction
The isoCell greatly simplifies and automates the cloning of single cells, by allowing
users to:
Create GRIDs on 60mm circular dishes.
Dispense single cells into GRID chambers (following the Poisson distribution).
Add cell-culture medium to GRID chambers, exchanging for waste products.
Harvest colonies.
Safety instructions
Use the isoCell with care, and take the following precautions:
Only use the isoCell once you have read and understood this manual. Ensure this
manual is accessible for all users, and that each potential user reads and
understands it.
Take all suitable precautions recommended for the safe handling of all cells and
other reagents used. For the case of FC40STAR, users should familiarise
themselves with the FC40 material safety data sheet, which is available on the
iotaSciences customer portal.
Powering the equipment:
Use only with the supplied
Mean Well GST90A24-P1M
power supply and power
cord.
Connect power supply to a suitable AC mains supply with voltage in range
100 – 240V; 50 – 60Hz; minimum power 1A.

The AC mains socket shall act as the disconnect device and be readily
accessible.
Avoid subjecting the isoCell to impact and vibration, both during use and during
transportation.
Do not connect cables in ways other than those mentioned in this manual.
Different connections may cause damage and fire.
Do not alter the isoCell in any manner, other than those shown in the manual,
demonstrated during training, or directed by iotaSciences.
Do not obstruct the movement of the isoCell’s needle holder, nor of the syringe
plunger mounts.
Only use the isoCell when it is set on top of a safe, flat and stable horizontal
surface.
If water or other liquid has been spilled near the isoCell, safety may be
compromised. Ensure that no spilled liquid has been in contact with or entered
the isoCell.
If water or other liquid enters the isoCell, stop using it immediately and unplug
the power supply. Continued use may cause a fire. Contact iotaSciences for
actions or precautions.
If any foreign object enters the isoCell, safety may be compromised. Contact
iotaSciences for actions or precautions.
Unplug the isoCell immediately if it smokes, or produces a strange odour or
unusual noise. Continued use may cause a fire. Contact iotaSciences for actions
or precautions.
Do not autoclave the isoCell.
The isoCell is designed to work between 16 – 35°C (60 – 95°F) and 40 – 60%
humidity. Operating outside these limits may degrade performance and
damage the isoCell.
All service shall be performed by iotaSciences authorised personnel only.
Getting started
Familiarisation

Users should familiarise themselves with the key components of the isoCell (Figure 1)
prior to use.
Figure 1: Key components of the isoCell.
N.B. the selection pillar is by default undeployed and therefore may not be visible.
The isoCell is supplied with the following accessories, consumables and spares:
Documents:
isoCell quickstart user guide
isoCell training guide
Single cell suspension preparation guidelines
Mains power cable, with appropriate mains plug for country of use
Transformer (24V Mean Well GST90A24-P1M power supply)

USB cable, type A – type B
FC40STAR bottle assembly, including 2-port cap and 0.20µm air filter
Touchscreen stylus
Reference stage
50-page single-cell microscope notebook
2x spare jetting assembly
2x 40ml bottles of FC40STAR
CloneG consumables kit, comprising:
18x 60mm dishes (either tissue-culture treated or suspension)
with attached locating rings
36x eight-tube PCR strips, or 36x flat bottom 8-well strips
50x 1.5ml microcentrifuge tubes
1x pipetting aid
2x dispensing assembly
Training kit, comprising:
6x tissue-culture treated 60mm dishes with attached locating
rings
12x eight-tube PCR strips
25x 1.5ml microcentrifuge tubes
1x pipetting aid
1x 10-page single-cell microscope notebook
1x 40ml bottle of FC40STAR

Installation
The isoCell should be located on a flat, stable surface inside a laminar flow hood.
Upon first being powered-on, the isoCell will initiate a preliminary setup procedure.
This consists of a sequence of on-screen instructions for the user to follow, and
requires approximately 30 minutes to complete. Upon completion, the isoCell will be
ready to use.
Using the isoCell
Powering-on
To power-on the isoCell, ensure that it is connected to a suitable mains power socket
by the supplied mains power cable and 24V transformer. Press the power button
(located on the top of the isoCell).
The isoCell bed – placement of reagents and materials
The isoCell bed (Figure 2) is where the workflow of isolating, culturing and harvesting
cells is executed.
Figure 2: The isoCell bed, showing correct layout of 60mm dish, microcentrifuge
tubes and 2x 8-tube PCR strips (optionally replaced with 2x flat bottom 8-well strips).
The workflow is executed on a 60mm tissue culture dish (supplied in the CloneG
consumables kit). The dish must be placed in the circular station at the centre of the
bed. It must be seated flat, and oriented such that the triangular protrusion of the
locating ring fits into the station’s triangular notch (Figure 2).
The isoCell bed is equipped with an internal heater, which can be turned on or
off in the
options
program.

N.B. The heater is not intended to hold the dish at precisely 37°C. Rather its
purpose is to slow cooling when the dish is removed from an incubator.
When required by the workflow, user-supplied reagents must be placed in 1.5ml
microcentrifuge tubes (supplied in the CloneG consumables kit) at six defined
locations on the bed (Figure 2). A minimum of 1ml of each required reagent should be
provided. Note that:
The isoCell will provide a visual prompt of the reagents required by any given
part of the workflow.
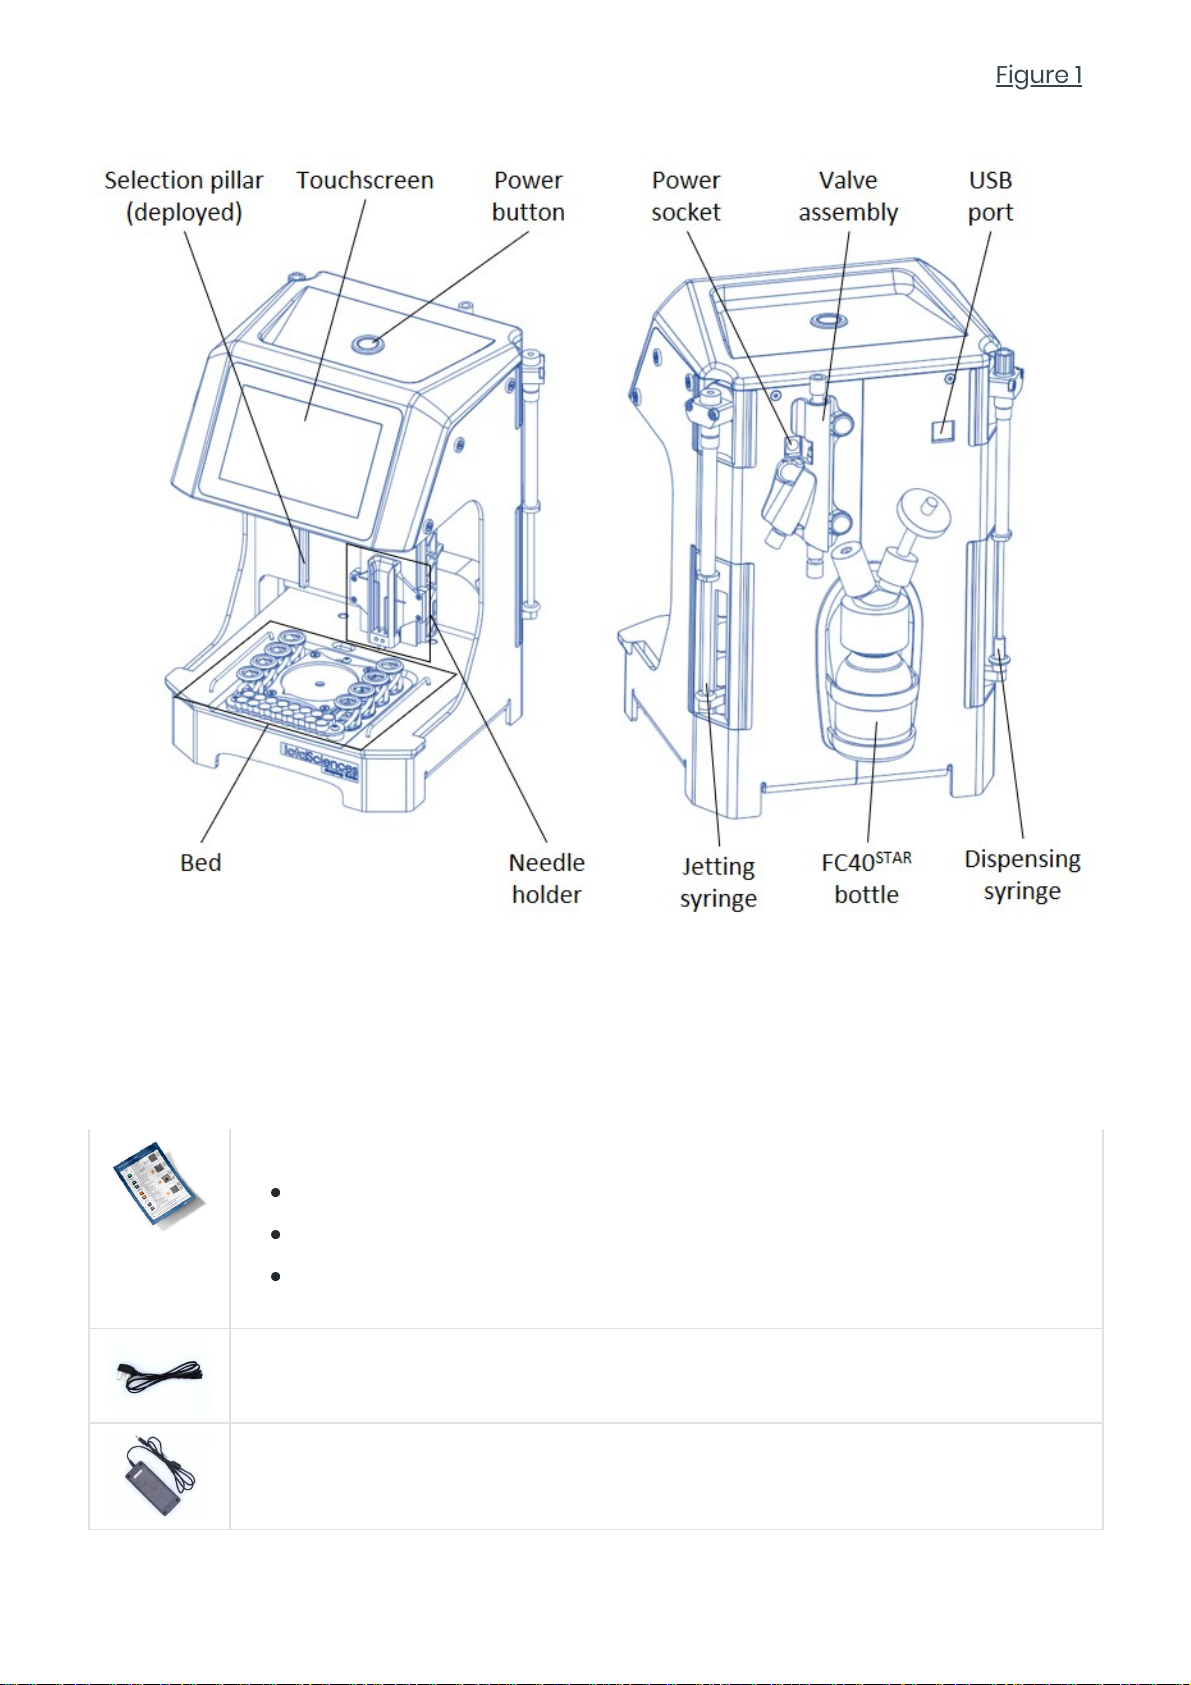
A seventh reagent, FC40STAR, is stored in the FC40STAR bottle at the rear of the
isoCell (Figure 1).
Before beginning any program, ensure all microcentrifuge tubes are open
with their lids tucked under the rails, as shown in Figure 2. This is essential to
prevent obstruction of the needle holder.
Two further (empty) microcentrifuge tubes serve as repositories for aqueous and
FC40STAR waste. The isoCell will provide a visual prompt when waste microcentrifuge
tubes are required. Users should ensure that waste tubes are empty.
For instructions on the safe disposal of FC40STAR, refer to
Disposal of FC40STAR
.
Cells are harvested by the isoCell from the 60mm dish into the two 8-tube PCR strips
(or flat bottom 8-well strips) located at the front of the bed (Figure 2). The isoCell will
provide a visual prompt when the PCR or flat bottom strips are required. The strips
should be prepared with 120µl cell culture medium in each tube/well.
Do not put caps on the PCR strips.
Running programs
The isoCell workflow of isolating, culturing and harvesting cells is executed by
running a series of programs on the isoCell. For instance, the
GRID
program will
create a GRID on the 60mm dish, the
plate
program will dispense cells into a GRID,
etc. All programs are executed from the isoCell’s interactive touchscreen. A stylus is
supplied for higher touch accuracy when required.
At the beginning of each program, a message on the touchscreen will prompt the
user to place the correct materials and reagents onto the
isoCell bed
. When
providing reagents in microcentrifuge tubes, the user should fill the tube to a

minimum volume of 1ml. When a waste tube is required, the user should ensure that
the tube is empty.
Many programs require the user to select a username and dish colour. The
isoCell supports up to thirty-six users. Under each username the isoCell can
simultaneously track up to nine individual dishes via the dishes’ coloured
locating rings. Stored user data can be managed via the
data
program.
Starting-up
Upon being powered-on, the isoCell will execute a startup routine.
Users should not skip the startup routine.
Restarting
To restart the isoCell, first press the on-screen button (located on the left side of
the touchscreen). Then select the
restart
option, which will initiate a restart routine.
The restart routine will put the isoCell into a fresh state. It is recommended
that when switching users, the new user restarts the isoCell in this way.
Powering-off
To power-off the isoCell, first press the on-screen button (located on the left side
of the touchscreen). Then select the
shutdown
option, which will initiate a shutdown
routine. At the end of the shutdown routine, the isoCell will indicate that power can
be safely switched off. At this point the user should power-off the isoCell by pressing
the power button (located on the top of the isoCell).
Users should not skip the shutdown routine.
Consumables ordering
To order consumables for the isoCell (CloneG kits and FC40STAR), please visit the
consumables store on the iotaSciences customer portal to obtain an instant quote.
Workflow
The isoCell offers a convenient and user-friendly workflow to achieve consistent and
reliable outcomes from single-cell cloning experiments. It enables users to:

1. Isolate single cells
2. Culture and outgrow single cells into populations/colonies
3. Harvest populations/colonies derived from a single cell
The isoCell supports up to thirty-six users. Under each username the isoCell can
simultaneously track up to nine individual dishes via the dishes’ coloured locating
rings.
The
isoCell quickstart user guide
provides a concise overview of the isoCell
workflow. The
isoCell training guide
provides a more detailed introduction to
the isoCell workflow for new users. Both documents are supplied with the
isoCell, and available for download from the iotaSciences customer portal.
Isolate
Cells are isolated in three stages:
1. The
GRID
program is used to form a 256 chamber GRID on a 60mm tissue culture
dish, with each chamber measuring 1.9mm by 1.9mm.
2. The
plate
program is used to dispense 200nl cell-suspension fluid to each of the
GRID’s 256 chambers.
3. The
input data
program is used to store, in the isoCell’s memory, the GRID-
coordinates of chambers containing single cells.
GRID
To form a GRID, the user must first prepare the tissue culture dish with a coating of
cell culture media/supplement formulation, overlaid with FC40STAR.
Detailed dish-preparation protocols for specific cell culture
media/supplement formulations are available on the iotaSciences customer
portal.
For successful GRID formation, ensure that the relevant dish preparation protocol is
followed correctly. Once prepared, place the dish onto the isoCell bed and run the
GRID
program.
Plate
To plate cells, the user must first prepare a 1.5ml microcentrifuge tube containing a
sample of cell-suspension fluid with a dilution ratio of 5000 cells per millilitre.

For detailed instructions on best practice when preparing the cell-suspension,
refer to the
single-cell suspension preparation guidelines
(available on the
iotaSciences customer portal).
The
plate
program will dispense the cell-suspension fluid to the GRID chambers. The
probability of chambers containing a single cell is determined by Poisson statistics. A
dilution ratio of 5000 cells per millilitre maximises this probability, and leads to (on
average) 94 out of 256 chambers containing a single cell.
The cell-suspension tube does not need to be placed onto the isoCell bed at
the beginning of the
plate
program. Rather, best practice is for the user to
agitate the sample until the isoCell prompts the user to place the tube onto
the bed. This helps to prevent the cells from settling, thus maximising the
adherence to Poisson statistics.
For higher throughput, up to four dishes (with pre-formed GRIDs) can be plated
sequentially in a single run of the plate program. It is not necessary to use the same
cell-suspension for all dishes when plating sequentially, since the dispensing system
is washed and sterilised between dishes.
Input data
Once cells have been plated into chambers, the chambers that contain single cells
need to be identified, and the corresponding GRID-coordinates need to be
determined.
This is facilitated through use of the reference stage (supplied), on which each
chamber’s GRID-coordinate is etched. Remove the plated dish from the isoCell, and
place it on the reference stage, ensuring that the triangular protrusion of the
locating ring fits into the triangular notch of the reference stage. Using a microscope,
identify the GRID-coordinates of all chambers containing a single cell.
A single-cell microscope notebook is supplied for ease of recording GRID-
coordinates of single-cell chambers. Once exhausted, fresh notebook pages
can be downloaded for printing from the iotaSciences customer portal.
Once the GRID-coordinates of single cells have been determined, the
input data
program is used to store these coordinates in the isoCell’s memory. The stages in the
program are as follows:
1.
Select user
. The user should select their own username. If the user is using the
isoCell for the first time, they will have to enter a new username at this point.

2.
Select colour
. The user needs to select the colour of the locating ring attached to
their dish.
3.
Select chambers
. The user needs to select coordinates of all chambers
containing a single cell.
4. Press the button to save data.
The isoCell supports up to thirty-six users. Under each username the isoCell
can simultaneously track up to nine individual dishes via the dishes’ coloured
locating rings. Stored user data can be managed via the
data
program.
Culture
Two programs are provided for the culturing of single cells into monoclonal colonies:
fill
and
feed
.
Fill
The
fill
program is used to top up each chamber containing a single cell from 200nl
to 800nl. This must be the first program that is run on the dish following the
input
data
program.
Feed
The
feed
program is used to remove 800nl waste from each monoclonal chamber,
and replace the removed fluid with 800nl fresh media. The user may run this
program as often as they deem suitable.
The
feed
program should not be run on a dish containing suspension cells –
this would result in the cells being removed along with the 800nl waste.
Harvest
Two programs are provided for the harvesting of colonies:
detach
and
extract
. The
user can select up to sixteen colonies to harvest per run of the
detach
and
extract
programs.
Detach
The
detach
program is used to deliver dissociation reagent to the selected
chambers. It will first wash the chambers twice with PBS, after which it will dispense
800nl of dissociation reagent to each chamber.

Following a run of the
detach
program, the user should return the dish to the
incubator for a suitable time period to allow the dissociation reagent to take effect.
The
detach
program should not be run on a dish containing suspension cells –
this would result in the cells being removed during the PBS washes.
Extract
The
extract
program is used to remove selected colonies from the dish. It can be run
alone (for suspension cells), or following a run of the
detach
program (for adherent
cells). The
extract
program will deliver each selected colony separately into one tube
of the two 8-tube PCR strips (or flat bottom 8-well strips) located at the front of the
bed (Figure 2).
The user must first prepare the strips by depositing 120µl cell culture medium into
each tube/well.
Do not put caps on the PCR strips.
Chamber states
As a dish progresses through the workflow, the isoCell tracks the state of the
chambers. The current state of chambers in a dish is displayed at the beginning of
the
input data
,
fill
,
feed
,
detach
and
harvest
programs, and can be viewed at any
time via the
data
program.
The chamber states are:
Empty – Chamber is empty. This is the default state – a chamber is
assumed
empty
until it is marked as
single-cell unfilled
via the
input data
program.
Single-cell unfilled – Chamber contains a single cell (or its derivative
monoclonal colony). Chamber volume is 200nl, indicating that the
fill
program has not yet been run on the dish.
Single-cell filled – Chamber contains a single cell (or its derivative
monoclonal colony). Chamber volume is 800nl, indicating that the
fill
program has been run on the dish.
Detached – Dissociation reagent has been administered to the chamber
using the
detach
program.

Harvested – The colony has been harvested from this chamber using the
extract
program.
Dead – The cell or colony in this chamber has died, and the user has
marked it as dead at the beginning of the
feed
program.
Unknown – The chamber is in an unknown state. This can happen if, for
example, a program is cancelled while operating on the chamber. The
recover
program can be used to attempt to return these chambers to a
single-cell filled
state.
The isoCell does not record the number (if any) of times the
feed
program has
been run on a dish. The
feed
program will operate on chambers in a
single-
cell filled
state and will return them to a
single-cell filled
state.
Advanced programs
Data
The
data
program (
more
→
data
) enables the user to:
Add or remove usernames.
View current
chamber states
of dishes.
Erase data of individual dishes under a chosen username.
Removing a username will erase all stored dish data for that username.
Options
The
options
program (
more
→
settings
→
options
) allows the user to:
Adjust display screen brightness
Adjust brightness of lights
Adjust volume
Turn bed heater on or off
Set time

The
set time
program (
more
→
settings
→
set time
) is used to update the date and
time on the isoCell.
Replace dispensing
The
replace dispensing
program (
more
→
replace dispensing
) guides the user
through the replacement of the dispensing assembly (dispensing needle plus tube).
For more information, see
replacing the dispensing assembly
.
This program will automatically charge the new dispensing assembly with ethanol,
and calibrate the new dispensing needle.
If the dispensing assembly has been replaced without running the
replace
dispensing
program, the
reset dispensing
program must be run to charge the
new assembly with ethanol. And the
calibrate
program must be run to
calibrate the new dispensing needle.
FC40STAR level
The
FC40STAR level
program (
more
→
FC40STAR level
) is used to update the tracked
level of FC40STAR in the FC40STAR bottle (located at the rear of the isoCell). To update
the level, move the slider to the correct height, and press the button to save.
See
Refilling FC40STAR
for more information.
Reset jetting
The
reset jetting
program (
more
→
reset jetting
) is used to completely flush and refill
the jetting system.
Reset dispensing
The
reset dispensing
program (
more
→
reset dispensing
) is used to completely flush
and refill the dispensing system.
Users should immediately run the
reset dispensing
program if a program that
uses the dispensing system has been aborted prematurely. This will ensure
that all reagents are quickly flushed from the dispensing system.
Recover

The
recover
program (
more
→
recover
) is used to attempt to recover any chambers
from an
unknown
state to a
single-cell filled
state (see
chamber states
).
The program will operate on all chambers whose state is unknown. It will remove
800nl fluid from each chamber, and replace the removed fluid with 800nl fresh
media.
The
recover
program is not guaranteed to successfully return colonies to a
useable state. If (for instance) chambers were left in an
unknown
state
following an abort of the
detach
or
extract
programs, the colony may be
physically detached from the dish. In which case, the removal stage of the
recover
program will likely remove and discard of the colony.
Calibrate
The
calibrate
program (
more
→
calibrate
) is used to calibrate the dispensing and
jetting needle positions relative to the centre of the isoCell bed. It can be used if
either of the isoCell’s needles has been replaced, to ensure continued performance
of the isoCell.
Needle calibration happens automatically during the
startup
and
restart
routines, and when replacing the dispensing assembly using the
replace
dispensing
program.
Move
The
move
program (
more
→
move
) is used to:
Manually move the isoCell’s needle holder using the six arrow buttons indicated
in Figure 3a. To return the needle holder to its home (not in use) position, press
the
reset
button.
Manually withdraw or insert the plungers of the dispensing and jetting syringes,
using the four buttons indicated in Figure 3b.
The movement step size is set using the three buttons indicated in Figure 3b. Step
sizes are in millimetres for the needle holder and microlitres for the syringes. With the
step size set to 1.00 the move buttons will cause large/fast movements, whereas with
it set to 0.01 the move buttons will cause small/slow movements.

Figure 3a: Needle holder control screen

Figure 3b: Syringe control screen
About
The
about
program (
more
→
about
) displays:
The software version number currently installed on the isoCell
Contact details for iotaSciences
Maintenance
Cleaning
Users are recommended to clean the exterior of the isoCell regularly, ideally before
and after each use. iotaSciences recommend the use of a paper towel, dampened
with 70% ethanol.
Do not attempt to manually clean the needles, which are delicate and easily
damaged. The isoCell programs, if followed correctly, will ensure that needles
are kept clean.

Care should be taken to ensure that excessive volumes of cleaning fluid are
not used on the isoCell, as excess fluid entering the isoCell may lead to
degraded performance or electrical safety risk.
Refilling FC40STAR
FC40STAR is stored in the FC40STAR bottle, located on the rear of the isoCell (Figure 1).
The isoCell tracks the level of FC40STAR stored in this bottle, and will prompt the user
when a refill is needed. Note that the isoCell cannot sense the FC40STAR level; rather
the current level is stored in the isoCell's memory. Following any program that uses
FC40STAR, the tracked level is updated in the isoCell's memory.
To refill the FC40STAR bottle, completely unscrew the two-port cap from the bottle.
Top up by carefully pouring fresh FC40STAR into the bottle. It is not necessary to
remove any residual FC40STAR.
Having topped up the bottle, replace the two-port cap. Then use the on-screen
interface to update the tracked FC40STAR level. Alternatively, the tracked FC40STAR
level can be updated at any time using the
FC40STAR level
program.
Ensure that the FC40STAR intake tube is submerged at the bottom of the
FC40STAR bottle.
Replacing the dispensing assembly
The dispensing assembly (dispensing needle plus tube) should be replaced every
eighteen dishes. Two fresh dispensing assemblies are included in every
consumables kit.
To replace the dispensing assembly, run the
replace dispensing
program and follow
the on-screen instructions.
Troubleshooting
Problems encountered during programs can often be traced to a small number of
common issues. Please ensure the following:
Reagent microcentrifuge tubes are in place, open, and contain at least 1ml
reagent (see
isoCell bed
).

Dish is seated flat on the isoCell bed, oriented such that the triangular protrusion
of the locating ring fits into the bed's triangular notch (see
isoCell bed
).
FC40STAR bottle (on rear of isoCell) is not empty. FC40STAR intake tube must be
submerged in FC40STAR at the bottom of the bottle.
Dispensing syringe does not contain air. Use the
reset dispensing
program to
flush any air from the syringe.
Jetting syringe does not contain air. Use the
reset jetting
program to flush any air
from the syringe.
Needles are properly calibrated. Use the
calibrate
program to ensure this.
Should your problem still be unresolved, please contact iotaSciences technical
support by raising a support ticket via the iotaSciences customer portal
Disposal and recycling
Disposal of isoCell
EU Waste Electrical and Electronic Equipment (WEEE) Directive
In August of 2005, the European Union (EU) implemented the EU
WEEE Directive 2002/96/EC and later the WEEE Recast Directive
2012/19/EU requiring Producers of electronic and electrical
equipment (EEE) to manage and finance the collection, reuse,
recycling and to appropriately treat WEEE that the Producer places
on the EU market after August 13, 2005. The goal of this directive is
to minimize the volume of electrical and electronic waste disposal
and to encourage re-use and recycling at the end of life.
Iota Sciences Ltd has met its national obligations to the EU WEEE Directive by
registering in those countries to which Iota Sciences Ltd is an importer. Products
bearing the symbol of a strikethrough refuse bin must not be disposed of along with
unsorted refuse.
To dispose of your isoCell at the end of its useful life, please contact iotaSciences for
the correct procedure.
Users outside the European Union
To dispose of your isoCell at the end of its useful life, please refer to your local waste
management organisation for proper disposal practices for used electronic and
Table of contents
Popular Laboratory Equipment manuals by other brands

Woson
Woson TANCO Operation manual

Endress+Hauser
Endress+Hauser Liquistation CSF48 operating instructions

Agilent Technologies
Agilent Technologies 7250 Concepts guide

Civco
Civco GUS G10VPL Operator's manual

Steinberg Systems
Steinberg Systems SBS-LI-8-12V user manual

Struers
Struers AbraPlan-30 instruction manual

Vitlab
Vitlab pipeo operating manual

Applied Biosystems
Applied Biosystems 2720 user guide

Scilogex
Scilogex SCI100-S Operation instructions

Markes International
Markes International HiSorb Agitator U-HSAG-20 Instructions for use

Parallax
Parallax PDT-PIN-7001-MP-I Operation manual

Zeiss
Zeiss TIRF 3 operating manual