IPmitter IPMIT400 User manual

IPmitter Wireless Distribution xIPMIT400 & 450
IPMIT400 & IPMIT450 Wireless Distribution
A cost eective, simple and reliable solution to transmittin IP si nals
from buildin to buildin .
Email: support@ipmitter.com Last Revised 30/01/2018 Pa e 1 of 34

IPmitter Wireless Distribution xIPMIT400 & 450
Contents
Introduction................................................................................................ 3
Powerin your IPmitter.......................................................................... 4
Super WDS – Quick Setup...................................................................... 5
Setup via the Web.................................................................................... 6
Home Screen.............................................................................................. 7
Setup Wizard.............................................................................................. 8
Super WDS Web Setup........................................................................... 10
Repeater mode Setup............................................................................. 12
AP Mode Setup.......................................................................................... 15
CPE Mana e................................................................................................ 18
WIFI Settin s............................................................................................... 19
WDS Settin s.................................................................................................................... 20
Repeater Settin s............................................................................................................ 21
Mac ACL.............................................................................................................................. 22
Advanced............................................................................................................................ 23
Network Con ......................................................................................... 24
Device Mana e.......................................................................................... 27
Reboot.................................................................................................................................. 28
Modify Password.............................................................................................................. 28
Up rade............................................................................................................................... 29
Time....................................................................................................................................... 29
Lo ......................................................................................................................................... 30
Troubleshootin ....................................................................................... 31
Specication............................................................................................... 34
Email: support@ipmitter.com Last Revised 30/01/2018 Pa e 2 of 34

IPmitter Wireless Distribution xIPMIT400 & 450
Introduction
The Pro IPMIT400 is a top of the ran e IP brid e and boasts an ultra-fast 900Mbs data transfer rate,
5.8GHZ band and also a 48V PoE connection for easy and rapid deployment in PoE systems.
The IPmitter works in 3 modes, Super WDS mode with LED pairin , Repeater mode and AP mode.
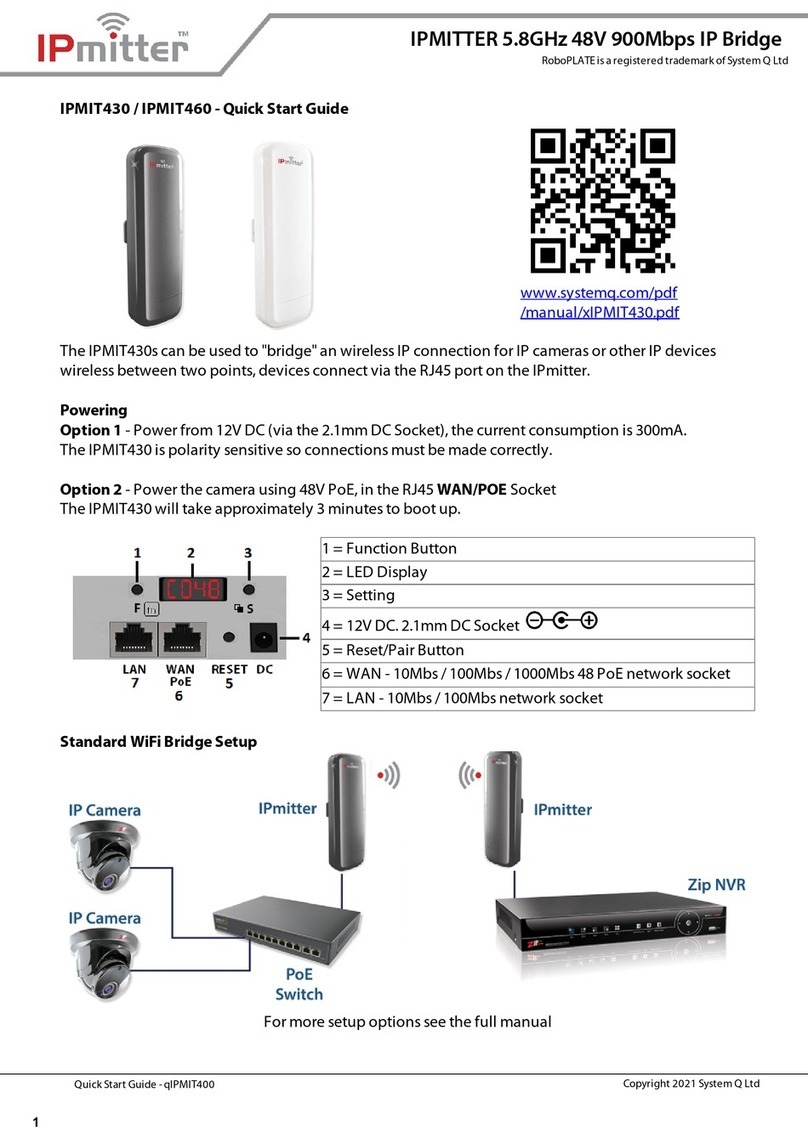
IPMIT400 Can be powered usin 48 PoE (Not supplied) or can be powered usin 12V DC (Not supplied).
IPMIT400 & 450
The Controls
IPMIT400 & 450
1 Function
Button
Select the desired se ment on the LED Display
2 LED Display Displays WiFi channel number, the last se ment of the IP address or power
3 Settin Chan e between Host, Client and channel number. Turns the display back on
4 12V DC 12v DC. 2.1mm DC Socket.
5 Reset/Pair 10 Second press to reset. 1 Second press when pairin
6 WAN Network connection socket. Can be used for 48 PoE power input
7 LAN Network connection socket.
Email: support@ipmitter.com Last Revised 30/01/2018 Pa e 3 of 34

IPmitter Wireless Distribution xIPMIT400 & 450
Powerin Your IPmitter
Email: support@ipmitter.com Last Revised 30/01/2018 Pa e 4 of 34

IPmitter Wireless Distribution xIPMIT400 & 450
Super WDS – UICK SETUP
You will need to pair the IPmitters before installin , the units do not come paired up from factory. This
pairin process is simple on a test bench setup before installin in position. The IPmitter comes set in
Super WDS mode. This allows for easy pairin usin the LED display.
When powered up the display will show the channel number 048 for 5.8GHz. This is proceeded by either
an H or C indicatin Host (master) or Client (Slave). The default is client(C).
Before pairing one IPmitter needs to be set to H (host), one to C (client) and they both have to be on
the samechannel number.
Host Channel 48 Client Channel 48
Changing to host, setting the channel and pairing
Note – Best practise is to set the Client at the “camera end” and the Host at your “Network end”. This
allows for more Clients to be added at a later date if required.
Step 1. Press the F (function) button and the rst character will ash press the S (settin ) button to
chan e the value.
Step 2. To move to the next character press the F button a ain and use the S button to chan e the value.
Step 3. Pressin the F button a ain when the last character is ashin will make the whole display ash
for about 5 seconds to indicate the settin s have been saved.
Step 4. Now press the RST (reset) button for 1 second on each IPmitter. The display will chan e to a P
with a rotatin se ment whilst pairin and will show a value when paired. Pairin can take up to 2.5
minutes.
To add more clients (up to 4) to one host then set the channel on the new client and press the reset
buttons on the new client and the Host. They will then pair.
Email: support@ipmitter.com Last Revised 30/01/2018 Pa e 5 of 34

IPmitter Wireless Distribution xIPMIT400 & 450
Setup via the WEB Interface
The default settin s for the IPmitter
IP Address: 192.168.1.123
Password: ipmitter (lower case)
These are shown on the label on the back of the unit.
The default WiFi key is 66666666
When the IPmitters are in Super WDS mode one IP address will always be on the default and the others
will be automatically assi ned. The IP address of the unit can be found by pressin the S button until the
display chan es to Annn the 3 characters after the A indicate the last se ment of the IP address. Unless
you have chan ed the IP address the rst 3 se ments will still be 192.168.1.nnn
192.168.1.123
If the IPmitters are paired in Super WDS mode, then by lo in onto the IPmitter at 192.168.1.123 the IP
address of other connected IPmitters can be found in CPE Mana e.
Remember. When you connect to the IPmitter your PC/Laptop needs to be on the same subnet.
Email: support@ipmitter.com Last Revised 30/01/2018 Pa e 6 of 34

IPmitter Wireless Distribution xIPMIT400 & 450
Home Screen
This screen displays the status information of the IPmitter.
1 Working Mode shows which of the 3 modes the IPmitter is set.
2 Flow shows the data ow from and to the Ipmitter.
3 Device Information shows the resource usa e in the IPmitter.
4 Status this is mode dependant and shows relevant connection information.
5 Information this shows information on the IPmitter you are viewin .
6 Device Location this allows you to set a name for the IPmitter. This maybe seen when connectin from
other WiFi devices. Click on the ear icon to add the name.
Email: support@ipmitter.com Last Revised 30/01/2018 Pa e 7 of 34

IPmitter Wireless Distribution xIPMIT400 & 450
Setup Wizard
This screen is for chan in between the dierent modes. Just click on the required mode to start the
setup wizard. If you want to chan e the setup for the mode you are already in you can click on the wizard
a ain.
Super WDS Mode
This is used for point to point connection and will work as one-to-one or many-to-one. You can pair
a maximum of 4 clients to one host. This can be set up without the use of a computer usin the LED
display.One – One
Many – One
Email: support@ipmitter.com Last Revised 30/01/2018 Pa e 8 of 34

IPmitter Wireless Distribution xIPMIT400 & 450
Repeater Mode
This is used to extend the ran e of your WiFi network. The IPmitter is wirelessly connected to your
existin network to extend the wireless covera e. This requires lo in onto the web interface to
setup.
Repeater extendin the WiFi covera e and wirelessly addin a camera.
AP Mode
This is used to add wireless networkin to a network without wireless or to add wireless
networkin outside the ran e of your existin wireless. It requires a wired connection to the
existin network.
Addin WiFi to your network
Email: support@ipmitter.com Last Revised 30/01/2018 Pa e 9 of 34

IPmitter Wireless Distribution xIPMIT400 & 450
Super WDS Web Setup
Using Setup Wizard to setup Super WDS
Althou h the IPmitter may already be in Super WDS mode. You can still use the Setup Wizard by
clickin on the Super WDS Mode icon.
Step 1 – Connecting other IPmitters
Scan this will show a list of available WiFi devices. Althou h it will show devices not on the same
channel you will not be able to connect to them. Selectin a device in the list will add it. The AP
BSSID is the MAC address of the selected device and the SSID is the name.
Password this is the password for Super WDS connected devices. It defaults to o but for extra security a
password can be added. If used this should be the same in all of your IPmitters and has a minimum of 8
characters.
Step 2 – LAN Settings
Email: support@ipmitter.com Last Revised 30/01/2018 Pa e 10 of 34

IPmitter Wireless Distribution xIPMIT400 & 450
IP Mode this is used to set the IP address. In Super WDS mode you would normally leave this in
GHCP so that IPmitters assi n their own IP addresses. It can be set to DHCP and the IPmitter will et
network settin s from a DHCP server. It can also be set to Static IP if you wish to set a xed IP
address. In static IP CPE mana e will not display connected devices.
Step 3 – WiFi Settings
WiFi Status turns the WiFi on or o.
SSID is the name displayed when seen by other WiFi devices
Hide your WiFi name? When a wireless device searches the area for the networks it will not be able
detect the WiFi name associated with the router.
WiFi Password this is the password required to Lo in to IPmitter from another wireless device.
Timing allows for a timed reboot or interval for the IPmitter.
Step 4 – Save conguration
Movin onto step 4 will automatically save the con uration
Email: support@ipmitter.com Last Revised 30/01/2018 Pa e 11 of 34

IPmitter Wireless Distribution xIPMIT400 & 450
REPEATER Mode Web Setup
Repeater mode this lets you connect the IPmitter to an existin WiFi network, the IPmitter will then pick
up the existin WiFi network and extend the existin wireless network as second network.
- Select Setup Wizard
- Select Repeater Mode
Step 1 – Connectin settin s for existin WiFi
Repeater SSID is the WiFi network you want the IPmitter to connect. To nd the network you want to
connect to press Scan and then select the WiFi network name.
Lock BSSID is the Mac Address of the device you are connectin the IPmitter to, this eld is completed
automatically.
Encryption is the type of Wireless Encryption used to access the WiFi network.
Email: support@ipmitter.com Last Revised 30/01/2018 Pa e 12 of 34

IPmitter Wireless Distribution xIPMIT400 & 450
Password is the password used to access the WiFi network.
Bandwidth is the broadcastin bandwidth which your wireless network uses. This needs to set to match
your router/ WiFi Bandwidth.
Pass through is set to o as default, if the IPmitter is only connectin other IPmitter devices then you will
need to set this on, otherwise leave this option o.
Step 2 – WiFi Settin s for the repeater
WiFi Status turns the WiFi on or o for the repeater itself.
SSID is the name of the WiFi network you will see when you connect to the repeater. This can be the
same as the existin WiFi network or unique to the repeater.
Hide your WiFi name? When a wireless device searches the area for the networks it will not be able
detect the WiFi name associated with the router.
WiFi Password is the password used to access the Repeater WiFi network. A stron password consists of
at least six characters (and the more characters, the stron er the password) that are a combination of
letters, numbers and symbols. This can be the same as the existin WiFi network or unique to the
repeater.
Timing allows for a timed reboot or interval for the IPmitter.
Email: support@ipmitter.com Last Revised 30/01/2018 Pa e 13 of 34

IPmitter Wireless Distribution xIPMIT400 & 450
Step 3 – Save conguration
Movin onto step 3 will automatically save the con uration
Applications for Repeater mode:-
Router wireless extender – Extends the existin si nal from a wireless router and the rebroadcasts it to
create a second network. You can then connect to the WiFi via the repeater which will be a stron er
si nal than without the repeater.
Access point extender – this can use an existin WiFi access point or IPmitter to then rebroadcast it to
create a second network. This means you can connect to the WiFi of the repeater with a stron er si nal
than just connectin to the Access point.
Limitations:-
Bandwidth is reduced by 50% as there is data bein transmitted between the existin WiFi and the
Repeater, then from the repeater to the connectin device. Instead of just a connection between the
existin WiFi and the device.
Email: support@ipmitter.com Last Revised 30/01/2018 Pa e 14 of 34

IPmitter Wireless Distribution xIPMIT400 & 450
AP MODE
AP Mode lets you set the IPmitter as a wireless access point allowin a WiFi device connect to a wired
network.
- Select Setup Wizard
- Select AP Mode
Step 1 – LAN Settin s
IP Mode can be set to either static or DHCP. Static IP address is a unique xed address which you can
assi n to the IPmitter. DHCP will obtain the address from the DCHP server or the router and assi n
IPmitter with an address from the network.
LAN IP is a unique local IP address of the IPmitter that identies the device on the local area network.
Subnet is the number that denes a ran e of IP address that can be used on the network. This should
match other devices on the network. The most common subnet mask is 255.255.255.0
Email: support@ipmitter.com Last Revised 30/01/2018 Pa e 15 of 34

IPmitter Wireless Distribution xIPMIT400 & 450
Gateway (or default ateway) is a router address connected to the local network that sends packets out
of the local network. This is normally the local IP address of your router.
Primary DNS is usually your Gateway (router's) local IP address.
Secondary DNS another DNS server address if the primary DNS fails, a third party DNS address you can
use could be 8.8.8.8 and/or 8.8.4.4.
Step 2 – WiFi Settin
SSID is the name of the WiFi network you will see when you connect to the network.
Hide your WiFi name? When a wireless device searches the area for the networks it will not be able
detect the WiFi name associated with the router.
Channel is the broadcastin channel and bandwidth which your wireless network uses. This would
normally be set to 20M/40M for best performance and reliability and allows devices to use the lar est
bandwidth they support. You may want to use the WiFi Analyzer which can be found on the WiFi Settin s
pa e.
WiFi Password is the password used to access the WiFi network. A stron password consists of at least
six characters (and the more characters, the stron er the password) that are a combination of letters,
numbers and symbols.
Timing allows for a timed reboot or interval for the IPmitter
Email: support@ipmitter.com Last Revised 30/01/2018 Pa e 16 of 34

IPmitter Wireless Distribution xIPMIT400 & 450
Step 3 – Save conguration
Movin onto step 3 will automatically save the con uration
Applications for AP Mode:-
Standard AP Mode – Connect a router or network the IPmitter to allow for WiFi devices to connect to the
network. If the location and devices where you are wantin WiFi has not ot a this you can wire the
IPmitter to the local area network to transform a wire into wireless which multiple devices can share and
connect to.
Email: support@ipmitter.com Last Revised 30/01/2018 Pa e 17 of 34

IPmitter Wireless Distribution xIPMIT400 & 450
CPE Mana e
This screen shows connected devices when in Super WDS Mode. The description will show the Device
Location if this has been set in the home screen. Clickin on the I.P. Address will open that address in a
new tab in your browser. If the Status shows oine this maybe because of an incorrect password if it has
been chan ed from the default.
Email: support@ipmitter.com Last Revised 30/01/2018 Pa e 18 of 34

IPmitter Wireless Distribution xIPMIT400 & 450
WiFi Settin s
WiFi Settings
WiFi Status turns the WiFi on or o for the repeater itself.
WiFi Analyzer displays a WiFi analyzer so that you can see WiFi devices in your vicinity when choosin a
channel.
SSID is the name of the WiFi network you will see when you are connectin .
Hide your WiFi name? When a wireless device searches the area for the networks it will not be able
detect the WiFi name associated with the IPmitter.
BandWidth is the broadcastin bandwidth which your wireless will use. When set to 20/40 it will switch
accordin to the connected device.
Channel is where the WiFi channel is selected. Ideally you should avoid choosin a channel that is
already in use.
WiFi Password is the password used to access the IPmitter. This has to be at least 8 characters (and the
more characters, the stron er the password) that are a combination of letters, numbers and symbols.
Apply saves the settin s for this pa e.
Email: support@ipmitter.com Last Revised 30/01/2018 Pa e 19 of 34

IPmitter Wireless Distribution xIPMIT400 & 450
WDS Settings
WDS Status turns WDS on and o.
uick Link enables pairin usin the LED display and reset button. If you turn this o you will only be
able link IPmitters usin the web interface.
AP BSSID this is the MAC address of the connected device you are tryin to connect to. To edit or delete
just click on the address.
SSID this shows the SSID of the connected device. This will be blank if the pairin was done usin the
IPmitter buttons.
Scan displays a list of WiFi devices. Select the device that you wish to connect and the AP BSSID and SSID
will be automatically added.
Password this is the password for Super WDS connected devices. It defaults to o but for extra security a
password can be added. If used this should be the same in all of your IPmitters and has a minimum of 8
characters.
BandWidth is the broadcastin bandwidth which your wireless will use. When set to 20/40 it will switch
accordin to the connected device. Chan in the bandwidth here will chan e it in the WiFi Settin s.
Channel is where the WiFi channel is selected. Ideally you should avoid choosin a channel that is
already in use. Chan in the channel here will chan e it in the WiFi Settin s.
WiFi Analyzer displays a WiFi analyzer so that you can see WiFi devices in your vicinity when choosin a
channel.
Apply saves the settin s for this pa e.
Email: support@ipmitter.com Last Revised 30/01/2018 Pa e 20 of 34
This manual suits for next models
1
Table of contents
Other IPmitter Network Hardware manuals
Popular Network Hardware manuals by other brands

Honeywell
Honeywell LonWorks protocol Installation and user manual

DCB
DCB BROADCAST POLLING FRAD BPF-2 BU manual

IFM
IFM O2I5 Series operating instructions

Polycom
Polycom V2IU 6400-S user guide

ADTRAN
ADTRAN NetVanta 1000 Series Hardware installation guide

Sierra Wireless
Sierra Wireless AC595 Developer's guide

Zte
Zte MF993C user manual

MSB Technology
MSB Technology The Premier DAC user guide

CoreTigo
CoreTigo TigoMaster 2TH user manual

ZyXEL Communications
ZyXEL Communications ZyAIR B-320 user guide

CommScope
CommScope OneCell RP5000 Series Hardware Installation and Commissioning

MikroTik
MikroTik RouterBOARD 411R Quick setup guide and warranty information