IPSO PC30 User manual

1234567890123456789012
1
23456789012345678901
2
1
23456789012345678901
2
1
23456789012345678901
2
1
23456789012345678901
2
1
23456789012345678901
2
1
23456789012345678901
2
1
23456789012345678901
2
1
23456789012345678901
2
1
23456789012345678901
2
1
23456789012345678901
2
1
23456789012345678901
2
1
23456789012345678901
2
1
23456789012345678901
2
1
23456789012345678901
2
1
23456789012345678901
2
1
23456789012345678901
2
1
23456789012345678901
2
1
23456789012345678901
2
1
23456789012345678901
2
1
23456789012345678901
2
1
23456789012345678901
2
1
23456789012345678901
2
1
23456789012345678901
2
1
23456789012345678901
2
1
23456789012345678901
2
1
23456789012345678901
2
1
23456789012345678901
2
1
23456789012345678901
2
1
23456789012345678901
2
1
23456789012345678901
2
1
23456789012345678901
2
1
23456789012345678901
2
1
23456789012345678901
2
1
23456789012345678901
2
1
23456789012345678901
2
1
23456789012345678901
2
1
23456789012345678901
2
1
23456789012345678901
2
1
23456789012345678901
2
1
23456789012345678901
2
1
23456789012345678901
2
1
23456789012345678901
2
1
23456789012345678901
2
1
23456789012345678901
2
1
23456789012345678901
2
1
23456789012345678901
2
1
23456789012345678901
2
1
23456789012345678901
2
1
23456789012345678901
2
1
23456789012345678901
2
1
23456789012345678901
2
1
23456789012345678901
2
1
23456789012345678901
2
1
23456789012345678901
2
1
23456789012345678901
2
1
23456789012345678901
2
1
23456789012345678901
2
1
23456789012345678901
2
1
23456789012345678901
2
1
23456789012345678901
2
1
23456789012345678901
2
1
23456789012345678901
2
1
23456789012345678901
2
1
23456789012345678901
2
1
23456789012345678901
2
1
23456789012345678901
2
1
23456789012345678901
2
1
23456789012345678901
2
1
23456789012345678901
2
1
23456789012345678901
2
1
23456789012345678901
2
1
23456789012345678901
2
1
23456789012345678901
2
1
23456789012345678901
2
1
23456789012345678901
2
1
23456789012345678901
2
1
23456789012345678901
2
1
23456789012345678901
2
1
23456789012345678901
2
1
23456789012345678901
2
1
23456789012345678901
2
1
23456789012345678901
2
1
23456789012345678901
2
1
23456789012345678901
2
1
23456789012345678901
2
1
23456789012345678901
2
1
23456789012345678901
2
1
23456789012345678901
2
1
23456789012345678901
2
1
23456789012345678901
2
1
23456789012345678901
2
1
23456789012345678901
2
1
23456789012345678901
2
1
23456789012345678901
2
1
23456789012345678901
2
1
23456789012345678901
2
1
23456789012345678901
2
1
23456789012345678901
2
1
23456789012345678901
2
1
23456789012345678901
2
1
23456789012345678901
2
1
23456789012345678901
2
1
23456789012345678901
2
1
23456789012345678901
2
1
23456789012345678901
2
1
23456789012345678901
2
1
23456789012345678901
2
1
23456789012345678901
2
1
23456789012345678901
2
1
23456789012345678901
2
1
23456789012345678901
2
1
23456789012345678901
2
1
23456789012345678901
2
1
23456789012345678901
2
1
23456789012345678901
2
1
23456789012345678901
2
1
23456789012345678901
2
1
23456789012345678901
2
1
23456789012345678901
2
1
23456789012345678901
2
1
23456789012345678901
2
1
23456789012345678901
2
1
23456789012345678901
2
1
23456789012345678901
2
1
23456789012345678901
2
1
23456789012345678901
2
1
23456789012345678901
2
1
23456789012345678901
2
1
23456789012345678901
2
1
23456789012345678901
2
1
23456789012345678901
2
1
23456789012345678901
2
1
23456789012345678901
2
1
23456789012345678901
2
1
23456789012345678901
2
1
23456789012345678901
2
1
23456789012345678901
2
1234567890123456789012
IPSO - LSG n.v.
IPSO PC30
Nieuwstraat 146 - B-8560 Wevelgem (Belgium)
Tel. 056/41 20 54 - Fax 056/41 86 4
Preprogramming, programming,
copying, operating
Part No. D0890

contents
Table of contents 1
1 Introduction ..................................................................................... 1
Microprocessor PC30 .............................................................................. 1
Flow charts .............................................................................................. 1
2 Classification according to modes ................................................ 3
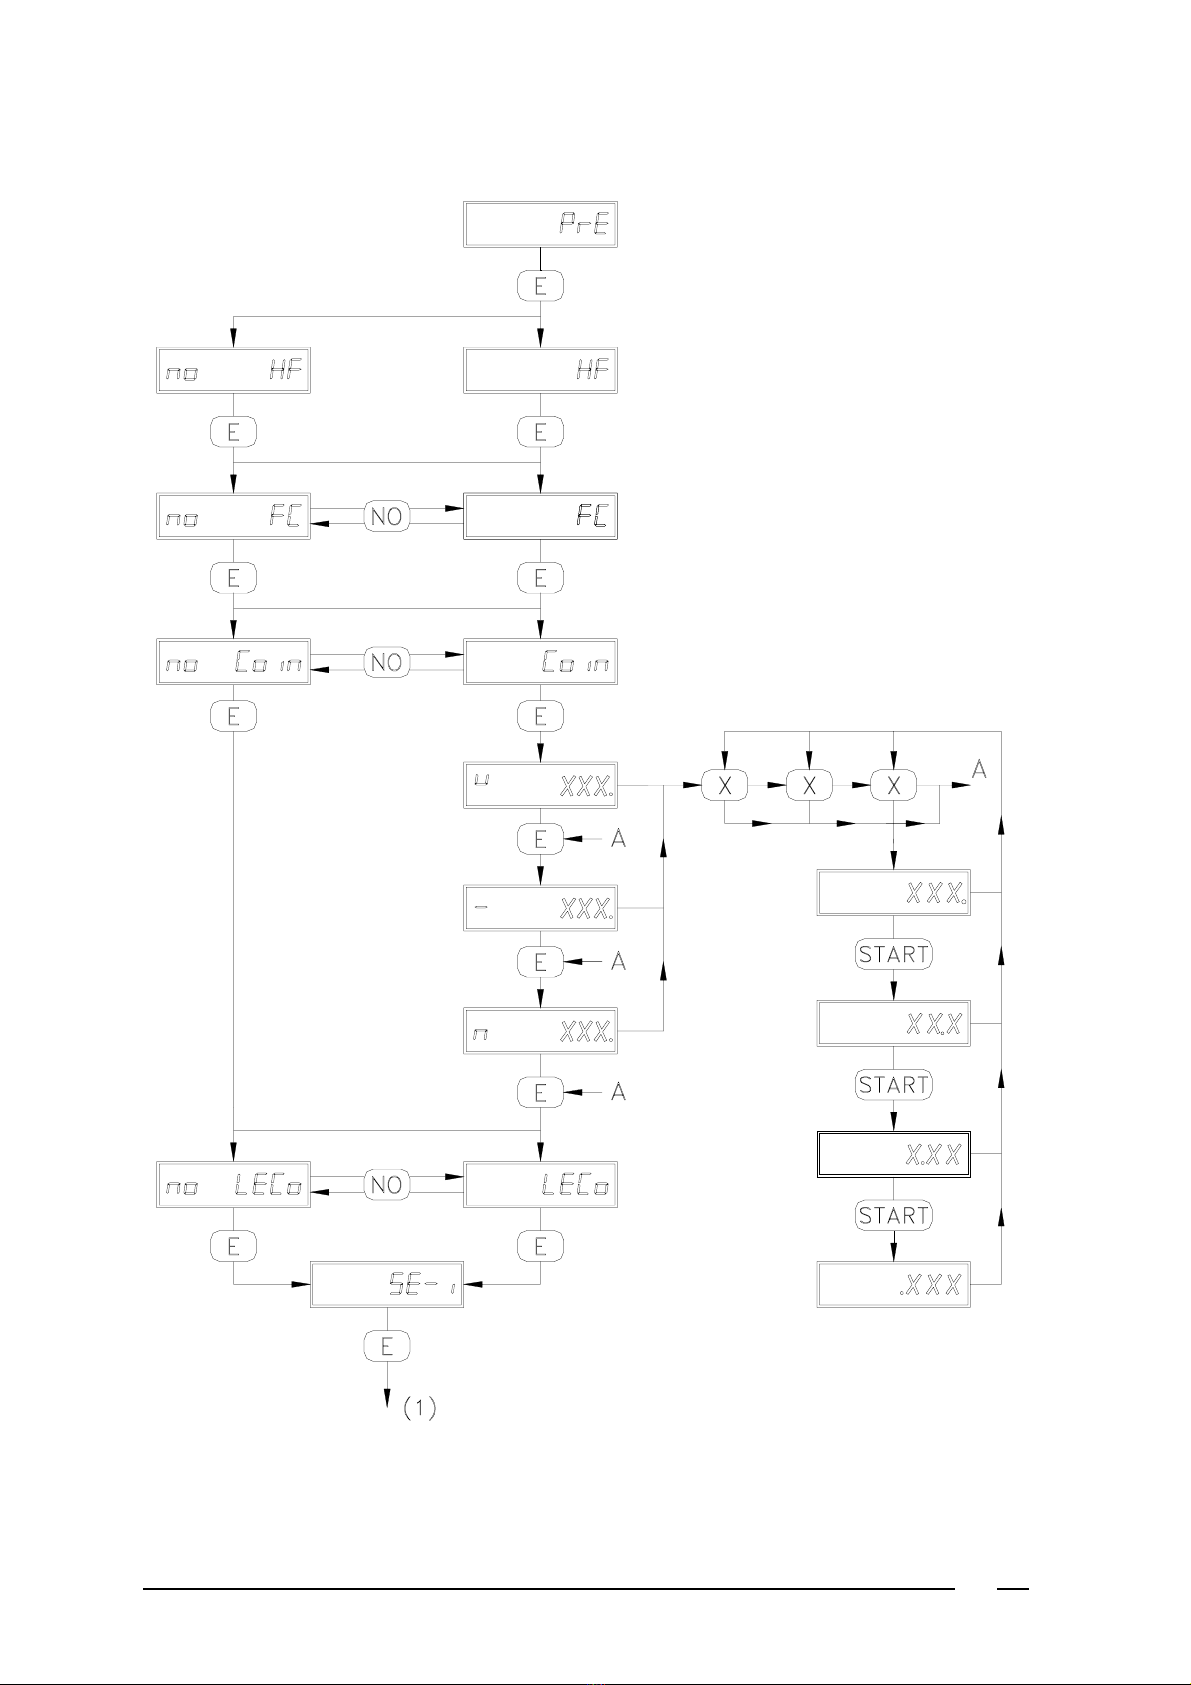
Preprogramming mode ............................................................................ 3
Programming mode ................................................................................. 3
Copying mode .......................................................................................... 3
Operating mode ....................................................................................... 3
3 Preprogramming mode ................................................................... 7
Preprogramming ...................................................................................... 7
4 Programming mode ........................................................................ 15
Programming ........................................................................................... 15
Insert and delete a program segment ...................................................... 33
Program tables ........................................................................................ 33
5 Copying mode ................................................................................. 3
Copying mode .......................................................................................... 3
Standard programs .................................................................................. 3
6 Operating mode ............................................................................... 60
To select a program ................................................................................. 60
To start a program ................................................................................... 60
Programmed start .................................................................................... 61
Changing to another program .................................................................. 61
One time modification of the level, wash time and temperature input ...... 61
Control of the temperature ....................................................................... 61
Control of a program in progress ............................................................. 61
Rapidly going through a program ............................................................ 62
Programmed stop .................................................................................... 62
Soaking .................................................................................................... 62
Time stop ................................................................................................. 62
Interruption and stopping the program ..................................................... 63
Adding water ............................................................................................ 63
Draining water.......................................................................................... 63
Heating the bath ...................................................................................... 63
Adding soap ............................................................................................. 63
Error message ......................................................................................... 64
Total operating hours, recieved coins ...................................................... 64
Overview of the total of steps per program .............................................. 64
7 Test mode ........................................................................................ 65
8 iquid soap connection .................................................................. 67
Code: 24 /000056/04
Version 1.27 - 2.XX ß
06/02/01

Index
The manufacturer reserves the right to change the contents
of this instruction manual without previous notice
°C XX 17, 61, 63
°F XX 17
A
ACCL 62
Add 11, 25
ALArm 13
ALArm.XXX 25, 31
B
Bu= 13
C
CDn XX 25
CDu XX 25
CLoSE 63
Coin 7, 15
Cold 61
CoPY PrG 3, 3
D
d2 27, 2
Data.XXXX 31
dAtA.XXXX 3
dELAY XX 61
dESt .YY 3
dI 27, 2
diSt 2
dO 2
door. oPEN 60
dt XXX 2
dX LXX 63
E
E 3 2 8 3
E 4 5 5 3
E 6 1 3
E 7 8 8 64
E 2 2 3 64
End 31
EntEr 61
Error = 00 3
Error = 02 60
Error = 03 3
Error = 04 64
Error = 05 64
Error = 06 64
Error = 07 64
Error = 08 64
Error = 0 64
Error = 10 64
Error = 11 64
Error = 12 64
Error = 13 64
ES.tilt.XX 13
R
Ram full 15, 33, 3
S
S XX 17
SE-i 7
SoAH 25, 62
SoAh.tiME 62
SoAH.XXX 25
SoAP XX 63
SourCE.XX 3
SoX tXXX 63
SP XX 17
SP2- X 27
SPI- X 27
SPin 27
StArt 3
StoP 25, 62
StoP.tiME 62
StoP.XXX 25
T
t XX 15, 1
t °C 11
t XX 1 , 61
t °F 11
t= XXXX 2
t=XX°C 61
t1. XXX 21
td XXX 27
Tu XXX 31
W
WASh 2
X
XX del 33
XX ....YY 3
XX. del 33
XX. inS 33
XX. Cool 25
XX. CYt i 15
XX. dEti 27
XX. teMP 17
XX.id XX 15
XX.ti XXX 62
XX.tistop 62
F
FC 7
FREE = XX 64
G
GEntlE 11
Good. XXXX 3
H
HEAt 17
HEAt-Mod 11, 17
HEAt-SYS 17
HECo 11, 1 , 61
HF 7
HS. XXXX 27
I
i1
i2
i3
i4
i5
i6
i8
i
iS.tilt.XX 13
iX LXX 63
L
L XX 23, 61
LECo 7, 61
LS. XXXX 27
M
Mod 11, 17
N
no Add 25
O
oPEn door 63
P
P.XX 61
P.XX.StArt 61
PrE 3
ProG 15
ProG XX 3, 15, 60
ProGr 3
ProM. XXXX 3
PXX. End 60,64

5
Introduction 1
Microprocessor PC30
Machines equipped with the electronic freely programmable microprocessor PC30 allow you to program 30
programs ( 0 to 29) of your own choice There are also 10 standard programs ( 30 to 39) available The operation
of the machine, as well as the input of data necessary to obtain a wash program occur via the keyboard in the fascia
panel
Flow charts
In this manual flow charts are frequently used Below you can find an explication of the applied symbols
This gives a presentation of a text that appears on the display
These symbols with rounded off corners stand for pressing the appropriate keys
on the keyboard
e g numbers, start, stop, etc (X stands for a number of your choice)
The symbols in rectangulars stand for mechanical interventions that need to be
executed
e g turning the key switch in the front
The representation of a rhomb refers to a software requirement
e g has a frequency controlled motor been selected in the preprogram or not, has
a coin-op machine been selected or not, etc

6
Pre-programmeer mode Programmeer mode Kopieer mode Bediening mode
Hoofdstuk 3 Hoofdstuk 4 Hoofdstuk 5 Hoofdstuk 6

7
Classification according to modes 2
As soon as the electric power is connected to the machine, it will carry out a so-called " Eprom test "
" ProM.XXXX " and " Good.XXXX " will appear temporarily on the display (XXXX stands for the number of the
Eprom version) Then " dAtA.XXXX " appears temporarily This is the " Checksum " of the total data This value
changes each time the program is altered
Then " StArt " appears
Now choose between 4 different modes
Remark:
" Error 03 " appears on display when the electrical power is supplied to the machine for the very first time, or when
a fault is found in the Ram memory (memory wash programs) Press E
Preprogramming mode
In this mode the machine can be initiated into its own technical specifications (e g coin-op or manually operated
machine, the number of water inlet valves, machine with or without heating, etc ), as well as into certain freely
programmable options (e g temperature in °C or °F, temperature displayed during the cycle or not, etc )
To get into the "preprogramming mode":
- Set the key switch in the front to " PROG "
- Put in " E 6 1 " (press quickly one after the other)
" ProGrAM " appears on the display Press " E "
" PrE " appears on the display
To alter the "preprogram": see chapter 3
Remark:
- The preprogram is fixed during assembly of the machine so that it usually needn't be altered anymore
- If the key switch in the front is not set to " PROG ", " Error = 00 " (flashing) will appear for about 10 seconds after
" E 6 1 " is put in
Programming mode
In this mode you can put in step by step the data necessary to obtain a complete wash cycle of your own choice
To get into the "programming mode":
- Put the key switch in the front in the " PROG " position
- Put in " E 4 5 5 " (Press quickly one after the other)
" ProGr " (flashing) will appear on the display
To program a wash program: see chapter 4
Remark:
If the key switch in the front is not set to " PROG ", " Error = 00 " (flashing) will appear for about 10 seconds after
" E 4 5 5 " is put in
Copying mode
In this mode existing programs can be copied to other program numbers This can save a lot of work when almost
identical programs need to be programmed
To get into the "copying mode":
- Put the key switch in the front in the " PROG " position
- Put in " E 3 2 8 " (Press quickly one after the other)
" CoPY PrG " will appear on the display
To copy a program: see chapter 5
Remark:
If the key switch in the front is not set to " PROG ", " Error = 00 " (flashing) will appear for about 10 seconds after
" E 3 2 8 " is put in
Operating mode
In this mode an existing wash program can be started
To get into the "operating mode", press the number of an existing wash program " ProG XX " will appear on the
display ( XX stands for the selected wash program)
To start the program: see chapter 6

8

9
Classification according to modes 2
Remark: coin-op machine
Press on the keyboard the number of an existing wash program.
XXX.XX = Price of the program (e.g. 120.00)
The amount due for this program
Insert the necessary coins in the coin meter(s).
After each insertion the amount still due will appear on the display
nce the full amount has been inserted, " StArt " will appear again.
Press " START " to start the program

10

11
Preprogramming mode 3
Preprogramming
To get into the "preprogramming mode": see " Classification according to modes 2 ".
The selection here is generally made by altering, if necessary, the command on the display by means of
" N " (e.g. " no FC " becomes " FC " after pressing " N "). Confirm this selection with " E ".
While preprogramming, it is possible to return step by step by pressing the " ST P " button.
PrE = Preprogram (Altering the "Preprogram")
Press " E "
HF = Machine of type HF, WE245/304 or "high spin" WE-machine
FC = Frequency controlled (frequency controlled motor)
Coin = machine with coin mechanism
First, put in the value of the coin meter with the highest value by means of " X,X,X "
If necessary, move the decimal point by pressing " START "
By pressing " E " you can proceed to the other coin meters and install them in the same manner
LECo = Level control (Control of the water level)
This means the program is temporarily stopped until the appropriate water level is reached
SE-i = Select inlet (Selection of water inlet valves).

12

13
Preprogramming mode 3
HF - WE - WE/4 HFP
Inlet valve Inlet valve
i2 Soft (tub) i1 Soft (hopper 1)
i4 Warm (tub) i2 Soft (hopper 2)
i6 Hard (tub) i3 Soft (hopper 3)
i8 ---- i4 Hard (hopper 4)
i1 Soft (prewash) i5 Hard (hopper 5)
i3 Warm (main wash) i6 Hard (hopper 6)
i5 Hard (conditioner) i7 Soft (tub)
i7 ---- i8 Warm (tub)
i9 Hard (tub)

14

15
Preprogramming mode 3
HEAt-SYS = Heating System
All machines with hot water feeding can use this temperature modulation technique This technique consists
of a controlled water feeding -and mixture process which results in most cases in obtaining the correct water
temperature in the wash bath during the filling of the tub If this function is disabled, a traditional water mixing
procedure will be executed
The next steps require this function to be either activated or disabled
Select from:
HEAt (filling and heating system without modulation)
HEAt-Mod (filling and heating system with modulation
Mod (filling procedure consisting only of modulation; no heating system)
If no hot water inlet valves were selected (see SE-i), HEAt will automatically be selected and
HEAt-SYS will not be displayed
HECo = Execute heating control (temperature control)
This function will temporarily stop the program while the water is being heated to the programmed temperature
GEntlE = The action and stop times of the drum will be switched while the water is being heated
If the machine is not equipped with a heating system (Mod is selected at HEAt-SYS), the function HECo and
GEntlE will not be displayed
t °C or t °F = Choice to display temperature in °C or °F.
Add = Additional programs
These 3 options (Cool-down, time stop and soak program) can be installed later on in the programming process
SoAP = Liquid soap injection

16

17
Preprogramming mode 4
u = Buzzer at the end of the program
t = Temperature shown on the display
ACCL = Acceleration
With this it is possible to go through a program rapidly in the "operating mode" with the bottom " E "
EMEr = Emergency stop
The button " STOP " is used as an emergency stop in the "operating mode"
ALArm
This allows to control an external light or sound source through the exit SOAP 6 This source can e g indicate
the end of a program or soak cycle However, this reduces the number of soap exits from 6 to 5
The following steps will not be displayed on the WE machines On all WE machines, the preprogramming is
now finished and the display returns to StArt
iS.tilt.XX (Intermediate Spin unbalances)
Indicate the number of unbalances allowed during intermediate spin (from 1 to 15) before the spin cycle is
skipped
ES.tilt.XX (Final Spin unbalances)
Indicate the number of unbalances allowed during final spin (from 1 to 15) before the spin cycle is skipped
The preprogramming phase is now finished The display will return to StArt .

18

19
Programming mode 4
Programming
To get into the "programming mode": see Classifications according to modes 2.
The selection here is generally made by altering, if necessary, the command on the display by means of
" N " ( e.g. " no HECo " becomes " HECo " after pressing " N "). Confirm this selection with " E ". While
programming, it is possible to return step by step by pressing the " ST P " button.
ProG (flashing) = Programming
Press " E "
ProG XX = The program number that is to be programmed
Put in the required program number with " X,X "
The led in the button of the selected number on the keyboard will light up If a program number higher than 9
is selected, press the number followed by " +10 " or " +20 " Press " E " once more
The next step depends on the selection during "preprogramming"
- With " no Coin " (without coin meter): transition to " XX.id XX "
- With " Coin " (with coin meter): transition to " Coin "
Coin = Amount due for the wash program
Press " E " and then put in the amount with " X,X,X,X "
If necessary, move the decimal point by pressing " START "
Press " E " once more
By pressing " STOP ", it is possible to return to " ProG XX " to change the price of another program
By pressing " STOP " once more, one can immediately proceed to " StArt " This enables you to modify the
amount without running through the entire program
XX.id XX = " Program number " and " Number of program segment ".
The first XX stands for the program number which is put in with " ProG "
The second XX stands for the number of the segment of the program.
Example:
" 02.id 03 " stands for program 2, segment 3 in this program
A segment is a part of a program (prewash, main wash, rince, etc ) and always ends with a drain So in order
to obtain a complete wash cycle, different segments of a program must be put in one after the other (maximum
99 per wash cycle)
Put in the number of the segment with " X,X " and press " E "
Should there be insufficient space in the Ram memory, the error message " Ram full " will appear
XX. CYt i = Cycle time
This is the duration of the wash time for this segment (XX) of the program (without taking into account the
temperature and level controls)
From now on, XX stands for the number of the program segment that was put in
Press " E "
t XX = Time (wash time in minutes)
Put in the time with " X,X " ( from 0 to 60 minutes) and press " E "
If " 0 " was put in, the program immediately skips to " SPin " ( or " no SPin ")
XX. rotE = Rotation (Pause and cycle times)
Press " E "

20

21
Programming mode 4
A XX = Action Time (Cycle Time)
Put in the action time (0 to 60 seconds) with " X,X "
If the motor is frequency controlled, one decimal digit will appear which enables you to set the time accurately
to 0 1 seconds
When " 0 " is put in (cycle without cylinder rotation), the next step (" S XX ") will be skipped
Press " E "
S XX = Stop time (Pause time)
Put in the pause time (1 to 60 seconds) with " X,X "
If the motor is frequency controlled, one decimal digit will appear which enables you to set the time accurately
to 0 1 seconds (Minimum 0 5 seconds)
Press " E "
The next step depends on the selection during the "preprogram"
- With " no FC " (no frequency controlled motor): transition to " XX. tEMP "
- With " FC " (frequency controlled motor): transition to " SP XX "
SP XX = Speed
Put in the rpm speed of the wash cycle (10 to 50 rpm) with " X,X "
Press " E "
XX. tEMP = Temperature (temperature of the bath)
Press " E "
°C XX = Temperature ( r °F XX °C or °F according to the setting in the Preprogramming).
Indicate the temperature (maximum 5°C) with X,X and press E
If a cold wash bath is desired, select 0 Now, the display will immediately show XX. SE-i
The next step will depend on the setting selected during the preprogramming at HEAt-SYS .
åIf HEAt-Mod was selected, then N will allow to choose between:
HEAt (heating without modulation) with transfer to HECo or XX. SE-i
HEAt-Mod (modulation with additional heating) with transfer to HECo or XX. SE-i
Mod (modulation without additional heating) with transfer to HECo or XX. SE-i
Now press E .
If HEAt was selected, the display will immediately go to HECo or XX. SE-i .
If Mod was selected, the display will immediately go to XX. SE-i .
å
å
Table of contents
Other IPSO Washer manuals