IRiver Kyobo Sam EB12 User manual

USER GUID E

CONTENTS
01
02
03
Gatting Started Troubleshooting and
Other Resources
Basics

0 3 Gatting Started
What’s in the Box?
Components may be changed without notice to improve the
performance or quality of the product.
Main Body
Quick start guide &
warranty information USB cable
Quick Start Guide: Basic guide to using the EB12.
Product Warranty: Please keep this warranty in a safe place in
the event your EB12 needs servicing.
USB Cable: Connect the USB cable to a PC to charge the
product.

0 4
1
2
3
4
5
6
7
Touch EPD
Simply touch the screen to start.
Press the menu button to display the menu window.
Press the home button to display the home screen.
Click here to display the previous screen.
5 6 7
1
4
3
2
Gatting Started
EB12 at a Glance
Product appearance, printed and engraved information
may vary depending on the model.
Menu Button
Home Button
Previous Button
Micro SD
Card Slot
USB Jack
Power
Insert a Micro SD card into the device to view
the stored files.
Connect a USB cable to link with a computer
or recharge the device.
Press and hold the power button to turn the
device on/off. Press and hold briefly for
power-saving mode.
0 5 Gatting Started
Powering Up & Charging
Power on/off
1. Press and hold the [ ] power on/off key to power on.
2. During stand-by mode, Press and hold the [ ] power on/off
key to power off.
This product has an automatic power saving function to
prevent excessive battery consumption. If there is no key
operation within the prescribed period [Settings - automati-
cally turn off], the device will be automatically powered off.
(See page 25)
Turning to standby mode
Using the reset function
1. Manually switch to standby mode by pressing the [ ] key
briefly when the power is on.
2. Return to normal mode by pressing the [ ] key briefly.
1. Should the product stop unexpectedly during operation and keys
are no longer responsive, press and hold the [ ] key for 10
seconds to reset the product.
When using the reset function, the current time and memory
data will not be deleted. Do not use the reset function while
the product is in use. Doing so may seriously damage the
memory.

0 6
Screen refresh
Screen setup
Recharging by connecting with the computer
Gatting Started
1. Refresh the screen by pressing and holding the [ ] key for
more than 2 seconds.
Optimize the screen for reading by:
1. Press the [ ] key will brings up a window for environment setup.
2. Set up the desired line spacing, margins, and font.
1. To recharge the device’s battery, simply turn on the computer and
connect the device.
When an eBook is viewed continuously: up to ?? page views
On Standby: Approximately ?? weeks after full recharge
Use only the USB cable provided with the device. Unauthorized cables
may cause device malfunction.
Connect the provided cable to the high-power USB 2.0 port.
Connecting the cable to a low-power USB port (keyboard or USB hub
without power supply) may not recharge the device. Charging may be
interrupted when the computer switches to standby mode.
Recharge the device at room temperature. Recharging in excessively
hot or cold environments may adversely affect charging rate or
capacity. Battery life will gradually shorten after frequent recharges.
Recharge time will take ? hours and ?? minutes (when battery is fully
discharged and the power is off). Recharging while the device is in use
will increase the time necessary to achieve a full charge.
Recharge at least 10 minutes before turning the power on when the
battery is completely discharged and then reset the device by
pressing the [ ] key more than 10 seconds.
0 7
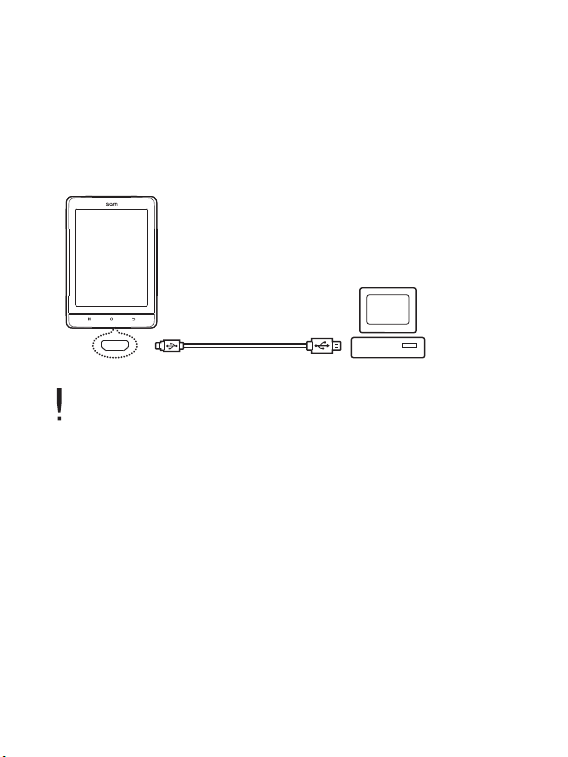
Connecting & Syncing
Connecting to a computer
1. Turn on the power of the device and the computer, and then
connect the device to the computer.
Use only the USB cable provided with the EB12 to ensure safe
operation.
Connect the computer and the USB cable only after all
functions of the EB12 have been stopped.
Check that the EB12 is connected to a high-power USB 2.0
port. Connecting to a keyboard or a USB hub without its own
power supply may prevent normal operation.
Disconnecting from a computer
1. Click the icon displayed in the task bar or desktop of the
computer to safely disconnect the EB12.
2. Click [Ok] to ensure the EB12 can be safely removed.
Gatting Started

0 8
The icon may be hidden in the task bar depending on the
operating system. For example: For Windows XP, click the
expand icon to display it on the screen.
When using application programs like Windows Explorer or
Windows Media Player, it may be unsafe to disconnect the
device while using the program.
Remove the EB12 only after exiting all applications and
programs. Failure to do so may result in the loss of stored
data.
Copy files & folders to the EB12
Delete files & folders in the EB12
1. To copy a file/folder from the computer, select the file and use
the drag & drop method to add the files to the device.
Please connect the USB cable properly and use caution
when copying or moving files. If the
computer or product is powered off or the USB cable is
removed while the file/folder is being copied or moved, data
may be lost or become seriously damaged.
Transmission speed may vary depending on the computer
and the OS environment.
1. Select the file/folder to delete, right-click, and select [Delete].
2. Click [Yes] in the [check file/folder/deletion] window to delete the
selected file/folder.
Gatting Started

0 9
Brand : SanDisk, Transcend
Insert/remove the SD Card
Recommended SD Cards
1. Gently insert and push the Micro SD card in the card slot as
shown in the figure below while the product is powered off.
2. Gently press the SD card again to remove it.
Insert/remove the SD card when the product is powered off.
To avoid damage, do not apply excessive force when
inserting the SD card.
Do not remove the SD card while in use. Doing so may delete
data, damage the EB12 or cause damage to the SD card.
Do not repeatedly insert/remove the SD card.
Improper handling of the SD card may cause damage to the
EB12 or to the SD card.
Use of an unauthorized SD card may result in a malfunction
of the EB12.
Transfer speed of the SD card may vary depending on the PC
status.
Formatting the SD card deletes all data. Please back up the
card before formatting it.
Please format the SD card as FAT 32 system and format any
SD card that is not recognized or may cause damage to the
EB12 or to the SD card.
SD cards up to 32 GB are supported by the EB12.
Gatting Started

1 0
To Purchase eBooks from Kyobo Book
Make eBook purchases from Kyobo Book wherever Wi-Fi is
available.
How to buy eBooks
1. Connect to a wireless network.
2. Visit Kyobo Book website (www.kyobobook.co.kr) to sign up for a
membership.
3. Press the [ ] key at the home page and select [Kyobo login].
- You may use the shortcut to [Kyobo Book – Buy a Book Store] on
the home page.
4. Use the keypad to type in the ID and password on your Kyobo
Book account.
5. Select [Login].
6. Once logged in, you will see the Kyobo Book website.
7. Enter the title or author to search for the desired eBook.
8. Once you select an eBook, detailed information on the book will
be displayed.
9. Select [Buy an eBook Now] and enter your credit card informa
-tion to complete the transaction.
10. Once you select [Download] on the purchased books list, you will
see the eBook downloaded in your library.
Gatting Started
To connect to Kyobo Book, you must have access to a Wi-Fi
network. For how to connect to Wi-Fi networks, please refer
to the next page (p. ??).
Table of contents
Other IRiver Ebook Reader manuals


