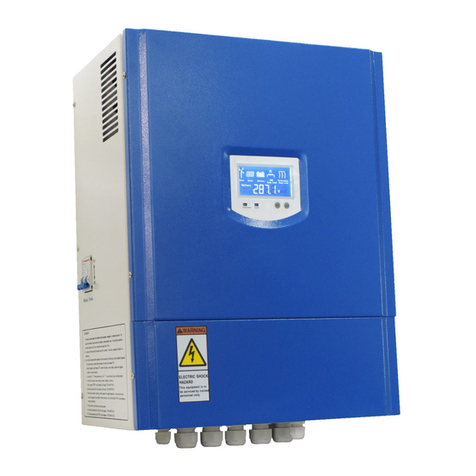
ista Breeze 12V / 650W User manual

16 1
New Generation / Neue Generation / Yeni Nesil
650W-850W HYBRID CONTROLLER USER MANUAL
650W-850W HYBRID LADEREGLER BENUTZERHANDBUCH
650W-850W HİBRİT ŞARJ KONTROL CİHAZI KULLANMA KILAVUZU

CONTENTS / INHALT / İÇİNDEKİLER
ENGLISH
Warning
Description
Features
Specications
Installation
DEUTSCH
Warnung
Beschreibung
Eigenschaften
Technische Daten
Installation
TÜRKÇE
Uyarı
Tanım
Özellikler
Tanım ve Özellikler
Kurulum
2

ENGLISH
WARNING:
The controller is just for battery charging. It can only directly connect to
battery. Please note that + and - poles when the battery is connected.
Connect in the same directions. You should never connect directly to
any other devices such as inverters. In case of incorrect connection,
devices may pose risk of re hazard.
DESCRIPTION:
This controller combines the functions of AC to DC rectier and wind
turbine controller. It is the most cost eective solution for renewable
energy system.
The controller is suitable for wind turbine with permanent magnet
generator or hydro system with permanent magnet generators, which
has a 3-phase AC output within the corresponding voltage range. This
controller is suitable for use with 150W Solar PV. It recties and regulates
the generator’s 3 phase alternating current in order to be able to charge
battery banks in a smooth and safe way the also protects the batteries
from over-charging.
When the battery has reached fully charge state, it will cut o current
owing to the battery and brake the wind turbine automatically.
FEATURES:
14 3

ENGLISH
SPECIFICATION
Lorem ipsum
Light’s Meaning
• RED: When red light is on it mean’s brake system work
(Battery Discharge)
• ORANGE: When orange light is on it mean’s controller work
(Battery Charge Mode)
Load control and diversion control: the controller has over charge
protection, short circuit protection, pole confusion protection.
It is reliable with highly ecient, long services life.
4 13
Input Voltage Range
Range Battery Voltage
Wind Turbine Max.
Input Current
Max Input Solar Power
Weight (Gross)
Size (mm) 200x115x60 200x115x60
620gr 620gr
Recommend Battery
Max Input Wind Power 500W 500W
MODEL
12V / 650W
24V / 650W 12
V /
8
50W
24V / 850W 48V / 850W
12V/150 Ah
12V/200 Ah
24V/75 Ah
24V/100 Ah
Great for wind system controller can support battery charging from
simultaneous wind generator load up to 500 watt
or 700 watt
. It can
use togetheruntil 150W solar PV.
Rated Output Power 650W 650W 850W 850W 850W
14,2 ~ 17
24,6 ~ 28 14,2 ~ 17 24,6 ~ 28 52,8 ~ 57,9
12V 24V 12V 24V 48V
150W 150W 150W 150W 150W
700W 700W 700W
Over Charge Protection 14,9 V 29 V
No- load current ≤0.2A ≤0.2A ≤0.2A ≤0.2
A ≤0.2A
24V/150 Ah
24V/200 Ah
48V/75 Ah
48V/100 Ah
12V/200 Ah
12V/300 Ah
40 Ah 20 Ah 55 Ah
30 Ah 15 Ah
650gr 650gr 650gr
200x115x60 200x115x60
200x115x60
14,9 V 29 V 58V

ENGLISH
INSTALLATION:
The controller is designed to be mounted on a vertical wall
Step 1:
Connect the device as shown in battery, the battery cable connection,
use a minimum thickness of 6mm².
Please attention when you connect terminals, If connecting like +/+
and rigth, your controller will burn and it out of warranty.
Step 2:
3 connect the cable from the devices as shown in the wind turbine.
(this 3-cable connection sequence is not important.) When start to
installation be careful +/- pole, Connect cable comes from Solar PV
what is shown on devices.
12 5

ENGLISH
Battery and Turbine installation with controller
6 11
Emergency Stop Button
(Short Circuit)

ENNGLISH
Now connect the solar system, please adjust to connect the
negative pole to negative pole and positive pole to positive pole.
Wiring diagram for an example
That’s it. Installation is nished
10 7
Emergency
Stop Button
(Short Circuit)

DEUTSCH
Warnung:
Der Laderegler ist nur zum Auaden einer Batterie gedacht.
Schließen Sie den Laderegler niemals an einen Inverter an, da so
Brandgefahr entstehen kann und Gefährlich ist.
Beschreibung:
Dieser Laderegler wandelt Wechselstrom in Gleichstrom um. Es ist eine
kostengünstige Lösung für erneuerbare Energiesysteme.
Sie können diesen Ladereger für alle 3-Phasen Windgeneratoren oder
Wasserkraft Anlagen sowie Standard Solaranlagen benutzen. Sobald
die Batterie vollständig aufgeladen ist bremst der Laderegler automatisch
ab.
Eigenschaften :
Das Design sorgt für eine eziente Belüftung und ein ezienten Betrieb
geeignet für Wechselstrom und Windgeneratoren.
Ladereglung und Umleitungsreglung :
Der Laderegler verfügt über ein Bremsschutz bei vollem Akku und hat ein
Kurzschlussschutz.
Er ist zuverlässig und hat eine lange Lebensdauer.
8 9
Dieser Laderegler ist für 500W
oder 700W
Windgeneratoren und
gleichzeitig für 150W
Solaranlagen geeignet.

DEUTSCH
Leuchtionen:
Rote Leuchtiode: Wenn die rote Leuchte brennt, bedeutet es dass der
Laderegler den Windgenerator bremst. z.B. bei vollem Akku oder wenn
die Windgeschwindigkeit zu hoch ist
Orangene Leuchtiode: Wenn diese an ist heißt es dass der Laderegler
lädt.(Der Laderegler ist im Lademodus)
8 9
Eingangsspannungsbereich
Wind Turbine Max.
Eingangsstrom
12V/150 Ah
12V/200 Ah
24V/75 Ah
24V/100 Ah
MODEL 12V / 650W 24V / 650W 48V / 850W
12V / 850W 24V / 850W
620 gr
620 gr
Eigenverbrauch
≤0.2A
≤0.2A
Max. Eingang Solar Pv. 150W 150W
Batterie 12V 24V
14,2 ~ 17
24,6 ~ 28
Empfohlene Batterie
40 Ah 20 Ah
Nennausgangsleistung 650W 650W
Gewicht (brutto)
Göße(mm) 200x115x60 200x115x60
850W 850W 850W
14,2 ~ 17 24,6 ~ 28 52,8 ~ 57,9
12V 24V 48V
150W 150W 150W
Schutzspannung
14,9 V 29 V
14,9 V 29 V 58V
≤0.2A ≤0.2A
≤0.2A
12V/200 Ah
12V/300 Ah
24V/150 Ah
24V/200 Ah
48V/75 Ah
48V/100 Ah
200x115x
6
0
200x115x60
200x115x60
650gr 650gr 650gr
55 Ah
30 Ah 15 Ah
Max. Eingang Windkraft 500W 500W 700W 700W 700W

DEUTSCH
Installation
Den Laderegler können Sie an eine Wand befestigen.
Schritt 1
Verbinden Sie den Laderegler sowie es auf der Batterie gezeigt wird.
Verwenden Sie ein Kabelanschluss von mind. 6mm² für das anschließen
des Ladereglers und der Batterie.
Bitte passen Sie auf das Sie die Gleichen Pole anklemmen, das heißt
Minuspol zu Minuspol und Pluspol zu Pluspol.
Wenn Sie das nicht beachten brennt der Laderegler ab und die Garantie
fällt weg.
Schritt 2
Schließen Sie die 3 Kabel vom Windgenerator sowie in der Beschreibung
unten an. Die Reihen folge ist unwichtig.
10 7

DEUTSCH
Schaltplan Beispiel
Das war`s schon !! Die Installation ist Abgeschlossen.
Batterie - und Turbineninstallation mit Controller
6 11
Notfall Halt Taste
(Kurzschluss)
Notfall Halt Taste
(Kurzschluss)

TÜRKÇE
UYARI:
TANIM:
Özellikleri:
Bu şarj kontrol cihazı sadece batarya şarj etmek içindir. Kurulum sırasında
ilk önce; şarj kontrol cihazınızı akünüze bağlayınız. Akü bağlantısı yapılır-
ken lütfen + ve – kutuplarına dikkat ediniz. Aynı yönlerde bağlantıyı ya-
pınız, yanlış bağlantı durumunda cihazınız yanar.
Sadece doğrudan bataryaya bağlayabilirsiniz. İnverter gibi cihazlara asla
doğrudan bağlamayınız.
Bu şarj kontrol cihazı rüzgar türbininden gelen AC akımını DC akımına
doğrultur ve rüzgar türbini için yük oluşturarak verimli bir şarj olanağı
sağlar.
Şarj kontrol cihazı kendi voltaj aralığında 3 fazılı AC çıkışı olan rüzgar
türbinlerinde ve standart güneş panellerinde kullanılabilir. Cihaz gelen
akımı doğrultmanın yanı sıra bataryayı aşırı şarj olmaktan korur.
Batarya tamamen dolduğunda otomatik olarak rüzgar türbinini frenler.
Şarj denetleyici, kısa devre fren sistemi yüksek verimli ve uzun ömürlüdür.
12 5
Yüksek güvenilirlik, alüminyum gövde, verimli havalandırma tasarımı
Sarj sistemi için 500 W
ve 700 W
’a kadar olan rüzgar türbinlerini
destekler.

TÜRKÇE
Işık Kodları ;
Kırmızı: Kırmızı yanıyorsa otomatik frenleme devrede demektir.
Turuncu: Turuncu yanıyorsa sistem aktif demektir. (şarj olmaya müsait)
TEKNİK ÖZELLİKLER
4 13
Maks. Rüzgar türbini
enerji girişi
620 gr
6
20 gr
Önerilen batarya
MODEL
12V / 650W
24V
/ 650W
12V /
8
50W
24V /
8
50W
48
V /
8
50W
40 Ah
20
Ah
12V/150 Ah
12V/200 Ah
24V/75 Ah
24V/100 Ah
Maks. Rüz. Enerji girişi
500W
500W
Mak. Güneş Ene. giriş
i
150W
150W
Batarya voltajı
12V
24V
Giriş voltaj aralığ
ı 14,2 ~ 17 24,6 ~ 28
Nominal çıkış gücü
65
0W
6
50W
Koruma Voltajı 14,9V 29V 14,9V 29 V 58 V
Ağırlık (Brüt)
Boyut
(mm)
200x115x60 200x115x60
200x115x60
2
0
0
x
115x60
200x115x60
650gr 650gr 650gr
55 Ah
30 Ah 15 Ah
12V/200 Ah
12V/300 Ah
24V/150 Ah
24V/200 Ah
48V/75 Ah
48V/100 Ah
≤0.2A
≤0.2A
Batarya Tüketim
i
≤0.2A
≤0.2A
≤0.2A
700W 700W 700W
12V 24V 48V
150W
150W
150W
14,2 ~ 17 24,6 ~ 28 52,8 ~ 57,9
850W 850W 850W

TÜRKÇE
Kurulum
Tanım ve özellikleri
Bu sarj kontrol cihazi duvara monte edebileceginiz sekilde tasarlanmıştır.
1. Adim:
2.
Adim:
Sekilde gösterildigi gibi rüzgar türbininden gelen 3 kabloyu cihaza baglayiniz.
( bu 3 kabloda baglanti siralamasi önemli degildir)
Güneş panelinden gelen 2 kabloyuda + / - kutuplara dikkat ederek cihazda belirtilen
yere bağlayınız.
14 3
Sekilde gösterildigi gibi bataryanizi cihaza baglayiniz. Batarya baglantisinda en az
6mm² kalinliginda kablo kullanmaya özen gösteriniz. Bataryanin pozitif ve negatif
uclarina dikkat ediniz.

Türbin ve bataryanın şarj kontrol cihazı ile örnek bağlantı şeması
Örnek bağlantı şeması
İşte bu kadar! Kurulumu tamamladınız
TÜRKÇE
15
Acil Fren Butonu
(Kısa Devre)
Acil Fren Butonu
(Kısa Devre)

16 1
This manual suits for next models
4
Table of contents
Languages:
Other ista Breeze Controllers manuals
Popular Controllers manuals by other brands

Honeywell
Honeywell SILENT KNIGHT SK-Control nstallation and Maintenance Instructions

Balcrank
Balcrank 3330-102 Operation, installation, maintenance and repair guide

Schleicher
Schleicher XCA 1100 operating manual

HighPoint
HighPoint RocketRAID mini-SAS 6G HBA Series installation guide

Lunatico
Lunatico PocketCW2 user manual

mensor
mensor CPC3000 user manual