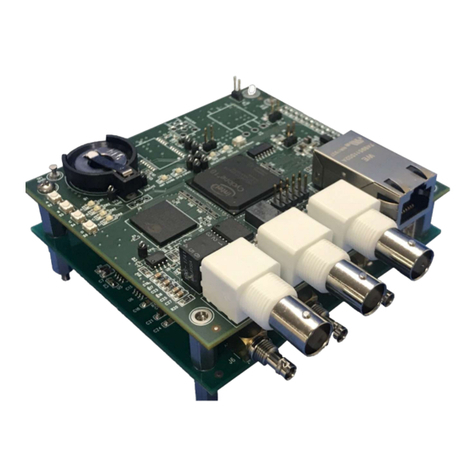
ITS Telecom EKSELANS CAP1 User manual

ITS Partner O.B.S S.L · Av. Cerdanyola 79-81 Local C
08172 Sant Cugat del Vallés · Barcelona (Spain)
Phone: +34935839543 · info@ek.plus · www.ek.plus
USER MANUAL CAP 1
TABLE OF CONTENTS
Hardware....................................................................................................................................................................................................................................... 3
Example of installation diagram................................................................................................................................................................................ 3
Access to CAP 1 ...................................................................................................................................................................................................................... 4
CAP 1 web interface............................................................................................................................................................................................................. 5
Team list...................................................................................................................................................................................................................................6
Device group.......................................................................................................................................................................................................................11
Zero Configuration ........................................................................................................................................................................................................ 12
Team group.........................................................................................................................................................................................................................13
Server address..................................................................................................................................................................................................................14
Gateway.......................................................................................................................................................................................................................................15
State ................................................................................................................................................................................................................................................16
LAN.............................................................................................................................................................................................................................................16
WAN ..........................................................................................................................................................................................................................................17
NETWORK .................................................................................................................................................................................................................................18
LAN.............................................................................................................................................................................................................................................18
WAN ..........................................................................................................................................................................................................................................19
Authentication ..................................................................................................................................................................................................................20
Local Auth............................................................................................................................................................................................................................. 21
Firewall..........................................................................................................................................................................................................................................22
IP Filter/Port .......................................................................................................................................................................................................................22
MAC filtering.......................................................................................................................................................................................................................23
URL filtering.........................................................................................................................................................................................................................23
DMZ........................................................................................................................................................................................................................................... 24
Open ports........................................................................................................................................................................................................................... 25
Management...........................................................................................................................................................................................................................26
System.................................................................................................................................................................................................................................... 26
User...........................................................................................................................................................................................................................................26
QoS Bandwidth Configuration............................................................................................................................................................................ 27
Records.................................................................................................................................................................................................................................. 28
Firmware............................................................................................................................................................................................................................... 28
Time zone ............................................................................................................................................................................................................................ 29

ITS Partner O.B.S S.L · Av. Cerdanyola 79-81 Local C
08172 Sant Cugat del Vallés · Barcelona (Spain)
Phone: +34935839543 · info@ek.plus · www.ek.plus
3
USER MANUAL CAP 1
Hardware
•RESET: Reset button. Press for 15 seconds for the device to restore to factory settings.
•WAN: WAN port. Connect to the internet provider's router.
•LAN: LAN port.
•DC: DC power supply.
Example of installation diagram

ITS Partner O.B.S S.L · Av. Cerdanyola 79-81 Local C
08172 Sant Cugat del Vallés · Barcelona (Spain)
Phone: +34935839543 · info@ek.plus · www.ek.plus
4
USER MANUAL CAP 1
Access to CAP 1
To access the CAP 1 follow the next steps:
1. Connect to CAP 1 with a network cable or wireless configuration (with an AP), you always
must be connected to its LAN port. Configure your PC's network adapter with a static IP. In
order to make the configuration easy EK have the application Ek NET Adapter, you will be
able to configure the network adapter easily. You can download from
https://ek.plus/software/ you will find a new section "EK NET ADAPTER".
3. Open a web browser and go to the URL: http://192.168.10.1
4. Enter the user and password: admin / admin

ITS Partner O.B.S S.L · Av. Cerdanyola 79-81 Local C
08172 Sant Cugat del Vallés · Barcelona (Spain)
Phone: +34935839543 · info@ek.plus · www.ek.plus
5
USER MANUAL CAP 1
CAP 1 web interface
Once the password is entered, the following window will appear.
Then, it shows to us the next areas:
1. Language selection. Spanish/Italian by default is configured for these two languages. The
English version is available on the website ek.plus.
2. Displays the RAM and CPU occupancy information for CAP 1.
3. Search for a particular AP.
4. Displays the list of access points connected to CAP 1. This block changes depending on the
function of the controller to which we are connected. The image represents the "Teams List"”.
5. Relevant information as quantity and status of APs.
6. Access to the "List of Computers" section”.
7. Access to section " Device Group”.
8. Access to the "Zero Configuration"”.
9. Access to the "Team Group" section”.
10. Access to the section "Server address”.
11. Access to the "Gateway”.
12. It shows the options available depending on the section in which we are.

ITS Partner O.B.S S.L · Av. Cerdanyola 79-81 Local C
08172 Sant Cugat del Vallés · Barcelona (Spain)
Phone: +34935839543 · info@ek.plus · www.ek.plus
6
USER MANUAL CAP 1
Team list
This section shows all APs connected to CAP 1.
1. Displays information regarding APs:
•SN: ID assigned to the AP by the CAP 1.
•Location: AP location identified by the client.
•Name: AP Name.
•IP device: IP assigned to the AP by CAP 1. If we connect to the NETWORK with the
RANGE indicated on this IP, we will be able to access the WEB interface of the AP
directly.
•User: User number connected to the AP. Clicking will open a new window giving
information about connected clients:
•Channel: Channel on which the AP is transmitting the SSID of the AP (2.4Ghz / 5.8Ghz
depending on model).
•Online Time: Shows how long the AP takes on.
•Group: Displays the name of the group to which the AP is assigned.

ITS Partner O.B.S S.L · Av. Cerdanyola 79-81 Local C
08172 Sant Cugat del Vallés · Barcelona (Spain)
Phone: +34935839543 · info@ek.plus · www.ek.plus
7
USER MANUAL CAP 1
After pressing the CONFIG button on the desired AP, open a new window to configure the AP in
question:
“Device Status" shows us relevant information about the AP:
•Model: Product name.
•Online Time: Shows how long the AP takes on.
•MAC Device: Displays MAC.
•IP device: IP assigned to the AP by CAP 1. If we connect to the NETWORK with the
RANGE indicated on this IP, we will be able to access the WEB interface of the AP
directly.
•Software: Displays the software version that the AP is currently using.
•AC IP: CAP IP.
•SSID: SSID names.
•BSSID: Displays the MACs assigned to the different SSIDs.
•Channel: Channel on which the AP is transmitting the SSID of the 2.4Ghz / 5.8Ghz AP.
•Wireless Security: Displays selected security for SSIDs.
•RF Output Power: Shows the emission power of the AP.
•Beacon Interval: Displays the selected "beacon interval" value.
•Coverage Threshold: Shows us the selected "threshold".

ITS Partner O.B.S S.L · Av. Cerdanyola 79-81 Local C
08172 Sant Cugat del Vallés · Barcelona (Spain)
Phone: +34935839543 · info@ek.plus · www.ek.plus
8
USER MANUAL CAP 1
“Network Status" allows you to configure how the AP obtains IP:
•DHCP: Gets the DHCP IP automatically from CAP 1.
•Static IP: Allows you to manually assign the desired IP to the AP.
The "Wireless" menu allows you to configure the basic options:
•Device list: If the AP has only a 2.4 or 5.8 broadcast band, it will correspond to WLAN 1,
if on the contrary the AP has 2.4 and 5.8 the WLAN 1 will correspond to 2.4 GHz and
WLAN 2 to 5.8 GHz.
•AP configuration: APs allow you to configure up to 4 SSIDs.
•Status: Enabled –Enables SSID, Disabled –Disables SSID.
•Issue SSID: Enabled - Emits SSID, Disabled –Hidden SSID,
•SSID: SSID Name.

ITS Partner O.B.S S.L · Av. Cerdanyola 79-81 Local C
08172 Sant Cugat del Vallés · Barcelona (Spain)
Phone: +34935839543 · info@ek.plus · www.ek.plus
9
USER MANUAL CAP 1
•Wireless Security: Displays the assigned security. To see more details and configure it,
click on the "Config" button. A new window will open to set up wireless security.
•VLAN: Allows you to assign a VLAN to the SSID.
The "Advanced" menu shows more options for the most technical-level AP:
•MODE: Select the standard for wireless N/AC.
•Channel: Channel on which the AP is transmitting the SSID of the 2.4Ghz/ 5.8Ghz AP.
•Client Isolation: Enabled: Users are isolated and cannot be seen among themselves.
•RTS Threshold: Reduce this value if there are electromagnetic problems or traffic
saturation in the network.

ITS Partner O.B.S S.L · Av. Cerdanyola 79-81 Local C
08172 Sant Cugat del Vallés · Barcelona (Spain)
Phone: +34935839543 · info@ek.plus · www.ek.plus
10
USER MANUAL CAP 1
•Beacon interval: Interval for "beacon". The "beacon" is a packet that is sent to the client
computer to notify if it is connected. If the time is reduced, more packets will be sent
making the network slower. And if the value is too high, this will cause the equipment to
disconnect more frequently.
•Aggregation: Allows for higher flow.
•Short GI: Improves flow rate. Use only for N mode and deactivate if mixed mode is used.
•Coverage Threshold: Indicates the maximum allowed power that the client can have to
stay connected to the AP. Beyond this power the AP will disconnect the client.
•MAX User: Maximum number of clients that can be connected.
2. Group: Selecting one or more APs and clicking on the Group function will open a new
window. This feature allows one or more APs to configure a number of equal options:
•Channels and Powers.
•Time when APs reboot (watch dog).
•Maximum users allowed when connecting.
•Password.
3. Refresh: Reapply the group configuration to the selected AP.
4. Delete: Remove ap from CAP 1.
5. Restart: Restart the selected AP.
6. Clean up: Empty the list.
7. Reset: Returns the selected AP to factory settings.
8. Update: Updates the firmware of the selected AP. Clicking opens a new window to select
the firmware.

ITS Partner O.B.S S.L · Av. Cerdanyola 79-81 Local C
08172 Sant Cugat del Vallés · Barcelona (Spain)
Phone: +34935839543 · info@ek.plus · www.ek.plus
11
USER MANUAL CAP 1
Device group
This section lists all groups created in CAP 1. A group contains multiple APs that are set to the same
setting.
1. New: Opens the window so that you can configure the group settings. The form is the same
as in section 2 of "TeamsList". Note: Select a specific time of day when APs are restarted.
2. Delete: Deletes the group, but the configuration on the APs is still maintained.
3. Show APs: Indicates the number of APs connected to the group. By clicking on the + button
a window appears with all the APs, allowing you to select the ones you want to add to the
group.
4. Config: By clicking on the edit button in the corresponding group, we will be able to carry out
the configuration for the APs.

ITS Partner O.B.S S.L · Av. Cerdanyola 79-81 Local C
08172 Sant Cugat del Vallés · Barcelona (Spain)
Phone: +34935839543 · info@ek.plus · www.ek.plus
12
USER MANUAL CAP 1
Zero Configuration
This feature allows, before connecting any APs to CAP 1, to create a default configuration. Only one Zero
configuration can exist and once all the APs connecting to CAP 1 are created, they will pick up this
default configuration.
1. New: Opens the window to create the settings that the default APs will use. The form is the
same as in point 2 of the Teams List section.
Note: Select a specific time of day when you want APs to restart.
2. Remove: It removes the default settings, but the configuration on the APs is still maintained.
3. Edit: You can create the default settings by clicking on the edit button.

ITS Partner O.B.S S.L · Av. Cerdanyola 79-81 Local C
08172 Sant Cugat del Vallés · Barcelona (Spain)
Phone: +34935839543 · info@ek.plus · www.ek.plus
13
USER MANUAL CAP 1
Team group
This section shows the log of activity events for access points.
Date, team ID and MAC are displayed for each event that happens:
•On/ Off
•Deployment and configuration of APs.
•Errors
The "Clean Up" button empties the list of records.

ITS Partner O.B.S S.L · Av. Cerdanyola 79-81 Local C
08172 Sant Cugat del Vallés · Barcelona (Spain)
Phone: +34935839543 · info@ek.plus · www.ek.plus
14
USER MANUAL CAP 1
Server address
This section configures the DHCP that will assign IPs to the different APs that connect to CAP 1.
1. Server: Displays the initial IP for DHCP as well as the IP that will link between the APs and
CAP 1 (IP Server is a second IP for CAP 1 in the range that the APs will be). Number of IPs that
you can assign.
2. AP Address Information List: Displays the AP model, its assigned IP address, and its
corresponding MAC. The time remaining for the IP to be updated is also shown.
3. Refresh: Refresh the page.
4. Apply: Apply changes.

ITS Partner O.B.S S.L · Av. Cerdanyola 79-81 Local C
08172 Sant Cugat del Vallés · Barcelona (Spain)
Phone: +34935839543 · info@ek.plus · www.ek.plus
15
USER MANUAL CAP 1
Gateway
1. Menu: The different sections for the gateway are shown: Status, Network, Firewall and
Management.
2. Panel: Depending on the option you select the panel is loaded with the relevant options.
3. Sub Menu: This section will show the different sub-menus of the selected menu.

ITS Partner O.B.S S.L · Av. Cerdanyola 79-81 Local C
08172 Sant Cugat del Vallés · Barcelona (Spain)
Phone: +34935839543 · info@ek.plus · www.ek.plus
18
USER MANUAL CAP 1
NETWORK
LAN
1. LAN IP Configuration: Allows you to configure the IP and subnet mask of CAP 1.
2. DHCP Server Configuration: Allows you to enable or disable DHCP. Configure the initial DHCP
IP and the final IP.
3. Assigned IP-MAC List: Allows you to assign fixed IPs to a MAC. This way the MAC will always
have the same IP, which is an ideal option to apply the QoS feature.
•Introduce IP with the MAC you want in the first file.
•Activate the box.
•Press the Add button.
•The IP will be moved to the left column being assigned.

ITS Partner O.B.S S.L · Av. Cerdanyola 79-81 Local C
08172 Sant Cugat del Vallés · Barcelona (Spain)
Phone: +34935839543 · info@ek.plus · www.ek.plus
19
USER MANUAL CAP 1
WAN
1. WAN configuration: CAP 1 allows you to configure the WAN port in different ways: static IP,
DHCP, PPPoE.
2. Static IP: This section will change depending on the WAN configuration defined. PPPoE will
request the data relevant to your configuration. Static IP will request the necessary data: IP,
Subnet Mask
3. Advanced configuration:
•MAC Clone
•Enable uPNP: Enables uPNP functionality for uPNP-enabled devices and facilitates
network configuration.
•Enable Ping Access on WAN: Enables ping response to the WAN IP of the CAP1
•Enable Web Server Access on WAN Port: Access the CAP 1 interface from the WAN IP.
•Enable Ipsec pass through on VPN connection: Allows other devices to make an Ipsec
VPN connection.
•Enable PPTP pass through on VPN connection: Allows other devices to make a PPTP
VPN connection.
•Enable L2TP pass through on VPN connection: Allows other devices to make an L2TP
VPN connection.

ITS Partner O.B.S S.L · Av. Cerdanyola 79-81 Local C
08172 Sant Cugat del Vallés · Barcelona (Spain)
Phone: +34935839543 · info@ek.plus · www.ek.plus
20
USER MANUAL CAP 1
Authentication
This section activates the simple captive portal that allows CAP 1.
To activate the portal, authentication must be set to "local authentication”.
•Maximum users: Maximum number of authentications allowed by the portal.
•External domain White list: Whitelisting of domains that can be accessed without
authentication.
•MAC White list: MACs of devices that do not need to be identified in the portal.
Table of contents
Other ITS Telecom Controllers manuals
Popular Controllers manuals by other brands

gefran
gefran ADV200 Series Functions description and parameters list

Sigma Controls
Sigma Controls 100 Series instruction manual

KB Genesis
KB Genesis KBAC-24D Installation & operation manual

IBM
IBM 3746 installation instructions

Mateksys
Mateksys H743-WING quick start guide

Emerson
Emerson Fisher 67D Series installation guide