ITT 601A User manual

TCI Library- http://www.telephonecollectors.info/
KSP601-0P0
Issue 1, May '79
THE 601A KEY
TELEPHONE
SYSTEM,
5
LINE
AND
10 STATION
INTERCOM
CAPACITY
CONTENTS
Page
1.00 GENERAL.
.........................
2
LINE FEATURES
....................
2
INTERCOM FEATURES
.............
2
TECHNICAL
SUMMARY
.............
2
2.00 IDENTIFICATION
...................
3
KEY SERVICE
UNIT.................
3
Power
Supply.......................
3
Interrupter . . . .. .
..
..
. .
..
. .
....
.
..
. . 3
RINGING GENERATOR
.............
3
CO/PBX LINE CARD KTUs
...........
3
DIAL INTERCOM
..
.
..
.
......
..
.
..
..
3
General
............................
3
Dial Intercom
Card..................
3
T•T
Adapter
.........................
4
OPTIONAL AUXILIARY FEATURES
..
4
Call
Announcing....................
4
Dial Tone and
Ringback
for
Intercom
..........
4
Manual Intercom . . . .. . . . . . . . .. . .. . . 4
Voice Paging .. . . . .. . . .. . .. . . .. . .. . . 5
Music-On-Hold
.....................
5
SUBSETS AND CALL
ANNOUNCERS
............
.
..
. 5
Six-Button Subsets . . . . .. . . .. .. . . .. . 5
Ten-Button
Subsets.............
. . .. 5
Call Announcer. . . . . . .. . . .. . . .. . .. .. 5
3.00
PLANNING
THE INSTALLATION
....
6
GENERAL
..........................
6
PLANNING
CHART
.................
6
Stations and Lines. . . . . .. . .. . .. . . .. . 7
Optional
KSU
Equipment
............
7
4.00 INSTALLATION, C.O. SERVICE
......
8
PREASSEMBLY
OF
KSU
.
..
. .
....
.
..
8
MOUNTING
THE KSU
...............
9
INSTALLATION
OF
STATION BLOCKS
.............
9
CONNECTING
CO/PBX LINES
.......
11
CONNECTING
TELEPHONES
TO
BLOCKS
...................
11
CONNECTING
JUMPERS,
KSU
TO BLOCKS
...............
11
Common-Audible Signal
............
11
INSTALLING CARDS, KTUs
.........
11
OPERATIONAL
CHECKS
.............
11
5.00 INSTALLATION, DIAL INTERCOM
CONNECTIONS
................
19
General
............................
19
BuzzerSignaling
....................
19
Ringer Signaling
....................
19
T·T Dialing
.........................
19
INSTALLING CARDS, KTUs
.........
19
TO ADD DIAL
TONE
AND RINGBACK
...............
19
6.00 INSTALLATION, CALL
ANNOUNCING
.................
23
7.00 INSTALLATION
OF
AUXILIARY
FEATURES
....................
28
MUSIC-ON-HOLD
...................
28
MANUAL INTERCOM
...............
28
VOICE PAGING
.....................
28
8.00 CIRCUIT DIAGRAMS
......
'.
.........
32
ASSOCIATED PUBLICATIONS:
DOCUMENT NO.
184163-101
184243-101
184244-101
184245-101
184246-101
184247-101
EQUIPMENT COVERED
184162-101
Ringing
Generator
Kit (601A)
183977-101 Dial
Intercom
Card
(601
A)
184965-101
Interrupter
Card
(601
A)
183969-101
Power
Supply
(601A)
183973-101
Call
Announcing
Card (601A)
183981-101 T-T
Adapter
for
Intercom
(601A)
Drawings
and
specifications
included
in
this
document
are the
property
of
ITT and shall
not
be
reproduced
or
copied
in
whole
or in
part
as the
basis
for
manufacture
of
the
items
or
for
any
other
use
detrimental
to
the
interest
of
ITT.

TCI Library- http://www.telephonecollectors.info/
KSP601-00A
LINE FEATURES
1.06 Line features
include:
• Five-line
capacity
• Music-on-hold (optional)
• Use
of
standard
400-type
line
cards to
provide line pick-up, hold, and visual
1
and
audible
signaling.
• Buzzer or
ringer
signaling.
(Ringer
signaling
requires an
easily
installed
ring generator.)
-t:
Fig. 1-601A Key Service Unit With Ringing
Generator Installed
1.00 GENERAL
1.01
This
publ
ica
tion covers lde
r:
11t. cat1on. In-
stallation
, and
Operation
.
oi
a
6C
~
A Key
Telephone
System and ass
li
Ciatea a;::iparatus.
1.02 Whenever
this
publication
1s
re-,ssued.
the reasons for re-issue
will
be
listed
:n
this
paragraph.
1.03 The
601
A key
system
provides standard
key
system
functions
and features for 5 CO
lines
and
10
stat
ions.
1.04
Optional
features such as
dial
intercom
(with or
without
tone-and-voice
signaling
with
handsfree
answerback);
manual
intercom;
music-on-hold; and dial
access
to a
public
ad-
dress
system for paging from
intercom
stations
may be added.
1.05 Standard key
telephones
are used in a .
601A system.
Page2
•
Common
audible
signaling
(strapping
option).
INTERCOM FEATURES
1.07 Standard Dial
Intercom
features include:
• Ten
station
capacity
•
Two
digit
dial
codes
•
Common
talk
path
• Busy-lamp
indication
•
Last
Party
clear
1.08
Optional
Intercom
features are:
• Tel-Touch
dialing
• Dial tone,
ringback
(call
announcer
card)
• Call
Announcing,
providing
dIai
tone
and
ringback
tone.
• · A
system
can be
split
with
five
station
codes
designated
for
call
announcing
and five for buzzers
or
ringers.
•
Manual
intercom
.
• Dial
access
to
a paging system.
•
Pushbutton
access
to
a
paging
system.
TECHNICAL
SUMMARY
Power input: 115 Vac, 50/60
Hz,
1.5A fused.
Power
supply
outputs:
-24
Vdc at 1A, 18 Vac at
1A, and
10
Vac at 2A.
Line
capacity:
5
Station
capacity:
10
(dial codes)
Busy
lamp
capacity
(10
Vac):
50
Approximate
Dimensions,
inches
(cm)
Height
15.2 (38.6)
Width
8.1
(20.6)
Depth 6.9 (17.5)
Weight
(standard KSU)
approximately
12
lb.

TCI Library- http://www.telephonecollectors.info/
2.00 IDENTIFICATION
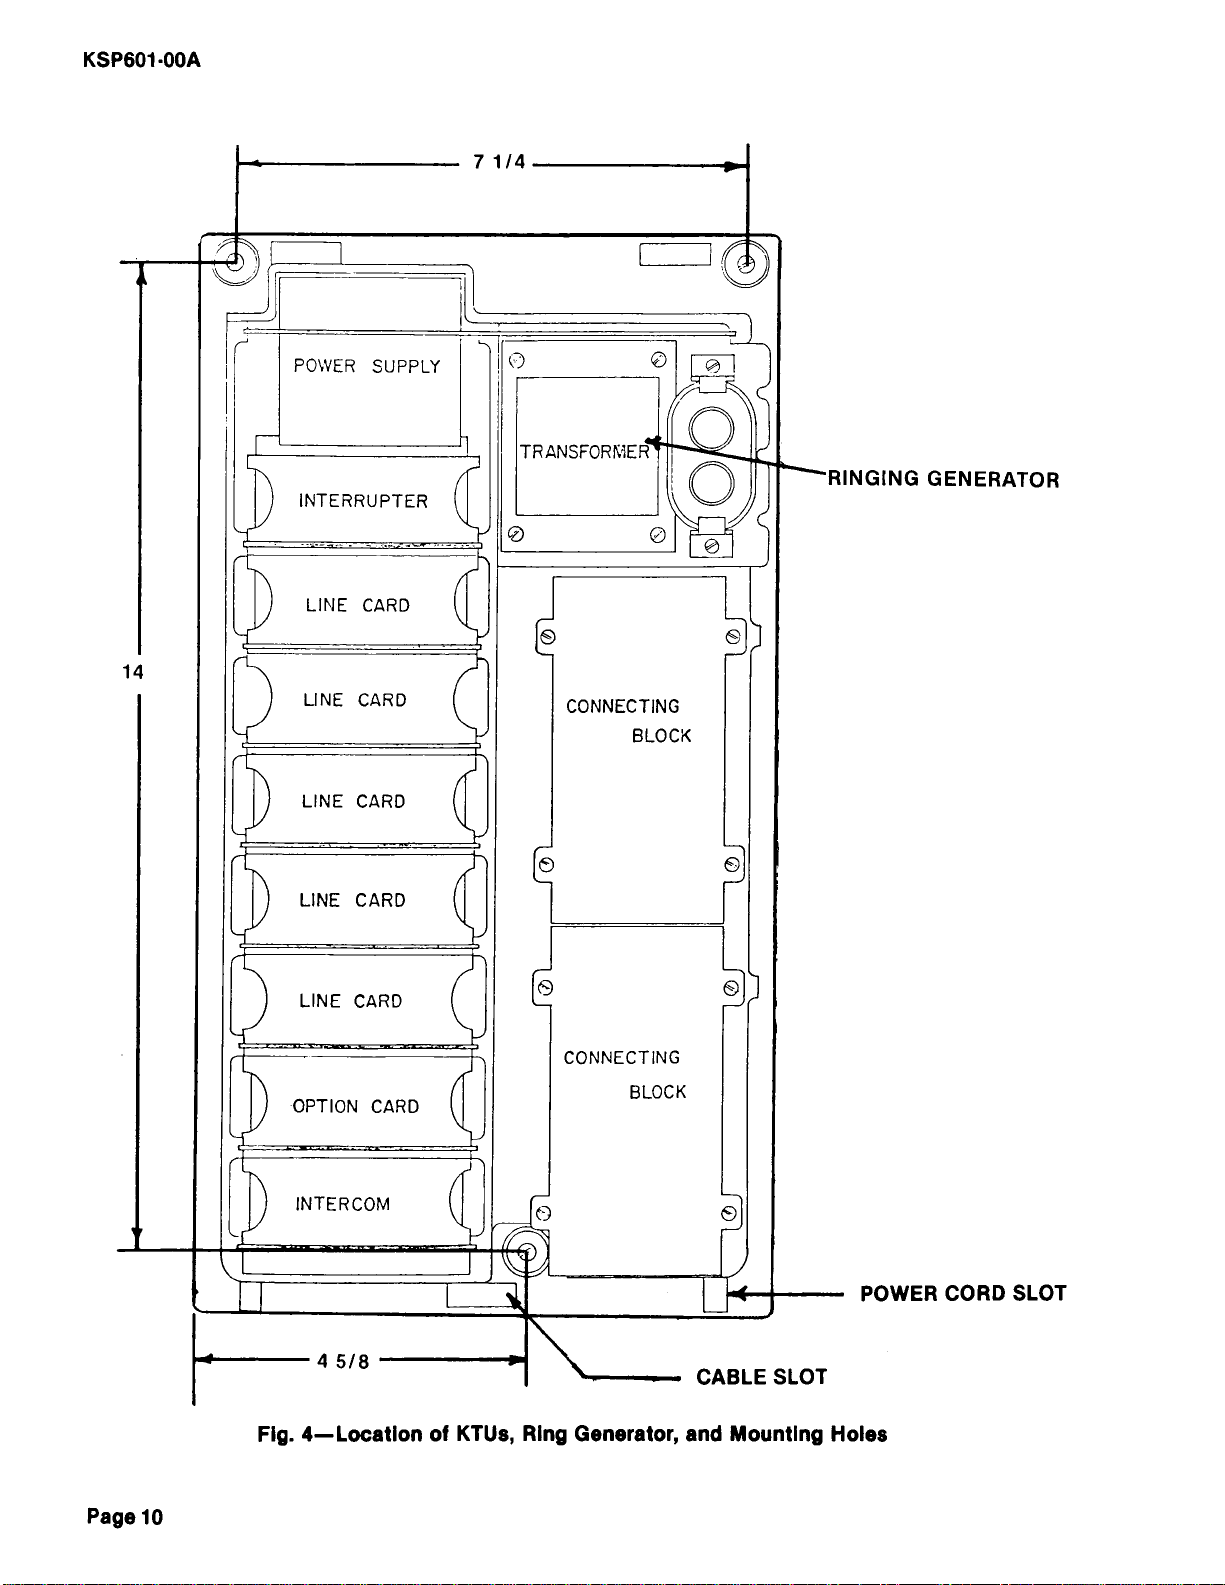
STANDARD 601A00-0P0 KEY SERVICE
UNIT
2.01 The
basic
601A Key Service
Unit
(KSU)
is
designed
for
wall
or
panel
mounting
and in-
cludes
a Backboard and Card Frame Assembly,
a Power Supply, an Interrupter,
connecting
block, and a cover.
2.02
The
Backboard
and
Card
Frame
Assembly
has seven 18-contact card connec-
tors, one 20-contact card connector, and
one
44-contact
card
connector.
Two
of
the
18-contact
connectors
are
dedicated
to
the
Power
Supply
and Interrupter. The remaining
five are wired
for
CO/PBX Line cards. Pins 1
through
18
of
the 20-contact card
connector
are
wired
to
individual
terminals
on the
connecting
block
so
it
can be
easily
wired
for
various op-
tional
cards. (NOTE:
This
connector
will
not
ac-
cept
20-pin
cards
such
as
the
405A
Semiautomatic
Exclusion, K414A Ringdown
Tie Line,
or
the K416A
Station
Line circuits.)
The 44-contact card
connector
is
dedicated
to
intercom.
Power Supply (183969-101)
2.02 The
power
supply
provides all voltages
required
for
a system using buzzer
signaling
or
call
announcing.
Power
input
is 115 Vac, 50/60
Hz and
outputs
are as
follows:
(1)
Regulated
-24
Vdc at 1
amp
for
intercom
and line card
talk
battery
and
power
for
logic
circuits
and relays.
(2)
18
Vac at 1 amp unregulated
for
power
to
buzzers
for
intercom
or CO signaling.
(3)
10
Vac at 2
amps
for
station
lamps.
This
will
supply
50
lamps,
continuous
load.
2.04 The
unit
consists
of
a
transformer
and
other
electrical
components
mounted on a
printed
circuit
board. It
includes
a fuse,
power
cord and a
jack
for
connection
to
a ring
generator
kit
P/N184162-101.
2.05 The
power
supply
board
plugs
into
the
power
supply
connector
provided in the 601A
key system.
Two
plastic
push fasteners are pro-
vided
to
anchor
the
power
supply
to
the KSU
frame. The
power
cord
plugs
into
connector
J1
on the PC board. (3-pin connector.)
KSP601-00A
Interrupter Card (183969-101)
2.06 The
interrupter
(P/N 183965-101) is in-
tended
for
use
with
the 601A key system
to
pro-
vide lamp flash, lamp wink, and interrupted (in-
termittent)
ringing. The ringing may be 105 V~c
or
18
Vac depending on the
strapping
of
option
block
TC1
located
near the
center
of
the card at
the
connector
end.
2.07 The
unit
is
installed
by
plugging
it
into
the second (from the top) card
connector
of
the
601A KSU.
RINGING GENERATOR KIT (184162-101)
2.08 A
ringing
generator
kit
must be sepa-
rately ordered and
installed
if
ringers are used
in
the
system.
The 184162-101
Ringing
Generator
Kit
was designed
for
the 601A key
system for
this
purpose. It has a nominal out-
put
of
105 Vac,
30
Hz.
CO/PBX LINE CARD KTU(K400E}
2.09 One K400E CO/PBX line card
KTU
must
be separately ordered and
installed
for each CO
or PBX line
coming
to
the system. These are in-
stalled
by
inserting
them
into
prewired line card
connectors. The K400E
KTU
includes
circuitry
to
facilitate
music-on-hold
and
signaling
through
a separate lead.
DIAL INTERCOM
General
2.10 The dial
intercom
system may be
of
any
one
of
several
configurations:
(1)
Using buzzers for signaling,
with
or
without
dial tone and ringback. (Dial
tone
and
ringback are provided by the call
announcing
card.)
(2)
Using ringers for signaling,
with
or
without
dial tone and ringback.
(A
ringing generator
must
be
installed
for ringer signaling, and a call
announcing
card
must
be
installed
to
provide
dial tone and ringback.)
(3)
Using call announcers for signaling.
In
this
application,
the call
announcing
card is
strapped to provide a tone burst and return tone
instead
of
ringback. It
also
provides dial tone
Page3

TCI Library- http://www.telephonecollectors.info/
KSP601-00A
(4)
Mixed
signaling,
using
buzzers (or ringers)
and
call
announcers
for
signaling.
Five
station
codes
must
be
assigned
to
each
method:
odd-
numbered
stations
will
be
signaled
by Call An-
nouncer
and even-numbered
stations
by buzzer
(or ringer).
(5)
The
dial
intercom
is
normally
rotary
but
can
be
adapted
to
accept
Tel-Touch (tone) dial-
ing by
adding
a
piggy-back
card to
the
intercom
card.
Dial
Intercom
Card (183977-101)
2.11 The
intercom
card (P/N 183977-101) is in-
tended
for
use
with
the
ITT
601
A key
system.
It
will
provide
intercom
for
up
to
ten rotary-dial
stations
with
buzzer
signaling
or,
optionally,
ringing
signaling
if
a
ringing
generator
kit
(P/N
184162-101) is
installed
in
the
KSU. It can be
converted
to
handle
Tel-Touch (tone)
dialing
by
the
addition
of
a
piggy-back
card
(PIN
183981-101).
The
intercom card does not
pro-
vide
dial tone
or
ringback, but these features
can be added
by
installing a call-announcing
card
in
the
KSU
even though call announcers
are not used
in
the system.
2.12 The
intercom
card
plugs
into
a
dedicated
connector
in the 601A KSU.
Station
connec-
tions
are
made
on
the
terminal
block
provided
in
the
KSU.
Tel-Touch (Tone Dial)
Adapter
Card (183981-101)
2.13 The 183981-101 Tel-Touch
adapter
card
was
designed
for
use in
conjunction
with
the
183977-101
dial-intercom
card
to
permit
Tel-
Touch
dialing
on
intercom
calls.
2.14 The
Tel-Touch
adapter
card
will
decode
standard
dual-tone
multiple-frequency
(DTMF)
codes
so
Tel-Touch
dialing
may
be used on the
601
A key
system
intercom.
2.15 The Tel-Touch card is
designed
to
be
piggy-back
mounted
on
the
183977-101 dial-
intercom
card
and
the
assembly
is then in-
serted in
the
intercom
card
slot
of
the
601A
KSU.
Page4
OPTIONAL
AUXILIARY
FEATURES
Call
Announcing
2.16 The 183973-101 Call
Announcing
card
was
designed
for use in
the
option
slot
of
the
601
A key
system
to
permit
tone-and-voice
signaling
with
handsfree
answerback
for
up
to
ten
stations
on
intercom
calls.
2.17 The
stations
to be
signaled
by tone-and-
voice
signaling
will
require a
call
announcer
for
each
station
to
be
signaled
in
this
manner.
This
may
be a 174B Call
Announcer
connected
to
each
phone
or
an 870 (rotary)
or
2870
(T-T)
telephone
with
integral
call
announcer.
If sta-
tions
are
situated
within
15 feet
of
each
other,
one Call
Announcer
may
be used
to
serve
several
stations.
2.18 The 183973-101 Call
Announcing
Card
may
also
be used in a
601
A key
system
to
pro-
vide
dial
tone
and
ringback
for
intercom
whether
Call
Announcers
are used
or
not.
Dial
Tone
and
Ringback on
Intercom
Calls
2.19 Dial
tone
and
ringback
for
intercom
calls
is provided by
installing
the
call
announcing
card even
though
call
announcers
are
not
used.
Manual
Intercom
(K401 B KTU)
2.20 The
K401
B
manual
intercom
KTU pro-
vides
busy-lamp
feed and
talk
path
for
manual
intercom
or
for
a
private
line
between
two
sta-
tions
only.
Stations
must
be
signaled
by a
separate
buzzer
arrangement
or
by
using
the
dial
intercom.
This
KTU requires
A-battery
(AB)
and A-ground(AG)
to
be
strapped
to
pins
18 and
3 respectively.
This
strapping
is
done
on
the
601A
connecting
block.
2.21 The
K401
B KTU
may
be
installed
in any
vacant
line
card
slot
or
in
the
"option"
slot.
2.22
Manual
intercom
may
require
two
but-
tons
of
the
connected
telephones,
one
button
to
access
the
line
and one
for
signaling.
An ex-
ternal
button
can be used
for
signaling.

TCI Library- http://www.telephonecollectors.info/
Voice Paging through
PA
System
2.23 Voice Paging
through
a
customer
owned
PA
system
from any
station
can be provided by
either
of
two
means:
(1)
button
access
to
a
PA
amplifier,
or
(2)
dial
access
to
PA
amplifier.
2.24
Button-Accessed
Paging.
A K401 B
Manual
Intercom
card may be used
to
access
the
PA
amplifier.
A person
at
any
station
can
page by
holding
down
a
line-pickup
button
that
has been converted
to
non-locking
operation
and
talking
into
his
handset.
In
planning
this
type
of
installation,
remember
that
a
button
will
be used at each phone and a line card
position
in the
KSU.
2.25
Dial-Accessed Paging.
In
a
system
using
all ringers and buzzers
for
intercom
signaling
(with or
without
dial
tone
and ringback) a K410A
PagingAdapter
KTU
is
installed
in a vacant line
card
slot
to
provide
this
feature.
In
system
using all
call
announcers
for
intercom
signal-
ing, the K410A
KTU
is
not
required. An
intercom
number
is
assigned
to
paging, and
interface
cir-
cuit
consisting
of
a
.1
Mfd, 25
V,
capacitor
and
a 600-Ohm
resistor
must
be
connected
to
the
PA
amplifier
input.
In
a
mixed
system
(using
buzzers
or
ringers at
some
stations
and call an-
nouncers
at
other
stations)
either
of
the
two
methods
may be used.
If
a buzzer/ringer
number
is
to
be used (even nymber) a K410A
KTU
must
be used, and
this
will
reduce line
capacity
by one.
Music-On-Hold (K403A KTU)
2.26
A K403A KTU may be
separately
ordered
and
installed
in the
C>ption
slot
or
in a separate-
ly provided card panel,
such
as a K359A one-
card panel,
to
provide music-on-hold for a max-
imum
of
six CO
or
PBX lines, a low-level
music
source,
such
as a tape
deck
or
FM tuner,
must
be
separately
provided.
SUBSETS
AND
CALL
ANNOUNCERS
Six-Button Subsets
2.27
Six-button
subsets
will
access
a
total
of
five
lines
including
intercom.
Refer
to
an ITT
"Telephone
Guide",
price
list, or
"Key
System
Guide"
KSG 6-79
for
ordering
information.
If
KSP601-00A
call
announcing
is
used
for
signaling,
a 174B
Call
Announcer
must
be
separately
provided
and
connected
to
each
station
to
be
signaled
by
call
announcing.
Ten-Button Subsets
2.28 Ten-button
subsets
will
access
a
total
of
nine
lines
including
intercom.
Thus a 10-button
set may handle five CO/PBX lines, rotary inter-
com
and
manual
intercom
and
will
have a
re-
maining
line
button
that
may be used
to
access
a
public
address
system
for
voice paging.
2.29
Ten-button
sets
are offered
with
integral
call
announcer. Ordering
information
follows:
(1
)0870*
*
-0BA-42M Set; 10-button; desk;
R-D;
ringer;
call
announcer
(2)
0870**-0BA-46M;
same
with
operator
recall
button
(3)
0870**-0BA-76M;
same
as
(1)
plus
automatic
exclusion
circuit
(4)
2870* *-0BA-42M; same as
(1)
except
T-T
dial
instead
of
R-D
(5)
2870* *-0BA-46M; same as
(2)
except
T-T
dial
instead
of
R-D
(6)
2870* *-0BA-76M; same as
(3)
except
T-T
dial
instead
of
R-D
If
subsets
are
wanted
without
ringer,
change
"BA"
to
"LR"
in ordering number.
174**-00B
Call Announcer Unit
2.30 Serves as
loudspeaker
for tone-and-voice
signaling
and as a
microphone
for
handsfree
answerback. One
call
announcer
can serve one
telephone
or
several
telephones
if
they
are
located
in
the
same area. It is
equipped
with
a
privacy
switch
that
can be used
manually
to
disable
the
transmit
mode. The purpose
of
this
switch
is
to
prevent a
caller
from hearing a con-
versation
at the called
station.
**Substitute
color
code
as
follows: 00, Black;
05,
Moss
Green;
13,
Beige; 15, White; 44,
Light Ash;
45, Cocoa
Brown
Pages

TCI Library- http://www.telephonecollectors.info/
KSP601-00A
3.00 PLANNING THE INSTALLATION
GENERAL
3.01
The
KSU
should
be
centrally
located
to
minimize
length
of
cable runs.
3.02 The
KSU
must
be
within
five feet (length
of
power
cord)
of
a
11
O
Vac service
outlet
which
is
not
controlled
by a
switch
accessible
for
false operation.
Do
not splice
or
add exten-
sions
to
power cord.
3.03 The service
outlet
must
be
of
the ground-
ing type and
should
provide
an
individual
cir-
cuit.
3.04 The
connecting
block
in
the
KSU
will
pro-
vide
terminating
points
for
five
station
cables.
If more than five
statior,s
are
to
be connected,
additional
66-type
connecting
blocks
musl
be
mounted
near the KSU. (See
figures
2 and
3.)
NOTE: The connecting block arrangement
is
an
installer
option. Trouble-shooting is
simplified if a separate split 66-type block
is
used for each two stations to be connected.
These blocks are then connected
in
multiple to
the
KSU
block with the exception of the
RT
leads which must
be
wired individually from the
KSU
"SIG" clips to each station side of each
block, and call-announcer
stations
must
have
an individual A-lead from the
intercom
button
to
any
clip
in
column
6,
rows 1 through 10.
PLANNING
CHART
3.05 Fill in the
"Station
Planning"
Chart.
CHART
I.
601
A
KEY
SYSTEM PLANNING, STATIONS AND LINES
Page&
WHICH BUTTON WILL
ICM "SIG"' PARTY
OR
THESE LINES APPEAR ON
NO. TERM LOCATION 1
10 0
11
1
12
2
13
3
14
4
15 5
16
6
17
7
18
8
19
9
Additional
KSU
Equipment
Required
K400E Line Card
KTU
1
183977-101
Intercom
Card
183973-101 Call
Announcina
Card
184162-101 Ringing
Generator
Kit
NOTE
1:
CA
=
Call
Announcing
RN
= Ringer
BZ
= Buzzer
2 3 4 5
ICM
1 1 1 1 1
SIGNALING
MODE SUBSET/CALL
(NOTE 1\ ANNOUNCER
CA
RN
BZ
MODEL NO.
(NOTE
2)
1 1
A
system
may
be
mixed
5
+
5
call
announcing
and buzzers (or ringers). Odd
number
stations
must
be
call-announcer
stations
and even numbered
stations
must
be buzzer
or
ringer
stations.
NOTE
2:
Stations
to
be
signaled
by
call
announcing
must
have a 174B call an-
nouncer
connected
to
the
telephone
set
or
a
telephone
set
with
integral
call
an-
nouncer
(model 870 rotary
dial
qr
2870
T-T
dial.)

TCI Library- http://www.telephonecollectors.info/
FEATURE
OR
FUNCTION
CO/PBX Line
Music-On-Hold
Ringer Signaling
Dial Intercom
Tel-Touch (Tone)
Dialing for Intercom
Dial Tone and Ringback
for Intercom CalIs
Call
Announcing
with
Dial Tone and Tone Burst
Manual Intercom
Button Access
to
a P.A.
System for Voice Paging
Dial Access
to
a P.A.
System for Voice Paging
KSP601-00A
ORDERING NO. DESCRIPTION
000400-00E
KTU,
CO/PBX Line Card. 18-contact
P.C.
board.
One required per CO/PBX line.
000403-00A
KTU,
Music-on-hold.
One required per system. (Requires low-
level
music
source.) 18-contact
P.C.
board.
184162-101 KIT, Ringing Generator. One required per system
to provide ringing voltage.
183977-101
KTU,
Dial Intercom. One required per system.
44-contact
P.C.
board
183981-101
KTU,
T-T
adapter. One required per system.
(Mounts on 183977-101
KTU.)
183973-101
KTU,
Call-Announcing. One required per system.
(Call Announcer not used.
KTU
strapped
for ringback.) 18-contact
P.C.
board.
183973-101
KTU,
Call-Announcing. One required per system.
000401-008
000401-008
000410-00A
(A
call announcer is required at each sta-
tion.) 18-contact
P.C.
board.
NOTE: A system may
be
mixed;
five
stations
signaled
by
call announcing and
five
by
buzzers
(or
ringers if a ringing generator
is
used).
KTU, Mc:inual Intercom. One required per manual
intercom
circuit.
KTU, Manual Intercom. One required. 18-contact
P.C.
board. Installs in line card slot.
KTU,
Paging Adapter. One required. 18-contact
P.C.
board.
Installs
in line card
slot
and
uses one intercom number.
NOTE:
The
K410A
KTU
is
not required
in
an
all
call announcing system
(or
in
a mixed system if a
call-announcing number
is
available).
Page7

TCI Library- http://www.telephonecollectors.info/
KSP601-00A
4.00 INSTALLATION C.O. SERVICE ONLY
PREASSEMBLE
KSU
4.01
The
power
supply,
interrupter
card,
power
cord, and
two
plastic
push-fasteners
are
packed
in
the
KSU.
4.02
After
removing
the
KSU
from
the
carton,
place
it on a level
work
surace
with
the
cover
up.
4.03 Press
inward
on the
center
section
of
the
bottom
of
the cover to
unlatch
it
and
lift
the
cover
straight
up and set
it
aside.
4.04
Check
that
the
following
items
are in-
cluded
then set
them
aside
until
they are
called
for:
(1)
3-conductor
power
cord.
(2)
One
small
envelope
containing
two
plastic
push fasteners. (These may be
included
in
power
supply
carton.)
(3)
One
carton
containing
the
KSU
power
sup-
ply (183969-101).
(4)
One
carton
containing
the
interrupter
card
(183965-101
).
Install Power Cord
in
KSU
(Tools
required:
one
thin
blade
slot
screwdriver.)
4.05 Turn the
KSU
over so the
internal
wiring
is up.
4.06 Remove one
of
the
two
screws
that
secure
the
power
cord
retainer
bar
at
the
bot-
tom
left
of
the
KSU
and loosen
the
second
screw.
4.07
Insert
the
plastic
jack
of
the
power
cord
through
the
rectangular
slot
on
the
left
side
of
the KSU and pull the cord
through
the hole
until
it
extends
about
4
inches
beyond the
top
of
the
KSU.
Pages
4.08 Place
the
power
cord in
the
retainer
slot
and
reinstall
the
screw
removed in a prev:ous
step. If a
ringing
generator
will
not
be used,
tighten
the
screws. If a
ringing
generator
is
to
be
installed,
do
not
tighten
the
screws
at
this
time.
Install Ringing Generator
if
Required
(Tools required: one thin blade slot screwdriver
and one medium size Phillips screwdriver.)
4.09 Turn the KSU so
its
front
is up.
4.10 Place the
transformer
on the
plastic
bosses
at
the
upper
right
corner
of
the
KSU.
(The
installation
will
be
neater
if
the
transformer
leads are turned
to
your
right.)
Secure
the
transformer
with
the
four
long
screws
included.
4.11
Using the
two
short
screws.
attach
the
two
metal
clips
loosely
to
the
KSU
immediately
to
the
right
of
the
transformer.
4.12 Raise the
clips
and
place
the
capacitor
(with
wiring
toward
your
left)
under
them.
Tighten
the
two
screws
so
the
two
clips
fasten
over
the
shoulders
of
the
capacitor
and hold
it
securely.
Install Power Supply
4.13
Insert
power
supply
in
the
top
card
slot
of
the
KSU
and plug
the
power
cord
onto
the
3-pin jack.
4.14 If a
ringing
generator
has been
installed,
push the
ringing
generator
jack
onto
the
6-pin
plug
of
the
power
supply.
4.15 Push the
two
plastic
push-fasteners
through
the
two
holes
near the
front
corners
of
the
power
transformer
and
through
the match-
ing holes
of
the KSU frame.
4.16 If
the
power
cord
retainer
bar
screws
have
not
been
tightened
gently
pull
the
slack
out
of
the cord,
tilt
the
KSU
up and
tighten
the
two
screws.

TCI Library- http://www.telephonecollectors.info/
MOUNT THE
KSU
4.17 Mount the
KSU
on a wall or panel
with
three bolts
or
screws. (Be sure the power cord
is in place.)
4.18 Connect a 12-gauge wire from the screw
terminal on the power supply to
an
approved
earth ground. (This screw terminal is located
near the right front corner
of
the power supply
card.)
KSP601-00A
INSTALL STATION CONNECTING BLOCKS
4.19 Near the
KSU,
install one
split
66-type
connecting block for each
two
stations
to
be
connected. (Figure
3.)
NOTE: If five
or
fewer stations are to be con-
nected, they can be connected directly to the
KSU
block. (Figure 2.)
CABLE
~
KSU
CABLE
~
CABLE
~
CABLE
~
'
CO/PBX
LINES
POWER
CORD
Fig.
2-Typlcal
Installation with Five or Fewer Stations
INDIVIDUAL
CABLES
TO
STATIONS
KSU
CO/PBX
LINES
JUMPERS
Spllt
66-
Type Blocks
POWER CORD
Flg.3-
Typlcal Installation Using Spllt 66-Type Blocks for Terrnlnatlon of Station Cable
Page9

TCI Library- http://www.telephonecollectors.info/
KSP601-00A
14
Page 10
POWER SUPPLY
INTERRUPTER
LINE
CARD
LINE CARD
LINE
CARD
LINE CARD
LINE
CARD
OPTION CARD
INTERCOM
7 1/ 4
--------41~
0 0
TRANSFORMER
0
CONNECTING
BLOCK
CONNECTING
BLOCK
RINGING GENERATOR
POWER CORD SLOT
CABLE SLOT
Fig.
4-Locatlon
of KTUs, Ring Generator, and Mounting Holes

TCI Library- http://www.telephonecollectors.info/
CONNECT CO/PBX LINES
4.20 Refer
to
table B and to figure 5 and con-
nect
CO/PBX lines
to
the
KSU
block.
NOTE: All cabling
is
brought through the
center opening
in
the bottom of the
KSU
frame.
CONNECT STATION CABLE
TO
STATION
BLOCKS
4.21
Using the standard wiring pattern, con-
nect
each
station
cable
to
one side
of
each
split
block. (The
station
leads
should
be con-
nected
to
the
outer
column
of
clips
on each
side
of
the block.) Label the
blocks
with
station
number, party name, and lead designations.
CONNECT JUMPERS FROM
KSU
TO STATION
BLOCKS
4.22 Refer
to
figure 5 and
connect
individual
jumpers
from
clips
of
column
5
of
the KSU
block
to
each
station
block. Use loop-through
termination
on
station
blocks
and
connect
each
jumper
to
the
two
center
columns
of
clips
of
each
station
block.
CAUTION:
Be
sure to connect jumpers by
designation. These designations are shown in
figure
5.
Common Audible Signal
4.23
Two
or
more lines may be connected
to
ring
at
one
or
more stations. For example:
if
one
station
is assigned
to
answer all calls, the
ringer
at
the
station
can be caused
to
ring on all
lines
by
strapping
all
RC
clips
together
and
connecting
them
to
the
R1
lead
of
that
station.
{This is
normally
the slate-yellow lead
of
the
station
cable
which
will
appear at terminal 40
on the
station
block.)
INSTALL PLUG-IN
KTUs
4.24 Refer
to
figure 6 and strap interrupter
card
for
18
Vac
or
105 Vac signaling. Insert the
interrupter
card
into
the card
slot
immediately
beneath the power supply.
NOTE: Install cards with component side up.
KSP601-00A
4.25 Insert one 400E line card
into
each active
line card slot. These are the five
slots
im-
mediately
beneath the interrupter.
NOTE: The 400E line card has several strap-
ping options. Refer
to
the instructions packed
with the 400E line card and strap the card for
the desired options.
OPERATIONAL CHECKS
4.26 Recheck all
connections
for
correctness
and security.
4.27 Plug
power
cord
into
110 Vac service
outlet.
4.28 Go off-hook at a
station
and depress
each connected line
button
in sequence. The
busy lamp
for
the associated line should be on
at
all connected
stations
when
its
button
is
depressed at any station.
4.29 While off-hook, depress line 1
button
and
check
that
you receive dial tone.
Blow
in your
transmitter
to
check
for
sidetone in your
receiver.
4.30 Check
for
proper
CO
ringing by
dialing
your own number. The lamp associated
with
the line
with
the
incoming
call should flash at
all connected stations. Have someone answer
at
another
set and check your talk path by con-
versing
with
them.
4.31
Push your HOLD button. The lamps
associated
with
the line you are on should
wink
at all connected stations.
4.32 Call your business
office
or
other
outside
number, and advise them that you are going to
put them on hold for
30
seconds and ask them
to operate their
hookswitch
several
times
while
they are on hold. Push your hold
button
and, at
the end
of
30
seconds, return to the held line by
pushing the
button
associated with that line.
The connection should have remained intact. If
it does not strapping on the 400E card may
be
incorrect. (See
instructions
packed
with
400E
KTU.
Page11

TCI Library- http://www.telephonecollectors.info/
KSP601-00A
TABLE
A1.-KSU
Block Layout, Rows 1 thru 25
CIRCUIT
DESIG-
NATION
1 2
Tl
Pin
3
CO/PBX
LINE
l Rl
AG
STATION
T
lT
(CLIPS
1-5)
CONNECTIONS
R lR (CLIPS
1-5)
LINE
l A lA (CLIPS
1-5)
(INCLUDE
RG,RC
Al/LG Al/LG (CLIPS
1-5)
ON
ROW
2)
L lL (CLIPS
1-5)
Tl
Pin
3
CO/PBX
LINE
2
R2
AG
STATION
T
2T
(CLIPS
1-5)
CONNECTIONS
R
2R
(CLIPS
1-5)
LINE
2 A
2A
(CLIPS
1-5)
(INCLUDE
RG,RC
Al/LG
LG
(CLIPS
1-5)
ON
ROW
9) L
21
(CLIPS
1-5)
T3
Pin
3
CO/PBX
LINE
3
R3
AG
STATION
T
3T
(CLIPS
1-5)
CONNECTIONS
R
3R
(CLIPS
1-5)
LINE
3 A
3A
(CLIPS
1-5)
(INCLUDE
RG,RC
Al/LG
LG
(CLIPS
1-5)
ON
ROW
16)
L
31.
(CLIPS
1-5)
CA
RESET
WHEN
CALL
CA
BUS
(1-5)
CONNECTED
ANNOUNCERS
ARE
USED
CA
BUS
(l-5)
CONNECTED
GROUND
LG
BUS,
GROUND
NOTES:
(1)
These clips are internally wired to pins of
the option slot
as
listed.
(2)
When a call announcer card is used
in
the
system, the intercom A-lead must
be
brought
from each station to any of these ten terminals.
Page12
CLIP
NUMBER
3 4 5
Pin
18
AB
RG
RC
Pin
18
AB
RG
RC
Pin
18
AB
RG
RC
to
26-6
TO
26-6
ROW
6 (Note
1)
No.
Pin
1
I\
1
Pin
2 2
Pin
3 3
Pin
4 4
Pin
5 5
N
Pin
6
~
6
E-<
Pin
7
0
7
z
Pin
8 8
Pin
9 9
Pin
10
V
10
- -
------
Pin
11
11
Pin
12
12
Pin
13
13
Pin
14 14
Pin
15
15
Pin
16 16
Pin
17 17
Pin
18
18
19
20
21
-·-
22
23
24
25

TCI Library- http://www.telephonecollectors.info/
Table
A2.-KSU
Block Layout, Rows
26
thru
50
CIRCUIT
DESIG-
CLIP
NUMBER
NATION
1 2 3
T4
PIN
3 PIN
18
CO/PBX
LINE
4
R4
AG
AB
STATION
T
4T
(CLIPS
1-5)
CONNECTIONS
R
4R
(CLIPS
1-5)
LINE
4 A
4A
(CLIPS
1-5)
(INCLUDE
RG,RC
Al/LG
LG
(CLIPS
1-5)
ON
ROW
27)
4L
(CLIPS
1-5)
TS
PIN 3 PIN
18
CO/PBX
LINE
5
RS
AG
AB
STATION
T
ST
(CLIPS
1-5)
CONNECTIONS
R
SR
(CLIPS
1-5)
LINE
5 A
SA
(CLIPS
1-5)
(INCLUDE
RG,RC
Al/LG
LG
(CLIPS
1-5)
ON
ROW
34) L
SL
(CLIPS
1-5)
INTERCOM
RT
SIG
RT
10
RT
11
RT
12
(SIGNAL)
CONN
SIG
RT
15
RT
16
RT
17
INTERCOM
T,R T
INTERCOM
T (CLIPS
1-5)
STATION
R
INTERCOM
R (CLIPS
1-5)
CONNECTIONS
T
INTERCOM
T (CLIPS
1-5)
R
INTERCOM
R (CLIPS
1-5)
LG
BUS
(1-5)
CONNECTED
TO
27-6
INTERCOM
LAMP
L
INTERCOM
LAMP
(CLIPS
1-5)
&
LAMP
GROUND
LG
BUS
(1-5)
CONNECTED
TO
27-6
(Mote
1)
L
INTERCOM
LAMP
(CLIPS
1-5)
NOTES:
(1)
Terminals labeled
LG
are connected only
to
terminal 27-6. When they are
to
be
used for
ground, 27-6 must be strapped
to
27-2
(AG).
When Call Announcers are used, 27-6 must
be
strapped to 27-3
(AB)
and these terminals then
provide
-24
V T~LK BATTERY.
4
RG
RG
RT
RT
5
RC
RC
13
RT
14
18
RT
19
I
I
I
I
KSP601-00A
ROW
6 (TIE
POINTS)
No.
Connected
to
llow ■
22,23
26
Connected
to
Rows
46.48
27
18V
ac Buzzer
sig.
28
CA
RST
(Call
Ann.
Reset
29
~
30
100
OHMS
>
31
105 V from Ring Gen.
32
105 V
RN
Interrup.
Ring
33
105 V
Input
to
ICM
34
Relay
Tree
Aux.
Input
(18 V
Input
35
to
Relay
Tree)
Call
Ann. Ringback Tone
36
-19V For
Call
Ann.
37
Ll
Lamp
Control
(CA)
11
38
I
12
Lamp
Control
(CA)
39
RB
Tone
Burst
(CA)
'
40
RL
ICM
Relay Control(CA)
41
FP Breaks
ICM
Dial
Tone
42
AO
For Mixed System
43
:
44
,I
45
4----
!146
11 47
,,
·i
48
>
49
,,__
'
50
Page
13

TCI Library- http://www.telephonecollectors.info/
KSP601-00A
Table
B.-KSU
Block;
CO
Lines
and
Station Termination. (See Fig.
5)
CIRCUIT
DESIGNATION
601A
CONNECTION
BLOCK COMMENTS
ROW CLIP
CO/PBX
Tl
l l
Line
Rl
2 l
DRl
1 2
Direct
Ring Lead
Line l
1T
j
1-5
lR
4
1-5
Station
lA
5
1-5
Connections
Al
6
1-5
One
Conn.
Per
Station
LG 6
1-5
lL 7
1-5
RC
2 5 Ring From
CO
Line Card
RG
2 4
CO/PBX
T2
8 l
Line
R2
9 l
DR2
8 2
Line 2
2T
10
1-5
2R
11
1-5
Station
2A
12
1-5
Connections
Al
13
1-5
One
Conn.
Per
Stat
ion
LG
13
1-5
2L
14
1-5
2RC
9 5
2RG
9 4
CO/PBX
T3
15
l
Line
R3
16
l
DR3
15
2
Line 3
3T
17
1-5
3R
18
1-5
Station
3A
19
1-5
Connections
Al
20
1-5
One
Conn.
Per
Station
LG
20
1-5
3L
21
1-5
3RC
16
5
3RG
16
4
CO/PBX
T4
26 l
Line
R4
27 l
DR4
26 2
Line 4
4T
28
1-5
4R
29
1-5
Station
4A
30
1-5
Connections
Al
31
1-5
One
Conn.
Per
Station
LG
31
1-5
4L
32
1-5
4RC
27 5
4RG 27 4
CO/PBX
T5
33
l
Line
R5
34
l
DR5
33 2
Line 5 5T
35
1-5
5R
36
1-5
Station
5A
37
1-5
Connections
Al
38
1-5
One
Conn.
Per
Station
LG 38
1-5
5RC
34
5
5RG
34
4
T
42,44
1-5
Dial
Station
R
43,45
1-5
Intercom
Connections
A
1-10
6
Use
with
call
announcing
card
only
LG A
1/LG
L
47,49
1-5
RT
40,41
1-5
Signal
palh,
stations
10-19
AB
46,48
1-5
Connect
AB
to
27-6
Call
Station
RESET
22,23
1-5
Connect
26-6
to
29-6
Announce
Connec
ti
ens
GROUND
24
1-5
Any ground will suffice
RT
40,41
1-5
Signal
path,
stations
10-19
Page14

TCI Library- http://www.telephonecollectors.info/
CO/PBX
LINES
D *
Tl
Rl
DR2
T2
R2
DR3
T3
R3
D 4
T4
R4
DRS
5
R5
KSP601-00A
DO
NOT CONNECT ANY LEADS TO THIS COLUMN
c::::J
c.::JCCJr:r::J~
0 I 2 3
'4
c:.n~~c::::::.::Jt:::!::l
5
G,
7 8 G
r::::r:::J--
-G.:J--
-c:::J-
-c:-::>-
-c:r=J
=
=
=
=
=
=
=
=
=
=
=
t:I::l
~I
3;:
.,,.,,
Yo
~5__]
¼
41
-o/Z~
4_0
~
.:;--i
Ai._=]
--CJ
1RG
1RC
1T
lR
1A
(NOTE
1)
,A;]
1L
2RC
2T
2R
2A
2LG
3T
3R
3A
3LG
3L
4T
4R
4A
4LG
4L
SRG
SR
ST
SR
SA
SLG
SL
STATION CABLE
OR JUMPERS TO
STATION BLOCKS
*DR Lead (Direct Ring Lead). See KSP400E
for
further
in-
structions
concerning
this
lead.
NOTE
1:
1
LG
(W·G)
connects
to
any available
pin
(1-5)
on
rows
6,
13,
20,
31,
or
38
.
NOTE
2:
For
common
audible
signaling,
connect
RC
clips
together
and
connect
to
station
that
is
to
receive CAS.
NOTE
3:
Only 1
station
shown
connected.
Connect
addi-
tional
stations
on same busses.
For
more
than
5
stations,
install
a
separate
block
to
connect
extra subsets.
Fig.
5-CO/PBX
Line and
Station
Connections
Page 15

TCI Library- http://www.telephonecollectors.info/
Table
C.
Station Connections
for
5-Line Sets
and 174B Call
Announcer
DESIG-
NATION
TERMINAL
IN
SET
MOUNTING
PLUG
CONNECTING
CONN.
BLOCK 601A
CONN.
BLOCK
CORD PIN
CABLE
ROW NUMBER ROW
TERM.
1T
iR
lA
Al
1LG
lL
2T
2R
2A
2LG
2L
3T
3R
3A
3LG
3L
4T
4R
4A
4LG
4L
5T
5R
~
5A
(1)8
<>:
w
....
5LG Z
5l
AG
AB
Hold
Lamp
CA
RST
CA
RT
1T
lR
lH
18
LG
L1
2T
2R
2H
LG
L2
3T
3R
3H
LG
L3
4T
4R
4H
LG
L4
ST
5R
5H
LG
L5
6
5
4
3
LG
LH
L2 (e)
SG
RT
RR
W-Bl
26
BL-W 1
W-0
27
0-W
2
W.-G 28
G-W
3
W-BN
29
BN-W
4
W-SL 30
SL-W (bl 5
R-BL
(c,d)
31
BL-R
6
R-O 32
0-R
7
R-G
33
G-R
(b) 8
R-BN
(c,d)
34
BN-R 9
R-SL
35
SL-R
10
BK-BL 36
BL-BK (b)
11
BK-O
(c,d)
37
O-BK
12
BK-G
38
G-BK
13
BK-BN
39
BN-BK
(b)
14
BK-SL
(c,d)
40
SL-BK
15
Y-BL(c)
41
BL-Y
(c)
16
Y-O
(d)
42
O-Y
/dl
(2)
17
Y-G
(d) 43
G-Y
(d)
18
Y-BN
44
BN-Y
19
Y-SL
45
SL-Y 20
W-BL
Bl-W
W-0
0-W
W-G
G-W
W-BN
BN-W
W-SL
SL-W (b)
R-BL
BL-R
R-O
0-R
R-G
G-R
(b)
R-BN
BN-R
R-SL
SL-R
BK-BL
BL-BK (b)
BK-O
(c.d)
O-BK
BK-G
G-BK
8K-BN
BN-BK
BK-SL
SL-BK
Y-BL
BL-Y
Y-O
O-Y
Y-G
G-Y
Y-BN
BN-Y
Y-SL
SL-Y
l
2
3
4
5
6
7
8
9
10
11
12
13
14
15
16
17
18
19
20
21
22
23
24
25
26
27
28
29
30
31
32
33
34
35
36
37
38
39
40
3
4
5
6
6
7
10
11
12
13
14
17
18
19
20
21
28
29
30
31
32
42.44
43,45
1-10
AlAG
47 49
34
34
29
40,41
1-5
1-5
1-5
1-5
1-5
1-5
1-5
1-5
1-5
1-5
1-5
1-5
1-5
1-5
1-5
1-5
1-5
1-5
1-5
1-5
1-5
1-5
1-5
6
1-5
1-5
2
(AG)
3 IAB\
6
1-5
(f)
(b) Spare
Conductors.
(c)
Not
Included in 34-conductor Mounting
Cord.
(d)
Not
Included
in
42-conductor
Mounting
Cord.
(e)
On
Network.
(f
)
RT
Terminal
assigned
to
this
station.
NOTES:
(1)
Line position 5
is
used for Intercom.
If
this
station
is
to
be signaled by call announcer, the
SA
lead
must
be connected
to
terminal 6
of
any
row 1 through 10.
(2)
The 0-Y lead, terminal
34
on the station
block, supplies AB (A-Battery)
to
the call an-
nouncer.

TCI Library- http://www.telephonecollectors.info/
KSP601-00A
Table D- Connections
to
Station blocks, 870, or
2870 Telephones
in
a 601A Key System.
CIRCUIT
MOUNTING
PLUG
RUNNING
STATION
BLOCK
JUMPERS
TO
KSU
BLOCKS
NOTES
DESIG-
CORD
PIN
CABLE
ROW
NUMBERS
ROW
TERMINAL
1T
W-BL
26
W-BL
lR
BL-W
1 BL-\'/
lA
W-O
27
W-O
Al
O-W
2
0-Vi
!LG
W-G
28
W-G
lL
G-W
3
G-W
2T
W-BN
29
W-BN
2R
BN-W
4
BN-W
2A
W-SL
30
W-SL
9A
or
PVL2
SL-W
5
SL-W
2LG
R-BL
31
R-BL -
2L
BL-
R 6 BL-R
3T
R-O
32
R-O
JR
O-R
7
O-R
3A
R-G
33
R-G
8A
or
PVL l
G-R
8
G-R
JLG
R-BN
34
R-BN
3L
BN-R
9
BN-R
4T R-SL 35 R-SL
4R
SL-R 10 SL-R
4A
BK-BL
36
BK-BL
7A
BL-BK
11
BL-BK
4LG
BK-O
37
BK-O
4L
O-BK
12
O-BK
ST
BK-G
38
BK-G
5R
G-BK
13
G-BK
SA
BK-BN
39
BK-BN
6A
BN-BK
14
BN-BK
5LG
BK-SL
40
BK-SL
5L
SL-BK
15 SL-BK
6T
Y-BL
41
Y-BL
6R
BL-Y
16
BL-
Y
AG
Y-O
42
Y-O
AB
O-Y
17
O-Y
6LG
Y-G
43
Y-G
6L
G-Y
18
G-Y
7T
Y-BN
44
Y-BN
7R
BN-Y
19
BN-Y
Bl
Y-SL
45
Y-SL
Rl
SL-Y
20
SL-Y
7LG
V-BL
46
V-BL
7L
BL-V
21
BL-V
8T
V-O
47
V-0
BR
O-V
22
O-V
RT
V-G
48
V-G
9L
G-V
23
G-V
CA
RST
V-BN
49
V-BN
BL
BN-V
24
BN-V
9T
V-SL
50
V-SL
7R
SL-V
25
SL-V
• Do
not
connect
these leads.
(1) Line position 6 is used for intercom in 601A
system. If this station is to be signaled
by
call
announcer, the 6A lead must be connected to
terminal 6 of any row 1 through 10.
(2) The 0-Y lead, terminal 34 on the station
block,
supplies
AB (A-Battery)
to
the
call
an-
nouncer.
(3)
Connect
a1umper from
terminal
35
to
any
spare A1/LG
terminal
clip
on
the
KSU
block.
If
1
2
3
4
5
6
7
8
9
10
11
12
13
14
15
16
17
18
19
20
21
22
23
24
25
26
27
28
29
30
31
32
33
34
35
36
37
38
39
40
41
42
43
44
45
46
47
48
49
so
3
1-5
4
1-5
5
1-5
6
1-5
6
1-5
7
1-5
10
1-5
11
1-5
12
1-5
. .
13
1-5
14
1-5
17
1-5
18
1-5
19
1-5
.
20
1-5
21
1-5
28
1-5
29
1-5
30
1-5
--
31
1-5
32
1-5
35
1-5
36
1-5
37
1-5
1-10
6 I 1I
liC/\<i
38
1-5
39
1-5
42,44
1-5
(11
ilCMI
43,45
1-5
1ll
IIC1\',I
27 2
27 3 12\
-A 1
iLG
13)
IICMI
47,49
1-5
1ICM1
--
--
-RG
141
-
RC
(4)
--
--
.
.
40,
-l
l
SIG
. .
29
6
. .
there are
no
spare A1/LG
clips,
this
jumper
may
be
omitted
as
all
LG
leads are
commoned
in
the
phone.
(4)
Connect
RG
and
RC
jumpers
as
shown
to
have CO
ringing
at
this
station.
If
this
station
is
to
have
common-audible
signaling
for
CO lines,
connect
the
RC
jumper
to
all
RC
terminals
at
the
KSU
block.
If
this
station
is
to
be
signaled
by
ringer
on
intercom
calls,
connect
the
RC
jumper
to
the
appropriate
intercom
RT
(SIG) ter-
minal.
Page 17

TCI Library- http://www.telephonecollectors.info/
KSP601-00A
Page18
I I
I I
IJ
Install
Jumper
in
B-C
to
Get 105 Vac Ring Voltage for Ringers. Install Jumper in
A-B
to
Get 18 Vac
for
Buzzers.
Fig.
&-Strapping
for
Interrupted Signal (Ringer
or
Buzzers) on Interrupter Card.

TCI Library- http://www.telephonecollectors.info/
5.00 INSTALLATION, TO ADD DIAL INTER-
COM
CONNECTIONS
General
5.01
The
following
connections
must
be
made
for
each
intercom
station:
T (Tip)
R (Ring
L (Lamp)
LG
(Lamp Ground)
SIG (Signal)
RG
(Ring Ground)
5.02 All
connections
are
common
except
SIG.
Individual
signal
leads
must
be
connected
from
each
station
to
the
appropriate
SIG
clip
on the
KSU
block.
Station
10
must
connect
to
SIG
"0",
11
to
SIG "1
",
12
to
SIG"2",
and
so
forth.
5.03 In
addition
to
station
connections:
if
5
or
fewer
stations
are
to
be connected,
install
a
jumper
from row
27,
clip
6
to
row
27,
clip
AG.
This
jumper
causes ground
to
appear at all
clips
on rows
46
and
48.
If
more than 5
stations
are
to
be connected,
install
a
jumper
from any
AG
clip
to
the
signal ground
terminal
(B1) on
both
sides
of
all
station
blocks.
This
is
normally
terminal
40
(YL-SL).
To Use Buzzers for Signaling
5.04 If buzzers are
to
be used
for
signaling,
in-
stall
a
jumper
from row
28,
clip
6
to
row 35,
clip
6.
To Use Ringers for Signaling
5.05
If
ringers are
to
be used
for
signaling,
in-
stall
a
jumper
from row 34,
clip
6
to
row 32,
clip
6.
(Do
not
strap
28-6
to
35-6 as
instructed
in
paragraph 5.04.) A
ringing
generator
must
be in-
stalled
in
the
KSU
to
provide 105 Vac, 30 Hz.
KSP601-00A
To Add Tel-Touch (Tone) Dialing
5.06 To
adapt
the
intercom
for tone dialing, in-
stall the Tel-Touch
adapter
card (183981-101) on
the
intercom
card: *
(1)
Remove the
"W"
plug from the
intercom
card (see fig.
8).
(2)
Place the
two
cards
with
components
fac-
ing each
other
and
with
the
small
end of the
Tel-Touch card toward the edge
connector
of
the
intercom
card.
(3)
Insert the
two
rows
of
pins
on the Tel-
Touch card
into
the
two
connectors
on the in-
tercom card making sure
that
no
pins
slip out-
side
of
the connectors.
INSTALL DIAL INTERCOM CARD
5.07 Refer
to
figure 8 and strap
intercom
card
as required. Insert the dial
intercom
card in the
bottom
slot
of
the
KSU.
TO
ADD DIAL TONE AND RINGBACK
TO
IN-
TERCOM
5.08
Connect
intercom
as
instructed
in
paragraph 5.01.
5.09 Add
jumpers
to
KSU
block
as shown in
figure
9.
5.10 Return the A-lead
associated
with
the in-
tercom
button
on each phone
to
an individual
clip
in
column
6,
rows 1
through
10
as shown in
figure
9.
5.11
Refer
to
figure
12
and strap the call an-
nouncing
card for
"Ringback".
This is
option
A-B.
5.12
Install
the call
announcing
card in the
option
slot
of
the KSU. (Second
slot
from bot-
tom.)
5.13 Refer
to
figure 8 and remove
X,
Y,
and Z
straps
from the
intercom
card and reinstall
it
in
the KSU.
Page 19

TCI Library- http://www.telephonecollectors.info/
KSP601-00A
NOTE
1:
The numbers under the Signal Lead
Pins on rows
40
and
41
correspond
to
the inter-
com
number
for
the
station
connected
to
that
pin. EXAMPLE: Under pin 2
or
row
40
is
a 1, the
intercom number
for
the
station
connected
to
that
pin
will
be 11. A
(1)
precedes the number
under the pin
to
produce the intercom number
for
that
station.
NOTE
2:
Refer
to
Figure 8
for
strapping
re-
quired on
intercom
card.
NOTE
3:
To have
dial
tone and ringback
on
in-
tercom, the
call
announcer card
must
be in-
stalled even
if
call
announcers are
not
used.
The
call
announcer card
is
installed in the op-
tion
slot, and
wiring
on the
connecting
block
is
as shown on figure
9.
Strap the
call
announcing
card
for
ringback (figure
12).
NOTE
4:
For 18 Vac buzzer signaling,
install
jumpers
28-6
to
35-6.
For 105 Vac ringer signal-
ing,
install
jumper
32-6
to
34-6.
Do
not
install
both
jumpers.
11
=
cu
cc·; = =
□-:;
~i
-
t:.OT
~
1,S -
c::c:::::::c-:::cr:)~~
l
<O~
4.6
Al3
~
,;:.c.
...,.
~-c::::>--a:::::l-~...J-~
::::=,
!)
c:::::>-~~~--L.'"::J
4
NOTE4
~
~
r-r;·
~-CI
co
t:=
CJ~,
.I..=
~J
a::,
....
G-7
~-1
~
~~
~-
~
~"'T":":-,----1--,
~:~-cr::,....~--CI::l·-c::lo=:J
~r.::~-,a:::;..-c.::=>----cr=>--e:::Jct:::::J
"';~I~~~~~:=:~~:;::__.
D::.>-
-CT::}--
-C~
CI
:}
--t:::;;::::J
~
L---r=l-
-C.r'l-
-Lr1-
--t:I::l
[~;
I
c:~-rr::)--
.....
_r:::J---:--::'.1-r.-:::i
c~·j
t:r.J
-L8·
-~:'.:.l-
-c=-l-
-r.r.J
c·
__
•~
L::}--.-----;-
~--(_'.;__J-.(.":7
BUZZERS
r;
Z'.
-'
-,.;.
""'
""
[s,~
1
11
[-~
~
~
/tl Intercom
TIP
[_.,:..,
Intercom
RING
[-~
....c'-::::.lr--::-.~--:::---:-,-~,-,--.------
[:
"T
~
rL-.
i.:_-'-}-.r_:_~-tL"_).---<..::_J
-
_-
-i
L
PJ
n,
i:i-----.i,n_-,,..ci.l
..:'::l·-7
I.C.lompGND
I:_'...?
I
-.-
.._
--
--
A.;.
l.
C.-Lamp
[__L..t
- - -
_.,
B
zz
r
GND
G:>
-
·t>7
~-
r-L·,.
--err-,
r...,_-<:.-.>-~
4.:,~
(---
.,.,
-
--~------
':Cl
Fig.
7-Strapping
and Connections
for
Five Intercom Stations
with
Buzzer
or
Ringer Signaling.
Page20
Table of contents