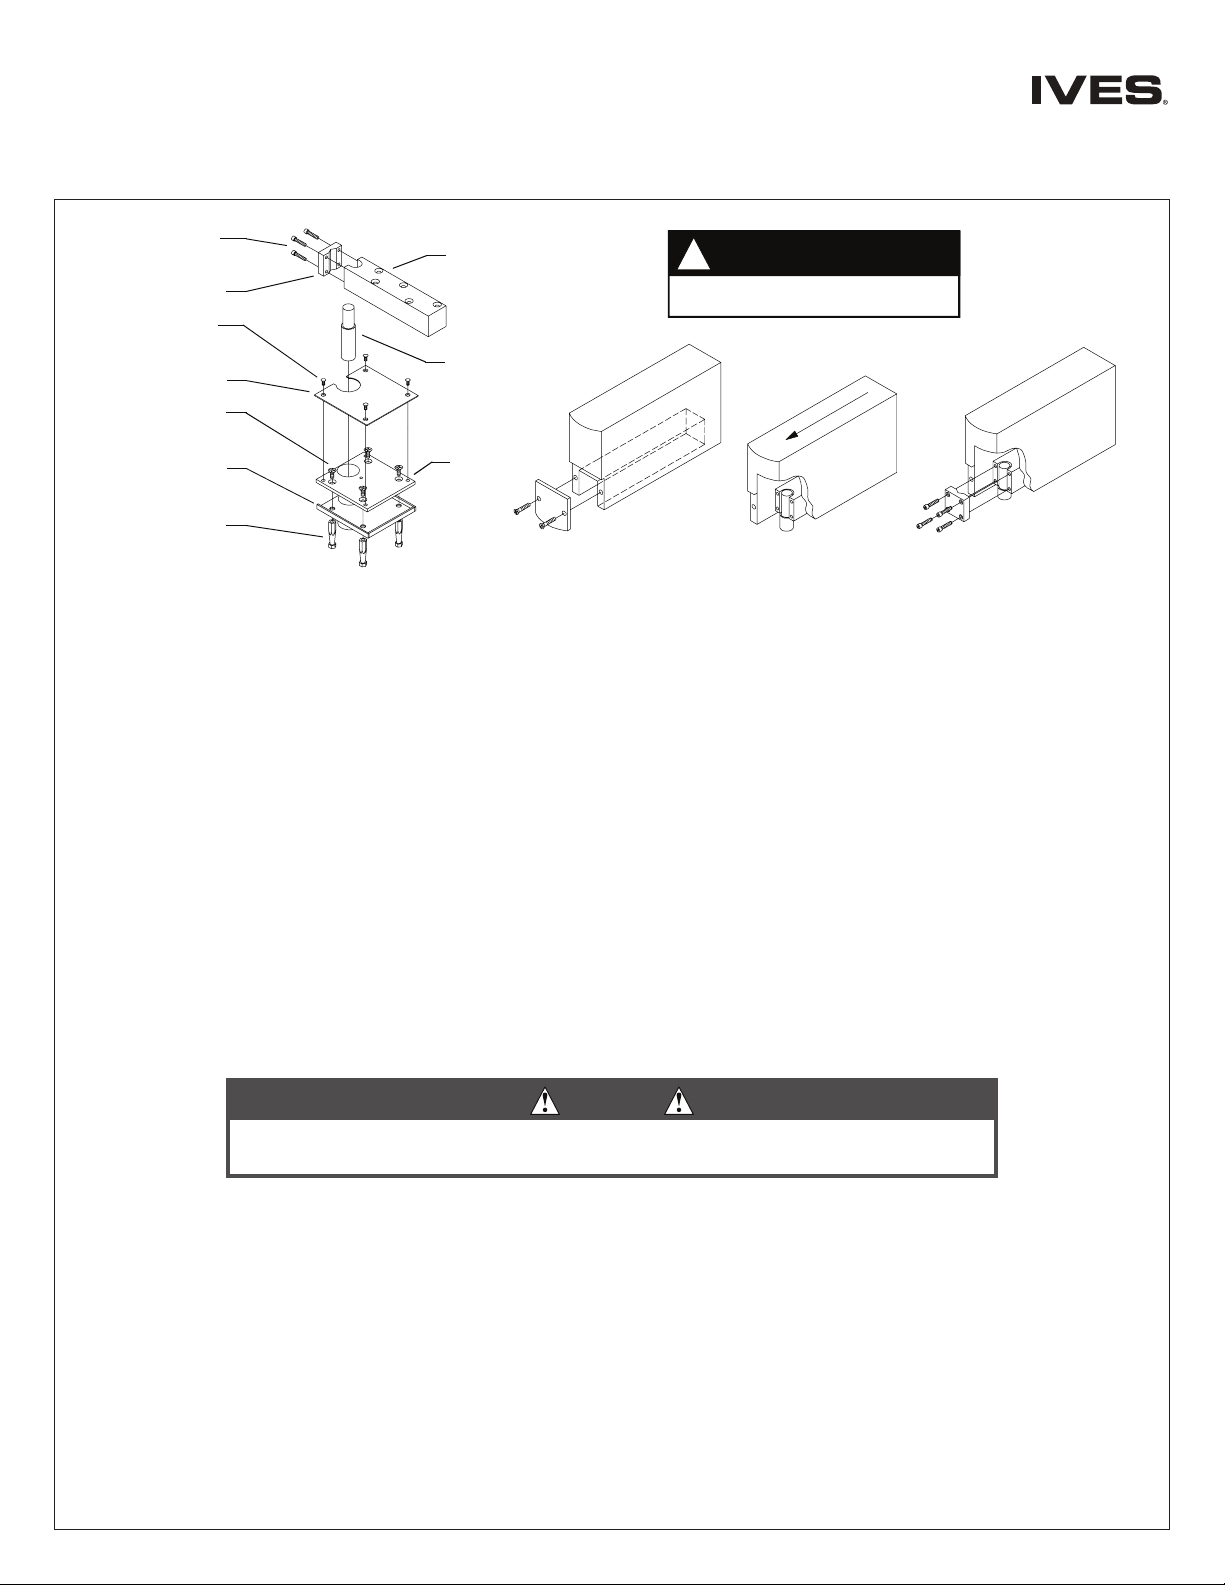
manuals.online logo
Brands
  1. Home
  2. •
  3. Brands
  4. •
  5. Ives
  6. •
  7. Indoor Furnishing
  8. •
  9. Ives 7259 User manual

Ives 7259 User manual

*26633-00*
26633-00
Clamp
screws
Pivot clamp
Finish
screws
Finish plate
Mounting
screws
Concrete
anchor pins
2” minimum door thickness.
NOTE
!
Figure 1 Figure2 Figure3
Door
leaf
Base
plate
Pivot
pin
Concrete
channel base
1. Prepare and mortise bottom of door and oor to receive pivot set. Determine pivot location using dimensions on reverse side. Be
sure to properly locate base plate. The nish plate of pivot base assembly should be removed until installation is complete.
2. Prepare bottom of door. If bottom of door has not been prepared prior to pivot installation, mortise per dimensions on reverse side.
The bottom of the door must have a removable heel section (Figure 1).
3. Remove pivot clamp from door pivot leaf with 5/16” Allen wrench. Locate, drill, and tap mounting holes for door leaf. Mount door leaf
in bottom of door with screws provided.
4. Locate and prepare cutout in oor for pivot base. The pivot base assembly must be located so that the center line of top pivot
point is plumb with center line of base pivot point. Secure pivot base:
a. Prepare compound that will be used to ll around pivot base (concrete, cement, grout, etc.).
b. Fill cutout with compound, leaving room for concrete channel base to t ush with oor.
c. Set pivot base into cutout. Align base assembly so pivot point is in proper position.
d. Use a level to be sure pivot base assembly is level on all sides.
e. Secure in proper position until compound sets up completely. Once compound has set up, mounting screws can be removed,
allowing removal or replacement of pivot base assembly.
f. Re-attach nish plate.
5. Maneuver door into position, about 90° to frame. Position door so door pivot leaf mates with pivot pin as shown in Figure 2. Re-attach
pivot clamp as shown in Figure 3. Do not tighten clamp screws completely. Engage pivot leafs at top of door. Now tighten clamp
screws securely.
6. If height adjustment is necessary for proper clearance, use shims between door bottom and pivot leaf to increase clearance. To
decrease clearance, mortise in door must be made deeper.
CAUTION
Improper pivot set installation can lead to personal injury or property damage. Follow
all instructions carefully. For questions contact Technical Support at 1-877-671-7011.
Bottom Center Pivot
7259
Installation Instructions
© Allegion 2014
Printed in U.S.A.
26633-00 Rev. 01/14-b
NOTE
It is very important for installer to verify that center line of top pivot point
lines up with center line of bottom pivot point before nal installation.
End View
with Threshold
End View
without Threshold
**
Top View
C pivot
L
Radius of heel
edge of door must
not exceed pivot
point to jamb
distance
5-1/8”, 130 mm
1/16”
2 mm
5”, 127 mm
4-13/16”, 122 mm
3/8”
10 mm
1-7/8”
48 mm
2-5/16”
59 mm
to
1-5/8”
41 mm
2-3/4”
70 mm
Removable door
section to allow
access to pivot leaf
bracket screws
2-1/2”
64 mm
C pivot
and door
L
13/16”
21 mm
*
5-1/16”,129 mm **
Pivot center may
be varied as
needed; standard
distance is 2-3/4”
as shown.
*
Dimensions for cement case
cutout. Depth is 3/8” without
threshold, 5/16” with threshold
.
**
Customer Service
1-877-671-7011 www.allegion.com/us

Other Ives Indoor Furnishing manuals

Ives VR900 User manual

Ives

Ives VR900 User manual

Ives Value Lines Lever 6000 User manual

Ives

Ives Value Lines Lever 6000 User manual

Ives 14 User manual

Ives

Ives 14 User manual

Ives Top Center Pivot 7255/55J User manual

Ives

Ives Top Center Pivot 7255/55J User manual

Ives 26 User manual

Ives

Ives 26 User manual

Ives 611 Series User manual

Ives

Ives 611 Series User manual

Ives Offset Intermediate Power Transfer Pivot... User manual

Ives

Ives Offset Intermediate Power Transfer Pivot... User manual

Popular Indoor Furnishing manuals by other brands

Regency LWMS3015 Assembly instructions

Regency

Regency LWMS3015 Assembly instructions

Furniture of America CM7751C Assembly instructions

Furniture of America

Furniture of America CM7751C Assembly instructions

Safavieh Furniture Estella CNS5731 manual

Safavieh Furniture

Safavieh Furniture Estella CNS5731 manual

PLACES OF STYLE Ovalfuss Assembly instruction

PLACES OF STYLE

PLACES OF STYLE Ovalfuss Assembly instruction

Trasman 1138 Bo1 Assembly manual

Trasman

Trasman 1138 Bo1 Assembly manual

Costway JV10856 manual

Costway

Costway JV10856 manual

moss DESIGN Caisson Credenza Assembly instructions

moss DESIGN

moss DESIGN Caisson Credenza Assembly instructions

Aquaglide FULL DECK 15.0 owner's manual

Aquaglide

Aquaglide FULL DECK 15.0 owner's manual

AREBOS AR-HE-SW30 user manual

AREBOS

AREBOS AR-HE-SW30 user manual

Till-Hilft Fulda 87005.330 Assembly instructions

Till-Hilft

Till-Hilft Fulda 87005.330 Assembly instructions

Twoey Outside 2010 quick start guide

Twoey Outside

Twoey Outside 2010 quick start guide

Hettich Easys 200 operating instructions

Hettich

Hettich Easys 200 operating instructions

The bedboss RELAX 404 Series owner's manual

The bedboss

The bedboss RELAX 404 Series owner's manual

Oeseder Möbelindustrie Bern 991 720 Assembly instructions

Oeseder Möbelindustrie

Oeseder Möbelindustrie Bern 991 720 Assembly instructions

Costway HW68469 user manual

Costway

Costway HW68469 user manual

Next ALIX A27743 Assembly instructions

Next

Next ALIX A27743 Assembly instructions

BROSA Hans Assembly guide

BROSA

BROSA Hans Assembly guide

Prodigg MINIKA PBA015T-FUR installation manual

Prodigg

Prodigg MINIKA PBA015T-FUR installation manual

manuals.online logo
manuals.online logoBrands
  • About & Mission
  • Contact us
  • Privacy Policy
  • Terms and Conditions

Copyright 2025 Manuals.Online. All Rights Reserved.