IYOGAPROPS Foldaway backbender User manual
• The backbender and Iyengar Yoga
• Basic handling
• Care
• Safe use
• Poses and assembly configurations
The backbender and Iyengar
Yoga
The Foldaway Backbender is a new
adaptation of BKS Iyengar’s classic
‘backbend bench’ design.
BKS Iyengar is widely regarded as
the foremost contemporary teacher of
yoga asana (posture). His technique
emphasises precise alignment and
deep absorption in each pose. Based
at the Ramamani Iyengar Memorial
Yoga Institute in Puna, India, Mr
Iyengar’s inspirational teaching has
spawned hundreds of Iyengar Yoga
schools around the world.
Now in his late eighties, he maintains
an active interest in the teaching
program at the Institute.
Fundamental to Mr Iyengar’s approach
is the notion of practicing each
pose in a way which is appropriate
to the experience and fitness of the
practitioner. For that purpose he has
developed and systematised the use
of a number of yoga props.
Props assist the practice
of those unable to
achieve the deepest
version of a pose.
Props also enable
practitioners to stay in
a pose for a longer time
than would otherwise be
possible, especially during
a ‘restorative’ practice.
Mr Iyengar developed the
backbend bench to assist
with the practice of back
bends or poses involving
spinal extension (arching
the spine backwards)
The Foldaway Backbender
was designed by Peter Harley. Peter
is an Iyengar Yoga teacher and
industrial designer, from Melbourne,
Australia. It adapts Mr Iyengar’s original
design, enabling more versatile use
and space-saving, foldaway storage.
This more recent model also includes
an attachment for the practice of
supported Kapotasana.
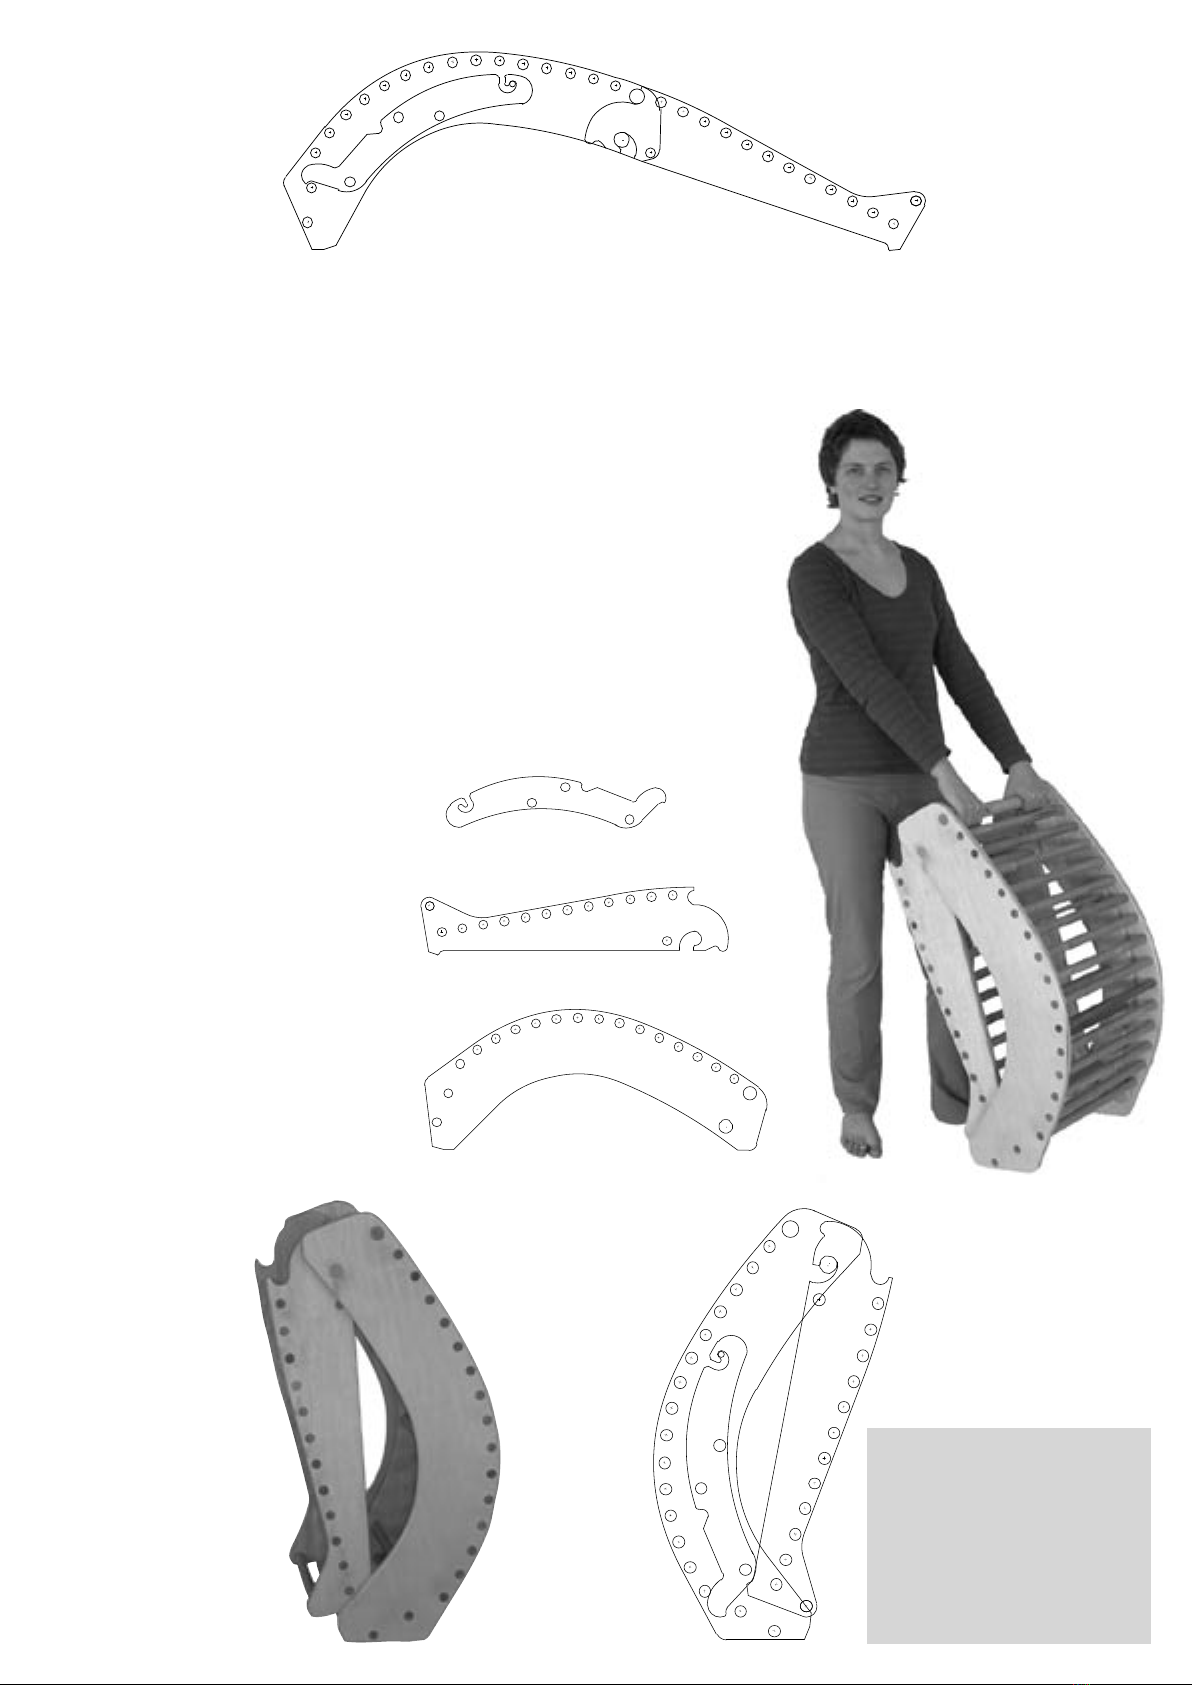
Basic handling
The Foldaway Backbender is made
in 3 parts plus a removable foot bar.
may result in its unexpected
folding and jamming your
fingers (Figure 2 overleaf).
To fold the bench from its
extended form simply lift
it by the large bar at the
centre. If it resists folding,
Take a little time to study the
mechanism to see how the
bench is folded, assembled and
disassembled. The diagrams
left and right show the parts
in the stored or folded
form.
The Foldaway
Backbender
(FAB) should
only be carried
in the folded
form and
gripped by
one of the large
diameter bars at the
top (Figure 1). Please
note that carrying the
bench in the unfolded form
Feedback
Please send comments,
questions and feedback to:
Thank you.
foldaway backbender
users’ guide
1
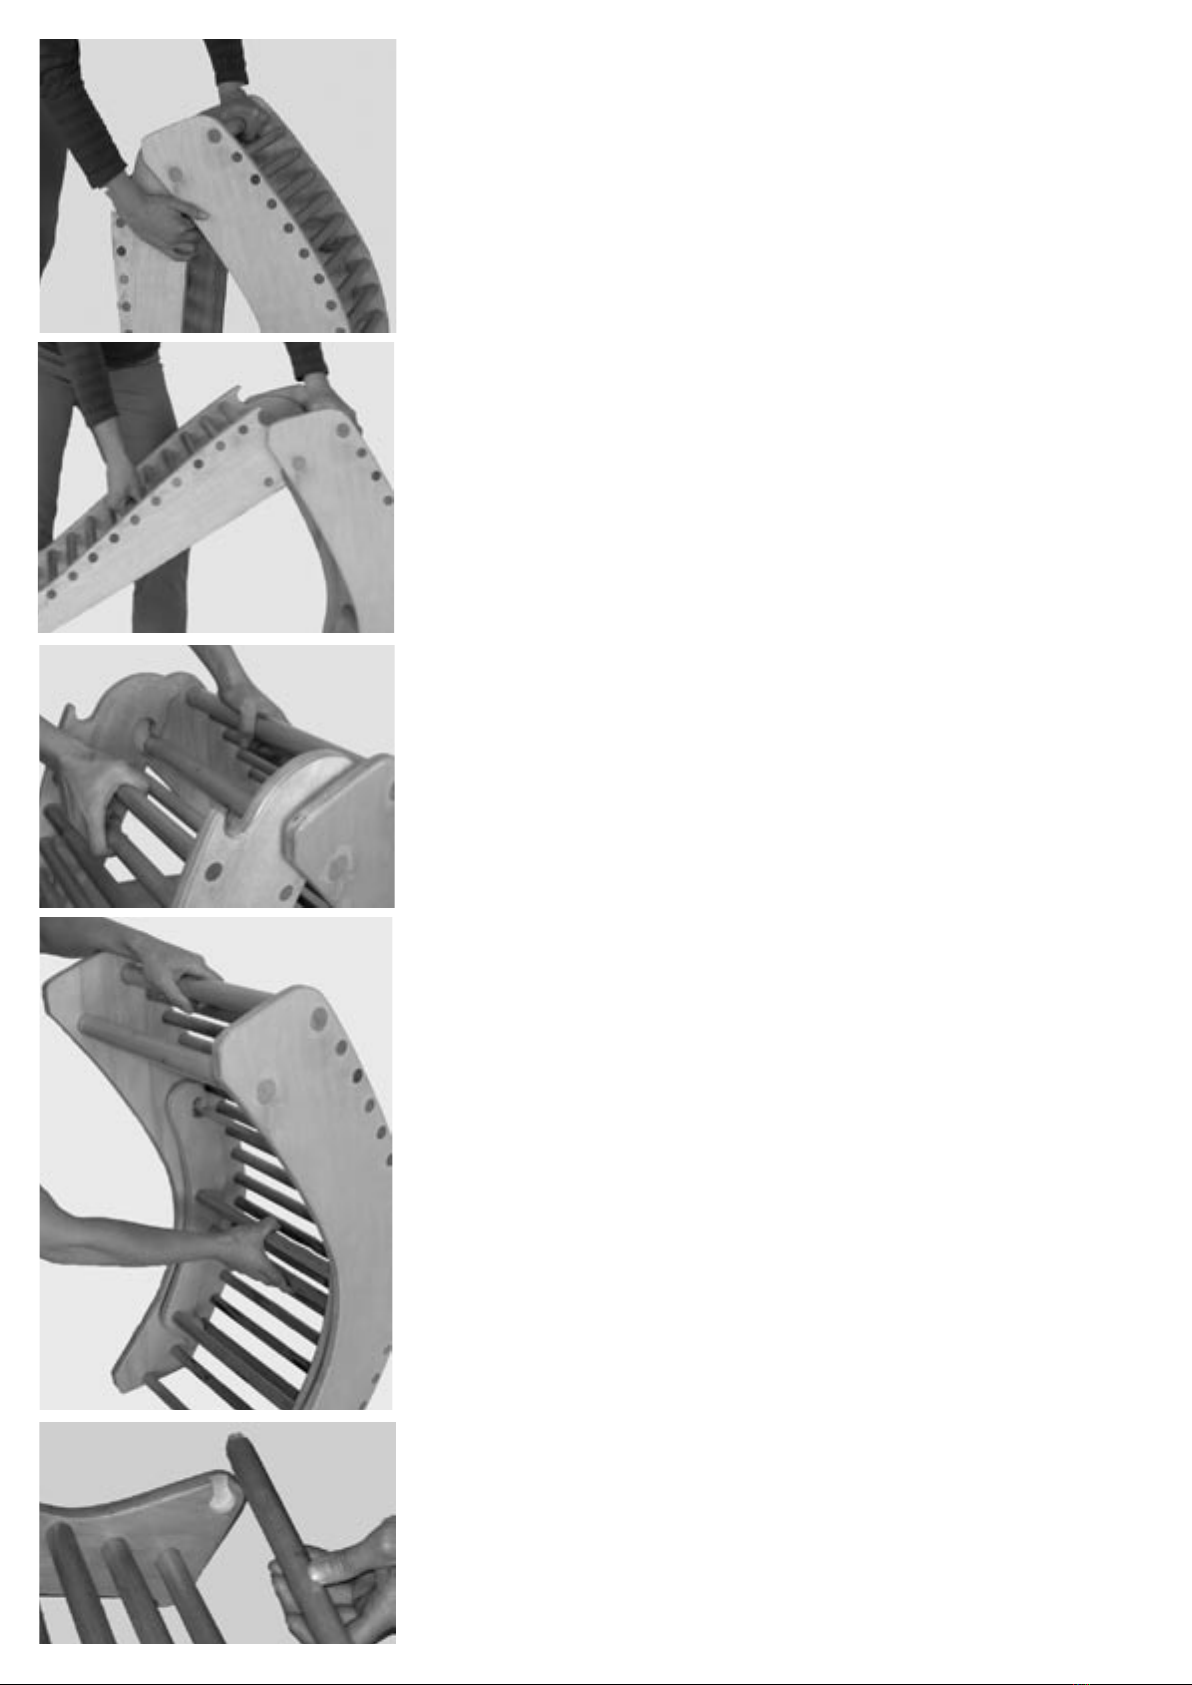
gently stretch it longer, then fold
(Figure 3).
The upper and lower sections can only
be disassembled and reassembled in
the folded form (Figure 4).
Removal and replacement of the
kapotasana extension from its storage
position in the upper section of the
bench (Figure 5) should only been
done with the big diameter bars at the
top. The kapotasana extension will
simply fall out if the bench is
held upside down.
To remove the foot bar, simply twist
and lift out (Figure 6).
Care
The FAB is supplied with a durable
laquer finish. Keepout of bright sun
and weather.
Safe use
• Read these instructions carefully
• At all times:
• avoid any use which causes undue
pressure or pain in any part of
the spine or neck, especially the
lumbar spine (the lower section of
the spine between the rib cage and
the pelvis).
• never sit upright from the FAB;
always slide onto the floor and
roll onto your side before sitting
up except when practicing
Kapotasana.
• We strongly recommend that before
using the FAB, especially in the
case of spinal injury, that you seek
the instruction and advice of a
qualified Iyengar Yoga teacher. To
find your nearest teacher go to www.
bksiyengar.com. In the case of injury
you should seek medical advice.
Intelligent practice of back bends can
be very beneficial to the health of the
spine, but must be approached with
caution. The teaching of Iyengar yoga
emphasises this cautious approach.
Particular care is given in back bends
to the state of the lumbar spine and
neck.
Viparita Dandasana
The principle pose for which the
Iyengar back bender was designed
is Viparita Dandasana (Figure 12 and
top of page 1). The safe practice of
this pose is described here. These
principles can be applied to the other
poses.
1 Lay a blanket on the FAB (optional).
2 Sit on the FAB close to the bottom
end (Figure 7).
3 Lay back and observe the sensation
in your spine. If uncomfortable move
even closer to the bottom of the FAB
so that your spine including your
neck becomes relatively flat (Fig 8).
4 If this position feels comfortable and
you are able to extend your spine
(arch your back) further then use your
feet and legs to push yourself higher
onto the bench. It may be necessary
to support your head with a cushion
(Figure 9) when your neck is near
the top of the bench to avoid over
extending the neck (Figure 10).
5 If the spine still feels comfortable
you can continue to move further
over the bench until your head nears
or touches the floor (Figure 11).
6 When well over the bench you can
grasp your elbows above your head
(Figure 12). If this induces pain,
support the elbows and/or head
(Figure 13) or clasp the hands over
the abdomen (Figure 11).
7 You may use a strap around the
thighs to prevent the legs from rolling
out (Figure 14).
8 Depending on your height and how
far over the bench you are able to go,
you may be able to press your feet
into the foot bar (Figure 12). Taller
people may find it more comfortable
to remove the foot bar. (Figure 15)
9 Beginners should stay for only a
short time (up to 2 minutes) but with
practice you may stay for longer
periods, provided that no pain is
experienced.
Dismounting from the FAB
10 Do not sit up from the back bend
position.
11 Those whose shoulders are on
the foot side of the top (Figure 9)
can simply slide down toward the
feet, pause for several breaths before
using the arms to carefully sit up
(Figure 16).
Those who are well over the bench
(Figure 12) can dismount by sliding
down onto the floor and resting for
several breaths before rolling onto the
side and carefully sitting up (Figure 17).
Other techniques for
minimising discomfort
With practice, those who are
susceptible to lower back discomfort
may be able to move a little deeper
over the bench by supporting the
knees with a bolster or firm cushion .
Alternatively you may practice using
the half bench (Figure 23).
3
6
4
✗
2
✓
5

7 8
910
11
12
13
15 16
✓✗
14
17 18
Asanas (poses)
The principles of safe use described
above should be observed at all times.
A number of poses are illustrated here,
but experienced yoga practitioners
may find the Foldaway Backbbender
useful for other poses.
Backbending (spinal
extension) poses
Viparita Dandasana (supported
inverted staff pose) (Figure 12). Viparita
Dandasana (full shoulder extension,
grasping the bottom bar). This pose
may also be practiced using the big
backbender configuration especially
for taller people (Figure 19).
19

Kapotasana (pidgeon pose) The apparatus can
be set at 2 heights (Figure 20 a/b). The intensity
of the pose can be further regulated by varying
the distance of the knees from the bench.
Practice with a block between the feet. (Figure
20c).
Ustrasana (camel pose) (Figure 21)
Setu Bandha Sarvangasana (supported bridge
pose) (Figures 22a/b). Remove foot bar for this
asana.
Vrschikasana (scorpion pose) Advanced
practitioners (Figure 23).
Reclining poses
Supta Virasana (supine hero pose). Buttocks
and bench elevated on bolster or blankets, head
supported (Figure 24).
Matsyasana (fish pose) (Figure 25).
Legs in simple cross leg pose (not illustrated).
Legs straight (not illustrated).
29
26
27
20a
20b
22b
23
21
24
28
Seated forward
bends
Do not overflex lower back.
The head end of the FAB
may also be used for a more
upright position. Use for
poses such as:
Paschimottanasana
(intense west stretch) (Figure
26).
Janu Sirsasana (head to
knee pose) (Figure 27).
Other poses
Adho Mukha Svanasana
(down-facing dog pose)
(Figure 28).
Urdhva Mukha Svanasana
(up-facing dog pose)
(Figure 29).
29
20c
25
22a
Foldaway Backbender is designed in
Australia by Iyogaprops.com.au
Foldaway Backbender is protected by
international patents and design registrations.
Other IYOGAPROPS Fitness Equipment manuals


