Izzo Golf Swami User manual

GOLF GPS WATCH

INTRODUCTION
With a comfortable & modern design, the SWAMI
Watch not only looks the part but backs it up
with excellent performance on the course. By
providing precise distances to the front, center,
and back of the green as well as distances to
water hazards, bunkers, & doglegs, the SWAMI
Watch can improve your round by providing pin
point accuracy before your next shot. Accurate
distances in a convenient & comfortable watch
design make the SWAMI Watch truly a game
changer!
SPECIFICATIONS:
Product SWAMI Golf GPS Watch
# of Courses 38,000+
Battery 270mAh Lithium Ion Polymer
Battery Life Up to 10 hours / Time: 90 Days
Weight 1.6 oz. / 45 g
Display Size 1.28” (128 x128 pixels)
Band Length 10.25”
Water Resistant Protected against light rain
2INTRODUCTION

CHARGING
1. Attach the magnetic pins on the charging
cord to the magnetic charging ports located
on the side of the Swami Watch. Make sure
the charging cradle snaps into place and is
securely attached to the unit.
2. Be sure the pins are aligned, then insert the
other end of the charging cord into a USB
port or AC adapter (included).
CHARGING 3
CHARGING
PINS
CHARGING
PORT
3. When connection is made, Battery Icon
bars will pulsate to indicate charging.
Note: Battery Icon bars will stop pulsating
when charging is complete.

4HOW TO USE
DESCRIPTION OF TERMS
• PRESS - PRESS & RELEASE button quickly.
• HOLD - PRESS & HOLD button until desired
screen appears or change happens.
A. [POWER ] - Power On/O Backlight On/O
B. Magnetic Charging Ports
C. [UP ]- Scroll Up
D. [OK ]- Select Options, HOLD to access Main
Menu, Toggle Shot Distance and Scorecard
while in Golf Mode
E. [DOWN ]- Scroll Down

DISPLAY DIAGRAM
PLAY MODE
HAZARD MODE
HOW TO USE 5
A. Distance to the Center of Green
B. Distance to the Back of Green
C. Distance to the Front of Green
D. Distance to front and back of Dogleg
E. Distance to layup or carry Water
F. Distance to layup or carry Bunker

TIME MODE
1. PRESS [OK ]button to toggle between
Analog or Digital Time Display.
2. PRESS [POWER ] button to turn Backlight
On/O.
3. To set time and date, see Settings. (Pg. 11)
4. HOLD [OK ]button to access Main Menu.
AT GOLF COURSE
1. From Time Screen, HOLD [OK ]button to
access Main Menu.
2. PRESS [OK ]button to select Play Golf.
3. Device will begin searching for satellite
signal (HOLD [OK ]button to cancel).
4. Once satellite connection is established,
the nearest golf courses will be listed. Use
[UP/DOWN ]buttons to scroll to desired
course, PRESS [OK ]button to select course.
6HOW TO USE

PLAY MODE
1. PRESS [OK ]button to toggle between
Hazard, Scorecard, and Shot Distance
screens.
2. To exit Play Mode at any time, HOLD
[OK ]button.
HAZARD VIEW
Note: If no hazards
are present, screen
will be blank.
1. PRESS [OK ]button to access the
Hazard screen.
2. Only 3 hazards will show at a time. If a hole
has more than 3 hazards, scroll by using
[UP/DOWN ]buttons. (Hazards that are
behind you will not be displayed).
3. To exit, PRESS [OK ]button to view
Scorecard, Shot Distance (if enabled),
or return to Play Mode.
HOW TO USE 7

SHOT DISTANCE
Note: Shot Distance must be turned On
in Settings.
1. PRESS [OK ]button to access Shot
Distance.
2. To start measuring Shot Distance, PRESS
the [DOWN ]button.
3. As you travel to your ball, the distance will
begin calculating.
4. Once you arrive at your ball, the distance
displayed is the distance of your previous
shot (the distance you traveled).
5. To reset, PRESS the [DOWN ]button.
6. PRESS [OK ]button to view next/previous
screen.
8HOW TO USE

SCORECARD
Note: Scorecard must be turned On
in Settings.
1. PRESS [OK ]button to access Scorecard.
2. Use [UP/DOWN ]buttons until number of
total strokes for that hole is displayed.
3. HOLD the [DOWN ]button to scroll to
Putts, use [UP/DOWN ]buttons until
correct number of putts is displayed.
4. HOLD the [DOWN ]button to scroll to GIR
(Greens in Regulation). Use [UP/DOWN ]
buttons to select Y/N (Yes or No).
5. To exit, PRESS [OK ]button to return to
Play Mode.
AUTO-HOLE ADVANCE
1. The device will automatically switch to
the next hole if Scorecard is turned OFF
or ON.
HOW TO USE 9

END ROUND
1. When nished with round, HOLD [OK ]
button to return to Main Menu.
2. If Scorecard is turned on, use the
[UP/DOWN ]buttons to scroll to desired
option, PRESS [OK ]to select.
• Save & Exit - Save Scorecard, end round,
and return to Main Menu.
• Discard & Exit - Discard Scorecard, end
round, and return to Main Menu.
•Cancel - Select to return to Play Mode.
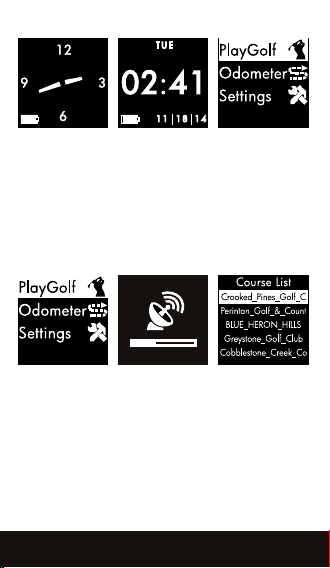
ODOMETER
1. From Time Screen, HOLD [OK ]button to
access Main Menu.
2. Use [UP/DOWN ]buttons to scroll to
Odometer, PRESS [OK ]button to select.
3. Circle will ash while connecting to satellite.
4. Once satellite connection is established,
circle will stop ashing.
10 HOW TO USE

ODOMETER (continued)
5. To start, PRESS [UP ]button. The
Odometer will begin calculating the
distance you will travel.
6. To reset, PRESS [DOWN ]button. The
distance will return to zero (0).
7. To exit and return to Main Menu, HOLD
[OK ] button.
SETTINGS
1. From Time Screen, HOLD [OK ]button to
access Main Menu.
2. Use [UP/DOWN ]buttons to scroll to
Settings.
3. PRESS [OK ]button to access Settings
Menu.
4. Use [UP/DOWN ] buttons to scroll through
Settings Menu.
5. PRESS [OK ]button to select desired setting.
6. HOLD [OK ]button to return to Main Menu.
HOW TO USE 11

TIME SET
Note: To set the correct time, select Play
Golf to connect to the satellites. The watch
will then automatically set the correct time
(must be outside).
1. Use [UP/DOWN ]buttons to manually adjust
the time by hour.
2. PRESS [OK ]button to save and return to
Settings Menu.
HOW TO USE 12

DATE/TIME FORMAT
1. Use [UP/DOWN ]button to change the Date
Format (MM-DD-YYYY, DD-MM-YYYY,
YYYY-MM-DD).
2. PRESS [OK ]button to scroll down. Use
[UP/DOWN ]button to select 12 hour or 24
hour clock.
3. HOLD [OK ]button to save and return to
Settings Menu.
13 HOW TO USE

SCORE HISTORY
1. Use [UP/DOWN ] buttons to scroll to the
saved score you would like to view, then
PRESS [OK ].
2. PRESS [OK ]button to save and return to
Settings Menu.
UNIT
1. Use [UP/DOWN ]buttons to change unit of
measure to Yards or Meters.
2. PRESS [OK ]button to save and return to
Settings Menu.
LANGUAGE
1. Use [UP/DOWN ]buttons to scroll through
Languages (English, Espanol, Francais,Deutsch).
2. PRESS [OK ]button to select Language
and return to Settings Menu.
3. PRESS [OK ]button to save and return
to Settings Menu.
BACKLIGHT
1. Use [UP/DOWN ]buttons to scroll through
the amount of time the Backlight stays on
(5s, 10s, 30s, o).
2. PRESS [OK ]button to save and return to
Settings Menu.
HOW TO USE 14

DISPLAY TYPE
1. Use [UP/DOWN ]buttons to toggle the
display type (Type 1 or Type 2).
2. PRESS [OK ]button to save and return
to Settings Menu.
DAYLIGHT SAVINGS TIME (DST)
1. Use [UP/DOWN ]buttons to toggle DST
(On/O)
2. PRESS [OK ]button to save and return
to Settings Menu.
SCORECARD
1. Use [UP/DOWN ] buttons to toggle
Scorecard (On/O).
2. PRESS [OK ]button to save and return
to Settings Menu.
SHOT DISTANCE
1. Use [UP/DOWN ]buttons to toggle
Shot Distance (On/O).
2. PRESS [OK ]button to save and return
to Settings Menu.
MODEL INFO
1. PRESS [OK ]button to return to
Settings Menu.
15 HOW TO USE

WARRANTY 16
WARRANTY POLICY
This product is warranted to be free from
defects for up to (1) year from the original
purchase date. IZZO Golf cannot refund your
purchase unless purchased directly from IZZO
Golf. IZZO Golf will replace or repair any unit
that is determined defective under normal
use within the warranty period. Please call
Customer Service at 800-777-7899 to request
a Return Authorization. All defective products
must be returned to:
IZZO Golf
Attn: Returns Dept.
1635 Commons Parkway
Macedon, NY 14502
Please include a note with your Name,
Address, Phone # and Return Authorization #.
Your replacement will be shipped once we
diagnose the returned unit.
If you have any other questions or
concerns, please call 1-800-777-7899 or
go to www.swamigps.com

17 CAUTION
CAUTION
Global Position System (GPS) was developed
& is managed by the United States Department
of Defense (DOD) which is responsible for its
normal operation and position precision control;
the U.S. is entitled to aect function or position
precision of the whole system without prior
notication or announcement based on its
political considerations or safety of national
defense. In order to use the device correctly
and safely, you must be aware of the following
information prior to operating the device:
• The device was only designed for the purpose
of leisure and recreation and is not applicable
for industrial or special measurement.
• The device is only an auxiliary device. IZZO
Golf will not accept any legal liability for
accidents due to mistaken operation, or any
use of the device for measurement.
• Please do not try to dissemble the device or
repair any part of the device discreetly.
• Please do not store the device in places
exposed to direct sunlight or in extremely
high temperatures.
Other manuals for Swami
2
Table of contents
Other Izzo Golf Watch manuals