J-Style 2166 User manual

2166
User Manual
Smart Watch

Introduction
2166 is a smart health watch which can monitor multiple
body vital signs under many different activity modes.
Note: the watch is not a medical device. The test results and
suggestions are for reference only.
24/7 Heart
Rate Monitor
Music Control
SpO2
Blood
Pressure
HRV
Stress
Temperature
Breath Training
Multi-Sport
Mode
SOS
Call & SMS
Sleep Tracking
Find Phone
Waterproof
5 ATM
Activity Tracking
1

What’s Included in the Box
(1) Watch with detachable band
(2) Magnetic USB charger
(3) User manual
(4) Gift box
Magnetic USB Charger
Home Button Heart Rate Sensor
Temperature Sensor
SpO2 Sensor
2

1. Download the APP
JCHealth
Note: Please ensure that your
Android version is 4.3 or later,
iOS version is 9.0 or later. The
watch supports Bluetooth 5.1
connection.
·Scan the QR code below orsearch JCHealth on GooglePlay
or iOS App Store to download our JCHealth App.
· Make sure the Bluetooth of your mobile device is on.
· Choose device identified in App and connect to your
smart watch device.
3

Magnetic
Charging Pins Low Battery Charging
2. Charge the Battery
Your device is powered by a rechargeable battery.
If the battery is less than 5%, the low battery icon will appear
to remind youtocharge thedevice. Please use the magnetic
USB charger to recharge the device. The display will light on
for 10 seconds during charging, then turns off automatically. It
takes about 1.5 hours to be fully charged.
Note:
1. Pleaseprevent the USB charger port from coming into contact
with conductive materials, such as liquids, dust, metalpowders
and pencil leads.
2. Theother functions except time doesn’t working during charge.
If you want to play the watch, please stop charging first.
4
Low power
please charge

3. Activate and Bind the Device
3.1 When out of the factory, the watch is set into hibernation
mode to save the battery. Before use, please charge to
activate your watch. After activation, the watch will start
charging. Please use your watch only after it is fully charged.
3.2 After the device is activated, you can use the “JCHealth”
APP to scan the QR code on the watch screen to bind. Or use
the “JCHealth” APP to scan the device ID to bind. Moreover,
you can press the skip button to enter the watch homepage.
For subsequent use, you can scan the device ID in the APP to
bind, or find the QR code in the watch About interface, and use
the APP to scan the QR code to bind.
Confirm to pair ?

4. Basic Operation
Swipeup: Quick setting, can set time format, silent mode,
brightness level, lift wrist, music control, find phone, checking
battery level, etc.
Swipedown: Different social notifications.
Swipeleft:Check detailed daily activity and sleep reports, to
start different Multi-sports mode.
Swipe right: Check detailed operation for different functions,
e.g. real-time Heart Rate Monitor, SpO2 Monitor,HRV/Stress/
BloodPressureMonitor, and morefunction settings.
Home button:Return to the main screen, or return to the
6
previous screen by pressing the button.

Swipe right from home screento findtheHeart Rate icon. The
device will automatically start heart rate monitoring. Please wear
tightly for accurate heart rate monitoring, otherwise the device
will gently vibrate to remind you to wear tightly.
5. Function Operation
5.1 Heart Rate Monitor
Swipe right from home screen to find the SpO2 icon. Tap to
start SpO2 monitoring. Please wear tightly for accurate SpO2
monitoring, otherwise the device will gently vibrate to remind
you to wear tightly. Please keep still while measuring.
5.2 SpO2 Monitor
7

09:30
AM
SpO2
How to measure blood oxygen level (SpO2), HR
and other vital signs correctly?
1 For better accuracy, do keep your arm still, fasten thestrap
tightly,and make sure the screen is facingup.Please make
sure the watch is worn on the correct position of the wrist,
which isatleast one-index-finger-widthaway from the carpal
bone.
Swipe right fromhome screento find the Vitals icon. Tap it to
measure blood pressure, HRV and stress level. Please keep
still while measuring. After themeasurement, you can slide to
check the report.
8

3 During the measurement, keep the screen facing up and
your body still.The SpO2 measurement will be paused if you
move your armand thescreen will show “Don’t Move”.Please
always keep still toget accuratemeasurement. Each measu-
rement lasts for about 1 minute, and the displayedSpO2 is
updated every second.
4 The SpO2 measurement will be interrupted while receivinga
notification for an incoming call or alarm.
5 Make sure the sensor area on the backofthe watch is clean,
dry and free from foreign objects.
6 In case in low temperature environment (such as high altitude,
winter and other low temperaturescenes), please take off the
watch, try to rub the wrist to stimulate blood circulation, and
then wear the watch again for measurement.
7 Thick hair, tattoos might affect the measurement ofSpO2/Vital
Signs, please try to avoid wearing the watch on those areas.
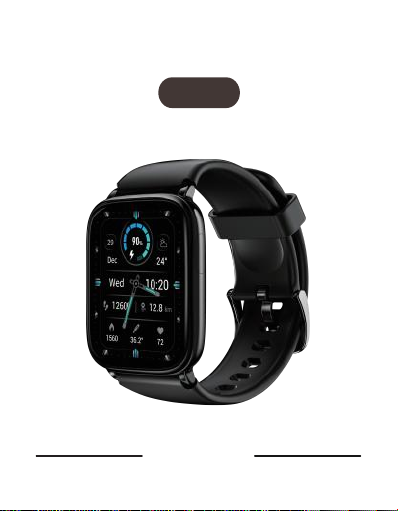
2 If you arenot wearing your band, or wearing it incorrectly,
an error message will be displayed. Please read the onscreen
instructions forhow to wear it correctly and touch Retry to
restart the measurement.
9

There are two measurement methods for body temperature:
1Wear on wrist to get 24H real-time temperature monitoring:
wear thesmart watch normally andkeep the back pressed
against your wrist.It can automatically measure your 24H
real-time wrist temperature trend.
2Wear under armpit to get highly accurate temperature
measurement: Swipe right from the home screen to find the
More icon, tap it and slide down to find the Temp icon. Then
press the Temp icon to start armpit temperature monitoring.After
removing the strap, press the smart watch (sensor side) under
your armpit, then clamp it for 4-5 minutesforaccuratemeas-
urement.
5.5 BodyTemperature Monitor
8 In order to make the measurementmore accurate, it is
recommended that you wear it for 3-5min before measuring
SpO2/Vital Signs.
9 The watch supports oxygen saturation measurements in the
range of 70% to 100%.
10

Swipe left from home screen to find the Exercise icon, slide
down to find Relaxation icon. Tap to start breath training.
5.6 Breath Training
11

Swipe left fromhome screen to find the Exercise icon, you can
chooseWalk, Run, Workout, Cycle, Relaxation,Cricket, Yoga,
Climb, Aerobics, Basketball, Badminton, Soccer, Dance, Table
Tennis,Rope Jump, Sit-ups, Volleyball or Tennistotakeexercises,
it canrecord your exercise data, such as exercise time, steps,
distance, speed, heart rate, calories, etc. Detailed exercise
report can be checked on the APP.
5.7 Multi-Sport Mode
12

Swipe right from home screen to find the More icon, you can
do different Settings, play more functions like Music Control,
Stopwatch, Timer, Alarm, Camera, Find Phone, SOS and
Temperature.
5.8 More Functions
Note: For SOS Help function, first you need to set Emergency
Contact (Name &Phone Number) in Personal Info page on APP,
up to 3contacts can be set. The SOS Help function can be
triggered effectively only when the Bluetooth ofthewatch and
the APP are connected, a SOS message will be sent to the
emergency contact person, including your name & GPS locat-
ion.
13

There are two ways to find the Settings icon:
Swipe up to findthe Settings icon; or swipe rightfromhome
screen to find the More icon, taptofind function menu where
you can find the Settings icon.
Click the Settings icon, you can set Wallpaper, Screen Time,
Power Off and Reset, as well as view more about Battery status
and About (Device Info).
Note: You can switch different wallpapers or on the watch and
APPboth, or customize your home screenwallpaper via the
APP.
5.9 Settings
14

6. Specifications
Warranty: 12 Months
Main BodySize:44.5*37.5*10.2mm
Weight: approx.36g
Display:1.69inch HD TFT
Battery:240 mAh Lithium Polymer Battery
Data Memory: 30 Days
Waterproof: 5ATM
Activity Time:99h59min
Calories Burned: Max 9999.9kcal
Running &Waling Distance:Max 999.99km
7. Precautions for Use
(1) Warning! Children swallowing risk! Children are not allowed
to play with the device. Keep children away from the device.
(2) Warning! Risk of fire / explosionorchemical burns! This
product contains a lithium-ion battery. Do not remove, disas-
semble, throw into fire or short the battery.
(3) Caution! Possible property damage! Do not dropthe device
and protect it from impact.
(4) Do not expose the device to extreme temperatures or extr-
15

eme temperature fluctuations. Protect the device from direct
sunlight and dust.
(5) When cleaning, do not use any strong chemical, abrasive
or foam cleaning materials. Protect the display from hard obj-
ects.
8. FCC Statemen
(6) Do notdispose off the device in domestic waste! If you have
any questions, please contact your municipal waste disposal
authority. Do not disposeoff used batteries in domestic waste.
Instead, takethem to a special waste disposal site or a retailer’s
battery collection point. Packaging is recyclable or can be
recycled into raw materials.
t
1
Any changes or modifications not expressly approved by
the party responsible for compliance could void the user
’s authority to operate the equipment.
This device complies with Part 15 of the FCC Rules.
Operation is subject to the following two conditions:
(1) this device may not cause harmful interference,
and (2) this device must accept any interference
received, including interference that may cause
undesired operation.
6

1
Note: This equipment has been tested and found to
comply with the limits for a Class B digital device,
pursuant to Part 15 of the FCC Rules. These limits are
designed to provide reasonable protection against
harmful interference in a residential installation. This
equipment generates, uses, and can radiate radio
frequency energy, and if not installed and used in
accordance with the instructions, may cause harmful
interference to radio communications. However, there is
no guarantee that interference will not occur in a
particular installation. If this equipment does cause
harmful interference to radio or television reception,
which can be determined by turning the equipment off
and on, the user is encouraged to try to correct the
interference by one or more of the following measures:
–Reorient or relocate the receiving antenna.
–Increase the separation between the equipment and
receiver.
–Connect the equipment into an outlet on a circuit
different from that to which the receiver is connected.
–Consult the dealer or an experienced radio/TV technician
for help.
7

Table of contents