Jackson Airmax+ User manual

ePOWERED AIR PURIFYING RESPIRATOR
User Instructions - Page 2
fAPPAREIL RESPIRATOIRE (APR) À ÉPURATION
D’AIR MOTORISÉ
Mode d’emploi - Page 17
gGEBLÄSEATEMSCHUTZSYSTEM
Bedienungsanleitung - Seite 33
i
ELETTRORESPIRATORE PER LA
PURIFICAZIONE DELL’ARIA (PAPR)
Manuale di istruzioni - Pagina 49
sRESPIRADOR PURIFICADOR
ELÉCTRICO DE AIRE
Manual de instrucciones - Página 65
AIRMAX+
USA:
SureWerx USA Inc., 300 Corporate
Drive Elgin, IL, USA 60123
surewerx.com/usa
Canada:
SureWerx, 49 Schooner St.,
Coquitlam, BC V3K 0B3
surewerx.com
Europe:
Balder d.o.o. Teslova ulica 30,
SI-1000 Ljubljana, Slovenia
jacksonsafety.eu
1024 0843

CONTENT
This JACKSON SAFETY AIRMAX+ powered respirator system should include:
• Blower Unit and PRSL Filter
• Waist belt
• Welding helmet head top (welding helmet and hood/head gear) unit or grinding (visor and hood) unit
• Hose and hose cover assembly
• Battery charger
• Lithium-ion battery
• Instruction Manual
• Flow-Test-Unit
SYSTEM OVERVIEW
JACKSON SAFETY AIRMAX+ has been designed and manufactured to comply with EN 12941:1998+
A1:2003+A2:2008 TH3 P R SL.
This powered air purifying respirator is belt mounted and provided with a high efficiency SL replaceable filter
canister that provides a filtration efficiency level above 99.8%. The respiratory system will provide a Nominal
Protection Factor (NFP) of 500 when used in conjunction with an original JACKSON SAFETY AIRMAX+ par-
ticulate filter CE marked as EN 12941:1998+A1:2003+A2:2008 TH3 P R SL.
The blower (4 cells battery pack) weights 900gr at a minimum flow rate of 170LPM for at least 8 hours at
a comfortable noise intensity of <70 dB. Lithium-ion batteries can be recharged multiple times and finally
replaced at the end of their lifetime, they should be fully charged at the beginning of the working shift.
The blower unit incorporates a number of safety measures to avoid the inadvertently change in the flow
conditions that include:
• The device has an audible alarm to indicate a blocked filter or low battery
• The device alarm activates for about 1 second when the blower unit is switched on, and deactivates once
the minimum operational flow rate is achieved. Please consider the power-off state an abnormal situation
while in use
• The switch for the air supply is recessed and so not possible to switch the air supply off inadvertently
A Flow-Test-Unit is provided along with every AIRMAX+ PAPR unit to verify the right air flow supply condi-
tions. Please follow the instructions and recommendations provided in this manual.
IMPORTANT NOTICE
Please read these instructions carefully before unpacking your JACKSON SAFETY AIRMAX+ PAPR. Failure
to comply with the instructions in this leaflet may void your limited product warranty and adversely affect
your health and safety.
The selection of this respiratory for the application should be the result of the risk assessment conducted
by a professional health and safety officer. Its use should be strictly in accordance to the instructions
provided along with the product. If you have any questions regarding the suitability of this product for your
assigned task, please contact your designated health and safety officer or use our dedicated technical
help line for further support.
The use of this system is limited to the product variants indicated in this packaging. Any alteration made
to adapt to other protective devices may end up affecting the health and safety of the wearer.
ePOWERED AIR PURIFYING RESPIRATOR
User Instructions
2

REGULATORY COMPLIANCE AND MARKINGS
WARNINGS AND LIMITATIONS OF USE
• This PAPR is not suitable for work in poorly ventilated areas (i.e. confined spaces) where oxygen level is
suspected to be below 17%.
• Determination of the use of this PAPR system should be addressed by a trained health and safety officer
that determines the suitability of the protection offered by this device for the particular task and the
hazards involved.
• Do not use this respiratory device when the concentration of hazardous substances has not been deter-
mined and their impact on human health and safety by a trained health and safety officer.
• The wearer of this respiratory system must have read this manual and fully understood the functions and
settings on the AIRMAX+ PAPR system. Its use, cleaning, maintenance, disinfection and storage condi-
tions should follow the instructions provided in this manual. Products returned for warranty replacement
will only be considered for replacement only if all recommendations provided in this manual were fully
followed.
• Do not use the AIRMAX+ PAPR system in areas were explosions might occur. Avoid direct exposure to
flames and/or sparks. Do not use the AIRMAX+ PAPR system in the presence of strong winds.
• Use only original filters certified for EN 12941:1998+A1:2003+A2:2008 TH3 P R SL the particular respira-
tory system.
• If the blower unit acoustic alarm sounds please leave immediately the working area and enter a non-
contaminated environment.
• Do not store nor use this respiratory system under temperature conditions that exceed recommendations
of this manual (below -5°C and above +55°C).
• Particle filters are not suitable to provide protection against gases and vapours above occupational
exposure limits. Please use TH3 P R SL filters packed in original packaging only, unsealed or second-hand
products must not be used.
• Carefully review the sealing gasket and search for any visible damage. Do not use if its serviceability is
suspected to be affected. Only use particle filters produced by Surewerx USA Inc properly labelled and
packed.
• Do not attempt to touch or modify the components of this PAPR.
• At very high work rates the pressure in the device may become negative at peak inhalation flow.
• JACKSON SAFETY AIRMAX+ PAPR systems are for use only by competent, trained personnel.
• Make sure that the air hose doesn`t make a loop and does not get caught up on something in the work
environment.
P R SL-Filter AIRMAX Product code 40302
Filter colour coding White (background)
Manufacturer Surewerx USA Inc
Elgin IL USA 60123
Compliance EN 2941:1998+A1:2003+A2:2008 TH3 P R SL
CE:
Module B, C2 Audit conducted by
OCCUPATIONAL SAFETY RESEARCH INSTITUTE, V.V.I.
Notified body 1024
Jeruzalémská 1283/9, 110 00 Praha 1, Czech Republic
UKCA:
Module B, C2 Audit conducted by
UL INTERNATIONAL (UK) LTD
Approved body 0843
Unit 1-3 Horizon Kingsland, Business Park Wade Road, Basingstoke
RG24 8AH, United Kingdom
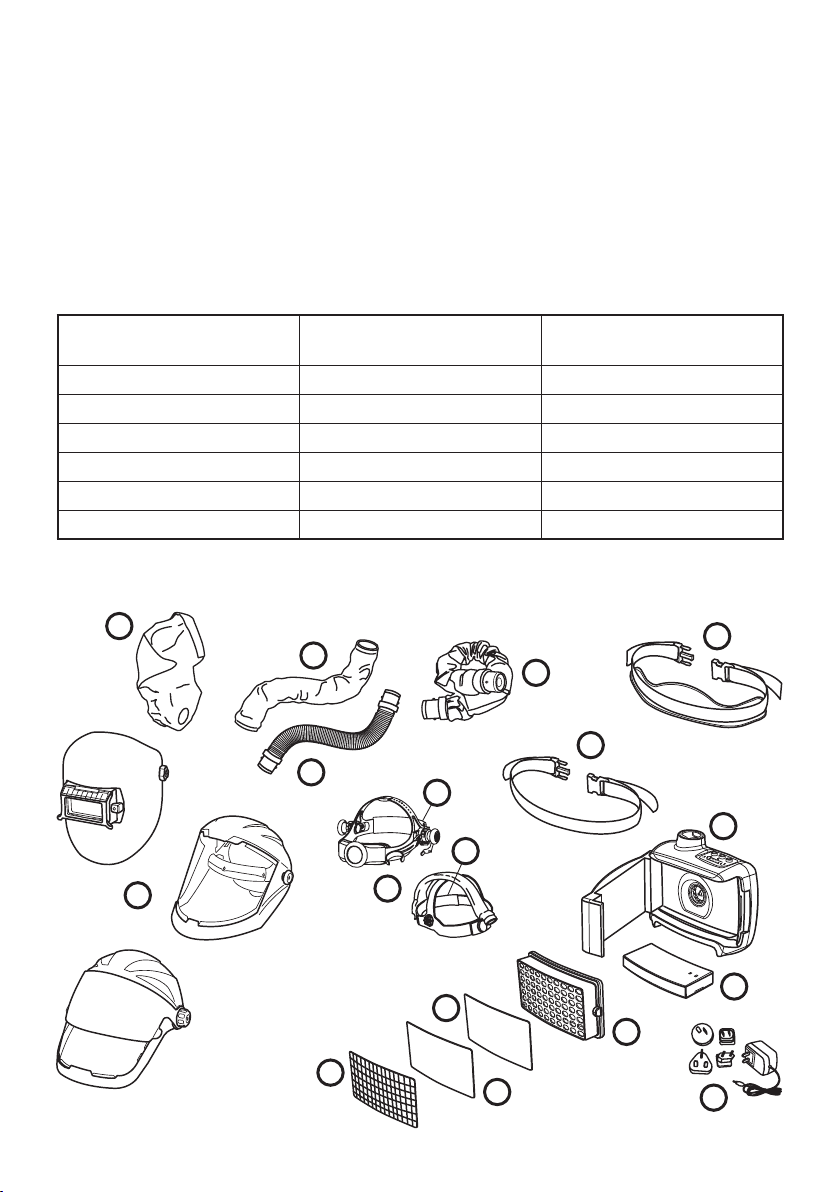
Markings See labels on product components
3

• Filters shall not be fitted directly to the helmet / hood.
• Do not allow water or other liquids to enter the blower unit.
• When the blower unit is switched off little or no respiratory protection is to be expected. When the blower
unit is switched off a rapid build up of carbon dioxide and depletion of oxygen within the head unit may
occur.
• Evacuate the contaminated area in any of the alarms is detected, any part of the product becomes dam-
aged or a considerable change in the air flow or smell is detected. You should also leave the area if you
feel dizziness, discomfort or difficulty in breathing.
APPLICATION GUIDELINES
AIRMAX+ PAPR can be effectively used, but is not limited, to protect the wearer in multiple tasks in the
following areas of use:
SYSTEM ASSEMBLY
General industrial applications GRP manufacture Ship construction and
maintenance
Agriculture Mining Metal transformation industry
Construction and demolition Metal foundries Waste disposal
Chemical plants Paint spraying (water based) General welding
General maintenance Pharmaceutical DIY
Food processing Pest control Tunnelling and quarrying
Mining Water and sewage treatment Textiles manufacture
5
7
6
4
3
15
16
8
14
12
9
10
11
2
1
4
13
4

AIRMAX+ PAPR WITH PAPR WELDING HEAD TOP UNIT
Item Description Part code
1 Airmax+ with S28311 PAPR welding helmet 40421
1 Airmax+ with Maxview PAPR Face Shield 40601
1 Airmax+ with Quad 500 PAPR Face Shield 40620
1 Airmax+ with Quad 500 PAPR Face Shield Flip Visor Shade 5 40630
1 Airmax+ with Quad 500 PAPR Face Shield Flip Visor Shade 8 40633
2 S28311 PAPR Face Seal J5250
2 Maxview & Quad 500 PAPR Face Seal J5244
3 S28311 PAPR Headgear J7260
3Maxview PAPR 370 Headgear J8571
3 Quad 500 PAPR 370 Headgear J8572
4 PAPR Sweat band J5462
5 FR Hose cover, 105 cm J5241
6 FR Hose with cover, 105 cm 40341
6 FR Hose with cover, 85 cm 40340
7 Hose without cover, 85 cm J7064
8 Airmax+ PAPR IP54 Blower Unit 40381
9 Airmax+ Welding HEPA PAPR Filter (EU) - pack of 6 40332
10 Airmax+ Replacement Pre-Filters - pack of 10 40311
11 Airmax+ Replacement Carbon Filters - pack of 10 40312
12 Airmax+ PAPR Battery Charger 40363
13 Airmax+ Spark Arrestor 40313
14 Airmax+ PAPR 4 Cell Battery 40353
15 Airmax+ PAPR Waist Belt 40371
16 Washable/Disposable Belt 40372
5

INITIAL ADJUSTMENT
• Put the belt around the waist and faster the two ends together
• If the belt is too loose, slide the male adjuster down the belt, towards the female half.
• If the belt is too tight, slide the male adjuster away from the female half.
• Repeat the above processes until a comfortable and secure fit is achieved.
Position the blower unit around the waist at the centre of the back to minimize the risk of the blower or hose
becoming caught up in use.
ATTACHING THE HOSE TO THE AIRMAX + PAPR BLOWER UNIT
Align the pins of the hose bayonet connector with the bottom of the arrow on the air outlet of the blower.
Push the bayonet connector into the blower until it reaches the bottom of the hole and then twist in a
clockwise direction on blower side until the locating pins clip into place. Repeat the process by turning
counter clockwise to lock the other end of the hose to the head top.
FITTING THE WELDING HELMET
• First set the welding head top rake and adjust the welding filter to suit. Lift the helmet to its upper position
• Place over the head and adjust the headgear ratchet wheel by rotating it until a satisfactory tightness is
achieved
• Pull the elasticized chin guard downwards and at the same time pull the helmet down
• The welding head top is then ready for use.
Loosen Tighten
6

OPERATING THE PAPR
Activate the Power-Switch at the side of the unit. Once turned on, the
flow alarm activates for about 1 second until the minimum flow rate is
achieved and respiratory protection is provided given that all compo-
nents are in place for the wearer to start the task.
The airflow can be adjusted by two arrow-buttons from 170 l/min up to
240 l/min. The number of lit Green LED diodes shows the actual airflow
level. The blower should then provide an initial air flow of +170 LPM for
at least 8 hours at a comfortable noise intensity of <70dB.
CHECKING THE AIR FLOW
With the blower unit running place the
Flow-Test-Unit onto the hose so that the
sealing gasket is securely gripping the air
outlet. Check that the indicator ball rises
above the pass fail marker. This easy test-
ing device is supplied with every AIRMAX+
PAPR unit. Jackson Safety recommends
carrying out this operation at least at the
beginning of every shift and after changing
the filter or any other cleaning or mainte-
nance activity.
FACE SEAL REPLACEMENT
S28311: Remove all 7 plastic screws of face seal placed around perimeter of the hood:
MaxView and Quad 500: Remove face seal fastened by Velcro around perimeter of the shield and release
the press stud strap that goes over the headgear on both sides.
• Disconnect airduct and headgear on the back
• Remove faceseal over the airduct
7

To re-fit
Place the recess of the face seal over airduct. Take care of orientation of the faceseal!
• S28311: Place in plastic screws in holes, place face seal over and fasten with 7 nuts.
• MaxView and Quad 500: Carefully place upper seam of the face seal on the top of shield and sym-
metrically attach it to Velcro around perimeter. Avoid gaps or wrinkles. Reattach stud strap on both sides
of headgear.
• Reconnect airduct and headgear on the back.
PROBLEM SOLVING
Inspect and dismantle this unit only in a clean environment where no presence of respiratory hazards is
suspected. Always leave the contaminated area to assess any encountered problem. If the alarm activates
during the execution of a task, leave the contaminated area and remove the TH3P R SL filter with the blower
with the power on. If the alarm deactivates, replace the filter; if not, recharge the unit. Check the air flow with
the Flow-Test-Unit. If the problem continues after the system is recharged, ask for technical support.
Make sure that the battery unit if fully loaded at the beginning of the shift. The AIRMAX+PAPR blower unit is
set to sound for 1 second once powered; if the alarm still sounds after check if the hose or filter are clogged;
otherwise the battery needs re-placing or recharging. If the problem persists, contact Surewerx for support.
Checking the air flow alarm
Proper functioning of the air flow can be checked by using the setup from previous paragraph and by put-
ting blower unit into bag. First keep the bag loose around blower, so that air flow is not obstructed and flow
indicator is in green sector. Then tighten bad around the blower, so that air flow is reduced and flow indicator
goes to red sector. In few seconds flow alarm sound should be heard, (if not, Flow alarm is not working prop-
erly). Release the bag to free air flow and indicator moves to green sector. After a few seconds alarm should
stop. If the alarm doesn’t stop, do not use the unit and contact jacksonsafety.eu for support.
FILTER REPLACEMENT CRITERIA
Filter should be replaced in all cases when its integrity is suspected to have been affected as a result of
contamination or physical damage. Filter must also be replaced at the end of its service lifetime, which can
be determined when the fully charged operational JACKSON SAFETY AIRMAX+ PAPR unit can’t supply airflow
above 170LPM tested with the use of the Flow-Test-Unit provided with the product. This is clear indication
that the filter is clogged and should be replaced. If the alarm deactivates after replacing the filter, the unit
is fully operational again; if not, recharge the unit before using it in a contaminated area. You should always
double check the air flow again with the Flow-Test-Unit to make sure the unit is fully operational.
Removing the Filter:
Opening the filter cover: Grip the blower and pull up the cover from the right side of the blower.
ATTENTION! It is strictly forbidden to use any tools to open the filter cover.
To remove the filter, pull it out of the unit. Clean the unit from dust ensuring no dust enters the air inlet.
FITTING THE FILTERS
Inspect the filter sealing gasket filter panels and confirm that is free of damage. Make sure that the new
filters are used within their expiry date. Make use of the opportunity to inspect that the filter holder is clean;
8

finally assemble the new filter into the blower. Inserting a new filter: Put the filter back into position and
gently push until it fits well on the body of the unit.
Closing the filter Cover; simply snap the cover into place. Pay special attention to snap the cover properly
into the blower. Do not attempt to use the blower unit without the cover fitted correctly.
WARNING!
It is essential that the user must not confuse the markings on the filter relating to any other standard other
than EN12941:1998 + A1:2003 + A2:2008 with the classification of the device when used with this filter. The
filters must be regularly checked (see Air Flow Test) and replaced. Filters are intended to be replaced and not
cleaned / re-used.
MAINTENANCE OF THE AIRMAX+ PAPR SYSTEM
• The blower unit, filter housing and head units must all be regularly cleaned to keep them in good working
order.
• For single users, the units can be cleaned with a cloth moistened with warm water and soap or an antimi-
crobial wipe.
• For multiple users, the units should be disinfected when passed from one user to another.
• Liquids must not be allowed to enter the workings of the blower unit or get on to the element of the filter.
Parts should be allowed to air dry. Under no circumstances should any solvents or abrasive cleaning
agents be used. The unit must not be dried using heat.
• The unit should continue to provide protection to the designed specification for at least 3 years when
maintained in accordance with these instructions. The duration of use depends on various factors such as
type of use, cleaning, storage and maintenance.
• Prior to each use the user should check that all components of this system are free from defects, such as
burnt areas, holes, splits or broken filters and hoses, cracked visors, ADF’s and helmets.
If additional cleaning is required, leave in the filter/cartridge and breathing tube. To minimize material falling
onto the motor/blower. The Airmax+ can now be showered under running water but not immerse, or put in a
respirator. Water temperature should not exceed 122°F (50°C). Blowers which have been dropped or dam-
aged should not be showered due to potential water ingress. Once the unit has been showered and dried the
filter is to be disposed of and not reused.
CHARGING THE BATTERY
Once the unit has reached the Minimum Design Flow
(MDF), it is better to leave it to run down completely be-
fore recharging. The battery can either be charged whist
installed in the blower unit or removed and charged
separately. Plug the charger into the main socket, fit the
plug on the end of the lead into the socket at the back of
the battery. The charger unit is a smart charger meaning
that once the battery is fully charged the charger unit
Shelf Life from date of manufacture when stored in original packaging
under the recommended storage conditions
1. Motor Unit/Blower 5 years
2. Battery pack (Standard + HD) 1 year
3. P R SL filter 5 years
4. Head top 5 years
5. ADF (Auto Darkening Filter 5 years
9

stops providing power to the battery this allows the battery to be charged overnight. It is not recommended
to charge batteries for extreme lengths of time as this can reduce the batteries capacity.
REMOVING AND REPLACING THE BATTERY
Hold the motor unit with the hose outlet down (in a
clean area away for contaminants) carefully pull the
battery tab towards the middle. Lift the battery up at
the catch end and the battery will now come free. To
replace the battery, place it into the cavity sliding the
non-catch end in first into the location groove. Then
push the battery down ensuring to get a firm click.
STORAGE AND TRANSPORTATION
When not in use or during transportation the blower
and head units should be stored in the container in
which they were supplied, in a place away from direct sunlight and contact with solvents or other surfaces or
objects that may impact and damage them. Do not store in areas with extreme temperature (outside -5°C to
+55°C range) or humidity (above 75%RH) conditions.
USER INSTRUCTION MANUAL FOR THE AIRMAX+ PAPR BATTERY CHARGER
Component code – 40363
This charger complies with the European regulations. Please read and keep these instructions carefully,
they contain important operation and safety descriptions. If the charger is not used in accordance with this
manual you may risk causing a fire, personal injury or equipment damage. Check label on the rear of the
charger for further details.
Features
The AIRMAX+ PAPR charger is suitable for Lithium-ion battery packs only and has been provided with a short
circuit protection device. Each charger has quick-change socket power adapter for various mains (see
picture below). It is designed to quick charge 4-6 cells Lithium–Ion battery packs with a capacity of
5200mAh to 7800mAh.
Only use this charger with batteries that meet the specifications on the chart below: Connect its DC output
plug to the battery and then connect its AC input plug to 100- 240VAC mains power before switching on the
mains power point; ensure the charging lights are illuminated.
It is normal that the charger and the battery might warm up (below 50°C) during charging; otherwise please stop
using it. Please disconnect the charger AC input plug first and then disconnect the DC output plug when charging
is finished. The red LED shows that the batteries are still charging. The green LED indicates that the battery is
fully charged and ready for use. Do not leave the battery charger in the power supply when not in use.
AIRMAX CHARGER -40363 TECHNICAL SPECIFICATIONS
• Operational range: 100Vac – 240Vac
• Frequency: 50-60Hz at 150mA
• Operating temperature range: 0°C to 40°C
• Operating relative humidity: 8% to 85%
• Operating temperature range: 0°C to 40°C
• Initial charge before first use of batteries: 8 hours
10

Safety
Do not charge any other batteries than the specified in this manual. Don’t use the charger if it shows visible
damage. Do not attempt to repair the charger, this will end the warranty and will increase the accident and/
or damage. Never expose the charger to water, rain or snow. Contact your supplier if charger replacement is
needed.
Environmental disposal
Batteries are chemical waste, dispose them in a special container or hand them in at an authorized recycling
center.
PACKAGING / LABELING
Lot Code Description: WLyjjj-xxxx (e.g. WL0013-0005)
WL = Manufacturer identifier
y = Last digit of year of production (e.g. 0 for 2020)
jjj = Julian (sequential) day of production (e.g. 013 for January 13)
xxxx = Last four digits of purchase order number (e.g. 0005)
TECHNICAL DATA
This powered respirator is light-weight and easy to handle. It is equipped with a replaceable particulate filter.
The system affords reliable protection against particulates and aerosols.
Air flow: 170 to 240 lpm. Minimum flow rate 170 lpm
Weight with filter: 1085 g (Fitted with 4 cell battery)
Operating temperature: between -5°c and +55°c
Type of filter: P R SL
Type of Battery: Replaceable and rechargeable Li-Ion (4 cell )7.4V/5200mAh Charging Cycles >350.
Charge time: 4-6 hours (depending on residual charge). Visual alarm for low battery voltage.
Visual, audible alarms and Vibration alarms: (NPF) 500
Noise level: 70dBA
Operating time: greater than 8 hours on minimum flow rate with a new filter and fully
charged battery in a clean environment at room temperature.
Note! Operating time can be shortened in case of clogged filter or under charged battery
WARRANTY
Surewerx warrants that its products (1) comply with Surewerx standard specifications as of the delivery
date to Surewerx authorized distributors/direct purchasers and are warrantied for the following periods from
end user’s date of purchase (verified by valid sales receipt) 2 year warranty is offered on the Airmax+ PAPR
1 year on the battery; (2) comply with all Surewerx labelling representations; and (3) are manufactured in
compliance with all applicable federal, state, and local laws in effect at the time and place of manufacture
of the products. THIS WARRANTY IS IN LIEU OF ALL OTHER WARRANTIES, EXPRESS OR IMPLIED, INCLUDING
ANY WARRANTY OF MERCHANTABILITY OR FITNESS FOR A PARTICULAR PURPOSE. Surewerx is not liable for
any kind of special, incidental, or consequential damages. Surewerx liability for breach of contract, tort or
other cause of action shall not exceed the product purchase price. Purchasers and users are deemed to have
accepted the above warranty and limitation of liability, and cannot change the terms by verbal agreement or
by any writing not signed by Surewerx. To the extent required by applicable law, Surewerx does not limit its
liability for death/ injury resulting from Surewerx negligence.
DECLARATION OF CONFORMITY:
https://www.jacksonsafety.eu/eu-products-documentation
11

FRANÇAIS
Masque protecteur Quad 500
Instructions d’assemblage, d’utilisation et d’entretien
Le masque protecteur multi-usages Quad 500 de première qualité a
une plus grande coque pour mieux protéger la tête, ainsi qu’une men-
tonnière intégrée. Sa fenêtre en polycarbonate transparent à résistance
aux chocs élevée assure une excellente qualité optique et un champ
de vision panoramique. La fenêtre en polycarbonate transparent
Sta-clear®comporte un revêtement anti-buée pour garantir une vision
claire quelles que soient les conditions de travail. Le masque protec-
teur multi-usages est disponible avec une fenêtre rabattable en teinte
5 IR et en teinte 8 IR procurant une protection ininterrompue lors des
travaux de meulage, de brasage et de coupe.
SureWerx™ USA Inc.
Elgin, IL 60123
Phone: (800) 323-7402
Fax: (847) 717-8419
www.surewerx.com/usa
Surewerx™
Coquitlam, BC V3K 0B3
Telephone: (800) 472-7685
Fax: (604) 523-7693
www.surewerx.com
Surewerx™
Balder d.o.o.Teslova ulica 30,
Sl-1000 Ljubljana, Slovenia
www.jacksonsafety.eu
JA5447_12/2020
© Copyright 2020, Surewerx
DÉCLARATION UE DE CONFORMITÉ
https://www.jacksonsafety.com/europe-products-documentation
12

FRANÇAIS
AVERTISSEMENT!
Ce mode d’emploi doit être retiré de l’emballage par l’utilisateur uniquement. Ne pas lire et observer les présentes
instructions et mises en garde peut entraîner de graves blessures et notamment la cécité.
Remarque : Certains matériaux risquant d’entrer en contact avec la peau de l’utilisateur, peuvent provoquer des réactions allergiques
chez les personnes sensibles à ces matériaux. Veuillez communiquer avec SureWerx pour de plus amples informations. Vérifiez
auprès de votre superviseur que ce masque protecteur et sa fenêtre offrent une protection adaptée pour l’application concernée.
Veuillez consulter les normes ANSI Z87.1 ou CSA Z94.3 pour savoir à quelle application ce masque de protection est destiné. Les
masques protecteurs procurent une protection limitée des yeux et du visage contre les risques les plus courants associés à des
chocs, projections de copeaux métalliques, particules et étincelles. En revanche, ils ne procurent pas de protection supplémentaire
contre les risques plus graves associés à des chocs violents, notamment, sans toutefois s’y limiter, contre les fragments de
matériaux propulsés par les meules à rectifier, les projectiles éjectés à haute vitesse, les dispositifs explosifs, le métal en fusion
ou les liquides toxiques. Les fenêtres résistantes aux chocs ne sont NI incassables, NI imperméables. Certains fenêtres SureWerx
ne répondent pas aux normes ANSI Z87.1 + contre les chocs à fort impact et ne doivent être utilisées qu’en tant que protection
élémentaire, telle que définie par la norme ANSI Z87.1. Ce produit ne doit pas être utilisé en tant que protection lors d’activités
sportives quelconques ou de simulations de jeux de guerre. Une fenêtre IR teintée adéquate doit être utilisée lors de l’exposition
à des rayonnements optiques dangereux, pouvant notamment provoquer des brûlures et coupures. Les masques protecteurs ne
procurent aucune protection contre les rayonnements infrarouges ou ultraviolets, à moins qu’une valeur de teinte conforme aux
normes
ANSI Z87.1, CSA Z94.3 et EN 166
ne soit indiquée sur leur fenêtre. Ne pas utiliser pour le soudage à l’arc. Ce produit ne protège
pas contre les rayons X, les rayons gamma, les rayonnements émettant des particules de haute énergie ou les lasers. Les masques
protecteurs doivent être fréquemment inspectés et immédiatement remplacés s’ils sont opaques, piqués, rayés ou endommagés.
Tout contact avec des produits chimiques peut entraîner la dégradation rapide du produit, ce qui diminue gravement le niveau de
protection contre les chocs. Les masques protecteurs ne doivent pas être utilisés sans s’assurer auparavant, à chaque utilisation,
qu’ils sont bien ajustés et hermétiques. Une protection oculaire principale, telle que définie par les normes ANSI Z87.1 et CSA Z94.3,
doit être portée chaque fois que ce produit est utilisé. N’apporter aucune modification au produit. Nettoyer avec du savon doux et de
l’eau ou tapoter avec un mouchoir doux et propre. NE JAMAIS utiliser de solvants ou de produits de nettoyage abrasifs. Conserver
dans un endroit frais et sec. Il est recommandé d’utiliser le produit en une période de 10 ans. La durée d’utilisation dépend de divers
facteurs comme mode d’utilisation, nettoyage, conservation et entretien. Les contrôles fréquents et le remplacement dans le cas de
dommage sont préconisés.
1. Inspectez fréquemment la fenêtre du masque protecteur et remplacez-la immédiatement si elle est usagée, piquée ou rayée.
2. Si le masque protecteur est utilisé avec une fenêtre TRANSPARENTE, celle-ci ne fournira AUCUNE protection contre les
rayonnements ultraviolets ou infrarouges.
3. S’il est utilisé avec une fenêtre TEINTÉE, NE PAS L’UTILISER POUR LE SOUDAGE À L’ARC!
4. Ce produit n’est pas conforme à la norme ANSI Z87.1 relative aux casques de soudeur.
5. Les casques à visière rabattable NE PEUVENT PAS être utilisés avec une fenêtre teintée.
6. Ce produit doit être utilisé uniquement avec une fenêtre rabattable, une visière et un harnais de tête appropriés de marque
Jackson.
Pour votre propre protection, veuillez lire ces instructions avant utilisation. L’utilisateur a la responsabilité de veiller à bien
comprendre les informations relatives au bon usage, au soin et à l’entretien du produit, ainsi que les restrictions concer-
nant son utilisation. Ne pas lire ces instructions pourrait entraîner des blessures graves, et notamment la cécité.
Retrait et remplacement de la fenêtre
Retrait de la fenêtre
1. Pour retirer la fenêtre, dégagez-la prudemment des onglets inférieurs (2) de la mentonnière en utilisant les deux
mains. La fenêtre doit être dégagée vers la face interne du masque protecteur, comme indiqué sur l’image (2).
Veillez à ne pas appuyer trop fort, car cela risquerait de casser l’armature du masque protecteur.
2. Tirez sur le côté de l’armature pour dégager la fenêtre des ongles intérieurs (3) sur la face interne du masque
protecteur. Faites la même chose de l’autre côté du masque protecteur. Veillez à ne pas appuyer trop fort, car
cela risquerait de casser l’armature ou les onglets du masque protecteur.
3. Une fois que le bas et les côtés de la fenêtre sont dégagés de l’armature, appuyez sur l’onglet situé sur la
couronne du masque protecteur. Soulevez le bas de la fenêtre vers le haut. La fenêtre devrait se dégager des
coins supérieurs et pouvoir maintenant être remplacée.
TIREZTIREZ
Face interne du masque
protecteur
Appuyez sur l’onglet de
déblocage pour dégager la
fenêtre.
Soulevez le bas de la
fenêtre vers le haut
TIREZTIREZ
FRANÇAIS
13

Masque protecteur Quad 500
Instructions d’assemblage, d’utilisation et d’entretien
FRANÇAIS
Assemblage de la fenêtre
1. Insérez le coin supérieur de la fenêtre dans l’onglet de la couronne indiqué dans l’image ci-dessus,
et faire la même chose de l’autre côté. Veillez à ne pas appuyer trop fort, car cela risquerait de casser
les onglets des coins de la fenêtre.
2. Appuyez sur l’onglet de déblocage sur la face interne de la couronne tout en poussant le bas de la
fenêtre vers la couronne.
3. En utilisant les deux mains, tirez le côté de l’armature du masque protecteur pour xer la fenêtre à l’intérieur
des onglets latéraux. Faites la même chose de l’autre côté de la fenêtre. La fenêtre doit être xée aux onglets
internes (3) du masque protecteur de chaque côté, comme indiqué sur l’image (4).
4. En utilisant les deux mains, tirez prudemment la mentonnière du masque protecteur pour xer la fenêtre
aux onglets inférieurs de la mentonnière (2). Vériez que le bas de la fenêtre est correctement xé entre les
onglets de la mentonnière, comme indiqué sur l’image (6).
5. REMARQUE : Avant utilisation, assurez-vous que les onglets de verrouillage indiqués sur l’image sont
complètement enclenchés!
Insérez le coin supérieur
de la fenêtre dans
l’onglet de la couronne
1 2
Appuyez sur l’onglet de déblo-
cage pour fixer la fenêtre
à la couronne
Poussez la fenêtre
vers la couronne.
3
TIREZTIREZ
Fenêtre
Onglets
de
Verrouillage
54
TIREZTIREZ
14

Retrait et remplacement de la visière
Retrait de la visière
1. Retirez les boutons du harnais de tête de chaque côté du masque
protecteur. Si le masque protecteur comporte des adaptateurs pour
casque de protection interchangeable à fentes (système HHIS), retirez
les boutons des adaptateurs de chaque côté du masque.
2. Retirez la visière rabattable et
remplacez-la avec une visière
approuvée de marque Jackson.
3. Positionnez la nouvelle visière
rabattable sur la couronne et
installez les boutons du harnais
de tête de chaque côté du masque
protecteur. Vériez que les
deux boutons sont bien xés avant
d’utiliser le masque protecteur.
1
23
Remplacement du harnais de tête
Pour remplacer le harnais de tête du casque 370, suivez les étapes ci-dessous :
1. Retirez le bouton à pivot de chaque côté du harnais de tête
2. Retirez le goujon de l’intérieur du casque, puis retirez le poteau du pivot, le joint
torique et le butoir du pivot de chaque côté du casque.
3. Assemblage du côté droit – En tenant le casque devant vous, avec l’arrière vous faisant
face, insérez le goujon leté à travers la courroie du harnais de tête, le poteau du pivot,
le joint torique et le butoir pivot. Placez ensuite le harnais dans le casque en insérant la
sangle d’ajustement d’angle dans le trou désiré. Enlez le bouton à pivot sur le goujon
qui passe maintenant de bord en bord du casque.
4. Répétez ensuite les étapes ci-dessus sur le côté gauche.
Système d’échange pour casque de soudeur
Lames de xation du casque
• Réglage de l’inclinaison à 4 positions permettant au soudeur de centrer le champ visuel.
• Boutons de serrage permettant d’abaisser le casque de soudeur à une position confortable.
• Faites de matériaux légers pouvant résister à des températures extrêmes allant jusqu’à 350 °F.
• Fixation verticale empêchant le uage du casque en le tenant fermement vers le haut.
• Peuvent être xées à tous les casques de soudeur Jackson Safety®de type HaloX et HSL, et
de la série Nitro.
• Utilisation approuvée avec l’équipement suivant:
Casque de protection SC-6 o Cadre d’échange pour écran facial de casque de soudeur.
LH Pivot Stop
RH Pivot
Stop
Pivot Post
O-Ring
Pivot
Knob
Base Stud
Butoir du pivot gauche
Base Goujon
Butoir du pivot
Joint torique
Butoir du pivot droit
Bouton du pivot
FRANÇAIS
15

FRANÇAIS
Système d’échange pour casque de soudeur – Instructions
Casque de soudeur – Fixation et lames
1. Le casque de protection peut être porté le bord vers l’avant ou l’arrière. Insérer les lames dans les
fentes du casque en maintenant le bouton face à l’arrière de la suspension, comme à la (Figure 1).
2. Retirer la gâche du loquet au moyen d’un tournevis plat. Assembler la xation au casque de sou
deur, comme à la (Figure 2/3).
3. Placer le casque de protection sur sa tête. Ramener le casque de soudeur face à son visage et
insérer le système de xation dans les lames. Appuyer fermement sur les boutons rouges vers
l’intérieur jusqu’à ce qu’un claquement sec signale que l’insertion est complète.
4. Adjust desired tension with the red knob. Clockwise to tighten. Counter-clockwise to loosen.
G‰che
Loquet
Bouton
unique
Bouton
rouge
Lam e Figure 3
Figure 2
Figure 1
Gâche
JA5447_12/2020
© Copyright 2020, Surewerx
Marquages
Numéro d'échelle (nuance)
Identication du fabricant
Classe optique
Liquides (gouttelettes et éclaboussures)
Numéro de la norme EN
Symbole pour la résistance mécanique -
Résistance moyenne à l'impact énergétique (entre 45 and 120 m/s)
Marquage de certication
Le cas échéant, l’EPI est soumis à la procédure d’évaluation de la conformité: Règlement (UE) 2016/425 et
avec les normes harmonisées EN 166:2001 et EN 169:2002.
Organisme notié 1883, ECS (European Certication Service) GmbH, Hüttfeldstraße 50, D-73430 Aalen,
Germany.
SM 1661 B3
16

CONTENU
• Ce respirateur JACKSON SAFETY AIRMAX+ doit être livré avec les éléments suivants :
• Ventilateur avec batterie et filtre intégrés
• Sangle ventrale
• Casque de soudeur (masque de soudeur et harnais crânien) ou protection en toile abrasive (visière et protection)
• Tuyau et protection du tuyau
• Chargeur de batterie
• Batteries au lithium-ion
• Notice explicative
• Test du débit d’air
PRÉSENTATION DU SYSTÈME
Le respirateur JACKSON SAFETY AIRMAX+ a été conçu et fabriqué conformément à la norme
EN12941:1998+A1:2003+A2:2008 relative aux dispositifs de protection P R SL de classe TH3.
Ce dispositif de protection assistée avec filtrage des particules est fixé sur une sangle ventrale et livré avec
une cartouche de filtre SL haute efficacité remplaçable qui garantit une efficacité de filtration supérieure
à 99,8 %. Le respirateur offre un facteur de protection nominal (FPN) de 500 lorsqu’il est utilisé conjointe-
ment à un filtre à particules JACKSON SAFETY AIRMAX+ portant le marquage CE, conformément à la norme
EN12941:1998+A1:2003+A2:2008 TH3 P R SL.
Le ventilateur (batteries incluses) pèse 900 g à un débit minimum de 170 LPM pendant au moins 8 heures,
pour un niveau d’intensité de bruit confortable inférieur à 70 dB. Les batteries aux lithium-ion peuvent être
rechargées plusieurs fois et remplacées à la fin de leur vie utile. Celles-ci doivent être complètement char-
gées au début de chaque prise de poste.
Le ventilateur intègre plusieurs dispositifs de sécurité destinés à protéger l’utilisateur contre toute variation
inattendue du débit d’air, notamment:
• L’appareil intègre une alarme sonore qui se déclenche en cas d’obstruction du filtre ou de baisse du
niveau de charge de la batterie.
• Cette alarme retentit pendant 1 second à la mise sous tension du ventilateur et s’arrête lorsque le débit
d’air minimum admissible est atteint. La mise hors tension du ventilateur pendant son utilisation constitue
une situation de fonctionnement anormale.
• L’interrupteur d’admission d’air étant en retrait, toute coupure accidentelle du débit d’air est impossible.
Un kit de test du débit d’ait est fourni avec chaque respirateur AIRMAX+ afin de s’assurer des bonnes conditions
d’alimentation en air. Veuillez suivre et respecter les instructions et recommandations fournies dans ce manuel.
AVIS IMPORTANT
Veuillez lire attentivement les instructions contenues dans le présent manuel avant de déballer votre
respirateur Jackson Safety AIRMAX+ PAPR. Le non-respect des instructions fournies dans ce document
peut annuler la garantie limitée du produit et nuire à votre santé et sécurité.
Le choix de ce respirateur pour votre application doit résulter d’une étude d’évaluation du risque menée
par un professionnel en matière de santé et sécurité. Son utilisation doit strictement se conformer aux
instructions qui l’accompagnent. Pour toute question concernant l’adéquation de ce produit aux tâches
qui vous sont assignées, veuillez contacter le professionnel désigné en matière de santé et de sécurité ou
faire appel à notre service d’assistance technique pour une aide supplémentaire.
L’utilisation de ce respirateur est limitée aux modèles indiqués dans le présent manuel.Toute modification apportée
au produit afin de l’adapter à d’autres dispositifs de protection peut nuire à la santé et à la sécurité de l’utilisateur.
fAPPAREIL RESPIRATOIRE (APR) À ÉPURATION D’AIR MOTORISÉ
User Instructions
17

CONFORMITÉ RÉGLEMENTAIRE ET MARQUAGES CE
AVERTISSEMENTS ET LIMITES D’UTILISATION
• Ce respirateur n’est pas conçu pour être utilisé dans des zones insuffisamment ventilées (c’est-à-dire, des
locaux confinés) où le niveau d’oxygène est estimé être inférieur à 17 %.
• La nécessité d’utiliser ce respirateur doit être étudiée par un professionnel expérimenté en matière de
santé et de sécurité qui doit déterminer l’adéquation de la protection qu’offre cet appareil pour la tâche
concernée et les risques impliqués.
• N’utilisez pas ce respirateur tant que la concentration des substances dangereuses n’a pas été déter-
minée et que leur effet sur la santé et la sécurité des personnes n’a pas été évalué par un professionnel
expérimenté en matière de santé et de sécurité.
• L’utilisateur de ce respirateur doit avoir lu et compris le descriptif des fonctions et réglages du respira-
teur AIRMAX+. L’utilisation de celui-ci, son nettoyage, sa maintenance et sa désinfection, ainsi que ses
conditions de stockage doivent respecter les instructions fournies dans ce manuel. Les produits retournés
pour remplacement dans le cadre de la garantie ne pourront être échangés qu’à condition d’avoir respecté
toutes les recommandations indiquées dans ce manuel.
• N’utilisez pas le respirateur AIRMAX+ dans les zones où des explosions sont susceptibles de se produire.
Évitez toute exposition directe du respirateur à une source de flammes et/ou d’étincelles. N’utilisez pas le
respirateur AIRMAX+ en présence de vents violents.
• En cas de déclenchement de l’alarme sonore du ventilateur, quittez immédiatement la zone de travail et
rendez-vous dans un environnement non contaminé.
• Vous ne devez pas stocker ni utiliser ce respirateur à des températures non conformes à celles spécifiées
dans ce manuel en dessous de -5 °C et au-dessus de +55 °C).
• Ne pas utiliser pour le soudage en hauteur en cas de risque de retombées de métaux en fusion. Ce sys-
tème de casque/filtre de soudage n’assure pas de protection contre les métaux en fusion et les projec-
tions pendant le soudage en hauteur.
• Les filtres à particules n’offrent pas une protection adaptée contre les gaz et les fumées dont la concen-
tration est supérieure aux limites d’exposition professionnelle. Utilisez exclusivement des filtres de type P
R SL conditionnés dans leur emballage d’origine. Les produits dont la fermeture hermétique est rompue
ou qui ont déjà servi ne doivent pas être utilisés.
• Examinez attentivement le joint d’étanchéité de l’emballage et recherchez tout signe éventuel de dom-
mage visible. N’utilisez pas ce produit si son intégrité vous semble compromise. Utilisez exclusivement
des filtres à particules fabriqués par Surewerx USA, correctement étiquetés et emballés.
• Ne tentez pas de manipuler ou de modifier les composants de ce respirateur.
• À des cadences très élevées, la pression du respirateur peut devenir négative en cas de très fort flux
Filtre P R SL AIRMAX Référence produit 40302
Fabriquant agréé CE Blanc (fond)
Conformité Surewerx USA Inc
Elgin IL USA 60123
Compliance EN 12941:1998+A1:2003+A2:2008 TH3
P R SL
CE:
Module B, C2 sous la surveillance
de l’organisme notifié
OCCUPATIONAL SAFETY RESEARCH INSTITUTE, V.V.I.
Notified body 1024
Jeruzalémská 1283/9
110 00 Praha 1
Czech Republic
Marquages CE Voir les étiquettes sur les composants du produit
18

d’inhalation. Les respirateurs JACKSON SAFETY AIRMAX+ sont destinés à être utilisés uniquement par du
personnel compétent et dûment formé à son utilisation.
• Ne laissez pas de l’eau ou tout autre liquide pénétrer à l’intérieur du ventilateur.
• Lors de la mise hors tension du ventilateur, la protection offerte par le respirateur est minime, voire
inexistante. Lors de la mise hors tension du ventilateur, l’accumulation rapide de dioxyde de carbone, ainsi
qu’une diminution d’oxygène peuvent se produire au niveau du casque.
• Si l’une des alarmes de l’appareil se déclenche, si l’un des composants du produit est défectueux ou en
cas de variation importante du débit d’air ou de détection de fumée, vous devez évacuer la zone contami-
née. De même, en cas d’étourdissement, de gêne ou de difficulté à respirer, quittez la zone.
APPLICATIONS
L’usage du respirateur AIRMAX+ s’avère très efficace pour la protection, entre autres, de l’utilisateur dans
les applications suivantes:
Applications industrielles
générales
Fabrication de plastiques renforcés à
la fibre de verre
Construction et maintenance
navales
Agriculture Exploitation minière Industrie de transformation des
métaux
Construction et démolition Fonderies de métaux Évacuation des déchets
Usines chimiques Peinture au pistolet (à base d’eau) Soudage général
Maintenance générale Pharmacie Bricolage
Transformation des alime Lutte anti-parasitaire Exploitations à flanc de coteau et
de carrière
Exploitation minière Traitement de l’eau et des eaux usées Fabrication de textiles
4
ASSEMBLAGE DU RESPIRATEUR
5
7
6
4
3
15
16
8
14
12
9
10
11
2
1
19

AIRMAX + PAPR AVEC ENSEMBLE CAGOULE DE SOUDAGE PAPR
Item Description Part code
1 APR motorisé AIRMAX+ avec Casque de soudage 280 série 40421
1 AIRMAX+ avec visière Maxview à APR motorisé 40601
1 AIRMAX+ avec visière Quad 500 40620
1 AIRMAX+ avec visière Quad 500 Teinte 5 IR 40630
1 AIRMAX+ avec visière Quad 500 Teinte 8 IR 40633
2Joint facial J5250
2 Joint facia J5244
3Serre-tête (APR) J7260
3Serre-tête 370 (APR) J8571
3Serre-tête 370 (APR) J8572
4Bande anti-sudation (APR) J5462
5 Protection de tuyau ignifugée, 105 cm J5241
6 Tuyau avec revêtement ignifugé, 105 cm 40341
6 Tuyau avec revêtement ignifugé, 85 cm 40340
7 Tuyau sans protection, 85 cm J7064
8 AIRMAX+ Unité de ventilation – 8 vitesses 40381
9 Filtre HEPA pour APR motorisé 40332
10 Pré-filtres de rechange 40311
11 Filtre anti-odeur 40312
12 Chargeur pour APR motorisé 40363
13 Pare-étincelles 40313
14 Batterie de rechange 4 cellules 7,4 V 40353
15 Ceinture de rechange 40371
16 Ceinture lavable 40372
RÉGLAGE INITIAL
• Fixez la sangle ventrale autour de votre taille et attachez les deux extrémités.
• Si la sangle n’est pas assez serrée, faites glisser le dispositif de réglage mâle sur la ceinture, dans la
direction du dispositif femelle. Si la sangle est trop serrée, faites glisser le dispositif de réglage mâle sur la
ceinture, en l’éloignant du dispositif femelle.
• Répétez la procédure ci-dessus jusqu’à ce que le réglage vous semble confortable et totalement sécurisé.
20
Other manuals for Airmax+
1
Table of contents
Other Jackson Respiratory Product manuals
Popular Respiratory Product manuals by other brands

Honeywell
Honeywell FENZY OPTI-PRO instructions

Omron
Omron COMPACT COMPRESSOR NEBULIZER NE-C30 instruction manual

Respironics
Respironics ComfortFull 2 Instructions for use

Respirex
Respirex PRPS Instructions for use

Flaem
Flaem NEBULAIR+ Instructions for use manual

Gima
Gima HOSPYNEB PROFESSIONAL instructions