Jade Smart Toilet User manual

Smart Toilet
USER MANUAL
CLEAN • COMFORT • HYGIENE

2
SAFETY NOTES
Please read the manual carefully before use in order to ensure
correct use of the product.
To improve performance of the product, specication
may change without notice.
To prevent injury to users and others, please follow
these instructions.
WARNING
The presented content is warning you how to avoid injury
CAUTION
Follow these instructions to prevent damage to equipment or other property
Dismantling, repair and
alteration are absolutely
forbidden without permission
or may cause re or electric
shock.
Do not use wet hand to touch
power plug which may lead to
electric shock.
Please do not spray water or
cleaning agent on the product
or power plug which may
lead to electric shock and
malfunction.
1. As an electric appliance, the product should not be installed too close to splashing water or in very
humid conditions.
2. The socket load should be 1300W and up.
3. The battery for the remote control will be 3 x 1.5V
4. If the power cord is damaged, it must be replaced by special cord from Jade Bath.
1. Don’t stand on the main body, cover, or seat.
2. Lower temperature when sitting on the toilet for a long time.
3. Don’t place upside down when connecting power without water supply.
Ensure the water is clean and
water pressure is as required.

3
CAUTION
Prohibited Must follow
Do not use damaged socket or
plug which may lead to electric
shock, short out or re
Do not use wet hand to plug in
which may lead to electric shock
Ensure the input water is clean
Please do not stand on a toilet or
put heavy objects on it
Open ame and smoking are
prohibited near to the toilet.
May lead to re
Dismantling, repair and alteration
of the product is forbidden
Do not force the toilet seat lid
to close
Disconnect the power plug during
thunderstorms
Ensure the plug is grounded
Beware of low temperature burn if
seated on toilet too long
Disconnect the plug if there is
abnormal smell or sound
Do not lean on the seat cover
Do not spray water or cleaning
agent on the product and power
plug which may lead to electric
shock and/or malfunction
Do not put many plugs on one
patch board which may lead to
power overload

4
OPERATION INSTRUCTIONS
Stop / Flush
Press this button to ush the toilet, seat sensor will engage automatic ush when you stand.
Posterior wash / Moving wash
When sit and press this button, the nozzle will clean itself for 2 seconds. Then it begins posterior washing.
The whole cycle lasts for 2 minutes. If you press this button again during washing, the spray will move
forwards and backwards. Press “Water pressure” during washing to pressure. Press “Stop” to nish
washing any time if you want.
Dryer temp
Press this button during drying to adjust drying temperature. There are 4 levels available.
Seat temperature
Press this button to adjust seat temperature according to your preference. There are 4 levels available.
Child
Press this button once to start child cycle. Wash 15 seconds, move wash 15 seconds and drying 1 minute.
Water temperature, dryer temperature and water pressure at lowest level, suitable for children. You can
activate this function even if there is not enough pressure on sensor.
Auto
Press this button once to activate rear wash 30 seconds, move wash 30 seconds and drying 3 minutes, then
stop. Or stop automatically when you stand. If press “Front wash” rst, then press “Auto”, will front wash
30 seconds, move wash 30 seconds and drying 3 minutes, then stop.
Bidet / Moving wash
Same
operation as posterior/moving wash button, the only difference is the washing position. This is
designed for female users.
Dryer
Press this button to activate drying function. Will stop automatically after 5 minutes or when you stand.
Press “Dryer temp” button to adjust dryer temperature, 4 levels to choose.
Water pressure
This button can adjust washing strength from strong(red indicator lights) medium (pink indicator) to soft
(blue indicator).
Nozzle position adjustment
Adjust nozzle position forward or backward according to your preference and convenience during washing.
There are 5 possible positions.
Save electricity
Press this button to activate power saving mode for 8 hours. When seated, it will stop this function
automatically. Use this function when not using the bidet, to save 40% energy.
Light / Eco mode
This button is light on/off function button. If you hold this button for 5 seconds, eco mode will be
activated. When seated eco mode will turn off automatically, and will turn on when you stand. (In eco
mode water and seat will stop heating, and toilet will enter sleep mode)
Open / Close
Open and close cover can be controlled by remote control. Press “Open” button once, cover will rise;
second time, seat will rise; press “Close” button once, seat will close, second time, cover will close.

5
OPERATION INSTRUCTIONS
Suspended induct ip cover
Put your foot on the right bottom side of the toilet once, cover will rise; twice,
seating ring will rise; third time, toilet will ush; fourth time, seating ring
will close; fth time, cover will close.
If no one sits while cover and seating ring are open, they will close
automatically after 90 seconds.
Flush automatically when you stand.
When nobody is seated on toilet,
press “Stop/Flush” button to ush;
When there is no electricity, press
the side button to ush.
When seated on the toilet,press any
wash button,nozzle will clean itself
for 3 seconds, then come out to wash;
when you stand, nozzle will clean
itself again for 3 seconds.
Automatic deodorization:
There is bamboo charcoal deodorizer
device inside to dispel odors
automatically.
OTHER FUNCTIONS

6
INSTALLATION
Required Tools:
- Monkey Wrench
- Phillips screwdriver
- Glass glue tape measure
- Pencil or marker pen
- Glass glue gun
Included:
Sealing ange Special hose Water input
angle valve
Remote with
3 batteries
Manual
1. Draw a cross central line on
the sewage pipe.
2. Put the toilet upside down
on cardboard or soft cushion.
Draw a cross central line on the
sewage outlet and extend.
3. Align the cross central line
on the toilet sewage outlet with
the mark on sewage pipe on the
ground.
4. Put toilet upside down the
toilet on the soft cushion. Coat
the glass glue on surface of
ange as well as the sewage
outlet and install the ange on
the sewage outlet solidly.
Water pipe connection and installation
1. Install the new angle valve and connect to the end
of special hose.
2. When power is on, adjust the valve and control the
water pressure under 7.5 kg
5. After ange installed, put the
toilet on the ground and make
sure the cross central line and
the sewage are aligned. Then
compress slowly until tight.
7. Coat anti-mildew sealants
on the circle of the toilet with
contact to the ground.
8. After sealants are solid, plug
in the power, slowly open the
angle valve. Control the water
pressure under 7.5 kg and check
the connection is well sealed.
6. Install the water input angle
valve and connect the hose.
Please release the water in the
pipe for 3-5 minutes in order to
ensure the pipe is clean before
connecting to the hose.
NOTE:
The toilet uses tornado siphon jet
ushing technology. If the water
pressure is high in your area (over
3 kg water pressure), there may be
some splash and noise when ushing.
If so, please control valve and adjust
the water pressure.
REMINDER:
It is normal that the nozzle ows
when angle valve is open for new
products and it will normalize after
recovering power supply.
Please stop power and water supply
when dismantling.
Installation steps
INSTALLATIONINSTALLATION

7
TRIAL OPERATION AND MAINTENANCE
Normal phenomenon
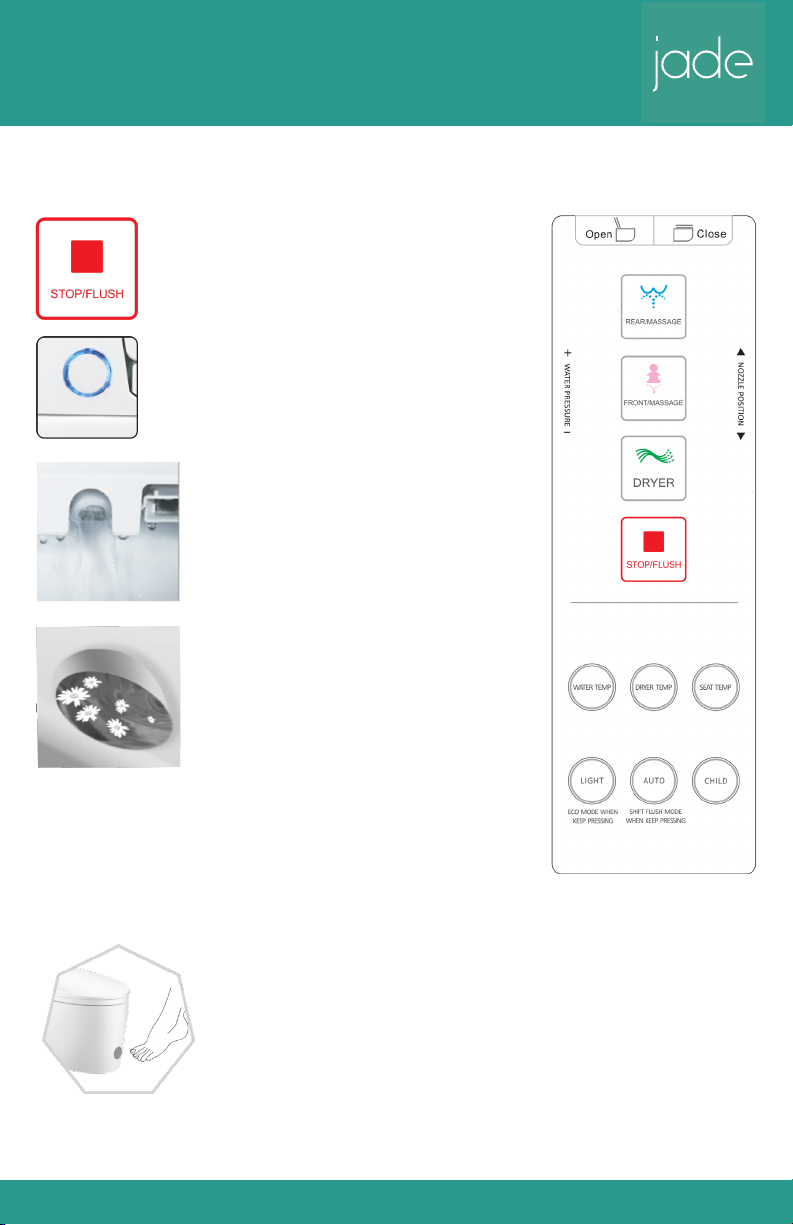
Put a wet towel on sensor area
Once nished with connection of water supply, open the angle valve and switch
on the power.
The magnetic valve will ush the toilet and the nozzle will come out. This is
the self-inspection process. The water temperature indicator ashes which
means the water tank is getting water and after 40 seconds the indicator will
stop ashing, which means nish water input. (It is normal for the nozzle to
delay spraying for 10-15 seconds on the rst time use)
NOTE: It is normal phenomenon for the nozzle to come out and spray
opening the angle valve and getting the water supply. After power is on, the
nozzle will go back and stop spraying.
Function conrmation
1. Please check each function according to the manual.
2. Switch on the power and put a wet towel or cloth on sensor area. After 1
minute, the water will be heated at set temperature and the warm air will
work when you press the “Dryer” button.
3. When there is no power supply, no function can work except
the non-electric ush.
Pair remote controller when seated on the toilet:
STEP 1: Keep pressing side button for 5 seconds until you hear “BEEP”, the LED
display will blink at the same time, now the toilet is waiting to pair.
STEP 2: Press any button on the remote controller, will hear “BEEP”, and LED
display will stop blinking, pair nished.
The remote control should already be paired.
Only need to pair if setting up a new remote control.
Main body cleaning
Clean with sponge or soft dry cloth with mild detergent.
NOTE: Do not use thinner, benzolin, detergent, chemical, pesticide or
deodorant to wipe.
Nozzle cleaning
1. Please clean the nozzle frequently. Press “Front wash or Rear wash”
button when no body seated so that the nozzle will come out. Then clean
it with toothbrush or soft cloth.
2. Please don’t over pull the nozzle. Press the “Stop” button after nished
cleaning so that the nozzle will go back automatically.
Filtering mesh cleaning
1. Stop the water supply.
2. Open the T-joint water input cap.
3. Take out the ltering mesh and clean it with
toothbrush.
4. Put it back and recover the water supply.
Not use for long time - Drainage
1. Stop the power supply.
2. Stop the water supply.
3. Lift up the main body.
4. Screw out the drainage screw and drain out water.
5. Put the drainage screw back.

8
SPECIFICATION
Power voltage 220V-240V 50-60Hz 1650W
Water Supply Water input Connect to the water pipe directly
Water pressure 0.08 MPa - 0.75 MPa (0.8 kgt/cm² - 7.5 kgt/cm²)
Wash device Rear wash water volume 0.5 L/min - 0.9 L/min
Front wash water volume 0.5 L/min - 0.9 L/min
Tank volume 1 L
Temperature Room temp./Low 33°C/Medium 37°C/High 40°C
Heating power 1600W
Safety device Floating switch / Temperature fuse / Water level sensor
Heated seat Temperature Room temp./Low 30°C/Medium 35°C/High 40°C
Heating power 40W
Safety device Temperature fuse
Warm air
dryer
Temperature Room temp./Low 35°C/Medium 40°C/High 45°C
Heating power 200W
Safety device Temperature fuse
Other safety device Earth leakage protector
Power cord length 1.5 m
Net weight 46 kg
NOTE:
1. Please stop the water supply if the power suddenly turns off in the process of using. The product will
run self-checking system and recover after power turns back on.
2. Please use our special angle valve and other accessories.
Phenomenon Inspection Method Solution
Fail to run Power failure or forget to
switch on
Conrm the power is on
Reconnect the power
The nozzle does
not spray or the
water does not
ow smoothly
Water supply failure or water
tap shut off
Check the water supply and turn on the valve
Filter mesh is jammed Check the lter mesh
Water outlet is jammed by
limescale
Clean the nozzle with toothbrush
Water leakage Connection parts not tight Tighten connection
Low temperature
for water or seat
Temperature not set Reset the temperature
Table of contents
Other Jade Toilet manuals