J&D MAnufacturing JD360 User manual

IS309-22G J&D Manufacturing • 6200 Hwy 12 • Eau Claire, WI 54701 • 1-800-998-2398 • www.jdmfg.com Page 1/6
HPF RING KIT FOR JD360 DESTRATIFIER FAN
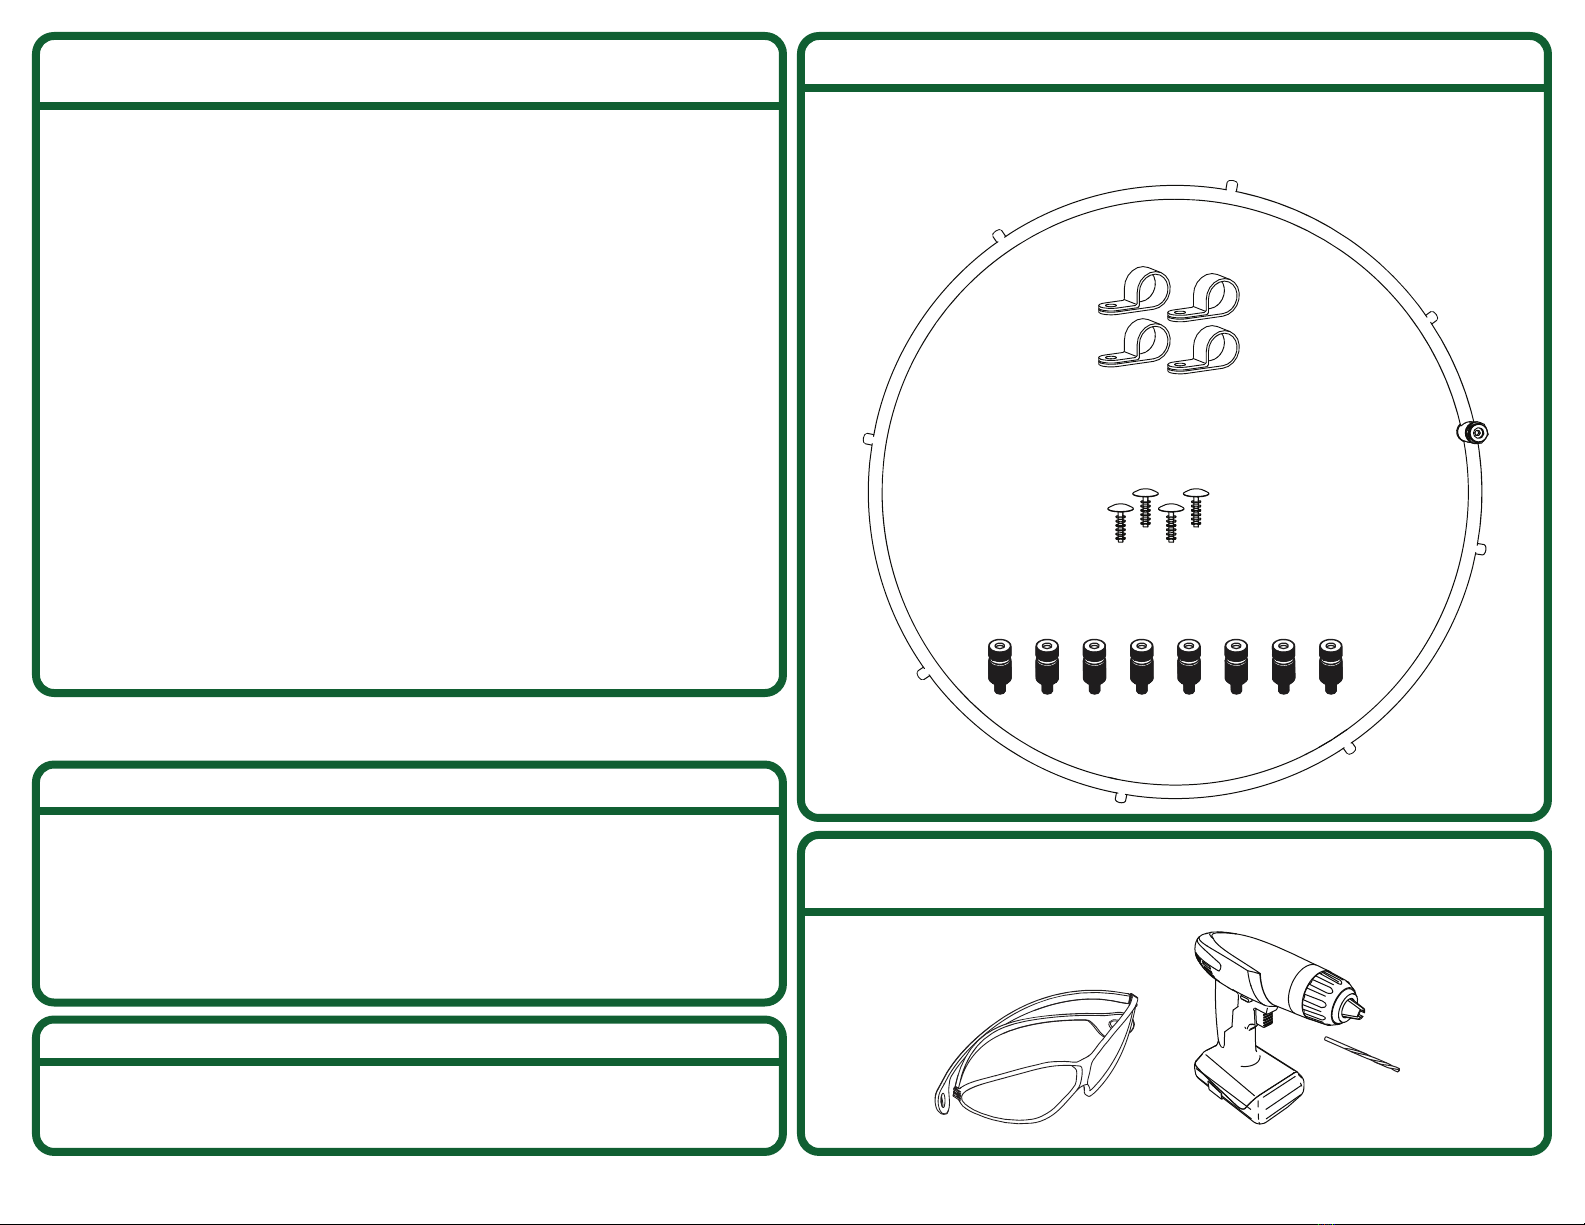
Table of Contents
J&D Mfg. warrants this products is free from defects in materials and workmanship under normal use for
the period of three years from date of purchase. Our warranty does not cover ordinary wear and tear.
J&D Mfg can repair or replace at our option, any product or part of the product that is found to be
defective. Our warranty applies to materials only and does not include return freight, delivery, loss or
damage to personal property, cost of removal or installation, any incidental or consequential damages or
labor. This warranty does not apply to products which are misused, abused, altered, improperly installed
or subject to negligence. All warranties must be approved through our warranty department. The original
purchaser must present a copy of the invoice for the defective product.
WARRANTY
Please read over ALL instructions carefully before you begin.
If you have any questions please call your local dealer, or contact J&D Manufacturing at
1-800-998-2398.
INSTALLATION
IS309-22G J&D Manufacturing • 6200 Hwy 12 • Eau Claire, WI 54701 • 1-800-998-2398 • www.jdmfg.com Page 2/6
Warranty ---------------------------------------------------------------------------------- Page 2
Parts Legend ----------------------------------------------------------------------------- Page 2
Recommended Tools for
Installation and Assembly (Not Provided) ------------------------------ Page 2
Preparing HPF Ring for Installation ----------------------------------------- Step 1
Placement of Ring on JD360 ----------------------------------------------------- Step 2
Drilling Holes for Ring Mounting Hardware ----------------------------- Step 3
Securing Ring to Fan ----------------------------------------------------------------- Step 4
Installing High Pressure Fog Nozzles --------------------------------------- Step 5
Connecting the Ring to Your HPF System -------------------------------- Step 6
Maintenance Instructions ------------------------------------------------------ Pages 6
End of Season & Winterizing -------------------------------------------------- Pages 6
Beginning of Season Setup ----------------------------------------------------- Pages 6
PARTS LEGEND
RECOMMENDED TOOLS FOR INSTALLATION AND ASSEMBLY
(NOT PROVIDED)
Safety
Glasses
(8) Anti-Drip High Pressure Nozzles
(4) Nylon Push-in
Ribbed Shank Rivet
(4) Nylon Loop Clamp
High Pressure Fog Ring
with 8 Nozzle Ports
Drill
1/8”
Drill Bit
IS309-22G J&D Manufacturing • 6200 Hwy 12 • Eau Claire, WI 54701 • 1-800-998-2398 • www.jdmfg.com Page 3/6
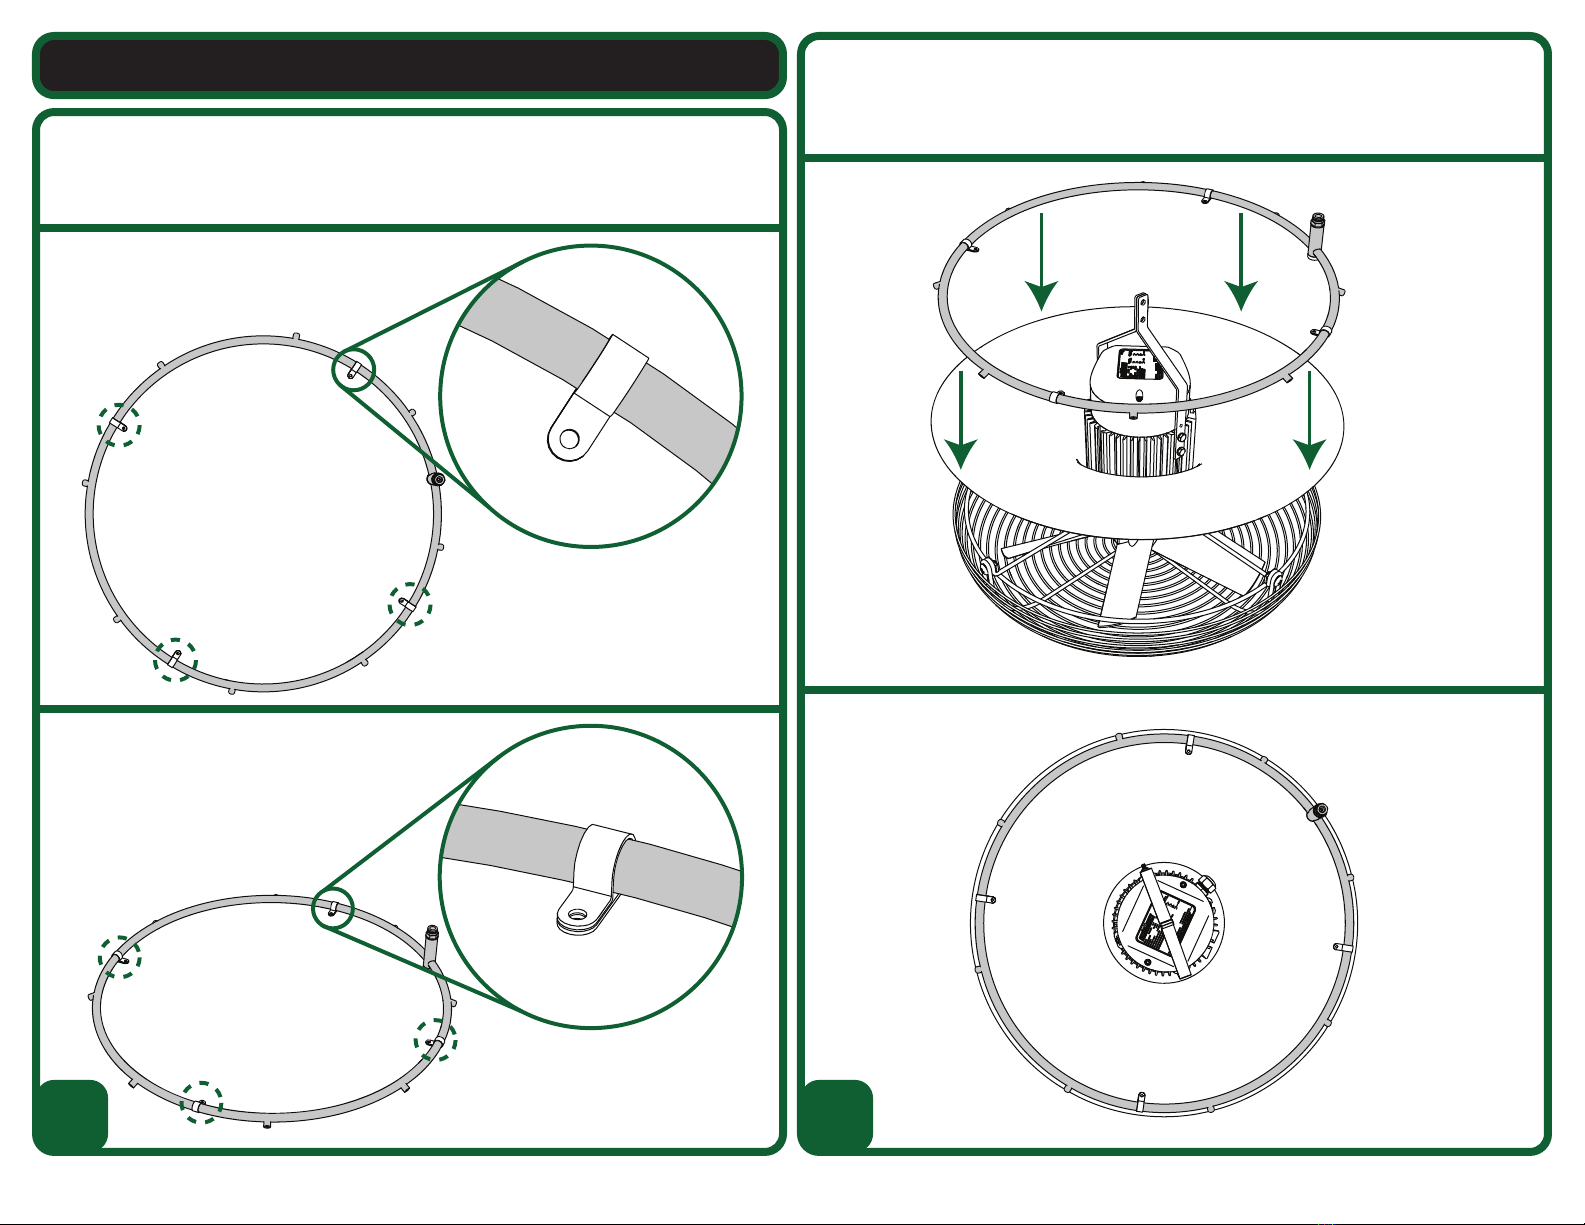
Preparing HPF Ring for Installation:
• With the tube connector facing up, install the (4) Nylon Loop Clamps, evenly spaced and with
the flat side down, as shown below
1
Placement of Ring on JD360:
• Place ring on the JD360 destratifier deflector
• Center ring
2
JD360 must not be installed/suspended during installation process.
Center Ring
IS309-22G J&D Manufacturing • 6200 Hwy 12 • Eau Claire, WI 54701 • 1-800-998-2398 • www.jdmfg.com Page 4/6
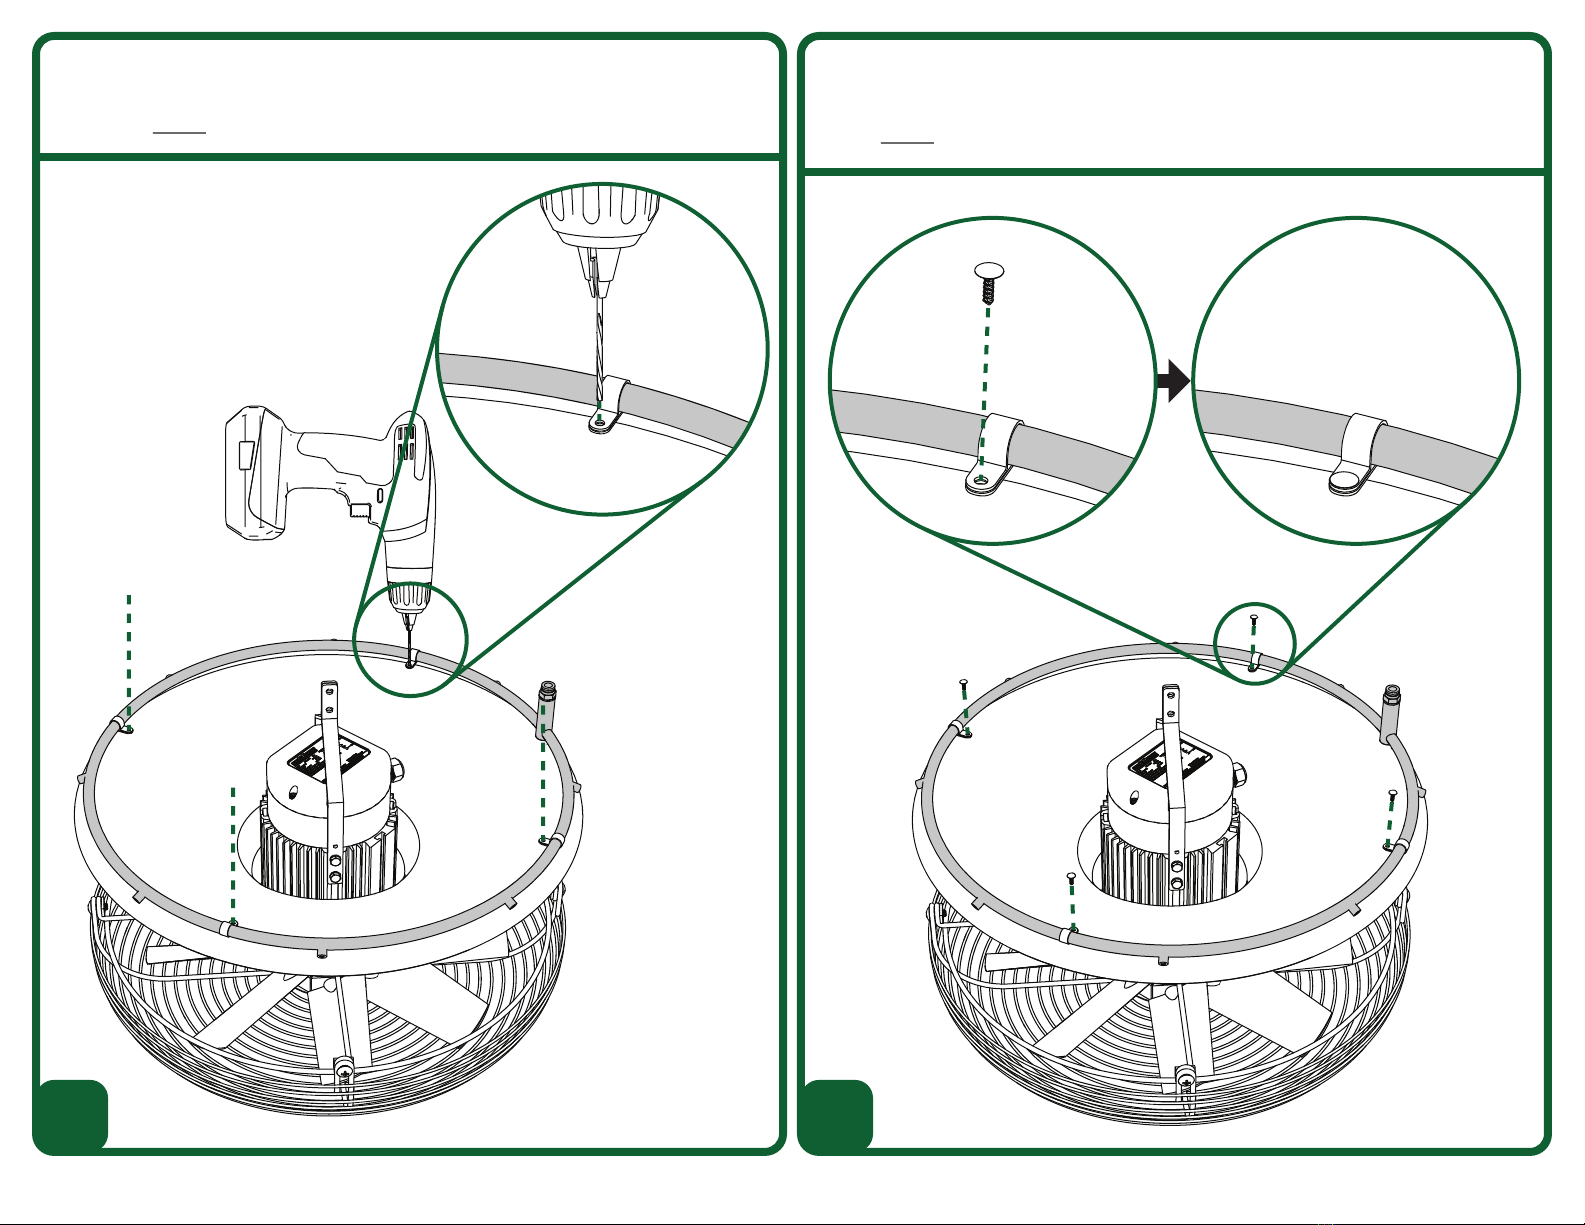
Drilling Holes for Ring Mounting Hardware:
• Using a Drill with a 1/8” Drill Bit and the mounting holes in the Nylon Loop Clamps
(installed in Step 1) as your guides, drill 4 corresponding mounting holes, as shown below.
3
Securing Ring to Fan:
• Insert (4) Nylon Push-in Ribbed Shank Rivets through Nylon Loop Clamps and into holes
drilled in Step 3, as shown below.
4
IS309-22G J&D Manufacturing • 6200 Hwy 12 • Eau Claire, WI 54701 • 1-800-998-2398 • www.jdmfg.com Page 5/6
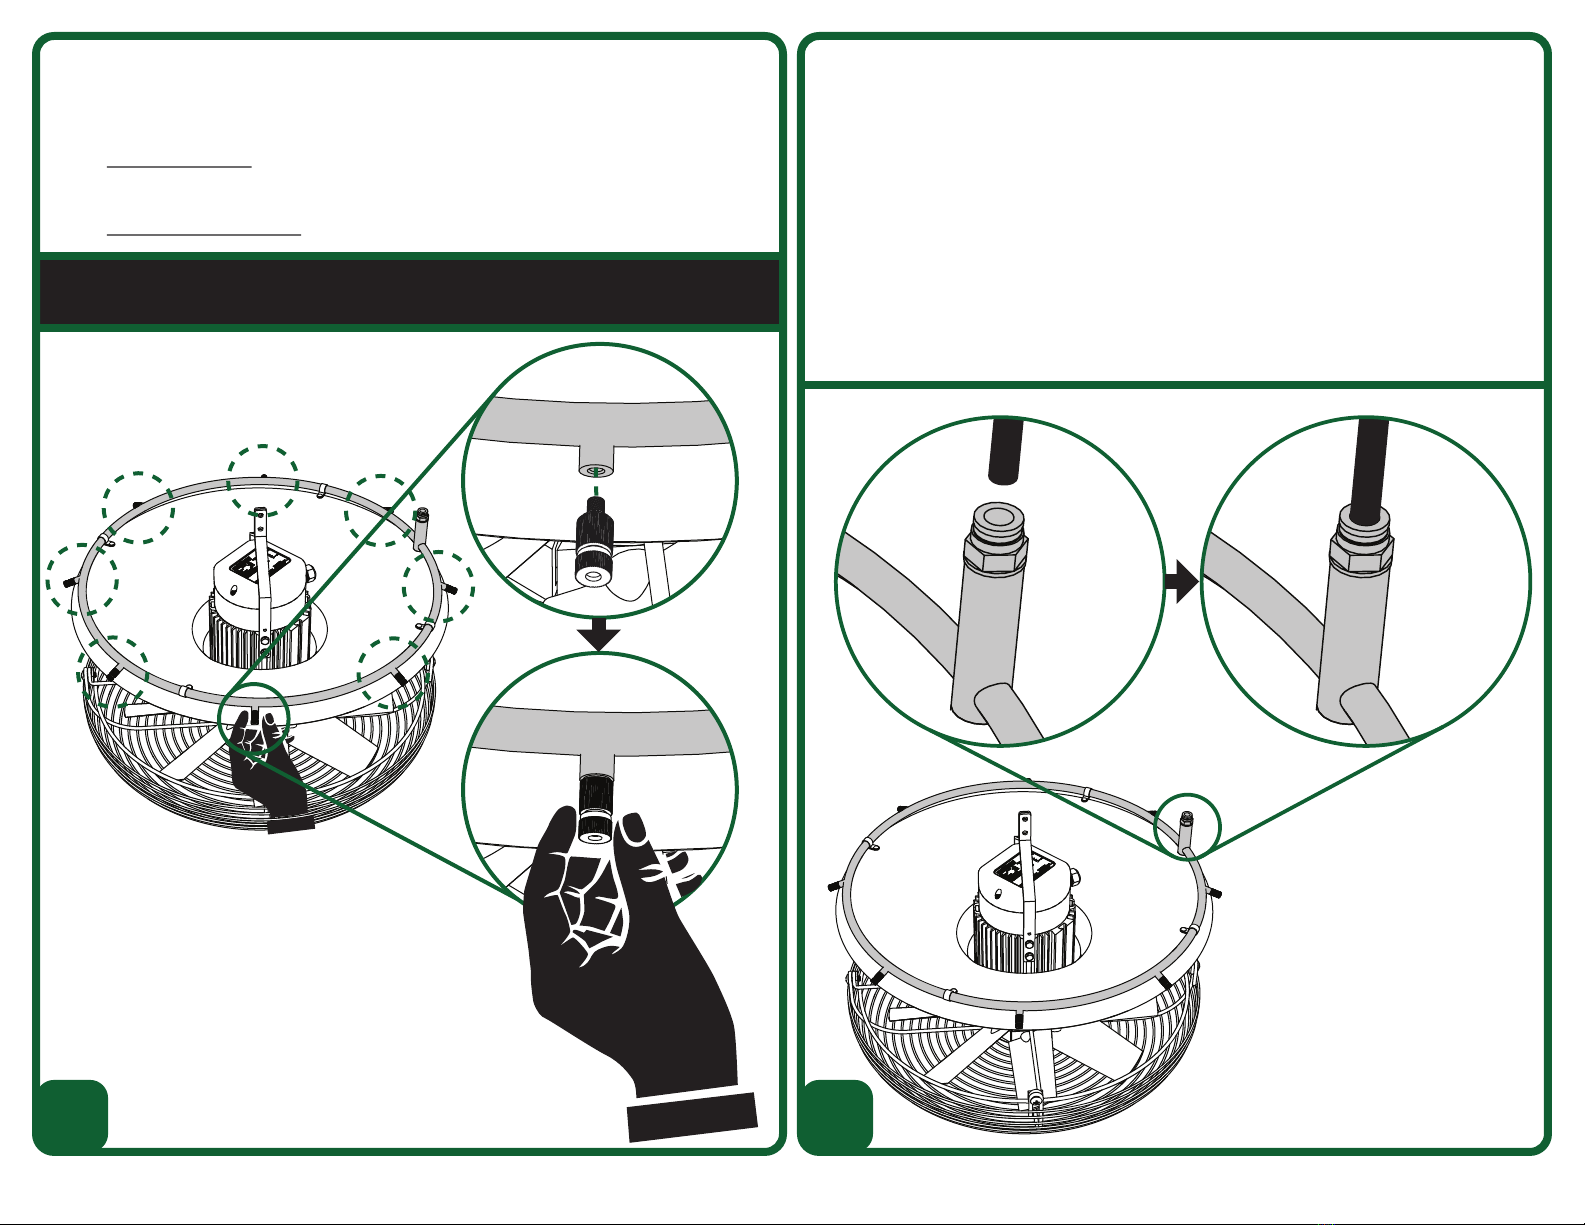
Installing High Pressure Fog Nozzles:
• Using your fingers, screw in and tighten the (8) Anti-Drip High Pressure Nozzles into the
nozzle ports.
- Hand tighten only.
- Tools are not recommended as they damage and over tighten the nozzles.
- DO NOT OVER TIGHTEN
WARNING: Do not remove nozzles or plugs while system is running.
5
Connecting the Ring to Your HPF System:
• Slip lock connectors requires the nylon tube be cut straight, cleanly, and without crimping or
deforming the tube while cutting.
• Insert the end of the nylon tube into the slip lock until you meet some resistance then push it
in another 1/2” or so until it stops.
NOTE: If you need to remove the nylon tube from the slip lock, the system must be depressur-
ized. Then push the metal slip lock collar back into the fitting and pull the nylon tube out.
Once the nylon tube has been fully inserted into a slip lock and is removed, even for a
short time, 1” of nylon tube (the amount that was inserted into the slip lock) must be
trimmed off or it will not seal properly. Keep this in mind if you intend to disassemble
your system seasonally as you will want to provide additional tubing to those sections
to allow for yearly trimming until you are required to replace your nylon tubing.
6
Use Hand Only
(no tools)

Type: Anti Drip Nozzle
O-ring O-ring
BodySpringPinHead
Ball
Maintenance Instructions:
• Check for plugged nozzles.
• Disassemble the nozzle/s as shown below.
• Set aside the o-rings and the ball. If necessary the o-rings and ball can be washed with slightly
soapy water.
• Soak the remaining metal parts in undiluted CLR® cleaner for a maximum of one hour.
• Once done soaking rinse all parts thoroughly and reassemble nozzles.
TIP: If cleaning more than one nozzle, separate nozzles by type and size as you remove them.
Keep them separated during the cleaning process so reassembling and reinstalling after
cleaning will be much easier.
WARNING: Do not remove nozzles or plugs while system is running.
WARNING: Do not remove nozzles or plugs while system is running.
WARNING: Do not remove nozzles or plugs while system is running.
IS309-22G J&D Manufacturing • 6200 Hwy 12 • Eau Claire, WI 54701 • 1-800-998-2398 • www.jdmfg.com Page 6/6
End of Season & Winterizing:
Nozzles End of Season Care
• Remove from ring
• Following Maintenance Instructions disassemble nozzles and clean them
• Reassemble nozzles
• Store nozzles in a container where they will not be exposed to freezing temperatures
Ring and Tube End of Season Care
• Do not reinstall nozzles at this time.
• Disconnect system from pump
• Using pressurized air, blow all water out of rings and tubes
Beginning of Season Setup:
Ring and Tube
• Cut off 1” of nylon tube, the amount that was previously inserted into the slip lock
(The pressure from the slip lock distorts the end of the tubing and it must be trimmed
off or it will not seal properly)
• Connect water to filter and pump system
• Run pump for 10 minutes to flush all tubing and rings
• Turn off pump
Nozzles
• Follow directions from Step 5 on installing nozzles (Hand tighten only)
System
• Turn on pump and check system
Table of contents


