Janome Quilt Maker 15 User manual

15” Quilting Machine
INSTRUCTION MANUAL

2022.02
Quilt Maker 15 User Manual
Page 2
Congratulations on your purchase of
a Janome Quilt Maker 15 from Janome!
Congratulations on your purchase of the Janome Quilt
Maker and welcome to the Janome family.
Our mission is to produce machines which inspire
creativity and innovation, yet are simple to use. The
better your tools, the more inventive and pleasurable
your sewing experience. We know the most important
thing about our products is not the machines
themselves, but what you create with them. That’s why
we design our machines for performance, but also for
comfort, quality, and intuitive ease of operation.
As a leader in the sewing industry, we keep striving to
provide best-in-class products and services which enable
sewists’ creativity and innovation. Please be sure to
register your warranty on janome.com. Your registration
allows us to communicate with you regarding machine
updates and other product information. In addition, our
website oers tutorials, quilting patterns, videos, and
more educational materials for your Quilt Maker 15.
Remember, if you ever have questions, your local
Janome Dealer can help you. For general questions,
please use the General Inquiries Form on janome.com
or call Monday through Friday 8:30AM - 5:00PM EST,
1-800-631-0183, option 3.
Package Contents
Please keep your original box and packaging
Contents of Package
1. Bobbins (5) one installed in bobbin case
2. Needle (134) size 100/16 (pack of 10)
3. Needle (134) size 110/18 (pack of 10)
4. Bobbin Case
5. Spool Pin and Thread Mast
6. EZ Pin Oiler
7. Lint Brush
8. Screwdriver
9. Power Cord (locking)
10. Needle Thread
11. Wrench, 8mm/10mm combined
12. 2, 5, 3, and 4mm L Hex Wrench
13. Replacement O-Ring
14. Ruler Foot (comes installed)
15. Bobbin Winder
16. Open-toe Foot
17. User Manual
18. Quilt Maker 15 Quilting Machine
Optional Accessories
1. 15” Machine Ruler Base
2. 11’ Leader Set
3. Set of 8 Casters
4. Hand Wheel Kit
5. Rear Handlebar Kit and Laser
6. Table Top Kit
7. EZ Ruler Foot
8. Square Feet Set
9. Channel Locks
10. Couching Feet Set
11. Glide Foot
12. Echo Feet Set
13. Horizontal Spool Pin
14. Bobbin 8 Pack
15. Bobbin Case

janome.com Page 3
Table of Contents
Important Safety Information ........................................................................................................................................... 6
About Your Machine.......................................................................................................................................................... 10
General Specifications .................................................................................................................................................................................10
Get to Know Your Quilt Maker 15.............................................................................................................................................................. 11
Installation and Setup........................................................................................................................................................14
Carriage..............................................................................................................................................................................................................14
Power Cord ....................................................................................................................................................................................................... 15
Front Handlebars............................................................................................................................................................................................ 15
Optional Accessory: Quilt from the Back Kit......................................................................................................................................16
Spool Pin and Thread Mast ........................................................................................................................................................................ 17
Machine Head USB Port(Built-in) ............................................................................................................................................................ 17
Optional Accessories ....................................................................................................................................................................................18
Operating Instructions ......................................................................................................................................................21
Power Switch.................................................................................................................................................................................................... 21
Lighting............................................................................................................................................................................................................... 21
Machine Needle............................................................................................................................................................................................... 21
Hopping Feet .................................................................................................................................................................................................. 23
Optional Accessories ...................................................................................................................................................................................24
Bobbin and Bobbin Tension......................................................................................................................................................................24
Threading the Machine ...............................................................................................................................................................................26
Threading the Needle with the Needle Threader ............................................................................................................................ 28
Top Tension ......................................................................................................................................................................................................29
Tension Quick Start Guide.........................................................................................................................................................................30
Quilting with the Quilt Maker 15 ......................................................................................................................................31
Preparing to Quilt........................................................................................................................................................................................... 31
Free-Motion Quilting....................................................................................................................................................................................33
Updating the Quilt Maker Software............................................................................................................................................ 33
Machine Maintenance .......................................................................................................................................................34
Clean and Oil Your Quilt Maker 15 ..........................................................................................................................................................34
Maintenance Schedule ................................................................................................................................................................................ 35
Quilt Maker 15 Screen Reference ............................................................................................................................................................36
Navigating the Screens...............................................................................................................................................................................38
Home Screen - Variations ..........................................................................................................................................................................39
Menu.................................................................................................................................................................................................... 40
Stitch Modes.....................................................................................................................................................................................................41
Cruise Stitch Mode - Setting Cruise Speed ........................................................................................................................................42
Needle Stop - Up or Down ........................................................................................................................................................................43
Lights..................................................................................................................................................................................................................44
Over-speed Alarm.........................................................................................................................................................................................44
Stitch Count.....................................................................................................................................................................................................45
Diagnostics.......................................................................................................................................................................................................46
Update ...............................................................................................................................................................................................................48
Information.......................................................................................................................................................................................................49
Home ..................................................................................................................................................................................................................49
Alerts ..................................................................................................................................................................................................................50
Troubleshooting................................................................................................................................................................. 53
Appendix 1 ..........................................................................................................................................................................58
Federal Communications Commissions (FCC) Declaration of Conformity (For USA Only)..........................................58
Canadian Department of Communications Compliance Statement (For Canada Only) ................................................58
Radio Interference (Other than USA and Canada)..........................................................................................................................58
Warranty..............................................................................................................................................................................59
Warranty Registration Card.......................................................................................................................................................................61
Machine Setup and Training Checklist and Certificate..................................................................................................................63

Page 4
2022.02
Quilt Maker 15 User Manual
Safety Section
This device complies with Part 15 of the FCC Rules.
Operation is subject to the following two conditions:
(1) This device may not cause harmful interference, and
(2) this device must accept any interference received,
including interference that may cause undesired
operation.
Note: Do not operate your Janome Quilt Maker 15®
quilting machine until you have completely read the
information contained in this manual. Please keep all
packaging and order information for warranty purposes.
IMPORTANT SAFETY INSTRUCTIONS
Read all instructions before using this machine.
When using this machine, basic safety precautions
should always be followed, including the following:
DANGER — To reduce the risk of electric shock:
• A quilting machine should never be left unattended
when plugged in. Always unplug the machine from
the electrical outlet immediately after using and
before cleaning.
WARNING — To reduce the risk of burns, fire,
electric shock, or injury to persons:
• The Janome Quilt Maker 15 is heavy. Never attempt
to lift it alone. Always use two people when lifting.
Always lift from the throat of the machine, not from
the handlebars.
• Always unplug the Janome Quilt Maker 15 from the
electrical outlet when performing any maintenance,
changing the needle, removing thread locks, or when
left unattended.
• Do not unplug by pulling on cord. To unplug, grasp
the plug, not the cord.
• Keep fingers away from all moving parts. Use caution
around the needle or sharp external components.
• Change the needle often. Do not use bent or dull
needles. “Every quilt deserves a new needle”.
• Switch the machine to the symbol o, or 0, position
to turn it o when making any adjustments in the
needle area, such as threading needle, changing
needle, threading bobbin, changing hopping foot,
and so forth.
• Never drop or insert foreign objects into any
opening.
• The Janome Quilt Maker 15 should only be used
indoors away from moisture.
• The Janome Quilt Maker 15 should not be stored or
used in extreme temperatures.
• Use the Janome Quilt Maker 15 only for its intended
use as described in this manual.
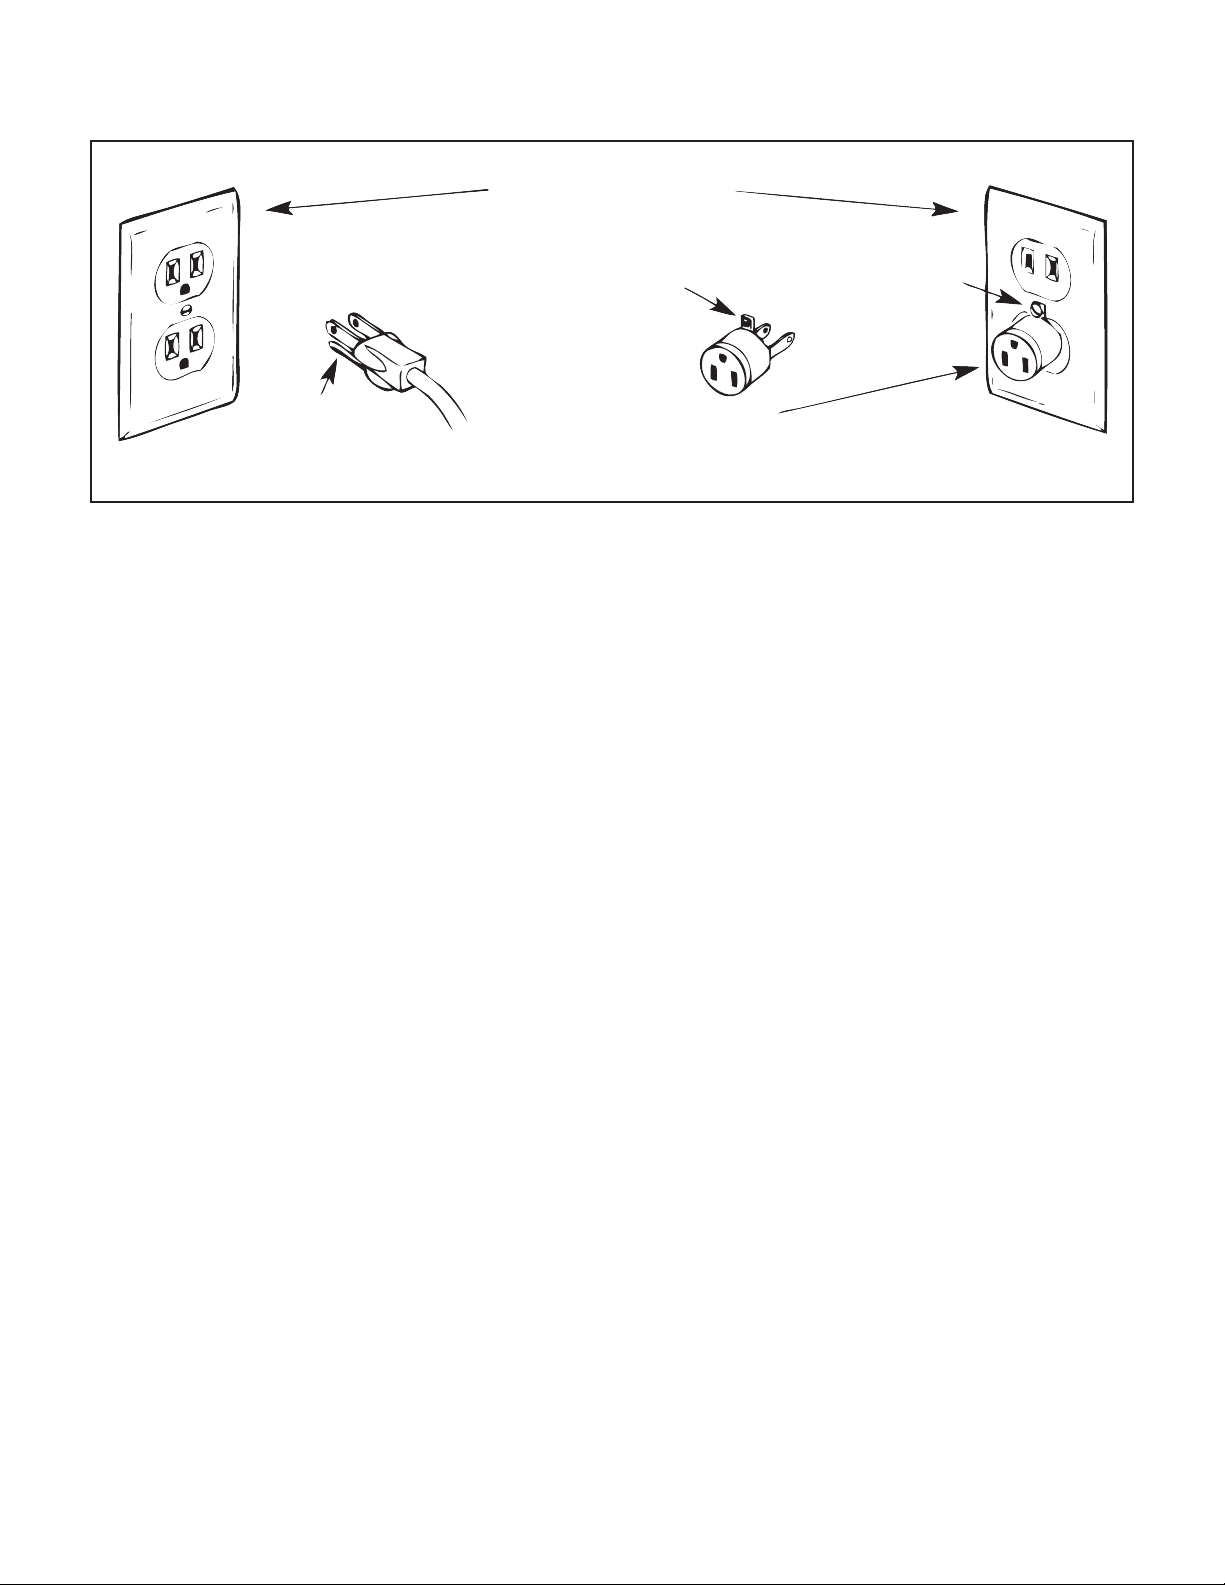
• To disconnect from the wall outlet, push the switch
to the o position, then remove the plug from outlet
pulling from the plug, not the cord. Never operate
the Janome Quilt Maker 15 if the cord is damaged or
not working correctly. If a mechanical or electrical
problem is encountered, return the Janome Quilt
Maker 15 to the nearest authorized service center or
the manufacturer for examination, repair, electrical,
or mechanical adjustment.
• It is not recommended that the Janome Quilt Maker
15 quilting machine be used with any machine quilting
frame other than those recommended by Janome.
• Use this quilting machine only for its intended use
as described in this manual. Use only attachments
recommended by the manufacturer as contained in
this manual.
• Never operate the machine with any air openings
blocked. Keep ventilation openings of the machine
free from the accumulation of lint, dust, and loose
cloth.
• Do not operate where aerosol (spray) products are
being used or where oxygen is being administered.
• Do not pull or push the machine across the fabric
excessively while stitching. It may deflect the needle
enough to cause it to break.
• Use only needles designed for free motion quilting
and recommended by Janome for this machine.
Other types of needles may be break during normal
quilting.
• Children shall not play with the machine. Close
attention is necessary when this machine is used
by or near children.
• This sewing machine may be used by children age 8
years and above and persons with reduced physical,
sensory, or mental capabilities or lack of experience
and knowledge if they have been given supervision
or instruction concerning use of the machine in a
safe way and understand the hazards involved.
• Cleaning and user maintenance shall not be made
by children without supervision.
• When machine is not in use unplug from all power
sources.

janome.com Page 5
To use the machine safely
1. Carefully watch the needle when sewing. Do not
touch the hand wheel, take up lever, needle, or other
moving parts.
2. Turn the machine o and unplug the cord in the
following cases:
• when you have stopped using the machine
• when you replace or remove the needle or any
other part
• when you check or clean the machine
• when you leave the machine unattended
3. Connect the machine directly to the wall outlet or to
a surge protector that connects directly to the wall
outlet. Do not use extension cords.
To increase the life of your machine
1. Do not store this machine in areas exposed to direct
sunlight or high humidity. Never use or store the
machine near a heater, an iron, a halogen lamp or
other hot things.
2. Use only neutral soaps or detergents to clean the
machine. Benzene, solvents and scouring powders
can damage the case and the machine and therefore
should never be used.
3. Do not drop or bump the machine.
4. Always consult the manual to replace or fix the
hopping foot, needle or any other part of the
machine. If necessary contact an authorized Janome
representative or Janome technical support.
Save these instructions.
This machine is intended for household or commercial use
General Specifications
The Janome Quilt Maker 15 utilizes high-tech electronics
and an innovative touch-pad user interface to oer
greater functionality and ease of operation to home
quilters than ever before conceived in the quilting
industry. The Janome Quilt Maker 15 quilting machine
is a high quality machine that incorporates very robust
design features and is very easy to maintain and service.
Disclaimer
Janome and its Representatives are in no way legally
responsible or liable for damage to the Janome Quilt
Maker 15 when used improperly or not in accordance
with the guidelines stated in this manual or when used
on machine quilting frames not recommended by
Janome.
Sewing Opening Dimensions:
Sewing Speed:
Stitches-Per-Inch:
Needle System:
Needle Sizes (recommended):
Hook System:
Bobbin Type:
Bobbin Case:
Motor Type:
Needle Positioning:
Electrical Power:
Display:
Sew Foot Stroke/Lift:
Needle Bar Stroke:
Take-Up Stroke:
Lubrication, main components:
Lubrication of hook:
(210 mm X 383 mm) 8.25” X
15”
Manual Mode:
Min 25spm, Max 1,800spm
Regulated Mode:
Min 0spm, Max full speed
Cruise Speed: 50 to 80spm
4spi – 18spi (regulated mode)
134 (134 X 7)
12/80 - 21/130
Rotary, Horizontal axis, M-class
bobbin
Aluminum, Class M
Type MF
Brushless DC, servo controlled
Up and down, walking stitch
100 – 240 VAC, 50 - 60Hz,
200W peak, Average 0.9A @
115 VAC, 60Hz
1.44” (128 x 128 pixels), Built-in
Face Cover
5 mm
35.3 mm
73 mm
Kluber Lube, permanent
Velocite 10, Texaco 22

Page 6
2022.02
Quilt Maker 15 User Manual
Optional U.S. Grounding
for Customers with 120 VAC Connections
This product is for use on a nominal 120 V or nominal 220 V circuit, and has a grounding plug that looks like the
plug illustrated in sketch Aabove. A temporary adapter, which looks like the adapter illustrated in sketches Band
C, may be used to connect this plug to a 2-pole receptacle as shown in sketch B if a properly grounded outlet is
not available. The temporary adapter should be used only until a properly grounded outlet can be installed by a
qualified electrician. The green colored rigid ear, lug, and the like, extending from the adapter, must be connected to
a permanent ground such as a properly grounded outlet box cover. Whenever the adapter is used, it must be held in
place by the metal screw.
IMPORTANT: In Canada, the use of a temporary adapter is not permitted
by the Canadian Electric Code.
Grounding Instructions
If This product must be grounded. In the event of malfunction or breakdown, grounding provides a path of least
resistance for electric current to reduce the risk of electric shock. This product is equipped with a cord having an
equipmentgrounding conductor and a grounding plug. The plug must be plugged into an appropriate outlet that
is properly installed and grounded in accordance with all local codes and ordinances.
DANGER – Improper connection of the equipment-grounding conductor can result in a risk of electric shock.
The conductor with insulation having an outer surface that is green with or without yellow stripes is the
equipment-grounding conductor. If repair or replacement of the cord or plug is necessary, do not connect
the equipment-grounding conductor to a live terminal.
Check with a qualified electrician or serviceman if the grounding instructions are not completely understood,
or if in doubt as to whether the product is properly grounded.
Do not modify the plug provided with the product – if it will not fit the outlet, have a proper outlet installed by
a qualified electrician.
To repair or adjust the machine
If the machine breaks down or needs adjustment, first check the troubleshooting chart in the appendix to inspect
and adjust the machine yourself. For more information and updates, visit our website at www.janome.com/qm15.
The contents of this manual and product specifications are subject to change without prior notice.
Check for updated manuals at www.janome.com/qm15
GROUNDING OUTLET BOXES
TAB FOR
GROUNDING
SCREW
METAL
SCREW
ADAPTERGROUNDING PIN
(A) (B) (C)

janome.com Page 7
Janome Quilt Maker 15 Components
Left Side View (picture shown with optional rear handlebars)
1
2
6
78
18
3
4
5
17
14
15
11
10
12
13
16
19
20
21
1. Spool pin
2. Thread mast
3. Rear handlebars
(optional accessory)
4. Machine encoder
connector
5. Machine encoder
6. Laser pin (optional
accessory)
7. Front handlebars
8. Front display
9. USB port
Close-up View of
Needle Area
10. Presser bar
11. Presser bar jam nut
12. Hopping foot mounting
screw
13. Ruler foot
14. Needle plate
15. Needle plate screw
16. Ruler base post
(optional accessory)
17. Needle
18. Needle bar thread guide
19. Needle stop sight hole
20. Needle bar clamp screw
21. Needle bar
9

22. Hand wheel
23. Threaded hole for the optional laser pin
24. 9-pin connection plug for the
optional laser
Close-up View of Tension
Assembly Area
25. Three-hole thread guide
26. Thread guide
27. Take-up spring
28. Top tension assembly
29. Thread stirrup
30. Take-up lever
31. Lower thread guide
Page 8
2022.02
Quilt Maker 15 User Manual
ÂIMPORTANT: Only rotate the hand wheel
toward you from this side of the machine.
From the rear of the machine, it will
rotate counter clockwise
Janome Quilt Maker 15 Components
Right Side View
(picture shown without handlebars)
22
23
24
25
26
27
28
29
30
31

janome.com Page 9
Rear View
Back View
32. Rear handlebar mounting holes (3)
33. Rear handlebar connection cover
34. Carriage encoder connection jack
35. Carriage encoder cable clip
36. Power input module with fuse holde
33
32
34
35
36

Page 10 Quilt Maker 15 User Manual
2022.02
Installation and Setup
Carriage
You should have your frame set up and ready to go. Refer to the frame manual for detailed instructions
about setting up the frame.
To install the carriage and machine on the frame
1. Place the carriage on the tracks, ensuring that the
stitch regulator faces the back of the frame.
2. Place the machine on the carriage.
UCAUTION: It is suggested to have two people
when lifting the Quilt Maker 15. Always lift
from the throat of the machine, not from the
handlebars, needle bar area or needle bar.
3. At the back of the machine, plug the carriage
encoder cable into the round jack on the back of
the machine (to the left of the power cord). Plug
the other end into the encoder.
4. Secure the carriage encoder cable through the clip
at the back of the machine. Check that there is no
strain on the cable at the plug into the machine.
5. Plug the machine encoder cable into the round jack
on the right side of the machine (as seen from the
rear of the machine). Plug the other end into the
encoder.
ÂIMPORTANT: If you ever need to remove the
machine from the carriage, disconnect the
carriage encoder cable from the carriage
encoder. Failure to unplug the cable when
removing the machine from the carriage
could result in damage to the cable or
carriage encoder.
UCAUTION: Never plug or unplug the encoder
cables or any other cables while the quilting
machine is on, as this could potentially cause
electrical damage to the machine or encoders.

janome.com Page 11
Power Cord
To install the Power Cord
• Insert the plug into the power connector on the rear of the machine. Plug the three-prong plug
end into your power source. Do not turn on the machine until the handlebars are installed.
To disconnect the Power Cord
• First pull out on the red buttons on the sides of the
plug and then pull the plug out of the machine.
NOTE: Make sure that the machine is o before
plugging into a power source. The main power
switch should be in the O (o) position.
Front Handlebars
The Quilt Maker 15 comes with handlebars for the front of the machine. Optional rear handlebars are
available for quilting with pantographs and Groovy or pattern boards. The front handlebars are used|
for most other quilting activities.
UCAUTION: To prevent any electrical damage to the handlebars, always turn o all power to
the machine when connecting or disconnecting the handlebars.
To install the Front Handlebars
1. Remove the two screws in the front top
cover with a 3mm hex tool. Remove
cover by pulling up on the rear portion
then sliding tabs out in the front.
2. Place four M4x10mm screws with
washers down through the handlebar
into the top of the machine and
tighten them firmly with a 3mm hex
tool.
3. Plug the two handlebar cable plugs
into the two jacks in the back top (left
plug to left jack and right to right).
The right handlebar cable is labeled.
4. Push ferrites down into the space so
that the cover will fit back into place.
5. Replace the front top cover by sliding
tabs at the front into machine and
angling the back of the cover down
into place. Tighten the screws with a
3mm hex tool. Do not over tighten.

Page 12 Quilt Maker 15 User Manual
2022.02
Optional Accessories
Quilt from the Back Kit
To install the Rear Handlebar
NOTE: Make sure that the machine is o
before installing the rear handlebar. The
main power switch must be in the O (o)
position.
1. Slightly loosen the two Philips screws on the
rear handlebar connection cover with a #1
Phillips screwdriver (not provided). Do NOT
remove the screws.
2. Pull o the plastic cover. It protects the
rear handlebar connection. Do NOT
remove the screws.
3. Re-tighten the two screws. They hold
the connection board to the machine.
4. You will need three M5 x 12 SKB ZN screws for
the rear handlebars (included in the Quilt from
the Back Kit) and a 3mm hex wrench.
5. Align the three holes in the handlebars with
the holes on the back of the machine.
6. Attach with the three screws. Tighten securely.
To install the Laser Pin
1. You will need the laser pin, washer and nut.
2. Screw the nut all the way onto the laser pin.
3. Slide the washer onto the laser pin threads and
screw the laser pin all the way into the side of
the machine.
4. While holding the laser pin, firmly tighten the
nut with the 8mm wrench (provided).

janome.com Page 13
Spool Pin and Thread Mast
To install the Spool Pin on the machine
1. You'll need the spool pin with nut and washer.
2. Remove the nut and washer.
3. Place the washer against the top of the
machine cover.
4. Screw the nut onto the spool pin all the way.
5. Place the spool pin through the washer and
into the top cover and tighten it all the way.
6. Hold the spool pin firmly and tighten the nut
with the 8mm wrench (provided). Do not over
tighten.
Install the Thread Mast onto the machine
1. You'll need the thread mast with washer
and nut.
2. Remove the nut and washer.
3. Place the washer against the top of the
machine cover.
4. Screw the nut onto the thread mast all
the way.
5. Place the thread mast through the washer and
into the top cover and tighten it down to the
nut. Turn until the loop of the mast is directly
over the spool pin.
6. Hold the thread mast firmly and tighten the
nut with a 10mm wrench (provided). Do not
over tighten.
Machine Head USB Port (built-in)
The USB port is a full USB port that can be used to power a USB device, update the machine software, or
communicate with accessories. It is located on the side of the machine to the left of the display at the front.

Page 14 Quilt Maker 15 User Manual
2022.02
Optional Accessories
Quilt Maker 15 Ruler Base
If you plan to use rulers and templates with your Quilt Maker 15, you will need to attach the ruler base
to give you a large, stable surface on which to rest the ruler or template. The ruler base, rulers, and
templates are optional accessories. For more information visit http://www.janome.com.
To install the Ruler Base
1. The Ruler Base Kit comes with four posts for the ruler base
that you will attach to the machine using the 4 screws.
2. Guide the wide part of the latches back until they are
between the front and rear ruler base posts. Then lower
the ruler base down between the posts.
3. Push the ruler base back until it is touching the machine
or snaps into place.
NOTE: When the wide part of the latch is down between the two posts there will still be a gap
between the ruler base opening and the front of the machine. Push back on the ruler base to
secure it into place
To remove the Ruler Base
• Grasp the front corners of the ruler base. Pull the ruler base towards you and then up and
away from the machine.
To use rulers and templates with your quilting machine
UCAUTION: Use only 1/4 inch thick rulers with your machine. Do not use rotary-cutting rulers;
they are too thin and can easily slip under the hopping foot. Always use the Steady-Fit Ruler
Base™ to stabilize the ruler. The Handi Sure Foot will give an extra measure of security while
using rulers.
Keep the ruler flat and quilt only where the ruler is held securely. Avoid losing control by walking your
hand along the ruler or stopping and repositioning your hand and/or the ruler.
• Quilting with rulers requires gentle three-point pressure as follows:
1. Position and press the ruler against any side of the hopping foot.
2. Press machine against ruler.
3. Press ruler against ruler base with only as much force as is necessary to keep the ruler from
slipping. Too much pressure will prevent the machine from moving.
The quilting line will be approximately 1/4 inch away from the ruler edge. The markings on all Janome
rulers take this into consideration.
NOTE: Set the machine to stop in the needle-down position to keep the machine from moving
while making adjustments with the ruler.

janome.com Page 15
Rear Laser Light
The optional laser light (for use with pantographs) is installed on a mounting post. The post is threaded
into a hole on the machine casting. The hole is found towards the back of the machine on the right side
about 2 inches in front of the rear wheel; see section on Quilt From The Back Kit.
The laser projects a straight laser beam visible as a dot on surfaces it hits. The laser dot is used as a
guide enabling you to use printed pantograph designs and stitch the pattern onto a quilt by tracing the
design with the laser dot.
The laser attaches to a mounting post which attaches to the machine. The laser stylus can move in any
direction by rotating the clamp on the post and pivoting the laser up or down. To make an adjustment,
simply loosen the black thumbscrews, position, and re-tighten.
ÂIMPORTANT: A label is attached to the laser’s case and shows an arrow which indicates
the direction of the laser light when energized. The label must remain in place on the laser.
Removing the label voids the laser’s warranty.
Laser Safety
When using the laser stylus, observe the following basic safety precautions.
• Never shine directly into the eyes.
• The laser stylus should never be left on and unattended.
• Do not use the laser stylus as a toy.
• Pay close attention when the laser stylus is being used by or near children or pets.
• Use the laser stylus only for its intended use as described in this manual.
UCAUTION: Use of controls or adjustments or performance of procedures other than those
specified herein may result in hazardous radiation exposure.
Laser Operation and Safety
Unplug the laser from the back of the machine to turn it o. Be sure the laser is attached to the machine
and pointed downward toward the table before connecting it to the port. Never point it in a direction
that would project the beam into someone’s eyes. If the laser should stop working, ensure the plug is
firmly seated into the Quilt Maker 15 laser port.

Page 16 Quilt Maker 15 User Manual
2022.02
Laser Focus and Image Size
Focus the laser by turning the threaded housing surrounding the lens clockwise or counterclockwise.
The laser image can be adjusted to project a bigger or smaller dot, or focal size. The direction of
rotation needed is determined by the distance of the laser from the pantograph surface. Experiment
by rotating the threaded end to achieve your desired focal size.
NOTE: If you can’t see the threaded housing, the lens may be threaded too far into the laser body.
You will need to use a large slotted screwdriver to turn it counter clockwise until the housing is
visible. You can then rotate it with your fingertips to bring the light into focus. Be very careful to
not scratch the lens when using the screwdriver.
Horizontal Spool Pin
The optional Horizontal Spool Pin allows you to use threads that need to feed from the side of the spool
horizontally. Examples would be straight-wound spools or mylar holographic threads.
The kit comes with 3 parts; a threaded post, a pin and a clamp. The Quilt Maker 15 does not require the
threaded post, so set that aside.
1. Loosen thumbscrew on clamp and attach to the top of the Quilt Maker 15 spool pin through the
opening closest to the thumbscrew.
2. Place the pin through the other opening and position it so that it is horizontal, at a 90 degree angle
to the Quilt Maker 15 spool pin and pointing out to the right of the machine.
3. Tighten the thumbscrew.
4. Place spool of thread on the horizontal spool pin and thread machine normally.

janome.com Page 17
Operating Instructions
Power Switch
The main power switch is at the rear of the machine.
Turn on the main power switch first by toggling the switch from the O position (o) to the - position (on).
ÂIMPORTANT: When you are finished quilting, if you will not be using the machine for more than
a day, we recommend you turn o the main power switch and unplug the power cord from the
power source.
ÂIMPORTANT: Refer to the safety instructions.
Lighting
The Quilt Maker 15 includes bright LED lights above the needle to make it easy for you to see your
quilting. You can adjust the intensity of the lights to suit your environment.
Machine Needle
Use only the recommended needle system for your Quilt Maker 15 quilting machine. The machine is
timed to use this specific type of needle (System 134) which is designed to work with the high quilting
speeds and multi-directional stitching the Quilt Maker 15 oers.
The Quilt Maker 15 uses the 134 needle system. Note that the
needle has a round shank rather than a shank with a flat side, like
home sewing machines use.
If you use the recommended needle, you will experience:
• Fewer skipped stitches
• Less needle breakage
• Less thread breakage, especially at high speeds
• Less thread splicing or shredding
• Optimum fabric protection
ÂIMPORTANT: Change the needle regularly. We recommend you use a new needle for each new
quilt and any time the needle becomes bent, dull, or burred.
UCAUTION: A damaged needle may result in poor stitching quality or may even damage the
machine or your quilt.

Page 18 Quilt Maker 15 User Manual
2022.02
To change the Needle
1. Move the needle bar to the UP position by pressing the Needle Up/Down control on the handlebar.
2. Turn o all power to the machine.
3. Loosen the needle bar clamp screw with
the 2.5mm hex wrench.
4. Remove the old needle by pulling it down. Discard the old needle in a safe way.
5. With the scarf of the needle (indentation
at the back of the needle just above the
needle eye) facing the rear of the machine
and the long groove down the front of the
needle facing the front of the machine,
push the needle all the way up into the
needle bar until it stops. Check the sight
hole to verify that the top of the needle
can go up no farther.
Scarf at back of needle just above eye
Long groove at front of needle - shoulder to eye
UCAUTION: Check the needle to confirm it is fully inserted. The needle bar has a sight hole
above the needle bar clamp screw. Make sure the needle is touching the top of the sight hole.
If it is not all the way up, the machine timing will be o and it may be possible for the needle
to collide with internal parts, causing damage not covered by warranty.
6. Carefully tighten the needle bar clamp screw.
UCAUTION: Although you can use your fingers to tighten the needle bar clamp screw, we
recommend that after finger-tightening the screw, you use the 2.5mm hex wrench to tighten it just
a bit more. The Quilt Maker 15 runs at very high speeds and this ensures the needle will not loosen
while quilting. However, do not over-tighten the needle clamp screw, as this may strip the threads
of the screw. (Stripped threads are not covered under the warranty. It may also become dicult to
insert the needle properly into the needle bar if threads are stripped.) Once the screw no longer
turns freely by hand, gently turn the hex tool until the screw is tightened snuggly.
Sight hole
Needle bar
clamp screw

janome.com Page 19
Needle Size Thread Size
12 and 14 monofilament, 100 wt. silk, 60 wt. polyester, mylar
16 monofilament, mylar, 100 wt., 80 wt., 60 wt., 50 wt., 40 wt. silk, polyester
and cotton thread
18 40 wt. cotton and polyester, 30 wt. cotton and polyester
19 and 21 Any thread 30 wt. and heavier such as 12 wt., 19 wt., 30 wt.
QUILTING TIP: A size 16/100 needle will accommodate most threads and fabrics. Heavier
threads, such as top stitch and some decorative threads, require a larger needle such as 18/110
or 21/130. Lofty batting and heavier fabrics such as denim, canvas, or densely woven fabric may
also require a larger needle.
Hopping Feet
Your machine comes with two hopping feet: a ruler foot (comes installed) and an open-toe foot. Use the
ruler foot for everyday quilting and ruler work, and use the open-toe foot when you need greater stitch
visibility (such as when you are micro quilting).
To change the hopping foot
1. Turn o all power to the machine
2. Raise the needle and foot to their highest
position. Remove the foot that is on the mount
by using the 2.5mm hex wrench to loosen the
mounting screw far enough that you can slide
the foot o of the mount.
3. Slide the desired foot onto the mount. Note
that the opening on the side of the foot is lined
up with the screw. Push the foot up as far as it
will go.
4. Fully tighten the screw with the
2.5mm hex wrench.

Page 20 Quilt Maker 15 User Manual
2022.02
ÂIMPORTANT: The Moxie does not have a presser foot lever, or top tension release, like a home
sewing machine. On a home sewing machine the top tension is released when the presser
foot is raised, allowing the thread to come freely out of the machine. When a home machine
is threaded the tension discs are released and open to allow the thread to easily fall between
the tension discs. This isn’t the case with the Quilt Maker 15 machine. The top tension is always
engaged and the tension discs are never open. Therefore the thread must be pulled up, or
flossed, between the tension discs or it will stay outside the discs and float without tension,
causing serious stitch quality problems and/or thread nests.
Optional Accessory: Janome Feet
Janome oers several optional accessory feet that can be used for everyday quilting as well as special
techniques. Explore the possibilities with these videos.
Bobbin and Bobbin Tension
The Quilt Maker 15 quilting machine uses M-class bobbins that are much larger than home sewing
machine L-class bobbins. The larger bobbins hold more thread and enable you to quilt for a longer
time between bobbin changes.
To wind the Bobbin
The Quilt Maker 15 comes with a separate bobbin winder. For full instructions about using the bobbin
winder, see the instruction manual that is packaged with the bobbin winder.
To insert the bobbin into the bobbin case
UCAUTION: To prevent personal injury, always turn o the power switch while inserting
and/or removing the bobbin case or anytime your hands are near the needle area, such
as when you change the needle or the hopping foot.
1. Place the bobbin in the bobbin case
so the thread is wound clockwise and
coming o top right.
Table of contents
Other Janome Sewing Machine manuals

Janome
Janome 385.4052LX200 User manual

Janome
Janome Jubilee 60507 User manual

Janome
Janome 5300QDC User manual

Janome
Janome myLock 134D User manual

Janome
Janome MW 3018 User manual

Janome
Janome Magnolia 7312 User manual

Janome
Janome Jem Platinum 720 User manual

Janome
Janome Horizon Memory Craft 12000 User manual

Janome
Janome MC8200QC User manual

Janome
Janome MC230E User manual

Janome
Janome MS5027PR User manual

Janome
Janome SEW MINI DELUX User manual

Janome
Janome MC6600P User manual

Janome
Janome ME 4023 User manual

Janome
Janome AQS2009 User manual

Janome
Janome Skyline S7 User manual

Janome
Janome 900 User manual

Janome
Janome ME 4014 User manual

Janome
Janome DC2010 User manual

Janome
Janome DC6030 User manual