Jarvis AN-10K1 User manual

JARVIS
TABLE OF
CONTENTS Page.........................
EQUIPMENT
SELECTION Ordering No..............
•Notice to Employer and Safety Director 2.......
•Notice to Operators, Maintenance
and Cleanup Personnel 3.....................
•Parts Diagram and List 4.....................
•Specifications 6.............................
•Installation Instructions 6.....................
•Operation Instructions 7......................
•Maintenance Instructions 7...................
•Trouble Shooting Chart 11....................
PRODUCTS CORPORATION
33 ANDERSON ROAD, MIDDLETOWN, CONNECTICUT 06457--4926
TEL. 860--347--7271 FAX. 860--347--6978 WWW. jarvisproducts.com
6244001:
Pneumatic Stunner
Model AN--10K1
AN--10K1 Stunner 4044003........
Model AST--100 Tester 4016003.......
Filter / Regulator / Lubricator 3022100...
Balancer 4042045..............
®

noticetoemployer
and safety director
page 2 of 12
Model AN--10K1
JARVIS
6244001:
®PRODUCTS CORPORATION
33 ANDERSON ROAD, MIDDLETOWN, CONNECTICUT 06457--4926
TEL. 860--347--7271 FAX. 860--347--6978 WWW. jarvisproducts.com
NOTICE TO EMPLOYER AND SAFETY DIRECTOR
AVOID INJURY
1. Remove and repair any tool that malfunctions. All personnel must be instructed to remove any mal-
functioning equipment.
2. Ensure that all employees who use this tool are trained in the proper use of this tool and are aware of
the dangers that may arise if they do not follow procedures outlined in this brochure.
3. Ensure that all employees are instructed not to walk in front of the tool during its use; and to never put
fingers, hands or other parts of the body directly in front of the tool.
4. Enclosed are four (4) copies of “NOTICE TO OPERATORS, MAINTENANCE AND CLEANUP PER-
SONNEL.” Post one copy on the employees’ bulletin board; give one copy to the operator(s); give one
copy to the maintenance foreman; and give one copy to the sub--contract cleanup / internal cleanup fore-
man. Additional copies will be provided upon request.
5. The tool is designed and intended to be powerful. This fact should be obvious to your employees, but
you must emphasize it to them.
6. Ensure eye and ear protection is worn at all times when operating the tool.
7. Never make modifications or alterations to the tool. Replace any missing or illegible labels.
8. Ensure that proper procedures are established in accordance with OSHA’s lockout/tagout procedures
(29 CFR 1910.147) to prevent accidental startup or release of stored energy.
9. Follow our installation and maintenance instructions for proper installation and care of the tool.
10. Avoid injury. Do not permit the tool to be misused.
11. If you resell or distribute a Jarvis product, you must provide the purchaser with the appropriate safety
sheets and tool brochure. Additional copies of safety sheets and tool brochures will be provided upon
request.
Keep body parts clear

notice to operators, maintenance
and cleanup personnel
page 3 of 12 Model AN--10K1
JARVIS
6244001:
®PRODUCTS CORPORATION
33 ANDERSON ROAD, MIDDLETOWN, CONNECTICUT 06457--4926
TEL. 860--347--7271 FAX. 860--347--6978 WWW. jarvisproducts.com
NOTICE TO OPERATORS, MAINTENANCE AND CLEANUP PERSONNEL
ANY MALFUNCTIONING TOOL MUST BE REMOVED FROM SERVICE
REPORT ANY PROBLEMS TO YOUR SUPERVISOR
1. Disconnect air hose in accordance with OSHA’s lockout/tagout procedures (29 CFR 1910.147) before
performing any repair or maintenance.
2. Disconnect air hose -- or have the air hose disconnected -- in accordance with OSHA’s lockout/tagout
procedures (29 CFR 1910.147) before performing any cleanup.
3. Disconnect air hose when the tool is not being used.
4. Never put fingers, hands or other parts of the body directly in front of the tool.
5. Always wear eye and ear protection when operating the tool.
6. Always keep operator’s head a safe distance away and off to one side of the tool when stunning to avoid
injury from the tools recoil.
7. Test the tool prior to use or daily. Using the Jarvis Stunner Tester is the preferred testing method; howev-
er the following procedure can also be used: Squeeze the trigger and depress the trigger contact bushing
against an unmounted rubber tire to activate the tool. If the tool malfunctions, remove it from service
and report or repair it immediately.
8. Never squeeze the trigger unless you want to use the tool.
9. Never make modifications or alterations to the tool. Replace any missing or illegible labels.
Keep body parts clear

parts diagram and list
page 4 of 12
Model AN--10K1
JARVIS
6244001:
®PRODUCTS CORPORATION
33 ANDERSON ROAD, MIDDLETOWN, CONNECTICUT 06457--4926
TEL. 860--347--7271 FAX. 860--347--6978 WWW. jarvisproducts.com
1
2
3
4
5
7
8
9
10
11
12 13
14
15
16
17 18 19 20 21
6
22
23
24
25
26
27
28
29
8
30
31
32 33
34
35
36
37
38
39
38
40
41
42
43
44
45
46
6
47
48
49
50
29
51
52
53
54
53
55
56
57
58
59
60
61
62
*
**
**
* Tighten to 56 lbf--ft
** Tighten to 7.4 lbf--ft
(76 N--m)
(10 N--m)
63
Figure A
64

parts diagram and list
page 5 of 12 Model AN--10K1
JARVIS
6244001:
®PRODUCTS CORPORATION
33 ANDERSON ROAD, MIDDLETOWN, CONNECTICUT 06457--4926
TEL. 860--347--7271 FAX. 860--347--6978 WWW. jarvisproducts.com
1 1036282 Trigger Contact Bushing 1
2 1014179 Compression Spring 1
3 1055056 Hex Head Screw 4
4 1004387 Lock Washer 8
5 1042496 Hanger Bracket 1
6 1054184 Shoulder Screw 2
7 1002459 Cylinder Cover 1
8 1035403 O--ring 2
9 1036281 Rod Guide Bushing 1
10 1036280 Bushing 1
11 1061901 Bumper 1
12 1035599 Packing Seal 1
13 1016598 Main Housing 1
1017382 Danger Label, Impact 1
14 1054183 Locking Screw 2
15 1065071 Locking Piston 1
16 1061898 Valve Plug 1
17 1035601 O--ring 1
18 1014178 Compression Spring 1
19 1035600 O--ring 1
20 1035245 O--ring 1
21 1035598 Packing Seal 1
22 1022266 Sliding Valve 1
23 1029395 Piston Spacer 1
24 1035604 O--ring 1
25 1007360 Special Nut 1
26 1065072 Locking Piston 1
3065020 Penetrator Shaft Assembly
(includes items 23--27)
27 1020347 Penetrating Shaft 1
28 1035606 O--ring 1
29 1035605 O--ring 2
30 1009168 Housing Cylinder 1
31 1061899 Muffler 1
32 1035602 O--ring 1
33 1011186 Quick Connect Socket 1
34 1011185 Quick Connect Plug 1
35 1007359 Hex Lock Nut 1
36 1055950 Hex Head Screw 1
37 1022264 Release Valve Assembly 1
(includes items 38, 39, 40,
and 41)
3022093 Release Valve Assembly 1
with Trigger (includes
items 37, 42 and 43)
38 1035603 O--ring 2
39 1018158 Lever Yoke 1
40 1018159 Rocker Lever 1
41 1010487 Roll Pin 1
42 1018160 Trigger Lever 1
43 1010488 Lever Pin 1
44 3020053 Trigger Firing Shaft Assy. 1
45 1010490 Roll Pin 1
46 1007361 Hex Lock Nut 2
47 1007302 Hex Lock Nut 1
48 1059138 Hose Assembly, Coiled 1
49 1009167 Upper Valve Sleeve 1
50 1061900 Packing Ring 1
51 1035609 O--ring 1
52 1035607 O--ring 1
53 1035608 O--ring 2
54 1022267 Valve Case 1
3022097 Valve Case with O--rings
items 52 and 53
55 1036279 Catch Bushing 1
56 1015014 Air Deflector 1
57 1035610 O--ring 1
58 1002458 Housing Cover 1
59 1004453 Lock Washer 4
60 1055095 Socket Head Cap Screw 4
61 1042495 Safety Bracket 1
1017061 Name and Info Label 1
1055274 Drive Screw 4
62 1042497 Hanger Bracket 1
63 1010489 Valve Retaining Pin 1
64 1050602 Reducing Bushing 1
3035071 Seal Kit (items 8, 12, 17--20,
24, 28--30, 32 ,51--53 & 57)
ITEM PART NO. PART NAME QTY

specifications and
installation instructions
page 6 of 12
Model AN--10K1
JARVIS
6244001:
®PRODUCTS CORPORATION
33 ANDERSON ROAD, MIDDLETOWN, CONNECTICUT 06457--4926
TEL. 860--347--7271 FAX. 860--347--6978 WWW. jarvisproducts.com
SPECIFICATIONS
Operating Pressure 150--175 psi 10--12 bar
Air Consumption (per cycle) 0.42 ft310 L
Penetrating Shaft Diameter 0.63 in 16 mm
Control Handle Pneumatic
Overall Dimensions (l x w x h)
16 x 9.5 x 16.5 in
406 x 241 x 419 mm
Weight 19.5 lbs 8.8 kg
INSTALLATION INSTRUCTIONS
IMPORTANT: ALWAYS DISCONNECT AIR HOSES IN
ACCORDANCE WITH OSHA’S LOCKOUT/TAGOUT
PROCEDURES (29 CFR 1910.147) BEFORE
PERFORMING ANY MAINTENANCE OR REPAIRS.
ALL WIRING MUST BE DONE IN ACCORDANCE WITH
NATIONAL, STATE AND LOCAL ELECTRICAL CODES.
Refer to Figure A on page 4 for numbered items.
1Install compressor:
1.1 Install compressor in a location that allows good
air circulation and easy access from stunning
box.
1.2 Install an air filter--regulator--lubricator at the op-
erator’s station. Jarvis part number 3022100 is
available.
1.3 Install hose assembly (item 48) to air filter--regu-
lator--lubricator. Refer to Figure 1.
2 Install balancer:
2.1 Install a balancer over the stunning box to sus-
pend AN--10K1. Jarvis part number 4042045 is
available.
3 Install AN--10K1 Pneumatic Stunner:
3.1 Mount stunner (with balancer) hanging from a
rail that allows movement lengthways across the
stunning box. Refer to Figure 2.
4 Fill the air filter--regulator--lubricator:
4.1 Use SAE 10 oil approved for USDA H1 service
to lubricate the air and to extend service life of
bumper (item 11).
Figure 1
Compressor
Air Pressure Line
Air--Filter--Regulator-- Lubricator
Hose Assy.
AN--10K1
Pneumatic
Stunner
Figure 2
Approx. 6.5 ft (2 m)
Rail
Hose Assy.
Balancer
Approx. 8 to 12 inches (200 to 300 mm)
Stunning Box
4.2.Adjust the lubricator to obtain approximately one
drop of oil for every three uses of the stunner.
5 Connect stunner to air pressure line:
Note: Make sure air supply valve is closed before con-
necting hose assembly to the air--filter--regulator--lubri-
cator; and that the system’s operating air pressure is a
minimum 150 psi (10.3 bar). If operating air pressure
falls below 150 psi, the release valve assembly (item 37)
will not close and air will escape.

installation, operation, and
maintenance instructions
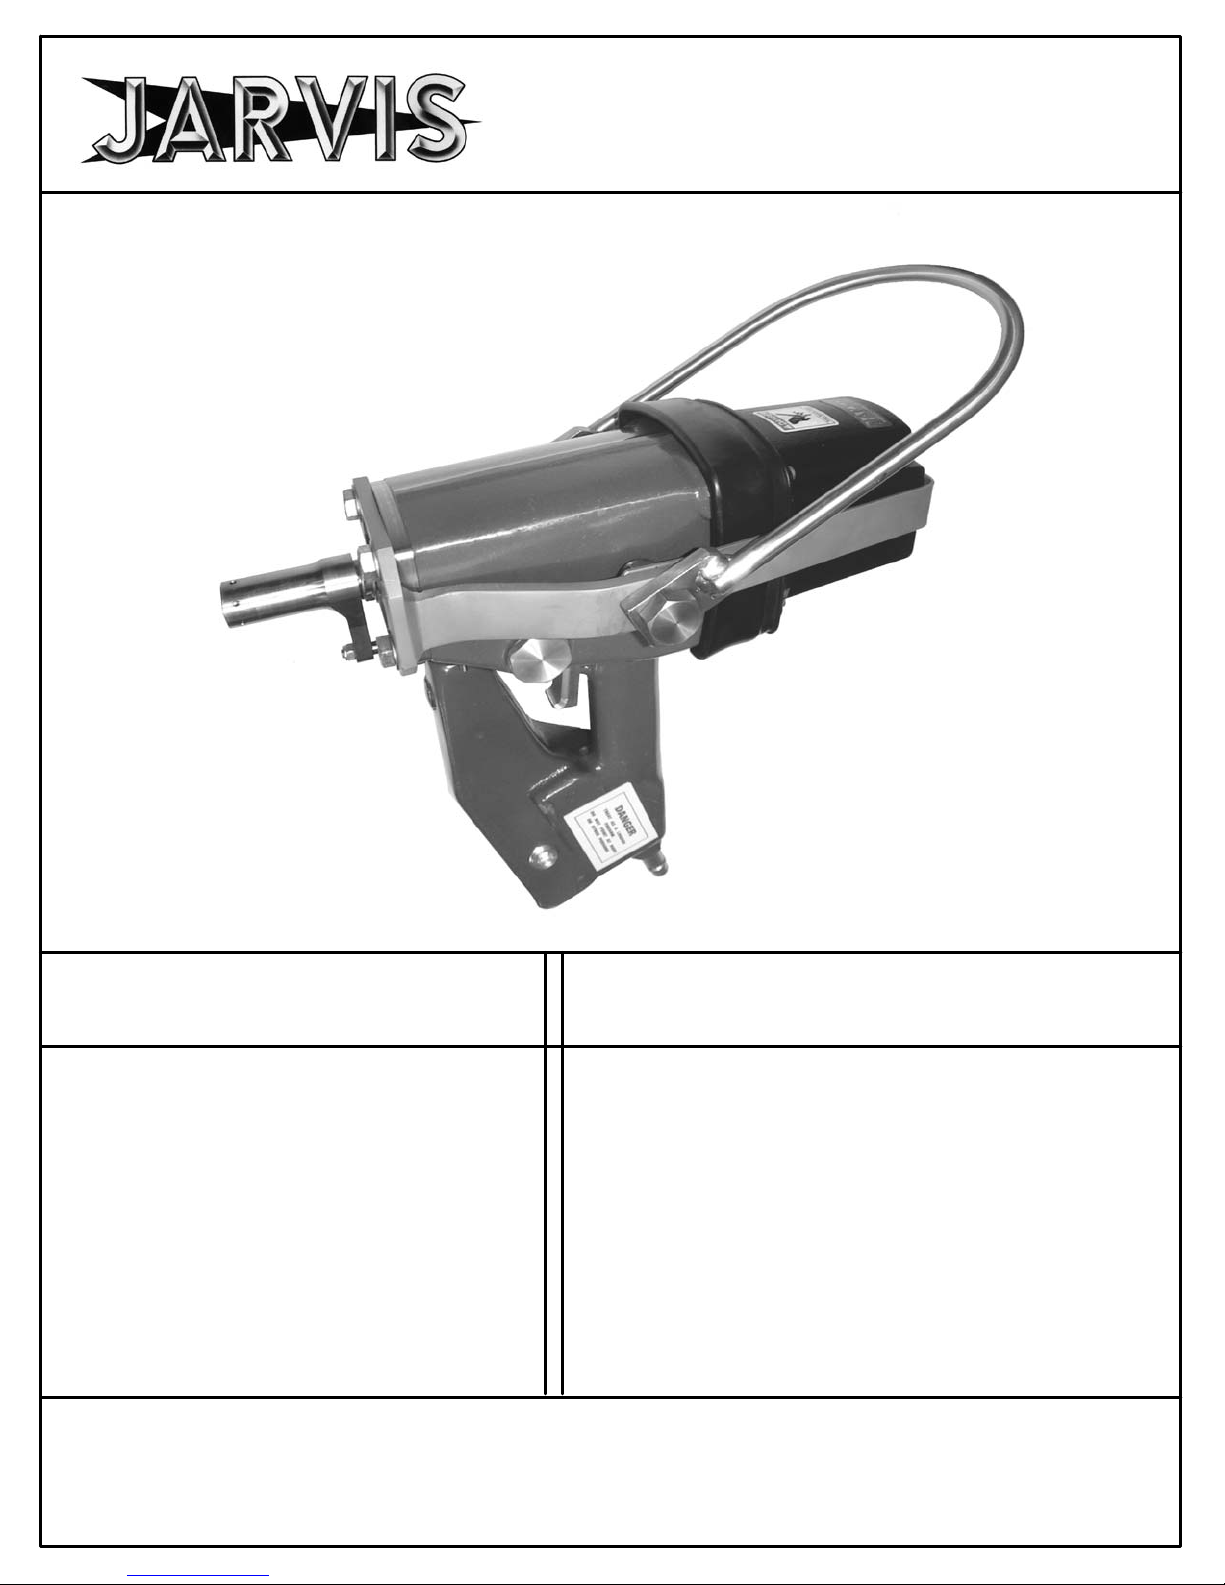
page 7 of 12 Model AN--10K1
JARVIS
6244001:
®PRODUCTS CORPORATION
33 ANDERSON ROAD, MIDDLETOWN, CONNECTICUT 06457--4926
TEL. 860--347--7271 FAX. 860--347--6978 WWW. jarvisproducts.com
5.1 Make sure trigger lever (item 42) and trigger con-
tact bushing (item 1) move freely before the
stunner is connected to the air pressure line.
5.2 Connect quick connect socket (item 33) on stun-
ner to hose assembly (item 48).
OPERATION INSTRUCTIONS
Eye and ear protection must be worn at all times while
operating the AN- 10K1 Pneumatic Stunner.
Note: Always disconnect quick connect socket (item
33) from hose assembly (item 48) when tool is not being
used.
Operating air pressure must be maintained between a
minimum 150 psi (10.3 bar) and a maximum 175 psi
(12.1 bar). Air pressure must never exceed 175 psi.
Installation of a safety valve on the air line will prevent
air pressure from exceeding the maximum pressure.
1Connect air hose.
2Each day, before you begin operation, go through
the following check list:
2.1 Make sure that the compressed air supply is at the
proper pressure and that the lubricator is up to the
full mark.
Note: Keep body parts away from contact bushing
(item 1) when trigger is activated.
2.2 Make sure the tool is working correctly. Use
Jarvis AST--100 Stunner Tester to insure pene-
trating shaft (item 27) is traveling at the proper
speed. As an alternative, the following proce-
dure can be used: Squeeze the trigger lever
(item 42) and displace the contact bushing (item
1) against an unmounted rubber tire. If the tool
malfunctions, remove it from service and report
the problem to your supervisor immediately.
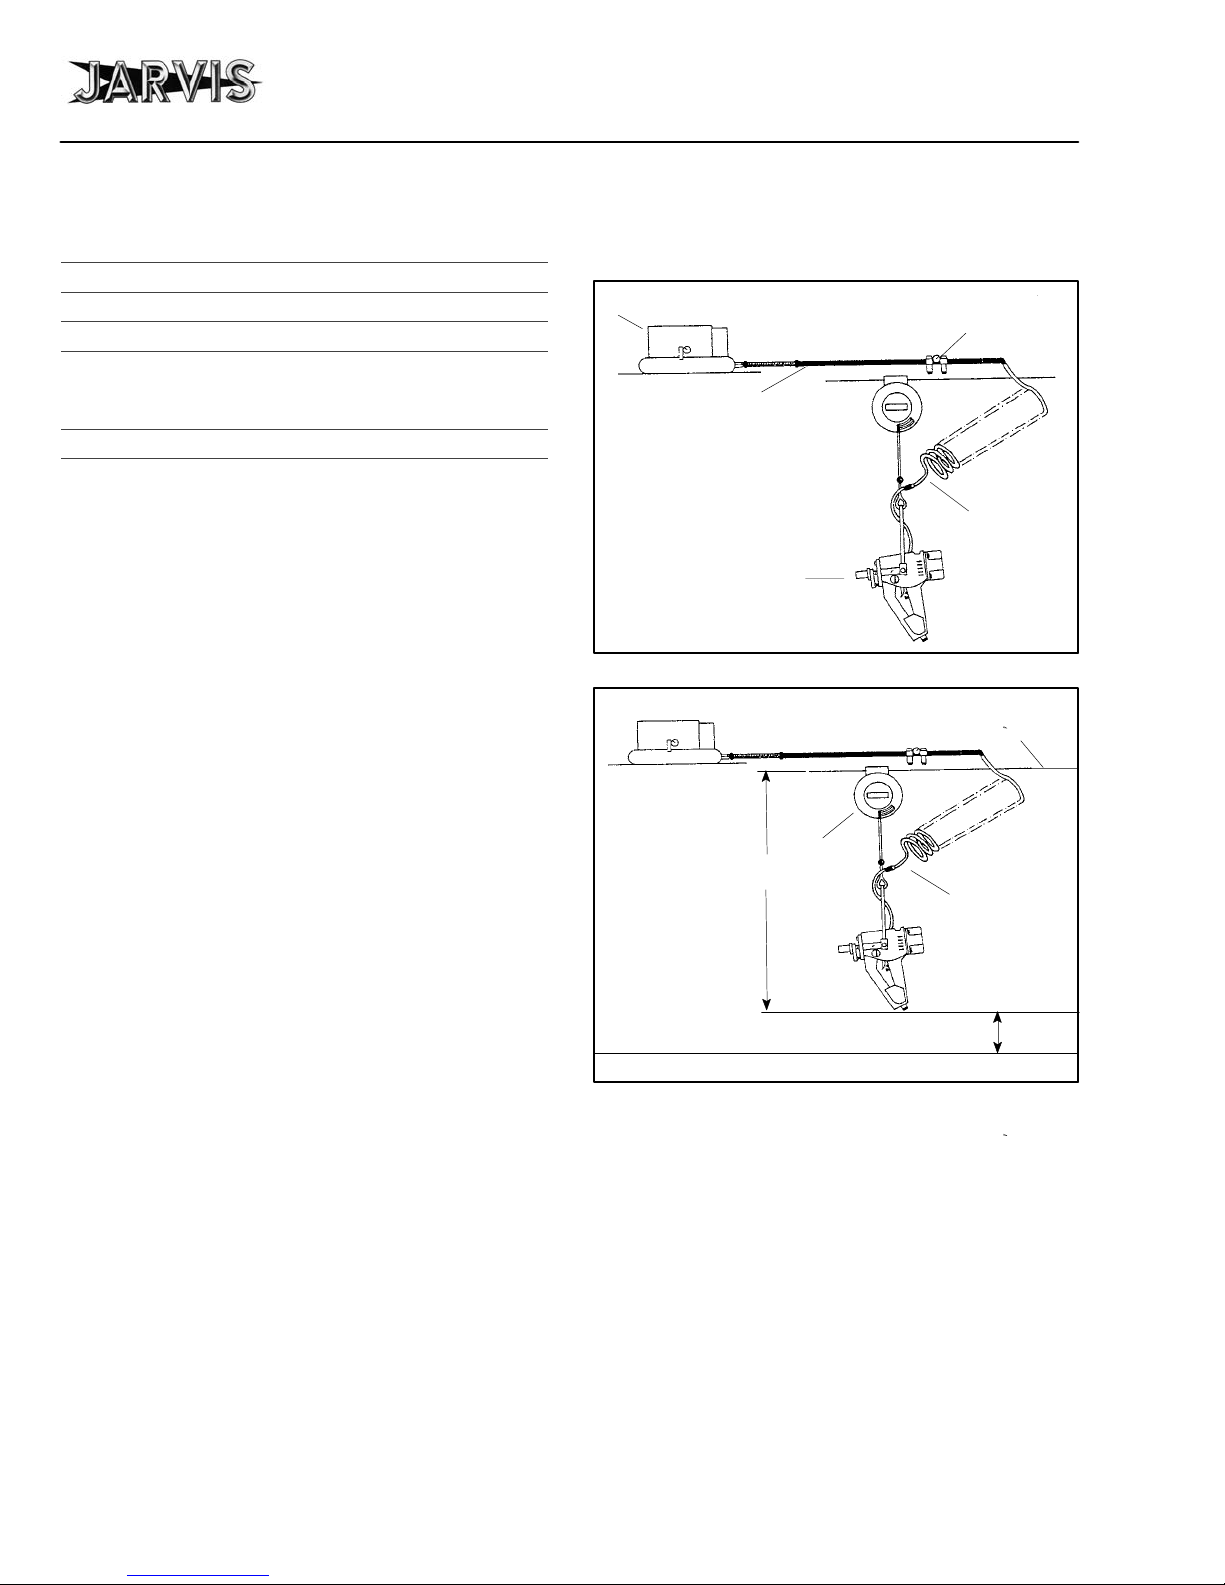
3 Use hanger bracket (item 62) to guide stunner to the
animal’s head.
Note: Operator’s head must be a safe distance away
and on one side of the stunner when the stunner is in
use to avoid any injury from tool’s recoil.
Keep hands away from the trigger contact bushing area
(item 1) when penetrating shaft (item 27) is activated.
4 Squeeze trigger lever (item 42).
5 Position the AN--10K1 stunner directly on the ani-
mal’s head to activate trigger contact bushing (item
1) and release penetrating shaft (item 27) .
6 After penetratingshaft (item 27) isreleased andani-
mal is stunned, remove trigger contact bushing
(item 1) from the animal’s head.
7 Repeat procedure for next animal placed in stun-
ning box.
Note: If penetrating shaft (item 27) does not go back
automatically to its original position after animal is
stunned, the stunner must be fired again without being
in contact with the animal’s head. Point stunner in a
safe direction, away from the animal and people. Si-
multaneously squeeze trigger lever (item 42) and move
trigger firing shaft assembly (item 44) in direction of
main housing (item 13).
8 Disconnect quick connect socket (item 33) from
hose assembly (item 48) after stunning has been
completed.
MAINTENANCE INSTRUCTIONS
ALWAYS DISCONNECT THE AIR SUPPLY IN ACCOR-
DANCE WITH OSHA’S LOCKOUT/TAGOUT PROCE-
DURES (29 CFR 1910.147) BEFORE PERFORMING ANY
MAINTENANCE OR REPAIRS.
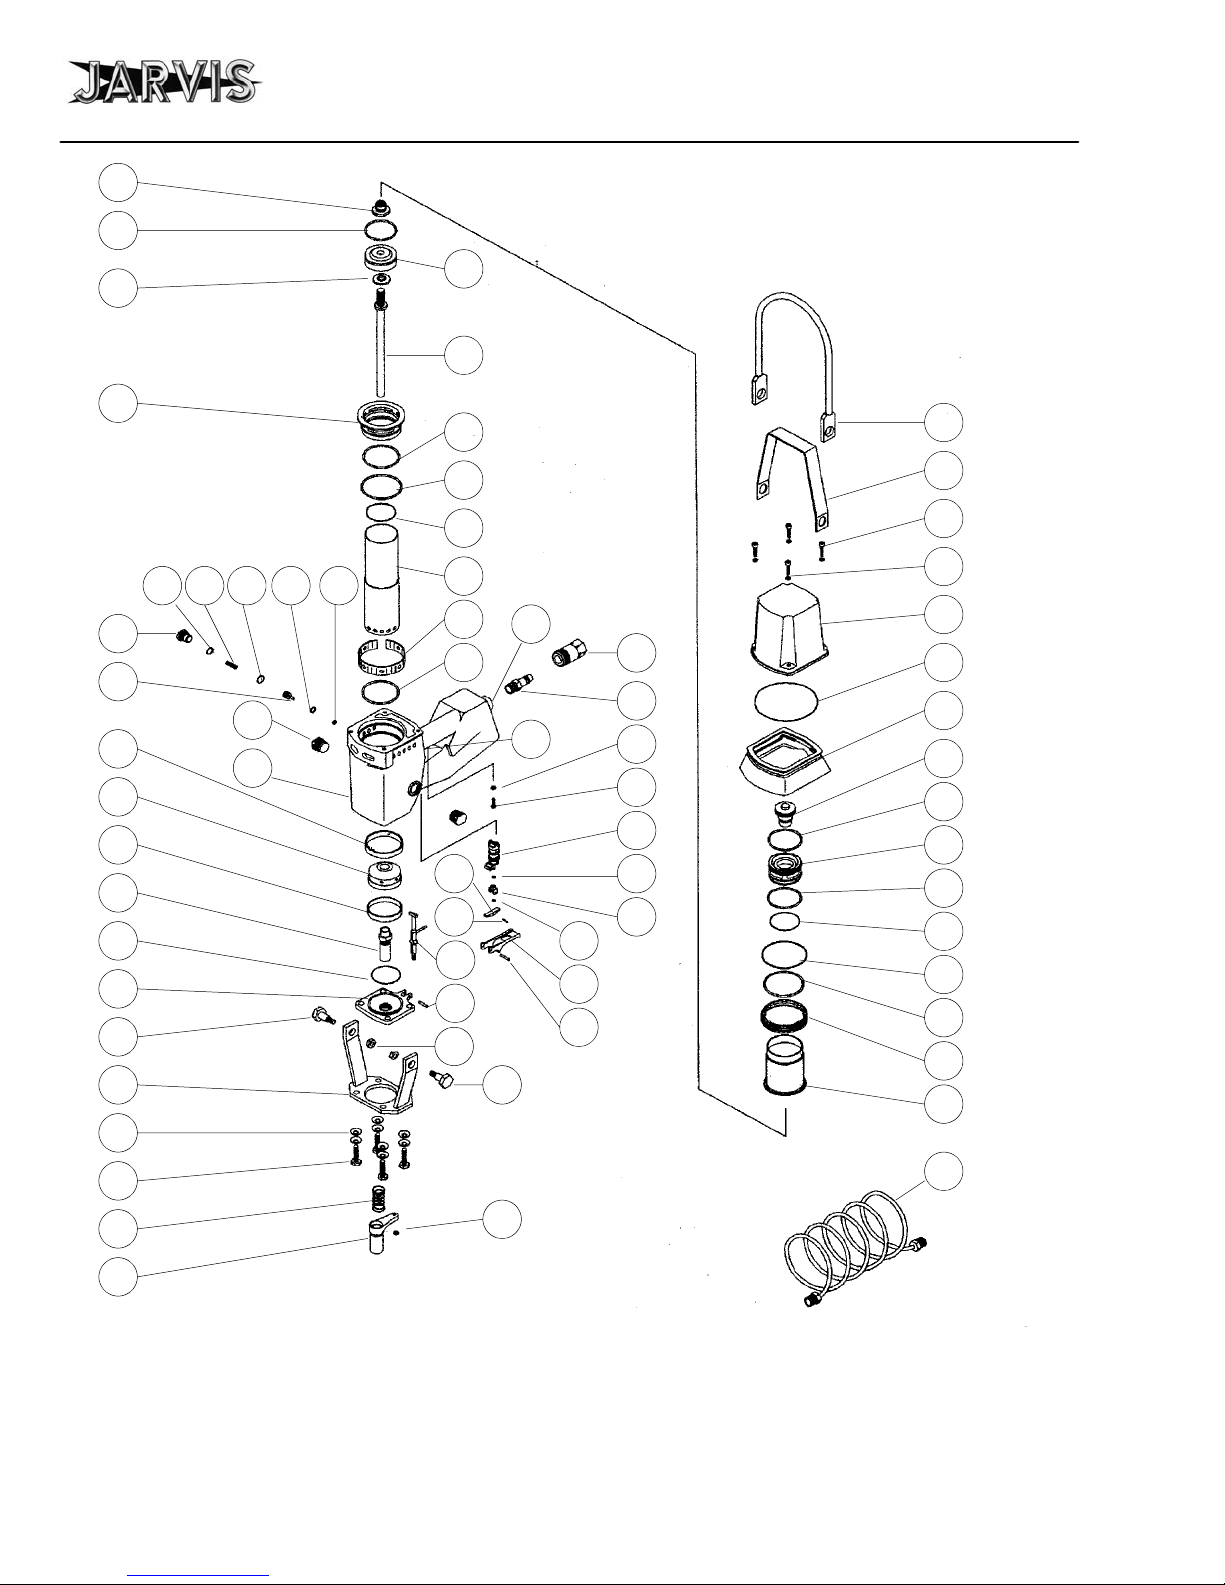
Refer to Figures A on pages 4 for referenced items.
Refer to Figure B, Trouble--shooting Chart, on page 10
for trouble--shooting procedures.
Always disconnect quick connect socket (item 33)from
hose assembly (item 48) before attempting any mainte-
nance or repairs.
Note: When testing stunner after completing mainte-
nance or repair procedures, operating air pressure can-
not be lower than 70 psi (4.8 bar).

maintenance instructions
page 8 of 12
Model AN--10K1
JARVIS
6244001:
®PRODUCTS CORPORATION
33 ANDERSON ROAD, MIDDLETOWN, CONNECTICUT 06457--4926
TEL. 860--347--7271 FAX. 860--347--6978 WWW. jarvisproducts.com
1DAILY:
1.1 Check tightness and condition of hex head
screws (item 3) and socket head screws (item 60).
Replace if necessary.
1.2 Check condition and operating smoothness of
trigger contact bushing (item 1), trigger firing
shaft assembly (item 44), release valve assembly
(item 37), rocker lever (item 40) and trigger lever
(item 42). Lubricate or replace if necessary.
2WEEKLY:
2.1 Check condition of housing cover (item 58). Re-
place if necessary.
2.2 Check condition of catch bushing (item 55). Re-
place if necessary. Refer to penetrating shaft dis-
assembly, section 3.
2.3 Check condition of o--rings (item 53), valve case
(item 54), packing ring (item 50) and upper valve
sleeve (item 49) for dirt, wear or damage. Re-
place if necessary. Refer to penetrating shaft dis-
assembly, section 3.
2.4 Check condition of bumper (item 11). Replace if
necessary. Refer to bumper disassembly, section
5.
Note: Bumper has an approximate service life of 5000 --
6000 cycles.
2.5 Check end of penetrating shaft (item 27) for wear
or damage. Replace if necessary. Refer to pene-
trating shaft disassembly, section 3.
2.6 Wash all parts thoroughly and lubricate with
SAE 10 oil approved for USDA H1 service.
3PENETRATING SHAFT DISASSEMBLY:
3.1 Remove shoulder screws (item 6) and hex lock
nuts (item 46) from hanger bracket (item 5).
3.2 Remove safety bracket (item 61) and hanger
bracket (item 62).
3.3 Remove socket head screws (item 60) that secure
housing cover (item 58) to unit.
3.4 Remove housing cover (item 58).
3.5 Remove o--ring (item 57) and air deflector (56).
3.6 Remove penetrating shaft assembly (items
23--27).
3.7 Remove catch bushing (item 55).
3.8 Remove o--rings (item 53), valve case (item 54),
packing ring (item 50) and upper valve sleeve
(item 49).
3.9 Remove special nut (item 25), o--ring (item 24),
locking piston (item 26) and piston spacer (item
23) from penetrating shaft (item 27).
4PENETRATING SHAFT INSTALLATION:
4.1 Reverse steps and procedures outlined in section
3. See special notes below:
4.1.1 Make sure safety bracket (item 61) and hang-
er bracket (item 62) are correctly installed
onto hanger bracket (item 5).
4.1.2 Install and tighten hex lock nuts (item 46)
to 7.4 lbf--ft (10 N--m).
4.1.3 Install and tighten socket head screws
(item 60) with lock waster (item 59) to 7.4
lbf--ft (10 N--m).
4.1.4 Make sure o--ring (item 57) is correctly
installed into groove of housing cover (item
58). Adhesive may be used to install the o--
ring into the groove.
5BUMPER DISASSEMBLY:
5.1 Remove shoulder screws (item 6) and hex lock
nuts (item 46) from hanger bracket (item 5).
5.2 Remove safety bracket (item 61) and hanger
bracket (item 62).
5.3 Remove socket head screws (item 60).
5.4 Remove housing cover (item 58).
5.5 Remove o--ring (item 57) and air deflector (56).
5.6 Remove penetrating shaft assembly (items
23--27, and 49--55).
5.7 Remove sliding valve (item 22), housing cylin-
der (item 30) and muffler (item 31).

maintenance instructions
page 9 of 12 Model AN--10K1
JARVIS
6244001:
®PRODUCTS CORPORATION
33 ANDERSON ROAD, MIDDLETOWN, CONNECTICUT 06457--4926
TEL. 860--347--7271 FAX. 860--347--6978 WWW. jarvisproducts.com
5.8 Remove o--ring (item 32) and packing seal (item
12).
5.9 Remove bumper (item 11). Replace if necessary.
6BUMPER INSTALLATION:
6.1 Reverse steps and procedures outlined in section
5. See special note below:
6.1.1 Make sure o--ring (item 32) is correctly
installed and centered with thinner portion of
housing cylinder (item 30).
7RELEASE VALVE DISASSEMBLY:
7.1 Remove hex lock nut (item 47) that secures trig-
ger firing shaft assembly (item 44) to trigger con-
tact bushing (item 1).
7.2 Remove trigger firing shaft assembly (item 44).
7.3 Remove release valve assembly (item 37).Re-
place if necessary.
8RELEASE VALVE INSTALLATION:
8.1 Reverse steps and procedures outlined in section
7. See special notes below:
8.1.1 Lubricate o--rings (item 38) with SAE 10 oil
approved for USDA H1 service prior to
installation.
8.1.2 Make sure that rocker lever (item 40) and trig-
ger lever (item 42) are correctly installed, and
trigger lever (item 42) easily contacts trigger
firing shaft assembly (item 44).
8.1.3 After installation, make sure distance be-
tween hex head screw (item 36) and main
housing (item 13) is adjusted to 0.60/0.63 in
(15/16 mm). Refer to Figure 3.
Figure 3
Trigger Firing Shaft Assy.
Rocker
Lever
Release Valve Assy.
Hex Head Screw
0.60/0.63 in
(15/16 mm)
9CYLINDER COVER DISASSEMBLY:
9.1 Remove hex lock nut (item 47) securing trigger
firing shaft assembly (item 44) to trigger contact
bushing (item 1).
9.2 Remove trigger firing shaft assembly (item 44).
9.3 Remove roll pin (item 45).
9.4 Remove trigger contact bushing (item 1) and
compression spring (item 2).
9.5 Remove hex head screws (item 3) and lock wash-
ers (item 4) securing hanger bracket (item 5) to
cylinder cover (item 7).
9.6 Remove shoulder screws (item 6) and hex lock
nuts (item 46) from hanger bracket (item 5).
9.7 Remove hanger bracket (item 5).
9.8 Remove cylinder cover (item 7). Use light taps
to separate cylinder cover from main housing
(item 13). Replace if necessary.
9.9 Remove o--ring (item 8), rod guide bushing (item
9) and bushing (item 10). Replace if necessary.
10 CYLINDER COVER INSTALLATION:
10.1 Reverse steps and procedures outlined in sec-
tion 9. See special notes below:
10.1.1 Make sure o--ring (item 8) is correctly
installed and is centered properly on cylinder
cover (item 7).
10.1.2 Make sure cylinder cover (item 7) is properly
seated on hanger bracket (item 5).

maintenance instructions
page 10 of 12
Model AN--10K1
JARVIS
6244001:
®PRODUCTS CORPORATION
33 ANDERSON ROAD, MIDDLETOWN, CONNECTICUT 06457--4926
TEL. 860--347--7271 FAX. 860--347--6978 WWW. jarvisproducts.com
10.1.3 Install and tighten hex lock nuts (item 46)
to 7.4 lbf--ft (10 N--m).
10.1.4 Install and tighten hex head screws (item 3)
to 56 lbf--ft (76 N--m).

trouble shooting chart
page 11 of 12 Model AN--10K1
JARVIS
6244001:
®PRODUCTS CORPORATION
33 ANDERSON ROAD, MIDDLETOWN, CONNECTICUT 06457--4926
TEL. 860--347--7271 FAX. 860--347--6978 WWW. jarvisproducts.com
Figure B
Trouble--shooting Chart
Problem Probable Cause Solution
Refer to Figure A, page 4 for referenced items.
Air escaping from air vent slots Damaged or contaminated o--rings Clean or replace o--rings
Lack of Power Low air pressure Check compressor or air
Damaged or contaminated o--rings Clean or replace o--rings
needs adjustment
Lubricate with SAE 10 oil approved
for USDA H1 service
completely to its original
position
Low air pressure Check compressor or air
Damaged or worn bumper (item 11) Replace bumper
Damaged or contaminated
Damaged or worn edge on Replace penetrating shaft
penetrating shaft (item 27)
Damaged, worn or misaligned
packing seal (item 12)
Replace or re--install packing seal
Incorrect installation of compressor
or air--filter--regulator --lubricator
Check connection between
compressor and air--filter--
regulator--lubricator, and
between lubricator and
Damaged or contaminated o--rings Clean or replace o--rings
(items 28, 29, 52 and 53)
(items 28, 29, 32, 51 and 53)
Damaged or worn release
valve assembly (item 37)
connections
Replace release valve assy.
Release valve assy. (item 37)
needs adjustment
Adjust release valve assembly
Damaged or contaminated upper
valve sleeve (item 49)
Clean or replace upper
valve sleeve
Release valve assy. (item 37),
sliding valve (item 22), upper valve
sleeve (item 49), and trigger
contact bushing (item 1) need
lubrication
needs adjustment or replacement
pressure line connections
Add lubricant to air filter--
regulator--lubricator
Damaged catch bushing (item 55) Replace catch bushing
o--rings (8, 24 and 32) Clean or replace o--rings
Damaged release valve assy. (item 37) Replace release valve assemblyAir escaping from release valve
(items 32, 29, 28, 53, and 51)
filter--regulator--lubricator
Air filter--regulator--lubricator
Adjust or replace release valve assembly.
Penetrating shaft remains
penetrating shaft
pneumatic stunner
stuck, or does not go back
Pneumatic stunner does not activate Lubricate parts with SAE 10 oil
approved for USDA H1 service
SeeFigure3,page9
SeeFigure3,page9

page 12 of 12
Model AN--10K1
JARVIS
6244001:
®PRODUCTS CORPORATION
33 ANDERSON ROAD, MIDDLETOWN, CONNECTICUT 06457--4926
TEL. 860--347--7271 FAX. 860--347--6978 WWW. jarvisproducts.com
PRODUCTS CORPORATION
33 ANDERSON ROAD, MIDDLETOWN, CONNECTICUT 06457--4926
TEL. 860--347--7271 •FAX. 860--347--6978 •WWW. jarvisproducts.com
®
JARVIS
6244001:
Table of contents
Other Jarvis Power Tools manuals